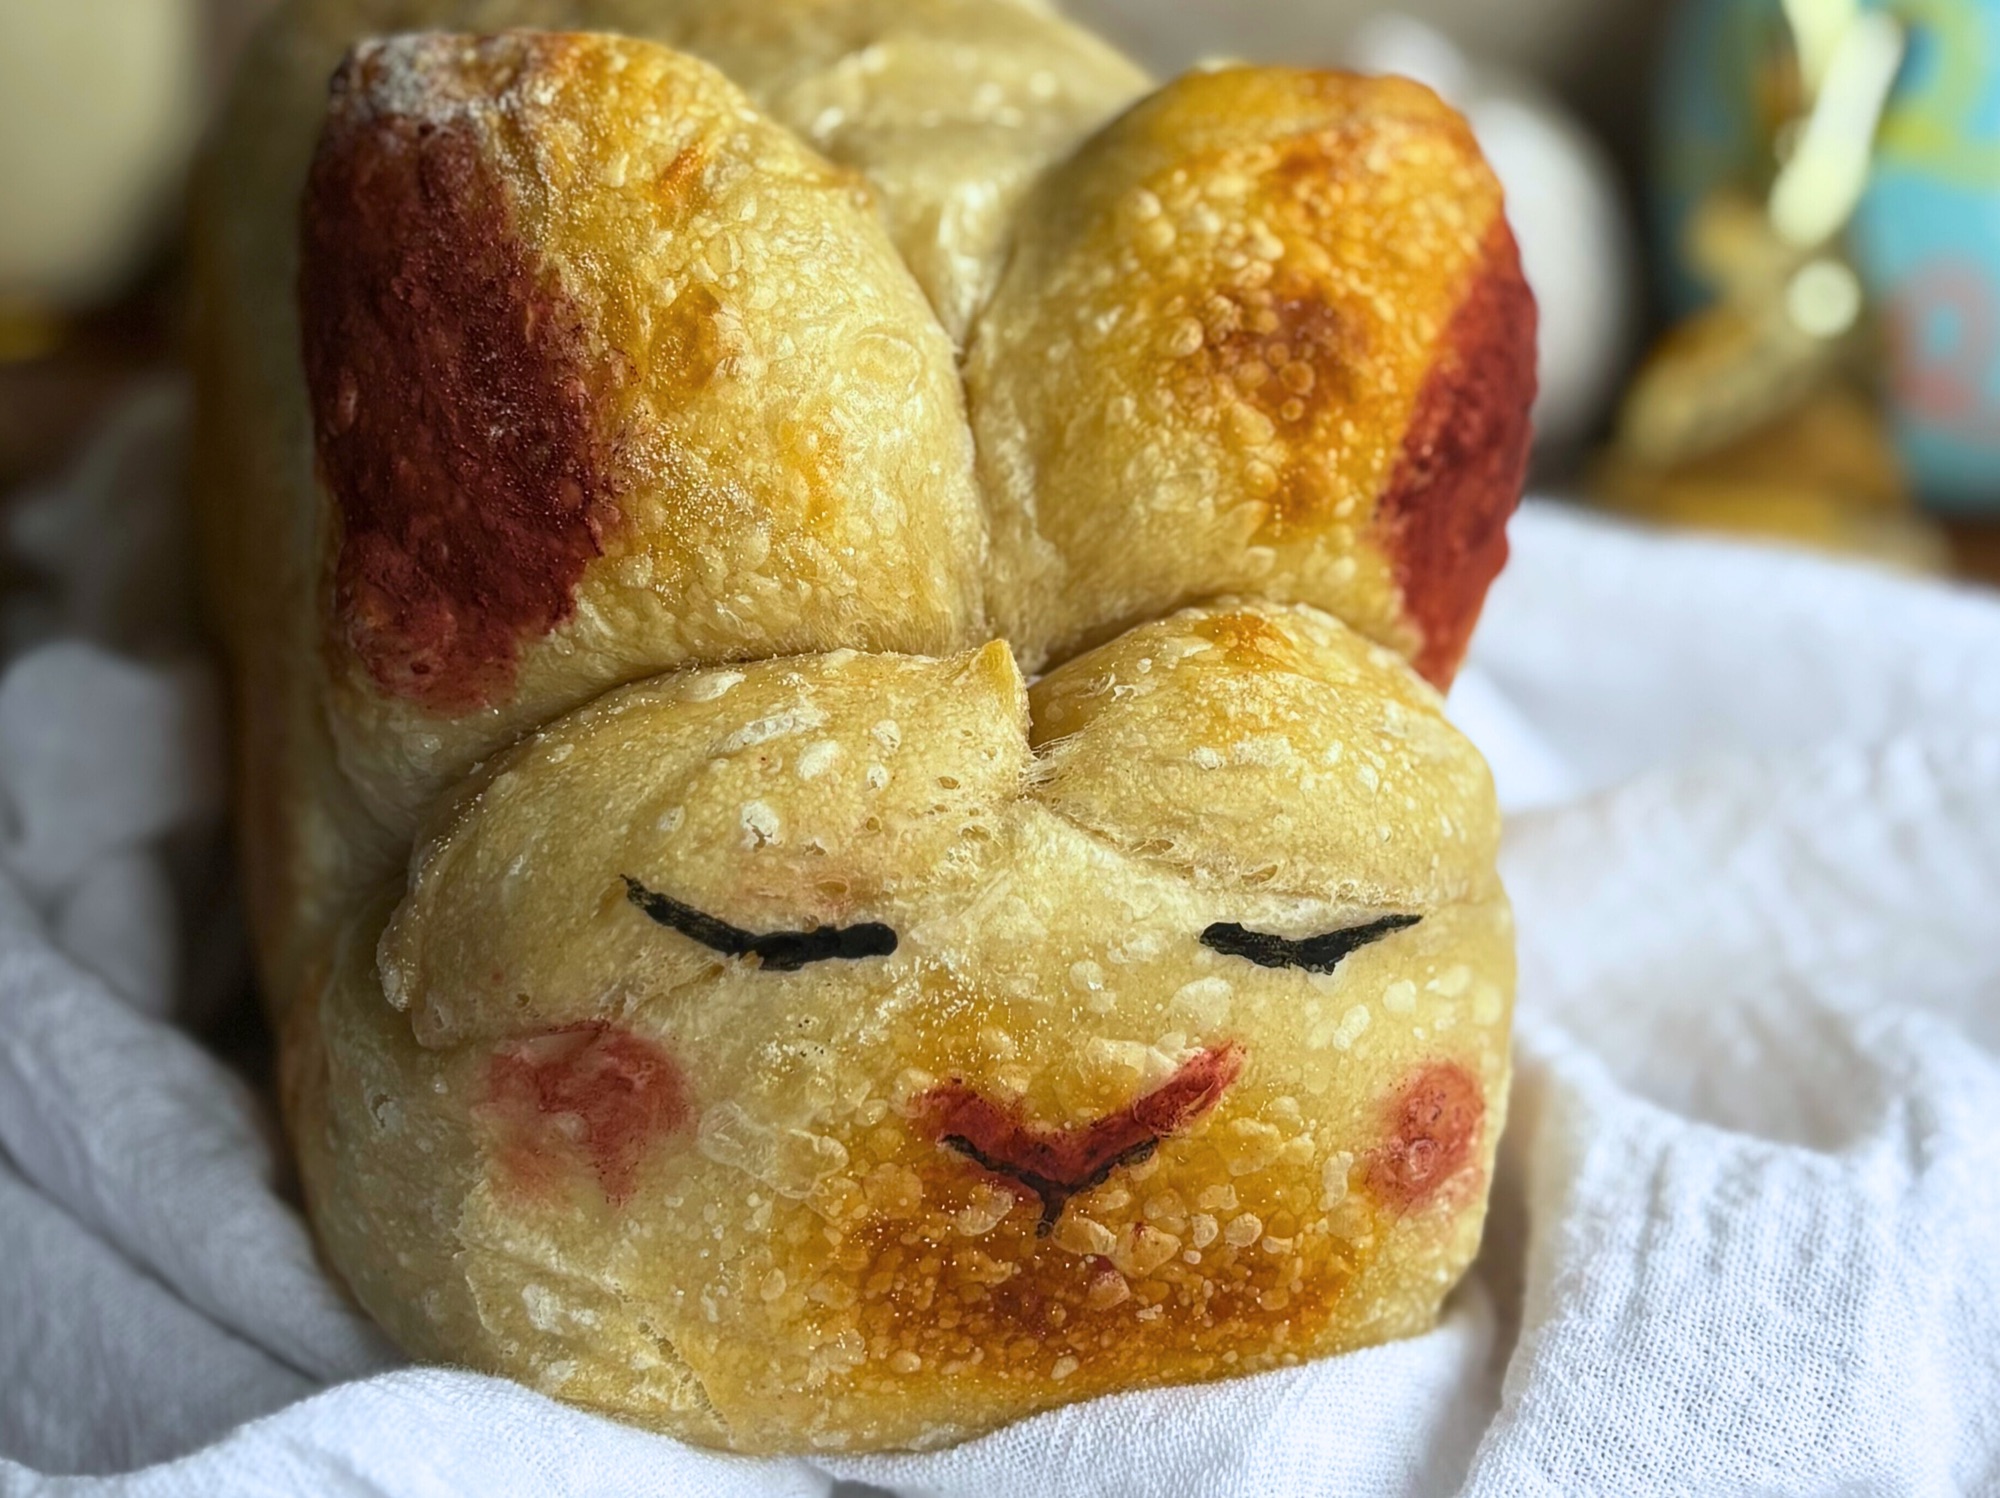
Everyone is making sourdough Easter bunnies right now, and honestly, for good reason. But most versions are free form boules baked in a Dutch oven, and if you are a loaf pan baker, that method was not made for you. I wanted to create a version that works with a standard loaf pan because I genuinely think it produces a cuter, more defined bunny shape. The loaf pan keeps the body structured and upright, the ears stand tall, and the little sleeping face holds its expression all the way through the bake. No spreading, no flopping, no guessing. Just an absolutely ridiculous little bread bunny that your family will not want to cut into.
This is a shaping and decorating tutorial built around a standard artisan sourdough boule. You will use your existing cold fermented dough, so if you do not have a go-to sourdough recipe yet, I have a few linked throughout this post to get you started.
Table of Contents
- What You Need Before You Start
- Why Sourdough
- How to Shape the Easter Bunny
- How to Add the Face Details
- Tips for a Better Bake
- Which Sourdough Recipe Should I Use
- Frequently Asked Questions
- Watch the Video How I Make It
- Let’s See Your Bunny
What You Need Before You Start
This tutorial requires a fully fermented and shaped sourdough dough, ready for its final proof. Before you begin the bunny shaping steps, you will need:
- One batch of your favorite artisan sourdough dough, cold fermented and ready to bake
- Two 10×5 inch loaf pan lined with parchment paper (a standard 9×5 will also work)
- Butcher’s twine or food-safe kitchen twine
- A sharp knife for portioning
- A small bowl with a drop or two of water for mixing your decorating pastes
- Red rice yeast powder for the inner ears and rosy cheeks
- Activated charcoal powder for the eyes and nose
- A small food-safe brush or toothpick for applying details

The red rice yeast powder and activated charcoal are both pantry-friendly, food-safe ingredients you can find online or in natural grocery stores. You only need a tiny amount of each. Mix a drop or two of water with a small pinch of each powder separately to form a thin paste, and you have your natural food coloring for the face and ears.
Why Sourdough
Beyond the obvious fun of shaping this loaf, sourdough is genuinely the right choice for a project like this. The long fermentation process that sourdough requires does more than develop flavor. It breaks down phytic acid in the flour, which makes the bread easier to digest and increases the bioavailability of nutrients like iron, zinc, and magnesium. The slow, cold proof also means this dough is incredibly forgiving to work with during shaping. It holds structure well, which is exactly what you need when you are attaching ears and tying twine around a loaf of bread.
The extended fermentation timeline also works in your favor for a holiday bake. You can mix and bulk ferment your dough the day before, cold proof it overnight, shape the bunny the morning of and bake it fresh on Easter morning.

How to Shape the Easter Bunny
This is not a sandwich loaf. This bunny is made from a standard artisan sourdough boule, cold fermented and ready to bake. There is no additional shaping involved. Instead, you are working directly with the cold fermented dough ball and using a knife to cut the pieces you need right from it. Here is how the process works:
After your dough has completed its cold ferment, flip it out of the banneton upside down onto a piece of parchment paper. Using a sharp knife, trim a section from each side of the dough as shown in the photos. These two trimmed pieces are everything you need for the ears, tail, and feet. Set the main body aside.

Take the two trimmed pieces and cut 1/3 of each one off. The top two thirds of each piece will become the ears. Place them seam side down, with the pointed tips facing toward the middle of the loaf. The bottom third of each trimmed piece gives you the tail and the tiny feet. Roll one small piece into a round ball for the tail, and take the remaining two small pieces and tuck them underneath the back end of the loaf so they peek out just slightly, forming the feet.

Before you attach the ears, cut a piece of butcher’s twine about 8 inches long and slide it underneath the entire loaf, positioning it roughly 3 inches in from the end where the head will be. This is the end where the ears will go. Place both ears seam side down on top of the loaf at that same end, with their pointed tips aimed toward the middle of the loaf and the rounded bases sitting about two to three inches up from the edge. Dab a little water onto the bottom of each ear and under the tail and feet before pressing them into place. That moisture helps everything bond to the loaf during proofing and baking.

Bring the twine up between the two ears and tie it into a loose bow. Loose matters here. The dough will push outward as it bakes and tight twine will split the ears or cut into the loaf. Give it room.

Once assembled on the parchment, carefully transfer everything into your parchment lined loaf pan and go straight into the oven. There is no additional proofing step. Preheat your oven to 450 degrees. Place a second loaf pan of the same size inverted on top to act as a lid, creating a mini Dutch oven effect. Bake with the pan on top for 25 minutes, then remove it and continue baking for an additional 15 minutes. If the ears or top begin to get too dark before the time is up, lay a piece of aluminum foil loosely over the top for the remainder of the bake.
How to Add the Face Details
The face decorating happens in two stages: before the bake and after. This gives you the most control over the final look.
Before baking
Before transferring the assembled bunny into the loaf pan, paint on the ear details and the basic face outline. Mix a small pinch of red rice yeast powder with a drop or two of water to form a thin paste. Use a small brush to paint the interior of each ear. Paint it on a little bolder than you think you need because the color will shift and deepen during the bake. On the face, paint a wide V shape to mark where the nose and mouth will be. That is all you need at this stage. Transfer the bunny into the loaf pan and bake.

After baking
Once the bunny comes out of the oven, let it cool slightly before adding the finishing details. If any of the ear color needs to be touched up or deepened, mix another small batch of the red rice yeast paste, slightly thinner this time, and brush it on. For the rosy cheeks, dab your brush into the paste and wipe most of it off, then swirl it onto the cheek area in a circular motion moving outward. Use your fingers to blend it in slightly for a soft, natural look.

For the eyes, wrap a small length of cooking twine around the tip of a toothpick to create a thicker line. Dip it into your activated charcoal paste and draw on two simple curved lines for the sleepy closed-eye look. Then use the same toothpick to go just underneath the V to add a little shadowing around the nose, and draw a small line down the center at the bottom of the V to define the mouth.


Easter Bunny Sourdough Bread (Loaf Pan)
Equipment
- 10×5 inch loaf pan (a 9×5 will also work)
- Second loaf pan of the same size (for the inverted lid) or aluminum foil
- kitchen scale
- Parchment paper
- Sharp knife or bench scraper
- Butcher’s twine (8 inches)
- Small food-safe brush or toothpick Toothpick with a small length of twine wrapped around the tip (for eye details)
- Small bowls for mixing pastes
- Kitchen scissors
Ingredients
For the Dough:
- Use your preferred artisan sourdough bread recipe or the one linked to the blog post fully mixed and cold fermented overnight
For the Natural Food Coloring:
- 1 pinch red rice yeast powder (1/16 tsp)
- 1 pinch food-grade activated charcoal powder (1/16 tsp)
- 2 drops water for red paste
- 2 drops water for charcoal paste
Instructions
- Remove your cold fermented dough from the refrigerator and flip it out of the banneton onto a sheet of parchment paper. Work quickly and confidently as the cold dough is easier to handle.
- Using a sharp knife, trim a section of dough from each long side of the loaf. These two trimmed pieces will become the ears, tail, and feet, so set them aside on the parchment.

- Take each trimmed piece and divide it into thirds. The top two thirds of each piece will become the ears. Shape them gently with your hands, keeping the natural taper of the cut to form an elongated oval with a pointed tip. Set the remaining bottom third pieces aside for the tail and feet.
- Cut a piece of butcher’s twine approximately 8 inches long and slide it underneath the entire loaf, positioning it about 3 inches in from the end of the loaf where the head will be.

- Place both ears seam side down on top of the loaf at the head end, with the pointed tips facing toward the middle of the loaf and the rounded bases sitting about 2 to 3 inches in from the edge of the dough. Dab a small amount of water onto the bottom of each ear before pressing them gently into place to help them adhere.
- Bring the twine up between the two ears and tie it into a loose bow. The dough will expand significantly during baking so the twine must have room to give.
- Roll one of the reserved small dough pieces into a round ball and press it onto the lower portion of the loaf to form the tail. Dab water underneath before pressing into place.

- Take the remaining reserved piece and divide it in half. Tuck both small pieces underneath the back edge of the loaf so they peek out slightly to form the feet. Use a small dab of water to help them adhere.
- Mix a small pinch of red rice yeast powder with 1 to 2 drops of water to form a thin paste. Use a small brush to paint the interior of each ear generously, painting a little bolder than you think you need as the color deepens during baking.

- On the face area of the loaf, paint a wide V shape using the red rice yeast paste to mark where the nose and mouth will be.
- Line your loaf pan with parchment paper and carefully transfer the assembled bunny into the pan.

- If using a second loaf pan as a lid, place it inverted directly on top. If using aluminum foil, mold a sheet of foil around the outside of an inverted loaf pan to create a domed lid, then place it over the pan and tuck the edges around the outside to create a seal.
- Bake at 450 degrees Fahrenheit with the lid on for 25 minutes, then remove the lid and continue baking for an additional 15 minutes until the crust is deep golden brown. If the ears begin to darken too quickly, lay a piece of aluminum foil loosely over the top for the remainder of the bake.
- Remove the bunny from the oven and allow it to cool slightly before adding the face details.
- Mix a fresh small batch of red rice yeast paste, slightly thinner this time. If any ear color needs to be touched up, brush it on now. For the rosy cheeks, dab your brush into the paste, wipe most of it off, then swirl it onto the cheek area in a circular motion moving outward. Use your fingers to blend it in slightly for a soft natural look.

- Mix a small pinch of food-grade activated charcoal powder with 1 to 2 drops of water to form a thin paste. Wrap a small length of twine around the tip of a toothpick to create a thicker line. Dip it into the charcoal paste and draw two simple curved lines on the face for the sleepy closed-eye look.
- Use the same charcoal toothpick to add a small amount of shadowing just underneath the V to define the nose, then draw a small line down the center at the bottom of the V to emphasize the mouth.
- Allow the bunny to cool completely before removing the twine. The indentation left by the twine adds to the bunny shape.
Notes
Tips for a Better Bake
A few things that will make a real difference in your finished bunny:
Practice the face on paper first. Before decorating your baked bunny, grab a scrap of paper and practice drawing the eye shape and V outline with your toothpick. It takes only a minute and gives you a lot more confidence when you move to the actual loaf.
Use an inverted loaf pan as your lid. Place a second loaf pan of the same size upside down on top to trap steam during the first 25 minutes of baking, just like a Dutch oven does for a free-form loaf. This is what gives you the oven spring and crust development without needing any specialized equipment. You are welcome to use a Dutch oven instead, but it will change the shape of the finished bunny since the dough will no longer be contained.
No second loaf pan? Use aluminum foil. Before you add your dough to the pan, flip your loaf pan upside down and mold a sheet of aluminum foil around the outside of the inverted pan bottom, crimping it neatly around the edges so it holds its shape. Remove the foil mold from the pan, then flip the pan right side up and do a quick test fit to make sure your foil dome sits snugly on top. Once your dough bunny is in the pan and ready to bake, place the foil dome on top and tuck the edges around the outside of the pan to create a seal. It works exactly the same way as a second pan lid.
Tie the twine loosely. This cannot be overstated. If the twine is too tight before baking, it will be cutting into your loaf by the time it comes out of the oven. You want the bow tied with room to breathe.
Do not over-proof. A slightly under-proofed dough holds its sculptural shape better in the oven than a fully relaxed dough. If you are cold proofing overnight, cap it at 24 hours max.
Watch the ears. The ears and tail are smaller than the body and will brown faster. If they are getting too dark before the body is done, tent them loosely with small pieces of aluminum foil for the last ten minutes of baking.
Use parchment in the pan. This makes removing the bunny from the pan after baking much easier and keeps all your ear details intact.
Let it cool completely before removing the twine. The twine peels away cleanly once the loaf has cooled, and the indentation it leaves adds to the bunny look.

Which Sourdough Recipe Should I Use
This shaping method works with any standard artisan sourdough boule recipe. You want a dough that holds its structure well through a cold ferment, which most classic sourdough recipes do naturally. Avoid very slack or high-hydration doughs above about 80% as they tend to spread and lose definition when the pieces are cut and reassembled.
Here are a few of my recipes to get you started:
- My Sourdough Starter Guide — if you are just getting started, begin here
- Classic Sourdough Bread — the base recipe I used for this bunny and the one I recommend if this is your first time
- Double Chocolate Cookie Dough Swirl Sourdough — imagine a chocolate bunny, but make it bread. You can skip the cookie swirl and make it all chocolate.
- Bone Broth Sourdough Loaf — imagine a savory bunny, with extra nutrients and protein.
Frequently Asked Questions
Can I use any sourdough recipe for this bunny shape?
You can use most sourdough sandwich bread recipes, but avoid very high-hydration doughs (above 80% hydration) as they tend to spread too much to hold the bunny shape. A dough in the 70 to 75% hydration range is ideal.
Do I need a Dutch oven for this?
No. This method uses a loaf pan with an inverted second loaf pan on top to create the same steam environment a Dutch oven provides. The loaf pan is actually what gives this bunny its structured, upright shape and defined features. You are welcome to use a Dutch oven instead, but keep in mind it will change the look of the finished bunny since the dough will spread and bake free-form rather than holding the tall, contained shape you see here.
Is red rice yeast powder safe to eat?
Red rice yeast powder is a natural food-safe ingredient used for color. It is widely available at natural grocery stores and online. As with any ingredient, check with your healthcare provider if you have specific dietary concerns.
What is activated charcoal and is it food-safe?
Food-grade activated charcoal is a natural black coloring agent made from coconut shells or other plant sources. It is used in baking and cooking for color. Make sure you are purchasing food-grade activated charcoal, not the kind made for other uses.
Will the twine burn in the oven?
Natural cotton butcher’s twine is oven safe at the temperatures used for baking bread. Avoid synthetic twine or colored twine, which may not be food-safe at high heat. If you’re worried coat in a neutral oil before wrapping. Alternatively, you can tuck parchment strips underneath the twine.
Can I make this with kids?
Absolutely. The shaping and decorating steps are a genuinely fun activity. Younger kids can help paint on the face details and place the tail, while older kids can help shape the ears.
How do I store leftover Easter bunny bread?
Store at room temperature wrapped in a bread bag or beeswax wrap for up to three days. For longer storage, slice and freeze individual portions for up to three months.
What do I do if I don’t have a second pan? Use aluminum foil. Before you add your dough to the pan, flip your loaf pan upside down and mold a sheet of aluminum foil around the outside of the inverted pan bottom, crimping it neatly around the edges so it holds its shape. Remove the foil mold from the pan, then flip the pan right side up and do a quick test fit to make sure your foil dome sits snugly on top. Once your dough bunny is in the pan and ready to bake, place the foil dome on top and tuck the edges around the outside of the pan to create a seal. It works exactly the same way as a second pan lid.
Why didn’t you score this loaf?
I consicered this load already scored, since we sliced into the sides on the dough to make the ears, tails and feet. If you are concerned, feel free to cut a four inch score on both sides of the bunny body, down below the loaf pan top line. Or reslice the side before putting it into the loaf pan.
I want to watch how you do it!
Let’s See Your Bunny
If you make this Easter bunny sourdough bread, I want to see it. Leave a comment below and let me know how it turned out, and tag me on Instagram or Facebook when you share your photos. There is nothing better than seeing your versions of these recipes come to life in your own kitchens.
Want recipes like this one delivered straight to your inbox before they hit the blog? Sign up for the H3art of the Home newsletter below and never miss a new recipe.


Leave a Reply