I have been making flour tortillas for over fifteen years. Long before sourdough was part of my life, before the starter lived on my counter, I was making these. Simple, fast, made with whatever fat I had on hand. When I started regularly baking sourdough over six years ago, I adapted the recipe almost immediately and never looked back.
But the real story behind why I am sharing this recipe today is the power outage.
Nine days without electricity. I had a waffle iron, an Instant Pot, and a very full sourdough starter that needed to be used. What came out of those nine days was one of my favorite kitchen discoveries: a waffle iron breakfast burrito that changed how I think about this dough entirely. I rolled out the tortilla dough, cracked an egg directly onto my greased waffle iron, laid the raw tortilla on top, closed the lid, and let it cook. Tortilla and egg, done at the same time. One tool, no extra pan, minimal cleanup.
I am sharing this recipe today because I am making it in real time, and I want you to see just how easy this actually is. If I could pull this off with no power and a generator, you can absolutely do it on a Tuesday morning.

Table of Contents
- Why Long Fermented Tortillas Are Worth It
- Ingredients Overview
- Fermentation Method Options
- How to Preshape and Shape Your Tortilla Balls
- How to Cook Sourdough Tortillas
- Waffle Iron Breakfast Burrito Method
- Can I Make These Without a Sourdough Starter?
- Storage and Freezing
- Tips for the Best Results
- FAQ
- Recipe
Why Long Fermented Tortillas Are Worth It
Most tortilla recipes are a quick mix and cook situation. Those are fine. But when you give the dough time to ferment, a few meaningful things happen.
The sourdough starter works on the flour over those hours, helping to break down phytic acid and making the nutrients in the grain more bioavailable for your body to absorb. The gluten network relaxes completely during that long rest, which means rolling the tortillas out thin is dramatically easier compared to a quick-rest dough that keeps springing back.
The flavor also develops into something a little more complex and interesting without being sharp or overpowering.
The other reason long fermentation is worth it is the flexibility it gives you. You are not standing in the kitchen at 5pm trying to do everything at once. Mix in the morning, cook by dinner. Or mix before bed and roll in the morning. The dough does the work while you go about your day.

Ingredients Overview
The full recipe with measurements is in the recipe card below. Here is a breakdown of what you need and why each ingredient matters.
All purpose flour is the base of this dough. It produces a soft, pliable tortilla with the right amount of structure. Bread flour will make them tough, so stick with all purpose here. You can substitute up to half with whole wheat if you prefer a heartier texture, though you may need a touch more water.
Double acting baking powder is the leavener that gives your tortillas that beautiful puff when they hit the hot pan. Double acting is specifically recommended for this long fermented version because it releases its lift in two stages: once when it contacts moisture and again when it hits heat. Since this dough ferments for hours, that first activation has passed long before you cook. Double acting baking powder ensures you still get a strong puff on the pan. Rumford and Bob’s Red Mill both carry aluminum-free options that fit a clean ingredient approach.
Salt builds flavor and strengthens the dough structure. Do not skip it.
Fat is what gives the tortillas their softness and pliability. Coconut oil, butter, and avocado oil all work well in this recipe. Butter gives the richest, most savory flavor. Coconut oil adds a subtle quality and great pliability. Avocado oil is neutral and keeps the recipe completely dairy free. Honestly, I have loved every version of this and encourage you to use what you have on hand.
Room temperature water is all you need here. Warm water is typically called for in quick tortilla recipes because it helps activate baking powder immediately. Since this dough ferments for many hours, there is no need for warm water. Room temperature is perfectly fine and actually more accurate to the long ferment process.
Active sourdough starter contributes both to the fermentation and to the lift of the finished tortilla. Active, recently fed starter gives you the most reliable rise. Discard will also work but may extend your fermentation time slightly since it has lower yeast activity. See the section below if you do not have a starter at all.

Fermentation Method Options
One of the best things about this recipe is how well it fits into different schedules. There is no single right method here.
Same Day (Morning to Dinner)
Mix the dough in the morning. Cover tightly and leave at room temperature for 6 to 8 hours, or until the dough has noticeably puffed and roughly doubled in size. Divide, rest the balls for 10 to 15 minutes, and cook by dinner.
Overnight (Mix at Night, Roll in the Morning)
Mix the dough before bed and leave it covered at room temperature for 8 to 10 hours. Wake up, divide into balls, let them rest for 10 to 15 minutes, and roll and cook in the morning. This is my personal favorite method, especially for the waffle iron breakfast burrito situation described below.
Extended Cold Ferment (Optional Add-On)
After dividing into balls, place them in a zip-top bag or covered container and refrigerate for an additional 8 to 12 hours or up to 24 hours. When ready to cook, remove from the fridge and let the balls come to room temperature for about 30 minutes before rolling. This option deepens the flavor even further and gives you maximum flexibility with your timing.
How to Preshape and Shape Your Tortilla Balls
This is the step that makes rolling so much easier and is worth taking 30 seconds to do properly.
After your dough has fermented, divide it into 10 to 12 pieces. I find 60 to 70 grams per ball is my personal sweet spot and gives you a great size for tacos, burritos, and the waffle iron method.
To preshape each piece, make a C shape with your hand and place it around the dough. Push the dough away from you toward the opposite side of your palm, then pull it back down and toward you in one smooth circular motion. Repeat this a few times, letting the surface tension build until you have a tight, smooth ball. The goal is a ball with a taut top and a pinched seam on the bottom.

I am adding a short video showing exactly how this motion works because it is one of those things that is much easier to see than to read.
Once all your balls are shaped, cover them and let them rest for 10 to 15 minutes before rolling. This rest is important. The gluten needs a few minutes to relax after being shaped or the dough will keep springing back when you try to roll it out.
How to Cook Sourdough Tortillas
Once your dough balls have rested, you are ready to roll and cook.

Preheat a heavy bottomed pan or cast iron skillet over medium high heat. Do not grease the pan. A properly preheated dry pan is the key to tortillas that puff and develop those characteristic golden spots rather than cooking flat and dry.
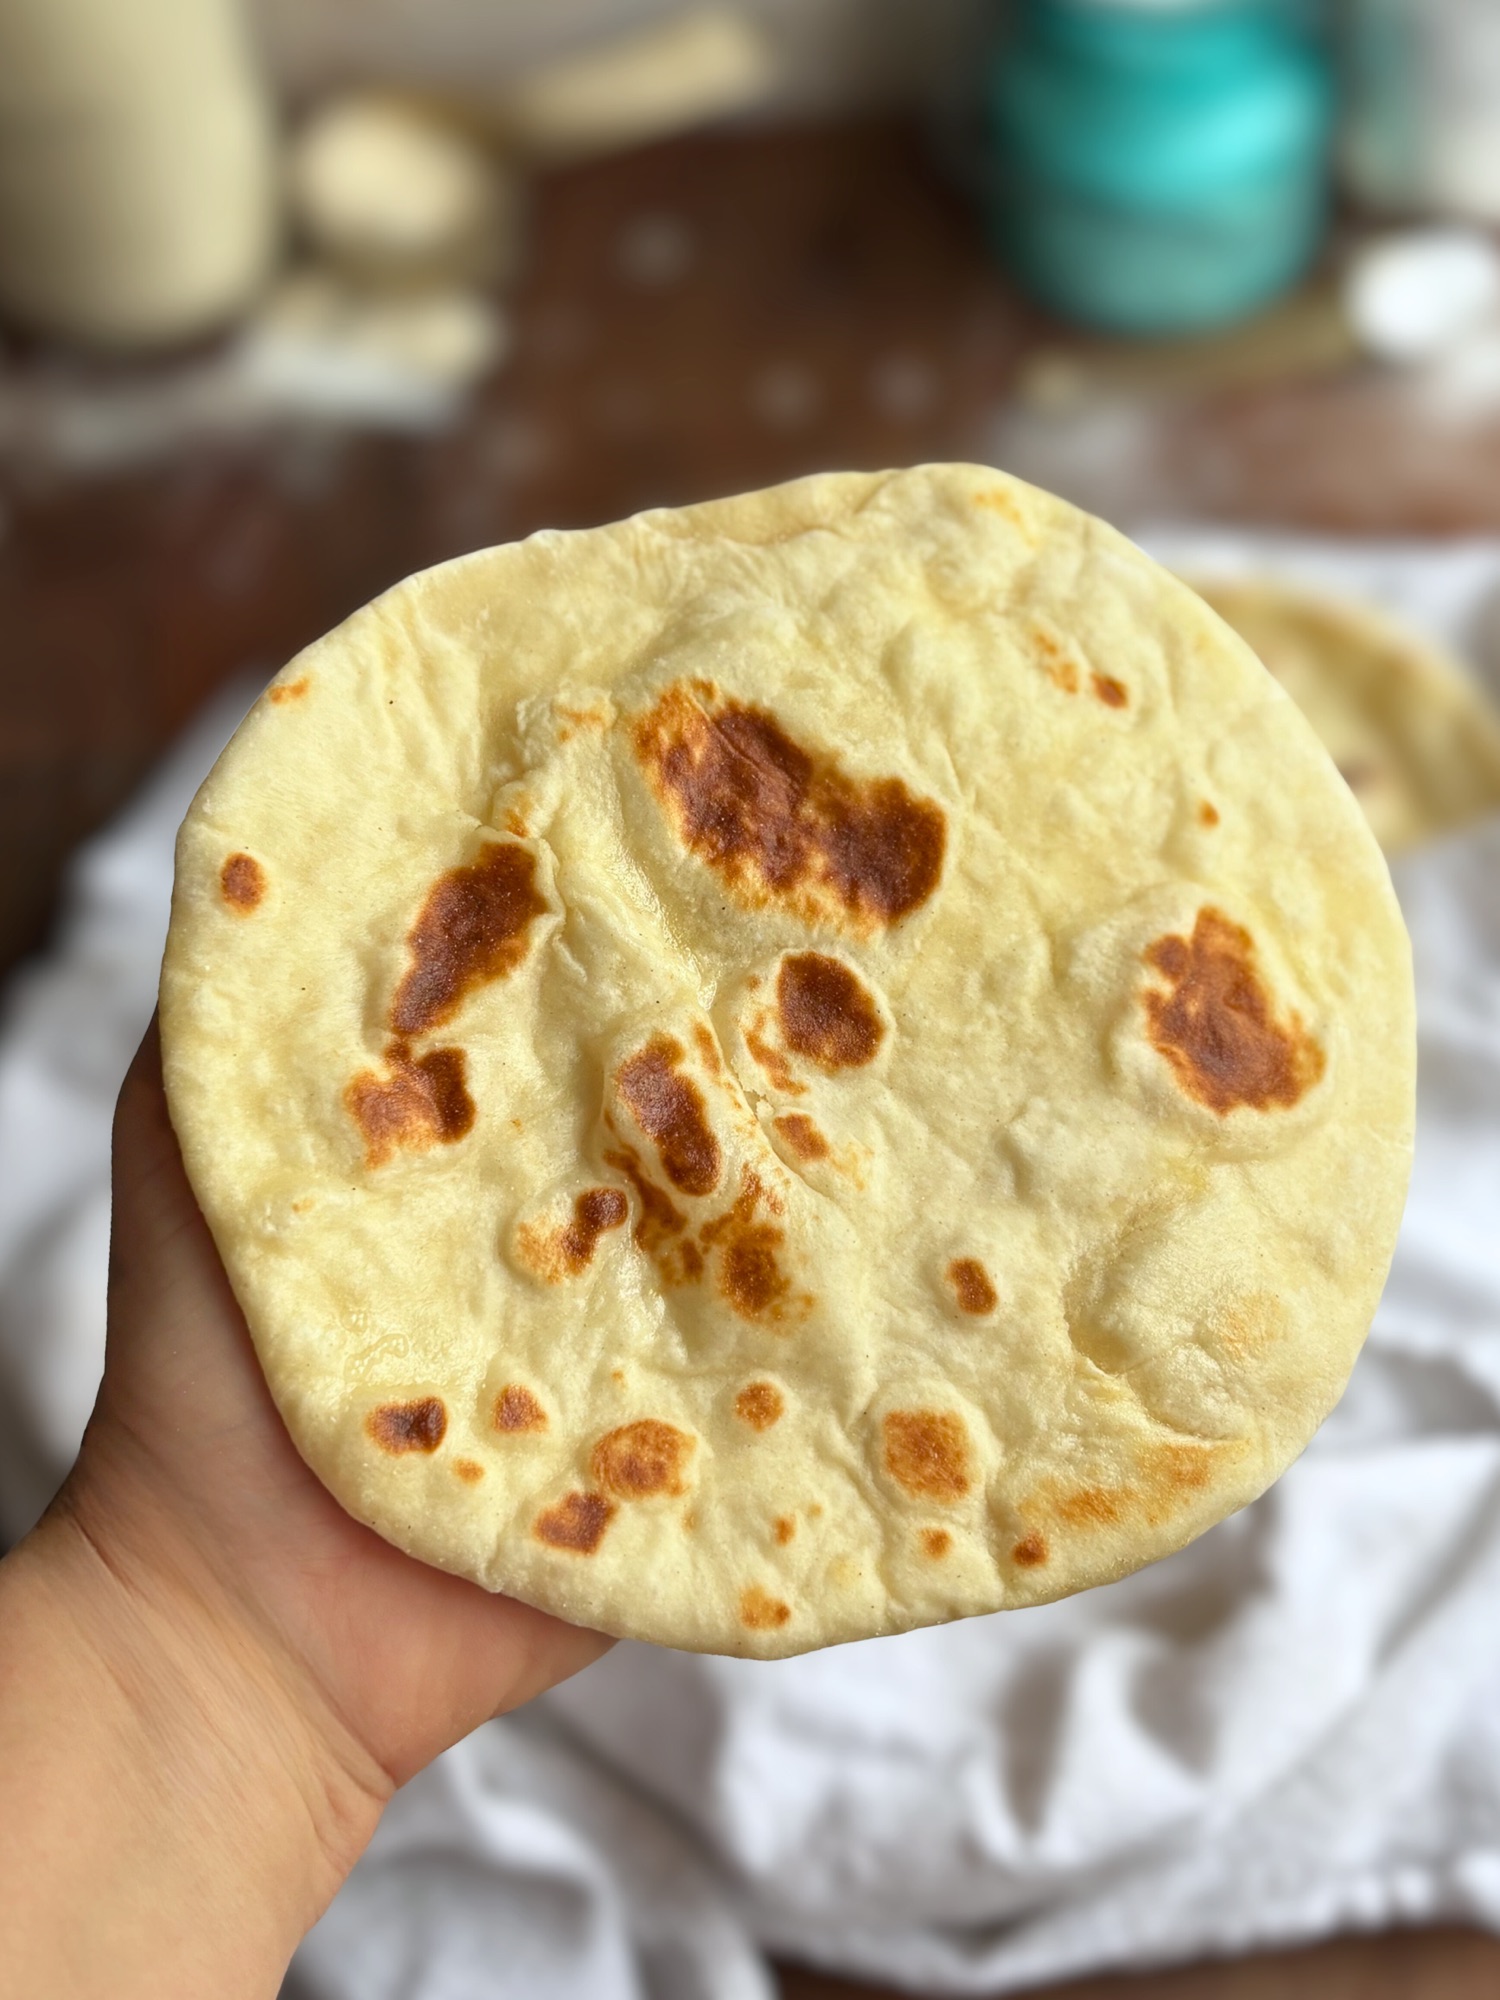
Working one ball at a time, roll each ball out on a lightly floured surface until very thin, approximately 6 to 8 inches across. You can go smaller for taco-sized tortillas or larger for burritos depending on your preference. The thinner you get them, the better the puff and texture. If the dough keeps springing back, let it rest for another few minutes before trying again.
Place the rolled tortilla flat onto the hot pan. Cook until bubbles begin to form across the surface, roughly 30 to 45 seconds. Flip and cook for just a few seconds on the second side.
Place each finished tortilla into a clean cotton kitchen towel and fold loosely to cover. The steam that builds in the towel keeps them soft and pliable. Plastic wrap or foil can trap too much moisture and make them gummy, so a cotton towel is the right move here.

Waffle Iron Breakfast Burrito Method

This is the method that came out of nine days without power and has stayed in my regular rotation ever since.
The idea is simple: instead of cooking the egg and the tortilla separately, you cook them together in the waffle iron at the same time.
Lightly grease and preheat your waffle iron. Scramble one or two eggs in a small bowl first, then pour them onto the greased bottom plate so they spread out evenly. Lay your rolled out raw tortilla dough directly on top.
For reference, my waffle iron is about 7 and a half inches wide so I roll mine to approximately 7 inches. Roll yours to just slightly smaller than the width of your waffle iron so it fits without folding over the edges.
Close the waffle iron and let it cook through, roughly set to a medium setting (I used 3.5 on mine). If you prefer, you can simply crack the egg directly onto the greased plate instead.

What comes out is a tortilla with the egg already cooked into one side. Load it with your fillings and roll it into a breakfast burrito. One tool, no extra pan for the eggs, very little cleanup.
The overnight fermentation method pairs perfectly with this because the dough is ready to go first thing in the morning. You are not starting from scratch at 7am on a busy day.
If you are a croissant person, this same concept works beautifully with my croissant dough as well. You can find my full Sourdough Croissant Masterclass for that approach.

Recipe

Soft Sourdough Flour Tortillas (Long Fermented or Overnight)
Equipment
- Large mixing bowl
- Pastry cutter or fork
- Rolling Pin
- Heavy bottomed skillet or cast iron pan
- Cotton kitchen towel
Ingredients
INGREDIENTS
- 360 grams all purpose flour 3 cups
- 8 grams double acting baking powder 2 teaspoons
- 6 grams salt 1 teaspoon
- 60 grams fat coconut oil, butter, or avocado oil (5 tablespoons)
- 200 grams room temperature water 3/4 cup plus 2 tablespoons
- 60 grams active sourdough starter 1/4 cup
Instructions
- Add the flour, baking powder, and salt to a large mixing bowl and whisk together until fully combined.
- Add your fat of choice and use a fork or pastry cutter to cut it into the flour until the mixture resembles coarse, sandy crumbs. A few larger bits are fine.
- Add the room temperature water and sourdough starter and mix until a shaggy dough comes together. Knead for 2 to 3 minutes until the dough is smooth and cohesive. If the dough feels crumbly add water 10 grams at a time. If the dough feels sticky add flour 10 grams at a time. Flour brand and kitchen humidity will affect the dough, so adjust by feel rather than strictly by measurement.
- Cover the bowl tightly and let the dough ferment at room temperature for 6 to 8 hours or until noticeably puffed and roughly doubled in size. For the overnight method, mix before bed and let the dough rest covered on the counter for 8 to 10 hours.
- Once fermented, punch the dough down and turn it out onto the counter. Divide into 10 to 12 equal pieces, aiming for 60 to 70 grams per ball for a standard tortilla size.
- To preshape each ball, make a C shape with your hand around the piece of dough. Push the dough away from you toward the opposite side of your palm, then pull it back down and toward you in a smooth circular motion. Repeat a few times until you have a tight, smooth ball with a taut top. Cover the balls and let them rest for 10 to 15 minutes so the gluten can relax before rolling.

- Preheat a heavy bottomed skillet or cast iron pan over medium high heat. Do not grease the pan. A fully preheated dry pan is what produces the characteristic bubble and golden spots.
- Working one ball at a time, roll the dough out on a lightly floured surface to approximately 6 to 8 inches across. You can go smaller for taco-sized tortillas or larger for burritos depending on your preference. If the dough springs back, let it rest another few minutes and try again.
- Place the rolled tortilla flat onto the hot pan and cook until bubbles form across the surface, approximately 30 to 45 seconds.
- Flip and cook for just a few seconds on the second side.
- Transfer the finished tortilla to a clean cotton kitchen towel and fold loosely to cover. Repeat with the remaining dough balls. The steam that builds in the towel keeps the tortillas soft and pliable until ready to serve.
Notes
Can I Make These Without a Sourdough Starter?
No sourdough starter? Just leave it out.
Continue with instructions as written. Let the dough rest for at least one hour before rolling so the gluten has time to relax. (No need for the long ferement). The baking powder handles all the lift, so your tortillas will still puff beautifully on the pan.
Traditional flour tortillas are not a yeast-leavened product at all. Baking powder is the leavener, not yeast. The sourdough starter in this recipe is an upgrade for flavor, fermentation benefits, and texture, but it is not structurally required.
If you are curious about building your own starter and getting into sourdough baking, my Minimal Waste Sourdough Starter Guide is a great place to begin.
Storage and Freezing
These tortillas store and reheat well, which makes them a great candidate for batch cooking.
At room temperature, store cooled tortillas in a sealed bag or airtight container for up to 3 days. They stay soft and flexible.
In the refrigerator, they keep for up to 5 days. Reheat in a dry skillet over medium heat for 20 to 30 seconds per side, or wrap loosely in a slightly damp paper towel and microwave for 30 seconds.
To freeze, let the tortillas cool completely. Stack them with a small square of parchment paper between each one so they do not stick together, then place the whole stack in a zip-top freezer bag. Freeze for up to 3 months. Thaw at room temperature or reheat directly from frozen in a skillet.
The uncooked dough balls can also be frozen. Place them on a parchment-lined sheet pan, freeze until solid, then transfer to a freezer bag. Thaw overnight in the refrigerator and let come to room temperature for 30 minutes before rolling and cooking.
Tips for the Best Results
Roll them thinner than feels right. The tortillas puff when they cook, so if they are not thin enough before they hit the pan, they will turn out more like a flatbread than a tortilla. Aim for 8 inches per ball and keep going.
Always rest the dough balls before rolling. After dividing, give the balls 10 to 15 minutes covered on the counter. This short rest lets the gluten relax so the dough cooperates when you roll it.
Preheat the pan fully before you start cooking. A hot pan from the beginning is what produces that beautiful bubble and slight char. Do not rush this step.
Use a cotton kitchen towel to rest your cooked tortillas. The steam builds up and keeps them soft and pliable until you are ready to serve. This is a small step that makes a real difference.
Check your baking powder. If your tortillas are not puffing, old baking powder is usually the culprit. Single-acting baking powder can also lose its effectiveness during a long ferment, which is why double acting is specifically recommended here.
FAQ
Can I use sourdough discard instead of active starter?
Yes. Discard works well here and is actually a great way to use it up. Your fermentation time may run a little longer since discard has lower yeast activity, but the end result is still a great tortilla.
Why are my tortillas turning out tough?
Two likely causes. First, they may not have been rolled thin enough. Second, they may have been cooked too long. Tortillas need very little time on the second side. Once they puff and bubble on the first side, flip and finish in just a few seconds.
Why are my tortillas not puffing?
Check your baking powder first. Old baking powder or single-acting baking powder is the most common reason tortillas do not puff after a long ferment. Also make sure your pan is fully preheated before you start cooking.
Can I refrigerate the whole dough before dividing?
Yes. After the room temperature ferment, you can refrigerate the entire batch for up to 24 hours before dividing and rolling. This gives you even more flexibility with your timing.
Can I use whole wheat flour?
You can substitute up to half the all purpose flour with whole wheat. A full whole wheat substitution will produce a denser, less pliable tortilla. If you go the whole wheat route, add a little extra water as needed since whole wheat absorbs more liquid.
Do I need a tortilla press?
No. A rolling pin on a lightly floured surface is all you need. The key is rolling thin enough, which a rolling pin handles perfectly well.
What is the best fat for this recipe?
All three options produce a great tortilla. Butter gives the richest flavor. Coconut oil adds pliability and a subtle quality. Avocado oil is neutral and keeps the recipe dairy free. Use what you have and what fits your preference.
How do I reheat tortillas without making them hard?
A dry skillet over medium heat for about 20 to 30 seconds per side is the best method. A microwave with a slightly damp paper towel for 30 seconds also works well.
If you make these, leave a comment below and let me know which method you used. I would love to hear how the waffle iron breakfast burrito version goes for you. Tag me on Instagram so I can see your results, and if you are not on the newsletter yet, sign up below to get new recipes sent straight to your inbox.


Leave a Reply