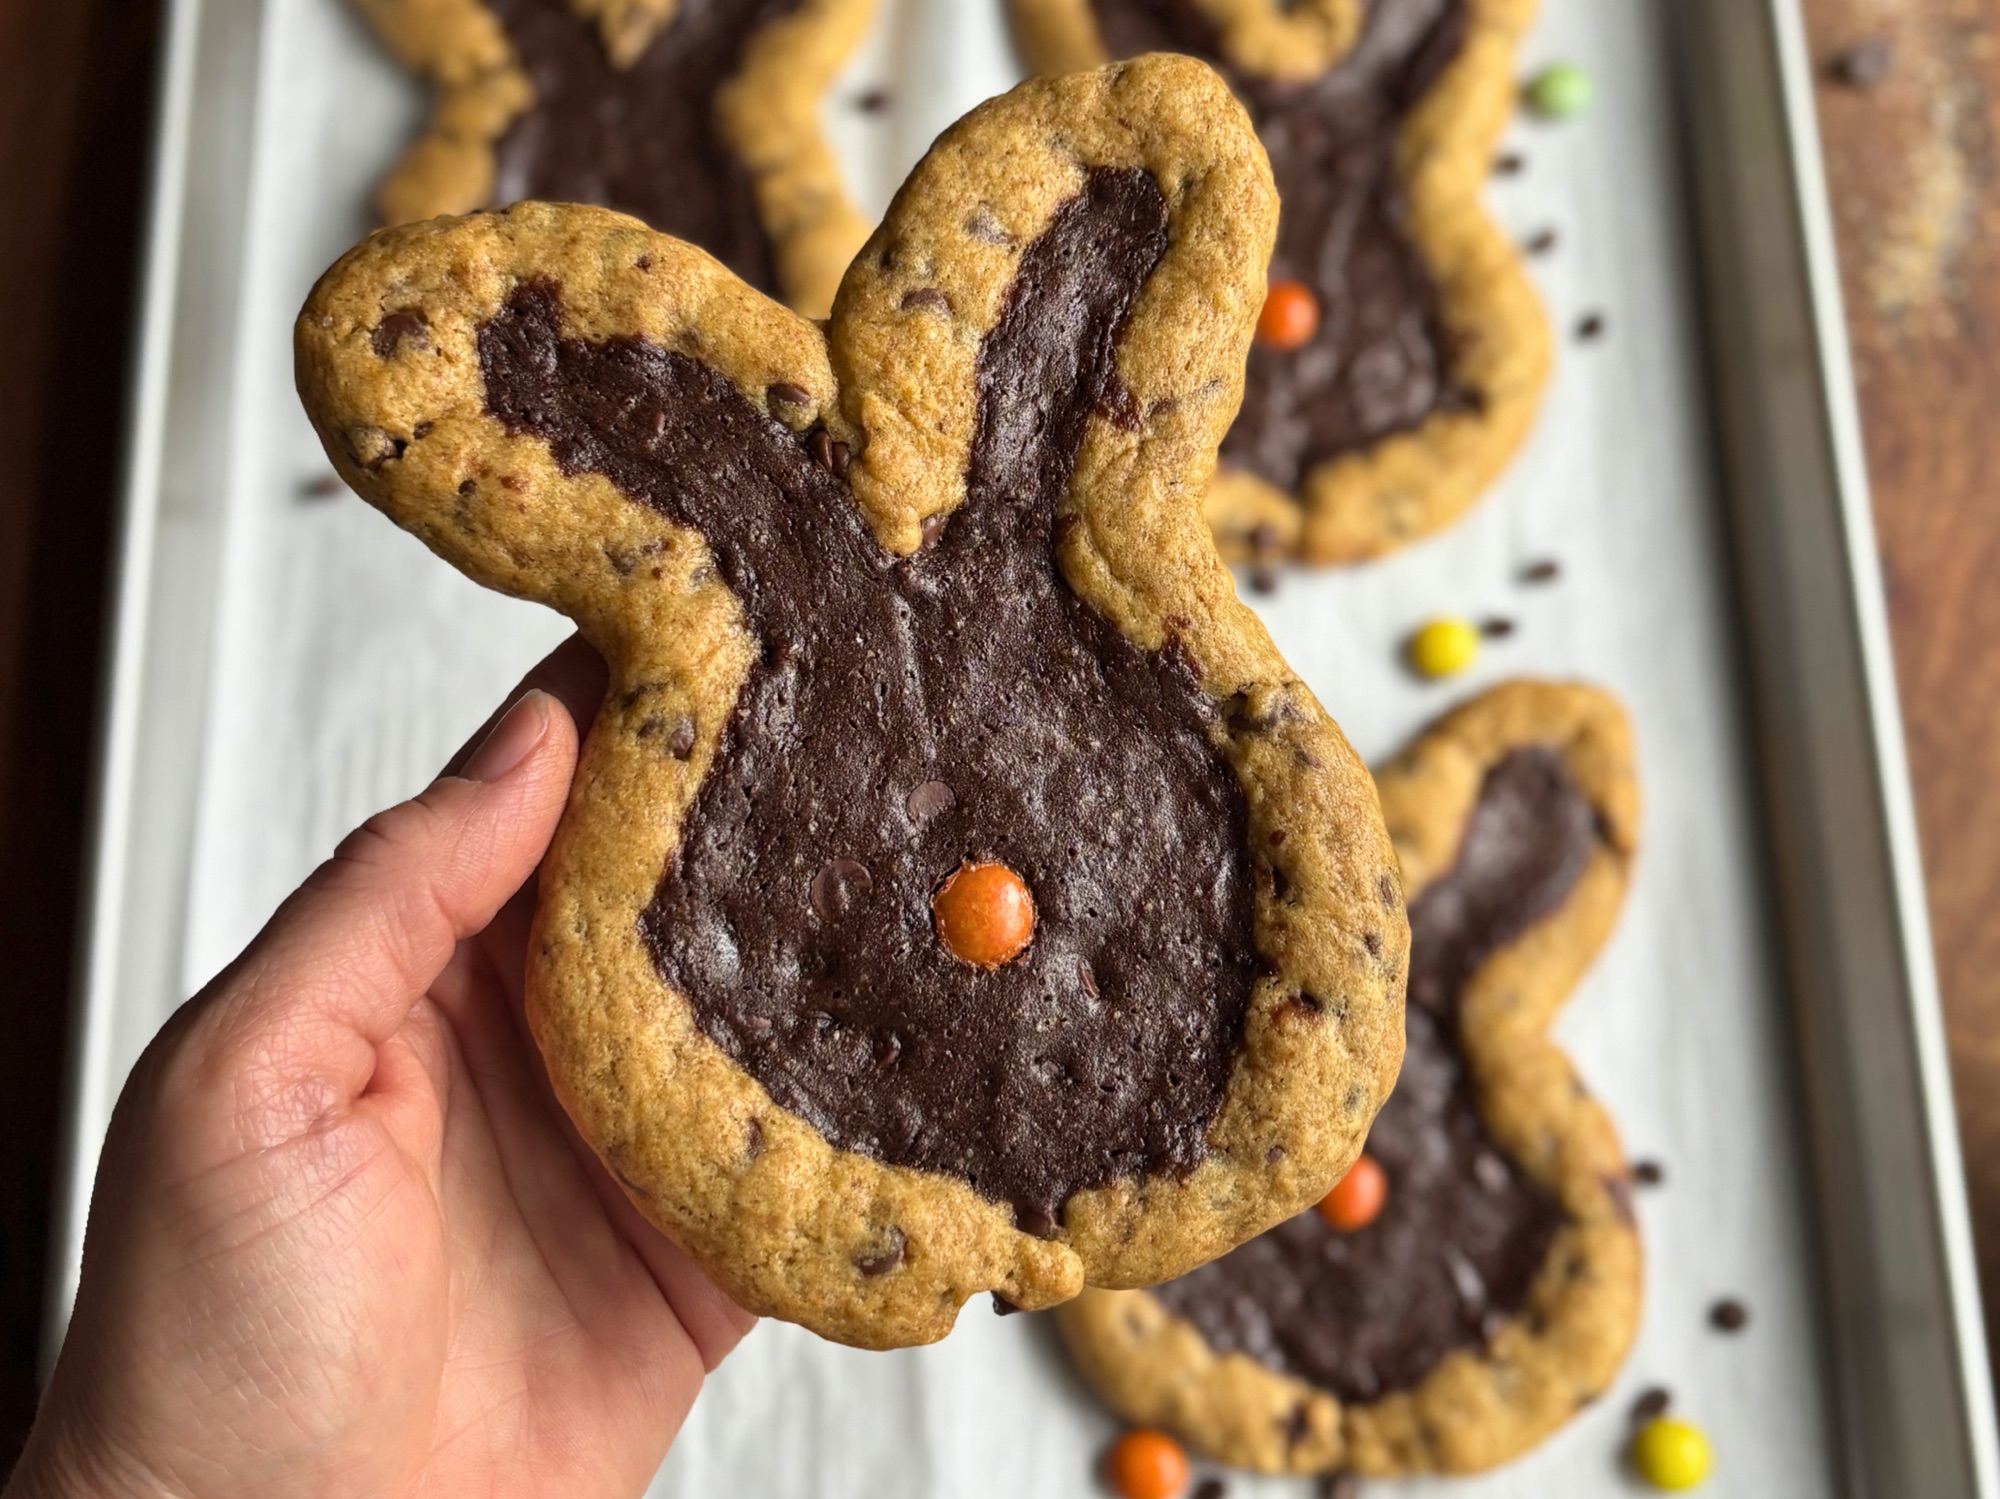
Sourdough chocolate chip cookie bunnies filled with fudgy brownie centers make the perfect Easter treat
Table of Contents
- What Are Bunny Brookies?
- Why This Recipe Works
- Ingredient Notes
- Can I Make This Without Sourdough?
- Step by Step Instructions
- Shaping the Perfect Bunny
- Flour Substitutions: Bread Flour vs All Purpose
- Decorating Options and Sprinkles
- How to Make Sourdough Starter
- Recipe
- Storage and Make Ahead Tips
- Frequently Asked Questions
- Shop This Recipe
When Easter rolled around this year, I couldn’t resist adapting my popular heart shaped brookies into the cutest Easter bunnies. These bunny shaped brookies combine everything I love about the original recipe with a fun seasonal twist that makes them absolutely perfect for Easter baskets, spring celebrations, or any time you want to add a little whimsy to your baking.
The concept is the same magic as the hearts: sourdough chocolate chip cookie dough shaped into bunny outlines, frozen to hold their structure, then filled with thick fudgy brownie batter and baked together. Each bunny is its own little world of texture and flavor, with crispy chewy cookie edges meeting rich chocolatey brownie in every bite.
The bunny shape does require a bit more finesse than the hearts, but I promise it’s worth it. The key is shaping the ears wider than you think they should be. Trust me on this. They’ll bake up to the perfect bunny ear proportions.
What Are Bunny Brookies?
Bunny brookies are individual bunny shaped cookies made with a sourdough chocolate chip cookie dough border filled with fudgy sourdough brownie batter. Unlike traditional brookies that layer cookie dough and brownie batter in a pan, these are hand shaped into bunnies before baking.
The cookie dough is rolled into ropes, formed into bunny shapes with tall ears, frozen to hold their structure, then filled with brownie batter in the ears and body, and baked together. The result is a stunning Easter dessert that combines two beloved treats in one adorable package.

Why This Recipe Works
The melted butter method creates structure. Both the cookie dough and brownie batter use melted butter rather than creamed butter. This creates a denser texture that holds its shape during baking, which is essential for maintaining the bunny outline.
Long fermentation builds flavor. The cookie dough ferments for 8 to 24 hours in the refrigerator, developing complex flavor notes. The brownie batter also gets an overnight rest, which deepens the chocolate flavor without adding any sour or tangy notes.
Freezing prevents spreading. The shaped bunny cookies are frozen for about 1 hour before filling with brownie batter. This keeps the cookie dough from spreading into the brownie during baking, maintaining clean lines between the two components.
Chilled brownie dough is easier to work with. For the bunny ears, chilled brownie dough can be rolled into thin ropes to fit perfectly into the ear shapes. The cold dough holds its shape better and is easier to manipulate with damp fingers.
The baking temperature is a compromise. At 340 degrees Fahrenheit, the cookie has enough time to set and develop golden edges while the brownie bakes through to a fudgy center. This middle ground temperature prevents the cookie from burning while the brownie finishes cooking.

Ingredient Notes
For the Cookie Dough:
The chocolate chip cookie recipe comes from a Depression era recipe, adapted with sourdough. The melted butter creates a bakery style texture with crispy edges and soft centers that stay fresh for days thanks to the honey.
Bread flour gives the cookies structure and chew, though all purpose flour works well too. The instant coffee enhances the chocolate flavor without making the cookies taste like coffee. For the bunny brookies, we use only one egg yolk instead of a whole egg, which creates an even richer, more tender cookie dough that shapes beautifully.
For the Brownie Batter:
After the overnight fermentation, the batter will be thick, almost like frosting. This is exactly what you want. The thick consistency prevents the brownie from leaking out of the bunny shapes during baking.
The chilled brownie batter is actually easier to work with for the bunny ears. You can roll small amounts into thin ropes to fit perfectly into the ear shapes, then use damp fingers to press the remaining batter into the body.
Dutch process cocoa powder creates a rich, deep chocolate flavor. Espresso powder is completely optional but can intensify the chocolate without adding coffee flavor.

Can I Make This Without Sourdough?
Yes! If you don’t have sourdough starter, you can easily substitute with equal parts milk and all purpose flour by weight.
For the Cookie Dough:
- Replace 75g sourdough starter with:
- 38g milk (2 tablespoons plus 2 teaspoons)
- 38g all purpose flour (1/4 cup plus 1 tablespoon)
For the Brownie Batter:
- Replace 45g sourdough starter with:
- 23g milk (1 tablespoon plus 1 1/2 teaspoons)
- 23g all purpose flour (2 tablespoons plus 2 teaspoons)
Important Notes:
- Mix the milk and flour together before adding to your recipe where the sourdough starter would go
- The texture and flavor will be slightly different from the sourdough version, but still absolutely delicious
- You can skip the 8 to 24 hour fermentation and chill for just 2 hours if making the non-sourdough version
- The sourdough version develops deeper, more complex flavor during the long fermentation, but the non-sourdough version is perfect when you’re short on time
Both versions work beautifully for these bunny brookies!
Step by Step Instructions
Day 1: Make and Ferment Both Batters
Mix both the cookie dough and brownie batter according to their recipe instructions. For the cookie dough, you can press it into an 8×8 inch pan, leave it in a bowl, or dump it onto a piece of parchment paper and roll it into a log shape for easier portioning later. Cover both batters tightly and refrigerate for 8 to 24 hours for best flavor development.
Short on time? You can chill for as little as 2 hours if you want to skip the long ferment. The longer fermentation develops deeper, more complex flavor, but 2 hours is the minimum chill time needed for the dough to firm up properly for shaping.
Day 2: Bring Brownie Batter to Room Temperature (Optional)
You can work with the brownie batter cold or at room temperature. For the bunny ears, cold brownie batter actually works better because you can roll it into thin ropes. For the body filling, either temperature works well.
Day 2: Portion and Shape the Bunny Cookies
Remove the fermented cookie dough from the refrigerator. Portion the dough into 35 gram balls. You will need one 35 gram ball per bunny (12 bunnies total).
Roll each 35 gram ball into a rope about 10 inches long and roughly half an inch in diameter.

Shaping the bunny: Start at what will be the bottom of the bunny. Bring the rope up on both sides to create the body, then continue upward to form two tall ears. The ears should be set wider than you think they should be. This is critical. During baking, the dough will puff slightly and the ears will appear more proportional if you start them wide.
Press the bottom point together firmly to seal. Make sure your bunny outline is complete with no gaps.
Place shaped bunnies on a parchment lined baking sheet.

Freeze the Shaped Bunnies
Place the baking sheet with the shaped bunny cookies in the freezer for about 1 hour. The bunnies should be firm and cold.
Fill the Bunnies
Preheat your oven to 340 degrees Fahrenheit.
Remove the chilled bunny shapes from the freezer. For the ears, take about 1 teaspoon of brownie batter and roll it into a thin rope. Press it gently into each ear cavity. You can also use damp fingers (not soaking wet, just slightly damp) to press the brownie batter into the ears. The moisture helps prevent sticking.
For the body, use approximately 2 tablespoons of brownie batter (a rounded cookie scoop works perfectly). Spoon the batter into the center, filling to about two thirds the height of the cookie border.
Important: Keep the brownie batter as clean as possible where it meets the cookie edge. No matter where the brownie touches the cookie dough, it will stay there after baking. If brownie batter gets on the cookie dough, it will bake that way and affect the appearance. You can wipe away any brownie that gets out of place before baking.
Do not overfill or the brownie may overflow during baking.

Add the Nose
Press one naturally colored chocolate gem (orange, red, or pink work beautifully) into the brownie batter where the nose should be.
Bake
Bake at 340 degrees Fahrenheit for about 15 minutes. Cookie edges should be golden brown and brownie center should be just set. A toothpick inserted into the brownie should come out with moist crumbs, not wet batter.
Let bunnies cool on the pan for 15 minutes before attempting to move them. This allows them to set properly. Then transfer to a wire rack to cool completely.

Shaping the Perfect Bunny
The key to beautiful bunny brookies is in the shaping technique. Here is what works best:
Each bunny needs 35 grams of cookie dough total: This creates a bunny that is substantial but not oversized, with enough dough to form a sturdy border around the brownie filling.
Roll to 10 inches long: Each rope should be about 10 inches long and roughly half an inch in diameter. Too thin and the edges will overbake; too thick and the bunny will be misshapen.
Shape the ears WIDER than normal: This is the most important tip. The ears should be set wider apart than you think looks right. During baking, the cookie dough puffs slightly and the ears will move closer together visually. If you start them too narrow, they’ll look like tiny antennae instead of bunny ears.
Make the body round: The bottom portion of the bunny should be rounded, not pointed. This gives you more room for brownie filling and creates a more recognizable bunny shape.
Freeze before filling: This step is not optional. Chilled cookie dough holds its shape when you add the brownie batter and prevents spreading during baking.
Use damp fingers for the brownie: Slightly damp fingers (not soaking wet) help you press the brownie batter into the ears and body without it sticking to your hands. This technique makes filling much easier.
Fill ears first, then body: Roll small amounts of chilled brownie batter into thin ropes for the ears, then fill the body cavity. This ensures the ears get proper filling without overflow.

Flour Substitutions: Bread Flour vs All Purpose
For the Cookie Dough:
Bread Flour (recommended): Bread flour has a higher protein content (around 12 to 13 percent) compared to all purpose flour (around 10 to 12 percent). This extra protein develops more gluten, which creates a chewier texture and helps the cookie hold its shape during baking. For bunny brookies, this structure is especially important since the cookie needs to support the brownie filling and maintain those delicate ear shapes.
If using bread flour, use 220 grams as written in the recipe.
All Purpose Flour: All purpose flour will work and still produce delicious results. The cookies will be slightly more tender and may spread a tiny bit more during baking, but they will still hold their bunny shape well. The texture will be softer rather than chewy.
If using all purpose flour, increase the amount to 230 grams (1 3/4 cups plus 4 tablespoons or scant 2 cups).
For the Brownie Batter:
The brownie recipe is scaled to 1.25 times the original to provide enough filling for the bunny shapes. If using bread flour, use 48 grams (1.25 times 38g). If using all purpose flour (recommended for brownies), use about 53 grams.
Why the difference? All purpose flour absorbs slightly less liquid than bread flour, so you need a bit more to achieve the same consistency.
Both options are excellent. Choose based on the texture you prefer and what you have on hand.
Decorating Options and Sprinkles
Bunny brookies are adorable plain, but adding a little nose detail takes them to the next level for Easter.
Naturally Colored Chocolate Gems: Unreal makes beautiful naturally colored chocolate gems that are perfect for bunny noses. Orange creates a cute carrot nose look with nice color contrast. Red or pink gems work beautifully too. Press one gem into the brownie batter where the nose should be before baking.
Sanding Sugar on Cookie Edges (Optional): Before shaping the bunnies, you can roll the cookie dough ropes in pastel sanding sugar. Place your sanding sugar in a shallow bowl, roll each rope gently in the sugar to coat, then shape into the bunny. The dough is sticky enough from fermentation to hold the sugar without any egg wash.
Plain is perfect too: The contrast between the golden cookie and dark brownie center is stunning on its own. Sometimes simple is best.

How to Make Sourdough Starter
If you do not have a sourdough starter yet, it is easy to create your own at home. A sourdough starter is simply a mixture of flour and water that captures wild yeast and bacteria from the environment. Once established, it can be maintained indefinitely and used in all kinds of baking.
For complete instructions on how to create and maintain your own sourdough starter, check out my detailed guide here: SOURDOUGH STARTER POST
Active Starter vs Discard: For these bunny brookies, active starter is preferred because it provides better rise and structure to the cookie dough. However, sourdough discard works wonderfully too and is a great way to use what would otherwise go to waste. Both options will give you delicious results.

Easter Bunny Brookies (Sourdough Cookie Brownie)
Equipment
- Large mixing bowl
- Whisk or hand mixer/stand mixer
- spatula
- plastic wrap
- Kitchen scale (recommended)
- Baking sheet
- Parchment paper
- Shallow bowl (for optional sprinkles)
- Cooling rack
Ingredients
COOKIE DOUGH INGREDIENTS
- 113 g unsalted butter melted and cooled slightly 1/2 cup or 8 tablespoons
- 100 g dark brown sugar packed 1/2 cup
- 65 g granulated sugar 1/3 cup
- 10 g honey or light corn syrup 2 teaspoons
- 1 large egg yolk room temperature
- 75 g active sourdough starter 100% hydration fed 4 to 6 hours prior OR 75g sourdough discard (fed within 1 to 2 days) (1/3 cup)
- 6 g vanilla extract 1 1/4 teaspoons
- 220 g bread flour 1 3/4 cups
- 1.5 g dark roast instant coffee, optional optional (1/2 teaspoon)
- 4 g fine sea salt 3/4 teaspoon
- 2 g baking soda 1/2 teaspoon
- 120 g dark chocolate mini chips/regular chips or chocolate chopped from bars 2/3 cup plus 1 tablespoon but make sure its a fine chop
BROWNIE BATTER INGREDIENTS
- 115 g unsalted butter 8 tablespoons or 1/2 cup
- 95 g semi sweet chocolate chopped scant 1/2 cup or 3 ounces
- 136 g granulated sugar 2/3 cup
- 41 g brown sugar 3 tablespoons packed
- 102 g eggs 2 large eggs
- 54 g sourdough starter 100% hydration discard or active (1/4 cup)
- 6 g vanilla extract 1 1/4 teaspoons
- 41 g unsweetened cocoa powder scant 1/2 cup
- 2.5 g dark roast instant coffee, optional 3/4 teaspoon
- 58 g bread flour scant 1/2 cup
- 3 g fine salt 1/2 teaspoon
- 82 g dark chocolate chips 1/2 cup
DECORATION
- 12 naturally colored chocolate gems orange, red, or pink for bunny noses
Instructions
COOKIE DOUGH INSTRUCTIONS
- Melt 113g butter in microwave for 30 to 45 seconds or on stovetop. Let cool for 5 minutes until warm, not hot.
- Whisk together melted butter, 100g dark brown sugar, 65g granulated sugar, and 10g honey for about 1 minute by hand until smooth and glossy.
- Add egg yolk and whisk until fully incorporated and glossy.
- Add 75g sourdough starter and 6g vanilla extract, whisk until combined.
- Add 220g bread flour, 1.5g instant coffee, 4g salt, and 2g baking soda and fold with spatula until 80% combined. Streaks of flour are okay.
- Fold in 120g chocolate chips/chunks. Mix until all flour is incorporated. Do not overmix.
- Dump cookie dough onto a large piece of plastic wrap and roll into a log shape, OR press into an 8×8 inch pan, OR leave in bowl. Cover tightly with plastic wrap.
- Refrigerate cookie dough for 8 to 24 hours for best flavor development. Short on time? You can chill for as little as 2 hours if you want to skip the long ferment.
BROWNIE BATTER INSTRUCTIONS
- Melt butter and semi sweet chocolate together in a saucepan or bowl over gentle heat until smooth, or microwave in 30 second increments stirring between, until melted. Set aside to cool slightly.
- Whisk in granulated sugar and brown sugar while the mixture is still warm, then beat in eggs one at a time.
- Stir in sourdough starter and vanilla extract until everything is glossy and cohesive.
- In a separate bowl, combine cocoa powder, dark roast instant coffee (if using), bread flour, and salt.
- Fold dry ingredients gently into the wet mixture until combined. Do not overmix.
- Fold in chocolate chips.
- Cover the bowl and refrigerate brownie batter for 8 to 24 hours for best flavor development. Short on time? You can chill for as little as 2 hours if you want to skip the long ferment.
ASSEMBLY INSTRUCTIONS
- Day 2: Shape, fill, and bake
- Remove brownie batter from refrigerator. It can be used cold or at room temperature. For bunny ears, cold batter works better as it can be rolled into thin ropes.
- Preheat oven to 340 degrees Fahrenheit.
- Remove cookie dough from refrigerator. Portion dough into 35 gram balls. You will need one 35 gram ball per bunny (12 bunnies total).
- Roll each 35 gram ball into a rope about 10 inches long and roughly half an inch in diameter.

- Shape each rope into a bunny on the parchment lined baking sheet. Start at the bottom, bring the dough up on both sides to form the body, then continue upward to create two tall ears.

- CRITICAL SHAPING TIP: Set the bunny ears WIDER than you think they should be. During baking, the dough will puff and the ears will appear more proportional if you start them wide.
- Press the bottom point together firmly to seal the bunny shape.
- Place baking sheet with shaped bunny cookies in the freezer for about 1 hour. Bunnies should be firm and cold.
- Remove chilled bunnies from freezer.
- For the bunny ears, take about 1 rounded teaspoon of brownie batter and roll it into a thin rope. Press it gently into each ear cavity. You can use damp fingers (not soaking wet, just slightly damp) to help press the brownie into the ears without it sticking to your hands.

- For the body, spoon the remaining brownie batter into the center, filling to about two thirds the height of the cookie border. (Approximately 2 Tablespoons but all depends the size of your bunny face)
- IMPORTANT: Keep the brownie batter as clean as possible where it meets the cookie edge. No matter where the brownie touches the cookie dough, it will stay there after baking. If brownie batter gets on the cookie dough, you can wipe it away before baking.
- Do not overfill or the brownie may overflow during baking.
- Press one naturally colored chocolate gem into the brownie batter where the nose should be.

- Bake at 340 degrees Fahrenheit for about 15-18 minutes. Cookie edges should be golden brown and brownie center should be just set.
- Let bunnies cool on the pan for 15 minutes before attempting to move them. Then transfer to a wire rack to cool completely.
Notes
Storage and Make Ahead Tips
At Room Temperature: Store baked bunny brookies in an airtight container at room temperature for up to 5 days. The honey in the cookie dough keeps them soft and fresh.
In the Refrigerator: Bunny brookies can be refrigerated for up to 1 week. Let them come to room temperature before serving for the best texture.
Freezing Baked Bunny Brookies: Cool completely, then freeze in a single layer on a baking sheet. Once frozen solid, transfer to a freezer safe container or bag for up to 3 months. Thaw at room temperature or warm gently in a 300 degree oven for 5 minutes.
Make Ahead Strategy:
- Day 1: Make and ferment both cookie dough AND brownie batter overnight (20 minutes active time total)
- Day 2: Portion cookie dough into 35g balls, shape into bunnies, freeze 1 hour, fill with brownie batter, add nose gem, and bake (30 minutes active time)
Freezing Unbaked Bunnies: You can shape the bunny cookies and freeze them unbaked for up to 1 month. Freeze on a baking sheet until solid, then transfer to a freezer bag. When ready to bake, do not thaw. Fill frozen bunnies with brownie batter and bake, adding 2 to 3 minutes to the baking time.

Frequently Asked Questions
Can I use sourdough discard instead of active starter?
Yes, absolutely. Sourdough discard works beautifully in both the cookie dough and brownie batter. Active starter provides slightly more rise and structure, but discard is a wonderful way to reduce waste and still get delicious results.
Do these taste like sourdough?
No. The sourdough fermentation adds depth and complexity to the flavor, but there is zero sour or tangy taste. The chocolate and butter flavors are front and center.
Can I make these without a scale?
While a kitchen scale is highly recommended for the most accurate results, you can use the cup measurements provided in the recipe. Just be sure to spoon and level your flour rather than scooping directly from the bag, which can pack in too much flour.
Why do I need to freeze the bunny shapes before filling them?
Freezing the shaped cookie dough prevents it from spreading or losing its shape when you add the wet brownie batter. It also gives the cookie a head start in the oven, which helps maintain clean lines between the cookie and brownie.
Can I make these in different shapes?
Absolutely. You can shape the cookie dough into circles, hearts, squares, or any other shape you like. Just make sure the border is thick enough to hold the brownie filling.
My brownie batter is very thick. Is this normal?
Yes. After the overnight fermentation in the refrigerator, the brownie batter will be thick like frosting. This is exactly what you want. The thick consistency prevents leaking during baking. For the bunny ears, the thick cold batter can be rolled into ropes.
Can I bake these at 350 degrees instead of 340?
You can, but watch them closely. At 350 degrees, the cookies may brown more quickly. Start checking at 12 to 13 minutes and pull them when the edges are golden and the brownie is just set.
How do I know when they are done baking?
The cookie edges should be deep golden brown and the brownie center should look set but still slightly soft. A toothpick inserted into the brownie should come out with moist crumbs. The bunnies will firm up as they cool.
What if I don’t have naturally colored chocolate gems?
You can use regular chocolate chips, mini M&Ms, or even a small piece of orange peel for the nose. You can also skip the nose entirely and they’ll still be adorable.
Why do the ears need to be wider than normal?
During baking, the cookie dough puffs slightly. If you make the ears too narrow, they’ll bake up looking like tiny antennae. Setting them wider gives them room to puff into proper bunny ear proportions.
Can I make these without sourdough?
This recipe is specifically designed for sourdough fermentation, which creates the thick brownie batter and sturdy cookie structure needed for these shapes. A yeasted or non fermented version would require significant recipe adjustments and may not hold the shapes as well.

Shop This Recipe
Baking Essentials:
- Unreal Naturally Colored Chocolate Gems – Perfect for bunny noses in orange, red, or pink
- Kitchen Scale – Essential for precise 35g cookie dough portions
- Half Sheet Baking Pan – Professional quality for even baking
- Parchment Paper – Prevents sticking and makes cleanup easy
Sourdough Tools:
- Bench Scraper – Helpful for portioning dough
- Cookie Scoop – Makes scooping the brownie batter easy
Easter Extras:
- Easter Cookie Bags – Package your brookies as gifts
- Easter Gift Stickers – Add a personal touch to homemade treats
Final Thoughts
These sourdough bunny brookies combine the best of both worlds: the crispy, chewy texture of long fermented chocolate chip cookies and the fudgy richness of sourdough brownies. They are a labor of love that creates something entirely special for Easter.
Whether you make them for Easter baskets, a spring celebration, or just because you cannot decide between cookies and brownies, I hope you love them as much as I do.

Have you made these bunny brookies? Leave a comment below and let me know how they turned out! I would love to hear about your experience.
Share your photos! If you make this recipe, tag me on Instagram, TikTok, or Facebook at @h3artofthehome so I can see your beautiful creations. I love seeing your bakes come to life!
Get new recipes in your inbox: Sign up for my newsletter to have the latest sourdough recipes and baking tips delivered straight to your email every week.


Amazon Affiliate Disclaimer:
This post contains Amazon affiliate links. As an Amazon Associate, I earn from qualifying purchases at no additional cost to you. I only recommend products I personally use and love in my own kitchen.


Leave a Reply