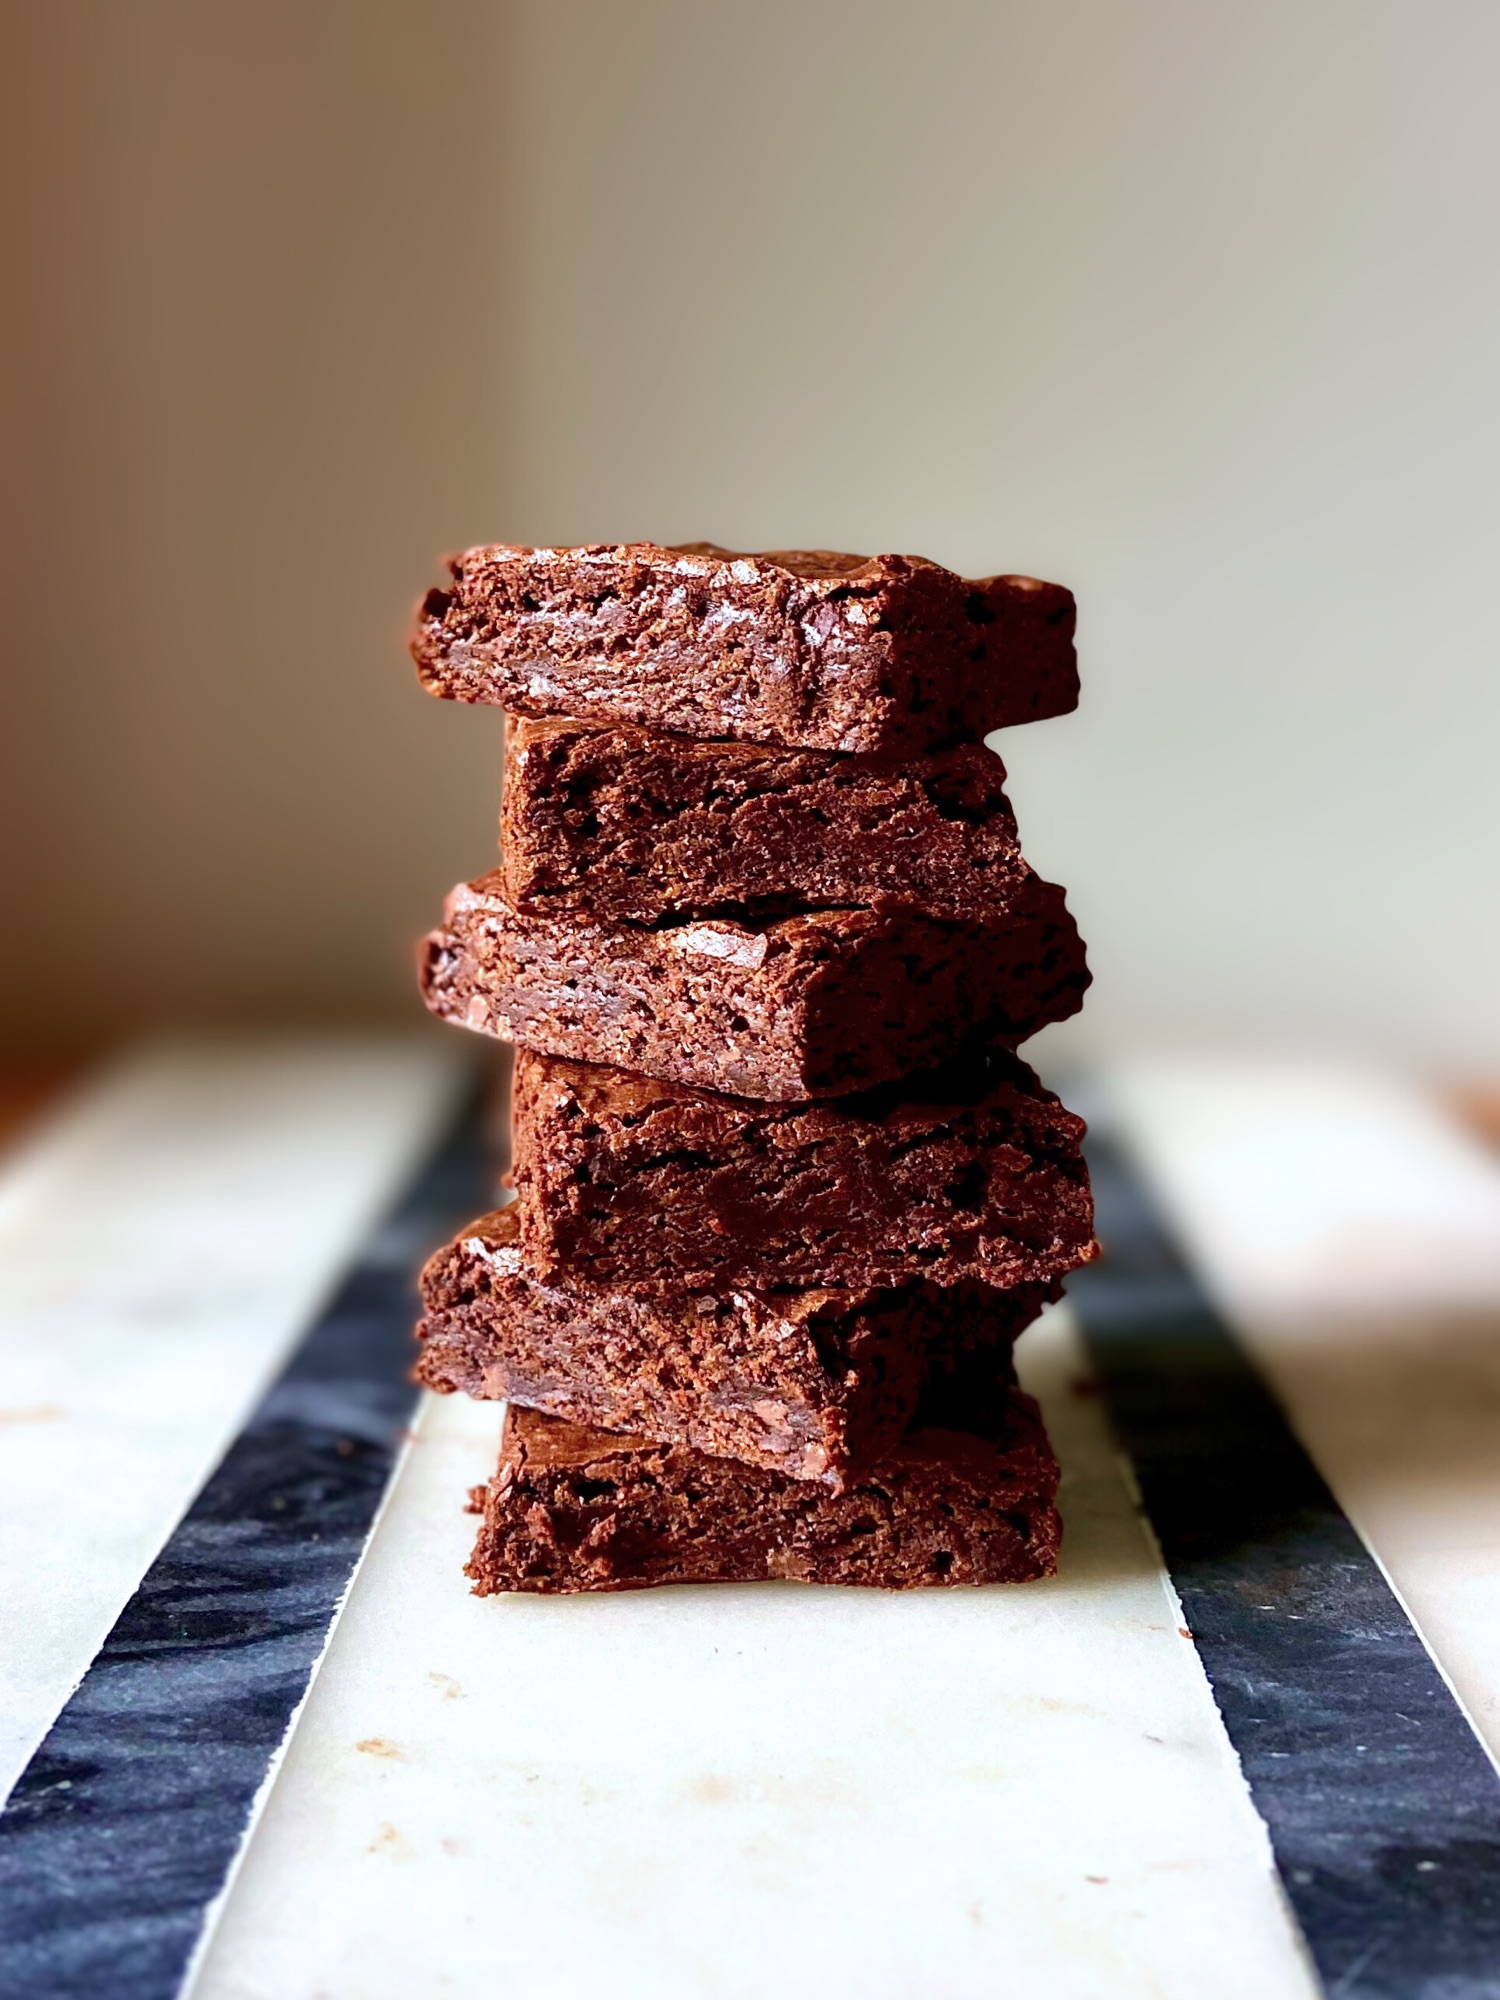
If you’ve been wondering what to do with your sourdough starter besides bread, these fudgy sourdough brownies are about to become your new obsession. Unlike traditional brownies, this recipe uses an overnight fermentation process that creates incredibly rich, complex chocolate flavor while maintaining that perfect fudgy texture everyone craves.
The secret is the 12 to 18 hour cold fermentation. While you sleep, the sourdough starter works its magic, developing deeper flavors and breaking down proteins for an even more tender crumb. The slow ferment creates layers of complexity that make the chocolate taste richer and more intense.
The result? Brownies that are deeply chocolatey with mysterious depth that keeps people asking “what makes these so good?” Plus, the overnight rest means less work on baking day. You just bring the batter to room temperature and bake. Don’t have a sourdough starter? Check the jump to section for the conversion recipe to no sourdough!
Jump to Section
Jump to:
- Why Use Sourdough Starter in Brownies
- What If I Don’t Have Sourdough Starter?
- Ingredient Breakdown
- Tips for Perfect Fudgy Brownies
- Visual Cues: How to Tell When They’re Done
- Variations and Add-Ins
- Troubleshooting
- Serving Suggestions
- Storage Instructions
- Frequently Asked Questions
Fudgy Sourdough Brownies
Ingredients
- 170 g unsalted butter
- 140 g semi-sweet chocolate chopped or chips
- 200 g granulated sugar
- 60 g brown sugar
- 150 g eggs about 3 large
- 20 g egg yolk about 1 extra yolk
- 8 g vanilla extract roughly 2 tsp
- 60 g unsweetened cocoa powder
- 3 g espresso powder about 1 tsp, optional but highly recommended
- 85 g all-purpose flour
- 80 g sourdough starter 100% hydration, discard or active
- 4 g fine salt
- 120 g dark chocolate chips for folding in before fermentation
- Flaky sea salt for topping
Instructions
Mix Wet Ingredients:
- Melt chocolate + butter: In a saucepan or bowl over gentle heat, melt the butter and chopped chocolate together until smooth. Set aside to cool slightly.
- Add sugars, eggs, vanilla, and starter: Whisk in both sugars while the mixture is still warm, then beat in the eggs and extra yolk one at a time. Stir in the vanilla extract and sourdough starter until everything is glossy and cohesive.
Mix dry ingredients:
- In a separate bowl, combine cocoa powder, espresso powder, flour, and salt. Fold this gently into the wet mixture until just combined—no overmixing.
- Fold in the chocolate chips.
Ferment overnight:
- Cover the bowl and refrigerate for 12–18 hours. This slow ferment deepens flavor and helps develop a fudgy, complex crumb.
Next day, prepare to bake:
- Let the batter sit at room temperature for 60-75 minutes to loosen up properly.
- Pour into a parchment-lined pan (see notes for sizes) and smooth the top.
- Sprinkle with flaky sea salt.
- Bake at 340°F (170°C): 8×8” pan: 32-38 minutes, 9×9” pan: 28-32 minutes, 13×9” pan: 22-26 minutes. You’re looking for set edges and a center that’s just barely jiggly—don’t overbake! The top should look slightly underbaked when you remove them.
- Cool completely: Let cool completely in the pan before slicing to preserve the ultra-fudgy center. For cleanest cuts, chill for 1 hour before slicing.
Notes
Why Use Sourdough Starter in Brownies?
Using sourdough starter in brownies might sound unusual, but it’s a game-changer for flavor and texture. The fermentation process breaks down proteins in the flour, creating an even more tender, fudgy crumb. The sourdough starter also adds subtle complexity to the chocolate flavor without making them taste sour or tangy. Plus, it’s a perfect way to use up sourdough discard, so nothing goes to waste!
These overnight brownies develop layers of flavor that you simply can’t achieve with a quick-mix recipe. The slow, cold fermentation enhances the chocolate and creates that “secret ingredient” depth that keeps people asking for the recipe.
What If I Don’t Have Sourdough Starter?
You can absolutely make these brownies without sourdough starter, but you’ll lose the overnight fermentation benefit that makes them special. Here’s how to adapt the recipe.
How to Replace the Sourdough Starter
Your sourdough starter (80g at 100% hydration) contributes both flour and liquid to the recipe. To replace it:
Remove from the recipe:
- 80g sourdough starter
Add to the recipe:
- 40g (about 1/3 cup) all-purpose flour (bringing your total flour to 125g)
- 40g (about 2 tablespoons plus 2 teaspoons) whole milk
That’s it. No baking powder or baking soda needed. Fudgy brownies rely on eggs for structure, not leavening agents. Adding baking powder or baking soda would make these cakey instead of fudgy.
What Changes When You Skip the Sourdough
No Overnight Fermentation: Without sourdough starter, there’s no point in the 12 to 18 hour rest. Mix the batter and bake immediately, just like regular brownies.
Different Flavor Profile: You’ll get classic, delicious chocolate brownies, but without the complex depth that fermentation creates. They’ll still be fudgy and rich, just more straightforward in flavor.
Simpler Process: You can make these start to finish in under an hour instead of planning ahead.
Instructions for Non-Sourdough Version
Follow the recipe exactly as written with these changes:
- Mix wet ingredients: Melt chocolate and butter together. Whisk in both sugars, then beat in eggs and extra yolk one at a time. Stir in vanilla extract and milk.
- Mix dry ingredients: Combine cocoa powder, espresso powder, flour (now 125g total), and salt. Fold into wet mixture until just combined.
- Add chocolate chips: Fold in the dark chocolate chips.
- Bake immediately: Pour into your prepared pan, sprinkle with flaky salt, and bake right away. No overnight rest needed.
- Baking times remain the same: 8×8 inch pan: 32 to 38 minutes, 9×9 inch pan: 28 to 32 minutes, 13×9 inch pan: 22 to 26 minutes.
My Honest Take
If you don’t have sourdough starter, this adaptation will give you excellent fudgy brownies. But if you do have starter (or can make some), I strongly recommend trying the original recipe with the overnight fermentation. The depth of flavor you get from that slow ferment is what makes these brownies truly special and different from every other brownie recipe out there.
Think of the non-sourdough version as a fantastic plan B, and the sourdough version as the reason this recipe exists.
Relationship Ingredient Breakdown: Why Each Ingredient Matters
Understanding why each ingredient is in this recipe will help you make the best sourdough brownies possible. Here’s what you need and why it matters.
Chocolate and Cocoa
Semi-Sweet Chocolate (140g): This is what gives you that intense chocolate flavor and contributes to the fudgy texture. I use quality chocolate chips or a chopped bar. The better your chocolate, the better your brownies. Look for something with at least 50% cacao.
Unsweetened Cocoa Powder (60g): This deepens the chocolate flavor without adding extra fat or sugar. Dutch-process cocoa gives you a darker color and milder flavor, while natural cocoa powder is more acidic and intense. Either works beautifully here.
Dark Chocolate Chips (120g): These are folded in before fermentation and create pockets of melted chocolate throughout. I prefer dark chocolate chips because they hold their shape better during the long ferment and add bittersweet contrast to the sweetness of the brownie.
Fats and Sweeteners
Unsalted Butter (170g): Butter adds richness and helps create that shiny, crackly top. I always use unsalted so I can control the salt level precisely. Make sure it’s fully melted and combined with the chocolate for a smooth base.
Granulated Sugar (200g): This is your primary sweetener. Granulated sugar dissolves completely into the batter and helps create that delicate, crackly top crust.
Brown Sugar (60g): Just a small amount of brown sugar adds moisture and a subtle caramel note. The molasses in brown sugar also helps keep these brownies extra fudgy.
Eggs and Leavening
Eggs (150g, about 3 large): Eggs provide structure and richness. They help bind everything together while keeping the texture fudgy rather than cakey.
Extra Egg Yolk (20g, about 1 yolk): This extra yolk is the secret to that ultra-fudgy, dense texture. Yolks add fat and richness without the leavening power of egg whites, which would make these more cake-like.
The Sourdough Component
Sourdough Starter (80g, 100% hydration): This is where the magic happens. The starter adds complexity and helps break down proteins during the overnight ferment. Use discard or active starter, either works. If your starter is not 100% hydration, you may need to adjust the flour slightly.
Flavor Enhancers
Vanilla Extract (8g, roughly 2 tsp): Pure vanilla extract brings out the chocolate flavor. Don’t skip this.
Espresso Powder (3g, about 1 tsp): This is optional but highly recommended. Espresso powder doesn’t make brownies taste like coffee, it intensifies the chocolate flavor and adds depth. If you don’t have espresso powder, instant coffee works too.
Fine Salt (4g): Salt balances sweetness and enhances all the other flavors. Don’t skip it.
Flaky Sea Salt (for topping): That finishing touch of flaky salt on top creates the perfect sweet and salty contrast. I use Maldon or any flaky sea salt.
Flour
All-Purpose Flour (85g): Just enough flour to give structure without making these cakey. We’re keeping the flour ratio low compared to most brownie recipes, which is part of what makes these so fudgy.
The balance of these ingredients, combined with the overnight fermentation, is what makes these brownies special. Don’t substitute or skip ingredients unless you know what you’re doing.
Tips for Perfect Fudgy Sourdough Brownies
Getting these brownies right comes down to a few key techniques. Here’s what you need to know.
Plan Ahead for the Overnight Fermentation
The 12 to 18 hour rest is what makes these special. Mix your batter the night before you want to bake, then let time do the work for you. This isn’t a step you can skip or rush. The slow, cold fermentation is the entire point of this recipe.
Always Bring Batter to Room Temperature Before Baking
After the overnight rest, let the batter sit at room temp for 60 to 75 minutes. This is not optional. Cold batter won’t spread properly and won’t bake evenly. Set a timer so you don’t forget. The batter should loosen up significantly and be pourable but still thick.
Don’t Overbake
This is the most common mistake. These brownies should look slightly underbaked when you remove them from the oven. The center should be just barely jiggly with set edges. A toothpick should come out with moist crumbs, not clean. They’ll continue cooking as they cool in the hot pan. Trust the process and pull them early.
Cool Completely Before Slicing
I know it’s tempting to cut into them while they’re warm, but resist. For the cleanest cuts and best texture, let them cool completely in the pan. This takes at least 2 hours. For extra clean slices, chill them in the refrigerator for an hour before cutting, then wipe your knife between cuts.
Choose the Right Pan Size
Use a 13×9 inch pan for thinner brownies that are easier to serve and bake faster. Use a 9×9 inch pan for thick, decadent squares with the best fudgy-to-edge ratio. Use an 8×8 inch pan if you want extra thick brownies, but know they’ll take longer to bake and you need to watch them carefully.
Use Quality Chocolate
Your chocolate is a main ingredient here, not a background player. Use chocolate you’d be happy eating on its own. It doesn’t have to be expensive, but it should taste good. Avoid chocolate chips labeled “baking chips” as they often have additives that affect melting.
Measure by Weight, Not Volume
Baking is chemistry. Use a kitchen scale and measure in grams for the most accurate results. A cup of flour can vary by 30 grams depending on how you scoop it, and that makes a big difference in brownies.
Line Your Pan with Parchment Paper
Leave some overhang on two sides so you can lift the whole brownie slab out of the pan once it’s cool. This makes cutting so much easier and prevents you from scratching your pan trying to get the corner pieces out.
Don’t Skip the Flaky Salt on Top
That finishing sprinkle of flaky sea salt is what takes these from great to incredible. The salt balances the sweetness and brings out the chocolate flavor even more. Don’t use regular table salt, use proper flaky salt like Maldon.
Visual Cues: How to Tell When They’re Done
Knowing when to pull brownies from the oven is the difference between fudgy perfection and dry disappointment. Here’s exactly what to look for.
What Perfect Batter Looks Like
Before you even get to baking, your batter should be thick, glossy, and ribbony. After the overnight fermentation, it will look slightly thicker and may have a subtle sheen from the butter. When you bring it to room temperature, it should loosen up enough to dump it in but still be thick and luxurious, not runny.
Signs Your Brownies Are Done
The Edges: The edges should be set and pulling slightly away from the sides of the pan. They’ll look matte and firm, not wet or glossy.
The Center: This is where people mess up. The center should still look slightly underbaked and have a gentle jiggle when you shake the pan. It should NOT be firm. If it looks completely set, you’ve gone too far. Unless you like those extra crispy edges.
The Surface: You’ll see a thin, papery crust on top that may have some cracks. The surface should look dry but the cracks might still look a bit glossy inside. That’s perfect.
The Toothpick Test: Insert a toothpick into the center. It should come out with moist crumbs clinging to it, NOT clean. Clean means overbaked. You want those crumbs to look wet and fudgy.
What Overbaked Looks Like
If your brownies are completely firm in the center, have no jiggle, and a toothpick comes out clean, they’re overbaked. They’ll still taste good, but they won’t have that ultra fudgy texture we’re going for.
Cooling is Part of the Baking Process
Remember, brownies continue to cook as they cool in the hot pan. That’s why pulling them when they look slightly underdone is exactly right. As they sit, the residual heat finishes the job and you end up with perfectly fudgy brownies.
Trust the process. Pull them early. Let them cool completely. You’ll be rewarded with the fudgiest brownies you’ve ever made.
Variations and Add-Ins
Once you’ve mastered the base recipe, here are some ways to customize your sourdough brownies.
Chocolate Variations
Triple Chocolate Brownies: Add 60g of white chocolate chips along with the dark chocolate chips for extra chocolate variety.
Mint Chocolate Brownies: Add 1 to 2 teaspoons of peppermint extract along with the vanilla, and use mint chocolate chips instead of regular dark chocolate chips.
Mexican Chocolate Brownies: Add 1 teaspoon of ground cinnamon and 1/4 teaspoon of cayenne pepper to the dry ingredients for a spicy kick.
Mix-In Ideas
Peanut Butter Swirl: Drop spoonfuls of peanut butter on top of the batter after pouring into the pan, then swirl with a knife. The fermentation won’t affect the peanut butter much.
Nutella Swirl: Same concept as peanut butter. Drop dollops of Nutella on top and swirl before baking.
Espresso Brownies: Increase the espresso powder to 2 teaspoons for a stronger coffee flavor that complements the chocolate.
Salted Caramel Brownies: Drizzle salted caramel sauce over the batter before baking, then swirl it in. Add extra flaky salt on top.
Texture Add-Ins
Chopped Nuts: Fold in 100g of toasted walnuts, pecans, or hazelnuts along with the chocolate chips. Toast them first for better flavor.
Pretzel Pieces: Crush 80g of pretzels and fold them in for a sweet and salty crunch.
Cookie Dough Chunks: Freeze small pieces of edible cookie dough and press them into the batter before baking.
Brownie Cookies: Instead of baking in a pan, scoop the batter onto a lined baking sheet and bake at 340°F for 12 to 15 minutes for chewy brownie cookies.
Dietary Modifications
Gluten-Free: Replace the all-purpose flour with a 1:1 gluten-free baking blend. The texture will be slightly different but still fudgy. You’ll need to use gluten-free sourdough starter as well.
Dairy-Free: Replace butter with refined coconut oil or a high-quality vegan butter. Make sure your chocolate chips are dairy-free as well.
Reduced Sugar: You can reduce the granulated sugar by up to 50g, but the texture will be slightly less fudgy and you won’t get as much of that crackly top.
A Note on Variations
When making variations, remember that the overnight fermentation can affect some add-ins. Wet ingredients like caramel or peanut butter swirls work best added right before baking, not before the fermentation. Dry ingredients like spices, nuts, and chocolate chips can all go in before the overnight rest.
Start with the base recipe first, then experiment with these variations once you know what the original should taste and look like.
Frequently Asked Questions
Can I use active sourdough starter instead of discard?
Yes! Both active starter and discard work perfectly in this recipe. Since we’re using the starter for flavor and texture rather than leavening, either option will give you great results. Active starter may have a slightly milder flavor than old discard, but the difference is minimal after the overnight fermentation.
Can I make these without the overnight fermentation?
While you technically could bake them immediately, you’d lose the complex flavor and tender texture that makes these brownies special. The overnight fermentation is what sets them apart from regular brownies. If you’re in a rush, regular brownie recipes are a better choice. But if you want the depth and complexity that fermentation brings, you need to plan ahead.
Why do these brownies taste so good?
The overnight fermentation develops deeper, more complex chocolate flavor. The process also breaks down proteins for an incredibly tender, fudgy texture that regular brownies can’t match. The sourdough starter adds layers of flavor without any sourness, creating a chocolate experience that’s richer and more interesting than traditional brownies.
Can I freeze sourdough brownies?
Absolutely! Wrap cooled brownies tightly in plastic wrap, then place in a freezer bag or airtight container. They’ll keep for up to 3 months. Thaw at room temperature for about an hour before serving, or warm individual brownies in the microwave for 20 to 30 seconds from frozen.
Do these brownies taste sour?
Not at all! The sourdough starter adds complexity and depth to the chocolate flavor without any sour or tangy taste. They taste like intensely rich, fudgy chocolate brownies with mysterious depth. People can tell there’s something special about them, but they can’t quite put their finger on what it is.
What pan size should I use?
You have three options depending on how thick you want your brownies:
- 8×8 inch pan: Extra thick brownies, bake for 32 to 38 minutes
- 9×9 inch pan: Thick, decadent squares, bake for 28 to 32 minutes
- 13×9 inch pan: Thinner, easier to serve brownies, bake for 22 to 26 minutes
I prefer the 9×9 inch pan for the best balance of thickness and serving size.
Can I use a different type of chocolate?
You can, but it will change the flavor and texture. Semi-sweet chocolate gives you the classic brownie flavor. Bittersweet or dark chocolate (60% to 70% cacao) will make them less sweet and more intensely chocolatey. Milk chocolate will make them sweeter and lighter in flavor. For the chocolate chips, stick with dark chocolate as they hold their shape better during the long fermentation.
How do I know when they’re done baking?
The edges should be set and pulling slightly away from the pan, while the center should still have a gentle jiggle when you shake the pan. A toothpick inserted in the center should come out with moist crumbs, not clean. The surface should have a thin, papery crust with some cracks. They should look slightly underbaked when you pull them out.
Why do I need to bring the batter to room temperature before baking?
Cold batter from the refrigerator is too thick and won’t bake evenly. The 60 to 75 minute rest at room temperature allows the butter to soften slightly and the batter to loosen up, which gives you even baking and the proper fudgy texture. If you skip this step, the brownies may not bake through properly.
Can I halve this recipe?
Yes, you can halve the recipe and bake in an 8×8 inch pan for 28 to 32 minutes. The overnight fermentation time stays the same.
Can I add nuts if I’m allergic?
These brownies are naturally nut-free! You don’t need to add anything. If you want extra texture, you can add chocolate chips, toffee bits, or crushed pretzels instead of nuts.
My brownies sank in the middle. What happened?
This usually means they were underbaked, despite looking set on top. Give them a few extra minutes next time. Also, resist opening the oven door too many times during baking, as temperature fluctuations can cause sinking.
How long do these brownies last?
At room temperature in an airtight container, they’ll stay fresh for up to 4 days. In the refrigerator, they’ll last up to a week. In the freezer, they’ll keep for up to 3 months. The texture is best within the first 3 days.
Can I make these gluten-free?
You can substitute the all-purpose flour with a 1:1 gluten-free baking blend, and use gluten-free sourdough starter. The texture will be slightly different but should still be fudgy. Make sure all your other ingredients (chocolate, cocoa powder) are certified gluten-free.
Serving Suggestions
These fudgy sourdough brownies are incredible on their own, but here are some ways to take them to the next level.
Classic Pairings
With Ice Cream: Serve warm brownies with a scoop of vanilla ice cream on top. The cold ice cream against the warm brownie is unbeatable. Try salted caramel ice cream or coffee ice cream for something different.
With Whipped Cream: A dollop of fresh whipped cream balances the richness. Add a tiny bit of vanilla extract to your whipped cream for extra flavor.
With Fresh Berries: Raspberries or strawberries cut through the richness and add a fresh element. The tartness of the berries complements the deep chocolate flavor.
Hot Fudge Brownie Sundae
Warm a brownie in the microwave for 15 to 20 seconds, top with vanilla ice cream, drizzle with hot fudge sauce, add whipped cream, and finish with a cherry. Classic for a reason.
Brownie Milkshake
Blend a brownie with vanilla ice cream and milk for an incredible milkshake. Add a shot of espresso if you want a mocha version.
Plated Dessert
Cut brownies into neat squares, dust with powdered sugar, and serve with a small scoop of ice cream and a drizzle of salted caramel or chocolate sauce. Add a sprig of fresh mint for presentation.
Coffee Pairing
These brownies pair beautifully with coffee. The espresso powder in the recipe enhances the chocolate, and a strong cup of coffee alongside brings out even more depth. Try them with a cappuccino or cold brew.
Gift Packaging
Cut brownies into squares and stack them in clear cellophane bags tied with ribbon. They make excellent gifts and stay fresh for several days. You can also layer them in a tin with parchment paper between layers.
Brownie S’mores
Cut brownies into small squares, sandwich them between graham crackers with a toasted marshmallow in the middle. The fudgy brownie takes the place of traditional chocolate bars.
Temperature Matters
Room Temperature: The default way to serve them. You get the full fudgy texture and the flavors are perfectly balanced.
Chilled: Some people prefer brownies cold from the fridge. They become even denser and fudgier, almost truffle-like.
Warmed: Heat individual brownies in the microwave for 10 to 15 seconds. The chocolate chips get melty again and the whole thing becomes extra gooey.
Honestly, there’s no wrong way to serve these. They’re rich enough to stand alone but versatile enough to dress up for any occasion.
How to Store Sourdough Brownies
Proper storage keeps your brownies fresh and fudgy for days.
Room Temperature Storage
Store these fudgy sourdough brownies in an airtight container at room temperature for up to 4 days. Layer them with parchment paper if you’re stacking them to prevent sticking. Keep them away from direct sunlight or heat sources, as this can cause the chocolate to bloom or the brownies to dry out.
The texture is best within the first 3 days. After that, they’re still delicious but may become slightly drier.
Refrigerator Storage
If you prefer your brownies cold and extra dense, store them in an airtight container in the refrigerator for up to a week. Chilled brownies have an almost truffle-like texture that some people prefer. Let them sit at room temperature for 10 to 15 minutes before serving if you want them to soften slightly.
Freezer Storage
For longer storage, wrap individual brownies tightly in plastic wrap, then place them in a freezer-safe bag or airtight container. They’ll keep for up to 3 months in the freezer.
To thaw: Remove from the freezer and let sit at room temperature for about an hour. Or, if you’re impatient, microwave individual brownies for 20 to 30 seconds from frozen for a warm, gooey treat.
Reheating Tips
Microwave: Heat individual brownies for 10 to 15 seconds to warm them and make the chocolate chips melty again.
Oven: Wrap brownies in foil and warm in a 300°F oven for 5 to 8 minutes. This works well if you’re reheating multiple brownies at once.
Gifting and Transporting
If you’re giving these as gifts or bringing them to an event, stack them in a container with parchment paper between layers. They travel well and stay fresh for several days without refrigeration. Just make sure they’re completely cool before packaging to avoid condensation.
Did you make these fudgy sourdough brownies? I’d love to hear how they turned out! Please leave a rating and comment below, and don’t forget to tag me on Instagram @h3artofthehome so I can see your delicious creations!


Leave a Reply