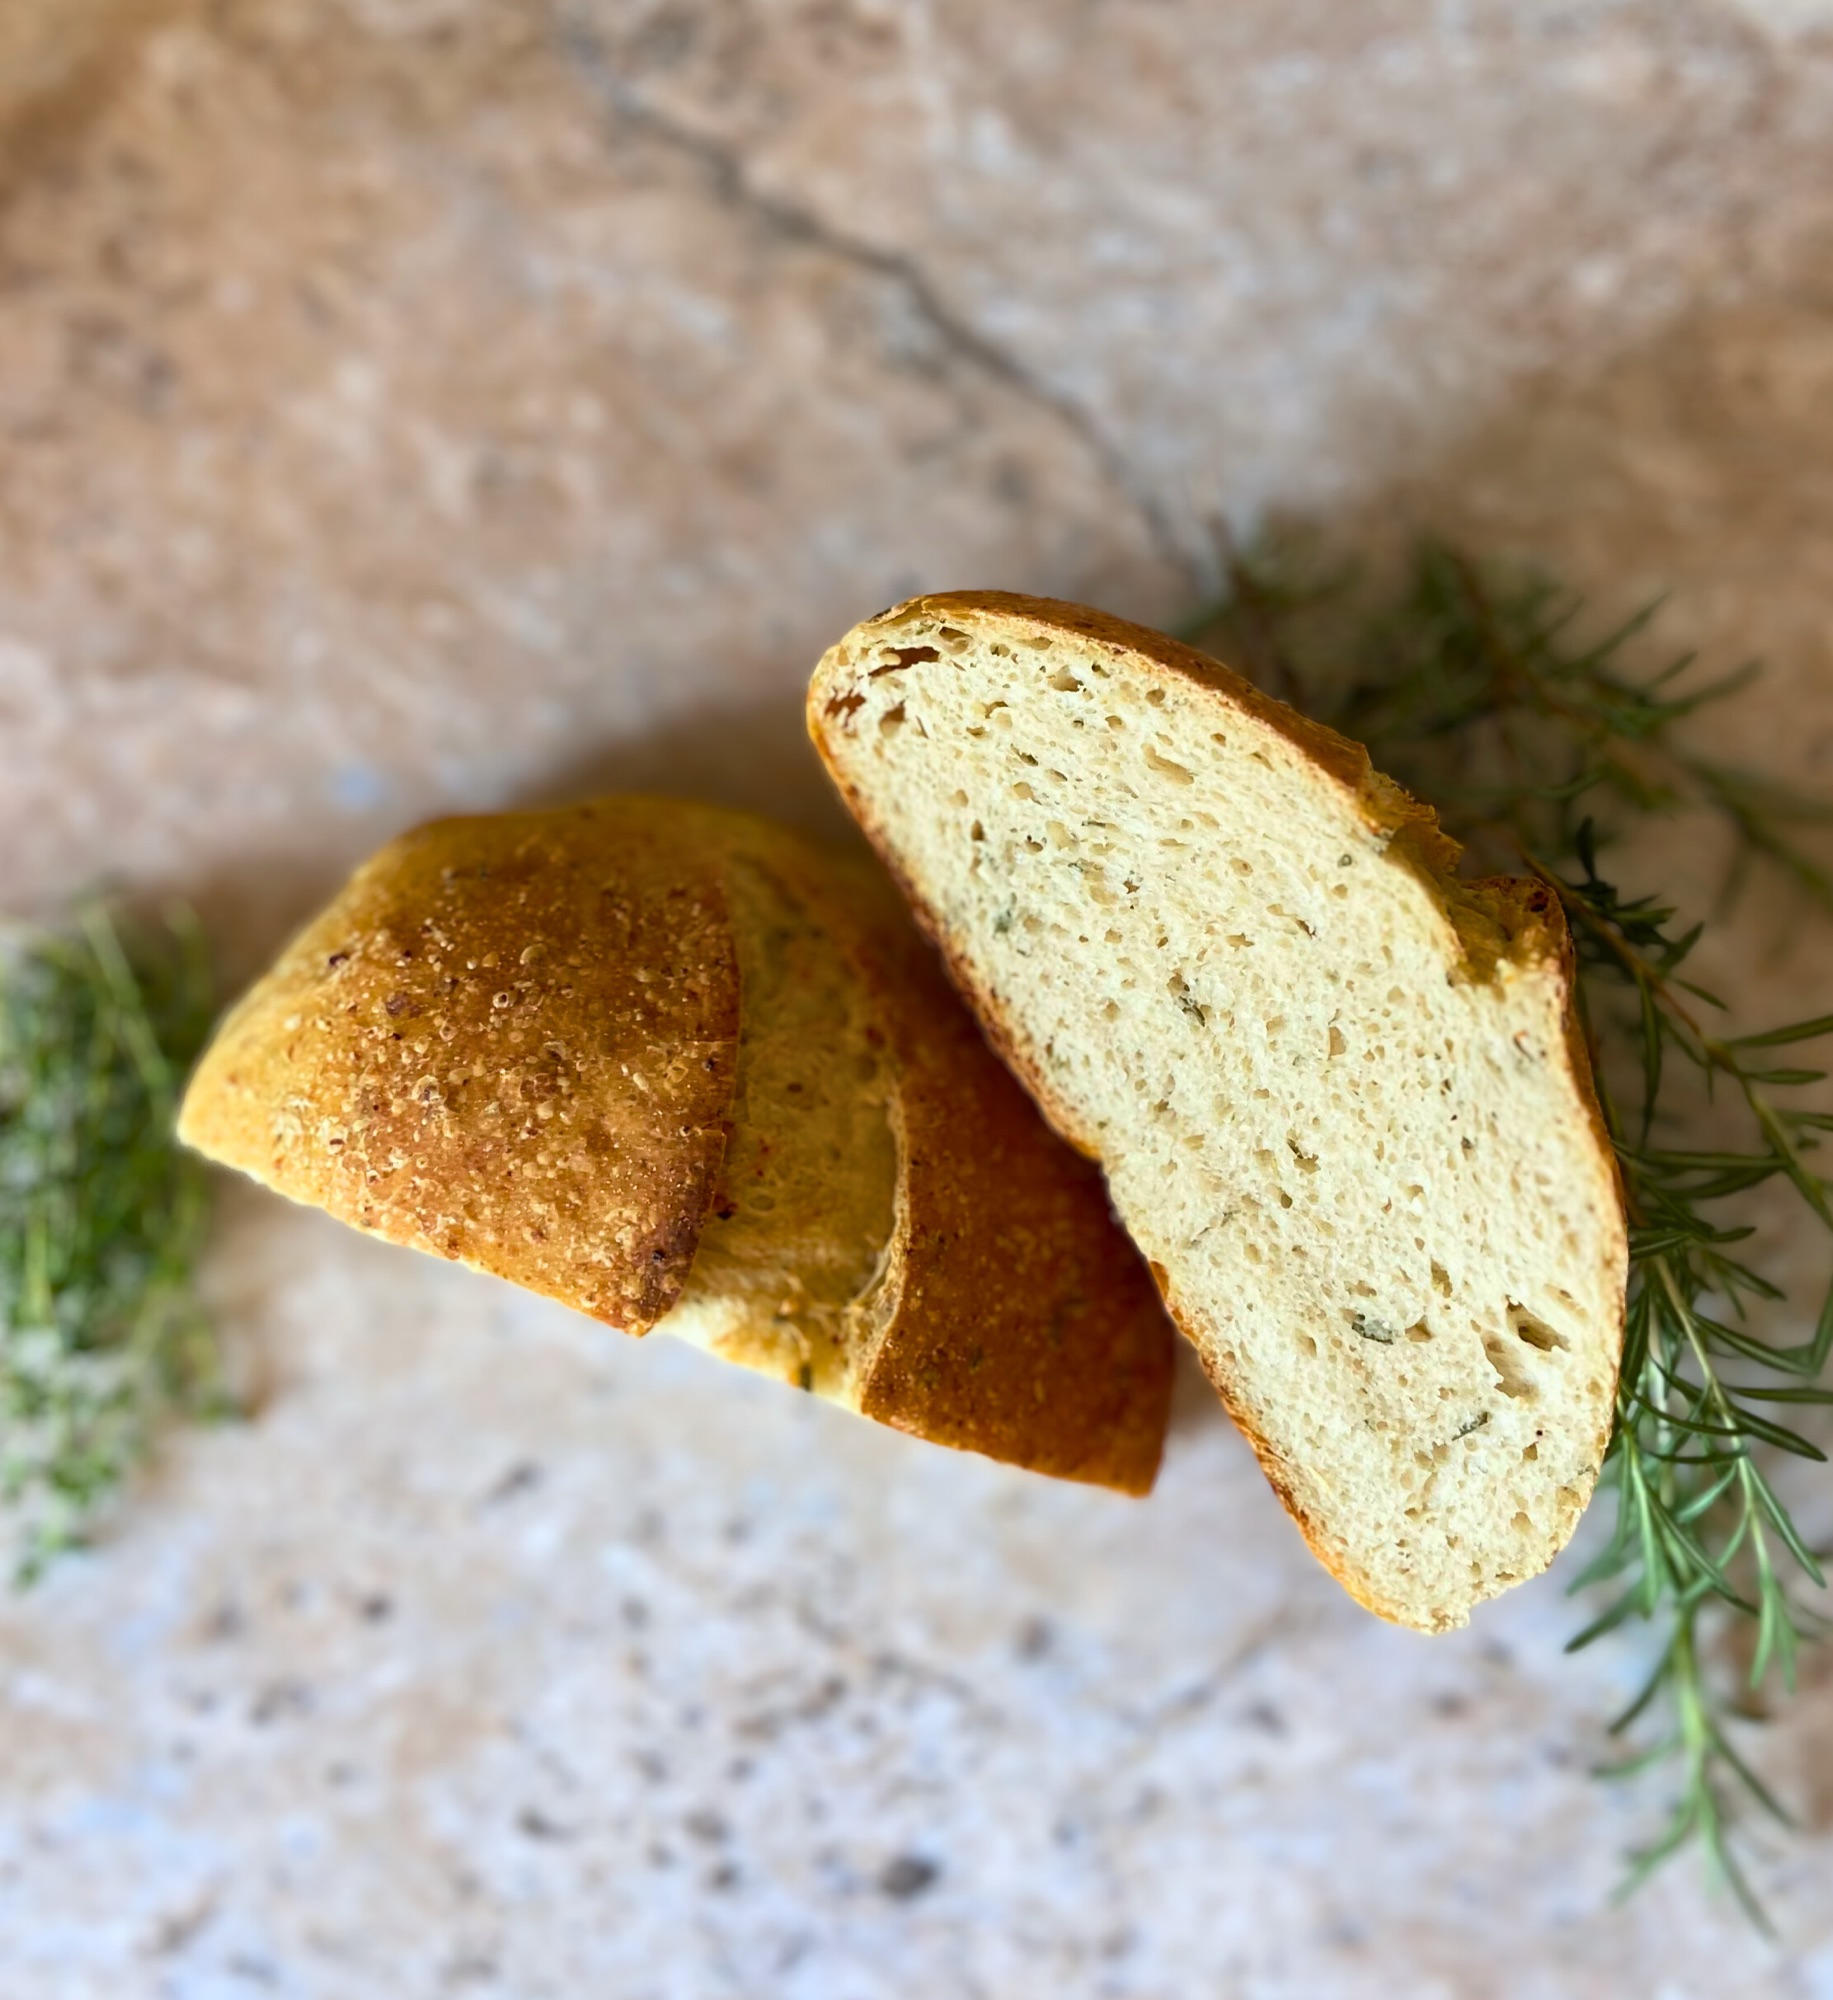
If you’ve been scrolling through TikTok or Instagram lately, you’ve probably seen cottage cheese everywhere. But here’s the thing: most of those viral recipes skip the sourdough fermentation entirely, missing out on all those gut-healthy benefits and complex flavors. This high protein cottage cheese sourdough bread combines the best of both worlds with 83% more protein than regular sourdough and 156% more than store-bought bread, all while keeping that authentic sourdough style and incredible texture.
But there’s a catch. Making cottage cheese sourdough is notoriously difficult because cottage cheese contains active protease enzymes that systematically destroy your gluten structure during fermentation. Most bakers end up with dense, collapsed loaves that never rise properly. After lots of research and testing, I finally cracked the code using fresh herbs as natural enzyme inhibitors combined with strategic cold fermentation. The result? A stable, high rise loaf with over 6 grams of protein per slice.
Jump to Section
- Why Cottage Cheese Sourdough Is So Difficult
- The Science Behind This Recipe
- Key Ingredients and Why They Matter
- Step-by-Step Process
- Tips for Success
- Troubleshooting Common Issues
- Nutritional Information
- Frequently Asked Questions
- More High Protein Recipes

High Protein Cottage Cheese Sourdough Bread
Equipment
- kitchen scale
- Large mixing bowl
- Fine-mesh strainer
- Cheesecloth
- Small bowl for herb infusion
- Plastic wrap or lid
- Banneton or proofing basket (or bowl lined with floured cloth)
- Dutch oven with lid
- Parchment paper
- Sharp knife or bread lame for scoring
- Wire cooling rack
- Instant read thermometer
Ingredients
For the Levain (Night Before):
- 80 g active sourdough starter
- 80 g bread flour
- 80 g water
- For the Final Dough:
All of the levain (above)
- 280 g bread flour
- 180 g cottage cheese full fat recommended, Good Culture brand preferred
- 80 to 100 g warm water adjust based on cottage cheese consistency
- 2 tablespoons fresh rosemary finely chopped
- 1 tablespoon fresh thyme leaves
- 1/2 teaspoon salt
- 1 tablespoon olive oil
- 1/2 teaspoon garlic powder
For Herb Crust (optional):
- 1 tablespoon olive oil
- 1 tablespoon fresh rosemary chopped
- 1 teaspoon fresh thyme
- 1/2 teaspoon coarse sea salt
- 1/4 teaspoon black pepper
Instructions
Night Before: Build Your Levain
- Mix 80g active starter with 80g bread flour and 80g water in a bowl.
- Cover and let ferment at room temperature for 8 to 12 hours until doubled and bubbly.
Morning: Drain Your Cottage Cheese
- Place 180g cottage cheese in a fine mesh strainer lined with cheesecloth.
- Salt lightly and let drain for 2 hours.
- You should have about 140g of drained cottage cheese remaining.
Herb Infusion
- Mix the drained cottage cheese with finely chopped fresh rosemary, thyme, and garlic powder in a small bowl.
- Let sit for 30 minutes to allow herbs to release their protective compounds.
Mix the Dough
- In a large mixing bowl, combine the levain with 280g bread flour.
- Add the herb infused cottage cheese mixture and work until just combined.
- Gradually add 80 to 100g warm water, starting with 80g and adding more as needed until the dough comes together.
- The dough should be slightly sticky but manageable, similar to typical bread dough.

Add Final Ingredients
- Work in 1/2 teaspoon salt and 1 tablespoon olive oil with wet hands using gentle mixing motions.
Bulk Fermentation with Stretch and Folds
- Place dough in an oiled container.
- Perform 4 sets of stretch and folds at 30 minute intervals during the first 2 hours at room temperature.
- For each set: wet your hands, grab one side of the dough, stretch it up, and fold it over itself. Rotate the container 90 degrees and repeat. Do this 4 times per set (once on each side).
- After the last set of folds, let the dough rest for 1 more hour at room temperature for a total of 3 hours of ambient fermentation.
Critical Cold Retard
- After 3 total hours at room temperature, immediately transfer your dough to the refrigerator.
- Refrigerate for 12 to 24 hours.
Shape the Dough
- Remove dough from the fridge and shape into a tight boule while still cold.
- Place seam side down in a banneton or bowl lined with floured cloth.
Final Rise
- Let rise at cool room temperature (65 to 68°F) for 3 to 4 hours until increased by about 50%.
- The dough should feel airy and jiggle slightly when you shake the bowl.
Preheat Oven
- Place Dutch oven in oven and preheat to 450°F for 45 minutes.
Prepare Herb Crust
- Mix 1 tablespoon olive oil with fresh herbs, salt, and pepper in a small bowl.
- Score and Load
- Turn dough onto parchment paper.
- Score with a sharp blade in a decorative pattern.
- Brush with herb oil mixture, ensuring herbs stick to surface.
Bake
- Lower dough into hot Dutch oven on parchment.
- Cover and bake for 20 minutes.
- Remove lid and reduce temperature to 425°F.
- Bake for another 20 to 25 minutes until deep golden brown and internal temperature reaches 205°F.
Cool
- Transfer bread to a wire cooling rack.
- Cool completely for at least 2 hours before slicing.
Notes
Why Cottage Cheese Sourdough Is So Difficult
Let me be straight with you: cottage cheese sourdough represents one of bread baking’s most challenging techniques. While cottage cheese dramatically boosts protein content, it contains active protease enzymes that break down the gluten structure your dough needs to rise. These enzymes are like tiny scissors cutting through the protein network you’re trying to build, causing dough collapse and poor oven spring.
Traditional sourdough methods rely on 12 to 24 hour fermentation periods, which gives these enzymes plenty of time to wreak havoc. The longer your dough sits at room temperature, the more damage the proteases cause. Most cottage cheese sourdough attempts fail spectacularly with dough that spreads instead of rises, creating dense, gummy centers and zero of that beautiful open crumb we all love.
The viral cottage cheese flatbreads you see on social media sidestep this problem by using quick-baking methods with no fermentation at all. They’re essentially protein-rich pancakes, not real sourdough bread. While those recipes have their place, they miss out on the complex flavors, improved digestibility, and gut health benefits that come from proper sourdough fermentation.

The Science Behind This Recipe
This recipe solves the enzyme problem through two key innovations: herb tannins as natural enzyme inhibitors and strategic cold retardation.
Fresh rosemary and thyme contain natural compounds called tannins and phenolic acids that slow down protease activity. When you infuse your cottage cheese with these herbs, you’re creating a protective barrier around the proteins before they even meet the flour. Think of it like wrapping your gluten strands in armor.
But herbs alone aren’t enough. The second part of the solution involves temperature manipulation. Proteases work fastest at warm temperatures (70 to 75°F) and slow down dramatically when cold. At refrigerator temperature (38 to 40°F), these enzymes slow by about 80 to 90%, essentially putting the gluten destruction in slow motion.
The timing strategy works like this: you get 3 hours at room temperature for gluten development through stretch and folds, then immediate refrigeration pauses the enzyme damage while fermentation continues slowly. This gives you proper bread structure while still achieving that characteristic sourdough flavor development.
Key Ingredients and Why They Matter
Cottage Cheese (Good Culture Recommended)
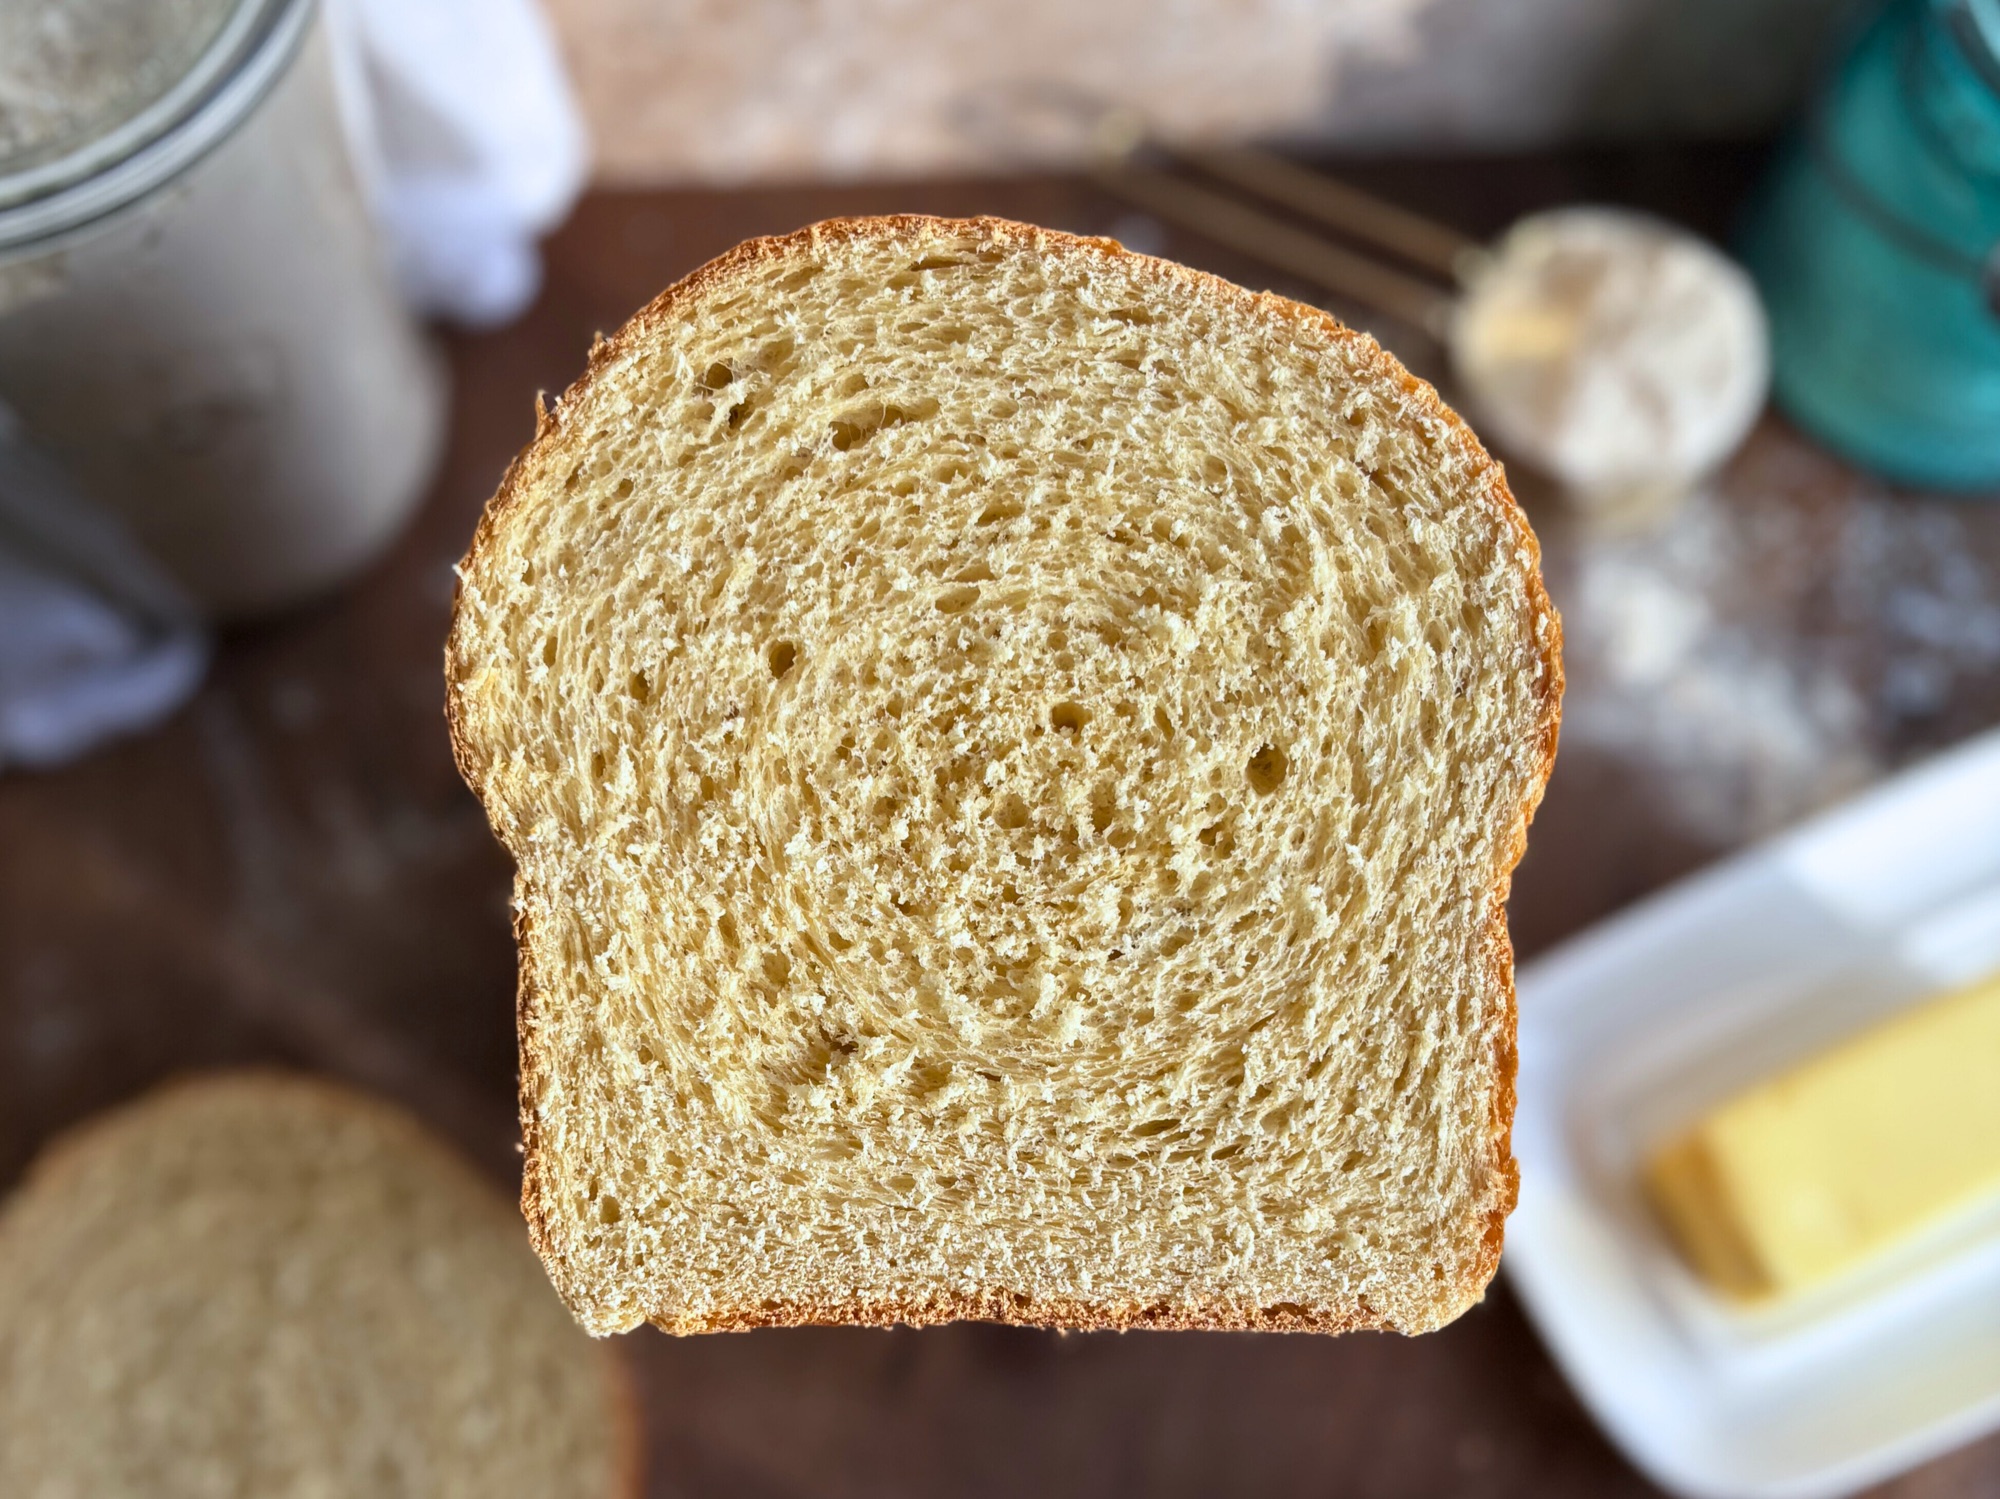
The star ingredient providing all that extra protein. Good Culture brand works exceptionally well for this recipe because it has higher protein content (about 15g per 100g) compared to standard brands (11g per 100g). This makes a real difference in your final protein count per slice.
You’ll drain the cottage cheese before use, which removes excess whey containing the most aggressive enzymes. This step is critical. Don’t skip it.
Fresh Rosemary and Thyme
These aren’t just for flavor, though they do add beautiful aromatic notes to the bread. The natural compounds in these herbs actively slow down the proteases that would otherwise destroy your gluten. Dried herbs won’t work as effectively because they’ve lost many of those protective compounds during processing.
Active Sourdough Starter
Your starter needs to be fed and bubbly, at peak activity. A strong starter is essential because it needs to work efficiently during the limited room temperature fermentation window. If your starter is sluggish, your bread won’t rise properly before you need to refrigerate it.
Bread Flour
High protein bread flour (12 to 14% protein) gives you the strongest gluten network possible. With enzymes working against you, you need every advantage. All-purpose flour won’t provide enough structure.
Strategic Hydration
The water amount ranges from 80 to 100g because different cottage cheese brands drain differently. You’re aiming for about 80% hydration, which creates a workable dough that’s slightly sticky but manageable. Too dry and you can’t develop gluten; too wet and the dough becomes soup.

Step-by-Step Process
Night Before: Build Your Levain
Mix 80g active starter with 80g bread flour and 80g water. Let this ferment at room temperature for 8 to 12 hours until doubled and bubbly. A strong levain is your foundation for success.
Morning: Drain Your Cottage Cheese
Place 180g cottage cheese in a fine-mesh strainer lined with cheesecloth. Salt lightly and let drain for 2 hours. This removes the enzyme-heavy whey. You should end up with about 140g of drained cottage cheese. Different brands will drain differently, which is why your water amount will vary later.
Herb Infusion
Mix your drained cottage cheese with finely chopped fresh rosemary, thyme, and garlic powder. Let this sit for 30 minutes. The herbs need time to release their protective compounds into the cottage cheese.
Mixing the Dough
Combine your levain with flour, then add the herb-infused cottage cheese mixture. Gradually add 80 to 100g warm water until the dough comes together. Start with 80g and add more as needed. The exact amount depends on how much moisture your cottage cheese retained after draining.
The dough should feel slightly sticky but manageable, similar to typical bread dough. If it’s bone dry and crumbly, add more water. If it’s soup, you added too much.
Work in salt and olive oil with wet hands using gentle mixing motions.

Bulk Fermentation with Stretch and Folds
This is where proper gluten development happens. Place your dough in an oiled container and perform 4 sets of stretch and folds at 30-minute intervals during the first 2 hours at room temperature.
For each set: wet your hands, grab one side of the dough, stretch it up, and fold it over itself. Rotate the container 90 degrees and repeat. Do this 4 times per set (once on each side).
After your last set of folds, let the dough rest for 1 more hour at room temperature for a total of 3 hours of ambient fermentation.
Critical Cold Retard
After 3 total hours at room temperature, immediately transfer your dough to the refrigerator for 12 to 24 hours. This is when the magic happens. The cold temperature essentially pauses enzyme activity while your sourdough continues fermenting slowly, developing all those complex flavors.
Don’t skip this step. It’s the key to preventing dough collapse.
Shaping and Final Rise
Remove your dough from the fridge and shape it into a tight boule while it’s still cold. The cold temperature keeps enzymes inactive during handling. Place seam-side down in a banneton or floured bowl.
Let rise at cool room temperature (65 to 68°F) for 3 to 4 hours until increased by about 50%. You’re looking for visible puffing but not necessarily doubling. The dough should feel airy and jiggle slightly when you shake the bowl.
Baking
Preheat your Dutch oven to 450°F for 45 minutes. Turn your dough onto parchment paper, score with a sharp blade, then brush with herb oil mixture (olive oil mixed with fresh herbs, salt, and pepper).
Lower into the hot Dutch oven, cover, and bake for 20 minutes. Remove the lid, reduce temperature to 425°F, and bake for another 20 to 25 minutes until deep golden brown and internal temperature reaches 205°F.
Cool completely on a wire rack for at least 2 hours. The structure continues to set as it cools, so resist the urge to slice it warm.

Tips for Success
Use a kitchen scale. Measuring by weight ensures consistency, especially important when working with cottage cheese that varies by brand.
Don’t rush the drain time. Those 2 hours of draining make a real difference in final texture and enzyme control.
Keep your room temperature fermentation short. More time at warm temperatures means more enzyme damage. Stick to the 3-hour window.
The cold retard is not optional. This is what makes the entire recipe work. Plan your baking schedule around it.
Score confidently. A sharp blade and decisive cuts give you the best oven spring. Hesitant scoring leads to tearing.
Let it cool completely. I know it’s tempting to slice into warm bread, but the crumb needs time to set properly. Cutting too early leads to gummy texture.
Troubleshooting Common Issues
Dough is too dry and crumbly
Add more water, 10g at a time, until it comes together. Your cottage cheese drained more than expected, so you need to compensate.
Dough spreads instead of rising
Your enzymes weren’t controlled properly. Next time, make sure you’re draining the cottage cheese fully and getting it into the fridge right at the 3-hour mark.
Dense, gummy crumb
You either didn’t develop enough gluten during stretch and folds, or you sliced the bread before it cooled completely. Make sure you’re doing all 4 sets of folds with proper technique.
No oven spring
Your starter might not have been active enough, or your final proof went too long. Check that your starter doubles within 4 to 6 hours after feeding, and watch your dough carefully during final rise.
Too much herb flavor
Use less herbs in the infusion, or switch to milder herbs like parsley. The protective effect works with lower amounts too.
Nutritional Information
Each slice of this high protein cottage cheese sourdough contains approximately:
- Calories: 120
- Protein: 6.4g (using Good Culture cottage cheese)
- Carbohydrates: 18g
- Fat: 2g
- Fiber: 1g
Protein Comparison
- This recipe: 6.4g protein per slice
- Regular sourdough: 3.5g protein per slice (83% less)
- Store-bought white bread: 2.5g protein per slice (156% less)
The cottage cheese provides complete protein with all essential amino acids, making this bread especially valuable for vegetarians or anyone looking to increase protein intake from non-meat sources.
The sourdough fermentation also enhances nutrient bioavailability, meaning your body can better absorb the protein and other nutrients compared to quick-rise breads.
Frequently Asked Questions
Can I use a different type of cottage cheese?
Yes, but protein content will vary. Full-fat, low-fat, or fat-free all work, though full-fat provides the best texture and flavor. The key is finding a brand that’s thick rather than liquidy. Good Culture, Daisy, and Organic Valley all work well.
What if I don’t have fresh herbs?
Fresh herbs are really important for the enzyme-inhibiting effect. Dried herbs won’t work as effectively. If you absolutely can’t get fresh rosemary and thyme, you can try dried, however it may change the result. The herbs are functional, not just decorative. Conversions from fresh to dried herbs are in the note section of the printable recipe.
Can I skip the cold retard?
No. This is the most critical step for preventing dough collapse. The cold temperature is what slows the enzymes enough to let your dough rise properly. Without it, you’ll end up with dense, flat bread.
How long does this bread stay fresh?
The cottage cheese keeps this bread moist longer than regular sourdough. Wrapped in linen then plastic, it stays fresh for 5 to 7 days at room temperature. It also freezes beautifully for up to 3 months.
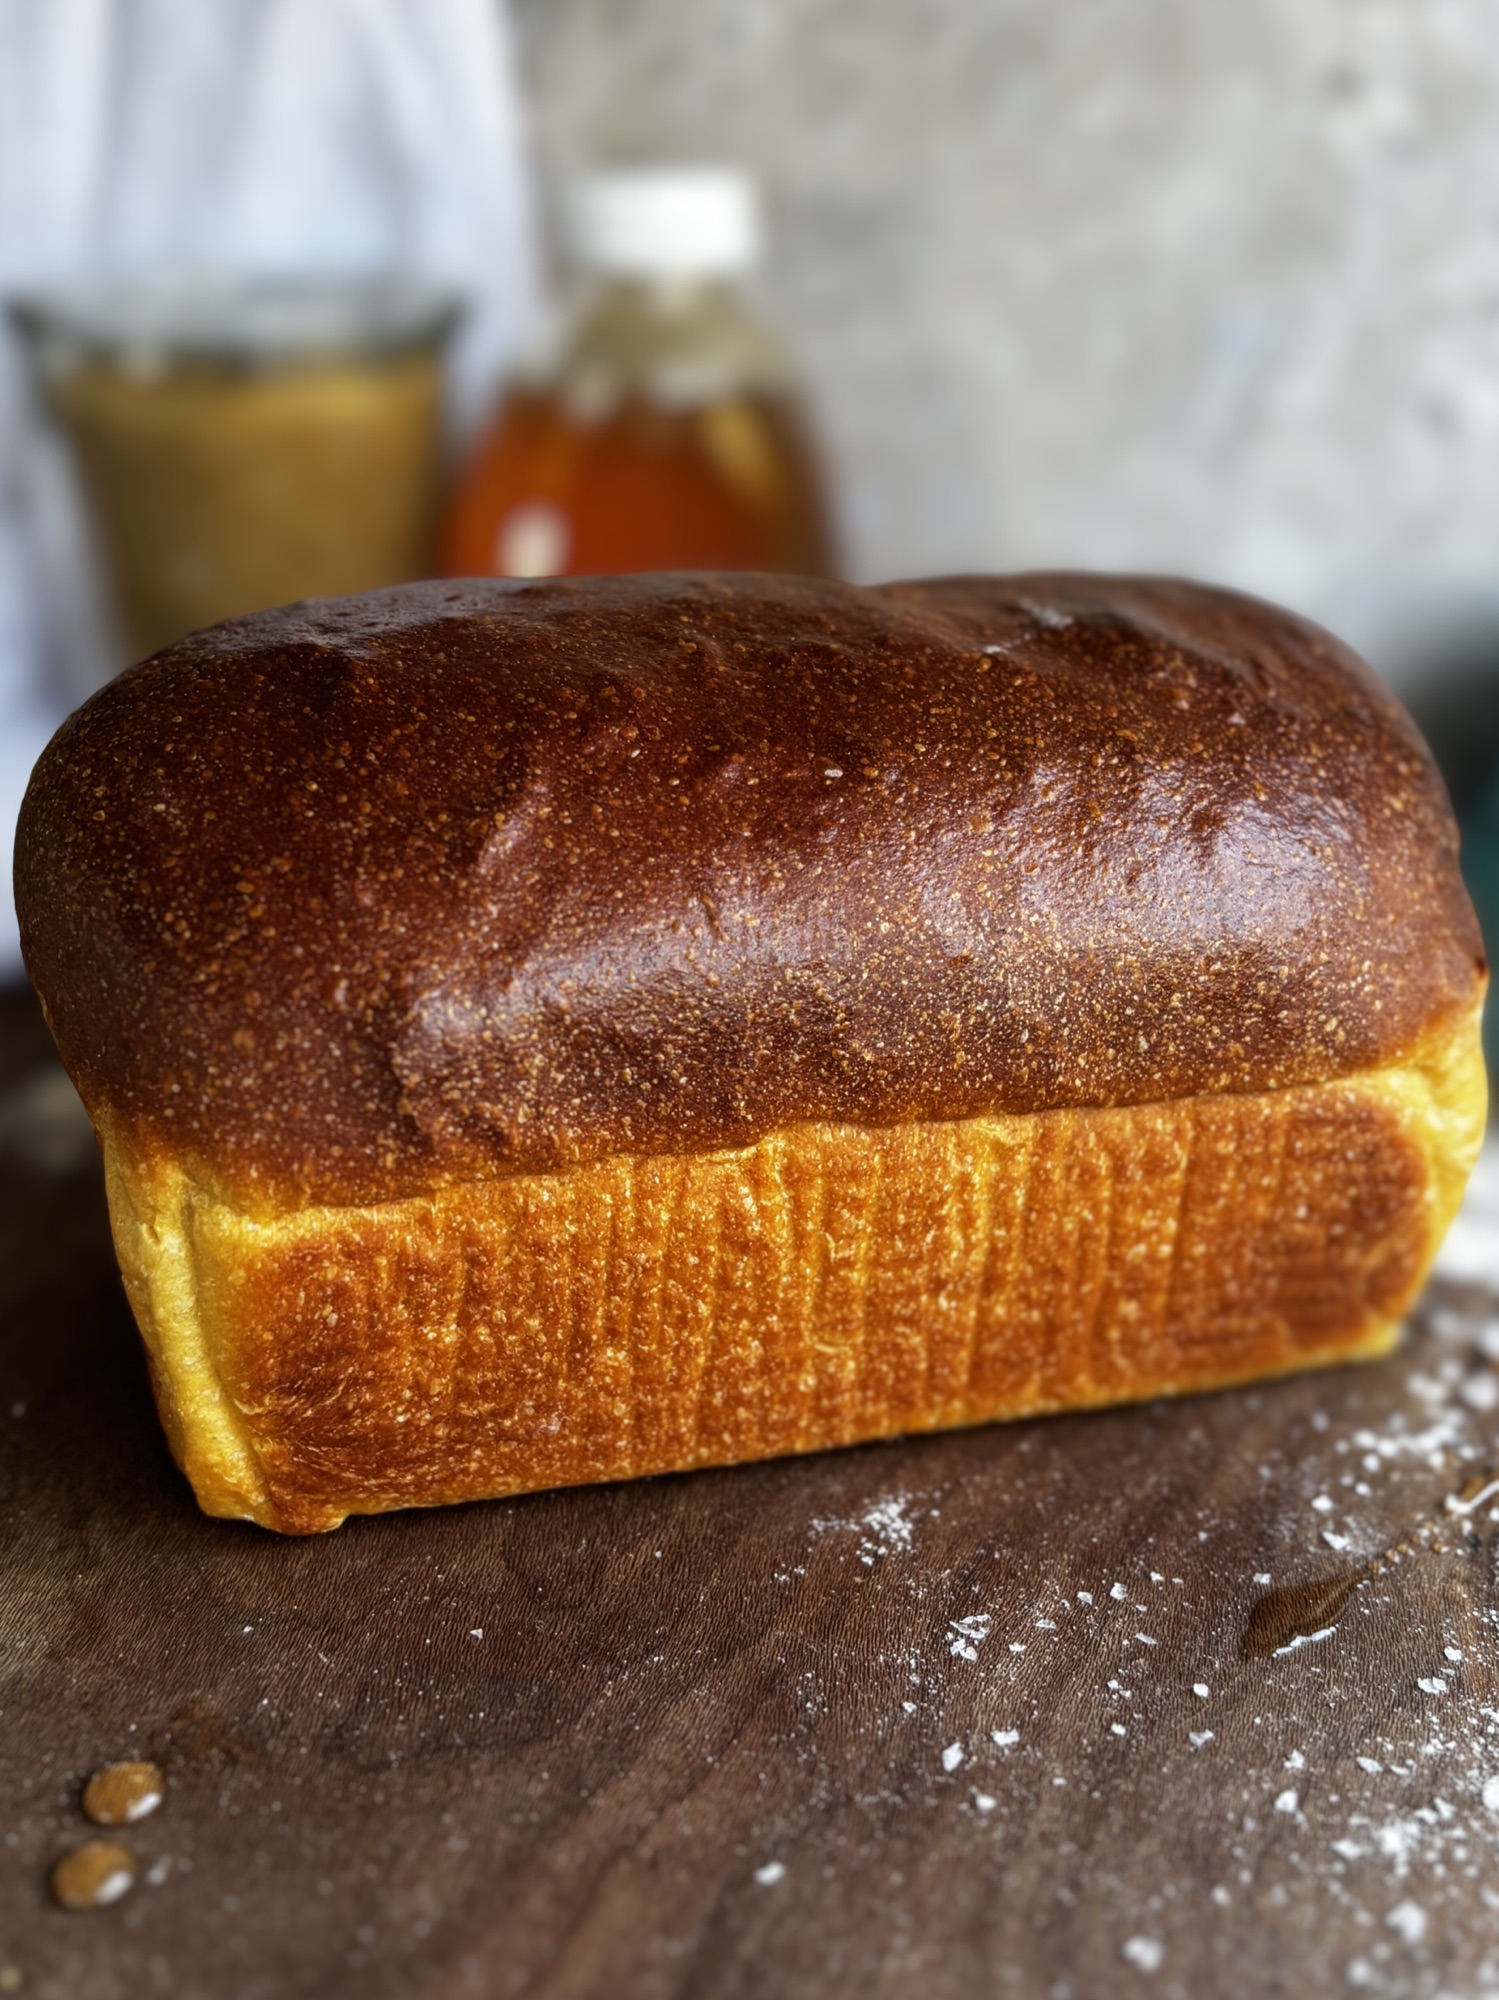
Can I make this in a loaf pan instead of a boule?
Absolutely. After the cold retard, shape into a log and place in a greased 9×5 inch loaf pan for the final rise. Baking time and temperature stay the same.
Why can’t I taste the cottage cheese?
The cottage cheese flavor becomes very subtle after baking and fermentation. You get the protein benefit without the obvious cottage cheese taste, which is exactly what makes this recipe so appealing.
Can I add seeds or other mix-ins?
Yes, but add them after the stretch and folds are complete. Seeds, nuts, dried fruit, or cheese can all be folded in gently before the cold retard.
What if my dough seems too wet during stretch and folds?
Wet hands are your friend. Keep a bowl of water nearby and wet your hands before each fold. High-hydration dough is supposed to be sticky. As you perform the folds, the gluten will strengthen and the dough will become more manageable.
More High Protein Recipes
Looking for more ways to boost your protein intake with delicious baked goods? Check out these recipes:
High Protein Cottage Cheese Scones
High Protein Pumpkin Spice Pudding
High Protein Pumpkin Spice Cheesecake Pudding
Pin this recipe for later! This high protein cottage cheese sourdough bread is perfect for meal prep, makes incredible toast, and keeps you full for hours thanks to all that protein and fiber. Whether you’re focused on fitness, looking for better nutrition, or just want amazing homemade bread, this recipe delivers on every level.


Leave a Reply