

This week focuses on the final transformation of your laminated sourdough croissant dough into perfectly golden, flaky pastries. Proper proofing and baking are crucial for achieving the signature honeycomb interior and crispy exterior.
Since completing the croissant class series, I have released my croissant recipe and guide. Click below to get it!
H3art of the Homes Master Croissant Recipe & GUIDE
Part 1: Pre-Proofing
Equipment Check
- Parchment-lined baking sheets with shaped croissants
- Paper towel/pastry brush
- Spray bottle for humidity control
- Large plastic bags or covers
- Instant-read thermometer
Initial Assessment of Shaped Croissants
Your croissants should be properly shaped and resting seam side down on parchment lined baking sheets. Before beginning the proofing process, ensure they’re evenly spaced (about 2- 3 inches apart) to allow for expansion during proofing.
Part 2: The Proofing Stage
Understanding Sourdough Croissant Proofing
Unlike commercial yeast croissants, sourdough versions require longer, gentler proofing due to natural fermentation patterns.
Proofing Conditions
- Temperature: 72-78°F
- Time: 4-12+ hours (varies significantly depending on your recipe)
- Environment: Draft-free location
Creating the Perfect Humid Proofing Environment
Method 1: Plastic Bag Technique
- Slide entire baking sheet into large, clean plastic bag
- Mist with water/paper towel hack
- Inflate bag slightly by blowing air in before sealing
- Ensure plastic doesn’t touch croissants (use a tall thin glass/container as spacers if needed)
Method 2: Large Container System
- Use clear plastic storage containers with lids
- Mist with water/paper towel hack
- Use a baking tray with a plastic lid cover.
Humidity Tips & Tricks
Maintaining Optimal Humidity (70-80%):
- Paper towel: lay damp (not wet) paper towels around edges on the baking sheet. Be sure they do not touch the croissants. They should stay moist throughout proofing.
- Misting technique: Use fine spray bottle to refresh humidity every 2-3 hours
Humidity Troubleshooting:
- Too humid: Excessive condensation, water droplets on croissants = reduce moisture sources
- Too dry: Croissants developing skin, feeling firm = add moisture, mist more frequently
Climate-Specific Adjustments:
- High humidity days: Reduce added moisture, focus on temperature control
- Dry climates: Double up on humidity sources, mist more frequently
- Air conditioning: Creates dry environment, increase humidity measures
- Seasonal changes: Summer requires less added humidity, winter needs more attention
The Poke Test for Doneness

- Gently poke the surface of a proofed croissant with your finger.
- Observe the reaction:
- Springs back slowly & leaves a slight dent – Perfectly proofed!
- Bounces back quickly – Needs more time.
- Doesn’t bounce back & stays deflated – Overproofed.
Properly proofed croissants will:
- Increase 50-70% in size(Important: This is NOT doubling or tripling like bread dough – croissants are much more delicate. A 50-70% increase means if your croissant was 3 inches long, it should now be about 4.5-5 inches long)
- Feel light and jiggly when gently shaken
- Spring back slowly when lightly poked
- Show visible butter layers without breaking through dough
Visual:
- Dough should look puffy but not overly inflated
- Layers should be visible and starting to separate
- Surface should be smooth, not taut and without cracks
Common Proofing Mistakes to Avoid
- Under-proofed: Dense, tight crumb; poor oven spring
- Over-proofed: Butter leakage; collapsed structure; greasy texture
- Humidity mistakes: Skin formation (too dry), water droplets on dough (too humid)
- Temperature fluctuations: Moving between different environments disrupts proofing
Part 3: Pre-Baking

Egg Wash Application
Perfect Egg Wash Recipe:
- 1 large egg yolk
- 2 tablespoon heavy cream or milk
- Pinch of salt
Application Technique:
- Strain mixture to remove lumps
- Use a small strip of paper towel to gently apply the egg wash or a soft pastry brush
- Apply thin, even coat (avoid pooling)
- CRITICAL: Never let egg wash drip down the sides or into the laminated layers Why Dripping Ruins Croissants:
• Egg wash acts like glue when it bakes, cementing layers together
• Drips create “glue lines” that prevent layers from separating and puffing
• Results in dense, heavy sections instead of flaky layers
• Can cause uneven rising and lopsided croissants
• Creates tough, chewy spots in the finished pastry
Croissant Wash Alternatives
Traditional Egg Wash (Baseline)
Recipe: 1 egg yolk + 2 tablespoons heavy cream
Result: Deep golden-brown color, rich glossy shine, professional bakery appearance
Egg White Wash
Recipe: 1 egg white + 1 tablespoon water or milk
Result: Light golden color, delicate shine, crisp finish
Best for: Lighter appearance, less rich look, when you want subtle browning
Milk or Cream Wash
Recipe: Whole milk or heavy cream (no mixing required)
Result: Soft golden color, minimal shine, tender crust
Best for: Homestyle appearance, subtle browning, softer crust texture
Cornstarch Slurry
Recipe: 1-2 teaspoons cornstarch + 2-3 tablespoons hot water, whisk together
Result: Very glossy, lacquered finish, professional shine
Best for: Asian bakery-style appearance, maximum shine without eggs
Butter Wash
Recipe: Melted butter(be sure it is cooled down) Apply right before baking or midway through
Result: Rich golden color, enhanced butter flavor, soft crust
Best for: Extra buttery taste, rustic appearance, tender texture
Simple Syrup Glaze(after baking application)
Recipe: Equal parts sugar and water, heated until dissolved(ex. 2 TBS water to 2 TBS sugar
Application: Brush on after baking while croissants are still hot
Result: Subtle shine, slight sweetness, clean polished look
Best for: Post-bake enhancement, adding sweetness without changing baking process
Quick Reference Chart

Final Setup
- Preheat oven to 400°F (200°C) with steam setup, if using (see below)
- Position racks in middle and below
Part 4: Baking: Steam vs. No-Steam Methods
Understanding Steam in Croissant Baking. Both methods produce excellent results when executed properly, but they create different textures and appearances.
Method 1: Steam Baking

Why Steam Works:
• Keeps surface flexible during initial expansion
• Promotes better oven spring and layer separation
• Creates glossy, golden finish
• Mimics professional bakery ovens
Steam Setup:
• Preheat oven to 400°F (200°C)
• Place empty metal pan (cast iron or heavy-duty) on lowest rack
• Position racks in upper and lower thirds
• Have your steam method ready. 1/2 cup boiling water or ice(see below)
Steam Application Methods:
Method A – Ice Cube Technique:
1. Load croissants into preheated oven
2. Immediately throw 6-8 ice cubes into hot pan
3. Close oven door quickly to trap steam
4. Steam will dissipate naturally over 8-10 minutes
Method B – Boiling Water Method:
1. Load croissants into oven
2. Pour 1/2 cup boiling water into preheated pan
3. Close door immediately
4. More intense steam burst, shorter duration
Steam Baking Timeline:
• Minutes 0-10: High heat (400°F) with steam
Steam timing: Remove steam source after first 10 minutes for crispier crust
• Minutes 10-18: Reduce to 375°F,
• Total time: 18-22 minutes
Method 2: No-Steam Baking
Why No-Steam Works:
• Creates crispier, more contrasted texture
• Easier to control and more consistent
• Less risk of soggy bottoms
• Better for home ovens without proper ventilation
No-Steam Advantages:
• Crust develops earlier and stays crispier
• More pronounced textural contrast between exterior and interior
• Eliminates risk of excess moisture affecting bottom layers
• Simpler technique with fewer variables
No-Steam Setup:
• Preheat oven to 375°F (190°C) – slightly lower starting temperature
• No water pans or steam sources needed
• Ensure good air circulation around croissants
No-Steam Baking Timeline:
• Minutes 0-12: Steady heat at 375°F (190°C)
• Minutes 12-22: Monitor browning. If they get too dark gently tent with foil
• Total time: 18-22 minutes
Choosing Your Method
Use Steam Baking When:
• You want maximum oven spring and height
• Seeking glossy, bakery-style appearance
• Working with slightly under-proofed croissants
• Your oven runs hot or has uneven heating
Use No-Steam Baking When:
• You prefer extra-crispy texture
• Your kitchen has humidity issues
• You want foolproof consistency
• Working with perfectly proofed croissants
Success Factors for Both Methods
Temperature Monitoring:
• Use oven thermometer to verify actual temperature
• Optional, Rotate pans halfway through baking if you notice uneven browning (do this gently and be sure not to bump the tray.)
• Internal temperature should reach 200°F (93°C)
Using your Eyes for Doneness
Perfect Croissants Display:
- Deep golden-brown color
- Crispy sound when tapped on bottom
- Flaky layers visible on sides
- No raw dough smell
- Internal temp of 200°F (93°C)
Troubleshooting Common Baking Issues
Butter Leakage:
- Over-proofed dough
- Oven too hot initially
- Solution: Lower temperature, check proofing
Pale Color:
- Insufficient egg wash
- Oven temperature too low
- Solution: Second egg wash application; verify oven temp
Dense Texture:
- Under-proofed dough
- Insufficient steam
- Solution: Extend proofing time; try or improve steam method
Uneven Browning:
- Hot spots in oven
- Uneven egg wash
- Solution: Rotate pans; consistent wash application
Part 5: After Baking

Cooling
- Remove from oven when golden brown
- Let rest on the tray for a minute or two
- Transfer to wire cooling racks
- Cool for at least 20 minutes before serving
- Avoid covering while warm
Storage & Serving
- Day of baking: Best within 4-6 hours
- Next day: Refresh in 350°F oven for 3-4 minutes
- Freezing: Wrap individually; thaw and refresh before serving
Tips for Success
Temperature Management
- Use instant-read thermometer for internal temperature
- Monitor ambient temperature throughout process
- Adjust timing based on seasonal temperature changes
Batch Consistency
- Mark baking sheets to ensure even spacing
- Keep detailed timing notes for future batches
Common Beginner Questions
Q: How do I know if my croissants are properly proofed?
A: They should increase by 50-70% in size, feel light when gently shaken, and spring back slowly when poked. The layers should be visible but the dough shouldn’t look ready to burst.
Q: What if my kitchen is too cold for proofing?
A: Create a warm environment using your oven light but monitor temperature. I would not go above 78°F.
Q: Why did my butter leak out during baking?
A: Usually indicates over-proofing or initial oven temperature too high. The dough structure couldn’t hold the melting butter. A small amount of butter leakage is completely normal and expected, it shows your lamination was successful!
Q: My croissants look perfect but feel heavy
A: This usually indicates under-proofing. The layers didn’t have enough time to develop gas and separate properly. The butter may also have been too cold during lamination, creating thick layers that didn’t steam effectively during baking.
Q: Why do some of my croissants have butter puddles around them after baking?
A: A small amount of butter leakage is completely normal and expected – it shows your lamination was successful! However, excessive pooling usually indicates over-proofing where the dough structure became too weak to contain the melting butter. Starting oven temperature may also be too high, causing the butter to melt faster than the dough can set.
Q: My croissants are browning too fast but still seem raw inside.
A: Lower your oven temperature by 25°F and cover them loosely with foil once they reach your desired color. This allows the interior to cook through without over-browning the exterior.
Q: Why do my croissants collapse after I take them out of the oven?
A: They’re likely underbaked. The interior structure hasn’t set enough to support itself. Always check internal temperature (200°F) rather than relying only on visual cues.
Q: My croissants look flat and wide instead of tall – what happened?
A: This suggests the dough was over-proofed or too warm during final proofing. The structure became too relaxed to hold its shape during baking.
Q: How can I tell if my proofing environment is too warm?
A: If your croissants are proofing faster than 3 hours, or if you see butter starting to leak during proofing (not baking), your environment is too warm. Aim for that 75-78°F sweet spot.
Q: My kitchen is very dry – how do I know if I have enough humidity?
A: The surface of your croissants should never form a skin or feel dry to the touch. If you can gently press the surface and it springs back without leaving a dry, crusty feeling, your humidity is good.
Q: What’s the difference between under-proofed and over-proofed croissants after baking?
A: Under-proofed: dense, tight layers, poor rise, doughy texture. Over-proofed: butter leakage, collapsed structure, greasy feel, layers may separate completely rather than staying connected.
Q: Can I save croissants that seem over-proofed?
A: If they’re only slightly over-proofed, bake them immediately at a slightly lower temperature (360°F) to give the structure time to set before the butter completely melts out. And remember…bake it anyway. You never know.
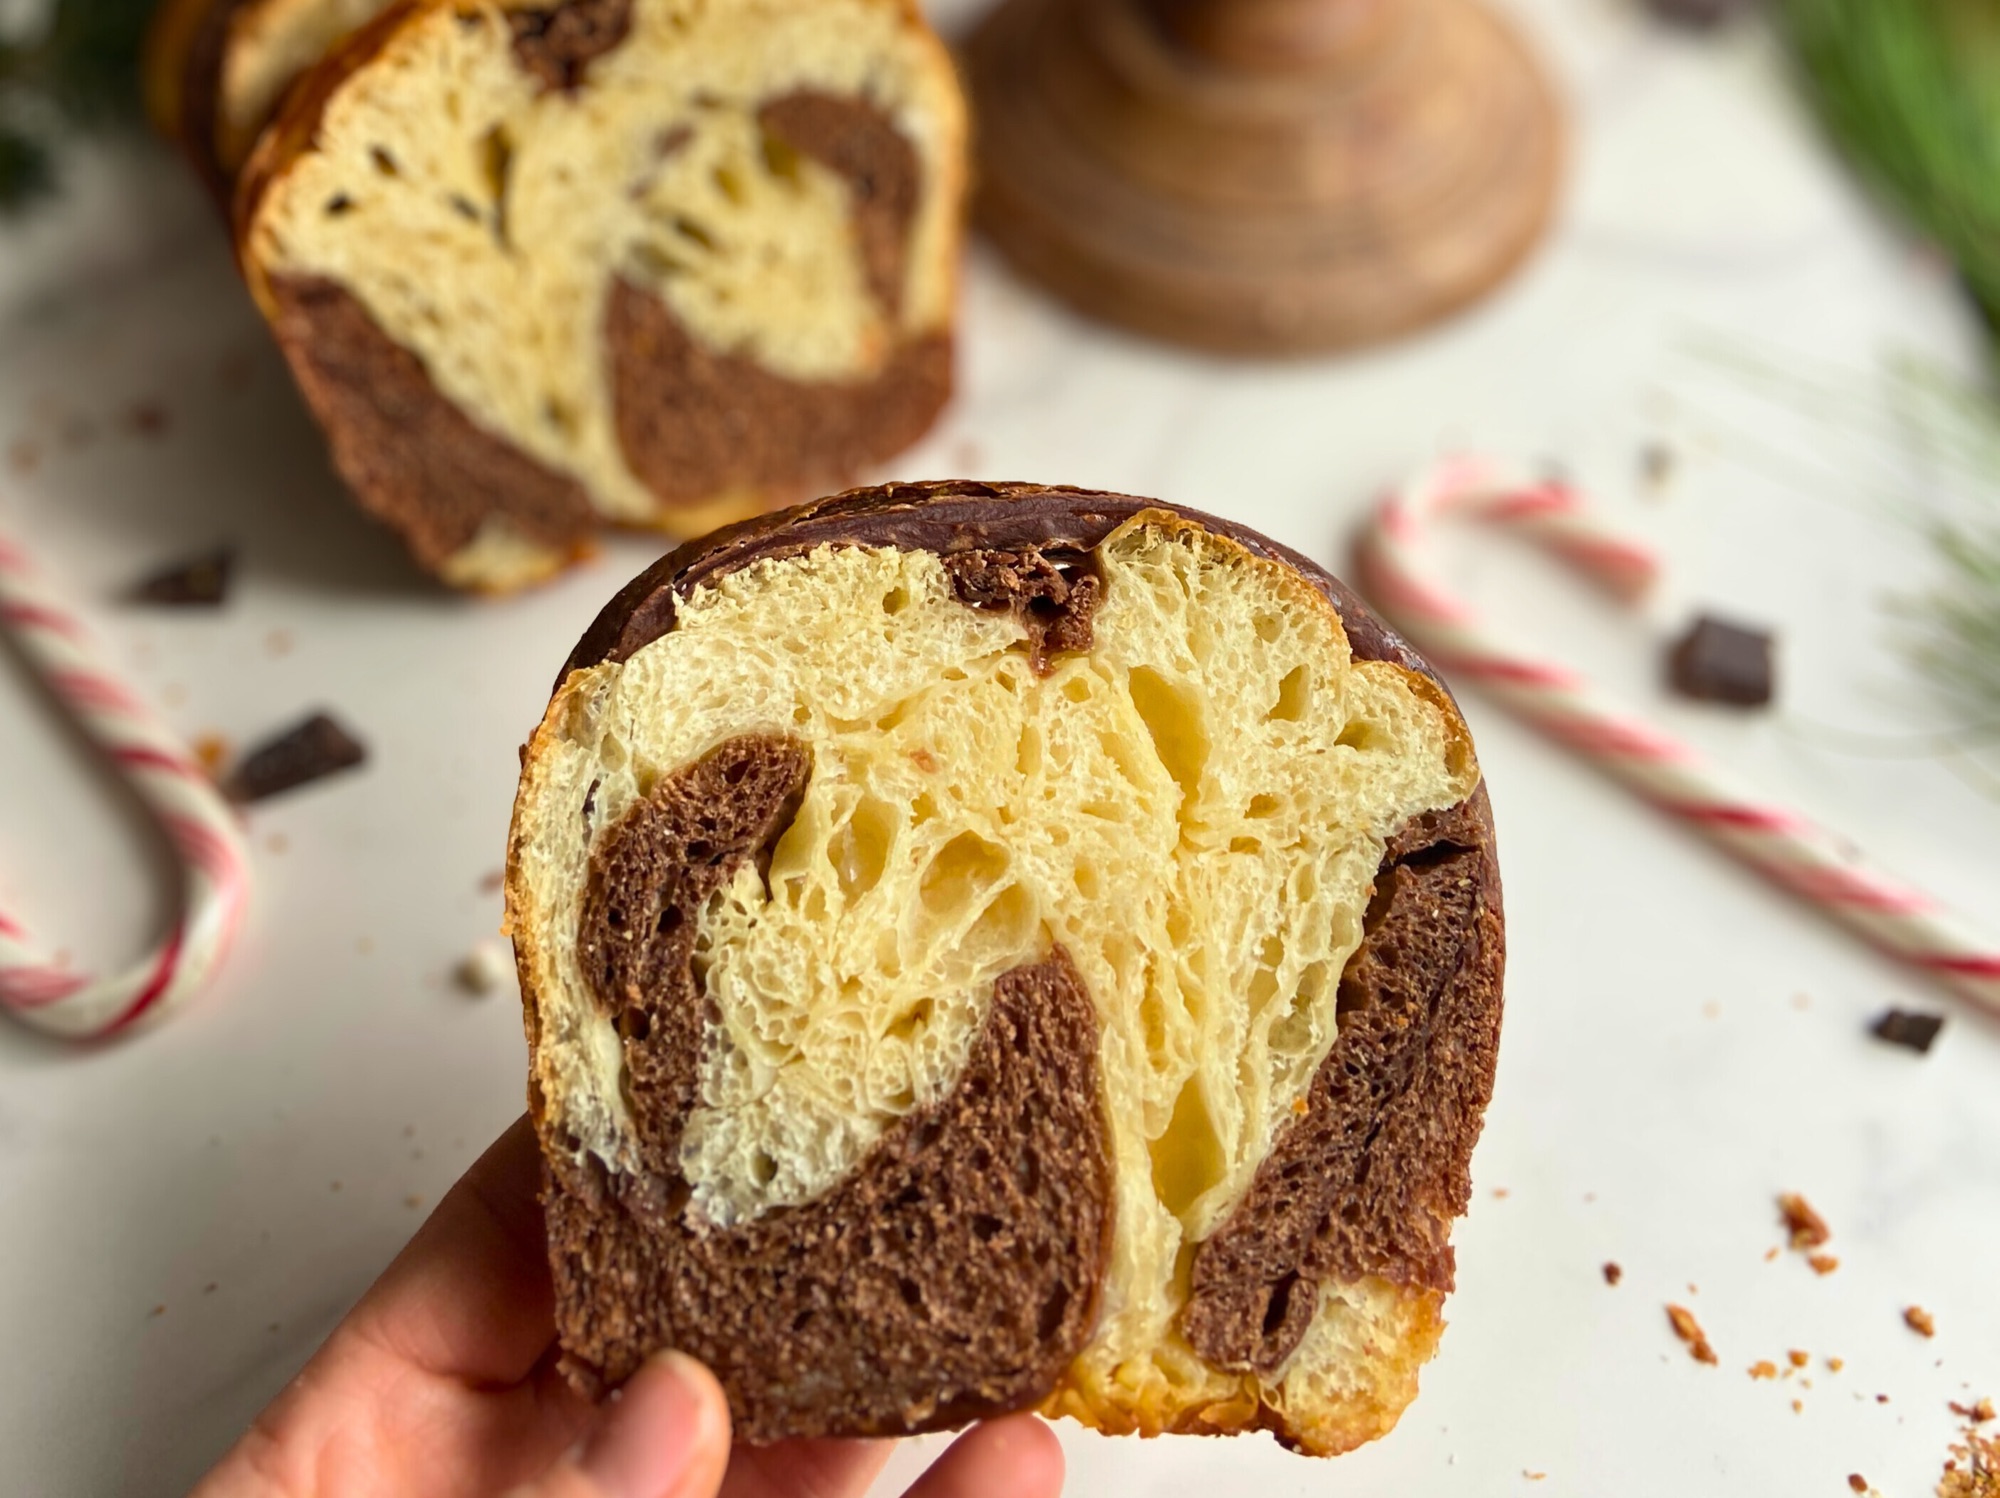
Q: What should the inside of a perfect croissant look like?
A: The crumb should have a honeycomb structure with irregular, airy pockets of varying sizes. You should see distinct butter layers creating thin, flaky separations throughout. The color should be pale cream to light golden, never gray or dense-looking.
Q: My croissants have a tight, bread-like crumb instead of flaky layers, what went wrong?
A: This usually indicates insufficient lamination during the folding process, or the butter was too soft/melted during lamination, causing it to mix into the dough rather than staying in distinct layers.
Q: Why does my croissant crumb look streaky or marbled?
A: This happens when the butter partially melted during lamination or proofing, creating swirled patterns instead of clean layers. Your dough or environment may have been too warm during the process.
Q: My croissant crumb is gummy or doughy in the center.
A: This indicates under-baking. The interior didn’t reach the full 200°F needed to properly set the dough structure. It could also mean the dough was under-proofed, creating a dense center that takes longer to cook through.
Q: What causes holes that are too big or tunnels in the crumb?
A: Over-proofing is usually the culprit. The gas bubbles became too large and the dough structure too weak to contain them properly, creating irregular tunnels instead of the desired honeycomb structure. Could also be lamination issues
Q: Is it normal for the crumb to be slightly dense near the bottom?
A: A slightly denser bottom layer is normal due to the weight of the croissant during proofing and baking. However, it shouldn’t be dramatically different from the rest of the crumb – if it’s very dense, you may have under-proofed or baked on too low a rack.
Q: My croissant has great layers on the outside but dense crumb inside.
A: This suggests uneven proofing or baking. The exterior set and developed properly, but the interior didn’t have enough time or heat to fully develop. Try extending proofing time or ensuring your oven temperature is accurate.
Q: Should the crumb spring back when I press it?
A: Fresh croissant crumb should have some give but not be spongy like bread. It should feel light and airy with a slight resistance. If it compresses and doesn’t spring back at all, it’s likely over-proofed or under-baked.

Remember: Sourdough croissants are a marathon, not a sprint. Each batch teaches you something new about timing, temperature, and technique. Keep detailed notes and trust the process and yourself! Confidence is key.
Congratulations, Croissant Graduates!
What an incredible journey we’ve shared together over these past six weeks! From understanding the science of lamination to mastering the delicate art of proofing and baking, I hope you walk away with a confidence in your ability to attempt these challenging pastries.
What’s Next?
Keep your eyes open, the plain croissant recipe, I’ve developed over the past year, will be released soon! This will be your foundation recipe for endless variations and the perfect complement to everything you’ve learned in this class.
Your Achievement Matters
You’ve earned it! I’ve created a special Certificate of graduation, that you can print out and personalize with your name. You’ve officially graduated from Croissant Class and have every right to be proud of coming to class the last six weeks.
Keep practicing, keep experimenting, and most importantly – keep enjoying those beautifully flaky, buttery croissants you can now create with confidence!
Happy baking,
Noelle Rae
Print your certificate below and celebrate your amazing accomplishment!


Leave a Reply