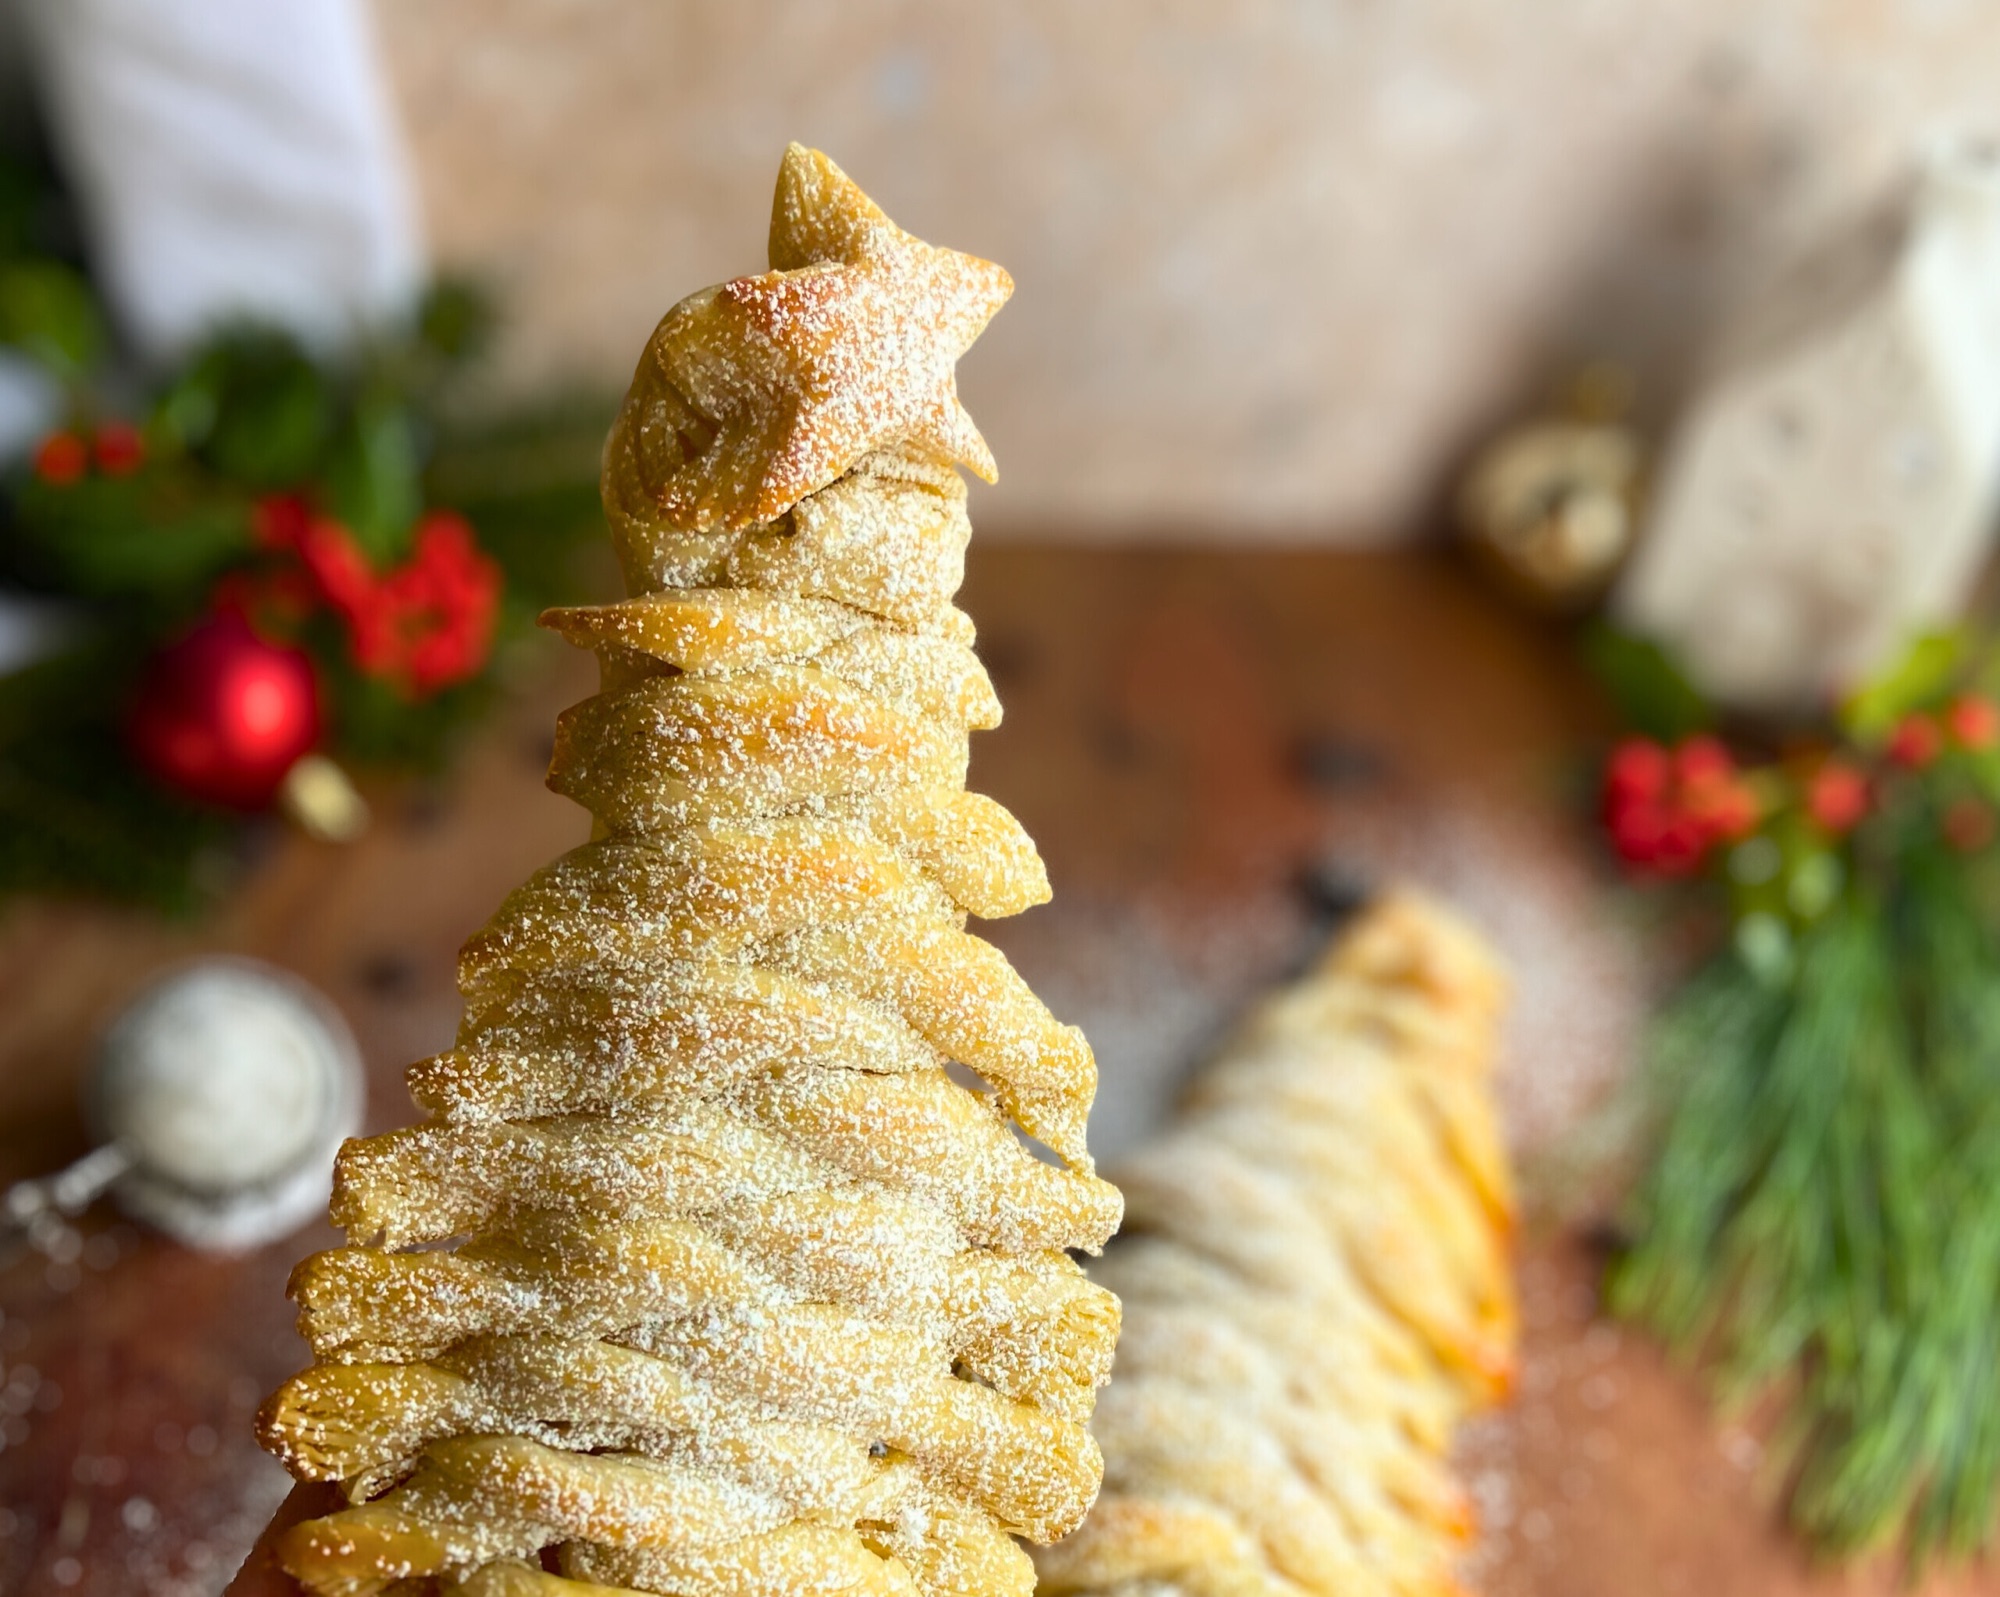
Stunning braided chocolate croissant Christmas trees made with flaky sourdough laminated dough. Learn how to create these bakery worthy holiday pastries with step by step photos and detailed instructions perfect for home bakers.
Jump to Section
- Introduction
- What You’ll Need
- Before You Begin
- Step by Step Instructions
- Proofing and Baking
- Storage and Reheating
- Pro Tips
- Frequently Asked Questions
- The Science & Nutrition Guide
- Extended FAQ: Your Questions Answered
- Ingredient Deep Dive
Introduction

These chocolate stuffed croissant Christmas trees are the perfect holiday showstopper for your breakfast table or holiday brunch. Made with my classic sourdough croissant dough and filled with rich chocolate, these braided pastry trees combine impressive presentation with absolutely delicious flavor. The braided design creates beautiful layers that showcase the flaky lamination of homemade croissant dough, while the chocolate filling melts into pockets of pure indulgence.
Whether you’re an experienced baker looking for a festive twist on classic croissants or an adventurous baker ready to try laminated dough shaping techniques, this Christmas tree croissant recipe will guide you through every step.
What You’ll Need
Ingredients:
- Sourdough croissant dough (prepared through final rollout) LINK TO THE CROISSANT RECIPE
- Chocolate bars or sticks Callebaut croissant chocolate sticks (recommended) or 70% dark chocolate bar, broken into pieces
- All purpose flour for dusting work surface
- Water for misting before proofing
- 1 egg yolk + 2 tablespoon milk for egg wash
- Powdered sugar (optional) for dusting after baking
Equipment:
- Rolling pin
- Sharp knife
- Ruler or measuring tape
- Parchment paper
- Baking sheets
- Spray bottle
- Strip of paper towel or pastry brush
- Small bowl for egg wash
Before You Begin
Important: This recipe assumes you have already prepared sourdough croissant dough through the final rollout stage. You’ll be stopping just before you would normally cut triangles to shape traditional croissants.
Skill Level: Intermediate. But if you’re a beginner just have fun! As long as you enjoy the process and work with properly laminated dough, your trees will be delicious and beautiful.
Timing Note: Proofing time varies based on temperature and humidity. Watch the dough, not the clock. Proper fermentation is key to flaky, delicious croissants.
Step by Step Instructions
Step 1: Prepare Your Dough
Follow your sourdough croissant recipe LINK through the final rollout step. Roll your croissant dough into a 12″ x 12″ square, about 1/4 inch thick.
Step 2: Cut Into Squares

Using a sharp knife or pizza cutter and a ruler, cut your 12″ x 12″ dough square in half vertically, then in half horizontally. This gives you four 6″ x 6″ squares. Trim the edges for clean, straight lines.
Pro Tip: Transfer each square to a parchment lined baking sheet BEFORE you start shaping. This prevents you from having to move delicate braided trees later and risking damage.
Step 3: Create Triangle Shape

For each 6″ x 6″ square:
- Measure 2 to 3 inches from each bottom corner along the side edges and mark these points
- Find the center point of the top edge (at 3 inches)
- Using a sharp knife, cut from the bottom left mark up to the top center point
- Cut from the bottom right mark up to the top center point
- Remove the two side triangular pieces and save for making stars or tree trunks
- You now have a triangle that looks like a little house. This is your Christmas tree base!
Step 4: Mark the Center Guide

Down the center of your triangle, mark a guide for your chocolate filling:
- At the bottom (base): Mark 3/4 inch wide
- At the top (point): Mark 1.5 inches wide
- Draw lines connecting the edges of the marks to create a tapered center strip
This tapered guide is essential. It’s where your chocolate will go and ensures your tree has the right proportions.
Step 5: Place Your Chocolate
Arrange chocolate bars or broken chocolate pieces down the center guide you just marked. The chocolate should fit comfortably within the marked lines.
Chocolate Options:
- Callebaut croissant chocolate sticks (recommended because they don’t get overly melty)
- 70% dark chocolate bar, broken into pieces
- Use about 2 to 3 chocolate sticks or equivalent broken chocolate per tree
Step 6: Cut the Branch Strips
This is where the magic happens! You’ll cut diagonal strips that become the tree branches.
- First round of cuts: Starting from the center guide, cut diagonal strips at a 45 degree angle outward to the edges of the triangle. Space these cuts about 3/4 inch apart. Make all cuts the same width first.
- Second round of cuts: Go back and cut each strip in half down the middle to create narrower individual branches. This two step method ensures you don’t accidentally overcut and gives you better control over spacing.
- Leave uncut sections: Don’t cut all the way to the very top or bottom. Leave about 1 to 1.5 inches uncut at the base for the trunk and a small section at the top.
You should end up with 5 to 6 strips on each side of the triangle.
Step 7: Create the Tree Trunk

Start at the base of your triangle:
- Fold one bottom corner over the chocolate
- Wrap the other bottom corner around it
- Tuck the corner underneath to create a rolled tree trunk base
This creates a sturdy foundation for your Christmas tree!
Step 8: Braid the Branches

Now for the fun part: creating your Christmas tree!
- Start at the bottom: Take one branch from the left side and fold it over the chocolate diagonally toward the right side
- Alternate sides: Take a branch from the right side and fold it over the chocolate, crisscrossing over the left branch
- Continue braiding: Keep alternating sides, working your way up the tree
- Crisscross pattern: Each branch should overlap the previous one, creating a beautiful braided effect
The key is to pull each branch snugly over the filling but not so tight that you compress the dough.
Step 9: Add Twist Detail (Optional but Stunning!)

After you’ve crisscrossed all the branches:
- Go back to each individual branch
- Give it a gentle twist (2 to 3 turns)
- This creates incredible texture and dimension, making the branches look like real pine boughs
This step is what takes these from pretty to absolutely stunning!
Step 10: Final Touches Before Proofing
- You can cut out little stars to stick on the top of the tree point with the scrap croissant trimmings.
- Gently mist with water and cover well.
- Your Christmas trees are now ready to proof!

Chocolate Stuffed Croissant Christmas Trees
Ingredients
- Sourdough croissant dough rolled to 12 inch by 12 inch square and 1/4 inch thick (see notes)
- Callebaut croissant chocolate sticks 8 to 12 sticks total (2 to 3 sticks per tree) OR 70% dark chocolate bar, broken into pieces
- All purpose flour for dusting work surface
- Water for misting
- 1 egg yolk
- 1 tablespoon whole milk
- Powdered sugar for dusting (optional)
Instructions
- Prepare your workspace by lining a baking sheet with parchment paper. Have your ruler, sharp knife or pizza cutter, and chocolate ready. Keep your rolled croissant dough cold.
- Cut the 12 inch by 12 inch dough square in half vertically, then in half horizontally to create four 6 inch by 6 inch squares. Use a ruler for precise measurements and clean cuts.

- Transfer each square to your parchment lined baking sheet before shaping. This is crucial to prevent tearing the delicate braided structure later.
- For each square, measure 2 to 3 inches from each bottom corner along the sides. Mark the center point at the top edge (3 inches from either side).

- Using a sharp knife, cut from the bottom left mark up to the top center point. Then cut from the bottom right mark up to the top center point. Remove the triangular side pieces and set aside for another use.
- Mark your chocolate guide down the center of the triangle. At the bottom (wide base), mark 3/4 inch wide. At the top (point), mark 1.5 inches wide. Connect these marks with lines to create a tapered guide.
- Arrange your chocolate pieces or sticks down the marked guide. Use 2 to 3 chocolate sticks per tree. Press gently so the chocolate adheres to the dough without compressing the layers.
- Starting from the center chocolate guide, cut diagonal strips at a 45 degree angle outward to the edges, spacing cuts about 3/4 inch apart. Make these first cuts all the same width.

- Go back and cut each wider strip in half down the middle to create your final branch strips. Leave 1 to 1.5 inches uncut at the bottom for the trunk, and a small section uncut at the top. You should have 5 to 6 strips on each side.
- At the base of the triangle, fold one bottom corner over the chocolate. Wrap the other bottom corner around it and tuck it underneath to create the tree trunk.
- Starting at the bottom above the trunk, take one branch from the left side and fold it over the chocolate diagonally toward the right.
- Take a branch from the right side and fold it over, crisscrossing the left branch. Continue alternating sides, working your way up the tree. Pull each branch snug but not too tight.
- After all branches are crisscrossed, go back to each individual branch and give it a gentle twist. Two to three turns per branch creates beautiful texture and prevents unraveling.

- Use croissant trimmings to cut out little stars. Wet the bottom with water or egg wash and push gently onto the tree tip.
- Lightly mist the shaped trees with water to prevent surface drying during the long proof.
- Cover loosely with plastic wrap or a clean kitchen towel. Proof at room temperature (68 to 75°F) for 6 to 12 hours. The trees are ready when they are puffy, jiggly when you gently shake the pan, and you can see distinct butter layers separating.
- When trees are fully proofed, preheat your oven to 400°F. Make sure it is fully preheated before baking.
- Whisk together the egg yolk and milk. Brush this egg wash gently and evenly over all exposed dough surfaces, getting into the crevices between branches.
- Bake at 400°F for 20 minutes, rotating the baking sheet 180 degrees halfway through (at 10 minutes) for even browning. Trees are done when deep golden brown all over with visible melted chocolate.
- Let cool on the baking sheet for 5 minutes, then transfer to a wire rack. Dust with powdered sugar while still slightly warm if desired.
- Serve warm or at room temperature. These are best enjoyed the day they are baked.
Notes
Total Fat: 26g
Saturated Fat: 16g
Cholesterol: 90mg
Sodium: 340mg
Total Carbohydrates: 40g
Dietary Fiber: 2g
Sugars: 9g
Protein: 8g
Proofing and Baking

Proofing:
Lightly mist the completed trees with water and cover to help with the room temperature bulk rise.
Proofing time: Approximately 6 to 12 hours at room temperature, depending on your kitchen temperature and humidity.
Watch for these signs of proper proofing:
- Dough looks puffy and slightly jiggly
- When you gently press the dough, it slowly springs back
- The layers are visibly separating
- Trees have increased in size noticeably
Remember: Watch the dough, not the clock! Proper fermentation is what creates those incredible flaky layers.
Baking:
- Preheat your oven to 400°F (200°C)
- Gently brush the proofed trees with egg wash (1 egg yolk + 1 tablespoon milk)
- Bake for 20 minutes until deep golden brown
- The chocolate should be melted and the pastry should be flaky and crisp
- Let cool completely on the baking sheet before moving
Finishing Touch:

Once completely cooled, dust with powdered sugar for a beautiful snowy effect.
Important: Make sure trees are fully cool before dusting. Warm pastry will melt the powdered sugar!
Storage and Reheating

Storage:
Store at room temperature like you would chocolate croissants. These are best enjoyed the day they’re baked, but will keep for 1 to 2 days in an airtight container.
Freezing:
These freeze beautifully! Wrap individually in plastic wrap, then place in a freezer bag. Freeze for up to 1 month.
Reheating:
- If frozen, let thaw at room temperature for 1 to 2 hours
- Preheat oven to 400°F (200°C)
- Place trees on a baking sheet
- Heat for 3 to 5 minutes, watching carefully
- Pro tip: Tent aluminum foil over the top to prevent the delicate branch edges from over browning
- The goal is to warm through and crisp up slightly without burning the tips
Pro Tips
For the best results:
- Transfer triangles to your baking sheet BEFORE braiding. This is crucial!
- Keep your dough cold while working. If it gets too warm, cover well and pop it in the fridge for 10 to 15 minutes
- Use a sharp knife for clean cuts that don’t compress the laminated layers
- The tapered strip width (narrower at bottom, wider at top) is what creates that perfect Christmas tree shape
- Don’t skip the twist! It adds incredible visual appeal and texture
- Use quality chocolate. It’s the star of the filling
- Proof in a draft free spot for even rising
- Watch for proper fermentation signs, not the clock
Troubleshooting:
- Chocolate leaking out: Your cuts may be too deep into the center guide. Leave a bit more margin next time
- Dough not puffing during proof: Temperature may be too cool. Find a warmer spot or extend proofing time
- Burning on edges: Tent with foil for the last 5 minutes of baking
- Not flaky enough: Proper lamination in your croissant dough is essential. Make sure your dough was kept cold during all folding stages
Frequently Asked Questions

Q: Can I make these ahead?
A: Yes! You can shape the trees, place on a baking sheet, mist lightly, cover tightly, and refrigerate overnight. Let them come to room temperature and continue proofing before baking.
Q: What if I don’t have croissant chocolate sticks?
A: Any good quality chocolate bar works! 70% dark chocolate, milk chocolate, or even chocolate chips. Callebaut sticks are recommended because they hold their shape better during baking.
Q: How do I know when they’re properly proofed?
A: The dough should look puffy, feel jiggly when you gently shake the pan, and slowly spring back when lightly pressed. The layers should be visibly separating.
Q: Can I use store bought puff pastry instead?
A: While you can, the flavor and texture won’t be the same as true laminated croissant dough. Sourdough croissant dough has a unique tangy flavor and superior flakiness.
Q: Why did my chocolate all melt out?
A: Make sure you’re not overfilling with chocolate, and ensure your braiding is snug enough to hold the filling in place. Callebaut croissant sticks are specifically designed not to get overly melty.
Q: Can I freeze baked trees?
A: Yes! Flash freeze on the baking sheet, then transfer to a freezer bag.
The Science Behind Perfect Lamination

Understanding what’s happening at a molecular level transforms you from recipe follower to confident baker.
Why butter layering creates flakiness: Your croissant dough contains hundreds of alternating layers of dough and butter. When these hit 400°F heat, the water in both components rapidly converts to steam. This steam expands with tremendous force, pushing those layers apart and creating the signature crispy, flaky texture that makes croissants special.
The sourdough advantage: Long fermentation (12-24 hours bulk + 6-12 hours final proof) breaks down gluten proteins and phytic acid. This creates three benefits: complex tangy flavor that elevates these beyond commercial pastries, improved digestibility (especially for those with mild gluten sensitivity), and stronger gluten structure that lets you stretch those thin braided branches without tearing.
Temperature is everything: Working with butter and dough at the same cool temperature (60-65°F) during lamination keeps butter in distinct layers rather than melting into the dough. Too warm creates greasy, dense pastries. Too cold causes butter to shatter into chunks. The sweet spot produces those dramatic separated layers you see in professional bakeries.
The proofing sweet spot: Kitchen temperature dramatically affects fermentation speed. A 68°F kitchen might need 10-12 hours for proper proofing. A 75°F kitchen could be done in 6-8 hours. This is why “watch the dough, not the clock” is the baker’s golden rule. Look for 1.5-2x size increase, visible jiggle when you shake the pan, and distinct butter layers separating.
Why high heat matters: Baking at 400°F creates immediate steam explosion between layers. The first 5 minutes produce “oven spring” as steam builds pressure. Minutes 5-15 set the structure. Minutes 15-20 achieve that deep golden caramelization. Lower temperature (like 350°F) allows butter to leak out before structure sets, resulting in greasy, flat pastries instead of tall, flaky ones.
Complete Nutritional Information
Per Christmas Tree (with 2-3 chocolate sticks):
Macronutrients:
- Calories: 380-420
- Total Fat: 24-28g (Saturated: 15-17g from European butter)
- Cholesterol: 85-95mg
- Sodium: 320-360mg
- Carbohydrates: 38-42g (Fiber: 2-3g, Sugars: 8-10g)
- Protein: 7-9g
What makes these nutrient-dense for a pastry:
- Sourdough fermentation increases mineral bioavailability (iron, zinc, magnesium) by breaking down phytic acid
- European-style butter (82-84% butterfat) provides fat-soluble vitamins A, D, E, K
- Dark chocolate (70%) contributes flavonoid antioxidants linked to cardiovascular benefits
- Lower sugar than commercial pastries means more stable blood sugar response
Glycemic considerations: Estimated glycemic load is moderate (12-15). Long fermentation lowers glycemic response compared to commercial yeast pastries. High fat content from butter slows sugar absorption. For best blood sugar stability, pair with protein like eggs or Greek yogurt.
Extended FAQ: Your Questions Answered
Why did my branches unravel during baking when they looked perfect after shaping?
This usually indicates over-proofed dough. When dough ferments too long, the gluten structure weakens and can’t hold the braided shape under the force of oven spring. The solution: catch your proof earlier. Dough should be puffy and jiggly but still have structural integrity. Think 1.5-2x size increase, not fully doubled. The twist on each branch also helps lock the shape – don’t skip that step.
Can I make mini Christmas tree croissants?
Absolutely! Cut your 12” x 12” square into 9 smaller squares (4” x 4”) instead of 4 large ones. Use 1 chocolate stick per mini tree. Reduce baking time to 12-15 minutes. These are perfect for kids or for serving at parties where people want to try multiple flavors.
What’s the best way to transport these to a holiday gathering?
These are surprisingly sturdy once baked and cooled. Place them in a single layer in a large container with parchment between any that need to stack. The twisted branches actually help protect the structure. Don’t cover warm pastries (creates condensation). Transport at room temperature. If needed, crisp them up in a 350°F oven for 3-5 minutes before serving.
Why does my chocolate taste bitter/burnt even though the pastry is perfect?
You’re likely using chocolate with too high cacao percentage. 85-90% dark chocolate can taste bitter and acrid when baked. Stick with 70% dark chocolate or Callebaut croissant sticks, which are specifically formulated for baking. If you prefer milk chocolate, use high-quality milk chocolate (35-40% cacao minimum), not cheap candy bars.
Can I proof these at room temperature for just 2-3 hours if my kitchen is very warm?
Warm kitchens (78°F+) can dramatically speed fermentation, but 2-3 hours is typically too fast even in heat. Yeast produces carbon dioxide quickly in warmth, but the dough also needs time for gluten relaxation and flavor development. If your kitchen is very warm, consider cold proofing in the fridge overnight or find a cooler spot (basement, air-conditioned room). Rushed proofing creates less flavorful pastries.
What causes the bottom to be pale/undercooked while the top is perfect?
Your oven’s bottom heating element might be weak, or you’re baking on too high a rack. Move to the lower-middle rack position. You can also try placing a baking sheet on the rack below to help reflect heat upward. Some bakers place a pizza stone on the lowest rack to improve bottom heat distribution. Also make sure that your pan is a good quality. Thinner aluminum may not conduct heat well.
How do I prevent the chocolate from seizing or becoming grainy?
This usually happens when chocolate comes in contact with water/moisture during baking. Make sure your dough isn’t wet or sticky when you add chocolate. Don’t overfill 2-3 sticks is plenty. The braiding technique actually helps by creating a semi-sealed pocket that protects chocolate from direct moisture. Using chocolate specifically designed for baking (like Callebaut) also helps prevent seizing.
Ingredient Deep Dive
Why European-style butter matters: American butter is typically 80% butterfat with 20% water. European-style butter is 82-84% butterfat with less water. In laminated dough, less water means:
- Flakier layers (less steam to make dough soggy)
- Richer flavor (more fat = more flavor)
- Better lamination structure (butter stays solid longer during rolling)
- Higher fat-soluble vitamin content
The chocolate factor: Callebaut croissant sticks (43.9% cocoa) are specifically formulated for baking with a reduced cocoa butter content. This special formulation means:
• They resist oven temperatures up to 200°C (392°F) without burning
• They melt smoothly during baking (creating molten pockets)
• They re-solidify with a clean snap after cooling
• They stay contained within the braiding (right viscosity when melted)
Standard chocolate chips contain stabilizers that prevent smooth melting, they’ll stay pellet shaped even when heated, creating grainy texture instead of smooth chocolate filling.
Egg wash chemistry: Egg yolk + milk creates a protein rich coating that undergoes Maillard reaction (chemical reaction between amino acids and sugars) during baking. This creates hundreds of flavor compounds plus that gorgeous mahogany color. The ratio matters: 1 egg yolk to 2 tablespoon milk creates ideal consistency, thick enough to coat without dripping, thin enough to brush smoothly without tearing delicate proofed dough.
The Bottom Line
These chocolate stuffed croissant Christmas trees are an indulgence meant for special occasions. The combination of quality ingredients, European butter, sourdough fermentation, dark chocolate, makes them more nutrient-dense than commercial pastries, but they’re still rich treats meant to be savored.
Make them with intention. Share them with people you love. Appreciate the craft, the science, and the fun. That’s what makes them special.
Final Thoughts
These chocolate stuffed croissant Christmas trees are truly a labor of love, but the results are absolutely worth it. The combination of buttery, flaky sourdough croissant dough with rich melted chocolate creates a pastry that’s both impressive to look at and incredible to eat. Whether you’re making these for Christmas morning, a holiday brunch, or as edible gifts, they’re sure to become a new holiday tradition.
The beauty of this recipe is that once you master the braiding technique, you can adapt it with different fillings. Try almond paste, Nutella, or even savory options like cheese and ham. The possibilities are endless!
Don’t forget to share your Christmas tree croissants on Instagram and tag me @h3artofthehome. I love seeing your creations!
Happy baking!
Related Recipes:
Pin this recipe for later!


Leave a Reply