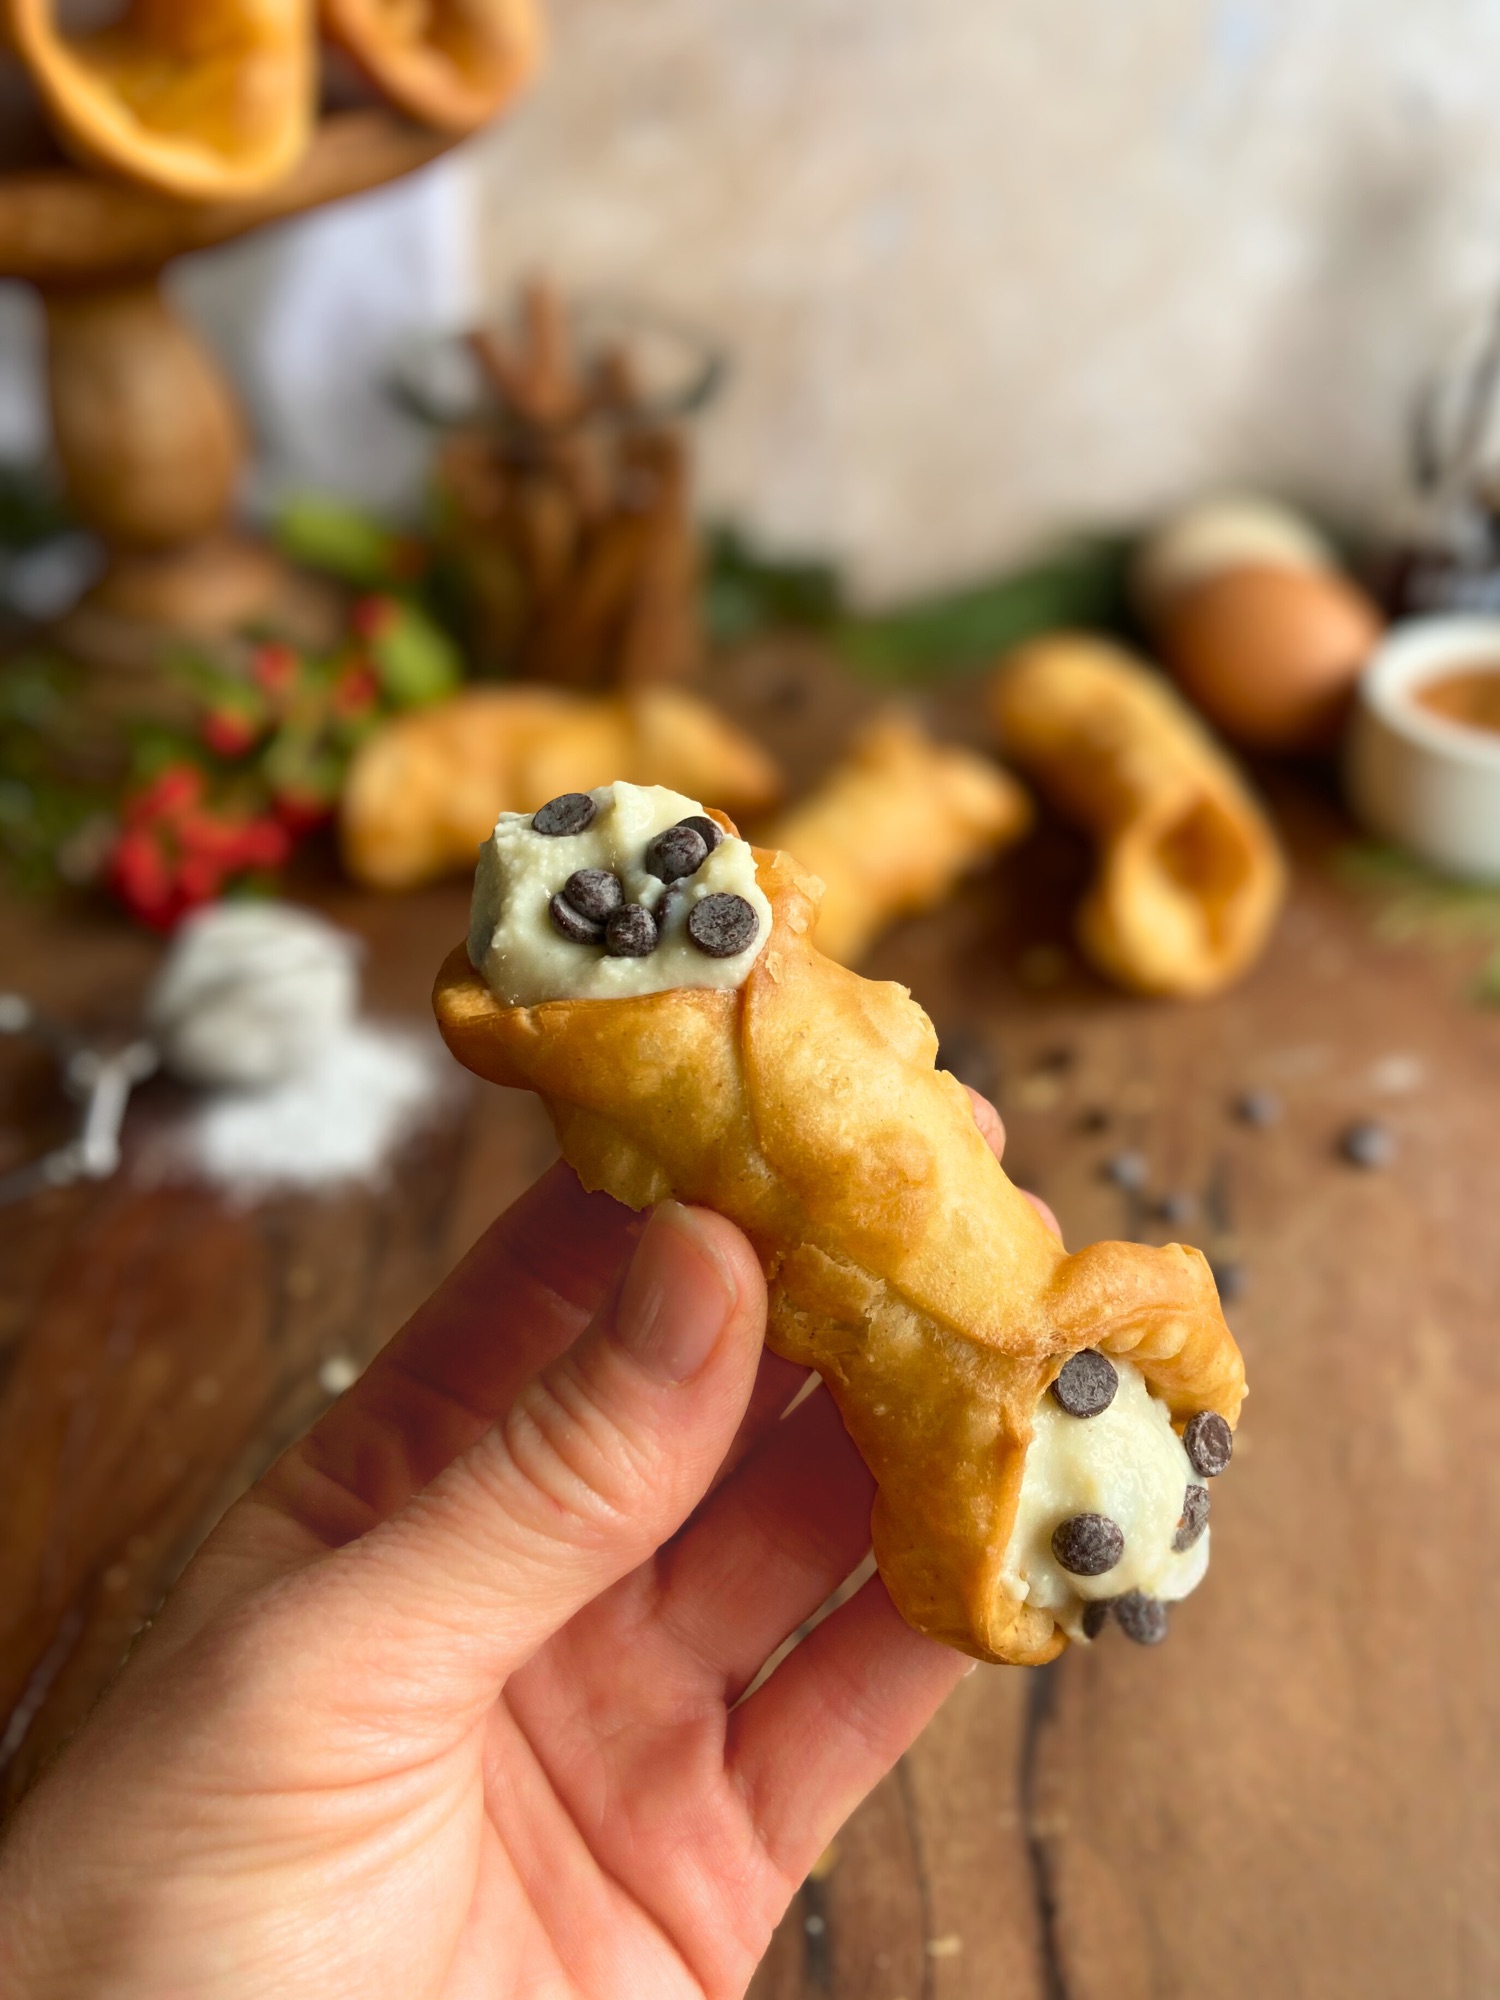
I’ve had my share of disappointing cannoli. Heavy shells that tasted like fried cardboard, fillings that were grainy or too sweet, and that sad sogginess that happens when they’ve been sitting too long. Traditional cannoli should be crisp and light with a delicate shatter when you bite in, but most fall far short. These long-fermented sourdough cannoli are everything cannoli should be: impossibly crisp shells with gorgeous bubbles and blisters, a filling that’s perfectly sweet and creamy, and that satisfying crunch that makes you reach for another one.
Jump to:
- What Makes Long-Fermented Sourdough Cannoli Special
- Why Wine and Vinegar in Sweet Dough
- Essential Tips for First-Time Cannoli Makers
- Troubleshooting Your Cannoli Shells
- How to Get Those Perfect Bubbles
- Storage and Freezing
- Sourdough Fermentation Benefits

Long-Fermented Sourdough Cannoli
Equipment
- Large mixing bowl
- Wooden spoon or stand mixer with paddle attachment
- plastic wrap
- Rolling pin or pasta machine (pasta machine highly recommended)
- 4-inch round cookie cutter or drinking glass
- 8 to 16 stainless steel cannoli tubes/forms I only had four and it worked just fine.
- Small bowl for egg wash
- – Pastry brush
- Heavy-bottomed pot or deep fryer
- Cooking thermometer (essential)
- Tongs
- Wire cooling rack
- Sheet pan
- Paper towels
- Fine-mesh strainer
- Cheesecloth, coffee filters, or clean cotton dish towel
- Large bowl
- Hand mixer or stand mixer-
- Rubber spatula
- Piping bag with large round tip (or zip-top bag)
Ingredients
For the Cannoli Shells:
- 280 g all-purpose flour 2¼ cups
- 20 g granulated sugar 1½ tablespoons
- 5 g fine sea salt ¾ teaspoon
- ½ teaspoon ground cinnamon optional
- 25 g unsalted butter softened to room temperature (2 tablespoons)
- 100 g active sourdough starter 100% hydration, fed and bubbly(scant ½ cup)
- 75 g Sauvignon Blanc or any dry white wine 5 tablespoons
- 1 large egg yolk
- 12 g white vinegar 2½ teaspoons
For Sealing:
- 1 egg white reserved from above + 1 tablespoon water, beaten together
For Frying:
- Avocado canola/vegetable, or peanut oil (about 2 quarts)
- Extra flour for rolling
For the Ricotta Filling:
- 950 g whole milk ricotta cheese 4 cups
- 240 g powdered sugar 2 cups
- 2 teaspoons vanilla extract
- ¼ teaspoon salt
- 160-200 g mini chocolate chips 1 to 1⅓ cups
- Zest of 1 to 2 oranges or lemons optional
- Extra mini chocolate chips for dipping ends
- Powdered sugar for dusting
Instructions
Day 1: Mix and Ferment the Dough
- Mix dry ingredients: In a large bowl, whisk together 280g flour, 20g sugar, 5g salt, and ½ teaspoon cinnamon (if using).
- Cut in butter: Add 25g softened butter (cut into small pieces). Using your fingertips, rub/work the butter into the flour mixture until it resembles coarse sand or breadcrumbs, 1 to 2 minutes.
- Add wet ingredients: Make a well in the center of the flour mixture. Add 100g sourdough starter, 75g white wine, 1 egg yolk, and 12g vinegar. (Reserve the egg white in a small bowl, cover, and refrigerate for Day 2.) Mix with a wooden spoon or your hand until the dough comes together into a shaggy, rough mass. It will look dry, this is correct.
- Knead: Turn dough out onto a clean counter (no flour needed). Knead firmly for 5 minutes, using the heel of your hand to push the dough away, then folding it back. After 5 minutes, the dough should be smooth, supple, and slightly tacky. If still shaggy, rest 10 minutes and knead 2 to 3 minutes more.
- Cold ferment: Shape dough into a smooth ball or disc. Wrap tightly in plastic wrap. Refrigerate for 12 to 24 hours (16 to 20 hours is ideal).
Day 1: Drain the Ricotta
- Set up strainer: Place a fine-mesh strainer over a large bowl. Line with 2 to 3 layers of cheesecloth, overlapping coffee filters, or a clean cotton dish towel.
- Drain ricotta: Add 950g ricotta to the lined strainer. Spread into an even layer. Cover loosely with plastic wrap. Refrigerate for 12+ hours (overnight is perfect). Discard the liquid that collects in the bowl.

Day 2: Roll, Fry, and Fill
- Temper dough: Remove dough from fridge. Let sit at room temperature for 1 hour. This is crucial for easy rolling and maximum bubbling during frying.
- Heat oil: Pour oil into heavy-bottomed pot to depth of 3 inches. Heat to 350 to 360°F. Use a thermometer and maintain this temperature throughout frying.
- Prepare egg wash: Beat reserved egg white with 1 tablespoon water. Set aside with pastry brush.
- Divide and roll dough: Lightly flour work surface. Divide dough into 3 to 4 portions. Keep unused portions covered with plastic wrap. Take one portion and roll with rolling pin or pasta machine. For pasta machine: flatten dough by hand into rough rectangle. Run through widest setting, then progressively thinner settings until setting 7 or 8. Dough should be 1/16 inch thick, almost see-through. For rolling pin: roll until 1/16 inch thick, rotating frequently and using minimal flour.

- Cut circles: Using a 4-inch round cutter (or 3 to 5 inches for different sizes), cut out circles. You should get 5 to 6 circles per portion. Gather scraps, press together gently, let rest 10 minutes, re-roll once.

- Rest circles: Let cut circles sit on counter for 5 to 10 minutes before wrapping. Work in batches of 6 to 8 circles at a time. Keep unused circles covered with plastic wrap to prevent drying.
- Wrap cannoli tubes: Take one circle and place cannoli tube across the center. Wrap dough around tube, overlapping edges by ½ inch. Brush egg wash generously on one overlapping edge. Press the other edge onto it firmly, pinching and pressing the seam together along entire length. Don’t wrap too tight around tube, leave slight wiggle room. Gently flare both ends outward slightly away from tube.

- Fry shells: Place 2 to 3 wrapped molds in hot oil seam-side down. They may sink, this is okay. Fry 2 to 3 minutes total, turning frequently with tongs for even browning. Shells should be deep golden brown with darker blistered spots.
- Drain and remove from molds: Using tongs, lift shells from oil and place on wire rack over sheet pan. Let cool 45 to 60 seconds, just until cool enough to handle. While still warm, carefully slide shells off tubes. Let shells cool completely on wire rack. Repeat wrapping and frying with remaining dough circles, letting tubes cool briefly between batches.
Make the Filling:
- Check drained ricotta: Remove ricotta from strainer. Discard liquid in bowl below. Ricotta should be thick and paste-like.
- Sift powdered sugar: Sift 240g powdered sugar through fine-mesh sieve into a separate bowl to remove lumps.
- Beat filling base: In large bowl, combine drained ricotta, sifted powdered sugar, 2 teaspoons vanilla, and ¼ teaspoon salt. Beat with hand mixer on medium-low speed (level 2 to 3) for 2 to 3 minutes. Stop and scrape down sides at least once. Mixture should become light, fluffy, and smooth, lightening slightly in color. Sugar should be completely dissolved (taste to check for grittiness).
- Add chocolate chips: Reserve 2 to 3 tablespoons mini chocolate chips in small bowl for dipping ends later. Fold remaining 160 to 200g chocolate chips into ricotta mixture gently with rubber spatula. Don’t use mixer or you’ll break up chips.
- Chill filling: Cover bowl tightly with plastic wrap pressed directly on surface. Refrigerate until ready to fill (or load into piping bag now and refrigerate in bag).

Assemble:
- Fill shells: Fill shells within 2 hours of serving for maximum crispness. If filling is too stiff after chilling, let sit at room temperature 5 to 10 minutes. Load filling into piping bag with large round tip (or zip-top bag with ½-inch corner cut off). Pipe filling into both ends of each cooled shell, working from ends toward middle.

- Finish: Dip ends of filled cannoli in reserved mini chocolate chips. Dust generously with powdered sugar. Serve immediately.
Notes

What Makes Long-Fermented Sourdough Cannoli Special
Most cannoli recipes use a quick dough that rests for an hour or two at room temperature. This long-fermented version takes a completely different approach by giving the dough 12 to 24 hours in the refrigerator with active sourdough starter doing its magic.
The overnight fermentation creates layers of complex flavor you simply cannot get from a quick dough. The lactic acid bacteria break down the flour, developing depth and subtle flavor notes that balance beautifully against the sweet ricotta filling. The slow fermentation also relaxes the gluten, making the dough incredibly easy to roll paper thin without fighting back.
For anyone with gluten sensitivities, the long fermentation is a game changer. My middle son has gluten sensitivity, and whenever I make anything with flour using a long-fermented sourdough method, he can eat it without issue. The extended fermentation time allows enzymes to break down the gluten proteins that often cause problems.
Beyond the digestive benefits, the texture is simply superior. The shells fry up lighter and crispier with more dramatic bubbling and blistering than traditional recipes. That overnight rest allows the dough to hydrate evenly, and when it hits hot oil, the moisture creates steam that produces those gorgeous bubbles all over the surface.

Why Wine and Vinegar in Sweet Dough
If you’ve never made cannoli before, the ingredient list might surprise you. Wine and vinegar in a sweet dessert? It seems counterintuitive, but these two ingredients are absolutely essential to achieving authentic cannoli texture.
The wine serves multiple purposes beyond just flavor. The alcohol inhibits gluten development, which keeps the shells tender instead of tough and chewy. As the shells fry, the alcohol evaporates rapidly, creating pockets of steam that produce those signature bubbles and blisters all over the surface. Without wine, you’d have smooth shells instead of that gorgeously textured, craggy exterior that makes cannoli so visually appealing.
The vinegar works similarly. The acidity tenderizes the dough and helps create that delicate, shattering crispness when you bite into the shell. It also contributes to the bubbling during frying. Together, the wine and vinegar are doing heavy textural lifting while remaining completely neutral in flavor. You won’t taste anything boozy or sour in the finished shells. They simply taste like perfectly fried, slightly sweet pastry with incredible texture.
This is traditional Sicilian technique that’s been used for centuries. The combination of alcohol and acid is what separates cannoli shells from other fried pastries. Skip them and you’ll end up with something closer to a bland fried cookie than a proper cannoli.

Essential Tips for First-Time Cannoli Makers
Making cannoli for the first time can feel intimidating, but with the right techniques, you’ll be rolling out perfect shells by your third or fourth circle. Here’s what you need to know.
Roll the dough thin. This is the single most important factor in achieving crispy, delicate shells. You want the dough rolled to 1/16 inch thickness, which is thin enough that you can almost see through it. A pasta machine makes this dramatically easier than a rolling pin. Roll to setting 7 or 8 for the ideal thickness. Thick dough creates heavy, doughy shells that taste more like fried bread than proper cannoli. The pasta machine I use for this and pasta is extremely reasonably priced. Get it here.
Cut with a 4-inch round cutter. Use a 4-inch round cookie cutter or drinking glass to cut your circles. You can go smaller (3 to 3.5 inches for mini cannoli) or larger (up to 5 inches for jumbo), but 4 inches is the classic size. When wrapping the dough around the tube, make sure you have at least ½ inch of overlap where the edges meet. This overlap is essential for a secure seal that won’t pop open during frying.
Let the cut circles rest before wrapping. After you roll and cut your circles, let them sit on the counter for 5 to 10 minutes before wrapping them around the tubes. This brief rest allows the gluten to relax even more and helps create better bubbling when the shells hit the hot oil. The dough becomes more pliable and easier to work with, and you’ll get more dramatic blistering on the finished shells.
Important: Work in batches of 6 to 8 circles at a time. Cut your circles, let them rest 5 to 10 minutes, then wrap and fry that batch. If dough circles sit out too long (more than 15 to 20 minutes), they’ll develop a dry crust that won’t seal properly and won’t fry as well. Keep any circles you’re not actively working with covered with plastic wrap to prevent drying.
The seal is everything. Your shells will absolutely fall apart in the oil if the seal isn’t done correctly. Brush egg wash generously on one overlapping edge, then press the other edge onto it firmly. This isn’t a gentle tap, you need to really pinch and press the seam together along the entire length. Think of it like sealing a dumpling or empanada. The seal needs to be tight enough to withstand the bubbling action of hot oil.
Keep the wrap loose around the tube. While the seal needs to be tight, the dough should wrap loosely around the cannoli tube with a little wiggle room. If you stretch it tight against the metal, the shell will stick and you won’t be able to slide it off after frying. The dough should drape comfortably around the tube, not cling to it.
Flare the edges. After sealing, gently pull the dough edges outward at both ends so they flare slightly away from the tube. This allows hot oil to circulate inside and fry the dough evenly from all sides. Without flaring, the edges can stay pale and doughy while the rest browns.
Oil temperature matters. Use a thermometer and keep the oil between 350 and 360°F. Too cool and the shells absorb oil and become greasy. Too hot and they burn before cooking through. The temperature will drop when you add shells to the oil, so fry just 2 to 3 at a time and let the oil come back to temperature between batches.
Remove shells from tubes while warm. After frying, let the shells drain on a wire rack for 45 to 60 seconds, just until cool enough to handle. Then immediately slide them off the tubes. If you wait until they’re completely cool, they contract and stick to the metal, making removal difficult or impossible without breaking them.

Troubleshooting Your Cannoli Shells
Even with careful technique, cannoli can be tricky. Here’s how to fix the most common issues.
Shells coming apart in the oil: This happens when the seal isn’t tight enough or there isn’t enough egg wash. Make sure you’re brushing egg wash generously on the overlapping edge and pressing very firmly to seal. The seal should be pinched together along the entire seam, not just tapped. If your dough is rolled too thick, it also seals less effectively. Roll thinner and press harder.
Shells sticking to the tubes: This means the dough was wrapped too tightly around the metal. The dough needs a little space between it and the tube so the shell can contract slightly as it cools without grabbing onto the metal. Wrap more loosely next time, and make sure you’re removing the shells while they’re still warm, not after they’ve cooled completely.
Not enough bubbles or blistering: Several factors contribute to bubbling. First, make sure your dough is completely at room temperature when you fry. This is critical. Let it sit out for a full hour after removing from the fridge. Cold or cool dough simply won’t bubble as dramatically. Second, let your cut circles rest 5 to 10 minutes before wrapping and frying. This resting time is key for maximum bubbling. Third, check your oil temperature. It needs to be a solid 350 to 360°F for proper bubbling action.
Shells are too thick or doughy: You didn’t roll the dough thin enough. It should be rolled to 1/16 inch, which is almost translucent. Use a pasta machine if you have one, it makes achieving that thinness much easier. If using a rolling pin, keep rolling until you can see your hand through the dough when you hold it up to the light.
Shells are greasy: Your oil wasn’t hot enough. When oil temperature is too low, the dough absorbs oil instead of frying quickly and crisply. Use a thermometer and don’t let the temperature drop below 340°F. Also, make sure you’re draining the shells properly on a wire rack, not just on paper towels, which can trap steam and make them soggy.
Shells are burning: Oil is too hot. Reduce the heat and let it stabilize at 350 to 360°F before continuing. Also check that your dough isn’t rolled too thin. Paper thin dough can burn before it cooks through.

How to Get Those Perfect Bubbles
The dramatic bubbles and blisters all over cannoli shells are what make them visually stunning. Here’s exactly how to achieve that signature texture.
Start with room temperature dough. After the overnight fermentation in the fridge, let the dough sit at room temperature for 1 hour before rolling. This is crucial. Cold dough doesn’t create as much steam expansion when it hits hot oil, and it’s also harder to roll thin. Room temperature dough has more active moisture that turns to steam, creating bigger, more dramatic bubbles, and it rolls out much more easily without springing back.
Rest the circles after cutting. This is the secret technique that makes the biggest difference. After you roll and cut your circles, let them sit on the counter for 5 to 10 minutes before wrapping them around the tubes. During this rest, moisture redistributes throughout the dough and the gluten continues to relax. When this rested dough hits hot oil, it creates more steam and more bubbles than dough that’s wrapped and fried immediately.
Proper oil temperature creates bubbles. The oil needs to be between 350 and 360°F. At this temperature, the wine and vinegar in the dough evaporate rapidly, creating pockets of steam that push the dough outward into bubbles. Lower temperatures don’t create enough steam. Higher temperatures set the exterior too quickly before bubbles can form.
Turn the shells frequently. Even if your tubes sink instead of floating, you’ll still get bubbles all over if you turn the shells every 30 to 45 seconds with tongs. This ensures all sides spend time in contact with the hottest oil, which creates even bubbling across the entire surface.
The wine and vinegar are essential. These ingredients evaporate during frying and create the steam that forms bubbles. A dough without wine and vinegar will fry up relatively smooth. The alcohol and acid are what create that gorgeously blistered, craggy texture.

Storage and Freezing
Cannoli shells store remarkably well, which makes them perfect for holiday prep or making ahead for entertaining.
Unfilled shells at room temperature: Store completely cooled shells in an airtight container at room temperature for up to 5 days. They stay surprisingly crisp. Place parchment paper between layers if stacking to prevent scratching.
Freezing shells: Unfilled shells freeze beautifully for 2 to 3 weeks. Place them in an airtight container with parchment between layers. When ready to use, thaw at room temperature for 15 to 20 minutes. If they’ve lost any crispness, refresh them in a 250°F oven on a wire rack for 5 to 10 minutes.
Never freeze filled cannoli. The ricotta filling will make the shells soggy. Always store shells and filling separately and assemble right before serving.
Ricotta filling: Keep the filling refrigerated in an airtight container for up to 3 days. The texture stays perfect and it’s ready to pipe whenever you need it.
Filled cannoli have a short window. Once filled, cannoli should be served within 2 hours for maximum crispness. After that, the moisture from the filling starts to soften the shells. They’re still delicious, just not as dramatically crispy.
Make-ahead strategy for entertaining: Fry all your shells a day or two ahead and store at room temperature. Make the filling the night before and refrigerate in a piping bag. When guests arrive, pipe the filling into the shells, dust with powdered sugar, and serve. Assembly takes 5 minutes and everything tastes freshly made.

Sourdough Fermentation Benefits
The long fermentation with active sourdough starter isn’t just about flavor. It fundamentally changes the structure and digestibility of the dough in ways that benefit everyone, especially those with gluten sensitivities.
Gluten breakdown for easier digestion. During the 12 to 24 hour fermentation, enzymes and lactic acid bacteria break down complex gluten proteins into simpler, more digestible forms. This is why many people who struggle with commercial wheat products can eat long-fermented sourdough without issues. My middle son has gluten sensitivity, and he eats these cannoli without any problems because of the extended fermentation.
Flavor complexity you can’t get otherwise. The lactic acid bacteria create layers of subtle flavor that balance the sweetness of the ricotta filling. You’re not getting a sour taste, just depth and complexity that makes the shells more interesting than standard cannoli. The fermentation also brings out nutty, slightly sweet notes from the flour itself.
Improved texture through gluten relaxation. The acids produced during fermentation relax the gluten network, which makes the dough incredibly easy to roll paper thin. Quick-rest doughs fight back when you try to roll them thin because the gluten is still tight and springy. This dough rolls out effortlessly because it’s had time to relax completely.
Better browning and crisping. The fermentation process breaks down some of the starches into simple sugars, which promotes better browning during frying. You get that gorgeous golden color and deeper flavor from Maillard reactions. The enzymatic action also creates a more delicate structure that fries up crispier.
Lower glycemic impact. While these are still a treat and not a health food, the fermentation does lower the glycemic index compared to quick doughs. The bacteria consume some of the simple carbohydrates, and the remaining starches are partially broken down into forms that digest more slowly.
The science is fascinating, but the bottom line is simple: long-fermented sourdough creates better tasting, more digestible, easier to work with cannoli dough. The overnight rest is completely hands off, and the results are dramatically superior to traditional quick rest, discard recipes.

These long-fermented sourdough cannoli are worth every minute of the overnight wait. The shells are impossibly crisp and light with gorgeous bubbles, the filling is creamy and perfectly sweet, and that satisfying crunch when you bite in is exactly what cannoli should be. Once you make these, you’ll understand why fresh cannoli from a proper Italian bakery are worth the hype, and you’ll never settle for sad, stale, cardboard-tasting shells again.
Love this recipe? Subscribe to my email list to get recipes like this sent directly to you, ad-free. Follow me on Instagram @h3artofthehome to keep up with all the fun things I’m creating in my kitchen!


Leave a Reply