
If you’re looking to add a creative twist to your sourdough baking, using melted ice cream instead of water creates an incredibly rich, tender loaf with unique flavor possibilities. But there’s a crucial baking science lesson you need to know first: melted ice cream is not a 1:1 substitution for water. Understanding the density difference between these two liquids is the key to success.
Why Melted Ice Cream Doesn’t Equal Water
When I first attempted to substitute melted cookies and cream ice cream for the water in my standard sourdough recipe, I ran into a problem. Even though I measured out the same weight of ice cream as water, my dough was far too dry and stiff. The issue comes down to density.
Water has a density of 1 gram per milliliter. This means that 350 grams of water equals exactly 350 milliliters of liquid volume. Simple enough, right?
Melted ice cream, however, is much denser. Depending on the fat content and ingredients, melted ice cream typically has a density between 1.1 and 1.2 grams per milliliter. This means that 350 grams of melted ice cream only provides about 290 to 320 milliliters of actual liquid volume. You’re getting significantly less liquid than you think.
The Correct Conversion for Baking
To properly replace water with melted ice cream in sourdough, you need to account for this density difference. Here’s the math that matters:
If your recipe calls for 350 grams of water (which is 350ml of liquid), you’ll need approximately 420 to 475 grams of melted ice cream to achieve proper hydration in your dough. Through testing, I found that 475 grams works best for cookies and cream ice cream, creating a loaf with better texture and a lighter crumb.
This isn’t just about getting the texture right. Proper hydration affects everything from gluten development to fermentation speed to the final crumb structure of your bread. If you find your loaf is too dense, it’s likely because you didn’t use enough ice cream to account for the density difference.
Choosing the Right Ice Cream
Not all ice cream is created equal, and this matters for your sourdough. Many products labeled as “frozen dairy dessert” or “dairy treat” instead of ice cream contain stabilizers, thickeners, and artificial ingredients that can affect how they behave when melted and mixed into dough.
Real ice cream has a simple ingredient list: cream, milk, sugar, and flavorings. These products melt cleanly and incorporate smoothly into bread dough. Frozen dairy desserts often contain guar gum, carrageenan, cellulose gel, and other additives that can create a gummy texture or prevent proper gluten development.
For the best results, choose ice cream with the fewest additives. Read the ingredient label and look for products that list cream and milk as the first ingredients. Premium ice creams with higher fat content and minimal stabilizers will give you better texture and flavor in your finished bread. The cleaner the ingredient list, the better your sourdough will turn out.
Print Recipe Jump to RecipeIce Cream Sourdough Recipe
This recipe transforms a basic sourdough into something truly special. The fat from the ice cream creates an incredibly tender crumb, while the sugar helps with browning and adds subtle sweetness. Using cookies and cream ice cream adds delightful cookie pieces throughout the loaf.
Ingredients:
- 75 grams active sourdough starter
- 475 grams melted cookies and cream ice cream
- 500 grams bread flour
- 10 grams salt
- 8 grams vanilla extract
Instructions:
- Prepare the ice cream. Melt your cookies and cream ice cream completely. You can use the microwave to speed the process up. Just make sure once melted you’re allowing it to come back to 80°F or below to use.
- Mix the dough. In a large bowl, combine the warmed ice cream, sourdough starter, and flour. Mix until no dry flour remains. The dough will feel softer and slightly tackier than traditional sourdough. Cover and let it rest for 1 hour (autolyse).
- Add the salt and vanilla. After the hour rest, sprinkle the salt over the dough and add the vanilla extract. Work them in using wet hands or the pincer method. Knead for a few minutes until fully incorporated.
- Stretch and folds. Over the next 2 hours, perform stretch and folds every 30 minutes. You’ll do a total of 4 sets of stretch and folds. To do this, wet your hands, grab one side of the dough, stretch it up, and fold it over itself. Rotate the bowl 90 degrees and repeat until you’ve gone around all four sides. This builds strength in the dough.
- Bulk fermentation. After your stretch and folds are complete, let the dough continue to ferment. Because of the sugar content in ice cream, fermentation happens faster than normal. Check your dough after 6 to 8 hours total bulk fermentation time (including the stretch and fold period).
Signs your dough is ready:
- The dough has increased in volume by 50% to 75%
- You can see bubbles on the surface and around the edges
- When you gently press the dough with a wet finger, it springs back slowly but leaves a slight indentation
- The dough looks puffy and aerated, not flat
- You can see webbing and air pockets when you lift the edge of the dough
- The dough feels light and billowy, not dense
If your dough hasn’t shown these signs after 6-8 hours, give it more time.
- Shape the dough. Turn the dough out onto a lightly floured surface. The dough will be softer than regular sourdough, so handle it gently.
To shape a round boule:
- Lightly flour the top of the dough and your hands
- Use a bench scraper or your hands to flip the dough so the floured side is down
- Gently stretch the dough into a rough square or circle
Optional: Add extra Oreo cookies. If you want visible cookie pieces in your bread, now is the time to add them. The cookies from the ice cream will have mostly disintegrated during the stretch and folds and kneading process. Sprinkle about 1/2 to 3/4 cup of crumbled Oreo cookies evenly over the stretched dough. As you fold and shape, the cookie pieces will get incorporated throughout.
- Take the edge furthest from you and fold it to the center
- Rotate the dough 90 degrees and repeat, folding the edge to the center
- Continue rotating and folding until you’ve gone around all four sides
- Flip the dough over so the seam side is down
- Cup your hands around the back of the dough ball
- Using gentle pressure, drag the dough toward you in a circular motion
- The dough should tighten and form a round ball as you rotate and drag it
- Repeat this circular dragging motion 3 to 4 times until you have a taught, round ball
- Let it rest for 5 minutes before transferring to your banneton
Don’t worry if it doesn’t hold a super tight shape. The softer texture from the ice cream means it will spread slightly, and that’s perfectly normal.
- Final proof. Place the shaped dough into a banneton or bowl lined with a floured towel, seam side up. Cover with a lid, bowl cover, or shower cap to prevent the dough from drying out. Refrigerate for 8 to 12 hours.
- Bake. Preheat your oven to 450°F (230°C) with a Dutch oven inside for at least 30 minutes.
Once the dough has finished its final proof, gently turn it out onto a piece of parchment paper.
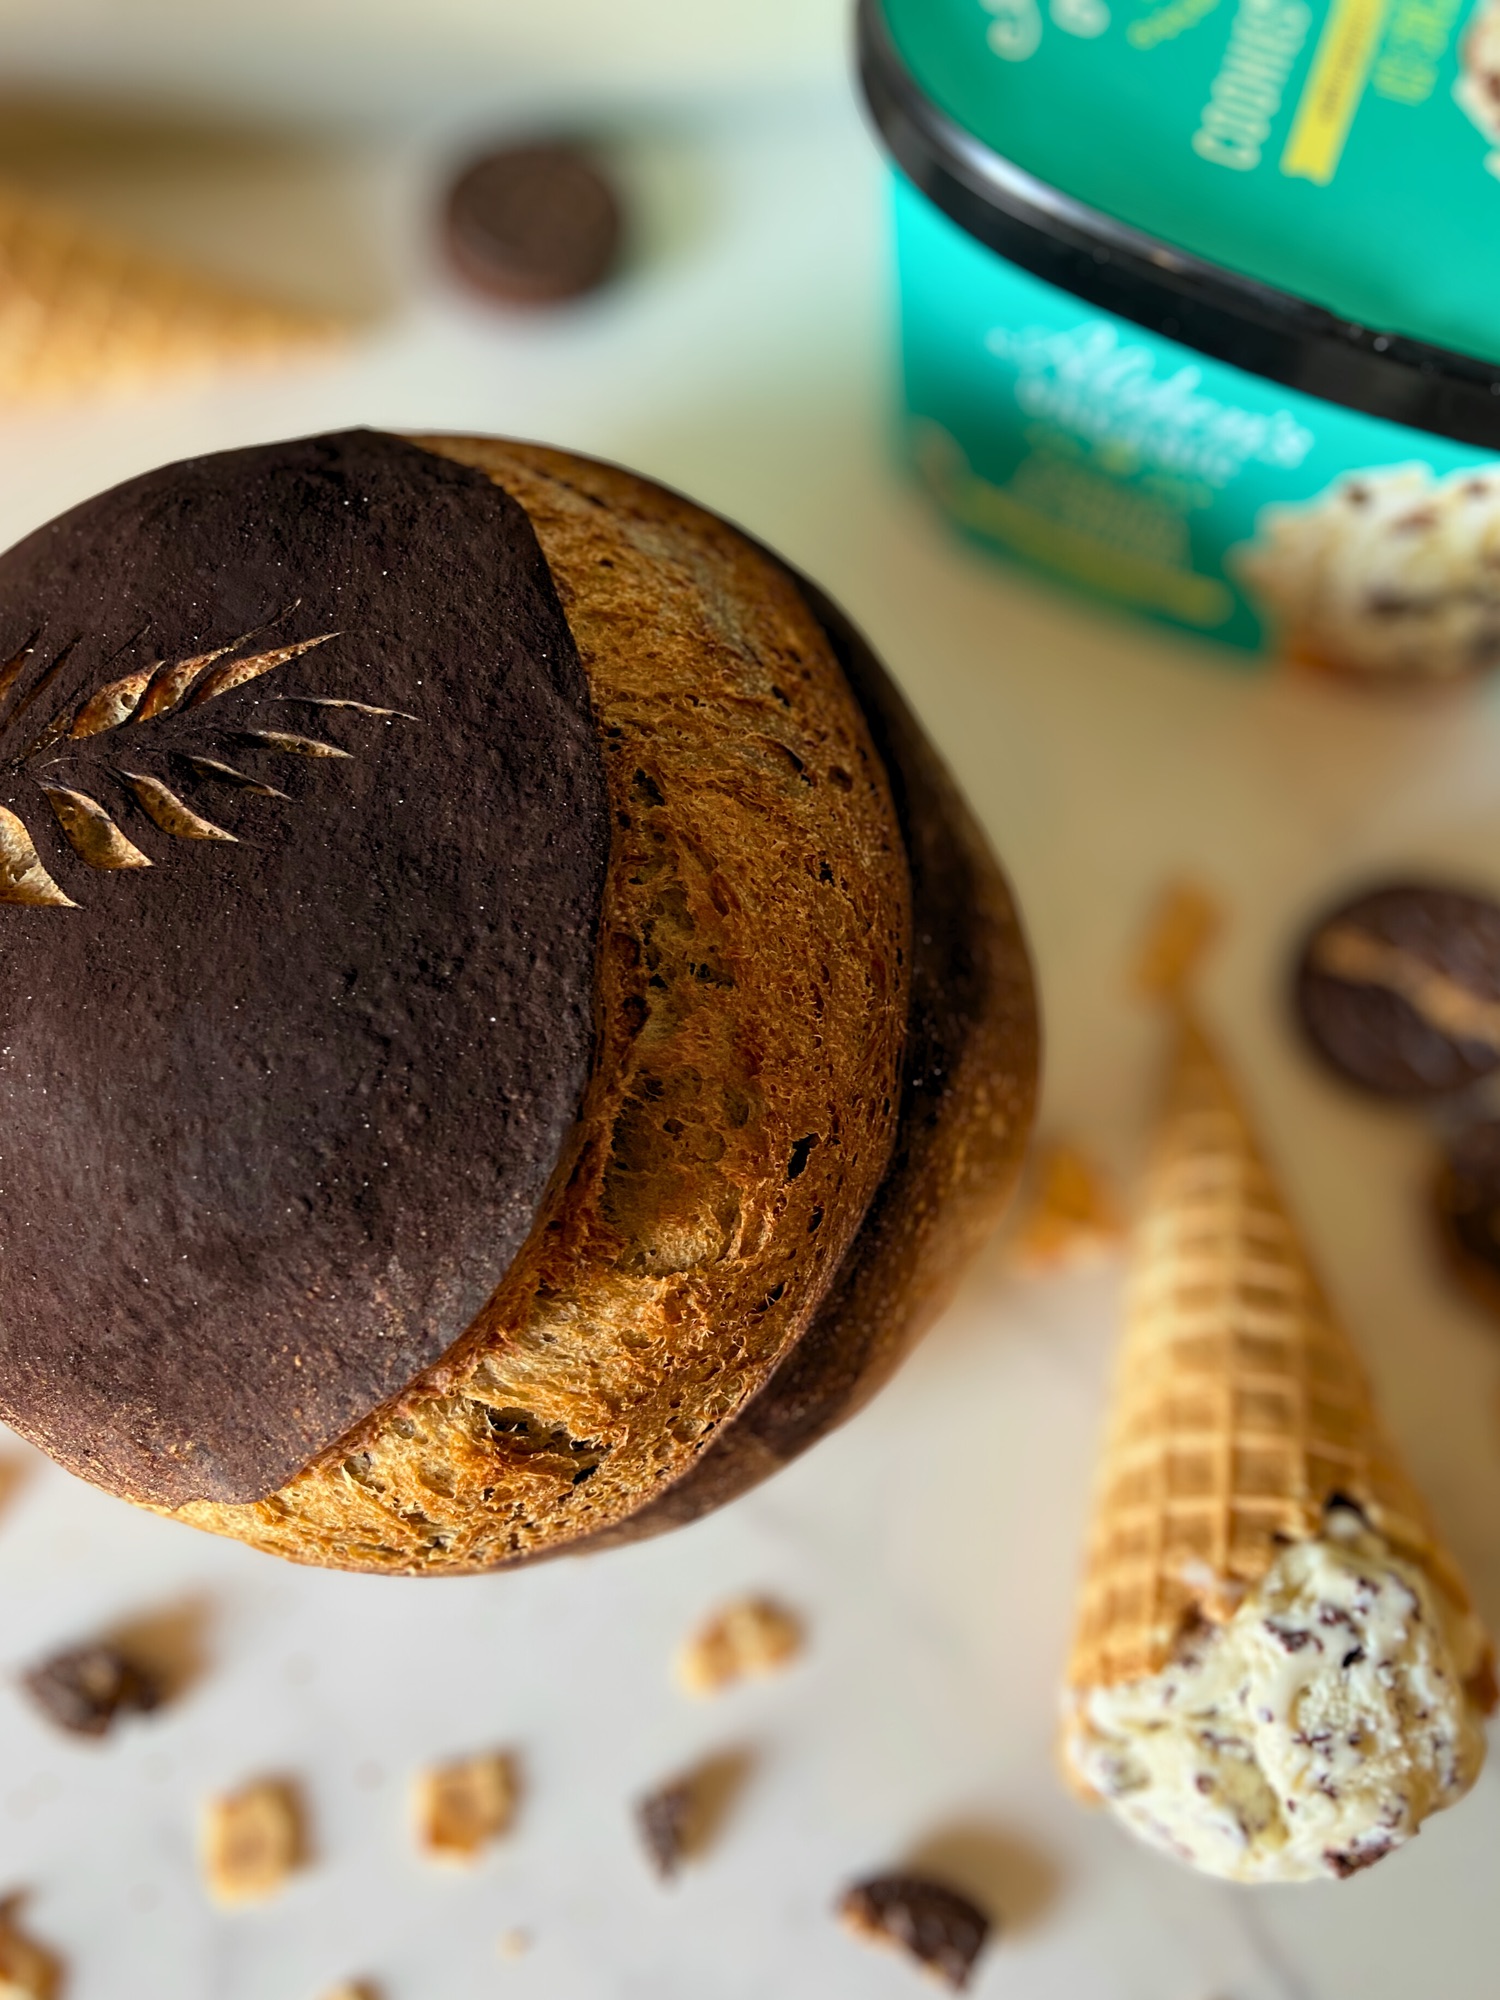
Optional: Add black cocoa powder. For a dramatic visual effect, lightly dust the top of the loaf with black cocoa powder using a fine mesh sieve. This creates a beautiful dark contrast against the light crumb when you score and bake the bread.
Score the top of your loaf with a sharp blade or lame. Carefully lift the parchment paper with the dough and place it into the hot Dutch oven, cover with the lid, and bake for 40 minutes. Remove the lid and bake for an additional 5 to 10 minutes until deep golden brown.
- Cool completely. Let the bread cool on a wire rack for at least 2 hours before slicing. This step is crucial with this recipe. Because of the highly enriched nature of the dough from the ice cream, cutting into the loaf while it’s still hot will create a dense, gummy crumb. The interior needs time to set properly. I know it’s tempting, but patience here makes all the difference in achieving that perfect tender crumb structure.

Ice Cream Sourdough Bread
Ingredients
- 75 grams active sourdough starter
- 475 grams melted cookies and cream ice cream
- 500 grams bread flour
- 10 grams salt
- 8 grams vanilla extract
- 1/2 to 3/4 cup crumbled Oreo cookies optional, for extra cookie pieces
- Black cocoa powder for dusting optional
Instructions
Prepare the ice cream
- Melt your cookies and cream ice cream completely. You can use the microwave to speed the process up. Just make sure once melted you’re allowing it to come back to 80°F or below to use.
Mix the dough
- In a large bowl, combine the warmed ice cream, sourdough starter, and flour. Mix until no dry flour remains. The dough will feel softer and slightly tackier than traditional sourdough. Cover and let it rest for 1 hour (autolyse).
- Add the salt and vanilla
- After the hour rest, sprinkle the salt over the dough and add the vanilla extract. Work them in using wet hands or the pincer method. Knead for a few minutes until fully incorporated.
Stretch and folds
- Over the next 2 hours, perform stretch and folds every 30 minutes. You’ll do a total of 4 sets of stretch and folds. To do this, wet your hands, grab one side of the dough, stretch it up, and fold it over itself. Rotate the bowl 90 degrees and repeat until you’ve gone around all four sides. This builds strength in the dough.
Bulk fermentation
- After your stretch and folds are complete, let the dough continue to ferment. Because of the sugar content in ice cream, fermentation happens faster than normal. Check your dough after 6 to 8 hours total bulk fermentation time (including the stretch and fold period).
Signs your dough is ready:
- The dough has increased in volume by 50% to 75%
- You can see bubbles on the surface and around the edges
- When you gently press the dough with a wet finger, it springs back slowly but leaves a slight indentation
- The dough looks puffy and aerated, not flat
- You can see webbing and air pockets when you lift the edge of the dough
- The dough feels light and billowy, not dense
- If your dough hasn’t shown these signs after 6-8 hours, give it more time.
Shape the dough
- Turn the dough out onto a lightly floured surface. The dough will be softer than regular sourdough, so handle it gently.
- To shape a round boule:
- Lightly flour the top of the dough and your hands (optional)
- Use a bench scraper or your hands to flip the dough so the floured side is down
- Gently stretch the dough into a rough square or circle
- Optional: Add extra Oreo cookies. If you want visible cookie pieces in your bread, now is the time to add them. The cookies from the ice cream will have mostly disintegrated during the stretch and folds and kneading process. Sprinkle about 1/2 to 3/4 cup of crumbled Oreo cookies evenly over the stretched dough. As you fold and shape, the cookie pieces will get incorporated throughout.
- Take the edge furthest from you and fold it to the center
- Rotate the dough 90 degrees and repeat, folding the edge to the center
- Continue rotating and folding until you’ve gone around all four sides
- Flip the dough over so the seam side is down
- Cup your hands around the back of the dough ball
- Using gentle pressure, drag the dough toward you in a circular motion
- – The dough should tighten and form a round ball as you rotate and drag it
- – Repeat this circular dragging motion 3 to 4 times until you have a taught, round ball
- Let it rest for 5 minutes before transferring to your banneton
- Don’t worry if it doesn’t hold a super tight shape. The softer texture from the ice cream means it will spread slightly, and that’s perfectly normal.
Final proof
- Place the shaped dough into a banneton or bowl lined with a floured towel, seam side up. Cover with a lid, bowl cover, or shower cap to prevent the dough from drying out. Refrigerate for 8 to 12 hours.
Bake
- Preheat your oven to 450°F (230°C) with a Dutch oven inside for at least 30 minutes.
- Once the dough has finished its final proof, gently turn it out onto a piece of parchment paper.
- Optional: Add black cocoa powder. For a dramatic visual effect, lightly dust the top of the loaf with black cocoa powder using a fine mesh sieve. This creates a beautiful dark contrast against the light crumb when you score and bake the bread.
- Score the top of your loaf with a sharp blade or lame. Carefully lift the parchment paper with the dough and place it into the hot Dutch oven, cover with the lid, and bake for 40 minutes. Remove the lid and bake for an additional 5 to 10 minutes until deep golden brown.
- Cool completely
- Let the bread cool on a wire rack for at least 2 hours before slicing. This step is crucial with this recipe. Because of the highly enriched nature of the dough from the ice cream, cutting into the loaf while it’s still hot will create a dense, gummy crumb. The interior needs time to set properly. I know it’s tempting, but patience here makes all the difference in achieving that perfect tender crumb structure.
Notes
Tips for Success with Ice Cream Sourdough

Choose your flavor wisely. Almost any ice cream flavor works, but some create more interesting results than others. Cookies and cream adds texture. Vanilla makes a subtly sweet loaf perfect for French toast. Chocolate or coffee ice cream creates a dessert-like bread that’s amazing toasted with butter.
Watch your fermentation time. Don’t rely on the clock; watch for visual cues like volume increase and bubble formation.
Embrace the softer texture. Ice cream sourdough will have a softer, more tender crumb than traditional sourdough because of the added fat and sugar. This is a feature, not a problem. The bread is phenomenal for sandwiches and toast.
Adjust for mix-ins. If your ice cream has large chunks (cookie pieces, candy bits, nuts), they’ll add interesting texture to your bread. The chunks may create slight gaps in the crumb structure, which adds character.
Temperature matters. Make sure your melted ice cream is at room temperature or a little warmer before mixing. Cold ice cream will slow down your starter and make mixing more difficult.
What Went Wrong with My First Attempt

In my initial experiment, I used 375 grams of melted cookies and cream ice cream to replace 350 grams of water. Despite using slightly more by weight, the dough was noticeably dry and difficult to work with. The problem was clear: I wasn’t accounting for density.
That 375 grams of ice cream only provided about 310 to 340 milliliters of liquid, leaving me short by about 40 to 50 milliliters. In bread baking, that’s a significant deficit. The dough couldn’t develop gluten properly, and the final loaf would have been dense and tight.
If you find yourself in this situation with dough that’s already mixed but too dry, you can gradually add milk or water (50 to 75 ml) while kneading. However, it’s difficult to incorporate liquid evenly into dough that’s already formed, so it’s better to get the ratio right from the start.
The Science Behind Better Bread

Understanding ingredient density isn’t just useful for creative substitutions like ice cream. It applies anytime you’re converting between weight and volume measurements or substituting one liquid for another.
Milk, for example, has a density of about 1.03 g/ml, making it very close to water. Honey is much denser at 1.4 g/ml, while oil is lighter at 0.92 g/ml. Knowing these differences helps you make accurate substitutions and troubleshoot recipes.
For sourdough specifically, proper hydration is everything. Too little liquid and your bread becomes dense and dry. Too much and it’s impossible to shape and handle. Getting that balance right, especially when using unconventional ingredients, separates okay bread from exceptional bread.
Final Thoughts on Ice Cream Sourdough
Making sourdough with melted ice cream might sound like a gimmick, but it produces genuinely delicious bread with a tender crumb and subtle sweetness that works for both sweet and savory applications. The key is understanding that weight and volume aren’t the same thing when dealing with liquids of different densities.
Use 475 grams of melted ice cream to replace 350 grams of water, watch your fermentation times closely, and embrace the softer texture. You’ll end up with a unique loaf that surprises and delights everyone who tries it.
Happy baking, and remember that even failed experiments teach us something valuable about the science of bread.


Leave a Reply to Noelle Reed Cancel reply