Table of Contents
- Why This Recipe is Different
- Why This Recipe Works
- Key Ingredients You Need
- Understanding Bagel Dough
- Fermentation Schedule
- My Preferred Fermentation Method
- Shaping and Boiling Technique
- Everything Bagel Seasoning
- Adding Cheese Filling
- Troubleshooting Dense Bagels
- Serving and Storage
- Yeast Version
I have a confession: I absolutely hate making traditional bagels. I know that sounds ridiculous coming from someone who willingly spends 2 to 3 days making croissants, but hear me out. There’s something about the whole process of poking holes, stretching them to the perfect size, and boiling individual rings that feels overwhelming to me. Maybe it’s the precision required for each individual bagel, or the fact that one mis-sized hole can close up completely during baking. Whatever the reason, traditional bagel making has always lived in my brain as more stressful than laminating butter into dough dozens of times.
So I did what I always do when a technique intimidates me: I found a way around it. Tricking myself into thinking they’re fun! These everything bagel pull apart bagels give you all the authentic bagel experience (yes, we’re still boiling) without any of the hole-poking anxiety. Just shape balls, boil them, coat them in everything seasoning, and bake. The result? Golden, chewy bagel perfection that’s actually easier and more fun to share than traditional bagels.
If you’ve been searching for the perfect shareable bread recipe that combines the best parts of sourdough bagels with the fun, interactive appeal of pull-apart bread, this sourdough bagel pull-apart is about to become your new favorite. Imagine pulling apart tender, chewy bagel balls coated in everything bagel seasoning, with the option to hide melted cheese inside each ball for an extra indulgent surprise. This recipe transforms traditional bagel dough into a crowd pleasing centerpiece that works for breakfast, brunch, game day, or any gathering where you want to wow your guests.
This sourdough bagel pull-apart takes the beloved texture and flavor of homemade sourdough bagels and reimagines them as bite sized balls arranged in a baking pan. Each ball gets the full bagel treatment including boiling in honey water and coating in everything seasoning before baking. The result is a pull-apart bread with authentic bagel flavor, chewy texture, and that signature golden crust you expect from quality bagels. If you love bold flavors, you might also enjoy my Mike’s Hot Honey Bagels for a spicy-sweet twist on traditional bagels or my Pizza Bagel Recipe.

Sourdough Everything Bagel Balls (Pull-Apart)
Equipment
- Large mixing bowl
- Stand mixer with dough hook (or use hands)
- kitchen scale
- plastic wrap
- Baking sheet
- Parchment paper
- 13×9 inch baking pan
- Large pot or Dutch oven for boiling
- Slotted spoon
- Kitchen towel
Ingredients
For the dough:
- 600 g bread flour 4¾ cups
- 310 g water 1⅓ cups
- 180 g active sourdough starter ¾ cup
- 25 g brown sugar 2 Tablespoons
- 12 g salt 2 Teaspoons
For boiling:
- 6 to 8 cups water 1½-2 quarts
- 2 tablespoons honey or sugar 40g honey or 25g sugar
For topping:
- Everything bagel seasoning generous amount for coating
Optional cheese filling:
- Low moisture mozzarella or sharp cheddar cut into 10 to 15g cubes
Instructions
Day 1:
- In a large bowl, dissolve the starter and brown sugar in the water.
- Add flour and salt. Mix until all flour is absorbed and forms a shaggy dough.
- Cover and rest 45 minutes to 1 hour.
- Knead by hand for 8 to 10 minutes or stand mixer on speed 2 for 6 to 8 minutes until smooth and elastic.
- Place in lightly oiled bowl, cover with plastic wrap. Let bulk ferment at room temperature until 1.5x in size, approximately 5 to 7 hours depending on temperature. Do NOT let it fully double before shaping.
- Once dough reaches 1.5x, divide into 18 pieces at 60g each. You could also make these larger or smaller depending on the desired amount or size.
- If using cheese filling, flatten each piece, place cheese cube in center, wrap and seal completely. Shape into tight balls by cupping hand over dough and rolling in circles on unfloured surface.
- Arrange shaped balls on parchment lined baking sheet. Cover tightly with plastic wrap or place in large covered container.
- Transfer immediately to refrigerator for overnight cold proof, 12 to 18 hours.
Day 2:
- Remove shaped balls from refrigerator first thing in the morning.
- Let come to room temperature for 60 to 90+ minutes. Watch for signs of proper fermentation: balls should feel slightly puffy, have a little give when gently pressed, and look visibly larger than when first shaped.
- Preheat oven to 425°F. Line 13×9 pan with parchment.
- Bring 6 to 8 cups water to boil. Add 2 tablespoons honey or sugar.
- Test one ball in the boiling water. If it floats immediately and bobs on surface, they are ready. If it sinks or struggles to float, give remaining balls another 15 to 20 minutes at room temperature.
- Boil 4 to 6 balls at a time, 20 to 30 seconds per side. I could fit 10 in my shallow but wide pan i used.
- Remove with slotted spoon, drain briefly on towel.
- While still wet, roll each ball in everything bagel seasoning, coating generously.
- Arrange in 13×9 pan.
- Bake 22 to 25 minutes until deep golden brown.
- Cool 5 to 10 minutes before pulling apart.
Notes
Why This Recipe is Different
Most sourdough bagel recipes follow the traditional method: shape individual bagels with holes, boil them one by one, and bake them spaced apart on baking sheets. This recipe breaks from that approach in ways that make the entire process more approachable while delivering authentic bagel flavor and texture.
First, there’s no hole poking. Instead of wrestling with dough rings that might close up during proofing or baking, you simply shape tight balls. This eliminates one of the most finicky parts of bagel making and actually makes the shaping process faster and more consistent.
Second, the pull apart format creates a more interactive eating experience. Rather than slicing individual bagels, everyone pulls apart warm, perfectly portioned balls. This makes these bagels ideal for gatherings, brunches, or any time you want food that encourages sharing and conversation.
Third, the brown sugar in the dough adds unexpected depth. Most bagel recipes use white sugar or honey, but brown sugar brings subtle molasses notes that complement the savory everything seasoning beautifully. This small change creates more complex flavor that sets these bagels apart from standard recipes.
Finally, the overnight cold fermentation approach gives you control over your schedule. Mix the dough when it’s convenient, let it ferment in the refrigerator overnight, and finish the bagels whenever you’re ready to bake. This flexibility makes sourdough bagel baking fit into real life rather than demanding you clear an entire day.

Why This Recipe Works
Traditional sourdough bagels are delicious, but they require individual shaping, boiling, and spacing on baking sheets. This pull-apart version simplifies the process while creating an eye catching presentation that encourages sharing. The balls are arranged with slight spacing in a 13×9 pan, allowing them to develop individual crusts before naturally fusing together during baking.
The secret to achieving genuine bagel texture lies in the boiling step. Boiling bagel dough in water with honey or malt syrup gelatinizes the exterior starches, creating that characteristic shiny, chewy crust. When you boil these smaller balls and give them breathing room in the pan, each piece develops its own crust while still connecting to its neighbors for that satisfying pull-apart effect.
This recipe uses an active sourdough starter for natural leavening, which provides complex flavor and better digestibility compared to commercial yeast bagels. The overnight cold fermentation develops deeper flavor while giving you flexibility in your baking schedule. You can mix the dough one day, refrigerate it overnight, and finish the bagels whenever you’re ready.
Key Ingredients You Need
This sourdough bagel pull-apart bread uses simple, wholesome ingredients that you likely already have in your kitchen. High protein bread flour is essential for achieving that characteristic bagel chew. The protein content in bread flour (typically 12-14%) creates a stronger gluten network that can withstand the boiling process and produce the dense, chewy texture bagels are known for.
Brown sugar adds a subtle molasses depth to the dough that complements the savory everything seasoning. Unlike recipes that use plain white sugar or honey, brown sugar brings complexity without making the bagels taste sweet. This unexpected ingredient creates a more interesting flavor profile that sets these bagels apart from standard recipes.
Your sourdough starter should be active and bubbly before mixing the dough. An active starter ensures proper fermentation and rise. If your starter has been refrigerated, feed it 4-8 hours before you plan to mix your dough, allowing it to double in size and become very active with plenty of bubbles throughout. If you need help getting your starter ready, check out my sourdough starter guide for detailed instructions on feeding and maintaining a healthy starter.

Understanding Bagel Dough
Bagel dough differs significantly from other bread doughs. With a hydration level around 50-52%, bagel dough is much stiffer than typical bread dough. This low hydration creates the dense, chewy texture that defines a proper bagel. While the dough may feel challenging to knead at first, this stiffness is exactly what you want.
The kneading process is crucial for developing gluten strength. Whether you knead by hand for 8-10 minutes or use a stand mixer for 6-8 minutes, you’re building the gluten network that will give your bagels their structure. The dough should transform from a shaggy mass into a smooth, elastic ball that springs back when pressed.
One key difference in this pull-apart version is the fermentation approach. Rather than the room temperature overnight rise that many bagel recipes use, this method employs a bulk fermentation at room temperature until the dough reaches 1.5x its original size, followed by cold fermentation in the refrigerator. This two stage approach prevents over proofing while developing excellent flavor.

Fermentation Schedule
Understanding the fermentation timeline is critical for success with sourdough bagels. Unlike commercial yeast bagels that can be rushed, sourdough bagels benefit from a longer, slower fermentation that develops complex flavors and improves digestibility.
On Day 1, mix your dough in the morning or early afternoon. Allow it to bulk ferment at room temperature for 5-7 hours, watching for it to increase to about 1.5x its original size. This is an important checkpoint. Many bakers make the mistake of letting the dough fully double before refrigerating, but the dough continues to ferment slowly in the refrigerator. If you refrigerate fully doubled dough, you risk over-proofing, which leads to dense bagels with poor oven spring.
Once your dough reaches 1.5x its size, transfer it to the refrigerator for 12 hours. The cold temperature slows fermentation dramatically while allowing flavor to continue developing. This cold rest also makes the dough easier to handle and shape the next day.
On Day 2, remove the dough from the refrigerator and let it rest at room temperature for 60-90 minutes. This brief rest takes the chill off the dough, making it easier to divide and shape. After shaping the balls, they need a critical final proof of 45-60 minutes at room temperature. This final proof is essential for achieving light, airy bagels rather than dense, gummy ones.
My Preferred Fermentation Method
While the method above works beautifully, I actually prefer a slightly different timeline that gives me more control but same results. This approach shapes the dough before the overnight rest, which I find produces lighter, more consistent bagels.
Day 1 (Morning/Afternoon):
1. Mix your dough in the morning or early afternoon.
2. Let it bulk ferment at room temperature for 5-7 hours until it reaches 1.5x its original size. It all depends on your starter and kitchen temperature!
3. Once the dough has risen to 1.5x, divide it into 60 gram balls and shape them tightly.
4. If adding cheese filling, flatten each ball slightly, add your cheese cube (10-15g), wrap and seal completely.
5. Arrange the shaped balls on a parchment lined baking sheet. Cover tightly with plastic wrap or place in a large covered container.
6. Transfer immediately to the refrigerator for an overnight cold proof (12-18 hours).
Day 2 (Morning):
1. Remove the shaped balls from the refrigerator first thing in the morning.
2. Let them come to room temperature for 1-2 hours. Watch for signs of proper fermentation: the balls should feel slightly puffy, have a little give when gently pressed, and look visibly larger than when you first shaped them. You kitchen environment will be the factor for how long this takes. Keep your eyes on the dough, not the clock.
3. Perform the float test: bring your boiling water to temperature and test one ball. Place parchment side down. If it floats immediately and bobs on the surface, they’re ready. If it sinks, give the remaining balls another 15-30 minutes at room temperature.
4. Once properly proofed, proceed with boiling, coating in everything seasoning, arranging in the pan, and baking as directed.
Why I Prefer This Method:
Shaping before the cold rest gives the gluten time to relax overnight in the refrigerator. When you pull them out in the morning, they’re already shaped and just need to warm up and finish proofing. This eliminates the need to work with cold dough, and I find it produces more consistent results because each ball gets the same cold fermentation time.
The extended cold proof also develops more complex flavor. Those extra hours in the refrigerator allow the fermentation to continue very slowly, building depth without over proofing the dough.
Finally, this timeline fits my schedule better. I can do the active work (mixing, kneading, shaping) when I have energy during the day, then let the refrigerator do the work overnight. In the morning, I just need to wait for them to warm up before boiling and baking.
Shaping and Boiling Technique
Shaping bagel balls is simpler than shaping traditional bagels with holes. Divide your dough into 60 gram pieces, which gives you approximately 18 balls. Each piece should be shaped into a tight ball using the cup and drag method. Place your hand over the dough piece and use circular motions on an unfloured surface, allowing the friction between the dough and counter to create tension on the surface of the ball.
The boiling step is nonnegotiable for authentic bagel texture. Bring 6-8 cups of water to a rolling boil and add 2 tablespoons of honey, molasses, or sugar. The sweetener helps with browning and adds a subtle sheen to the finished bagels. Place parchment side or seam side down. Boil the balls in batches of 4-6 pieces, giving them 20-30 seconds per side. Properly proofed bagels should float immediately when added to the water. If your bagels sink to the bottom or struggle to float, this is a clear sign they are under proofed and need more time to rise before boiling. Let the remaining balls continue proofing and test again in 15-20 minutes.
After boiling, drain the balls briefly on an oiled cooling rack, then immediately roll them in everything bagel seasoning while still wet. The moisture helps the seasoning adhere beautifully. Arrange the coated balls in a parchment lined 13×9 pan. This spacing allows each ball to develop some crust before they expand and touch during baking.
Everything Bagel Seasoning
Everything bagel seasoning has become a phenomenon in its own right, and for good reason. The combination of sesame seeds, poppy seeds, dried garlic, dried onion, and coarse salt creates an addictive savory blend that elevates any bread product. For this pull-apart bread, you’ll want to coat each ball generously. The seasoning not only adds incredible flavor but also creates textural interest and visual appeal.
You can use store bought everything seasoning, but making your own allows you to control the ratios and freshness of the ingredients. A homemade blend typically includes equal parts white sesame seeds, black sesame seeds, poppy seeds, dried minced garlic, dried minced onion, and flaky sea salt. Toast the sesame seeds lightly before mixing if you want an even deeper, nuttier flavor.
The key to getting the seasoning to stick is applying it while the bagels are still wet from boiling. Don’t pat them completely dry. That surface moisture acts as a natural adhesive. Roll each ball thoroughly in a shallow bowl of seasoning, pressing gently to ensure good coverage on all sides.
Adding Cheese Filling
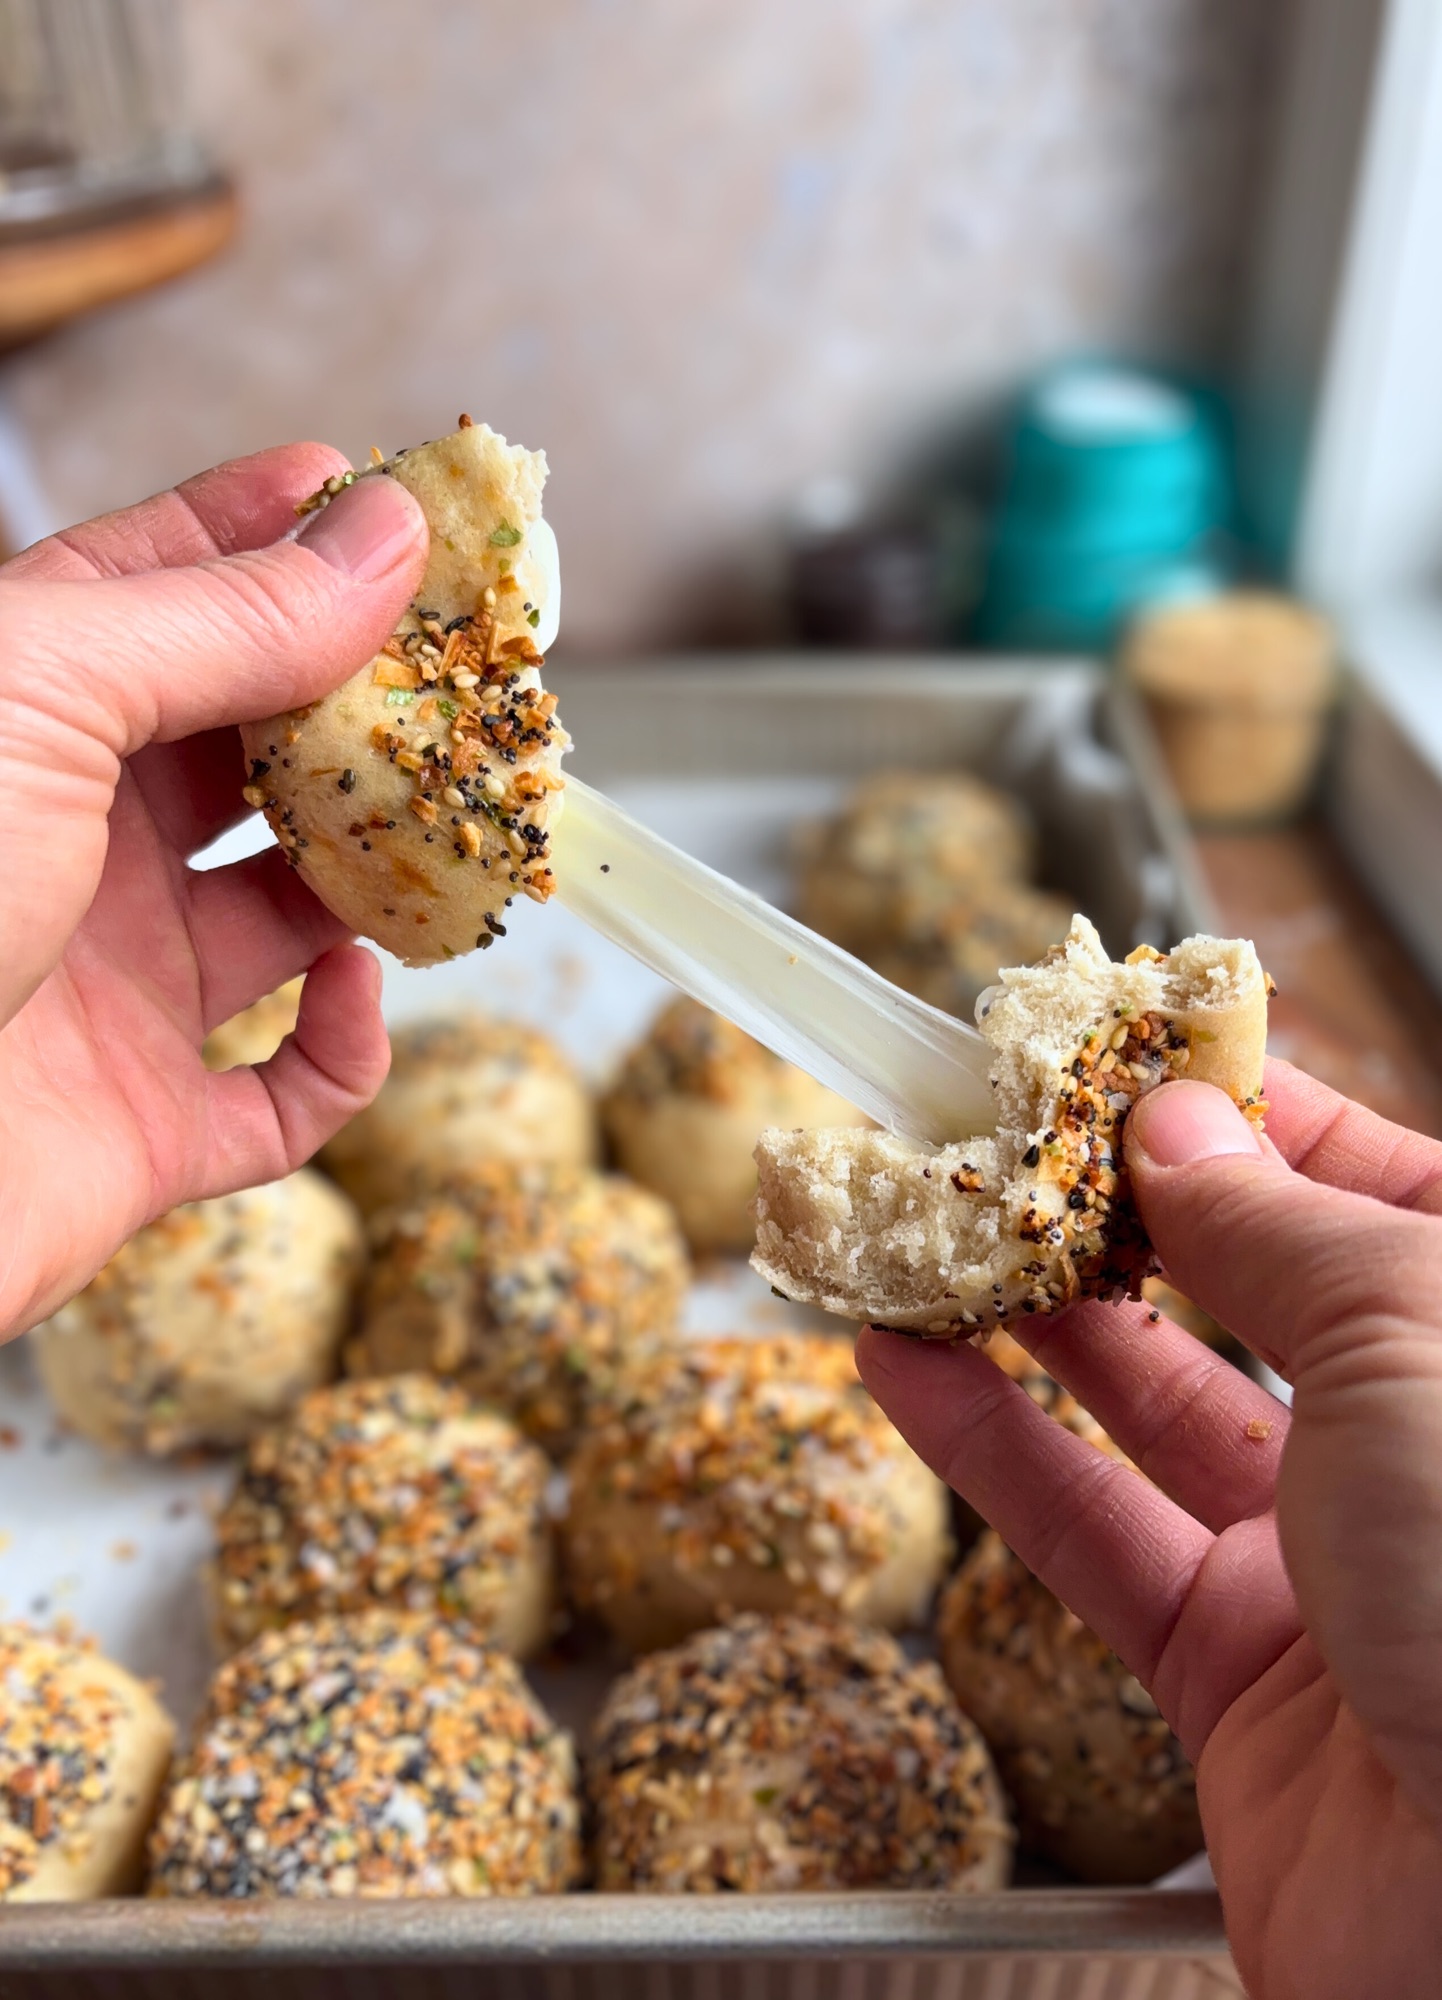
For an even more indulgent version, you can add cheese inside each bagel ball. Low moisture mozzarella and sharp cheddar both work beautifully, creating those irresistible cheese pulls when you tear the bread apart. The cheese stays hidden inside until you pull the bagels apart, creating a delicious surprise.
To add cheese filling, flatten each 60-gram dough portion slightly, place a small cube of cheese (about 10-15 grams) in the center, then wrap the dough around it and seal completely. Make sure to pinch the seams well so cheese doesn’t leak out during boiling and baking. Place seam side down on the parchment. The boiling step actually helps seal the dough around the cheese, preventing leaks.
The cheese filled version bakes at the same temperature and time as the plain version. The cheese melts inside while the exterior develops that perfect everything bagel crust. When you pull the bagels apart, you get both the external seasoning punch and an internal cheesy surprise with those satisfying cheese pulls stretching between each piece.

Troubleshooting Dense Bagels
Dense, heavy bagels are the most common issue home bakers encounter. While bagels should be chewy, they shouldn’t be brick-like or gummy. Several factors can cause overly dense results.
Over proofing is a primary culprit. If your dough fully doubles or triples during bulk fermentation before going into the refrigerator, the yeast exhausts itself. Over proofed dough loses its structure and bakes up dense because the gluten network has weakened. Watch your dough carefully and refrigerate it at 1.5x its original size, not when fully doubled.
Under proofing after shaping causes similar problems. After dividing and shaping the balls, that final 30-45 minute proof at room temperature is crucial. The balls should feel slightly puffy and airy, with a little give when you press them gently. Skip or rush this step, and your bagels will be tight and dense.
The float test during boiling provides another checkpoint. Properly proofed bagels float immediately and bob on the surface of the boiling water. If they sink or barely float, they haven’t proofed enough. Let the remaining unshaped balls continue proofing while you adjust your timeline.
Serving and Storage
This sourdough bagel pull-apart bread is best served warm from the oven when the exterior is crispy and the interior is soft and steamy. Let it cool for 5-10 minutes after baking so the structure sets, then serve it family style. The fun of pull-apart bread is in the tearing and sharing. Everyone can grab a ball or two, making it perfect for casual gatherings.
Serve your bagel pull-apart with classic accompaniments. Cream cheese is traditional and delicious, whether you go plain, chive, or vegetable. Smoked salmon, capers, and thinly sliced red onion turn this into a bagel and lox experience. For a simpler approach, good quality butter is hard to beat.
Store un-filled cooled bagels in an airtight container at room temperature for up to 2 days. The texture will soften slightly as they sit, but they’re still delicious. For longer storage, freeze the bagels in a freezer safe bag or container for up to 3 months. Reheat frozen bagels in a 350°F oven for 10-15 minutes, or toast individual balls directly from frozen.
Store cheese filled balls in the refrigerator up to 5 days. You will definitely need to reheat them either in the oven or microwave.

Tips for Success
Temperature matters significantly in bread baking. Keep your room temperature dough between 74-76°F during bulk fermentation for predictable timing. Colder kitchens will slow fermentation considerably, while warmer environments speed it up. Adjust your timeline accordingly and always trust visual cues over clock time.
Invest in a kitchen scale if you haven’t already. Measuring flour by weight rather than volume ensures consistency between batches. Bagel dough is stiff enough that even small variations in flour amount can significantly impact the final texture. Weighing your ingredients eliminates this variable.
Don’t skip the autolyse rest after mixing the dough. That 45-minute to 1-hour rest period allows the flour to fully hydrate and begins gluten development before you start kneading. This rest makes kneading easier and more effective, resulting in better dough structure.
Use parchment paper in your baking pan. While a well greased pan works, parchment provides insurance against sticking and makes cleanup effortless. It also allows you to lift the entire pull-apart bread out of the pan for easier serving and photographing.
Why Sourdough Bagels Are Worth the Effort
Sourdough fermentation transforms simple ingredients into something more nutritious and flavorful than quick rise bread. The long fermentation process breaks down complex carbohydrates and reduces phytic acid, making the bread easier to digest and its nutrients more bioavailable. Many people who experience discomfort from commercial bread find they tolerate naturally fermented sourdough much better.
The flavor complexity of sourdough bagels surpasses commercial yeast bagels. The fermentation develops subtle depth and character that you simply cannot achieve with fast rising dough. Each bite offers nuanced flavor that goes beyond just “bread” into something more interesting and satisfying.
Making bread at home, especially sourdough, connects you to centuries of baking tradition. There’s something deeply satisfying about transforming flour, water, and salt into beautiful, nourishing food with your own hands. This pull-apart bread embodies that satisfaction while being approachable enough for bakers at any skill level.
Frequently Asked Questions
Can I make this recipe with commercial yeast instead of sourdough starter?
Yes, you can adapt this recipe to use commercial yeast instead of sourdough starter. However, you’ll lose the characteristic sourdough flavor and digestibility benefits that come from long fermentation. For detailed instructions on making a yeasted version of this pull apart bagel recipe, check the table of contents at the beginning of the blog to get to that section.
Why do my bagels have a dense, gummy texture?
Dense, gummy bagels typically result from either over proofing or under proofing. Over proofed dough exhausts its yeast and loses structure. Under proofed dough hasn’t developed enough air pockets to create a light interior. Follow the visual cues in the recipe carefully, refrigerate at 1.5x size (not doubled), and don’t skip the final 30-45 minute proof after shaping.
Can I prepare the dough further in advance?
The dough can stay refrigerated for up to 24 hours after the bulk fermentation, though 12-18 hours is optimal. Beyond 24 hours, the dough may over proof even in the cold refrigerator. If you need more flexibility, shape the balls, place them on a parchment lined baking sheet, cover well, and freeze them. When ready to bake, thaw overnight in the refrigerator, bring to room temperature, continue with the ferment, though it will take significantly longer, then boil and bake as directed.
What can I use instead of everything bagel seasoning?
Bagel toppings are wonderfully versatile. Try sesame seeds, poppy seeds, dried minced onion, dried minced garlic, coarse salt, or any combination you prefer. For a simpler approach, coarse sea salt alone is classic and delicious. You can also experiment with za’atar seasoning, furikake, or even grated parmesan cheese.
Do I have to boil the bagels?
Boiling is essential for authentic bagel texture and appearance. The boiling step gelatinizes the exterior starches, creating that characteristic shiny, chewy crust. I was able to boil 10 balls in a time in the pan I chose. Without boiling, you would have bread rolls rather than bagels. The process only takes a few minutes and makes all the difference in the final product.
Yeast Version: Everything Bagel Pull Apart Bagels
If you don’t have sourdough starter or prefer a quicker timeline, you can make these everything bagel pull apart bagels with commercial yeast. The texture and flavor will be slightly different from the sourdough version, but you’ll still get delicious, chewy bagels with that authentic boiled crust and everything seasoning coating.
Yeast Version Ingredients
For the dough:
- 690g bread flour (5 1/2 cups)
- 400g water (1 2/3 cups)
- 7g (2 1/4 teaspoons) instant yeast OR 8g (2 3/4 teaspoons) active dry yeast
- 25g brown sugar (2 Tablespoons)
- 12g salt (2 Teaspoons)
For boiling:
- 6-8 cups water
- 2 tablespoons honey or sugar (honey 40g, sugar 25g)
For topping:
- Everything bagel seasoning (generous amount for coating)
Yeast Version Instructions
Day 1 (or Same Day):
1. If using active dry yeast: Dissolve it in the warm water (100-110°F / 38-43°C) with the brown sugar. Let bloom for 5-10 minutes until foamy before adding to flour. If using instant yeast: Add it directly to the flour mixture and use room temperature water.
2. In a large bowl, combine flour, salt, and instant yeast (if using). Add the water and brown sugar mixture (or bloomed active dry yeast mixture). Mix until all flour is absorbed and forms a shaggy dough.
3. Cover and rest 45 minutes to 1 hour.
4. Knead by hand (8-10 minutes) or stand mixer on speed 2 (6-8 minutes) until smooth and elastic.
5. Place in lightly oiled bowl, cover with plastic wrap. Let bulk ferment at room temperature for 1-1.5 hours until doubled in size (much faster than sourdough version).
6. Once doubled, you can either refrigerate overnight for easier handling and flavor development, or proceed directly to shaping.
Day 2 (or Later Same Day):
1. If refrigerated: Remove dough from fridge and let rest at room temp 30-45 minutes. If proceeding same day: Continue immediately.
2. Divide into 18 pieces at 60g each. Shape into tight balls.
3. Place on parchment lined baking sheet. Cover with damp towel, rest 15-20 minutes.
4. Let proof another 30-45 minutes until slightly puffy and airy.
5. Preheat oven to 425°F. Line 13×9 pan with parchment.
6. Bring 6-8 cups water to boil. Add 2 tablespoons honey/sugar/molasses.
7. Boil 4-6 balls at a time, 20-30 seconds per side. They should float immediately.
8. While still wet, roll each ball in everything bagel seasoning.
9. Arrange in 13×9 pan.
10. Bake 22-25 minutes until deep golden brown.
11. Cool 5-10 minutes before pulling apart.
What Yeast to Use
Instant Yeast (also called rapid rise or bread machine yeast): This is the easiest option. You can mix it directly into the dry ingredients without blooming it first. It works faster than active dry yeast and is more forgiving. Use 7g (2 1/4 teaspoons) for this recipe.
Active Dry Yeast: This needs to be bloomed in warm water first to activate. Dissolve it in the warm water with the brown sugar and wait 5-10 minutes until you see foam on the surface. This proves your yeast is alive and active. Use 8g (2 3/4 teaspoons) for this recipe, which is slightly more than instant yeast to account for the activation process.
Both types will work perfectly in this recipe. The choice comes down to convenience and what you have in your pantry.
Timing Differences: Yeast vs Sourdough
Bulk Fermentation: The yeast version rises in just 1-1.5 hours compared to 5-7 hours for the sourdough version. Commercial yeast is much more aggressive and predictable than wild yeast in sourdough starter.
Total Timeline: With yeast, you can make these bagels start to finish in about 3-4 hours if you skip the overnight cold ferment. With sourdough, you’re looking at a two day process with the overnight fermentation.
Cold Retard (Optional): With the yeast version, the overnight cold fermentation in the refrigerator is optional. It can make the dough easier to handle. With sourdough, the cold ferment is built into the method for both flavor and schedule flexibility.
Final Proof: Both versions need the same 60-90+ minute final proof after shaping. This step is critical regardless of which leavening method you use. But again watch the dough not the clock.
Additional Notes for Yeast Version
The yeast version will have a milder, less complex flavor than the sourdough version. You won’t get that characteristic sourdough depth. However, the texture will be very similar, chewy exterior with a tender interior, because both versions use the same boiling technique that creates authentic bagel texture and hydration. The
If you’re new to bread baking, the yeast version is more forgiving and predictable. Sourdough starter strength can vary, but commercial yeast provides consistent results every time. Once you’re comfortable with the yeast version, you can always try the sourdough method for more complex flavor.
The brown sugar works beautifully in both versions, adding subtle molasses notes that complement the everything seasoning without making the bagels taste sweet.

Shop This Recipe
Here are the exact tools and ingredients I use to make these Everything Bagel Pull Apart Bagels. These are the products I reach for every single time.
Baking Essentials:
USA Pan 13×9 Inch Baking Pan
Parchment Paper Squares (pre-cut saves so much time!)
Proofing Trays with Lids (perfect for overnight refrigeration)
Tools:
Fish Spatula (my go-to for handling delicate dough)
Kitchen Scale (essential for accurate measurements)
Ingredients:
Everything Bagel Seasoning (the blend I use and love)
These are affiliate links, which means I earn a small commission if you purchase through them at no extra cost to you. I only recommend products I actually use and love in my own kitchen!
More Bagel Pull Apart Recipes
If you love this everything bagel version, be sure to check out my Cinnamon Sugar Bagel Pull Apart recipe with optional cream cheese stuffing for a sweet twist on this technique.
Final Thoughts
This sourdough bagel pull-apart bread bridges the gap between artisan bread baking and fun, shareable food. It takes the beloved everything bagel and reimagines it as an interactive centerpiece that encourages gathering and sharing. Whether you’re hosting brunch, bringing food to a potluck, or simply treating your family to something special, this pull-apart bread delivers authentic bagel flavor in a format that’s even more enjoyable than traditional bagels.
The recipe requires some planning with its overnight fermentation, but the actual hands on time is minimal. Most of the work happens while you sleep or go about your day. The result is worth every minute: golden, chewy bagel balls generously coated in everything seasoning, optionally stuffed with melted cheese, all baked together into a stunning pull-apart bread that will have everyone coming back for more.
Start with this everything bagel version to master the technique, then explore the endless variations. Once you experience the satisfaction of pulling apart warm, homemade bagel bread fresh from your own oven, you’ll find yourself making this recipe again and again.
Love This Recipe?
If you made these Everything Bagel Pull Apart Bagels, I would love to hear from you! Please leave a star rating and comment below to let me know how they turned out. Your feedback helps me create better recipes and helps other bakers decide if this recipe is right for them.
Share Your Bakes
Did you make this recipe? Tag me on social media so I can see your beautiful bagel pull aparts!
Instagram: @h3artofthehome
TikTok: @h3artofthehome
Facebook: H3art of the Home
Pinterest: @h3artofthehome
I love seeing your creations and sharing them with the community!
Never Miss a Recipe
Want more sourdough recipes, baking tips, and behind the scenes content delivered straight to your inbox? Subscribe to my email list and join thousands of home bakers who are mastering sourdough one loaf at a time.
Save This Recipe
Pin this recipe to your sourdough board or bread baking board on Pinterest so you can find it easily when you’re ready to bake. I promise these bagel pull aparts will become a regular in your baking rotation!


Leave a Reply