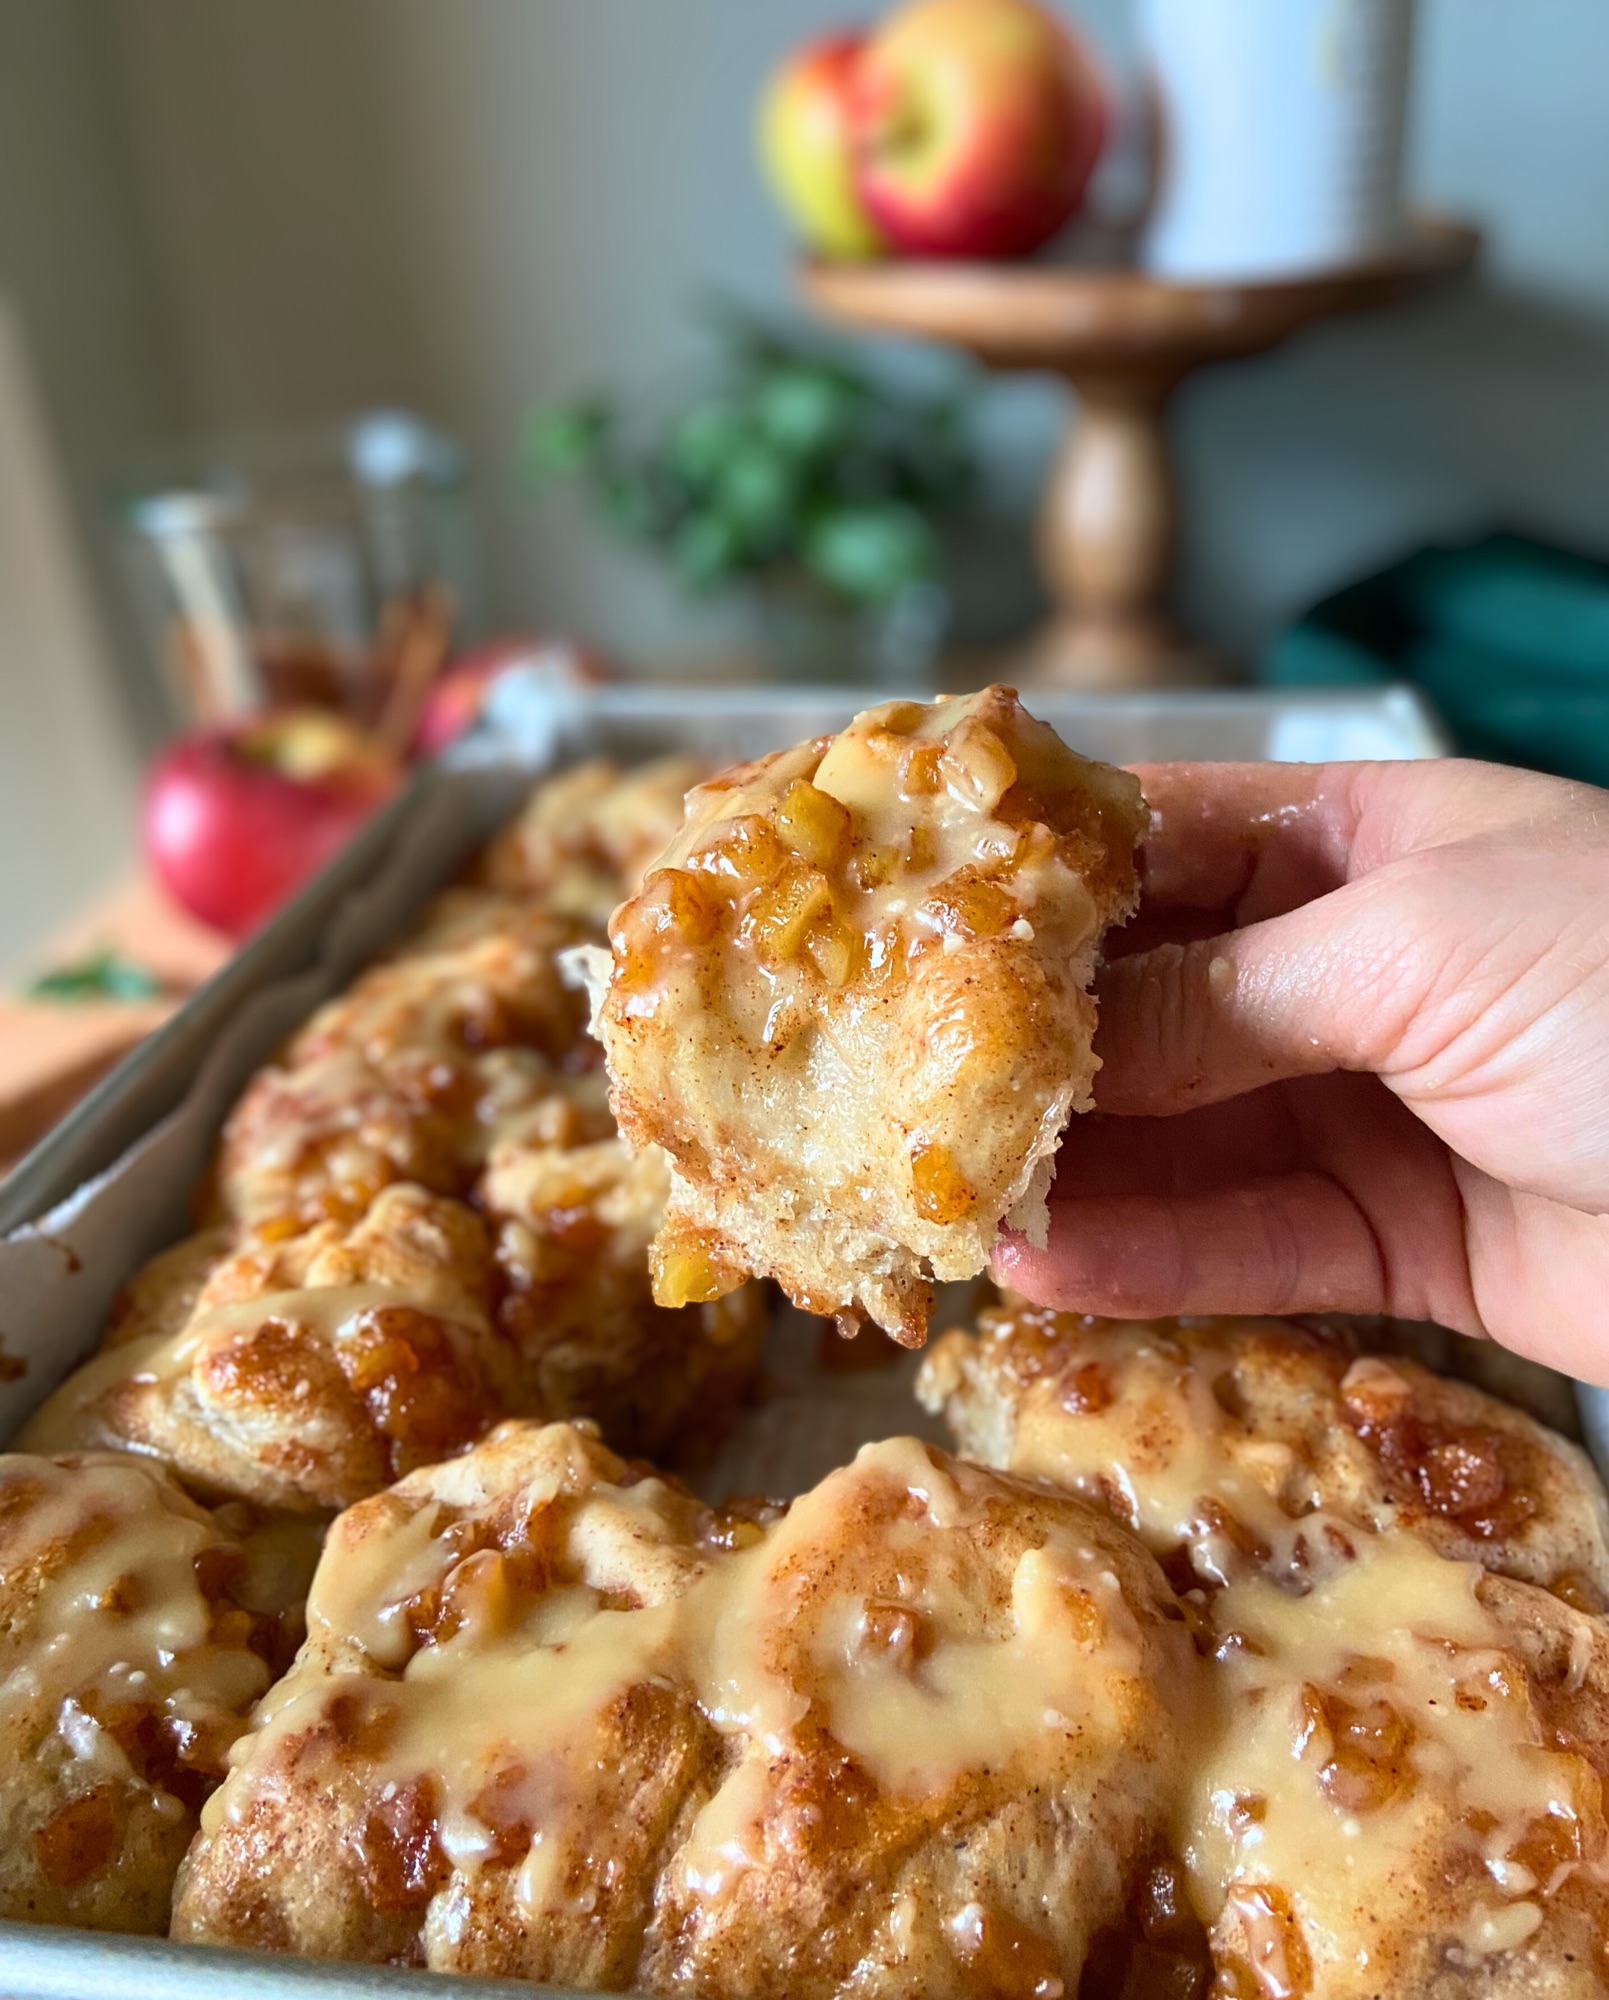
Transform your sourdough into caramel apple pie! This viral pull-apart focaccia features soft, fluffy pieces coated in spiced apple pie filling and cinnamon sugar, then drizzled with salted caramel glaze that hardens into the most satisfying crackly shell. Each piece pulls apart like a mini apple pie, perfect for fall brunch or Thanksgiving breakfast! This is the fourth installment in my Idle Hands Pull-Apart Focaccia Series, following my Garlic Parmesan version, Cinnamon Roll version, and Jelly Donut version. The combination of tender sourdough, chunky spiced apples, and that irresistible caramel drizzle makes this the ultimate cozy autumn treat that’s both impressive and surprisingly easy to make.
Table of Contents
- Why You’ll Love This Caramel Apple Pie Focaccia
- No Sourdough Starter? Use Yeast Instead!
- Expert Tips for Perfect Results
- Apple Varieties to Try
- Variations and Substitutions
- Bread Flour vs All-Purpose Flour
- Storage and Make-Ahead Instructions
- Frequently Asked Questions
- Why This Recipe Works
- The Idle Hands Pull-Apart Focaccia Series
Why You’ll Love This Caramel Apple Pie Focaccia
This caramel apple pie pull-apart focaccia is the fourth installment in my viral focaccia series, and it might be the best one yet! After my Garlic Parmesan Pull-Apart Focaccia hit 6M+ views and my Cinnamon Roll version reached 20M+ views, I knew I had to create something even more spectacular for fall.
Imagine this: soft sourdough pieces dipped in homemade spiced apple pie filling, rolled in cinnamon sugar, and glazed with salted caramel that hardens into that perfect crackly shell. Each piece pulls apart easily and reveals chunks of tender apples with that iconic caramel drip. Pure autumn heaven!
What makes this recipe truly special is how it captures everything we love about caramel apple pie in pull-apart bread form. The overnight sourdough fermentation creates incredibly soft, fluffy bread with that slight tang that balances the sweetness perfectly. The apple pie filling coats every ball for maximum flavor, the cinnamon sugar adds texture and warmth, and the caramel glaze? Chef’s kiss! It’s exactly like biting into a slice of warm apple pie with caramel sauce.
Here’s why you’ll be obsessed:
- Seasonally perfect: Caramel apples and cinnamon are peak fall flavors that everyone craves this time of year
- Sourdough made approachable: Uses your active starter but keeps things simple with a hands-off overnight rise
- Stunning presentation: The pull-apart format is inherently shareable and looks incredible on your table
- Make-ahead friendly: Prep the dough and filling a day ahead, then assemble and bake when you’re ready
- Crowd-pleaser: Sweet but not overly so, with that perfect balance of bread and dessert
- Unique coating method: Dipping the balls in apple pie filling before coating creates incredible flavor in every bite
- No frying required: All the flavor of caramel apples without any mess

Caramel Apple Pie Pull-Apart Sourdough Focaccia
Ingredients
Sourdough Focaccia Dough
- 500 g bread flour
- 400 g water room temperature
- 75 g active sourdough starter fed and bubbly
- 10 g salt
- 15 g sugar
- 5 g ground cinnamon 1 teaspoon
- 1.25 g ground nutmeg optional, 1/4 teaspoon
Apple Pie Filling
- 450 g apples peeled and diced into 1/4-inch pieces (about 3 medium apples)
- 75 g brown sugar packed
- 8 g cornstarch
- 15 g fresh lemon juice
- 3 g vanilla extract
- 5 g ground cinnamon
- 1 g ground nutmeg
- 0.5 g ground ginger
- 1.5 g salt
- 15 g unsalted butter
Cinnamon Sugar Coating
- 100 g granulated sugar
- 30 g cornstarch
- 8 g ground cinnamon 1 Tablespoon
Caramel Glaze
- 67 g granulated sugar
- 20 g water
- 30 g heavy cream warmed
- 15 g unsalted butter
- 2.5 g vanilla extract
- Pinch of salt
- 40 g powdered sugar
Instructions
Day 1: Make the Sourdough Dough
- Mix the dough
- In a large bowl, combine water, active sourdough starter, salt, sugar, cinnamon, and nutmeg (if using). Mix until combined. Add the flour and mix until no dry flour remains. The dough will be sticky and shaggy.
- Rest
- Cover the bowl with a damp towel or plastic wrap and let rest for 1 hour at room temperature.
- Stretch and fold
- Perform one set of stretch and folds to build strength. Wet your hands, grab one side of the dough, stretch it up, and fold it over itself. Rotate the bowl 90 degrees and repeat 4-6 times total until you’ve worked around the entire dough ball.
- Bulk fermentation
- Cover the bowl and let the dough proof at room temperature for 8-12 hours, or until at least doubled in size. Look for a domed top, visible bubbles throughout, and a puffy, jiggly texture.
Day 2: Make Filling, Shape, Rise, and Bake
- Make the apple pie filling
- In a large saucepan over medium heat, combine diced apples, brown sugar, lemon juice, vanilla, cinnamon, nutmeg, ginger, salt, and butter. Cook, with a lid on, stirring occasionally, until the apples soften, about 8-10 minutes. In a small bowl, whisk together cornstarch with 2 tablespoons of water until smooth. Pour this into the apple mixture and stir constantly for 1-2 minutes until thickened. Remove from heat and let cool until warm but still pourable. Keep it warm while you work.
- Prepare your pan
- Grease a 9×13 inch baking pan generously with butter or cooking spray.
- Prepare cinnamon sugar coating
- In a shallow bowl or plate, whisk together granulated sugar, cornstarch, and cinnamon. Set aside for dipping.
- Ball, Dip and Coat

- Dump dough out onto a greased surface. Pinch a golf ball size chunk of dough off. Working with one ball at a time, dip it into the warm apple pie filling, coating generously on all sides grabbing apple chunks with. Immediately roll in the cinnamon sugar mixture to coat completely. Place in the prepared pan. Continue until all balls are coated and arranged in the pan, touching each other.
- Second rise
- Cover loosely with plastic wrap or a damp towel and let rise for 1-2 hours at room temperature, or until puffy and the balls have grown together. They should jiggle slightly when you shake the pan.
- Add remaining filling
- After the second rise, pour or spoon any remaining apple pie filling over the top of the proofed focaccia.
- Bake
- Preheat oven to 425°F (220°C). Bake for 35-40 minutes, or until deep golden brown on top. If the top is browning too quickly (check around 25 minutes), tent with foil. The internal temperature should reach about 200-205°F. Cool in the pan for 10 minutes.
- Make the Caramel Glaze (See notes section for alternative)
- Make caramel
- In a microwave-safe bowl, combine granulated sugar and water. DO NOT STIR. Microwave on high for 1 minute, then check. Continue microwaving in 30-second intervals, watching closely (total time will be 2.5-3 minutes). The mixture will turn from clear to golden to amber. You want a medium amber color. CAUTION: The sugar mixture is EXTREMELY hot!
- Add cream and butter
- Carefully stir in warmed heavy cream (it will bubble up dramatically!), butter, vanilla, and salt. The mixture will seize up at first but keep stirring. Let cool for 5-10 minutes until just warm to the touch.
- Finish glaze
- Whisk in powdered sugar until smooth. The glaze should be pourable but have some body to it.
- Glaze
- Drizzle the caramel glaze generously over the warm focaccia. Make sure every piece gets covered.
- Let the glaze set for a few minutes before serving.
- Serve
- Pull apart and enjoy! Each piece is like a mini caramel apple pie.
Notes
Both ways = same delicious result! Pick what works for YOUR schedule
Follow the timing AND signs of complete proofing in the recipe

Expert Tips for Perfect Caramel Apple Pie Focaccia
- Use active, bubbly starter: Your starter should have doubled in size and be at its peak when you use it for best rise and flavor
- Don’t skip the 1-hour rest: This makes mixing easier and helps develop the dough
- Use the right apples: Keepsake, Granny Smith, Honeycrisp, or a mix of tart and sweet varieties work best. Avoid Red Delicious or other mealy apples
- Keep the filling warm while coating, cold filling won’t stick to the dough balls as well
- Work quickly when coating: Dip in filling, immediately roll in sugar, and place in pan before the filling cools
- The cornstarch coating is key: It absorbs moisture from the filling and creates a slight crust that caramelizes beautifully in the oven
- Watch your proof: This is the most critical step. Under-proofed = dense. Over-proofed = flat. Look for puffy, jiggly balls that slowly spring back when pressed
- Tent with foil if needed: If your top is getting too dark before the inside is done, cover loosely with foil
- Make the caramel carefully: Sugar burns happen FAST in the microwave. Watch closely and stop as soon as it hits medium amber
- The glaze hardens beautifully into that classic crackly caramel shell – just like caramel apples!
- Serve warm: This is best enjoyed the day it’s made, while still warm. The texture is incredible when fresh!

Yeast Substitution Guide for Caramel Apple Pie Focaccia
No Sourdough Starter? Use Yeast Instead!
Don’t have sourdough starter? You can use instant yeast or active dry yeast instead! Here’s what to do:
Replace This:
- 75g active sourdough starter
With This:
- 37g (about ¼ cup) all-purpose or bread flour
- 37g (about 2½ tablespoons) water
- 7g (2¼ teaspoons) instant yeast OR 9g (2¾ teaspoons) active dry yeast
Instructions Based on Yeast Type:
Using INSTANT YEAST (also called Rapid Rise):
This is the easiest option!
- Mix everything together at once: Add the flour, water, and instant yeast along with ALL the other recipe ingredients (500g bread flour, 400g water, salt, sugar, cinnamon, nutmeg) right from the start. Mix until combined.
- Bulk fermentation: Let the complete dough rise for 2-3 hours at room temperature until it doubles in size and becomes puffy and jiggly. (This replaces the 8-12 hour overnight fermentation you’d do with sourdough starter.)
- Continue as normal: Once your dough has doubled, proceed with the recipe exactly as written – same stretch and fold, same shaping, same apple pie filling coating, same cinnamon sugar coating, same second rise, and same baking!
Using ACTIVE DRY YEAST:
This requires one extra step to activate the yeast first.
- Activate the yeast: Mix the 37g warm water (100-110°F/38-43°C) with the 9g active dry yeast in a small bowl. Let it sit for 5-10 minutes until it becomes foamy and bubbly. If it doesn’t foam, your yeast is dead – start over with fresh yeast.
- Mix everything together: Once your yeast is foamy, add it along with the 37g flour and ALL the other recipe ingredients (500g bread flour, 400g water, salt, sugar, cinnamon, nutmeg). Mix until combined.
- Bulk fermentation: Let the complete dough rise for 2-3 hours at room temperature until it doubles in size and becomes puffy and jiggly. (This replaces the 8-12 hour overnight fermentation you’d do with sourdough starter.)
- Continue as normal: Once your dough has doubled, proceed with the recipe exactly as written – same stretch and fold, same shaping, same apple pie filling coating, same cinnamon sugar coating, same second rise, and same baking!
Important Notes:
Water Adjustment:
- Worried about wet dough? Start by decreasing the water in the main recipe to 360g (1½ cups). Experienced bakers can stick with the full 400g.
- Use room temperature water for instant yeast
- Use warm water (100-110°F) for active dry yeast
What Actually Changes:
- Much faster bulk fermentation (2-3 hours instead of 8-12 hours)
- Mix yeast right in with the flour and water at the beginning (same as you would with starter)
- Look for the dough to double in size and become puffy and jiggly
- Everything else stays EXACTLY the same: same mixing method, same stretch and fold technique, same shaping with apple pie filling and cinnamon sugar coating, same second rise time, and same baking temperature and time!
Temperature Tips:
- Ideal bulk fermentation temperature: 75-80°F (24-27°C)
- Warmer kitchen = faster rise (might only take 2 hours)
- Cooler kitchen = slower rise (might take 3+ hours)
- Don’t worry if it takes a bit longer – just watch for the dough to double!
Quick Reference Chart:
Ingredient Amount All-purpose or bread flour 37g (¼ cup) Water 37g (2½ tbsp) INSTANT YEAST7g (2¼ tsp)ACTIVE DRY YEAST9g (2¾ tsp)
Bulk Fermentation Time: 2-3 hours (until doubled)
Everything Else: Exactly the same as the sourdough version!
FAQ:
Q: Can I use regular all-purpose yeast from the grocery store?
A: Yes! Most grocery store yeast is either instant or active dry – check your package. Instant yeast (also called Rapid Rise or Bread Machine yeast) is easier because you don’t need to proof it first.
Q: Why does instant yeast need less than active dry?
A: Instant yeast has smaller granules and is more potent, so you need less of it to achieve the same rise.
Q: Can I let the yeast dough rise overnight in the fridge?
A: Absolutely! After mixing, you can refrigerate the dough for up to 24 hours for even better flavor. The cold temperature slows the rise. When ready to use, let it come to room temperature and finish doubling if needed, then continue with shaping and coating with the apple pie filling.
Q: My dough isn’t rising. What went wrong?
A: Check these things:
- Is your yeast fresh? (Check expiration date)
- Was your water the right temperature? (Too hot kills yeast, too cold slows it way down)
- Is your kitchen cold? (Move to a warmer spot)
- Did you accidentally add salt directly to the yeast before mixing? (Salt can inhibit yeast)
Q: Will the yeast version taste the same as sourdough?
A: It will be slightly different! The sourdough version has a subtle tang and more complex flavor from the long fermentation. The yeast version is milder and sweeter, which actually works beautifully with the caramel apple flavors. Both are delicious!
Q: Can I use this yeast method for all your sourdough recipes?
A: This substitution works best for enriched doughs like focaccia, pull-apart focaccia variations, and similar recipes. For lean doughs like basic bread loaves, you may need to adjust the formula differently.
Pro Tip: Instant yeast is more forgiving and faster to use. If you’re new to baking or want the easiest route, choose instant yeast over active dry!
Troubleshooting Common Issues
My focaccia is dense and heavy, not light and fluffy. What went wrong?
The most common culprit is under-proofing. If you didn’t give the dough enough time during either the bulk fermentation (8-12 hours) or the second rise (1-2 hours), the bread won’t develop that airy texture. Look for these signs of properly proofed dough:
- Doubled in size
- Puffy and jiggly when you shake the pan
- Slow spring-back when you press it with a finger
- Visible bubbles throughout
Other possible causes:
- Inactive starter: Your starter should be bubbly, doubled, and at peak when you use it
- Old yeast: If using the yeast version, check your yeast expiration date
- Skipped stretch and fold: This step builds structure – don’t skip it!
- Oven too hot: If the outside set before the inside could rise, you’ll get a dense center
The caramel glaze isn’t hardening into that crackly shell.
This usually means the glaze is too thin. Make sure you’re using powdered sugar (not granulated) in the glaze – this is what creates that signature crackle. If you added too much cream, the glaze will stay soft. Start with 30g (2 tablespoons) of warmed cream and only add more if absolutely needed. The glaze should be thick enough to coat the back of a spoon but still pourable.
Also, make sure you’re applying the glaze to warm (not hot) focaccia. If the bread is too hot, the glaze will melt and soak in. If it’s too cold, the glaze won’t spread properly.
My apple filling is too watery and made the focaccia soggy.
The cornstarch is crucial here! Make sure you’re whisking it with water until completely smooth before adding to the apples – any lumps won’t thicken properly. Cook the filling until it’s noticeably thickened (1-2 minutes after adding the cornstarch slurry).
Also, keep the filling warm while coating the dough balls. Cold filling becomes too thick to coat evenly and can add too much moisture. If your filling cools down, gently rewarm it on the stove or in the microwave.
The sugar coating fell off or got soggy.
Make sure you’re working quickly: dip in warm apple filling, immediately roll in cinnamon sugar, then place in the pan. The wet filling acts as “glue” for the sugar. If the filling cools down before you coat with sugar, the sugar won’t stick as well.
The cornstarch in the cinnamon sugar coating is key – it absorbs moisture from the filling and creates a slight crust. Don’t skip it!
My dough is too sticky to work with.
This is a high-hydration dough (80%), so it’s naturally sticky – that’s what creates the soft, fluffy texture! Instead of fighting it:
- Oil your hands and surface instead of flouring
- Work quickly when portioning and shaping
- Use a bench scraper to help portion the dough
- Don’t add extra flour – this will make the focaccia tough
The stickiness means you’re doing it right! If you used the yeast version and reduced the water to 360g, it’ll be more manageable.
The caramel burned or tastes bitter.
Sugar goes from perfect to burned in seconds, especially in the microwave! Watch closely through the microwave window. You want medium amber – the color of maple syrup. If it goes dark brown, it’s burned and will taste bitter. Start over if this happens.
Can’t tell if my starter is “active” enough?
Your starter should:
- Have doubled in size since the last feeding
- Be bubbly throughout (not just on top)
- Smell tangy and yeasty (not like nail polish remover)
- Pass the float test: drop a spoonful in water – it should float
If your starter isn’t meeting these criteria, give it another feeding and wait for it to peak before using.
The focaccia is browning too fast on top.
Tent it with foil! Check around the 25-minute mark – if the top is getting too dark but the center isn’t done, loosely cover with aluminum foil and continue baking. The internal temperature should reach 200-205°F for perfectly baked bread.
Can I salvage over-proofed dough?
Unfortunately, over-proofed dough loses its structure and will bake up flat and dense. Signs of over-proofing:
- Dough has more than tripled in size
- Looks deflated or collapsed
- Doesn’t spring back when pressed
- Has large irregular holes
Prevention is key – watch your dough, not the clock!
Bread Flour vs All-Purpose Flour for Focaccia
Why This Recipe Uses Bread Flour
This caramel apple pie pull-apart focaccia recipe is designed for bread flour because of its higher protein content (12-14% protein vs 10-12% for all-purpose flour). Here’s why that matters:
Benefits of Bread Flour:
- Better structure: Higher protein = more gluten development = stronger dough that can hold those beautiful air pockets
- Chewier texture: Creates that signature focaccia chew we all love
- Better rise: Stronger gluten network traps more CO2 from fermentation, giving you a fluffier, more dramatic rise
- Handles hydration: The 80% hydration in this recipe (400g water to 500g flour) works beautifully with bread flour’s ability to absorb and hold more water
Can You Use All-Purpose Flour Instead?
Yes! But you’ll need to make one adjustment:
Reduce the water to 360g (1½ cups) instead of the full 400g (1¾ cups).
All-purpose flour has less protein, so it absorbs less water. If you use the full 400g of water with all-purpose flour, your dough may be too wet and difficult to handle.
What to Expect with All-Purpose Flour:
- Still delicious and totally worthwhile!
- Easier to find (most people have AP flour on hand)
- Slightly softer, more tender crumb
- Slightly less chewy texture
- May not rise quite as dramatically
- Air pockets may be a bit smaller
Pro Tips:
- If you’re an experienced baker and want to use all-purpose flour with higher hydration, you can try the full 400g water, but be prepared for a very sticky, slack dough that requires confident handling
- For best results with all-purpose flour: use the 360g water amount, do all your stretch and folds as directed, and give it the full rise time
- Can’t find bread flour? King Arthur, Bob’s Red Mill, and Gold Medal all make widely-available bread flour
The Bottom Line:
Bread flour is recommended for the best texture and rise, but all-purpose flour absolutely works with reduced water. Don’t let flour type stop you from making this recipe!
Apple Varieties to Try
While any apple can work, certain varieties create the best flavor and texture balance
- Granny Smith – Tart and firm, holds shape well during baking, balances sweetness perfectly (my favorite!)
- Keepsake – Complex sweet-tart flavor with excellent texture, holds up beautifully during baking and adds depth
- Honeycrisp – Sweet and juicy with great texture, adds natural sweetness
- Mixed (Granny Smith + Honeycrisp) – Best of both worlds – combines tart and sweet for ideal balance
- Braeburn – Sweet-tart balance with firm texture that holds up to baking
- Pink Lady – Crisp and slightly tart with excellent baking qualities
- Golden Delicious – Sweet and mild, softens nicely
- Avoid: Red Delicious, McIntosh – Too soft and mealy when cooked, will turn to mush
Variations and Substitutions
Different apple flavors:
- Add ¼ cup chopped pecans or walnuts to the filling for crunch
- Mix in ½ teaspoon maple extract to the filling for maple apple flavor
- Add 2 tablespoons bourbon or rum to the apple filling for adult flair
- Sprinkle chopped toffee bits over the caramel glaze
Glaze alternatives:
- Add cream cheese drizzle: Mix 4 oz softened cream cheese with 2 tablespoons milk and 2 tablespoons powdered sugar
- Use dulce de leche instead of making caramel from scratch
SIMPLE VANILLA GLAZE (CARAMEL ALTERNATIVE)
• 120g (1 cup) powdered sugar
• 30-45g (2-3 tablespoons) heavy cream OR milk
• 5g (1 teaspoon) vanilla extract
• Optional: 15g (1 tablespoon) melted butter for extra richness
INSTRUCTIONS:
1. Whisk powdered sugar, 2 tablespoons cream/milk, and vanilla extract in a bowl until smooth.
2. Add more cream/milk 1 teaspoon at a time until you reach a thick but pourable consistency.
3. If using butter: Add melted butter and whisk until combined. This makes the glaze richer and gives it a slight sheen.
4. Drizzle over warm focaccia immediately. The glaze will set as it cools.
NOTES:
• Heavy cream makes a richer glaze than milk
• If you don’t have cream or milk, use melted butter (15g/1 tbsp) + water (15g/1 tbsp) for the liquid
• Glaze should be thick enough to coat the back of a spoon but still drip off
Smaller batch: Halve the entire recipe and use an 8×8 or 9×9 inch pan for about 12-14 servings.

Storage and Make-Ahead Instructions
This caramel apple pie pull-apart focaccia is best eaten the day of making while fresh and warm. The caramel glaze and apple filling keep everything moist and delicious for several hours.
Storage:
- Room temperature: Cover and store for up to 2 days. Best within the first 24 hours.
- Refrigerator: Store in an airtight container for up to 5 days. Warm individual pieces in the microwave for 15-20 seconds before serving.
- Freezer: Not recommended due to the caramel glaze, but you can freeze the baked focaccia before glazing for up to 2 months. Thaw, warm, then glaze fresh.
Make-Ahead:
- The dough can ferment at room temperature for up to 16 hours before shaping (just watch that it doesn’t over-proof).
- The apple pie filling can be made up to 2 days ahead and stored in the refrigerator. Warm before using.
- You can shape and coat the balls, place them in the pan, cover tightly, and refrigerate overnight. Pull from the fridge, let come to room temperature and complete the final proof (this will take 2-3 hours), then bake.
Frequently Asked Questions
Can I use store-bought apple pie filling?
You could, but homemade is so much better and lets you control the sugar and consistency. If using store-bought, you may need to thin it with a bit of water or apple cider for easier coating. The homemade version only takes 10 minutes!
Why is my glaze not hardening?
Make sure you’re using powdered sugar (not granulated) and don’t add too much cream. Start with 30g of cream and add more only if needed. The glaze should be thick – it hardens as it cools on the warm bread. The powdered sugar is essential for creating that crackly shell.
Can I skip the caramel and just use a simple glaze?
Absolutely! Mix powdered sugar with milk and vanilla for a simple vanilla glaze if you want to skip the caramel step. But the caramel really makes this special and captures that caramel apple flavor!
What if my apple filling is too thick/thin?
Too thick: Whisk in water or apple cider 1 tablespoon at a time while warm until you reach a coating consistency. Too thin: Mix ½ teaspoon cornstarch with 1 tablespoon water, add to filling, and cook 1 minute more until thickened.
Can I assemble this the night before?
Yes! Coat the balls, arrange in the pan, cover tightly, and refrigerate overnight. The next day, let them come to room temperature and complete their final proof (2-3 hours), then bake. OPTION 1: Night Before Evening: mix dough → proof overnight at room temp → morning: shape balls, dip & arrange → proof 1-2 hours → bake & ice
OPTION 2: Day Before Morning: mix dough → proof all day → evening: shape balls, dip & arrange → cover well & refrigerate overnight → next morning: bring to room temp 1-2 hours → bake & ice
Both ways = same delicious result! Pick what works for YOUR schedule
Follow the timing AND signs of complete proofing in the recipe
How do I know when it’s done baking?
The top should be deep golden brown and the internal temperature should read 200-205°F. The focaccia should sound hollow when tapped.
Can I freeze these?
Not recommended with the caramel glaze and apple filling. They’re best enjoyed fresh! However, you can freeze the dough balls after coating (before the second rise) and thaw/rise/bake when ready.
My sourdough starter isn’t very active – will this still work?
For best results, use a fed, bubbly, active starter. If your starter is sluggish, the rise times will be longer. Plan for up to 14-16 hours for bulk fermentation if needed. Make sure your starter has doubled and is at peak before using.
Can I make this without a microwave for the caramel?
Yes! Make the caramel on the stovetop instead. Combine sugar and water in a light-colored saucepan over medium heat. Don’t stir – just swirl the pan occasionally. Cook until medium amber, then carefully add warm cream, butter, vanilla, and salt.
Why This Recipe Works
This caramel apple pie pull-apart focaccia is the perfect marriage of artisan sourdough bread baking and classic American apple pie. Here’s what makes it so special:
The overnight room temperature rise develops incredible flavor complexity and creates that signature sourdough digest ability. It also develops the gluten structure for soft, fluffy bread that pulls apart beautifully without being dense or heavy.
Dipping the balls in apple filling before coating is a game-changer, it infuses every bite with apple pie flavor instead of just having it on top. The filling bakes right into the bread, creating better flavor distribution throughout. This is what sets this recipe apart from other pull-apart breads.
The cinnamon sugar coating with cornstarch creates texture and helps manage moisture from the wet filling. The cornstarch absorbs liquid and creates a slight crust that caramelizes in the oven, giving you that satisfying crunch on the outside while staying soft inside.
The hardening caramel glaze with powdered sugar is what really makes this feel like authentic caramel apples. Using the right ratio creates a glaze that sets into a glossy, crackly shell as it cools – just like the caramel on candied apples! The powdered sugar is the secret to getting that perfect texture.
Whether you’re serving this for Thanksgiving breakfast, fall brunch, or dessert, it’s guaranteed to disappear fast. Each pull-apart piece is like eating a warm slice of caramel apple pie – but better, because you made it yourself!
The Idle Hands Pull-Apart Focaccia Series
This caramel apple pie version is the fourth recipe in my viral pull-apart focaccia series. If you loved this one, you have to try the others:
- Garlic Parmesan Pull-Apart Focaccia – 3M+ views! Savory, buttery, garlicky perfection
- Cinnamon Roll Pull-Apart Focaccia – 6M+ views! All the flavor of cinnamon rolls in focaccia form
- Jelly Donut Pull-Apart Focaccia – 100K+ views and climbing! Glazed jelly donut magic
- Caramel Apple Pie Pull-Apart Focaccia – You are here! The perfect fall addition
Each recipe takes the same basic sourdough focaccia technique and transforms it into something completely different and delicious. The pull-apart format makes them perfect for sharing, brunches, parties, or just treating yourself to something special.
More Fall Sourdough Recipes You’ll Love
Looking for more fall baking inspiration? Check out these seasonal favorites:
- Pumpkin Spice Sourdough Croissants– Classic fall flavor in artisan form
- Apple Pie Sourdough Brioche Swirl – Another apple pie creation with gorgeous swirls
- Herb Swirl Sourdough Dinner Rolls – Perfect for Thanksgiving dinner
- Sourdough Croissants – My 60-page guide after 30+ trials
Final Thoughts
If you’ve been following along with my viral focaccia series, you know I love taking classic sourdough techniques and giving them a creative twist. This caramel apple pie version might be my favorite yet, it’s indulgent, seasonal, and absolutely delicious. The combination of soft sourdough, spiced apple filling, cinnamon sugar coating, and that iconic hardening caramel glaze creates something truly special.
Put those idle hands to good use and give this recipe a try! I promise it’ll be worth the wait. And when you make it, tag me @h3artofthehome in your photos – I love seeing your beautiful creations!
Happy baking!
Per serving (based on 15 servings):
- Calories: 295
- Total Fat: 5g
- Saturated Fat: 3g
- Cholesterol: 12mg
- Sodium: 320mg
- Total Carbohydrates: 58g
- Dietary Fiber: 2g
- Sugars: 24g
- Protein: 6g
Note: Nutrition information is approximate and will vary based on exact ingredients and portion sizes.


Leave a Reply