Prep Time: 20 minutes | Rest Time: 1-14 hours | Cook Time: 3 minutes | Yield: 1 pound fresh pasta (4-6 servings)
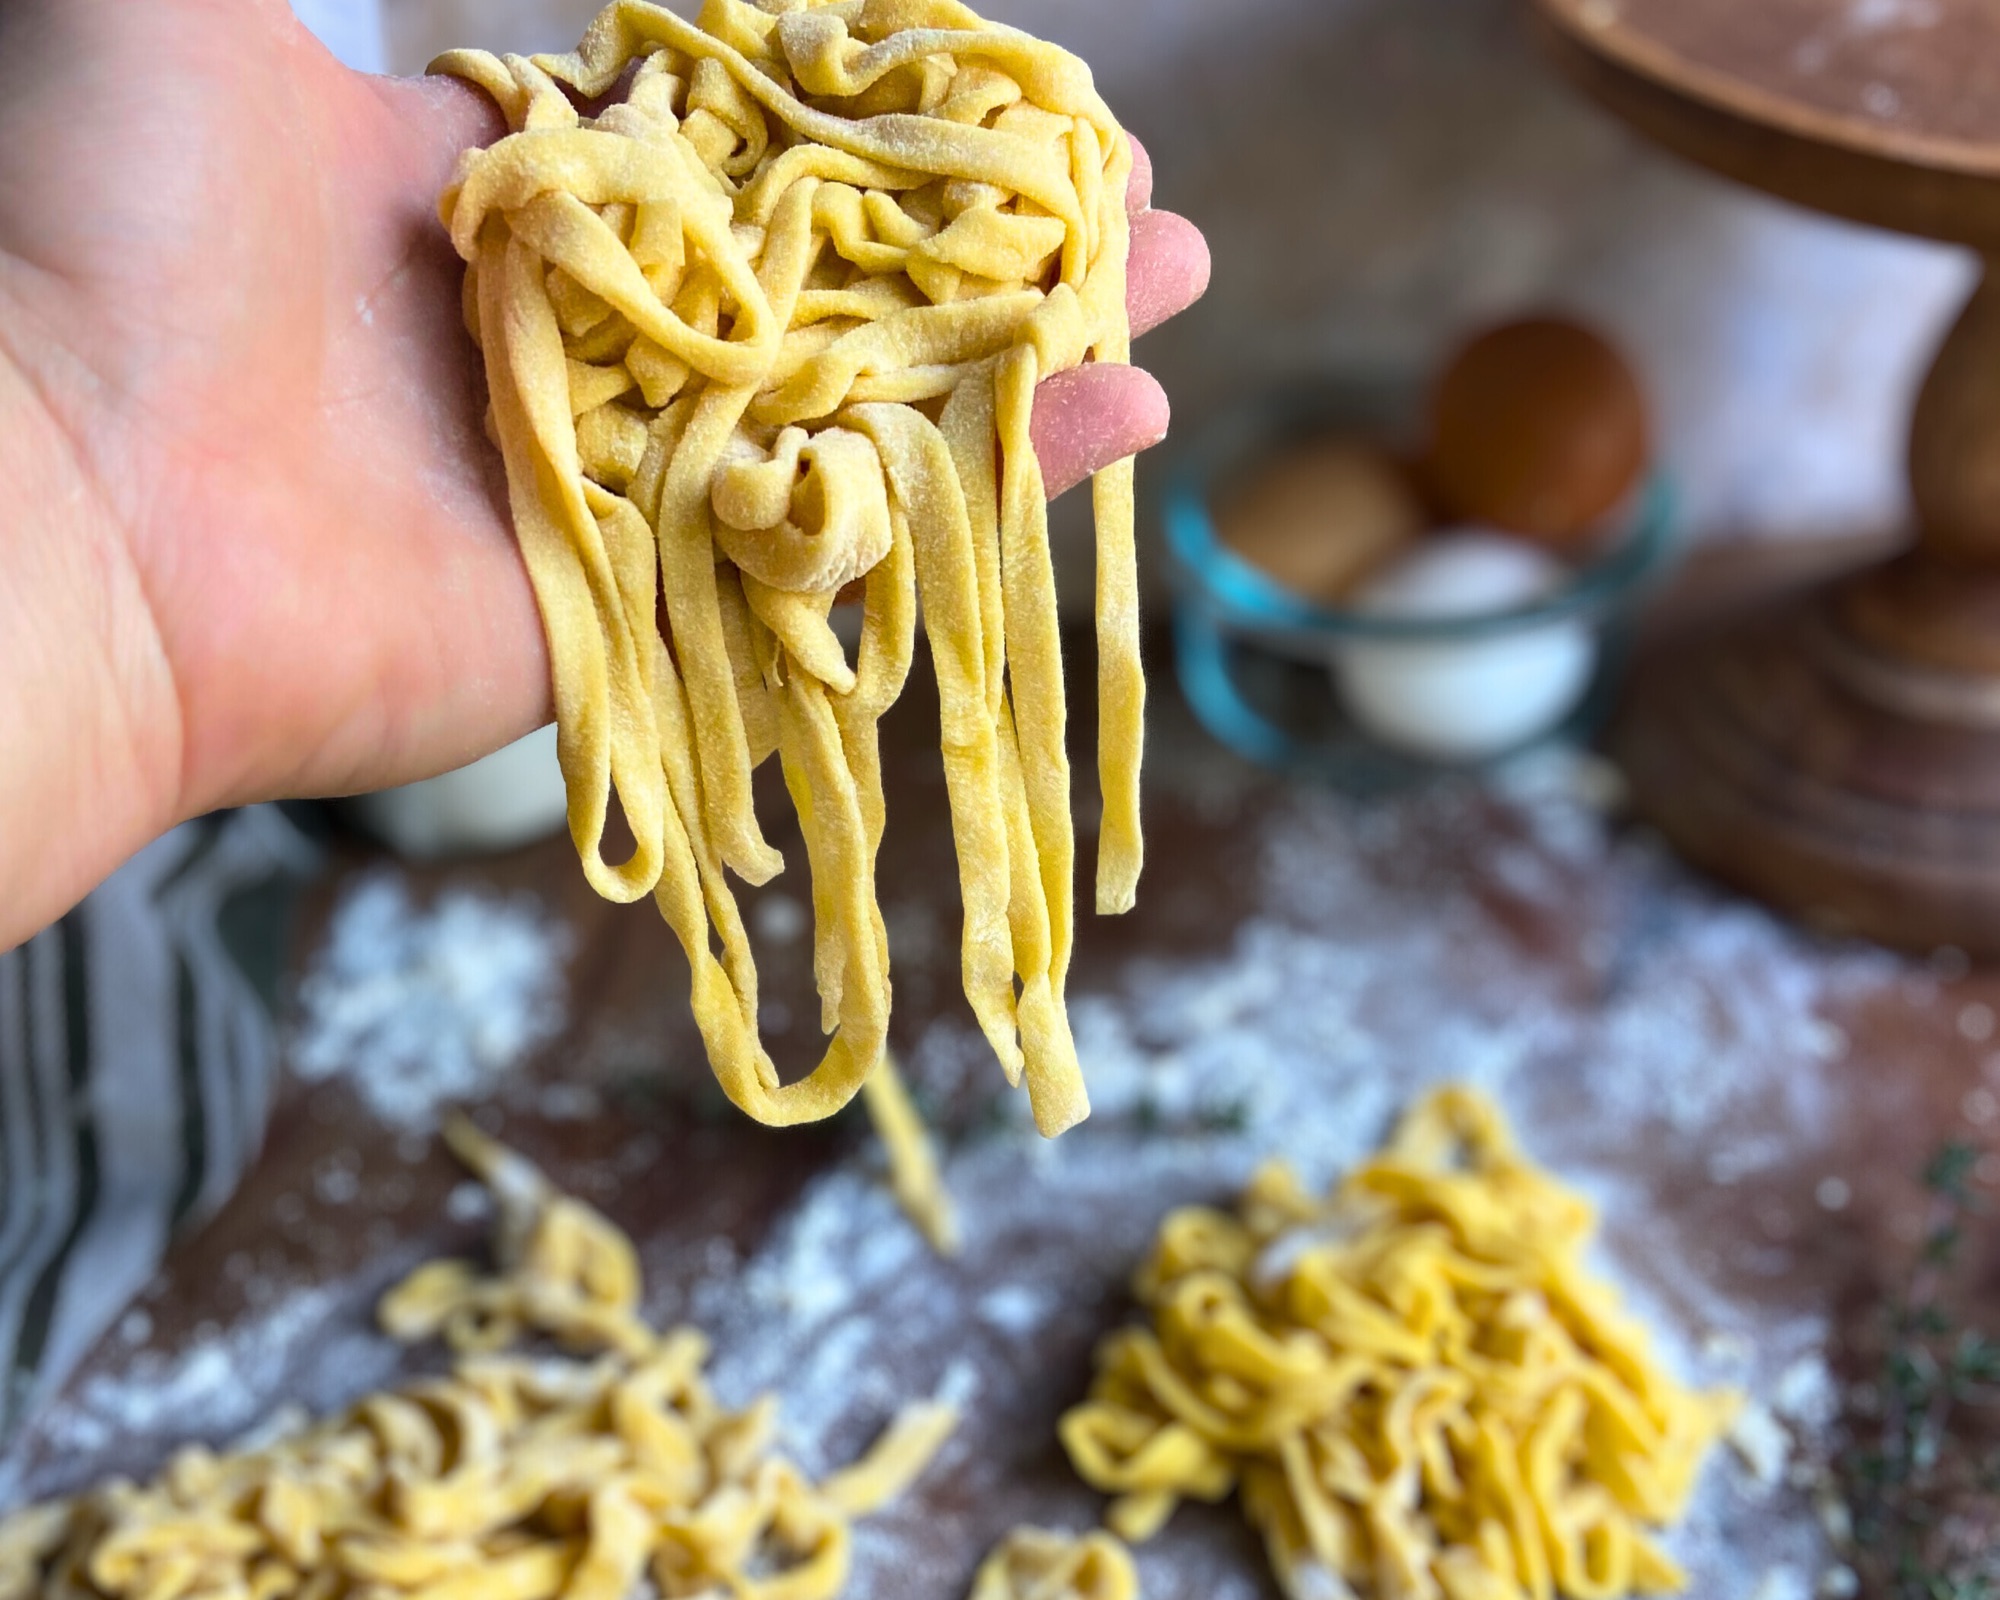
If you’re looking for a creative way to use sourdough discard, or your peak starter, that actually improves your cooking, this fresh sourdough pasta recipe is a game changer. Unlike traditional pasta dough, adding sourdough starter creates incredibly silky, extensible dough that’s easier to work with and delivers restaurant quality results at home. Whether you’re an experienced sourdough baker or just getting started with fresh pasta, this technique will revolutionize your pasta making game.
Quick Links:
- Why Make Sourdough Pasta?
- Ingredients
- Equipment Needed
- Step-by-Step Instructions
- Cooking Fresh Pasta
- Tips & Tricks
- Flavor Variations
- Storage Instructions
- Sauce Pairings
- Troubleshooting
- FAQ
- Shrimp Scampi Recipe
- Why Sourdough Makes Better Pasta: The Science
Why Make Sourdough Pasta?

This isn’t just another way to use up discard, sourdough actually makes better pasta. The natural enzymes in your starter break down gluten proteins just enough to create exceptional extensibility. Translation? Dough that rolls thin without fighting back, springs back less, and has a silkier texture when cooked.
The lactic acid bacteria contribute subtle tangy complexity that enhances (rather than overwhelms) whatever sauce you pair it with. It’s the same principle that makes sourdough bread so special, applied to pasta with remarkable results. Plus, the longer fermentation develops nuanced flavor you simply can’t achieve with standard pasta dough mixed and used immediately.
And let’s be honest, if you’re maintaining a sourdough starter, you’re always looking for worthwhile ways to use that discard. This recipe turns “waste” into something truly exceptional.
Jump to RecipeIngredients for Sourdough Pasta
- 300g all-purpose flour (or 200g all-purpose + 100g semolina flour for more texture and bite)
- 100g active sourdough discard or peak starter (100% hydration, meaning equal parts flour and water by weight)
- 2 large eggs, room temperature
- 1 tablespoon extra virgin olive oil
- 1/2 teaspoon fine sea salt
- Extra semolina or all-purpose flour for dusting
Ingredient Notes and Substitutions

Flour: All-purpose flour creates tender, silky pasta. Substituting some semolina (up to 100g) adds a slightly more toothsome, traditional texture and beautiful golden color. Italian “00” flour makes incredibly delicate pasta if you can find it, though it’s not necessary.
Sourdough discard or starter: You can use either discard or peak starter for this recipe, both work beautifully. For discard, use some that’s been fed within the last 12 hours for best results. It should still have some life and bubbles. Peak starter (at its highest rise, bubbly and active) creates especially flavorful pasta with great texture. Older, more acidic discard can make the pasta taste overly sour. If your starter is very stiff or liquid, you may need to adjust hydration slightly.
Eggs: Room temperature eggs incorporate more easily. The yolks add richness and that classic pasta color.
Olive oil: Adds richness, helps with extensibility, and makes the dough easier to work with. Don’t skip it.
Equipment You’ll Need

Essential: Work surface (preferably wood or marble), bench scraper, plastic wrap, sharp knife or pasta cutter
Helpful but not required: Pasta machine (manual or electric attachment), stand mixer with dough hook attachment, kitchen scale for accuracy, drying rack for cut pasta
You absolutely can make beautiful pasta by hand with just a rolling pin, it just takes more time and elbow grease. A pasta machine makes the process faster and helps achieve consistent thickness. A stand mixer with a dough hook can handle the kneading for you, which is especially helpful when making multiple batches. Don’t let lack of equipment stop you from trying this recipe.
How to Make Sourdough Pasta: Step-by-Step Instructions
Step 1: Create the Flour Well
Mound the flour on a clean work surface and use your fingers to create a large well in the center, like a volcano. Make sure the walls are high enough to contain the wet ingredients, you don’t want them breaching and running all over your counter. This traditional technique gives you maximum control over how the dough comes together.
Step 2: Add the Wet Ingredients
Pour the sourdough discard, eggs, olive oil, and salt into the well. The olive oil is important here, it adds richness and contributes to the dough’s extensibility, making it significantly easier to roll thin later.
Step 3: Incorporate Gradually
Using a fork, begin whisking the wet ingredients together in the center, gradually pulling flour from the inner edges of the well as you work. Move slowly and deliberately, incorporating more flour as the mixture thickens. You’re looking for a gradual integration that prevents lumps.
Once the mixture becomes too thick to work with a fork (it’ll look like thick, shaggy oatmeal), use your hands to bring everything together. Scrape up any flour from the work surface and incorporate it into the dough. At this stage, it’ll look messy and rough, that’s completely normal.
Step 4: Knead the Dough
Important note: This recipe is specifically optimized for use with a pasta machine. The lower hydration (around 50%) and the addition of olive oil create dough that rolls beautifully through machine rollers without sticking or tearing. While you can absolutely roll this by hand with a rolling pin, the hydration and oil content are calibrated for machine rolling. If you plan to exclusively hand-roll your pasta, traditional recipes with slightly higher hydration and no oil may be easier to work with, though this recipe will still work well.
Kneading by Hand:
Knead the dough for 8 to 10 minutes until it transforms from shaggy and rough to smooth and elastic. Use the heel of your hand to push the dough away from you, then fold it back over itself, give it a quarter turn, and repeat.
The dough should feel firm but not dry, think play-dough consistency. If it feels too crumbly and won’t come together cohesively, add water 1 teaspoon at a time, kneading thoroughly between additions. I typically need to add 2 teaspoons, but this varies based on humidity, flour brand, and egg size.
The sourdough adds beautiful extensibility to the dough, so once fully kneaded, it should feel silky and supple. When you poke it, it should spring back slowly. That’s your sign it’s ready.
Using a Stand Mixer with Dough Hook:
If you prefer, you can knead this dough in a stand mixer fitted with the dough hook attachment. Add the flour and salt to the mixer bowl. Add the sourdough starter, eggs, and olive oil on top. Mix on low speed (setting 2 on a KitchenAid) for 8 to 10 minutes until the dough is smooth and elastic.
The dough will form a ball that clears the sides of the bowl. If it seems too dry and crumbly, add water 1 teaspoon at a time with the mixer running on low. If it seems sticky, add flour 1 tablespoon at a time. The finished dough should be firm and smooth, not sticky or wet.
You’ll still need to rest the dough before rolling, regardless of which kneading method you use.
Step 5: Rest the Dough (Critical Step!)
Wrap the dough tightly in plastic wrap, you don’t want any air exposure that could dry out the surface. Now you have two excellent options:
Quick Method: Room Temperature Rest
Rest the dough at room temperature for 1 to 2 hours. This allows the gluten to relax (making it dramatically easier to roll thin), and gives the sourdough cultures time to develop subtle complexity without making the pasta overly acidic. The longer end of this range develops more flavor.
Overnight Cold Ferment Method (My Preferred Approach)
After resting at room temperature for 2 hours, transfer the wrapped dough to the refrigerator and let it ferment for 8 to 24 hours. This is where the magic really happens.
The extended fermentation develops incredibly complex, nuanced flavor. The enzymes have more time to work on the gluten structure, creating an even more extensible dough that practically rolls itself. The cold temperature slows fermentation, preventing excessive sourness while allowing all those beneficial enzymatic reactions to continue.
The overnight ferment also gives you serious convenience, mix the dough one day, roll it out the next. This makes fresh pasta much more approachable for busy schedules. If using this method, remove the dough from the refrigerator 30 minutes before rolling to take the chill off.
Bottom line: Both methods work beautifully, but if you have the time, the overnight ferment delivers noticeably better flavor and texture.
Step 6: Divide the Dough

Cut the dough into 4 equal pieces (about 125g each). This makes it much more manageable to work with. Keep the pieces you’re not currently using covered with plastic wrap or a damp towel to prevent them from drying out, even 5 minutes of air exposure can create a skin that’s difficult to roll smooth.
Step 7: Roll the Pasta

Remember: This dough’s lower hydration and olive oil content are specifically designed for pasta machine rolling. The firmer dough feeds through rollers beautifully without excessive sticking. If hand-rolling, you may find it requires more effort than higher hydration doughs, but the results are still excellent.
Using a Pasta Machine:
Flatten one piece of dough into a rough rectangle about 1/2 inch thick. Dust lightly with flour and run it through the widest setting on your pasta machine.
Fold the dough in thirds like a letter, then run it through the widest setting again with the open edge going in first. Repeat this folding and rolling process 3 to 4 times. This creates beautiful layers, ensures even texture throughout, and strengthens the dough structure.
Now gradually work through progressively thinner settings. There’s no need to run through every single number, I typically go: widest setting (0 or 1), then 2, then 4, then 6, then 7 or 8 depending on what shape I’m making. For fettuccine or tagliatelle, setting 6 or 7 is perfect. For delicate shapes like ravioli, you might want to go to 8 or 9.
Dust with flour as needed to prevent sticking, but don’t go overboard, too much flour can make the pasta taste chalky.
Rolling by Hand:
Flour your work surface generously. Using a rolling pin, roll the dough as thin as you can, rotating the dough frequently (quarter turns) and flipping it over to maintain even thickness. This takes patience and arm strength, but it’s absolutely doable.
Note: Because this dough has lower hydration optimized for machine rolling, it may require more effort to roll by hand than traditional high hydration hand rolled pasta doughs. Take breaks if needed, and don’t hesitate to let the dough rest for a few minutes if it’s fighting back too much. The end result is still excellent pasta.
For most shapes, you want the dough thin enough that you can almost see your hand through it when you hold it up to the light. That’s roughly 2mm thick or thinner.
Step 8: Cut the Pasta
Once rolled, dust each sheet generously with semolina or flour, this prevents sticking after cutting.
Ribbon Shapes (Fettuccine, Tagliatelle, Pappardelle):
If you have pasta machine cutters, simply run the sheet through your desired cutter. For hand-cutting, loosely roll up the pasta sheet like a loose jelly roll, then use a sharp knife to cut crosswise into ribbons of your desired width:
- Fettuccine: 1/4 inch (6mm)
- Tagliatelle: 1/4 to 3/8 inch (6-8mm)
- Pappardelle: 3/4 to 1 inch (2-2.5cm)
Immediately unroll the ribbons and toss with more semolina or flour to prevent sticking.
Other Shapes:
This dough works for virtually any pasta shape. Try cutting squares for maltagliati, use a chitarra cutter for square spaghetti, or cut and fill for ravioli or tortellini. The strong, elastic dough holds up beautifully for filled pastas.
Step 9: Dry or Cook Immediately
You can cook the pasta immediately, or let it dry slightly for easier handling. To dry, loosely nest the cut pasta and let it sit uncovered for 15 to 30 minutes. It should feel slightly firm on the outside but still pliable.
For longer storage, see the storage section below.
How to Cook Fresh Sourdough Pasta
Bring a large pot of water to a rolling boil. Salt it generously, it should taste like the sea. This is your only opportunity to season the pasta itself.
Add the fresh pasta and stir gently to prevent sticking. Fresh pasta cooks dramatically faster than dried, typically 2 to 4 minutes depending on thickness and shape. Ribbon shapes generally take 2 to 3 minutes, while thicker or filled pastas might need 3 to 4 minutes.
The golden rule: Start tasting at 2 minutes. The pasta should be tender but still have a slight bite (al dente). It should taste cooked through, not floury, but shouldn’t be mushy or falling apart.
Before draining, reserve at least 1 cup of pasta cooking water. This starchy liquid is magic for finishing sauces, it helps emulsify fats and thin sauce to the perfect consistency for coating pasta.
Sourdough Pasta
Ingredients
- 300 g all-purpose flour or 200g all-purpose + 100g semolina
- 100 g active sourdough discard or peak starter 100% hydration
- 2 large eggs
- 14 g olive oil 1 tablespoon
- 3 g fine sea salt 1/2 teaspoon
- Extra flour for dusting
Instructions
For Hand Mixing and Kneading:
- Mound flour on clean work surface and create a well in center. Add discard, eggs, olive oil, and salt to the well.
- Using a fork, gradually incorporate flour from inner edges until a shaggy dough forms.
- Knead by hand for 8 to 10 minutes until smooth and elastic. Add water 1 teaspoon at a time if too dry. Dough should feel firm but not crumbly.
For Stand Mixer with Dough Hook:
- Add flour and salt to the mixer bowl. Add sourdough starter, eggs, and olive oil on top.
- Mix on low speed (setting 2 on KitchenAid) for 8 to 10 minutes until dough is smooth and elastic and forms a ball that clears the sides of the bowl.
- If too dry and crumbly, add water 1 teaspoon at a time with mixer running. If sticky, add flour 1 tablespoon at a time. Finished dough should be firm and smooth.
Resting (for both methods):
- Quick method: Wrap tightly and rest at room temperature for 1 to 2 hours.
- Overnight method (recommended): Rest 2 hours at room temperature, then refrigerate 8 to 24 hours. Remove from refrigerator 30 minutes before rolling.
- Divide into 4 pieces. Roll thin using pasta machine (setting 6 to 7 for fettuccine) or rolling pin.
- Cut into desired shape. Toss with semolina or flour to prevent sticking.
Cook pasta:
- Bring large pot of salted water to boil. You want it to taste like the sea.
- Cook 2 to 4 minutes until al dente. Start tasting at 2 minutes. Reserve 1 cup pasta water before draining.
- Toss with your favorite sauce and serve immediately.
Notes
Understanding Pasta Dough Hydration
This recipe sits at approximately 50 to 52% hydration (once you factor in the liquid from eggs and discard together). That’s perfect for pasta, right in the traditional Italian range of 45 to 55%.
Lower hydration creates:
- Dough that’s easier to roll thin without excessive spring-back
- Better texture and bite (that al dente quality)
- Less stickiness when cutting and handling
- Pasta that holds its shape during cooking
The dough should feel noticeably firmer than bread dough. It won’t be soft and pillowy like focaccia dough or sticky like ciabatta. Instead, it should feel smooth, firm, and cohesive, similar to play-dough or modeling clay.
If your dough feels too dry and crumbly after kneading, add water 1 teaspoon at a time until it comes together. Environmental factors like humidity and flour protein content affect absorption, so minor adjustments are completely normal.
Tips for Perfect Sourdough Pasta Every Time

Use active discard: Fresher discard (fed within 12 hours) creates better texture and more pleasant flavor than very old, highly acidic discard.
Don’t skip the rest: The resting period is absolutely crucial. It allows gluten to relax, making the dough exponentially easier to roll thin. Trying to roll immediately after kneading results in frustration and thick, tough pasta.
Keep unused portions covered: Even brief air exposure creates a dried skin that won’t roll smooth. Keep your workflow organized.
Flour sparingly but adequately: Too little flour and everything sticks together. Too much and the pasta tastes chalky. Find the balance.
Don’t overcook: Fresh pasta cooks fast. Set a timer, start tasting early, and pull it as soon as it’s al dente.
Save pasta water: That starchy cooking liquid is what transforms good sauce into great sauce. Always reserve some before draining.
Work clean: Pasta-making is messy. Accept it, embrace it, and set yourself up for success with a clean workspace and tools within reach.
Flavor Variations
Once you master the basic technique, you can create stunning variations:
Herb Pasta: Add 1/4 cup finely minced fresh herbs (basil, parsley, or chives) when incorporating the wet ingredients. Gorgeous green flecks throughout.
Black Pepper Pasta: Add 1 to 2 tablespoons coarsely cracked black pepper to the flour. Perfect with cacio e pepe or carbonara.
Lemon Pasta: Add zest of 2 lemons to the dough. Incredible with seafood or creamy sauces.
Squid Ink Pasta: Add 1 to 2 teaspoons squid ink with the wet ingredients for dramatic black pasta. Reduce eggs to 1.5 to account for liquid.
Tomato Pasta: Replace one egg with 2 tablespoons tomato paste for beautiful coral-colored pasta with subtle umami depth.
Whole Wheat Pasta: Replace up to half the all-purpose flour with whole wheat flour for nutty, hearty pasta. You may need to add slightly more water.
Storage and Make-Ahead Instructions

Fresh dough (unrolled): Wrap tightly in plastic wrap. Refrigerate for up to 3 days or freeze for up to 3 months. Thaw frozen dough overnight in the refrigerator before using. Bring to room temperature before rolling.
Cut fresh pasta: Toss generously with semolina and form into loose nests or spread on a baking sheet. Store uncovered in the refrigerator for up to 2 days. The pasta will dry slightly, which is fine, it may just need an extra 30 seconds of cooking time.
Freezing cut pasta: Arrange in single layers on a parchment-lined baking sheet. Freeze until solid (about 1 hour), then transfer to freezer bags or containers. Frozen pasta keeps for up to 3 months. Cook directly from frozen, just add an extra minute or two to cooking time. Don’t thaw first or it’ll get gummy.
Cooked pasta: Like all fresh pasta, this is best enjoyed immediately after cooking. Cooked pasta can be refrigerated in an airtight container for up to 2 days, but the texture won’t be quite the same when reheated.
Serving Suggestions and Sauce Pairings
The beauty of fresh sourdough pasta is its versatility. The subtle tang complements virtually any sauce style:
Simple and Classic:
- Brown butter and sage with toasted walnuts
- Cacio e pepe (cheese and black pepper)
- Aglio e olio (garlic and olive oil)
- Marinara with fresh basil
- Pesto (basil, arugula, or sun-dried tomato)
Cream-Based:
- Alfredo with peas and prosciutto
- Carbonara with pancetta and egg
- Mushroom cream sauce
- Gorgonzola cream with walnuts
Protein-Forward:
- Bolognese (meat ragu)
- Sausage and broccoli rabe
- Chicken piccata over pasta
- Lamb ragu with mint
Seafood:
- Clams in white wine sauce
- Mussels with tomato and garlic
- Lobster with lemon butter
- Shrimp scampi (recipe below!)
Vegetarian:
- Roasted cherry tomatoes with burrata
- Spring vegetables with lemon and herbs
- Roasted butternut squash with brown butter
- Caramelized onions and goat cheese
Why Sourdough Makes Better Pasta: The Science
Adding sourdough starter to pasta dough creates measurable improvements in texture and workability. Here’s what’s actually happening:
Enzymatic action: The natural enzymes (proteases and amylases) in sourdough culture break down some gluten proteins and starches. This controlled breakdown creates exceptional extensibility, dough that stretches more easily and springs back less when rolled.
Acid development: Lactic acid bacteria produce organic acids that slightly lower the dough’s pH. This affects gluten development, creating a silkier, more tender texture while maintaining structure.
Flavor complexity: The fermentation process develops complex flavor compounds that you simply cannot achieve in pasta dough mixed and used immediately. It’s subtle, not aggressively sour, but adds a sophisticated depth.
Improved shelf life: The slight acidity acts as a natural preservative, giving fresh pasta better keeping quality in the refrigerator.
These benefits increase with longer fermentation time, which is why the overnight cold ferment method produces such noticeably superior results.
Troubleshooting Common Issues
Dough is too dry and crumbly: Add water 1 teaspoon at a time, kneading thoroughly between additions. Humidity, flour protein content, and egg size all affect hydration needs.
Dough is too sticky: Add flour gradually until the dough is smooth but not tacky. However, remember that pasta dough should be on the firmer side, don’t be too quick to add flour if it just feels different from bread dough.
Pasta tears when rolling: The dough probably needs more rest. Wrap it up and give it another 30 minutes. Gluten needs time to relax.
Pasta tastes too sour: Your discard may have been too old or acidic. Use fresher discard next time, or reduce fermentation time.
Pasta sticks together after cutting: Dust more generously with semolina or flour immediately after cutting. Toss it well to coat all surfaces.
Pasta is gummy after cooking: You likely overcooked it. Fresh pasta needs much less time than dried. Start checking at 2 minutes next time.
Sheets keep tearing at thin settings: You may be moving through settings too quickly. Go through each intermediate setting, or the dough hasn’t rested long enough.
Frequently Asked Questions
Can I use sourdough starter instead of discard? Absolutely! Both work beautifully. Peak starter (at its highest rise, bubbly and active) actually creates especially flavorful pasta with excellent texture. Fresh discard that’s been recently fed works great too. The terms are often used interchangeably in recipes like this, but don’t hesitate to use your best, most active starter if you have it.
What if my starter isn’t 100% hydration? You’ll need to adjust the recipe. For stiffer starters, add a bit more water. For more liquid starters, reduce water or add a bit more flour. The dough should reach that firm, play-dough consistency regardless of starter hydration.
Do I need a pasta machine? No! A rolling pin works fine, it just requires more effort and time. Many traditional Italian home cooks roll all their pasta by hand.
Can I make this in a stand mixer? Yes! Use the dough hook attachment and mix on low speed (setting 2 on a KitchenAid) for 8 to 10 minutes until smooth and elastic. Add the flour and salt to the bowl first, then add the starter, eggs, and oil on top. The dough will form a ball that clears the sides of the bowl. Adjust hydration with water or flour as needed, 1 teaspoon or 1 tablespoon at a time. You’ll still need to rest the dough before rolling, just like the hand-kneaded version.
Can I make this dough in a food processor? Yes. Pulse flour and salt to combine. Add eggs, discard, and oil. Pulse until the mixture looks like coarse crumbs. Turn out onto your work surface and knead briefly by hand until smooth.
How do I know when fresh pasta is done cooking? Taste it! It should be tender but still have slight resistance (al dente). It should taste cooked through, not raw or floury, but shouldn’t be mushy. Start checking at 2 minutes.
Can I use this dough for filled pasta? Absolutely. It’s strong and elastic enough to hold fillings beautifully. Roll it slightly thinner (setting 8 or 9) for ravioli or tortellini.
Why does my pasta have a dried skin after resting? Air exposure. Make sure it’s wrapped very tightly in plastic wrap with no gaps or openings.
Can I make this gluten-free? Unfortunately, gluten is what gives pasta its structure and texture. Gluten-free pasta requires entirely different ratios and techniques.
Recipe: Shrimp Scampi with Sourdough Pasta
Now that you’ve mastered sourdough pasta, here’s one of my favorite ways to serve it, a classic shrimp scampi with bright lemon, loads of garlic, and a silky butter sauce.
Ingredients:
For the Scampi Sauce:
- 6 tablespoons unsalted butter, divided
- 1/4 cup extra virgin olive oil
- 8 to 10 garlic cloves, thinly sliced (not minced)
- 3/4 teaspoon red pepper flakes
- 3/4 cup dry white wine
- Juice and zest of 1.5 lemons
- 3/4 cup reserved pasta water
For the Shrimp:
- 2 lbs large shrimp, peeled and deveined
- 1/4 cup fresh Italian parsley, chopped
- Salt and freshly cracked black pepper
- 1 batch fresh sourdough pasta
- Extra lemon wedges for serving
Instructions:
- Bring a large pot of salted water to boil for the pasta.
- In a large, deep skillet, melt 3 tablespoons butter with olive oil over medium heat. Add sliced garlic and red pepper flakes. Cook gently for 2 to 3 minutes until garlic is fragrant and just starting to turn golden at the edges. Sliced garlic (not minced) creates better texture and prevents burning.
- Pour in white wine, scraping up any golden bits. Let reduce by half, about 3 to 4 minutes. Add lemon juice and zest, simmer 1 minute, then remove from heat.
- Season shrimp with salt and pepper. Return skillet to medium-high heat. Cook shrimp in two batches (1 lb at a time) for 2 to 3 minutes per side until pink and just opaque. Don’t crowd the pan or they’ll steam instead of sear. Set cooked shrimp aside.
- Add fresh pasta to boiling water. Cook 2 to 4 minutes until al dente, tasting at 2 minutes. Reserve 1 cup pasta water before draining.
- Return all shrimp to the skillet. Add remaining 3 tablespoons butter, cooked pasta (use tongs), and 1/2 cup pasta water. Toss everything vigorously over medium heat until the sauce emulsifies and coats the pasta beautifully. Add more pasta water if needed for a silky, clingy sauce.
- Remove from heat, toss in fresh parsley, and adjust seasoning with salt and pepper. Serve immediately with lemon wedges.
Pro tip: For a slightly richer sauce, add 1/4 cup heavy cream when you add the final butter and pasta water. It’s not traditional, but it creates a luscious, coating texture.
Final Thoughts on Sourdough Pasta
Making fresh pasta from scratch is one of those cooking experiences that never gets old. There’s something deeply satisfying about transforming simple ingredients into silky ribbons of pasta with your own hands. Adding sourdough to the equation elevates the entire process, creating pasta with superior texture, easier workability, and subtle complexity that enhances every sauce you pair it with.
The overnight fermentation option makes this recipe incredibly practical for real life, mix the dough when you have time, roll it out when you’re ready to cook. No more pressure to complete everything in one session.
Once you experience how beautifully this dough handles and how exceptional the finished pasta tastes, you’ll understand why sourdough pasta deserves a permanent place in your cooking repertoire. It’s not just a clever way to use discard, it’s genuinely superior pasta.
Whether you’re tossing it with simple butter and herbs, building an elaborate seafood feast, or filling ravioli for Sunday dinner, this sourdough pasta delivers restaurant-quality results that’ll make you wonder why you ever bought dried pasta in the first place.
Now go make some pasta. Your sourdough starter has been waiting for this moment.


Leave a Reply