For most of my life, pesto was off the table. Not metaphorically, literally. Every recipe I found called for pine nuts or walnuts, and with a tree nut allergy, that meant pesto was something I watched other people enjoy while I sat on the sidelines. Then a friend shared their recipe, a version made without any nuts at all, and I have not stopped making it since. I grow basil every single summer specifically for this purpose. Bunches of it. Batches and batches frozen and tucked away so I have real, homemade pesto all year long.
So when I started dreaming up a savory scone, pesto was the only ingredient that made sense to me. But I did not want to just swirl it into the dough and call it a day. I wanted pesto in every single layer, woven all the way through, the way butter threads itself into a croissant. That obsession led me to this technique: freeze your pesto completely solid, then grate it like butter directly into the flour.
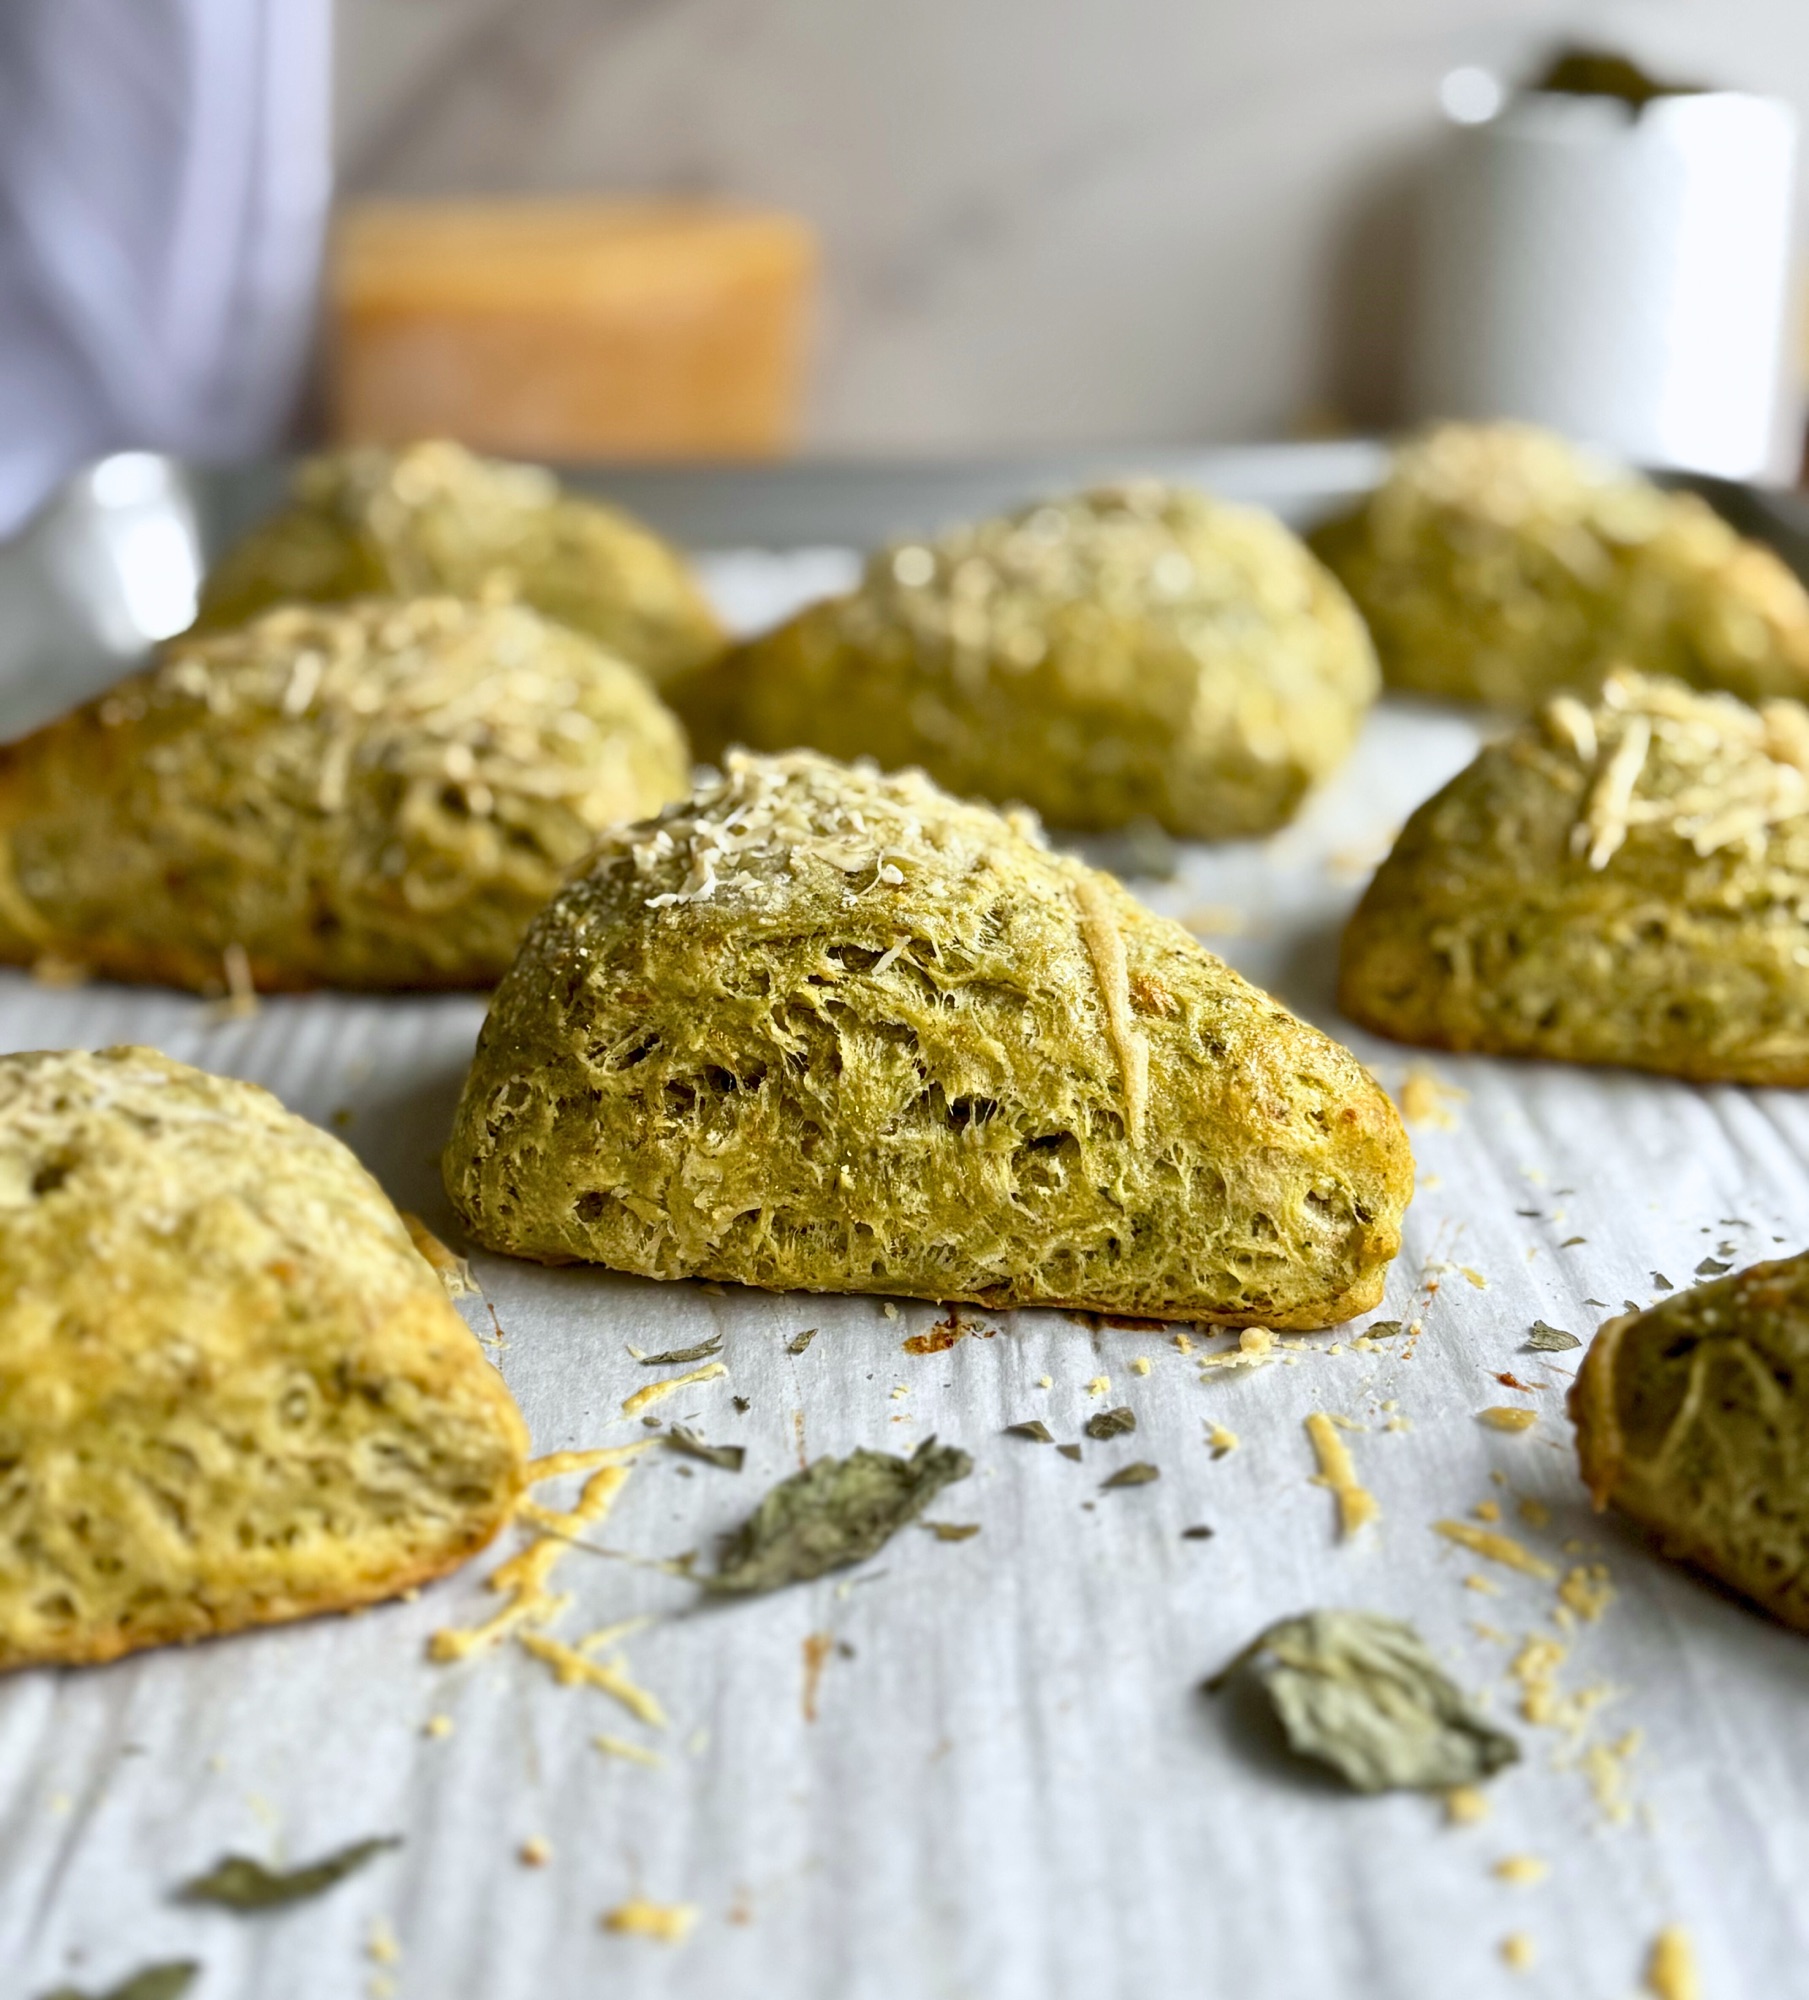
What comes out of the oven is something genuinely special. Deeply golden, crispy parmesan on top, a crumb that pulls apart in distinct flaky layers, and basil and cheese running through every single one of them. These sourdough pesto scones have become one of my most made recipes, and I think they are about to become one of yours too.
Table of Contents
- The Technique That Changes Everything
- About the Homemade Pesto
- Can You Use Store Bought Pesto?
- Why Sourdough Makes These Scones Better
- Key Ingredients and Why They Matter
- No Sourdough Starter? No Problem.
- Tips for the Flakiest Scones
- Storage and Make Ahead Instructions
- Shop This Recipe
- You Might Also Love
- Frequently Asked Questions
The Technique That Changes Everything
The frozen grated fat technique is not new to scone baking. Bakers have been grating frozen butter into flour for years because it creates distinct, evenly distributed fat shards throughout the dough. When those shards hit the hot oven, they release steam and push the dough apart, layer by layer, creating the flaky interior that makes a great scone so satisfying.
What is new here is applying that same logic to pesto. When you freeze homemade pesto solid and grate it on the large holes of a box grater, you get hundreds of tiny pesto shards mixed throughout the flour, just like butter. Every single layer of the finished scone has been infused with basil, garlic, parmesan, and romano from the inside out. No swirling, no marbling, no hoping the flavors distribute evenly. They do, because they are built into the structure of the dough from the very beginning.
This is also why the pesto recipe used here includes salted butter alongside the olive oil. The butter gives the frozen pesto the solid fat structure it needs to grate cleanly and behave like the frozen butter you add separately. Without that butter content, the pesto would be too oily to freeze firm enough to grate well. The butter in the pesto is not just flavor, it is what makes the entire technique work.

About the Homemade Pesto
The pesto recipe included here is scaled to make exactly the amount you need for one batch of scones, with a small buffer for what sticks to the food processor and the freezer bag. There is nothing left over, nothing to figure out. Make the pesto, freeze it, grate it, bake your scones. That is it.
If you want to be set up for your next batch, double or triple the pesto recipe and freeze the extra in a flat layer in a separate zip bag. Labeled and tucked in the freezer, it keeps well for up to a year. When you are ready to bake again, your pesto is already done.
The pesto here is made with just basil, olive oil, parmesan, romano, salted butter, and garlic. No nuts of any kind. The butter replaces the richness and body that pine nuts would typically contribute, and the combination of parmesan and romano gives you enough depth that nothing feels missing. It is a simple, clean pesto that freezes beautifully and bakes into these scones in the most extraordinary way.

Can You Use Store Bought Pesto?
Yes, with a caveat. Store bought pesto does freeze solid enough to grate, which means the technique will work. Spread it in a thin flat layer in a zip bag, freeze it overnight, and grate it directly from the freezer just as you would the homemade version.
The difference to be aware of is in the flakiness. The homemade pesto in this recipe includes salted butter, which contributes solid fat to the frozen pesto mass. That solid fat behaves in the oven the same way frozen butter does: it melts rapidly, releases steam, and creates defined flaky layers. Store bought pesto contains no butter. It is almost entirely olive oil, which does not create the same steam-driven layering effect in the oven. Your scones will still be delicious and the flavor will still come through in every bite, but the crumb structure may be slightly less dramatic and flaky than what you get with the homemade version.
If you love the results and want to get closer to the homemade version using store bought pesto, try blending one teaspoon of softened salted butter into your store bought pesto before freezing it flat. It will not replicate the exact ratio, but it moves things in the right direction.

Why Sourdough Makes These Scones Better
The active sourdough starter in this recipe is doing several things at once. First, it contributes to the leavening alongside the baking powder and baking soda, giving the scones extra lift and a more open crumb structure than a standard quick bread recipe alone would produce.
Second, and this is the part that matters for keeping quality, the mild acidity from the fermented starter slows down starch retrogradation, which is the process that makes baked goods go stale and dry. Scones made with sourdough stay tender and moist significantly longer than their non fermented counterparts. Where a standard scone might feel dry by the next morning, these hold their texture for two to three full days at room temperature.
Third, the starter adds a subtle depth to the overall flavor of the scone that you cannot quite put your finger on but would notice immediately if it were gone. It rounds out the brightness of the basil and the sharpness of the cheeses into something more complete and complex.
The baking soda in the recipe is there specifically to react with the acidity in the starter, the buttermilk, and the parmesan and romano cheeses. That reaction produces extra lift and improves browning, which is why these scones come out of the oven with such a deep golden exterior.

Key Ingredients and Why They Matter
Active sourdough starter: Use a recently fed, active starter at 100% hydration (equal parts flour and water by weight). The starter should be bubbly and at or just past peak when you use it. Sourdough discard works as a direct swap with no adjustments needed. The baking soda already in the recipe reacts with the natural acidity in the discard, the buttermilk, and the cheeses, so no extra leavening is required.
Buttermilk: Buttermilk replaced heavy cream in testing specifically because its thinner consistency allows it to incorporate into the dough without resistance, which means less mixing and better flakiness. Its acidity also works alongside the baking soda for additional rise, and its subtle flavor amplifies the pesto rather than competing with it. Use real buttermilk here for best results.
Cold grated butter: The butter you grate separately into the dough is responsible for the structural flakiness of the scone. Cold butter straight from the refrigerator is easier to grate than frozen and works perfectly here because of how the method is structured. You grate the cold butter and the frozen pesto directly into the flour mixture, toss everything together to coat, and immediately place the entire bowl in the freezer for 15 minutes. At the same time, your wet ingredients go into the refrigerator. By the time both come together, everything is thoroughly chilled and the butter is firm. The method does the work for you.
Parmesan and romano: Both the pesto and the topping use real freshly grated cheese. Pre-shredded cheese contains anti-caking agents that prevent it from melting and browning properly. For the crispy, deeply golden parmesan crust you see in the photos, freshly grated is not optional.


Pesto Scones (Sourdough)
Equipment
- Food processor or mini food processor
- Gallon zip freezer bag
- kitchen scale
- Box grater with large holes
- Large mixing bowl
- medium mixing bowl
- Whisk
- Fork or rubber spatula
- Half sheet baking pan
- Parchment paper
- Sharp chef’s knife
- Instant read thermometer
- – Pastry brush
Ingredients
Group 1: HOMEMADE NUT-FREE PESTO
- Make this first. It needs at least 4 hours in the freezer, or overnight.
- 10 grams fresh basil leaves packed (about 1/3 cup)
- 27 grams olive oil 2 tablespoons
- 8 grams parmesan cheese freshly grated (1 tablespoon + 1 teaspoon)
- 3 grams romano cheese freshly grated (1 teaspoon)
- 10 grams salted butter softened (2 teaspoons)
- 1 small clove garlic
Group 2: DRY INGREDIENTS
- These go into the large bowl, then into the freezer for 15 minutes.
- 250 grams all purpose flour 2 cups
- 8 grams baking powder 2 teaspoons
- 1.5 grams baking soda 1/4 teaspoon
- 4.5 grams fine salt 3/4 teaspoon
- 55 grams frozen homemade pesto grated on the large holes of a box grater (about 3 and 1/2 tablespoons)
- 40 grams cold unsalted butter grated on the large holes of a box grater (about 3 tablespoons)
GROUP 3: WET INGREDIENTS
- These go into a separate bowl, then into the refrigerator for the same 15 minutes.
- 1 large whole egg cold
- 100 grams active sourdough starter 100% hydration, cold (scant 1/2 cup)
- 90 grams cold buttermilk plus more by the tablespoon only if needed (about 6 tablespoons)
GROUP 4: TOPPING
- cold buttermilk or heavy cream for brushing
- freshly grated parmesan for sprinkling
Instructions
GROUP 1: MAKE AND FREEZE THE PESTO
- (Do this the night before or at least 4 hours ahead.)
- Add the basil, olive oil, parmesan, romano, salted butter, and garlic to a food processor and blend until smooth, scraping down the sides as needed.
- Transfer the pesto to a gallon zip freezer bag and spread it into a thin, round-ish log. Seal the bag and lay it completely flat in the freezer for at least 4 hours or overnight. The pesto must be frozen completely solid before you grate it.
GROUP 2: BUILD THE DRY MIXTURE AND FREEZE
- Measure the flour, baking powder, baking soda, and salt into a large bowl and whisk together until combined.
- Remove the frozen pesto from the freezer and immediately grate it on the large holes of a box grater directly into the flour mixture. Working quickly, grate the cold butter on the same large holes directly into the flour mixture as well. Toss everything gently with a fork until the fat shards are coated in flour. Cut them in with a pastry knife or fork until they are broken up a little. Do not overwork them.
- Place the entire flour bowl in the freezer for 15 minutes. This refirms any fat that warmed during grating and keeps everything cold until the wet ingredients are added.
GROUP 3: BUILD THE WET MIXTURE AND REFRIGERATE
- While the flour mixture chills, whisk together the cold egg, active sourdough starter, and 90 grams of cold buttermilk in a separate bowl until completely smooth and the starter is fully incorporated.
- Place this bowl in the refrigerator for the same 15 minutes so both mixtures are thoroughly cold when they come together.
GROUP 4: COMBINE AND CHECK THE DOUGH
- After 15 minutes, remove both bowls. Pour the cold liquid mixture over the cold flour mixture all at once.
- Use a fork or rubber spatula to fold together until just combined and no dry streaks of flour remain. The dough will look shaggy and rough. That is exactly right. Do not overmix.
- Press a small pinch of dough between your fingers. If it holds together, stop. If it crumbles and will not stick, add buttermilk one tablespoon at a time, folding gently between each addition, until the dough just comes together.
GROUP 5: SHAPE AND CHILL
- Turn the dough out onto a piece of plastic wrap. Gently press and pat into a disc approximately 1 inch thick. Do not knead. The dough should look rough on the outside. Wrap up in the plastic wrap, tightly.
- Transfer the disc to the refrigerator and let cold proof for 6-8 hours. If you want these sooner without the long ferment, pull out after about 2 or 3 hours of chill time and continue with instructions.
- Remove from the refrigerator, unwrap and use a sharp chef’s knife to cut the disc into 8 equal wedges, pressing straight down in one clean motion. Do not saw through the dough, as this compresses the edges and prevents the layers from opening during baking.
- Separate the wedges slightly a parchment lined baking sheet so they are not touching. Transfer the entire tray to the freezer for 1 hour. Do not skip this step.
GROUP 6: BAKE
- Position an oven rack in the center of the oven and preheat to 400 degrees F while the scones finish their freezer rest.
- Remove the scones from the freezer. Brush the tops lightly with cold buttermilk or heavy cream.
- Sprinkle freshly grated parmesan generously over all 8 scones.
- Bake straight from frozen for 20 to 25 minutes until the tops are deep golden and the parmesan is golden and crispy at the edges. Internal temperature should reach 200 to 210 degrees F on an instant read thermometer. Do not underbake.
- Allow to cool on the pan for 5 minutes before serving. These are best eaten warm.
Notes
No Sourdough Starter? No Problem.
If you do not have an active sourdough starter, you can still make these scones. The swap is straightforward: remove the starter entirely and adjust the flour and buttermilk to compensate for what the starter was contributing to the dough.
Because a 100% hydration starter is made of equal parts flour and water by weight, replacing 100g of starter means adding 50g of flour to your dry ingredients and 50g of additional buttermilk to your wet ingredients. You will also increase the baking powder slightly to make up for the leavening the starter would have provided.
For the non-starter version, use:
- 300g (2 cups + 3 tablespoons) all purpose flour
- 10g (2 and 1/2 teaspoons) baking powder
- 1.5g (1/4 teaspoon) baking soda
- 4.5g (3/4 teaspoon) fine salt
- 55g frozen grated pesto
- 40g frozen grated salted butter
- 1 large whole egg, cold
- 140g (just over 1/2 cup) cold buttermilk
Everything else about the method stays the same. Keep all ingredients cold, work quickly, handle the dough minimally, and follow the same shaping, freezing, and baking steps as the sourdough version.
One important difference: the non-starter version does not need any extended cold rest for fermentation. You can make it and bake it the same day. The cold chain steps (chilling the flour mixture and liquid mixture separately for 15 minutes, then freezing the shaped wedges for one hour) are still important for flakiness and are not optional, but there is no overnight wait.
Tips for the Flakiest Scones
Respect the cold chain. Every step of this recipe is designed to keep the fat cold until it hits the oven. A cold oven is the enemy of flaky scones. Do not skip the freezer steps.
Stop mixing the moment the dough holds. Overworked scone dough develops gluten and turns the crumb from flaky to tough. The dough should look rough and shaggy when you turn it out. That is correct.
Press, do not roll. Use your hands to pat the dough into a disc. A rolling pin applies even pressure that can compress the fat layers you worked hard to create.
Troubleshoot the dough before it hits the pan. If the dough is too dry and crumbly to hold together when pressed, add buttermilk one tablespoon at a time and fold gently until it just comes together. If the dough feels sticky or too wet, lightly flour your hands and the surface, not the dough itself. Adding flour directly to wet dough disrupts the hydration balance. Both issues are more common with store bought pesto, which has a higher oil content than the homemade version, so add your buttermilk more cautiously if you go that route.
Use a sharp knife. When cutting the wedges, press straight down with a sharp chef’s knife in one clean motion. Avoid bench scrapers for this step as even a good quality bench scraper can have a slightly dull edge, and a dull blade compresses and seals the sides of the dough instead of cutting cleanly through it. Clean, open sides are what allow the layers to separate and bloom in the oven.
Bake from frozen. The one-hour freezer rest before baking is not optional. Baking straight from frozen means the fat stays solid long enough to create maximum steam in the oven. It is the difference between a good scone and a great one.

Storage and Make Ahead Instructions
Baked scones keep at room temperature in an airtight container for up to two days. Do not refrigerate baked scones as the cold environment accelerates staling.
To freeze baked scones, cool them completely, wrap individually, and freeze for up to three months. Reheat from frozen in a 350 degree oven for eight to ten minutes.
To freeze unbaked scones, complete all steps through shaping and cutting. Freeze the wedges on the tray until solid, then transfer to a zip bag. Bake directly from frozen at 400 degrees, adding three to five minutes to the bake time. This is the best make-ahead option because the scones bake up just as well as fresh and you can pull out exactly as many as you need at a time.
Shop This Recipe
Here are the tools and ingredients that make this recipe easier and more consistent every single time. Everything is linked to Amazon for your convenience.
Tools
- Box grater with large holes – The large holes are essential for both the frozen pesto and the frozen butter. A sturdy grater with a solid base makes the job much easier and safer.
- Kitchen scale – This recipe is built around weight measurements for accuracy. A scale is the single most important tool for consistent baking results.
- Bench scraper – Invaluable for lifting the dough disc off the counter without disturbing the layers and for cleaning flour off your work surface between steps. Use your sharpest chef’s knife for the actual cutting.
- Half sheet baking pan – A heavy, rimmed half sheet pan distributes heat evenly and gives you enough room to spread all eight wedges without crowding.
- Parchment paper – Lines the pan for easy transfer and cleanup. Pre-cut sheets lay flat without curling.
- Mini food processor – Blends the pesto quickly and smoothly. A mini food processor is perfect for the small batch size of this recipe and easier to clean than a full-size machine.
- Instant read thermometer – Takes the guesswork out of bake time. Pull the scones when the interior hits 200 to 210 degrees F for a perfectly set crumb every single time.
- Pastry brush – For brushing the tops of the scones with buttermilk before adding the parmesan. A silicone brush is easy to clean and does not absorb liquid.
- Gallon zip freezer bags – Used to freeze the pesto flat so it is easy to grate straight from the freezer. Gallon size gives you enough room to spread it in a thin, even layer.
You Might Also Love
If you love the combination of sourdough and pesto as much as I do, my pull-apart pesto focaccia uses the same homemade pesto recipe and has become one of my most viral recipes. It is a completely different texture and experience from these scones, but the same deep, layered pesto flavor runs all the way through it.
Frequently Asked Questions
Can I use store bought pesto in this recipe?
Yes. Freeze it flat in a zip bag overnight until completely solid, then grate it just as you would the homemade version. Keep in mind that store bought pesto contains no butter, which means the finished scones may be slightly less flaky than the homemade version. The butter in the homemade pesto is what creates extra steam-driven layers in the oven.
Can I make these without a sourdough starter?
Yes. See the full non-starter version with adjusted measurements in the section above. Replace the 100g of starter with 50g additional flour and 50g additional buttermilk, increase the baking powder to 2 and 1/2 teaspoons, and bake the same day without any extended fermentation rest.
How do I know if my sourdough starter is at peak?
Peak starter is at maximum activity, meaning it has risen as high as it will go and the dome on top is just beginning to flatten. A starter at peak will be visibly bubbly throughout, smell pleasantly tangy and yeasty rather than sharp or alcoholic, and pass the float test: drop a small spoonful into a glass of water and if it floats, it is ready. Just past peak is also fine for this recipe. If it has fallen significantly from its highest point, use it as discard rather than active starter.
Can I use sourdough discard instead of active starter?
Yes, discard is a direct 1 to 1 swap with no adjustments needed. The baking soda already in the recipe reacts with the natural acidity in the discard, the buttermilk, and the cheeses, so no extra leavening is required. The finished scones will have a slightly deeper fermented flavor, which works beautifully with the pesto.
Why does the pesto recipe include butter?
The salted butter in the pesto serves two purposes. First, it adds richness and rounds out the flavor in a way that replaces the role pine nuts typically play in traditional pesto. Second, and more importantly for this recipe, the butter gives the pesto the solid fat structure it needs to freeze completely firm and grate cleanly on a box grater. Without the butter, the olive oil in the pesto prevents it from freezing hard enough to behave the way this technique requires.
Can I make the pesto ahead of time?
Yes, and this is actually the recommended approach. The pesto needs to freeze solid before you can grate it, which takes several hours or overnight. If you double or triple the pesto recipe, you can keep extra portions in the freezer for up to six months and have your next batch mostly prepped before you even start.
Why do I freeze the scones before baking?
The one-hour freezer rest before baking ensures that all the fat in the dough, both the grated butter and the grated pesto, stays completely solid until it hits the 400 degree oven. When cold fat makes sudden contact with high heat, it releases steam rapidly and pushes the dough apart into distinct layers. If the fat softens before baking, that steam-driven layering does not happen and you lose the flakiness.
How long do these scones stay fresh?
Thanks to the fermentation from the sourdough starter, these scones stay tender and moist at room temperature in an airtight container for up to three days, which is significantly longer than a standard non-fermented scone. For longer storage, freeze them baked and reheat in the oven.
Can I double this recipe?
Yes, the scone recipe doubles well. Double all ingredients. You can either bake two separate trays or shape the dough into two discs and cut each into eight wedges for sixteen scones total. Bake time stays the same since the individual scones are the same size.

Made These? Tell Me Everything.
If you make these sourdough pesto scones, I want to hear about it. Leave a comment below and let me know how they turned out. If you share them on Instagram or TikTok, tag me so I can see your beautiful work. And if you want recipes like this sent directly to your inbox before they go anywhere else, sign up for the H3art of the Home newsletter below.


Leave a Reply