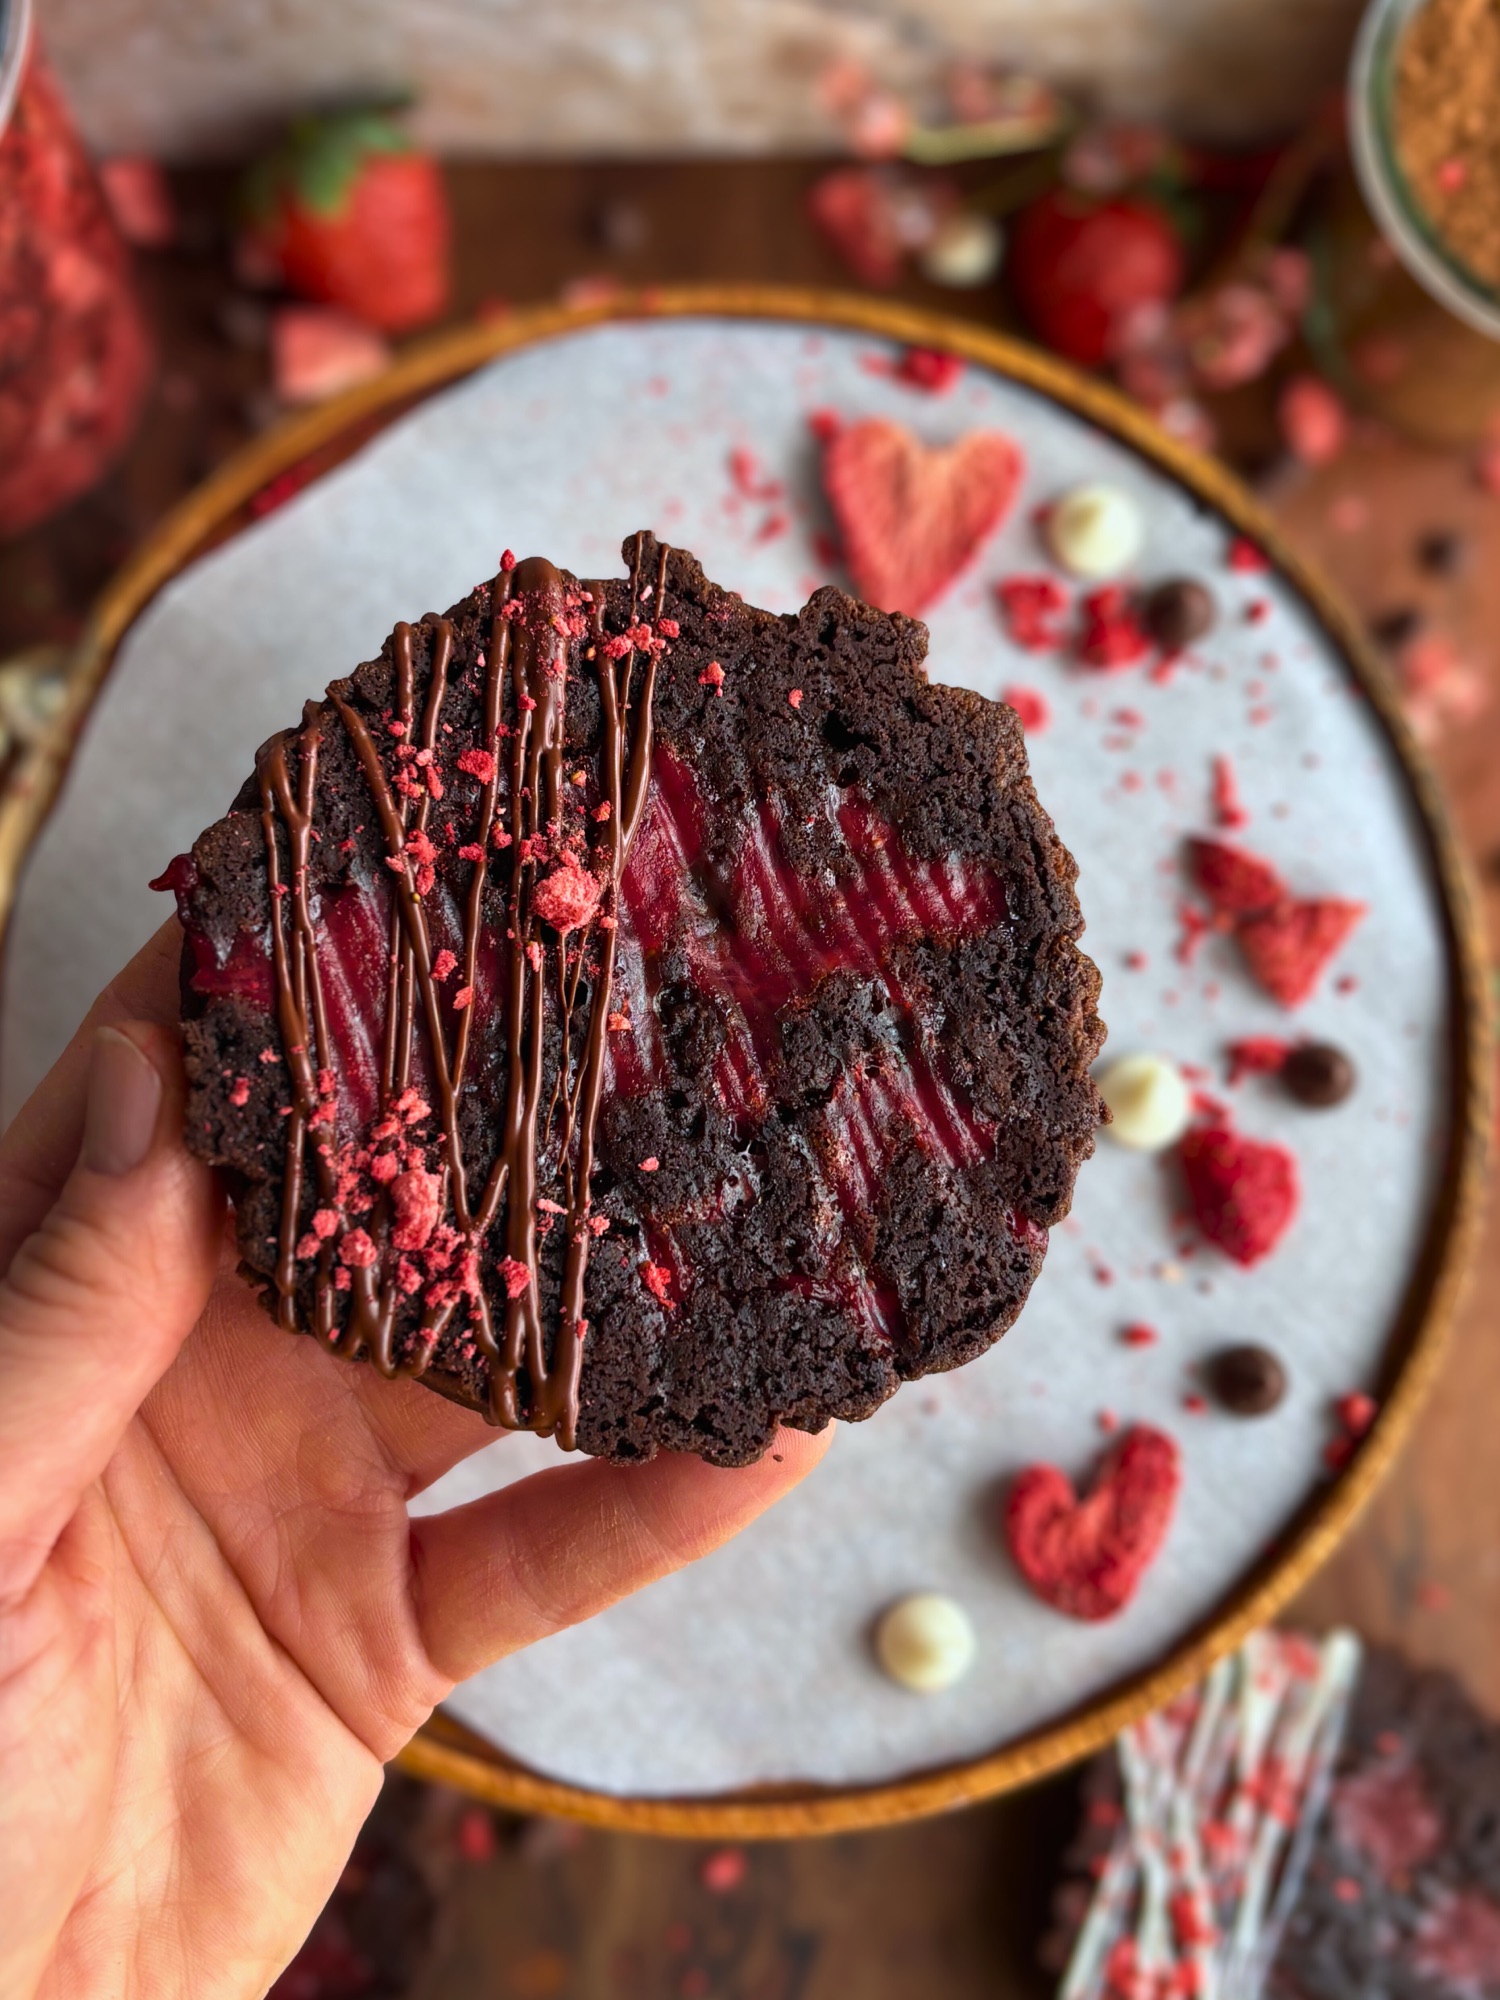
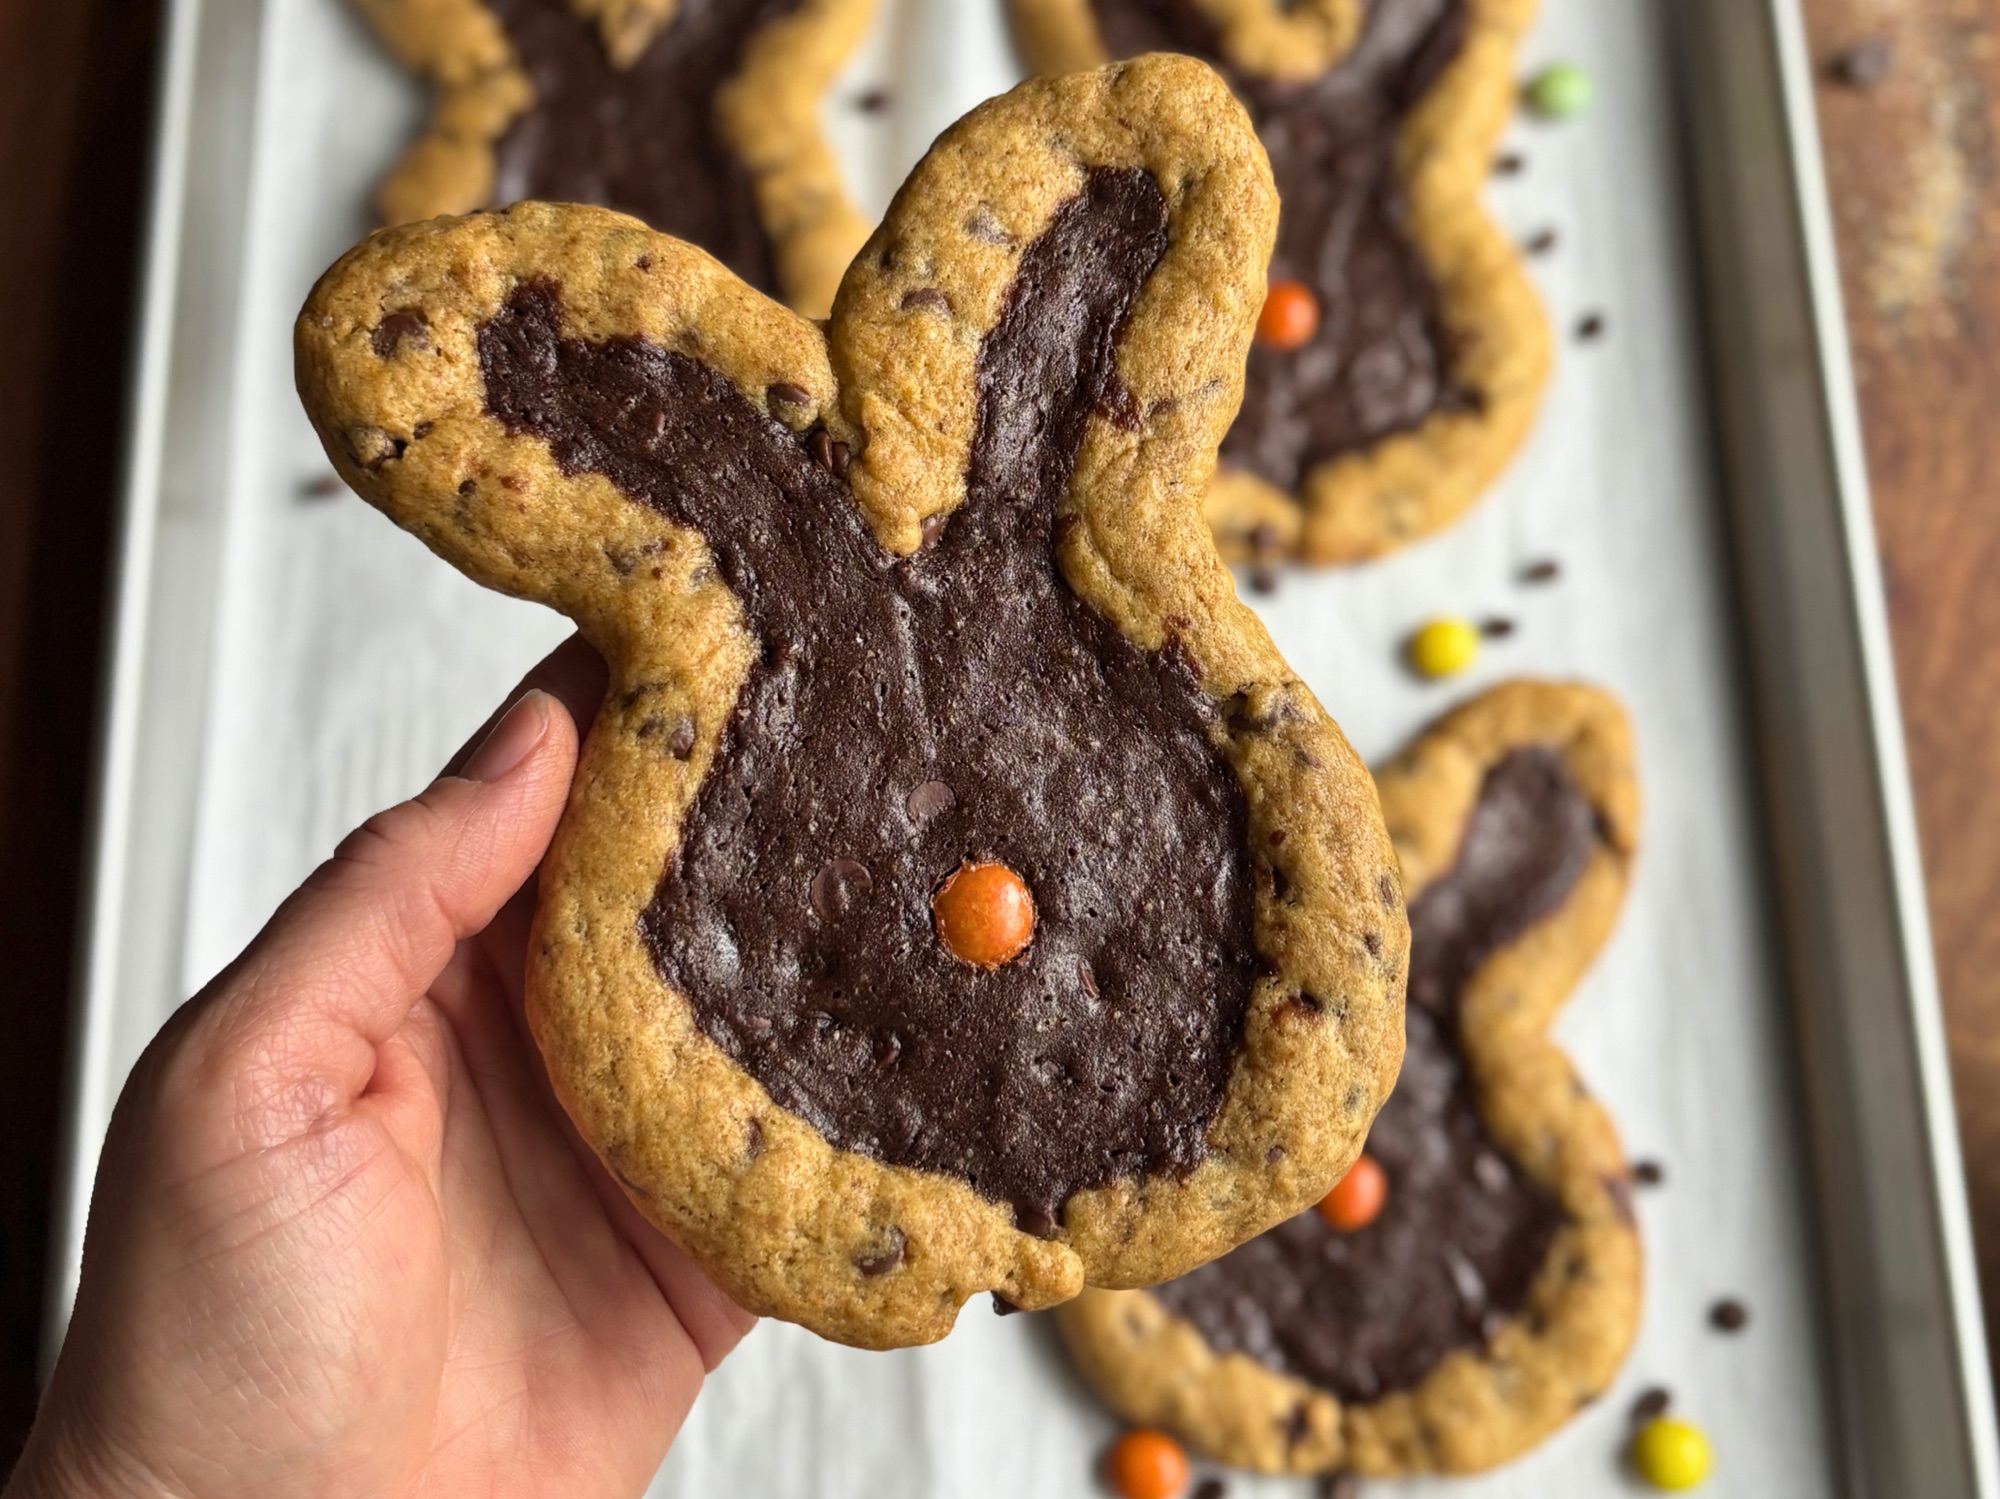
These chocolate covered strawberry sourdough cookies layer rich chocolate cookie dough, vibrant fresh strawberry compote, and fermented chocolate crumble. Made with sourdough starter for incredible depth (or use the quick non sourdough option), either way, you get bakery quality cookies with a gorgeous top. We’re using an innovative upside down cookie assembly and baking technique. The 12 to 24 hour fermentation develops complex flavors while breaking down starches for easier digestion, creating cookies that taste like they came from a professional bakery.
I am not really big into Valentine’s Day because I believe love should be celebrated every day, but any excuse to create something delicious works for me!
Table of Contents
- What Makes These Chocolate Covered Strawberry Cookies Special
- Why Use Sourdough in Cookies
- Understanding Dutch Process Cocoa Powder
- The Upside Down Cookie Technique
- Ingredient Breakdown and Substitutions
- Shaping and Assembly Techniques
- Tips for Perfect Chocolate Covered Strawberry Cookies
- No Sourdough Starter Alternative
- More Upside Down Cookie Recipes
- Frequently Asked Questions

Chocolate Covered Strawberry Sourdough Cookies
Equipment
- Stand mixer or hand mixer
- medium and large mixing bowls
- Whisk
- Rubber spatula
- Plastic wrap or airtight container
- Rolling Pin
- 3 inch round cookie cutter
- Baking sheets
- Parchment paper
- Small saucepan
- Kitchen scale (recommended) Measuring cups and spoons
- Offset spatula or thin flexible spatula
- Microwave safe bowl (for melting chocolate)
Ingredients
Strawberry Compote
- 2.5 to 3 cups fresh strawberries hulled and sliced into 1/4 inch chunks (or 375 to 400g frozen)
- 30 g granulated sugar 2 tablespoons plus 1 teaspoon
- 16 g cornstarch 2 tablespoons
- 15 ml fresh lemon juice 1 tablespoon
Chocolate Cookie Dough
- 220 g all purpose flour 1 and 3/4 cups
- 50 g Dutch process cocoa powder scant 1/2 cup
- 1 teaspoon baking powder
- 1/4 teaspoon salt
- 1/8 teaspoon cream of tartar
- 113 g unsalted butter softened (1/2 cup or 8 tablespoons)
- 80 g powdered sugar 2/3 cup
- 67 g brown sugar 1/3 cup, packed
- 120 g sourdough starter or discard 1/2 cup
- 50 g egg 1 large egg
- 15 g whole milk 1 tablespoon
- 1 teaspoon vanilla extract
- 1/2 teaspoon almond extract optional
Chocolate Crumble
- 90 g all purpose flour 3/4 cup
- 30 g Dutch process cocoa powder 1/4 cup
- 80 g brown sugar packed (1/3 cup plus 1 tablespoon)
- 30 g powdered sugar 1/4 cup
- 1/2 teaspoon salt
- 60 g unsalted butter cold and cubed (1/4 cup or 4 tablespoons)
- 30 g sourdough starter or discard 2 tablespoons
- 1 teaspoon vanilla extract
Chocolate Drizzle (White or Dark)
- 100 g white chocolate OR dark chocolate chopped (3.5 ounces)
- 1 tablespoon coconut oil
Garnish
- Freeze dried strawberries crushed (optional but recommended)
Instructions
Make the Strawberry Compote
- Combine sliced strawberries, granulated sugar, cornstarch, and lemon juice in a medium saucepan.
- Cook over medium heat, stirring gently, for 5 to 7 minutes until mixture thickens and becomes glossy.
- Strawberries should hold their shape but be coated in thick, jam like syrup.
- Do not overcook or the strawberries will break down too much and lose their texture.
- Remove from heat, cover and let cool completely, refrigerate.
- The compote will continue to thicken as it cools.
Make the Chocolate Cookie Dough
- Cream together the softened butter with the Dutch process cocoa powder, powdered sugar, and brown sugar in a large bowl using a stand mixer or hand mixer on medium speed for 2 to 3 minutes until light and fluffy.
- Add the egg, vanilla extract, almond extract (optional), and milk to the butter mixture and beat until well combined.
- Add the sourdough starter and mix until incorporated.
- In a separate medium bowl, whisk together the flour, baking powder, salt, and cream of tartar.
- Add the dry ingredients to the wet ingredients and mix on low speed until just combined. Do not overmix.
- Cover the bowl tightly with plastic wrap or transfer to an airtight container. I like to lay a piece of plastic wrap in a round pan and dump my dough from the bowl onto that. Flatten into a disk, wrap, and then place in the refrigerator.

- Refrigerate for 12 to 24 hours to allow fermentation. For a quicker option, chill for at least 4 hours.
Make the Chocolate Crumble
Food Processor Method
- Take the flour, cocoa powder, brown sugar, powdered sugar, and salt in the food processor. Pulse to combine
- Add the cold cubed butter, pulse until coarse crumb are created. Pea size and smaller.
- Add in the sourdough starter and vanilla to the mixture. Pulse until the dough comes together and is a similar consistancy as brown sugar. Where you can squeeze it together and it will stay formed but be able to be broken up if needed. Stop before the dough creates a ball of dough.
- Whisk together the flour, cocoa powder, brown sugar, powdered sugar, and salt in a medium bowl.
- Add in the sourdough starter and vanilla to the mixture. Pulse until the dough comes together and is a similar consistancy as brown sugar. Where you can squeeze it together and it will stay formed but be able to be broken up if needed. Stop before the dough creates a ball of dough.
- Cover the bowl tightly with plastic wrap or transfer to an airtight container.
- Refrigerate for 12 to 24 hours alongside the cookie dough. For a quicker option, chill for at least 4 hours.
Hand Method
- Add the cold cubed butter and sourdough starter to the flour mixture.
- Use your fingers or a pastry cutter to work the butter and starter into the dry ingredients until the mixture resembles coarse crumbs with pea sized pieces.
- Add the vanilla extract and mix gently until combined.
- Cover the bowl tightly with plastic wrap or transfer to an airtight container.
- Refrigerate for 12 to 24 hours alongside the cookie dough. For a quicker option, chill for at least 4 hours.
Assemble the Cookies
- Preheat your oven to 350 degrees F (175 degrees C). Line two baking sheets with parchment paper.
- Roll out the chilled cookie dough on a lightly floured surface to 3/8 of an inch thickness. This is the line on your ruler between the 1/4 inch mark and the 1/2 inch mark.
- Cut out circles using a 3 inch round cookie cutter or wide mouth jar (although any size will work, just adjust the baking time accordingly). You should get approximately 12-13 circles from the 3' cutter. Re roll scraps as needed.
- If you prefer to prep ahead, roll and cut the dough, then layer the cut circles with parchment paper or plastic wrap between them and store in an airtight container in the refrigerator until ready to assemble.
- Take the chilled crumble and spread it into rough circles on the prepared baking sheets, making each circle roughly 3 to 3.5 inches in diameter.
- For a marbled effect, create small gaps in the crumble that go all the way down to the parchment paper so you can see through to the pan. This allows the strawberry compote to pool through and creates beautiful red marbling when the cookies are flipped.

- Keep the crumble more towards the center. Leave about 1/4 inch to 1/2 inch around the outer edge clear so the filling does not leak out during baking.
- Spoon about 1 to 2 tablespoons of strawberry compote onto the center of each crumble circle, spreading it gently over the crumble.
- Place a cookie dough circle on top of each assembled cookie.
- Press down gently with your palm so the dough sets into the compote below.
- Use your hands to push any extra crumble underneath the edges of the cookie dough circle.
Bake the Cookies
- Bake for 18 to 23 minutes, or until the cookie dough on top is set and no longer looks wet.
- Remove from the oven and let the cookies cool on the baking sheet for at least 1 hour before attempting to move them. This is essential. The strawberry compote continues to thicken and set as it cools, and the cornstarch firms up considerably during this time. The cookies do not need to be fully cool to room temperature, but waiting at least one hour prevents the top from tearing.
- Once cooled for at least 1 hour, use a thin flexible spatula to carefully remove each cookie from the parchment paper, supporting the entire cookie as you lift it. Alternatively, gently lift the cookie and peel back the parchment paper from underneath at a very low angle. Let cool completely before drizzling the chocolate
Make the Chocolate Drizzle and Finish
- Place the chopped chocolate (white or dark) and coconut oil in a microwave safe bowl.
- Microwave in 30 second intervals, stirring between each interval, until the chocolate is completely melted and smooth.
- Flip each cooled cookie over so the crumble side is facing up.
- Drizzle the melted chocolate over each cookie in a back and forth motion.
- If using, immediately sprinkle crushed freeze dried strawberries over the chocolate drizzle before it sets.
- Let the chocolate set completely at room temperature, about 15 to 20 minutes, before serving.
Notes
What Makes These Chocolate Covered Strawberry Cookies Special
These cookies are not your typical drop cookies. The upside down technique creates distinct layers of flavor and texture that make every bite an experience. The fermented chocolate crumble forms a crispy, buttery base. The strawberry compote sits in the middle, thick and jammy with pieces of real strawberry that hold their shape. The chocolate cookie dough bakes on top, creating a soft, rich layer that contrasts beautifully with the crumble below. Finally, the white chocolate drizzle and freeze dried strawberry garnish add visual drama and an extra layer of sweetness.
The fermentation process is what sets these apart from standard cookie recipes. Both the cookie dough and the crumble ferment for 12 to 24 hours in the refrigerator, allowing the sourdough to work its magic. This develops deeper, more complex flavors while also breaking down some of the starches and sugars, making the cookies easier to digest. The result is a cookie that tastes like it came from a professional bakery, with nuanced chocolate notes and a subtle sweetness that balances the sweetness perfectly.
Due to high demand, I’ve added in a non-sourdough tweak. Check the table of contents for that!
Why Use Sourdough in Cookies
Sourdough is not just for bread. When you add sourdough starter to cookie dough, you unlock benefits that go far beyond flavor. The natural fermentation process reduces the overall sugar content as the wild yeasts and bacteria consume some of the sugars during fermentation. This creates a more complex sweetness rather than one dimensional sugar rush.
The fermentation also breaks down phytic acid, an anti-nutrient found in grains that can interfere with mineral absorption. This makes the nutrients in the flour more bioavailable and easier for your body to use. For people who experience digestive discomfort from baked goods, fermented recipes are often much gentler on the stomach.
From a flavor perspective, sourdough adds subtle depth that enhances chocolate beautifully. The slight acidity brightens the chocolate flavor rather than competing with it. In these cookies, the fermentation creates a more sophisticated, balanced flavor profile that plays off the sweetness of the strawberry compote.
The texture benefits are significant too. Sourdough creates cookies with a tender crumb that stays soft for days rather than turning rock hard after 24 hours. The natural acids in the starter help tenderize the gluten structure, giving you that perfect chewy soft texture that makes you reach for just one more cookie.

Understanding Dutch Process Cocoa Powder
The choice of cocoa powder matters tremendously in chocolate baking, and for these cookies, Dutch process cocoa is essential. Dutch process cocoa has been treated with an alkalizing agent that neutralizes its natural acidity. This process creates a darker color, a milder flavor, and a smoother taste compared to natural cocoa powder.
Natural cocoa powder is acidic and can taste harsh or bitter, especially in recipes with a lot of cocoa. Dutch process cocoa, on the other hand, has a more mellow, pure chocolate flavor without any sharp edges. This is exactly what you want in a cookie where chocolate is the star. The Dutch processing also creates that deep, dark brown color that makes these cookies look as decadent as they taste.
From a chemistry standpoint, Dutch process cocoa behaves differently with leavening agents. Because it is not acidic, it will not react with baking soda the way natural cocoa does. That is why this recipe uses baking powder as the primary leavening agent. Baking powder contains its own acid, so it will work properly with the alkalized cocoa.
If you try to substitute natural cocoa powder in this recipe, you will get a more bitter, less smooth chocolate flavor, and the cookies may not rise properly. Stick with Dutch process for the best results. Popular brands include Droste, Guittard, and Valrhona, but even grocery store brands like Hershey’s Special Dark work well.
The Upside Down Cookie Technique
The upside down method might seem unconventional, but it solves several baking challenges while creating something visually stunning. Traditional filled cookies often have issues with soggy bottoms or filling that leaks out during baking. By placing the crumble on the bottom, the strawberry compote in the middle, and the cookie dough on top, everything stays exactly where it should be.
The crumble base acts as a protective barrier. It is dry and buttery, which means it will not absorb moisture from the strawberry compote the way a traditional cookie bottom would. This keeps your cookies solid on the bottom rather than soggy. The compote is sandwiched safely in the middle where it can thicken and set without any risk of burning or bubbling over.
The cookie dough on top bakes to a perfect soft texture while also sealing everything together. As it bakes, it gently presses down on the layers below, creating a cohesive cookie rather than separate components that fall apart when you bite into them.
Assembly is straightforward but requires a light touch. You spread the crumble in circles first, then add spoonfuls of strawberry compote, then carefully place cookie dough circles on top. Everything ferments together overnight, then bakes in one go. The result looks impressive but comes together with techniques anyone can master.

Ingredient Breakdown and Substitutions
Sourdough Starter or Discard: You can use active, bubbly starter or discard straight from the fridge. Both work equally well in this recipe. The starter adds flavor, structure, and those beneficial fermentation properties.
Dutch Process Cocoa Powder: As discussed earlier, this is essential for the right flavor and color. Do not substitute natural cocoa powder.
Butter: Unsalted butter gives you control over the salt level. Make sure it is softened to room temperature for easy creaming with the sugars.
Brown Sugar and Powdered Sugar: The combination creates the right texture and moisture level. Brown sugar adds molasses notes that complement chocolate beautifully. Powdered sugar dissolves quickly and creates a tender crumb.
Milk: This recipe includes a small amount of milk to compensate for the cocoa powder’s tendency to absorb moisture. You can substitute with any dairy free milk if needed, though I have not tested this personally.
Strawberry Compote: Fresh or frozen strawberries work equally well. The cornstarch thickens the compote so it sets properly and will not make the cookies soggy. Do not skip this step.
White/Dark Chocolate: Use real white chocolate, not white coating chocolate or candy melts. Real white chocolate contains cocoa butter and has a smooth, creamy flavor. The coconut oil thins it slightly for the perfect drizzling consistency.
Dark chocolate is also a drizzle option. Its dark contrast against the deep red of the compote is beautiful.
You can also do a drizzle of each on the same cookie, creating a striking picture.
Freeze Dried Strawberries: These are optional but highly recommended for garnish. They add a pop of color and intense strawberry flavor.
Dairy Free Note: In theory, this recipe should work with dairy free butter and milk alternatives, though I have not tested it myself. If you try it, proceed with caution and be prepared to make adjustments if needed.

Shaping and Assembly Techniques
The way you shape and arrange these cookies makes a big difference in both appearance and structure. You have two options depending on the look you want.
Option 1: Simple Method
Simply spread the crumble into rough circles and proceed with adding the compote and cookie dough on top. This creates a more rustic look and is faster.
Option 2: Marbled Effect (Recommended)
For that gorgeous marbled appearance where pools of strawberry compote shine through when you flip the cookie over, arrange the crumble more deliberately. Create small gaps in the crumble that go all the way down to the parchment paper so you can see through to the pan. When you gently spread the strawberry compote over the top, it will settle into these gaps and create those beautiful red pools that show through on the finished cookie.
Assembly Tips:
- When placing your crumble, keep in mind the size of your cookie circles and try to make the crumble base roughly the same diameter (about 3 to 3.5 inches).
- Keep the crumble and compote more towards the center of the cookie. Leave about a quarter inch to half inch around the edge without any strawberry compote or the filling will leak out during baking.
- Once you place your cookie dough circle on top, press down gently so it sets into the compote below.
- Take your hand and push any extra crumble up and underneath the edges of your cookie dough circle to seal everything together.
This technique ensures your cookies hold together beautifully and creates those stunning visual layers that make these cookies so special.

Tips for Perfect Chocolate Covered Strawberry Cookies
Fermentation Time Matters: The 12 to 24 hour fermentation window gives you flexibility. Do not skip this step or rush it. The fermentation is what makes these cookies special.
Quick Option: You can bake these cookies in as little as 4 hours if you don’t want to wait for the full fermentation, as long as the dough is chilled and the crumble is chilled.
Make Ahead Strategy: After at least 4 hours of chilling, you can roll out your cookie dough and cut your circles in advance. Layer the cut circles with parchment paper or plastic wrap between them to prevent sticking, then store them in an airtight container in the refrigerator until you are ready to assemble. This makes the actual assembly much faster and less stressful when you are ready to bake.
Keep Your Compote Thick: When you cook the strawberry compote, make sure it thickens to a jam like consistency. It should coat the back of a spoon and hold its shape when cooled. If it is too thin, your cookies will be soggy. You also do not want to overcook it because the strawberries will break down too much and lose their texture.
Dough Thickness: Roll your cookie dough to 3/8 of an inch thick. This is the line on your ruler that sits right between the 1/4 inch mark and the 1/2 inch mark. A quarter inch is too thin and will not give you enough cookie structure, while half an inch is too thick and will not bake through evenly. 3/8 of an inch is the sweet spot for the perfect texture. Use a light dusting of flour on your work surface to prevent sticking.
Complete Cooling is Essential: Let the cookies cool completely on the baking sheet for at least one hour after baking. The strawberry compote continues to thicken and set as it cools. The cornstarch firms up considerably during this time, creating that perfect gel like consistency that will not be sticky to the touch. If you try to move them too early, they will fall apart.
Gentle Handling: Use a thin, flexible spatula to remove cookies from the parchment paper. These are delicate due to their layered structure, so take your time and support the whole cookie as you lift it.
Storage: Store in an airtight container at room temperature for up to 3 days or refrigerate for up to 5 days. The cookies actually improve slightly on day two as the flavors meld together.

No Sourdough Starter Alternative
If you do not have sourdough starter, you can still make these cookies by replacing the starter with equal parts flour and milk. This is the standard substitution used in sourdough baking and maintains the same dough consistency and hydration level.
For the Cookie Dough:
- Replace the 120g sourdough starter with 60g all-purpose flour and 60g whole milk
For the Crumble:
- Replace the 30g sourdough starter with 15g all-purpose flour and 15g whole milk
Method:
Mix the dough and crumble exactly as directed in the recipe. The baking powder already included in the recipe will provide the leavening, so no adjustments are needed there. Chill the dough for a minimum of 4 hours before assembling and baking.
What You Will Miss:
The sourdough version develops more complex flavors through fermentation and creates a slightly more tender texture. The cookies will also stay soft longer when made with sourdough starter. However, the non-sourdough version will still produce delicious cookies with the same structure and appearance.
More Upside Down Cookie Recipes
If you love these chocolate covered strawberry sourdough cookies, I have created an entire series of upside down cookie variations featuring different fruits and flavors:
Upside Down Strawberry Shortcake Cookies – Classic vanilla cookie dough with fresh strawberry compote and vanilla crumble (the original recipe that started this technique)
Blueberry Pie Upside Down Cookies – Fresh blueberry filling with buttery pie crust inspired crumble and lemon glaze
Cherry Pie Upside Down Cookies – Tart cherry compote with almond cookie dough and white chocolate drizzle
Caramel Apple Upside Down Cookies – Spiced apple filling with brown butter cookie base and salted caramel drizzle
Peach Pie Upside Down Cookies – Fresh summer peaches with cinnamon sugar crumble and cream cheese frosting
Pecan Pie Upside Down Cookies – Rich gooey pecan filling with brown butter cookie base for the ultimate indulgence
Each recipe follows the same upside down technique but showcases different seasonal fruits and flavor combinations.
Frequently Asked Questions
Can I use sourdough discard instead of active starter in these cookies?
Yes, absolutely. Both active sourdough starter and discard straight from the refrigerator work equally well in chocolate covered strawberry cookies. The fermentation will be slightly more vigorous with active starter, but the final result will be nearly identical.
Why is my strawberry compote too runny in my cookies?
The strawberry compote must cook long enough for the cornstarch to fully activate and thicken the mixture. It should coat the back of a spoon and look glossy and thick. Let it cool completely before assembling the cookies, as it will thicken further as it cools. If still too thin after cooling, cook it an additional 2 to 3 minutes.
Can I make chocolate covered strawberry cookies without fermenting the dough overnight?
Technically yes, but the fermentation is what gives these chocolate covered strawberry sourdough cookies their signature flavor and texture. If you are in a rush, reduce the fermentation time to 4 to 6 hours minimum, but 24 hours is ideal for the best flavor development.
Do I have to use Dutch process cocoa powder in chocolate cookies?
Yes, Dutch process cocoa powder is essential for the best results in these chocolate covered strawberry cookies. Natural cocoa powder will give you a more bitter, less smooth chocolate flavor and may affect how the cookies rise. Dutch process cocoa creates the deep chocolate color and mellow flavor these cookies need.
Can I freeze chocolate covered strawberry cookie dough?
Yes. Freeze the fermented cookie dough and crumble separately for up to 3 months. Thaw overnight in the refrigerator before assembling and baking. Do not freeze the assembled unbaked cookies, as the strawberry compote can make things messy when thawed.
Why do my chocolate covered strawberry cookies fall apart when I move them?
You likely tried to move them before they cooled completely. The strawberry compote needs at least one hour to set properly after baking. The cornstarch firms up during this cooling period. Be patient and use a thin, flexible spatula to support the entire cookie when you do move them.
Can I use milk chocolate or dark chocolate instead of white chocolate for the drizzle?
Absolutely. Dark chocolate creates a more dramatic look and intensifies the chocolate flavor, while milk chocolate adds extra sweetness. Use whatever chocolate you prefer for the drizzle on your chocolate covered strawberry cookies.
How should I store leftover chocolate covered strawberry cookies?
Store chocolate covered strawberry cookies in an airtight container at room temperature for up to 3 days or in the refrigerator for up to 5 days. The cookies stay soft and delicious, and many people actually prefer them on day two when the flavors have melded together.

These chocolate covered strawberry sourdough cookies bring together everything I love about baking: stunning visual presentation, complex chocolate and strawberry flavors, and a fermentation technique that transforms simple ingredients into bakery quality cookies. Whether you make these chocolate covered strawberry cookies for Valentine’s Day or any celebration, the upside down technique and sourdough fermentation create something truly special.
If you make these chocolate covered strawberry sourdough cookies, I would love to see your results! Leave a comment and star rating below to let me know what you think, or tag me on Facebook , Instagram or TikTok @h3artofthehome so I can celebrate your baking success. For more sourdough cookie recipes and fermentation techniques delivered straight to your inbox, sign up for my newsletter where I share new recipes, baking science tips, and behind the scenes content every week.
Happy baking!


Leave a Reply