Jump to the Table of Contents
If you have been following along here for a while, you know that last summer I developed one of my all-time favorite recipes: a banana bread sourdough focaccia loaded with cinnamon swirls and a vanilla drizzle. I honestly think about it all the time. It was soft, it was pillowy, it had that deep banana flavor running through every bite, and it was the kind of recipe that made me stop mid-slice and just stare at it. It landed in my personal top three, no question.
So naturally, the next thought was: what if I turned it into a pull-apart?
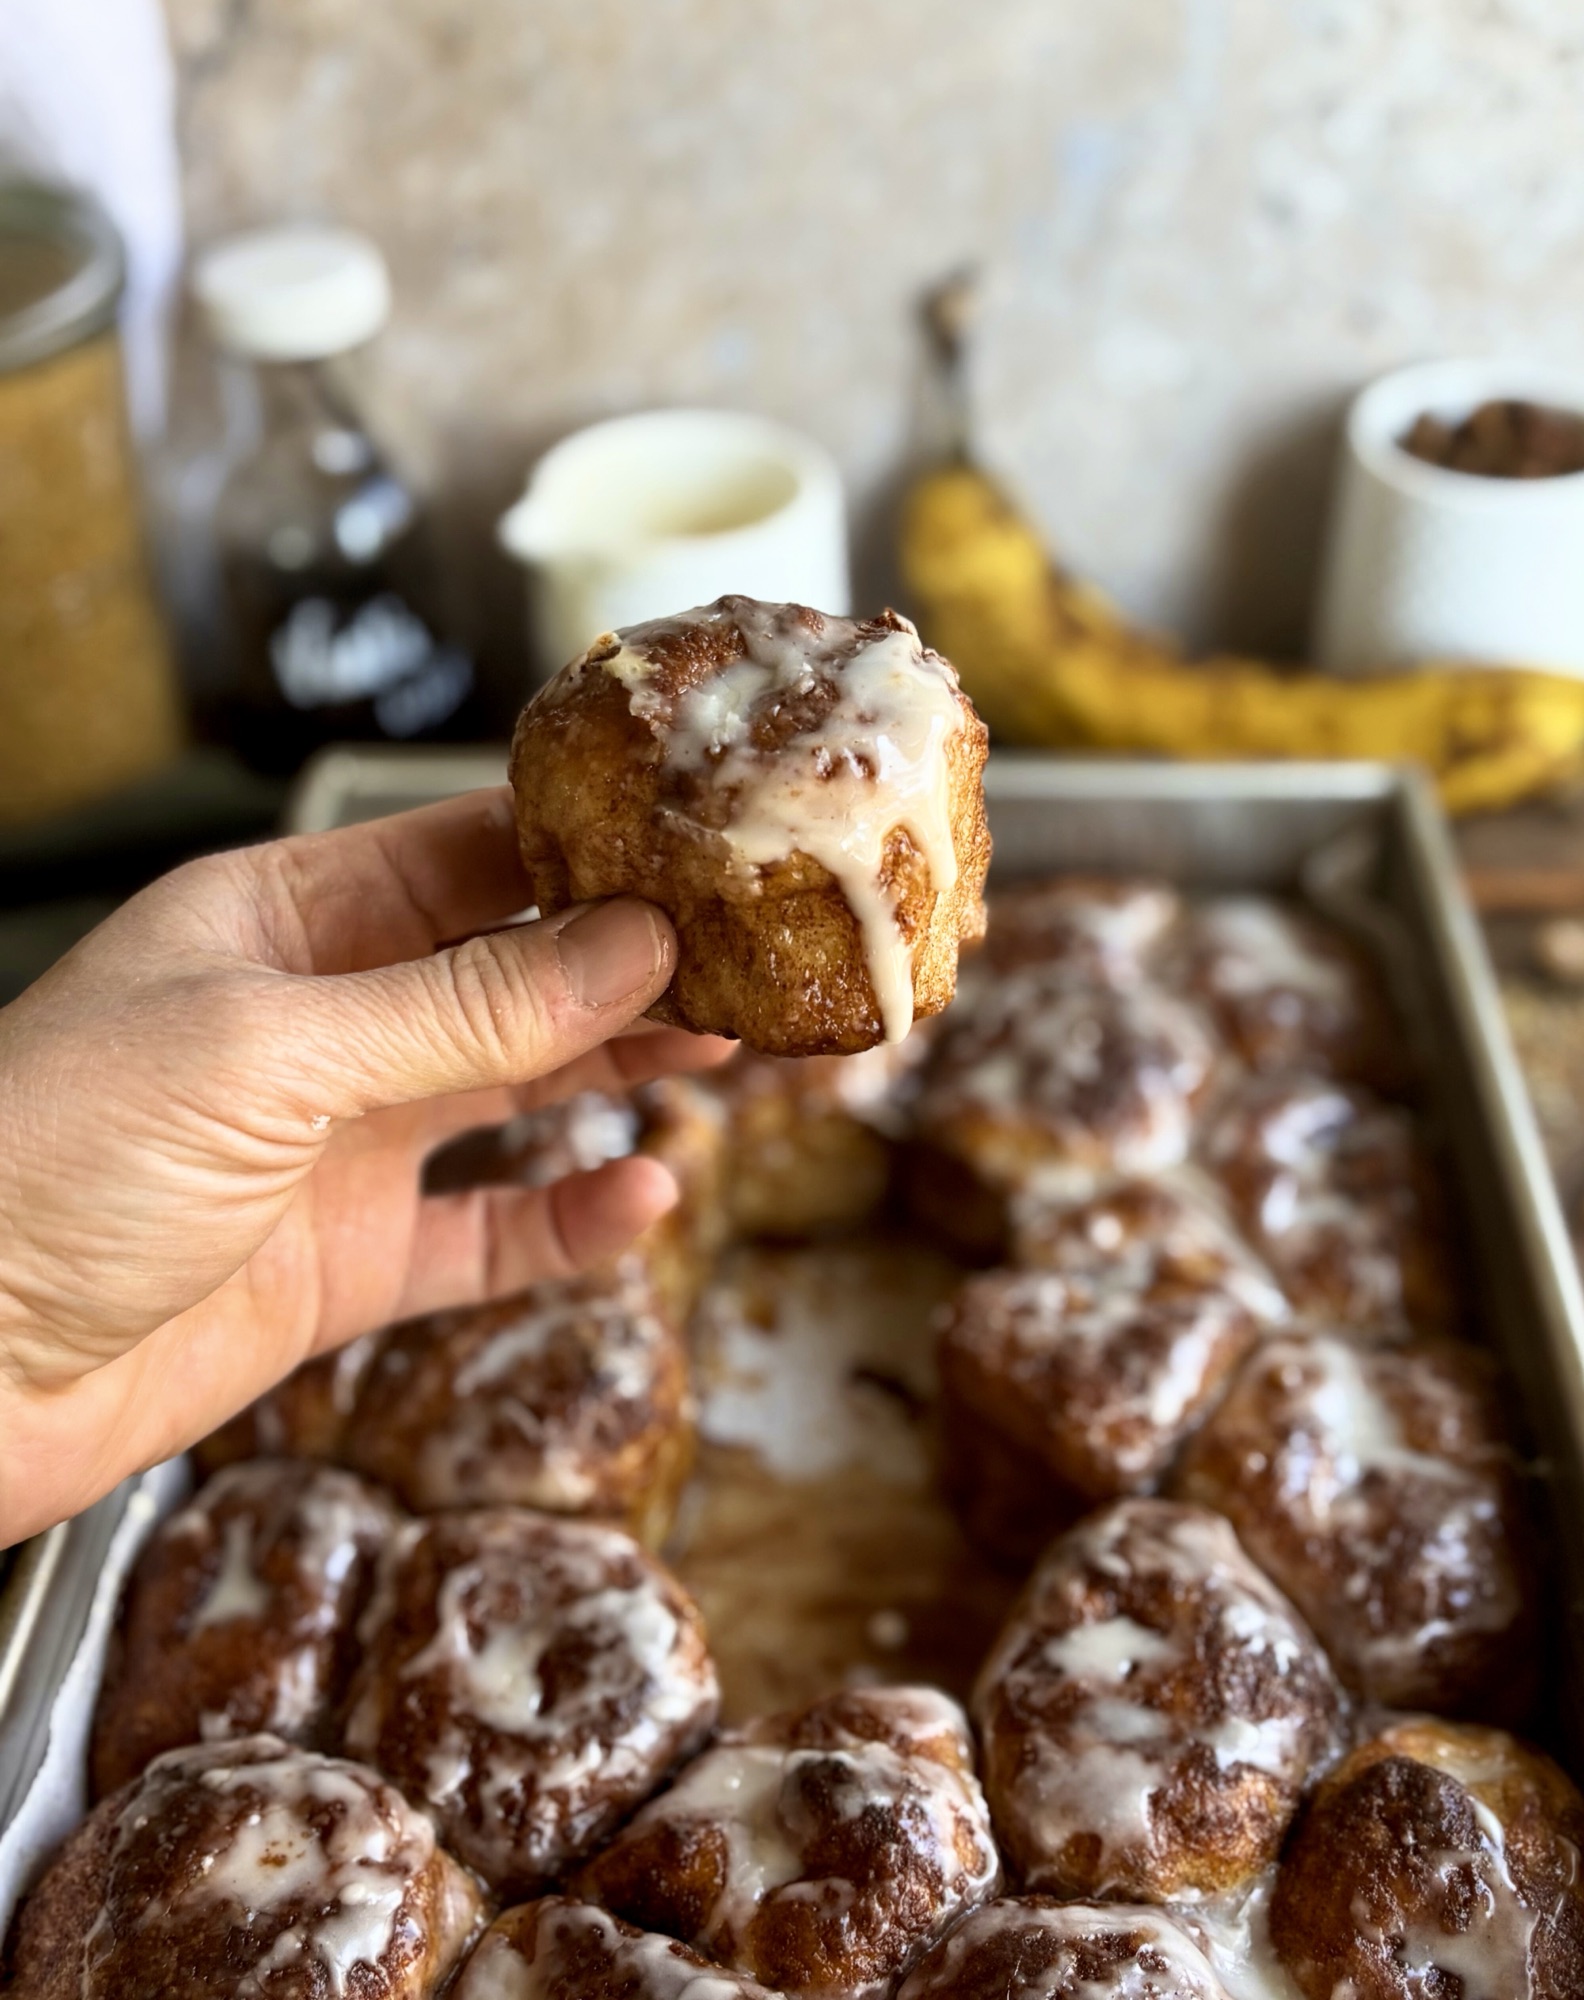
That is exactly what this recipe is. Same banana bread dough that I fell in love with last summer, now shaped into individual dough balls, dipped in vanilla butter, rolled generously in cinnamon sugar with a hint of nutmeg, arranged in a pan, proofed until poofy, dimpled, baked until deeply golden, and finished with a cream cheese icing that melts right into every crevice. The result is somewhere between banana bread, monkey bread, and a cinnamon roll, and it is absolutely heavenly. This one is in my top three. Easily.
The technique here is the same one I use for all my pull-apart focaccia recipes, and it works every single time. The dough does all the hard work overnight. By morning, all you are doing is pulling off pieces and rolling them. It is approachable, forgiving, and the payoff is extraordinary.
Table of Contents
- Why You Will Love This Recipe
- Ingredients Overview
- What If I Don’t Have Frozen Bananas?
- Tips for Success
- Glaze vs. Cream Cheese Icing: Which Should You Use?
- When and How to Serve
- Why Sourdough for This Recipe
- I Want to Use Yeast Instead of Sourdough
- Make-Ahead and Storage Instructions
- More Sweet Pull-Apart Focaccia Recipes
- FAQs
Why You Will Love This Recipe
This is not your average sweet bread. The dough is built on a sourdough base with real mashed banana folded right in, which means the banana flavor is not just a topping, it is baked into every single piece. The overnight fermentation develops the dough in a way that makes each ball incredibly tender with a slightly chewy exterior, and when those balls hit the hot pan after being rolled in cinnamon sugar, the outside caramelizes into something that is genuinely hard to describe. The icing on top just seals the deal.
A few reasons this recipe stands out:
Single-bowl, no-knead dough. One stretch and fold, then you walk away for the night. That is the hardest part.
Simple and actually fun to shape. You just pull golf ball-sized pieces off the dough, dip and roll, and place them in the pan. No rolling pins, no special tools.
Deeply flavorful at every layer. The banana in the dough, the nutmeg in the cinnamon sugar coating, the vanilla butter, the cream cheese icing: every layer is doing something.
Pulls apart beautifully. Each ball stays distinct enough to pull free but soft enough that they are all connected while baking, giving you that signature pull-apart texture.

Ingredients Overview
For the dough, you need:
Bread flour is essential here. The higher protein content builds the gluten structure that gives these balls their chew and hold, which matters when you are shaping individual pieces rather than spreading dough flat.
Frozen bananas, fully defrosted, are the key ingredient. Freezing breaks down the cell walls, intensifying the banana flavor and releasing more liquid as the bananas thaw. That extra liquid is what keeps this dough tender and gives you that soft, almost custardy interior. If you want to use fresh bananas instead, they need to be completely black and mushy, not just ripe. A firm or even standard ripe banana will not release enough moisture and you will end up with a much denser dough. The blacker and more liquidy, the better. Two large frozen bananas will typically yield around 175 to 225 grams once defrosted.
Active sourdough starter brings the rise and adds depth to the dough without overwhelming the banana flavor. Your starter should be fed and bubbly before you begin.
Brown sugar adds a gentle caramel sweetness to the dough itself, separate from the coating. A small amount keeps the dough from tasting flat without pushing it into dessert territory before it even hits the pan.
Vanilla extract in the dough works together with the banana to create that recognizable banana bread warmth.
Nutmeg stays out of the dough entirely and goes into the cinnamon sugar coating instead. This was a deliberate choice: keeping the dough clean and banana-forward, then layering the spice on the outside of each ball where it can caramelize and create a distinct flavor contrast.
For the vanilla butter dip and cinnamon sugar coating, you need:
Butter melted and stirred together with vanilla extract after cooling slightly. This is what each ball gets dipped into before rolling. It coats the dough, carries the cinnamon sugar, and creates the caramelization on the outside during baking.
Brown sugar mixed with ground cinnamon and nutmeg for rolling. The brown sugar caramelizes better than granulated and contributes a deeper molasses note that pairs well with banana.
For the icing, you have two options (full details below in the icing section).

What If I Don’t Have Frozen Bananas?
Frozen bananas are the gold standard for this recipe. The freezing process breaks down the cell walls and forces the banana to release significantly more liquid as it thaws, which is what gives this dough its soft, almost custardy interior. If you bake regularly and tend to toss overripe bananas in the freezer, you are already set.
But if you do not have any frozen bananas on hand, the oven method is the closest shortcut available and it works much better than simply using a raw banana.
Place your unpeeled bananas on a parchment-lined baking sheet and bake at 300 degrees F for 20 to 40 minutes, until the skins are completely black and the bananas feel soft to the touch. The heat forces moisture to release and softens the flesh in a similar way to freezing, giving you a much more liquidy, mashable banana than you would get from one that is simply ripe. Let them cool completely before adding them to your dough, especially if you are using sourdough starter, since hot liquid can affect starter activity.
Start with yellow bananas rather than green ones. Green bananas have not developed enough sugar or flavor yet, and the oven method will not fix that. Yellow bananas with some spotting are ideal.
Whatever you do, do not use a firm or only slightly ripe banana. It will not release enough liquid, and the dough will be noticeably denser and less tender as a result. The blacker and more liquidy the banana, the better your dough will be.

Tips for Success
Timing overview. Mix the dough the evening before and it is ready to shape the next morning. After shaping and the second proof of 2 to 3 hours, you are looking at mid-morning from a previous-night start, or early afternoon if you mix in the morning and bake the same day using the yeast version.
Hit your total liquid target, not a specific banana weight. Weigh your defrosted bananas, then add enough water to bring the combined weight to 375 grams. This eliminates guesswork and ensures consistent hydration every time.
Do not skip the overnight fermentation. The long, slow rise is what develops flavor in this dough. The banana notes deepen overnight in a way that a same-day rise simply cannot replicate.
Your starter matters. Use it at peak activity, when it has doubled and is still domed. A sluggish starter will result in a slower, less active bulk fermentation and can affect the final texture.
Keep your hands oiled when shaping. This dough is on the stickier side by design. Oil your hands and work surface rather than adding flour, which would tighten the dough and affect the tender texture you are going for.
Do not rush the second proof. The balls need time to puff up and start touching each other in the pan. If they go into the oven underproofed, they will be dense. You want them to look poofy and feel jiggly.
If your balls spread flat instead of puffing up, the most likely cause is overproofing. The dough went too long on the second proof and lost its structure. Watch for the visual cues rather than the clock: poofy, touching, and jiggly is the target. If your kitchen is warm, check earlier than the 2-hour mark.

Glaze vs. Cream Cheese Icing: Which Should You Use?
Both options are included in the recipe card. Here is how to choose:
Classic vanilla glaze is thinner and pourable. It drizzles into the crevices between the balls, coats everything lightly, and sets up with a slight shine. It is the quicker option and works beautifully if you want something sweet but not heavy. This is the version used in the video.
Cream cheese icing is thicker, richer, and slightly less sweet due to the cream cheese. It spreads over the warm balls and melts slightly into the tops, creating a luscious, creamy finish. If you love that classic cinnamon roll frosting experience, this is your version.
Both should be applied while the focaccia is still warm but not straight out of the oven. Ten to fifteen minutes of cooling gives the bread time to settle while still being warm enough to help the icing spread naturally.

When and How to Serve
This focaccia is a morning recipe through and through. Start it the night before and it is ready to pull apart by mid-morning, which makes it ideal for weekend breakfasts, holiday brunches, or any time you want to put something genuinely special on the table without being up before dawn.
It pairs beautifully with a strong cup of coffee or a latte, where the bitterness cuts through the sweetness of the icing in exactly the right way. For a brunch spread, set it out alongside fresh fruit and let people pull pieces straight from the pan while it is still warm.
It also works as a dessert. Served slightly warm with a scoop of vanilla ice cream alongside, it is a completely different experience than it is at breakfast, and a surprisingly easy one to pull off for a dinner party.
Leftovers reheat well. Individual pieces in the microwave for 15 to 20 seconds bring them back to soft and warm. The icing will melt slightly as it heats, which is honestly even better than fresh.

Why Sourdough for This Recipe
The long overnight fermentation does something to this dough that a same-day rise simply cannot replicate. As the dough ferments slowly at room temperature, the natural wild yeast in the starter breaks down the starches in the flour gradually, developing a depth of flavor that makes the finished bread taste like it took real effort, even though most of that time you were asleep.
For a banana bread dough specifically, the fermentation also deepens the banana flavor rather than competing with it. There are no commercial yeast notes, no sharp edges, just a clean, mellow sweetness that lets the banana and vanilla come through clearly.
There is also a practical benefit. Long fermentation makes the dough more extensible and easier to handle by morning. The gluten has had time to relax and develop, which means the dough stretches and shapes smoothly even at high hydration.
If you do not have a sourdough starter, the yeast version below will still produce a delicious result. But if you bake with sourdough regularly, this is exactly the kind of recipe your starter was made for.

I Want to Use Yeast Instead of Sourdough
No sourdough starter? You can still make this recipe, and it is just as delicious. The yeasted version uses the exact same dough, the same vanilla butter dip, the same cinnamon sugar coating, and the same icing. The only difference is the leavening and the timeline. Instead of an overnight bulk fermentation, you are looking at 2 to 3 hours from mixing to shaping. This is a great same-day option if you want it on the table for brunch or an afternoon treat.
What You Need
Dough
500g bread flour
375g total liquid (defrosted frozen bananas plus water to reach 375g)
37g all-purpose flour (replaces part of the starter)
37g warm water, (follow the instructions on your yeast for temperature) (replaces part of the starter)
7g instant yeast OR 9g active dry yeast
15g brown sugar
10g vanilla extract
10g salt
Vanilla Butter Dip
85g unsalted butter, melted
5g vanilla extract
Cinnamon Sugar Coating
150g brown sugar, packed (3/4 cup)
12g ground cinnamon (1 and 1/2 tablespoons)
1 to 2g ground nutmeg (1/4 to 1/2 teaspoon)
Vanilla Glaze
180g powdered sugar (1 and 1/2 cups)
45g whole milk or heavy cream (3 tablespoons)
5g vanilla extract
Pinch of salt
Cream Cheese Icing
113g full-fat cream cheese, softened
120g powdered sugar, sifted (1 cup)
45 to 60g heavy cream (3 to 4 tablespoons)
5g vanilla extract
Pinch of salt
Step-by-Step Instructions
Step 1: Prepare the Bananas
Weigh your defrosted frozen bananas directly in your mixing bowl. Add enough room temperature water to bring the combined weight to 375 grams. Mash thoroughly until no large chunks remain. The mixture will be very loose and liquidy, and that is exactly what you want.
If you are using the oven method instead of frozen bananas, see that section in the table of contents.
Step 2: Activate the Yeast
If using instant yeast: Skip this step. Instant yeast goes directly into the dough with everything else.
If using active dry yeast: Combine the 37g warm water (100 to 110 degrees F) with the 9g active dry yeast and a pinch of brown sugar. Stir gently and let sit for 5 to 10 minutes. The mixture should become foamy and smell yeasty. If nothing happens after 10 minutes, your yeast may be expired. Start with a fresh packet before continuing.
Step 3: Mix the Dough
Add the 37g all-purpose flour, brown sugar, vanilla extract, and salt to the banana mixture in the bowl.
If using instant yeast: Add the 7g instant yeast directly now as well.
If using active dry yeast: Pour in your activated yeast mixture now.
Mix everything together until a shaggy dough forms and no dry flour remains. The dough will feel wet and slightly sticky. That is normal for this hydration level. Cover the bowl with plastic wrap or a lid and let it rest for 30 minutes.
Step 4: Stretch and Fold
After the 30-minute rest, perform one set of stretch and folds. Wet your hand slightly to prevent sticking. Grab one side of the dough, stretch it up as far as it will go without tearing, and fold it over the center. Rotate the bowl 90 degrees and repeat. Do this four times, working around the bowl. The dough should feel noticeably smoother and more cohesive than before.
Cover the bowl again and let it bulk ferment at room temperature for 2 to 3 hours. The dough is ready when it has roughly doubled in size, looks puffy, and feels airy when you gently press it. Do not rely only on the clock: look for the visual cues.
Step 5: Prepare Your Pan and Coatings
While the dough finishes its bulk fermentation, line a 9×13 inch pan with parchment paper. No butter needed in the pan.
Melt the butter for the vanilla dip. Let it cool for a few minutes, then stir in the vanilla extract. Pour into a shallow bowl wide enough to dip the dough balls.
In a separate shallow bowl, whisk together the brown sugar, cinnamon, and nutmeg until evenly combined.
Step 6: Shape the Dough Balls
Lightly oil a clean work surface. Turn the dough out onto the surface. Working quickly, pull golf ball-sized pieces of dough directly off the mass. You do not need to be precise here: rustic and slightly irregular is perfectly fine.
One at a time, dip each piece into the vanilla butter, turning to coat all sides. Let any excess drip back into the bowl, then drop the piece into the cinnamon sugar mixture and roll to coat generously on all sides.
Place each coated ball into the prepared pan. Arrange them in rows with a little space between each piece. They will expand and press together during the second proof.
Step 7: Second Proof
Cover the pan loosely with plastic wrap or a lid. Let the dough balls proof at room temperature for 45 minutes to 1 hour. Because the yeasted version has already done its bulk fermentation, this second proof is shorter than the sourdough version. The balls are ready when they look poofy and the pan jiggles when you shake it gently.
During the last 30 minutes of proofing, preheat your oven to 425 degrees F with a rack in the center position.
Step 8: Dimple and Bake
Just before baking, press one dimple into each ball using your fingertip. Press down firmly enough to make an indent but not so hard that you push all the way through the dough.
If you are adding walnuts or pecans, sprinkle them over the top now after dimpling. They will caramelize on top during baking, and you can drizzle icing over them once the focaccia is out of the oven.
Bake for 25 to 30 minutes until deeply golden on top. At the 22-minute mark, gently lift one edge of the parchment to check the bottom. You want it golden but not dark. If it is coloring too quickly, slide a second baking sheet underneath the pan for the remainder of the bake.
The focaccia is done when the internal temperature reads 200 degrees F on an instant-read thermometer and the top is a deep caramel color.
Step 9: Make the Icing
Let the focaccia cool in the pan for 10 to 15 minutes before adding icing. Adding icing to a very hot pan will cause it to run off completely rather than settling into the crevices.
For the vanilla glaze: Whisk together powdered sugar, milk or cream, vanilla extract, and a pinch of salt until smooth. Add the liquid gradually and stop when you reach a drizzleable consistency. Drizzle generously over the warm focaccia.
For the cream cheese icing: Beat the softened cream cheese until smooth. Add powdered sugar, vanilla, and a pinch of salt, then stream in the heavy cream one tablespoon at a time until you reach a thick but pourable consistency. Drizzle or spread over the warm focaccia.
Pull apart and serve immediately.
Timing Overview for the Yeasted Version
Mix dough and rest: 30 minutes
Bulk fermentation: 2 to 3 hours
Shape and coat: 20 to 30 minutes
Second proof: 45 minutes to 1 hour
Bake: 25 to 30 minutes
Cool before icing: 10 to 15 minutes
Total time: approximately 4 to 5 hours, start to finish
Tips Specific to the Yeasted Version
Do not rush the bulk fermentation. Even at 2 to 3 hours, the dough needs to actually double before you move on to shaping. A warm kitchen will speed things up. A cooler kitchen may push you toward the 3-hour mark. Trust the dough, not the clock.
The second proof is shorter than the sourdough version, but do not skip it. Those 45 minutes to 1 hour give the shaped balls time to relax and puff up into each other, which is what creates the pull-apart texture.
If your kitchen is cold, you can proof the dough in the oven with just the oven light on for a warmer environment.

Banana Bread Pull-Apart Focaccia
Equipment
- Large mixing bowl
- kitchen scale
- 9×13 inch aluminum baking pan
- Parchment paper
- Small bowl for vanilla butter
- Shallow bowl for cinnamon sugar coating
- Plastic wrap or damp towel
- Wire cooling rack
Ingredients
For the Dough
- 500 grams bread flour 4 cups
- 2 large frozen bananas fully defrosted to room temperature
- (water as needed to reach 375 grams total liquid) (banana weight plus water combined)
- 75 grams active sourdough starter fed and bubbly 1/3 cup
- 15 grams brown sugar 1 tablespoon
- 10 grams vanilla extract 2 teaspoons
- 10 grams salt 2 teaspoons
For the Vanilla Butter Dip
- 85 grams butter melted 6 tablespoons
- 5 grams vanilla extract 1 teaspoon
For the Cinnamon Sugar Coating
- 150 grams brown sugar packed 3/4 cup
- 12 grams ground cinnamon 1 and 1/2 tablespoons
- 1 to 2 grams ground nutmeg 1/4 to 1/2 teaspoon
Optional
- 100 grams walnuts or pecans coarsely crushed 3/4 cup
For the Classic Vanilla Glaze
- 180 grams powdered sugar 1 and 1/2 cups
- 45 grams whole milk or heavy cream 3 tablespoons
- 5 grams vanilla extract 1 teaspoon
- pinch of salt
For the Cream Cheese Icing
- 113 grams full-fat cream cheese softened 1/2 cup
- 120 grams powdered sugar sifted 1 cup
- 45 to 60 grams heavy cream 3 to 4 tablespoons
- 5 grams vanilla extract 1 teaspoon
- pinch of salt
Instructions
Day 1 Evening: Mix the Dough
- Weigh your defrosted bananas directly in your large mixing bowl, then add enough room temperature water to bring the total liquid weight to 375 grams. The exact amount of water will depend on how much your bananas weigh.
- Add the sourdough starter, brown sugar, and vanilla extract to the bowl and mix until combined.
- Add the bread flour and salt. Mix with a wooden spoon or your hands until no dry flour remains. The dough will be sticky and shaggy. This is normal.
- Cover the bowl tightly with plastic wrap or a lid and let the dough rest at room temperature for 1 hour.
- After 1 hour, perform one set of stretch and folds to build strength in the dough. With wet hands, grab one side of the dough, stretch it up, and fold it over to the opposite side. Rotate the bowl 90 degrees and repeat until you have worked all the way around the dough.
- Cover the bowl again and let the dough bulk ferment at room temperature for 8 to 12 hours overnight, until it has at least doubled in size and looks bubbly and puffy.
Day 2 Morning: Shape, Proof, and Bake
- Line your 9×13 inch pan with parchment paper and set aside.
- Melt the 85 grams of butter for the vanilla butter dip and let it cool slightly before stirring in the 5 grams of vanilla extract. Pour into a small bowl and set aside.
- Mix the brown sugar, cinnamon, and nutmeg together in a shallow bowl for the coating.
- Lightly oil your work surface and turn the dough out. The dough should look bubbly and feel soft and airy.
- Working with oiled or wet hands, pull off a golf ball-sized piece of dough. Dip it into the vanilla butter, let the excess drip off, then roll it generously in the cinnamon sugar mixture until fully coated.
- Place the coated ball in the prepared pan. Repeat with the remaining dough, leaving a small gap between each ball. They will expand and connect during the second proof.
- Cover the pan and let the dough balls proof at room temperature for 2 to 3 hours, until poofy, almost doubled, and jiggling when you shake the pan gently.
- During the last 30 minutes of proofing, preheat your oven to 425 degrees F (220 degrees C).
- Press one dimple into the top of each ball with your finger just before baking.
- If adding nuts, sprinkle the crushed walnuts or pecans evenly over the top of the pan now. They will caramelize from the oven heat and sit beautifully on top of each ball.
- Bake for 25 to 30 minutes until deeply golden and the internal temperature reaches 200 degrees F (93 degrees C).
- Let the focaccia cool in the pan for 10 to 15 minutes before adding icing.
Make the Vanilla Glaze
- Whisk together the powdered sugar, milk or cream, vanilla extract, and salt until smooth. Add more milk a little at a time if needed to reach a drizzleable consistency.
- Drizzle generously over the warm focaccia and serve immediately.
OR Make the Cream Cheese Icing
- Beat the softened cream cheese until smooth, then add the powdered sugar, vanilla extract, and salt.
- Add heavy cream a tablespoon at a time and mix until the icing is smooth and pourable but still thick enough to coat the tops of the balls.
- Drizzle or spread over the warm focaccia and serve immediately.
Notes
Make-Ahead and Storage Instructions
Make ahead: After the bulk fermentation, shape the balls, dip and coat them, and arrange them in the prepared pan. Cover tightly and refrigerate overnight, up to 12 hours. The next morning, pull the pan out and let it come to room temperature for 1 to 3 hours before baking. Again, watching the dough and not the clock.
Same-day storage: Store any leftovers covered at room temperature for up to 2 days. Reheat individual pieces in the microwave for 15 to 20 seconds, or warm the whole pan in a 300 degree F oven until heated through.
Freezing: Bake first, then freeze without icing. Let the focaccia cool completely, wrap tightly, and freeze for up to 2 months. Defrost at room temperature, warm in the oven, and add fresh icing before serving.

More Sweet Pull-Apart Focaccia Recipes
If this recipe has you hooked on sweet pull-apart focaccia, here are more from the series to try next:
Cinnamon Roll Pull-Apart Sourdough Focaccia – The one that started the sweet pull-apart obsession. Vanilla butter, brown sugar cinnamon coating, and your choice of vanilla glaze or buttercream cheese frosting.
Caramel Apple Pull-Apart Focaccia – Warm spiced apple filling and a caramel drizzle that has become one of the most-made recipes on this site.
Lemon Blueberry Pull-Apart Sourdough Focaccia – Bright, fruity, and perfect for spring and summer baking.
Gingerbread Pull-Apart Focaccia – A holiday version packed with warm spices and a thick vanilla drizzle.
Original Banana Bread Sourdough Focaccia with Cinnamon Swirls – The recipe that inspired this one. If you want to see where it all started, this is it.
FAQs
Can I use fresh bananas instead of frozen?
You can, but they need to be completely black and mushy, not just ripe or spotty. A standard ripe banana will not release enough liquid and you will end up with a much denser dough. The blackened, almost liquidy banana you would normally hesitate to use is exactly what you want here. Frozen and defrosted bananas are strongly preferred because the freezing process guarantees that liquid release every time.
Can I add chocolate chips?
You can! I would recommend about 100g (2/3 cup) of mini chocolate chips. Mini chips distribute more evenly throughout the dough. Add them at the very end of the initial mix when your dough has come together.
My bananas weigh more or less than 200 grams. Does that matter?
Not at all. The recipe is written around a total liquid target of 375 grams, not a specific banana weight. Weigh your defrosted bananas, then add enough water to bring the total to 375 grams. This approach handles the natural variation in banana size every time.
Can I microwave the bananas to defrost them?
Yes, just make sure they cool down before adding your sourdough starter. If the liquid is too hot it can affect your starter’s activity. Room temperature or slightly warm is ideal.
Why is the nutmeg in the coating instead of the dough?
This was a deliberate recipe decision. Keeping the dough clean and banana forward lets the nutmeg shine in the coating, where it hits the outside of each ball, caramelizes during baking, and creates a spiced crust that contrasts with the soft banana interior. It makes every bite more interesting.
My dough is sticky. Is that normal?
Yes. This is a high-hydration dough with additional moisture from the bananas, and that stickiness is exactly what creates the soft, pillowy texture after baking. Use oiled hands and an oiled work surface when shaping. Do not add extra flour.
How do I know when the second proof is done?
The balls should look noticeably puffed, have grown together so they are touching or nearly touching, and jiggle when you shake the pan gently. If you press one lightly with a floured finger, it should spring back slowly. Do not rush this step.
Can I make this the night before and bake in the morning?
Yes. After shaping and coating the dough balls, arrange them in the pan, cover tightly, and refrigerate overnight for up to 12 hours. Pull the pan out in the morning and let it come to room temperature for 1 to 3 hours before baking. Again, watch the dough and not the clock.
Salted or unsalted butter?
Either works. Salted butter adds a nice contrast to the sweetness of the cinnamon sugar coating. If you use unsalted, add a small pinch of salt to the vanilla butter dip and you will get the same balance.
Can I add nuts like in classic banana nut bread?
Yes, and walnuts or pecans are both traditional choices that work well here. The best approach is to crush them up and sprinkle them over the top of the pan right after dimpling, just before it goes into the oven. This keeps them sitting on top of the dough where they will caramelize from the heat rather than getting pushed down into the focaccia. Once the focaccia comes out of the oven and cools slightly, drizzle the icing over the top as usual and it will run right over the nuts. A good starting point is about 100 grams of crushed walnuts or pecans for the full batch, which is roughly 3/4 cup. Walnuts have a slightly more classic banana bread flavor, while pecans are a bit sweeter and more buttery. Both work beautifully.

If you make this banana bread pull-apart focaccia, I would love to hear how it goes! Leave a comment below and let me know how yours turned out. Tag me on Instagram or Facebook so I can see your bake, and if you want recipes like this delivered directly to your inbox, sign up for the newsletter below.


Leave a Reply