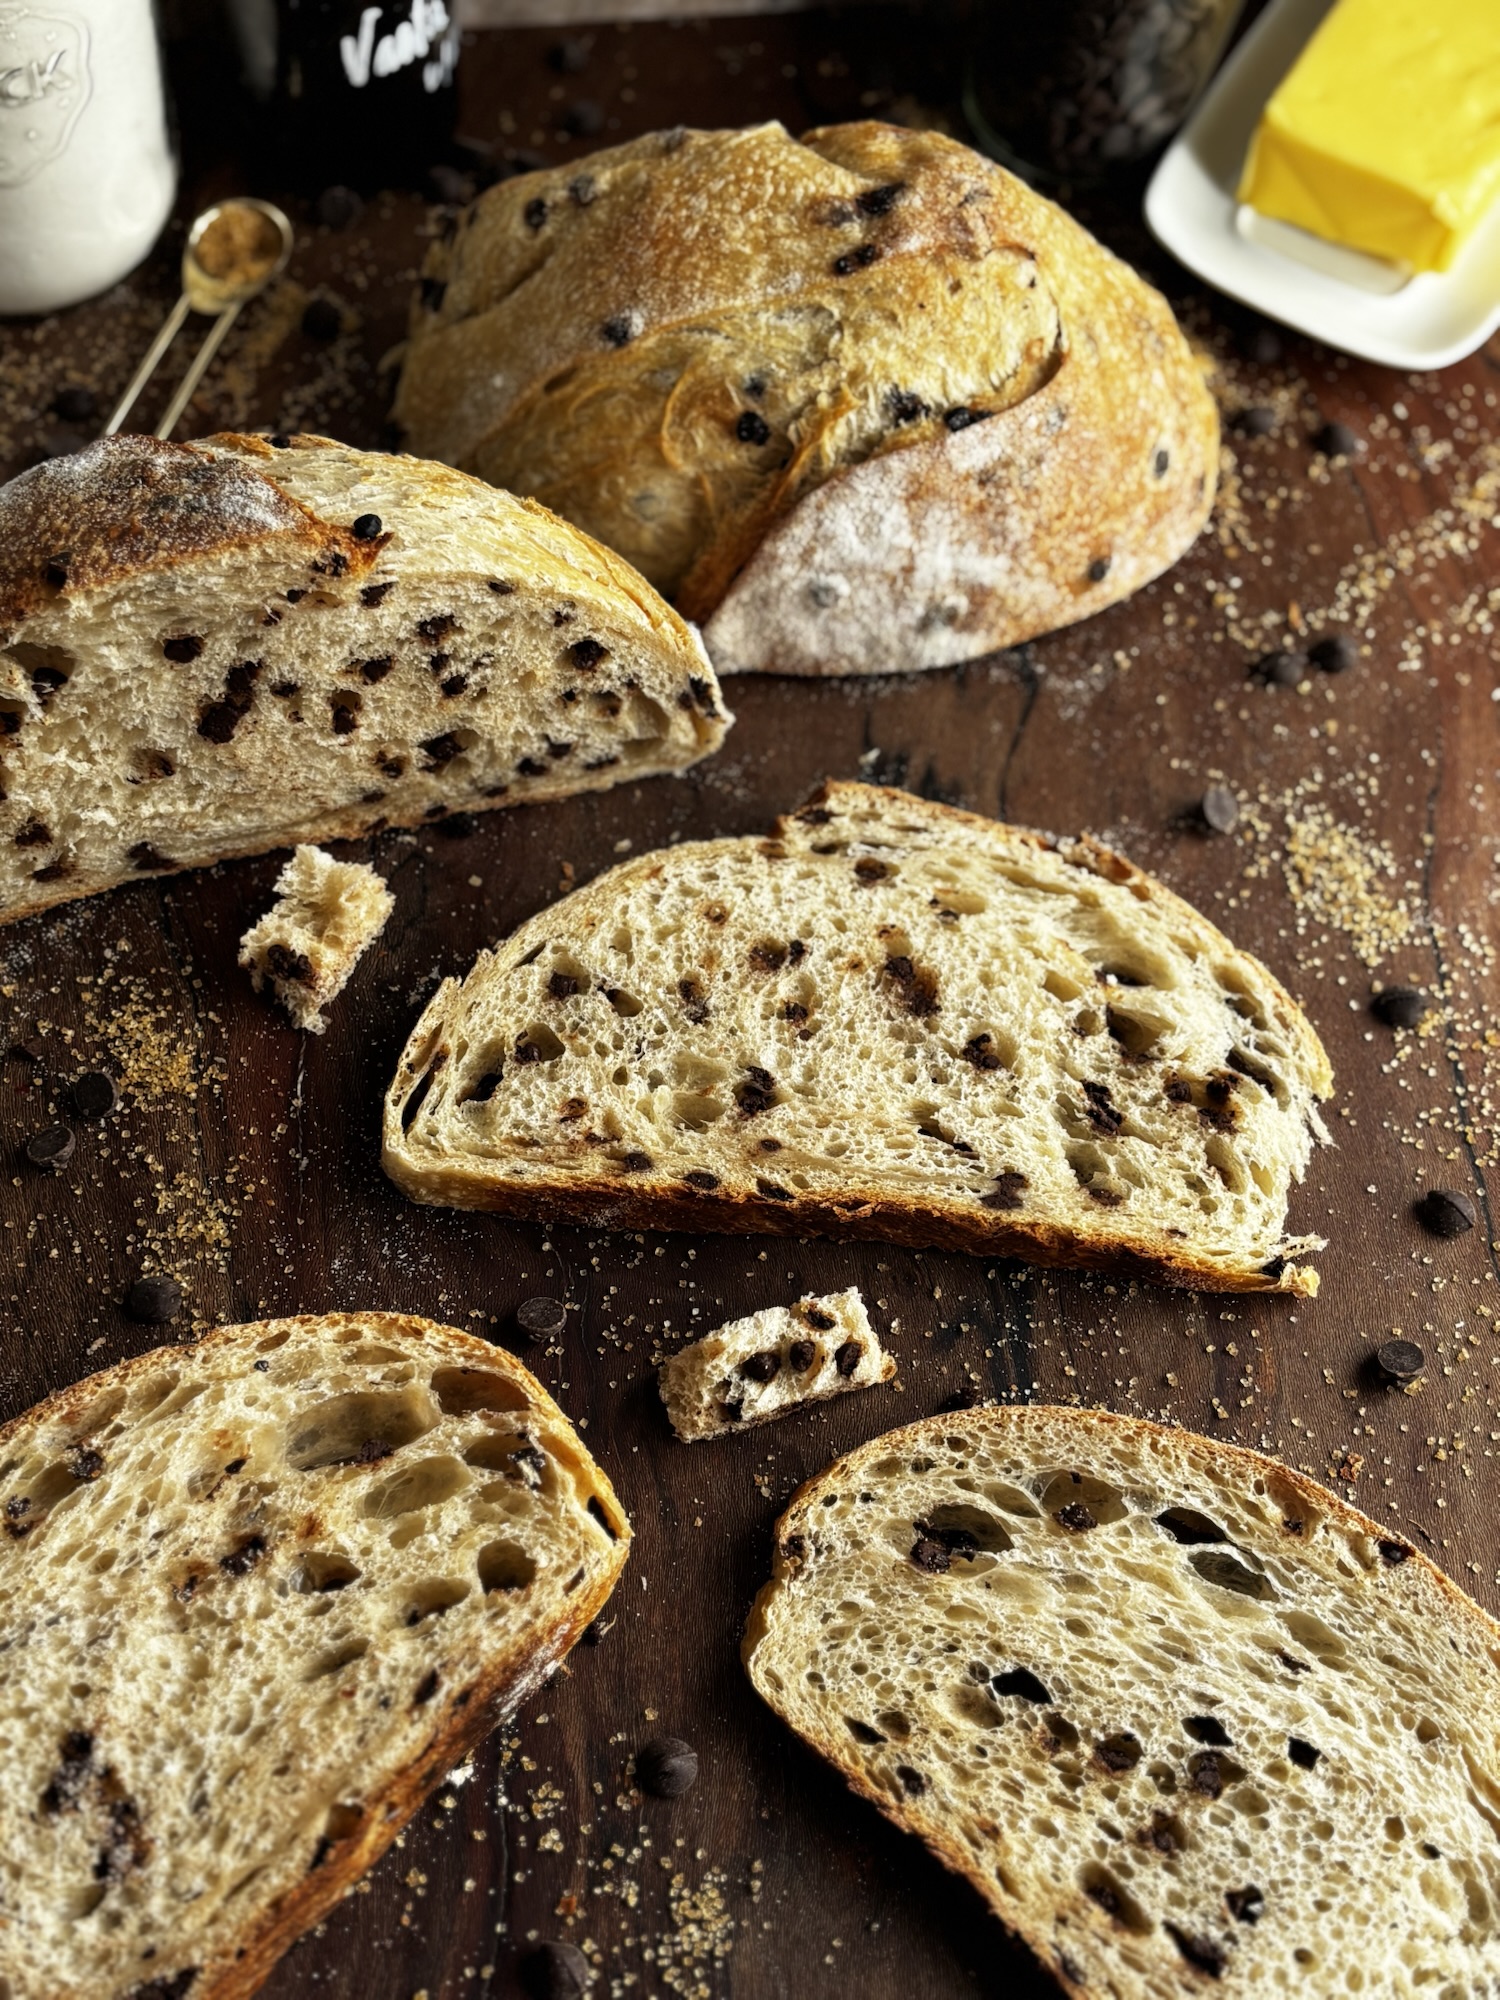
You’ve seen chocolate chip cookie dough folded into a sourdough loaf. This is the loaf that became the cookie.
Not sweet, not a quick bread, not a gimmick. Brown butter for that deep nutty depth, vanilla worked into the dough, mini chocolate chips folded in after the first set of folds. The flavor profile of cookie dough, built into a properly fermented artisan loaf. The kind of loaf that makes people ask what bakery you went to.
The method here is one you may have seen used in scone and biscuit recipes, where semi-warm browned butter gets poured into cold liquid and immediately seizes into small, irregular clumps. Bakers have used this technique for years as a shortcut to cutting in cold butter by hand, because those solid butter pieces create the same steam pockets and flaky texture during baking as grated frozen butter would. The same principle applies in a sourdough loaf. The browned butter gets poured into cold water at around 76-78°F, which causes it to solidify into little globules on contact. Those butter pieces become an inclusion in the dough, just like chocolate chips or cheese. As the loaf bakes, they melt into the crumb slowly and evenly, creating ribbons of nutty flavor throughout without pooling or leaking.
You can bake this as a classic artisan boule or in a loaf pan. Both methods are covered below. The crumb and crust are different from each version, and both are worth making depending on what you need.
In This Post
- Why Brown Butter in Sourdough Bread
- The Cold Water Method Explained
- Choosing Your Chocolate
- Two Ways to Bake It: Boule vs. Loaf Pan
- Why Long Fermentation Makes This Better
- Tips for Success
- Frequently Asked Questions
Why Brown Butter in Sourdough Bread
Standard butter is roughly 80% fat, 15 to 18% water, and a small amount of milk solids. When you brown butter, the water cooks off and the milk solids undergo the Maillard reaction, the same chemical process responsible for the color and flavor of a toasted crust or a golden croissant. The result is a fat that is more concentrated, more aromatic, and significantly more complex in flavor than the butter you started with.
For this recipe, you want a deeply browned butter. Not just starting to turn golden, but fully developed: dark amber, fragrant with a hazelnut and toffee quality, with dark brown milk solid flecks visible at the bottom of the pan. Pull it right before it crosses into burnt. That depth of color is where the flavor lives, and it needs to be strong enough to come through after a long cold ferment and a high-temperature bake.
Because the butter loses water during browning, starting with 75g of whole butter yields approximately 60 to 65g of actual browned butter after cooking. That reduction is accounted for in the recipe as written.

The Cold Water Method Explained
The technique in this recipe is simple in practice and rooted in basic fat science. When liquid fat contacts cold water, the fat solidifies almost instantly. If you stir as you pour, the butter forms irregular little solid clumps rather than a flat layer, and those pieces become your inclusion.
The butter should be around 76-78°F when it hits the water, which means it is still pourable and liquid but has cooled enough that it is no longer aggressively hot. Use a thermometer. The cold water used for this step doubles as your dough water, so chill it fully before you brown your butter and give it time to incorporate any vanilla you are adding before the butter goes in.
All ingredients: flour, starter, salt, vanilla and the butter-water mixture, go in together in this recipe. There is no autolyse and no delayed salt addition. The solid butter pieces behave more like inclusions than free fat, which means they do not coat the gluten proteins the way melted or softened butter would. You get full gluten development alongside the butter rather than having fat interfere with it from the start.
The chocolate chips go in after the first set of folds, when the dough has some structure to hold them without tearing.

New to sourdough? Start with the basic sourdough loaf first to get comfortable with the dough before adding inclusions.
Choosing Your Chocolate
Mini chocolate chips are the right call here for two reasons. First, they distribute evenly throughout the dough during folds without creating structural weak points the way larger chips can. Second, every slice gets chocolate rather than a few big pockets.
For flavor, dark chocolate chips (60 to 72% cacao) are the better pairing for this recipe. The bitterness balances the nuttiness of the brown butter and keeps the loaf from reading as a dessert bread. The vanilla in the dough handles the aromatic bridge between the two.
Semi-sweet chips also work well if you prefer a slightly sweeter result, or if you are baking for a broader audience. They will complement the brown butter without competing with it. Milk chocolate is not recommended here since the added sugar will push the flavor profile in a direction this recipe is specifically trying to avoid.
Either way, 75g of mini chips gives you consistent coverage throughout the crumb without the bread tipping into sweet territory.

Two Ways to Bake It: Boule vs. Loaf Pan
The dough is exactly the same for both. The shape you choose comes down to what you have, what you want the end result to look like, and how you plan to serve it.
The boule is the showstopper. The open ear, the dramatic oven spring, and the way the crust shatters when you cut into it make this version the right choice for gifting and for serving on a board. Bake it in a preheated Dutch oven at 450°F, covered for 45 minutes, then remove the lid and bake for an additional 10-15 minutes until deeply golden and the internal temperature reads 205 to 210°F.

The loaf pan version is the everyday option, and the crumb on it is genuinely beautiful: uniform, evenly dotted with chocolate, and easy to slice cleanly. The method used here creates excellent oven spring without a Dutch oven: preheat your oven to 450°F with a second pan inverted on top of the loaf pan as a makeshift lid. Bake covered for 9 minutes, then score the loaf, replace the top pan, and bake for an additional 20 minutes. Remove the top pan and finish baking for 15 minutes or until the crust is the color you want and the internal temperature hits 205°F.
The loaf pan version is more accessible for bakers who do not own a Dutch oven, and the even slices make it ideal for toast, which is possibly the best way to eat this bread. Toasted and served with salted butter, the brown butter notes in the crumb come through more clearly once the bread is warm.

Why Long Fermentation Makes This Better
I used a room temperature bulk fermentation at around 68°F, which was the sweet spot for this particular loaf. Keeping the dough cool does more than just slow things down. At those temperatures, the sourdough starter works slowly and steadily, breaking down complex starches and producing organic acids that develop flavor the way no shortcut can replicate. The brown butter and vanilla notes in the dough become more integrated over a longer ferment, giving the fat time to permeate the dough more fully rather than sitting in isolated pockets.
Temperature control is especially important here because of the butter inclusion. Try to stay below 74°F during bulk fermentation. Above that temperature, the butter pieces begin melting into the dough prematurely rather than staying as discrete inclusions, which changes the texture and can change the final crumb structure. Cooler and slower is always better for this recipe.
Long fermentation also breaks down some of the gluten and phytic acid in the flour, which makes the bread more digestible for people who are sensitive to conventional wheat products. It is one of the practical, science backed reasons that properly fermented sourdough behaves differently in the body than commercially yeasted bread.


Brown Butter Chocolate Chip Sourdough Bread
Equipment
- kitchen scale
- Small saucepan
- Instant read thermometer
- Large mixing bowl
- bench scraper
- Banneton or flour-dusted towel-lined bowl
- Dutch oven
- Parchment paper
- Bread lame or sharp knife
Ingredients
- 500 grams bread flour 4 cups
- 350 grams water refrigerated until ice cold (1 1/2 cups)
- 75 grams active sourdough starter 1/3 cup
- 10 grams salt 2 teaspoons
- 75 grams unsalted butter 1/3 cup
- 75 grams mini chocolate chips 1/2 cup
- 8 grams vanilla extract 2 teaspoons
- rice flour for dusting banneton
Instructions
- Brown your butter in a saucepan over medium heat, swirling occasionally. The butter will melt, foam, and then the foam will begin to subside as the milk solids at the bottom start to turn color. You are watching for a deep amber color with dark brown flecks at the bottom and listening for the sputtering to quiet. When it smells strongly nutty, almost like toasted hazelnuts, you are there. For this recipe you want it deeply browned, not just starting to color. The moment it hits that deep amber, pull it from the heat and pour it immediately into a heat safe bowl to stop the cooking. The line between perfectly browned and burnt happens fast so do not walk away from the pan.
- Allow the browned butter to cool until it reads around 76-78°F on your thermometer. It should still be fully liquid and pourable but no longer aggressively hot.
- Place your 350 grams of water in the refrigerator while the butter cools, or for at least 15 minutes. You want it fully chilled before you begin.
- Remove your cold water from the refrigerator. Add the vanilla extract and the sourdough starter to the cold water and stir well.
- Slowly drizzle the cooled browned butter into the water and starter mixture while stirring continuously as you pour. Slow and steady is the key here. The butter will seize on contact with the cold water and break into small irregular chunks throughout the liquid. These butter pieces are your inclusion and are exactly what you are after. If your butter is not forming little hardened globules as you pour, your butter is still too hot, your water is not cold enough, or both. Stop, place the mixture in the fridge for 5 to 10 minutes, and try again.
- Add your flour and salt directly on top of the butter and water mixture. Gently mix together until a shaggy dough forms with no dry flour remaining. Do not overwork this dough at this stage. The warmth from your hands can begin to melt the butter pieces, so just bring it together to that shaggy point and stop.
- Cover the bowl and allow the dough to rest for 30 minutes.
- After the rest, fold in your mini chocolate chips evenly throughout the dough, working them in gently so the dough structure is not disrupted.
- Perform your first set of stretch and folds, doing 4 folds by pulling each side of the dough up and over itself. Cover and rest for 30 minutes.
- Perform a second set of stretch and folds. Cover and rest for 30 minutes.
- Perform a third and final set of stretch and folds. Cover and allow the dough to bulk ferment at room temperature between 66 and 68°F. Because you started with cold water, bulk fermentation may take a bit longer than you are used to, but the dough will get there. Do not allow your dough temperature to exceed 74°F, as the butter inclusions will begin to melt into the dough prematurely above this temperature. Bulk fermentation is complete when the dough has grown noticeably, feels airy, and springs back slowly when poked.
- Turn the dough out onto a lightly floured surface and perform a pre-shape. Using your bench scraper and your hand, drag the dough toward you and push it away in a circular motion until it forms a smooth ball. This builds surface tension before the final shape.
- Allow the pre-shaped dough to rest uncovered for 15 minutes so the gluten can relax.
- Perform your final shape. Fold the left side of the dough in toward the center, then the right side in over that, like folding a burrito. Starting from the bottom edge, roll the dough up like a sleeping bag, then pull the roll toward you to tighten the surface tension into a smooth ball.
- Place the shaped dough seam side up into a banneton or a bowl lined with a well-floured kitchen towel, dusted generously with rice flour. Cover and refrigerate for 8 to 12 hours.
- When ready to bake, place your Dutch oven inside your oven and preheat to 450°F for at least 45 minutes.
- Remove the dough from the refrigerator. Turn it out onto a sheet of parchment paper. Score the top with a sharp lame or knife using your preferred pattern.
- Using the parchment paper as a sling, carefully lower the dough into the screaming hot Dutch oven. Replace the lid and bake covered for 45 minutes.
- Remove the lid and bake uncovered for an additional 10 minutes until the crust is deeply golden and the internal temperature reads 205 to 210°F.
- Allow the loaf to cool completely at room temperature for a minimum of four hours before slicing. The chocolate chips need time to fully set back up after baking and the crumb needs time to stabilize. Cutting in too early will result in a gummy interior.
Notes
Tips for Success
Brown the butter darker than you think you need to. The flavor needs to survive a long room temperature ferment and a 450°F oven. Light golden butter will disappear into the background. You want deep amber with dark flecks and an unmistakably nutty aroma.
Use cold water and pour the butter while stirring so the clumps form immediately. If the water is too warm, the butter will disperse as a layer rather than solidifying into pieces.
Add the chocolate chips after the first fold, not during the initial mix. The dough needs some structure first so the chips incorporate cleanly without breaking down.
Wait at least four hours before slicing. The chocolate chips need time to fully set back up after baking, and the crumb needs time to finish setting. Cutting in too early will give you a gummy interior and chocolate that smears rather than holds its shape in each slice.
For the loaf pan version, parchment lining is essential. The butter inclusions can cause sticking if you only grease the pan.

Frequently Asked Questions
Can I use regular melted butter instead of browning it?
You can, but the flavor will be noticeably different. Browning converts the milk solids through the Maillard reaction, producing the nutty, caramel like compounds that make this recipe distinctive. Plain melted butter will add richness but none of that depth. If you skip browning, the vanilla and chocolate will still be pleasant, but the loaf will taste like a good standard sourdough with inclusions rather than something specific.
One important note if you don’t brown the butter: Because water evaporates during the browning process, the final weight of the browned butter is what actually goes into your dough. Starting with 75g of whole butter will yield approximately 60 to 65g of browned butter depending on how long you cook it and how dark you take it. That post browning weight is your actual butter measurement for this recipe.
Why does the butter go into cold water instead of into the dough directly?
Pouring browned butter directly into dough as a liquid fat coats the gluten proteins and inhibits development from the start. The cold water shock solidifies the butter into small irregular pieces that behave like a chunky inclusion rather than a liquid fat. The dough develops normally and the butter pieces distribute throughout, melting slowly during proofing and baking rather than all at once. This is also why this loaf does not leak butter the way some enriched loaves do.
What happens if my butter doesn’t harden?
Pouring your butter in slowly is the key to getting those little hardened globules that create the beautiful butter pockets in the crumb. As you pour, watch for the butter to seize up on contact with the cold water. If you start pouring and the butter is staying liquid rather than breaking into chunks, stop. Let your butter cool down for a few more minutes and place your water back in the refrigerator for about 10 minutes, then try again.
And if it does not fully solidify even after that? Your bread is not ruined. The brown butter flavor is still fully there. You just lose those little pockets of butter throughout the crumb, which is what makes this loaf so visually stunning when sliced. Slow pouring is your best defense, so take your time with this step.
Can I use chocolate chunks instead of mini chips?
Yes, though the result will be different. Larger chocolate pieces create bigger pockets of melted chocolate in the crumb rather than an even distribution throughout each slice. They can also create structural weak points in the dough that may cause tearing during shaping. If you use chunks, chop them on the smaller side and fold them in gently. Mini chips remain the recommendation for consistent coverage and easier handling.
How do I store this bread and how long does it keep?
Store at room temperature cut side down on a board, or wrapped in a clean kitchen towel. It keeps well for 3 to 4 days. Do not refrigerate. Cold storage dries out the crumb and dulls the flavor. For longer storage, slice, wrap individual slices in plastic wrap, and freeze. Toast directly from frozen and the brown butter aroma comes back beautifully.
Is this bread sweet?
No. There is no added sugar in the dough. The vanilla provides aroma rather than sweetness, and the dark chocolate chips contribute a touch of sweet more than sugary taste. The overall flavor profile is savory and nutty with pockets of chocolate. It eats like a sophisticated artisan loaf, not a dessert bread or a dessert loaf.
What internal temperature should I bake this loaf to?
205 to 210°F is the target for a fully baked sourdough loaf. The enrichment from the butter means the crumb can hold together well at this range. Pull it at 205°F if you want a slightly more moist crumb, or push to 210°F if you prefer a drier, more sliceable texture. Always wait at least four hours before cutting so the crumb can set properly and the chocolate can firm back up completely.

Did You Make This?
Leave a comment below and let me know how it turned out. If you baked the boule or the loaf pan version (or both), I want to hear about it. And if you share it on Instagram or TikTok, tag me so I can see your bake.
Want recipes sent directly to your inbox? Sign up for the H3art of the Home newsletter and never miss a new loaf.


Leave a Reply