I have been on a mission to make everything I bake work harder nutritionally without sacrificing the things I actually care about, which are flavor, texture, and real fermentation. So when I started developing a high protein pizza crust, I knew I was not going to reach for protein powder or vital wheat gluten. I wanted something that belonged in a kitchen, not a supplement aisle.
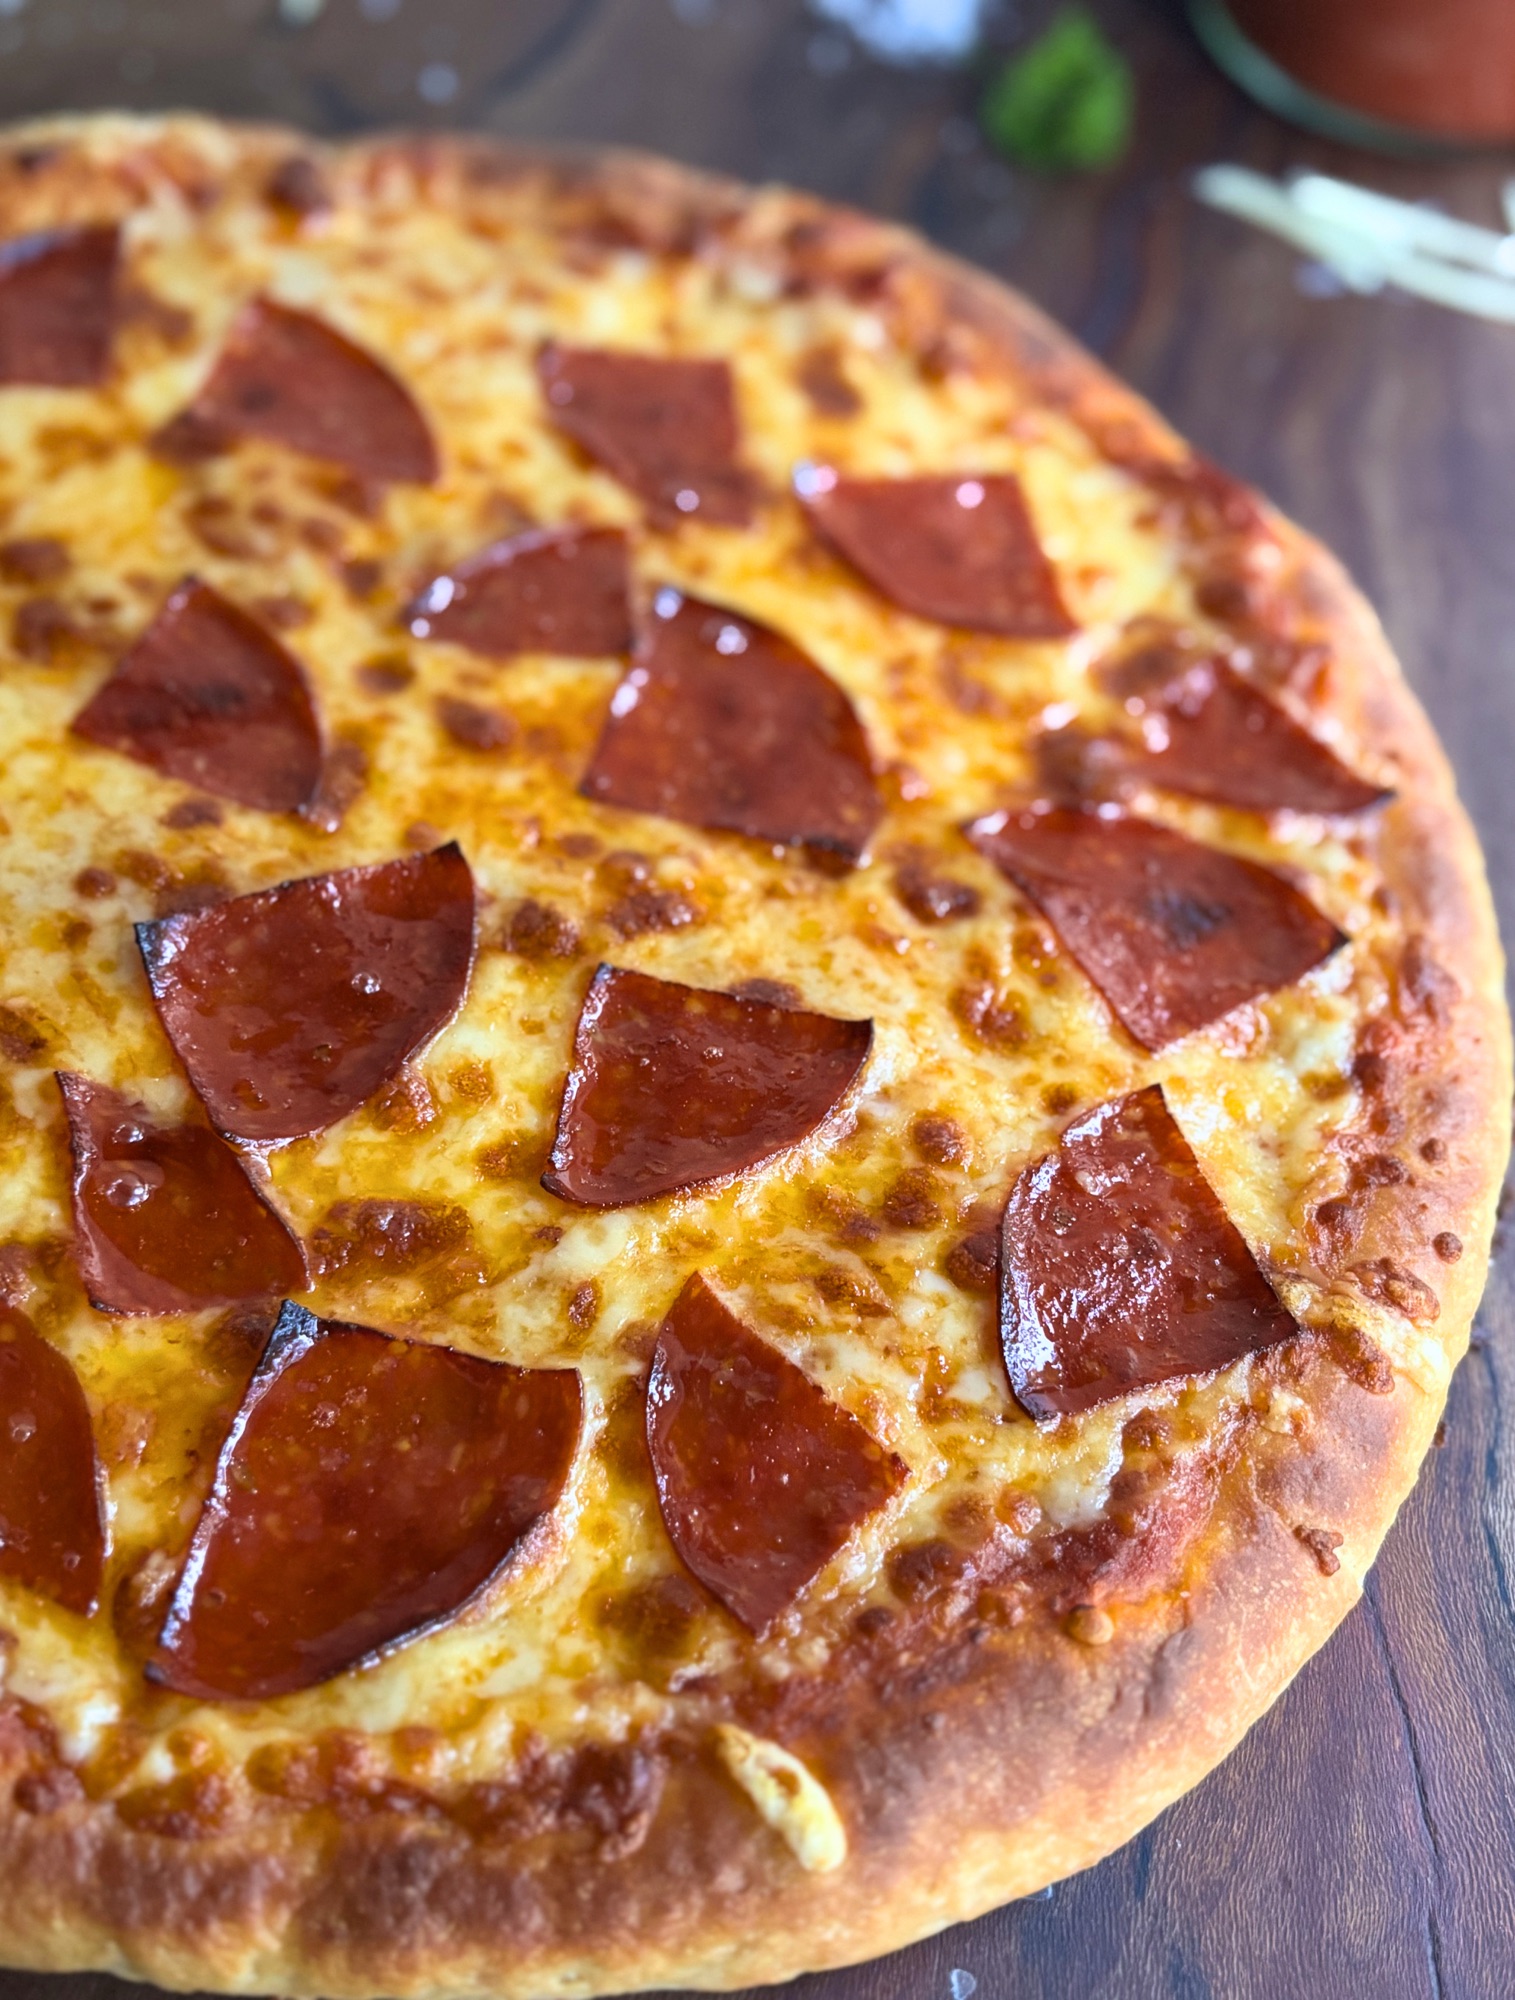
What I landed on is this High Protein Sourdough Pizza Crust, made with active sourdough starter and enriched with thick Greek yogurt or blended cottage cheese for a serious protein boost that comes entirely from real food ingredients. The crust is soft with a genuine chew, sturdy enough to hold a full load of toppings, and par bakes and freezes beautifully. It is not going to give you an open airy crumb like a lean sourdough because the enrichment changes the structure, and that is completely intentional. This crust is built for pizza night, for meal prep, and for pulling a ready to top crust out of the freezer on a Tuesday when nobody wants to cook.

Table of Contents
- Why You Will Love This Recipe
- The Protein Source: Greek Yogurt or Cottage Cheese
- Why Long Fermentation Matters
- How to Par Bake and Freeze
- Baking Tips for the Best Crust
- Recipe
- Substitutions and Variations
- Frequently Asked Questions
- More High Protein Recipes You Will Love
- Never Miss a Recipe
Why You Will Love This Recipe

This is not a baking powder pizza dough dressed up with a high protein label. Here is what makes it genuinely different.
Real sourdough fermentation. The dough long ferments overnight, developing flavor complexity and a crust structure that no quick dough can replicate. Your active starter is doing the actual work here.
No protein powder required. The protein boost comes entirely from thick Greek yogurt or blended cottage cheese. Both are pantry staples that also contribute to the texture and richness of the crust in ways that a powder simply cannot. Giving each pizza crust approximately 35 grams of protein just from the crust.
Built for meal prep. This crust par bakes and freezes exceptionally well. Pull it from the freezer, add your toppings, and bake. It reheats beautifully and tastes like you made it fresh.
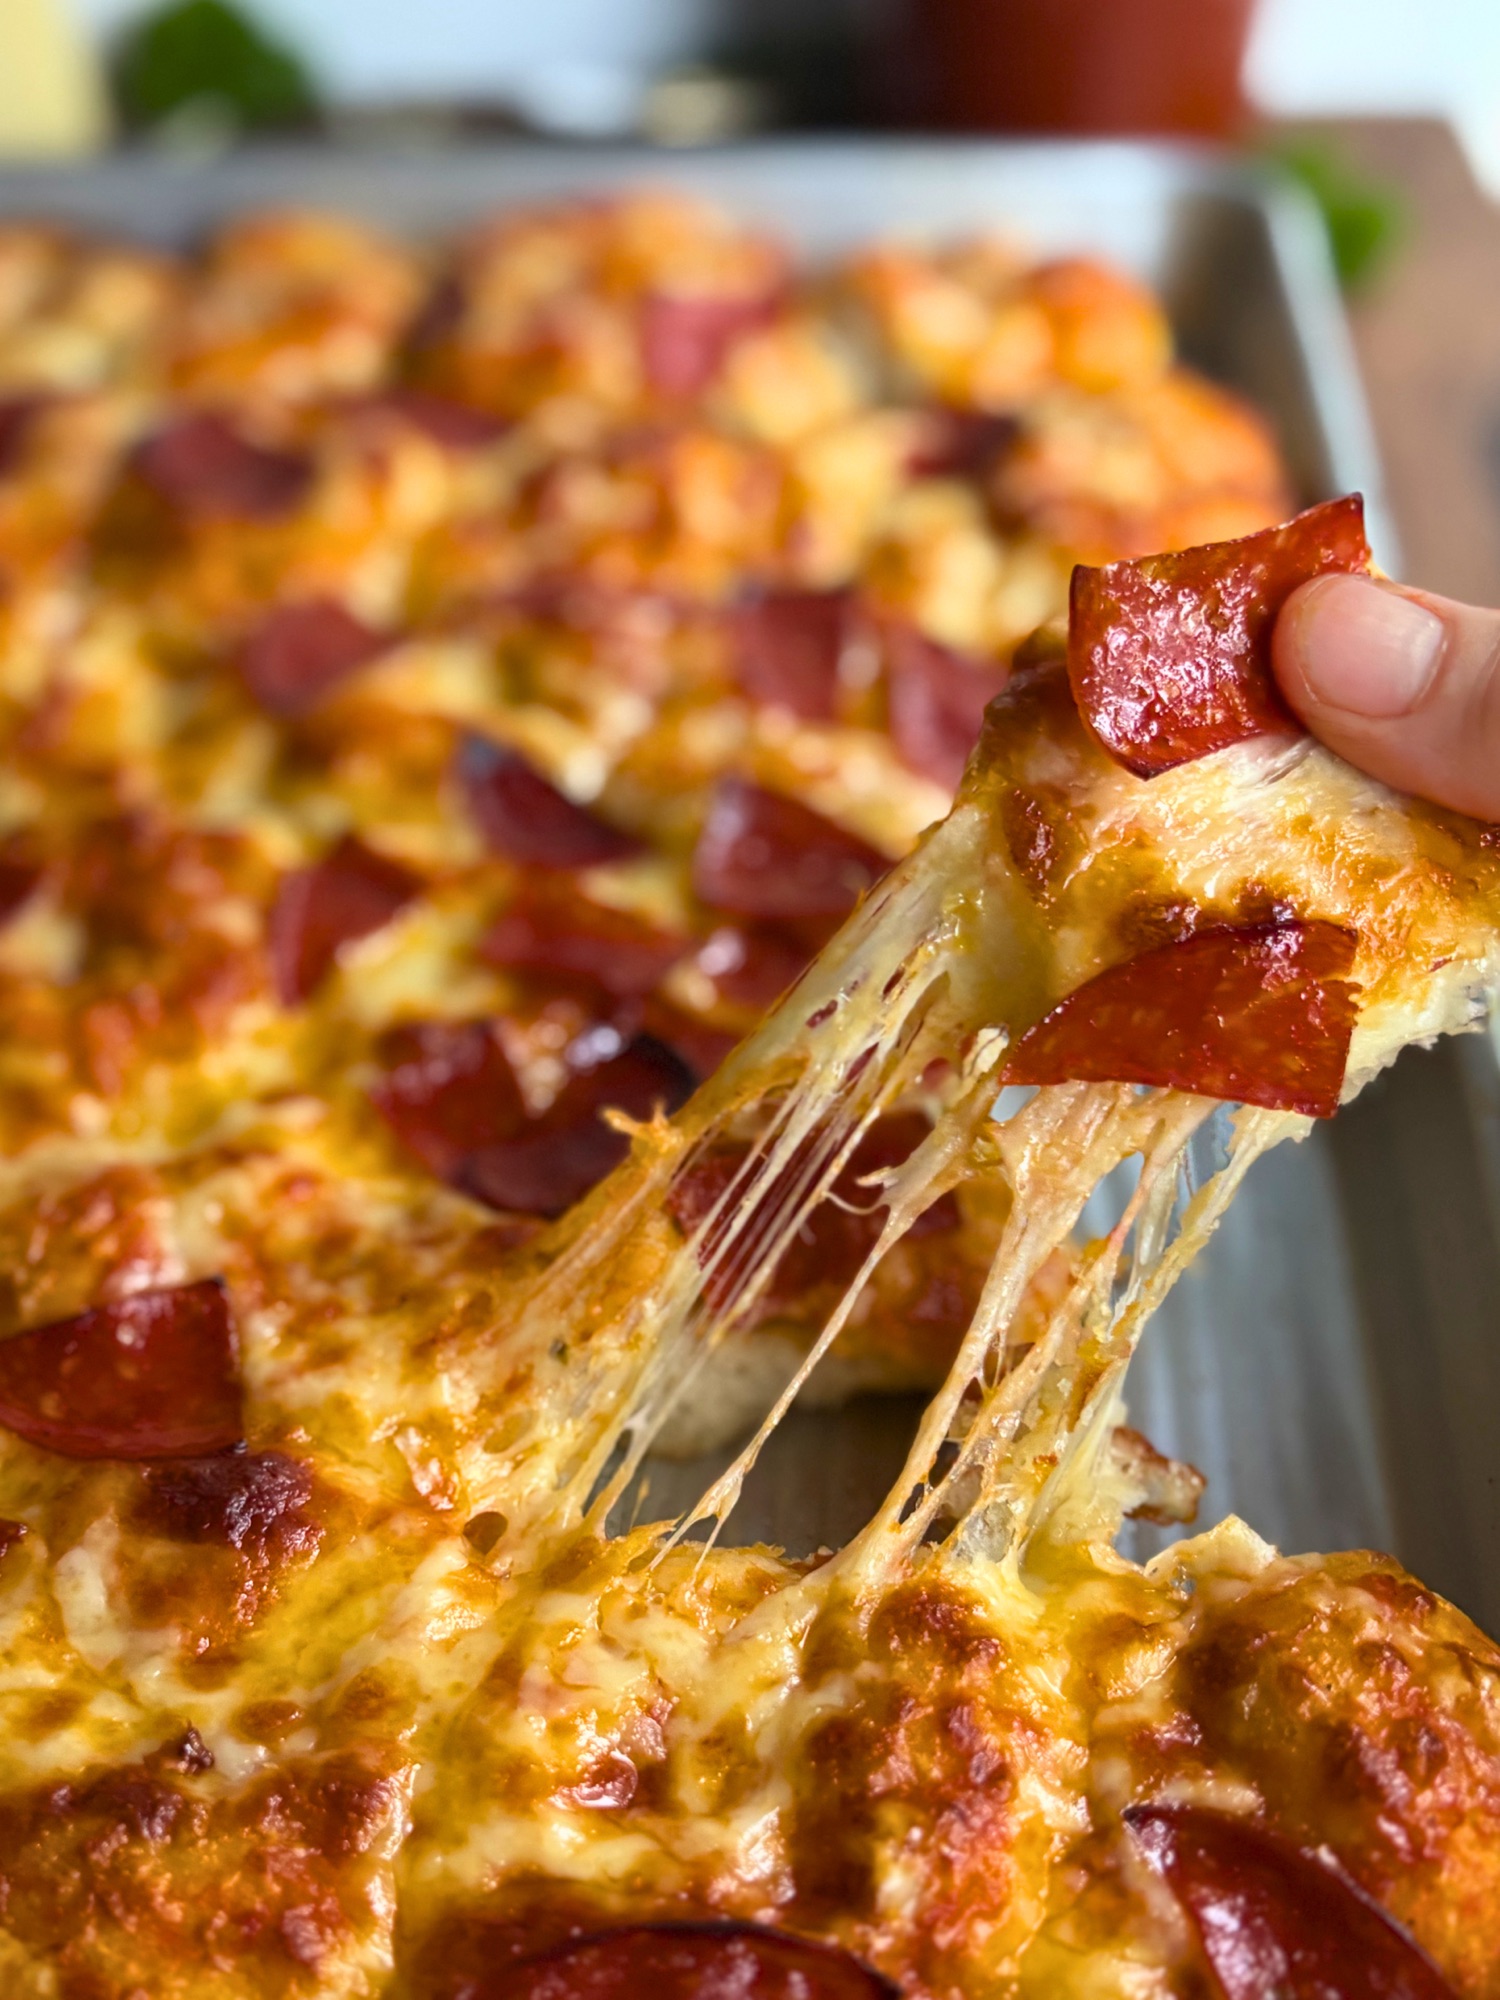
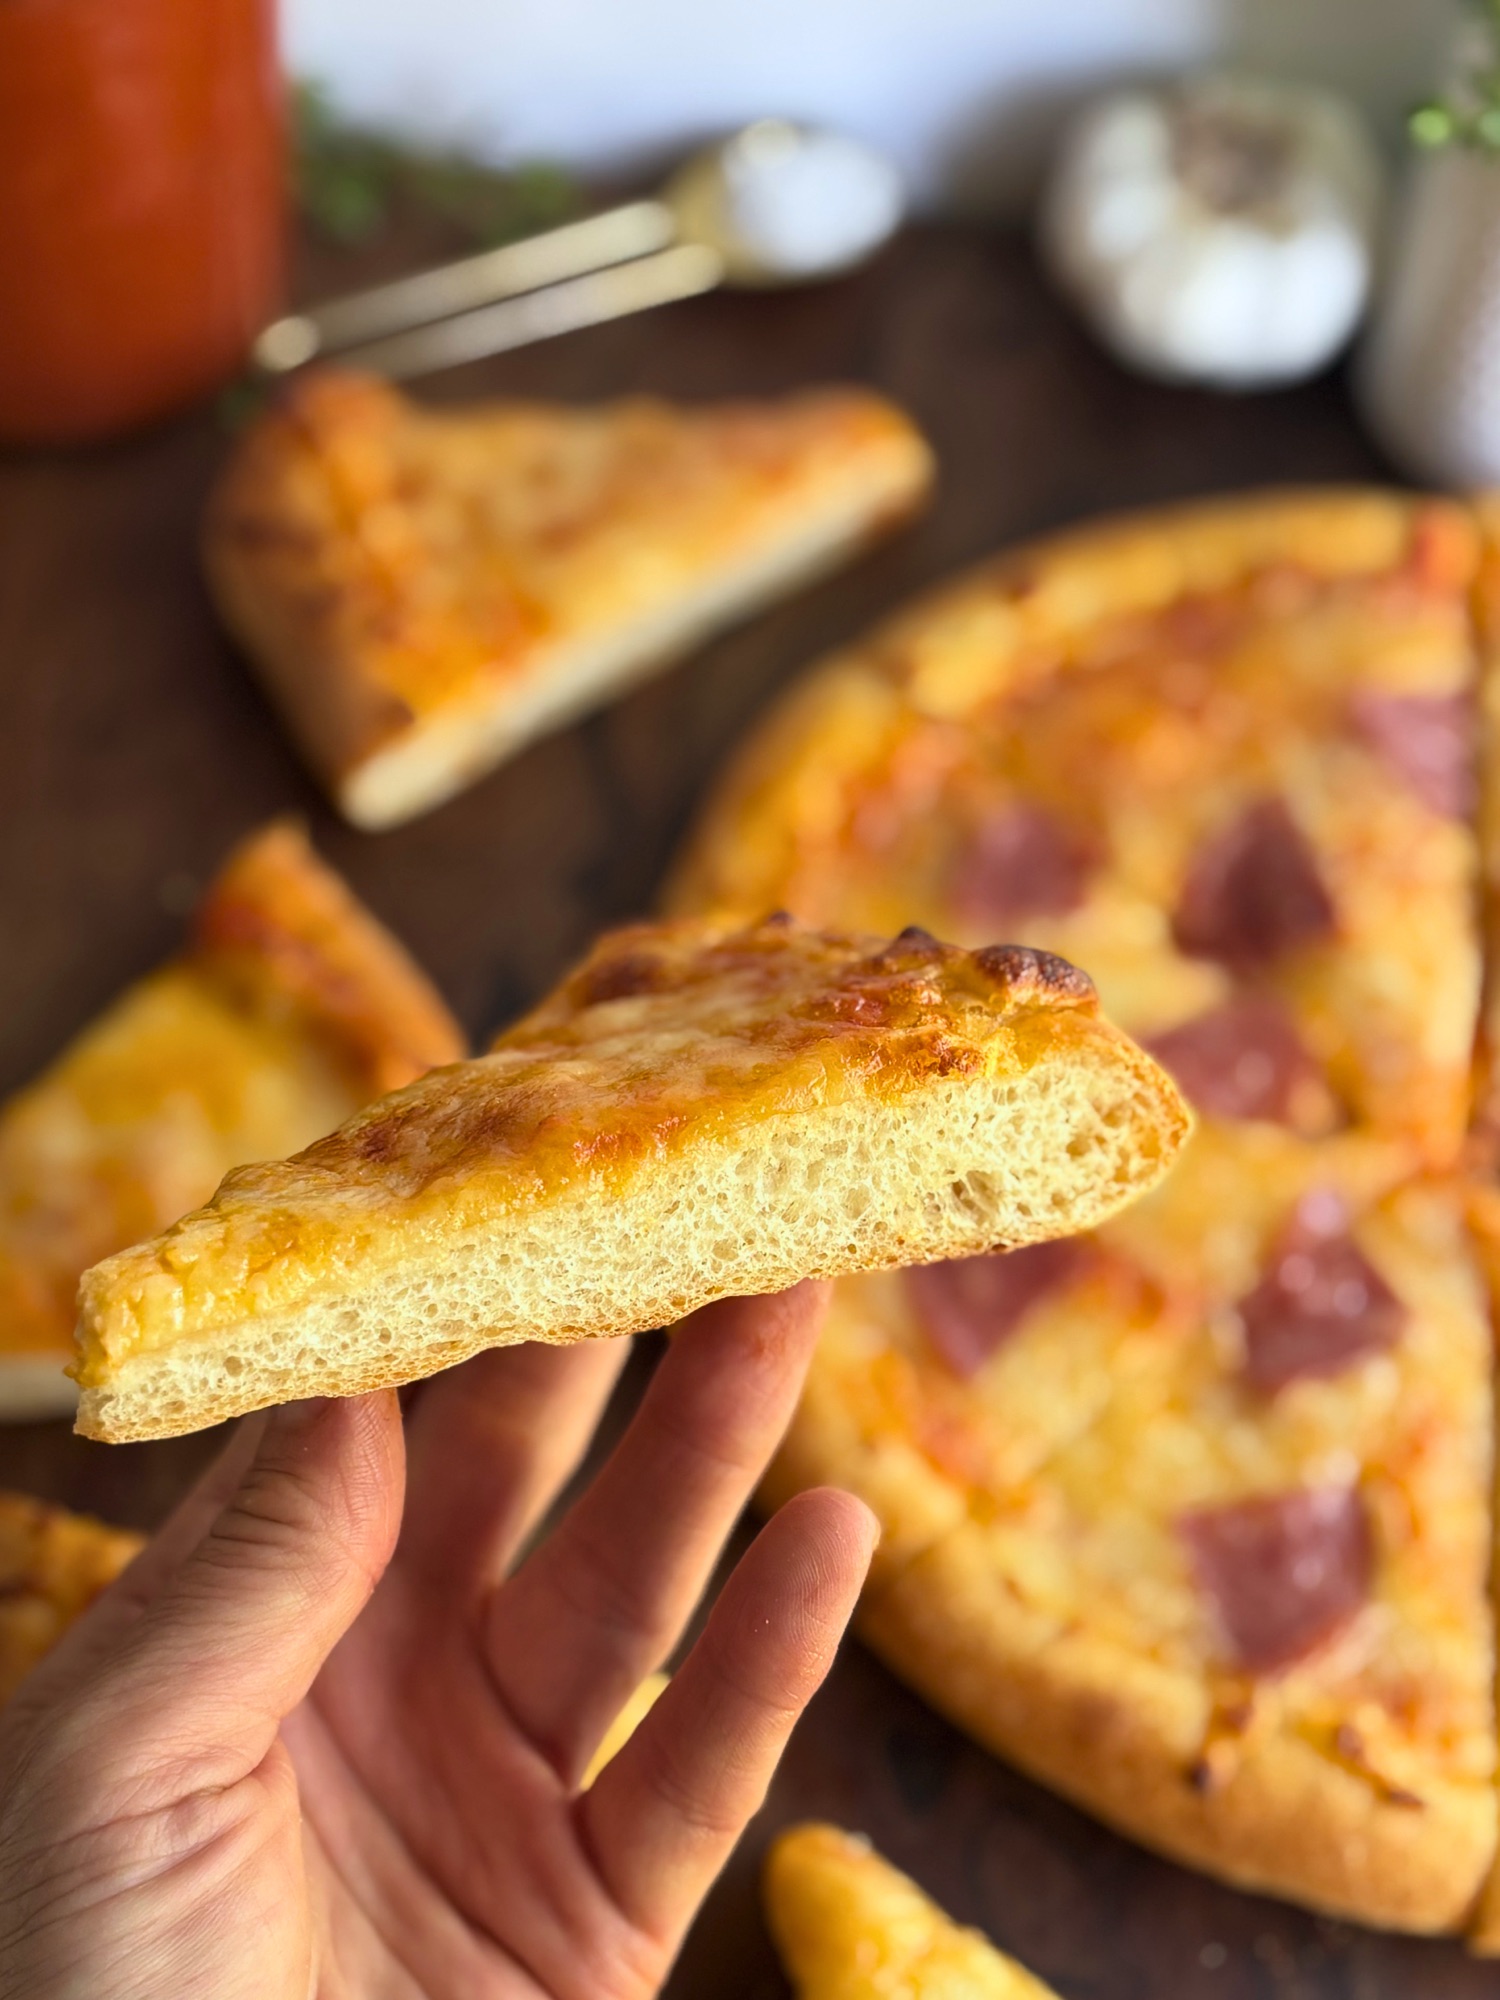
Honest texture. The enrichment from the yogurt or cottage cheese gives you a soft, tender crumb with a satisfying chew and a crust that holds up under toppings without going soggy. It is not a cracker and it is not a bread loaf. It is a pizza crust that does exactly what a pizza crust should do.
The Protein Source: Greek Yogurt or Cottage Cheese
Both thick Greek yogurt and blended cottage cheese work beautifully in this recipe. Here is what each one brings to the dough and how to use them.
Thick Greek yogurt contributes a bit more dairy flavor and a slightly richer dough. Use nonfat for the highest protein content. The key word is thick. Thin or regular yogurt will add too much free liquid and throw off your hydration, so stick with a strained Greek yogurt that holds its shape when you spoon it.
Blended cottage cheese gives you a more neutral flavor that lets the sourdough complexity take center stage. It also has a slightly higher protein content per serving than nonfat Greek yogurt. To prepare it, blend until completely smooth with 15g of milk per 200g of cottage cheese. The milk is not an extra ingredient; it is just what brings the cottage cheese to the right consistency before you measure it. Once blended, measure and use it at the same amount as the yogurt with no other adjustments needed. Good Culture is a great option because it is particularly thick and dry and blends up beautifully.
Either way you go, you are adding protein through real food rather than supplements, which is the whole point. A standard sourdough pizza crust without enrichment comes in around 14g of protein per crust. This one does significantly better than that from the dough alone, before you ever add cheese or toppings.

Why Long Fermentation Matters

Most high protein pizza dough recipes skip fermentation entirely. They rely on baking powder, mix in under 10 minutes, and bake immediately. That approach works for a quick weeknight situation but it does not give you flavor, and it does not give you a crust that anyone is going to talk about.
Long fermentation does several things that matter. The overnight cold ferment develops flavor complexity that simply cannot be rushed. It also relaxes the gluten significantly, which means your dough stretches easily and cooperatively rather than springing back every time you try to shape it. And the fermentation improves digestibility by breaking down some of the proteins and starches in the flour.
The process here is straightforward. You mix and knead the dough on day one, do one set of stretch and folds at the 30 minute mark, bulk ferment at room temperature for 6 to 8 hours, then cover and refrigerate overnight. On day two you pull the cold dough out, let it come fully to room temperature, shape, and bake.
The cold ferment is not optional. It is where most of the flavor development happens and where the dough goes from sticky and difficult to smooth, extensible, and easy to work with.
How to Par Bake and Freeze

This is my favorite thing about this recipe. Par baking and freezing this crust is genuinely one of the best meal prep moves you can make. Here is exactly how to do it.
Par bake the shaped crust at 475F on a preheated pizza stone for 6 to 8 minutes until just set and lightly golden. The crust should look dry and pale with minimal color. You are not finishing it here, you are just setting the structure.
Pull it out and let it cool completely on a wire rack. This step matters. If you add toppings while the crust is still warm the sauce will make the bottom steam and go soft before it ever hits the freezer.
Once fully cooled, wrap the crust tightly in plastic wrap and then in foil. Freeze flat. It will keep for up to 3 months.
When you are ready to bake, pull the crust straight from the freezer, add your sauce, cheese, and toppings, and bake on your preheated stone at 475F for 7 to 10 minutes until the cheese is golden and bubbling. You do not need to thaw it first. Straight from freezer to oven works perfectly and gives you an incredibly crispy bottom.

Baking Tips for the Best Crust

Preheat your stone for a full 30 minutes. A pizza stone that has not fully preheated is the number one reason home pizza crusts come out pale and soft on the bottom. Give it the time it needs.
Dock the crust before par baking. Use a fork to poke holes across the surface of the stretched dough before it goes in for the par bake. This prevents large air bubbles from forming during the initial bake and gives you a flatter, more even surface for your toppings.
Let the dough fully come to room temperature before stretching. Cold dough tears. After the overnight cold ferment, let the dough balls sit out for at least 1 hour before you try to shape them. If the dough springs back when you press it, cover it and give it another 20 minutes.
Spritz the parchment with water before shaping. A light mist of water on your parchment paper prevents the dough from sticking without adding any extra flour that could tighten the dough. It takes two seconds and makes a noticeable difference.
Use your hands, not a rolling pin. Lay your dough ball on the spritzed parchment and start pressing from the center outward with your fingertips, working around the dough in a circle and stretching evenly as you go. Once the dough gets larger, switch to using just your fingertips to push outward around the edges to build your crust rim. A rolling pin degasses the dough and gives you a denser, tougher result.

The crust will be softer than a lean sourdough. The enrichment from the yogurt or cottage cheese changes the crumb structure. This is not a Neapolitan crust and it is not trying to be. It is soft with chew, sturdy under toppings, and absolutely delicious. Expect that and you will love it.
Recipe

High Protein Sourdough Pizza Crust
Equipment
- – Stand mixer with dough hook or your hands
- kitchen scale measuring cups/spoons
- Pizza stone or steel sheet pan upside down
- Parchment paper
- Small spray bottle with water
- Fork for docking
- Pizza peel or sheet pan
Ingredients
For the Dough
- 380 grams bread flour 3 and 1/4 cups
- 130 grams active peaked sourdough starter scant 2/3 cup
- 200 grams nonfat Greek yogurt OR 200 grams cottage cheese blended smooth with 15 grams milk, warmed scant 1 cup
- 100 grams water room temperature (scant 1/2 cup)
- 20 grams olive oil 1 and 1/2 tablespoons
- 8 grams salt 1 and 1/3 teaspoons
- 5 grams sugar 1 teaspoon
For Baking
- water for the parchment
- Your favorite pizza sauce shredded low moisture mozzarella, and toppings of choice
Instructions
- If using cottage cheese, blend 200 grams with 15 grams of milk until completely smooth before measuring. If using Greek yogurt, measure straight from the container. Both should have a thick smooth consistency similar to Greek yogurt.
- Be sure to warm the greek yogurt or cottage cheese in the microwave for 30 seconds. Cold ingredients will dramatically slow fermentation.
- In the bowl of your stand mixer fitted with the dough hook, combine the bread flour and salt and mix briefly on low to distribute. In a separate bowl whisk together the starter, Greek yogurt or blended cottage cheese, water, olive oil, and sugar until smooth. Pour the wet ingredients into the flour.
- Mix on low speed until a shaggy dough forms, about 2 minutes, then increase to medium speed and knead for 6 to 8 minutes until the dough is smooth, pulls away cleanly from the sides of the bowl, and passes a partial windowpane test. Because this is an enriched dough you will not achieve a full translucent windowpane. You are looking for a partial windowpane where the dough stretches without immediately tearing. The dough should be tacky but not sticky. If it sticks to the bowl after 3 minutes, add flour one tablespoon at a time. If it looks too stiff, add water one tablespoon at a time.
- Transfer the dough to a lightly oiled bowl and cover. Perform one set of stretch and folds after 30 minutes by grabbing one side of the dough, stretching it up without tearing, and folding it over the center. Rotate 90 degrees and repeat four times around the bowl.
- Cover and bulk ferment at room temperature for 6 to 8 hours until the dough is 50 to 75% larger, looks domed, and feels airy when you press it. Do not bulk ferment overnight at room temperature as over fermentation breaks down the gluten and causes tearing when you shape.
- Once bulk fermentation is complete, seperate the dough into two equal pieces and shape into a ball. Place in an oil lined pan, spray a little oil on top and cover tightly with a lid or plastic wrap.
- You can either let rest for an hour and continue with make the pizza. Or for the long ferment, refrigerate overnight or up to 24 hours. The cold ferment deepens the flavor and transforms the dough from sticky and difficult to smooth, extensible, and easy to shape.
- After the rest or the next day (remove the dough from the refrigerator) and being the baking preparations.
- Place your pizza stone or steel in the oven and preheat to 475 degrees F for at least 30 minutes. A fully preheated stone is the difference between a pale soft bottom and a properly crispy crust. If you dot have either of those, take a baking tray and turn it upside down and be sure to preheat for at least 10 minutes.
- When ready to shape, lay a sheet of parchment paper on your work surface and give it a light spritz of water. This prevents the dough from sticking without adding extra flour. Place the dough ball in the center and press from the middle outward with your fingertips, working around the dough in a circle and stretching evenly as you go. Once the dough is larger, switch to pushing outward around the edges with your fingertips to build the crust rim. Work to a 10 to 12 inch round. If the dough springs back, cover and rest for another 10 minutes before trying again.

- Use a fork to dock the stretched crust all over before par baking. This prevents large air bubbles from forming and gives you a flat even surface for toppings.

- For a par bake, slide the docked crust on parchment onto the preheated stone and bake at 475 degrees F for 6 to 8 minutes until just set and lightly golden with no raw patches. Remove from oven and cool completely before adding toppings and freezing, or add toppings immediately and finish baking.

- For a fresh full bake, add sauce, cheese, and toppings to the shaped crust and bake on the preheated stone at 475 degrees F for 12 to 15 minutes until the cheese is deeply golden and the crust rim is dark brown. Watch closely after the 10 minute mark as the dairy in this dough accelerates browning.
Notes
Substitutions and Variations
Greek yogurt or cottage cheese. Both work at a 1:1 swap. Thick nonfat Greek yogurt and blended Good Culture cottage cheese are the two best tested options. Whatever you use, it needs to be thick. Thin dairy will throw off your hydration.
Same day version with yeast. If you do not want to plan ahead, check out my Same Day High Protein Sourdough Pizza Crust. It uses rapid rise yeast alongside the active starter for a much shorter timeline without sacrificing the sourdough flavor.
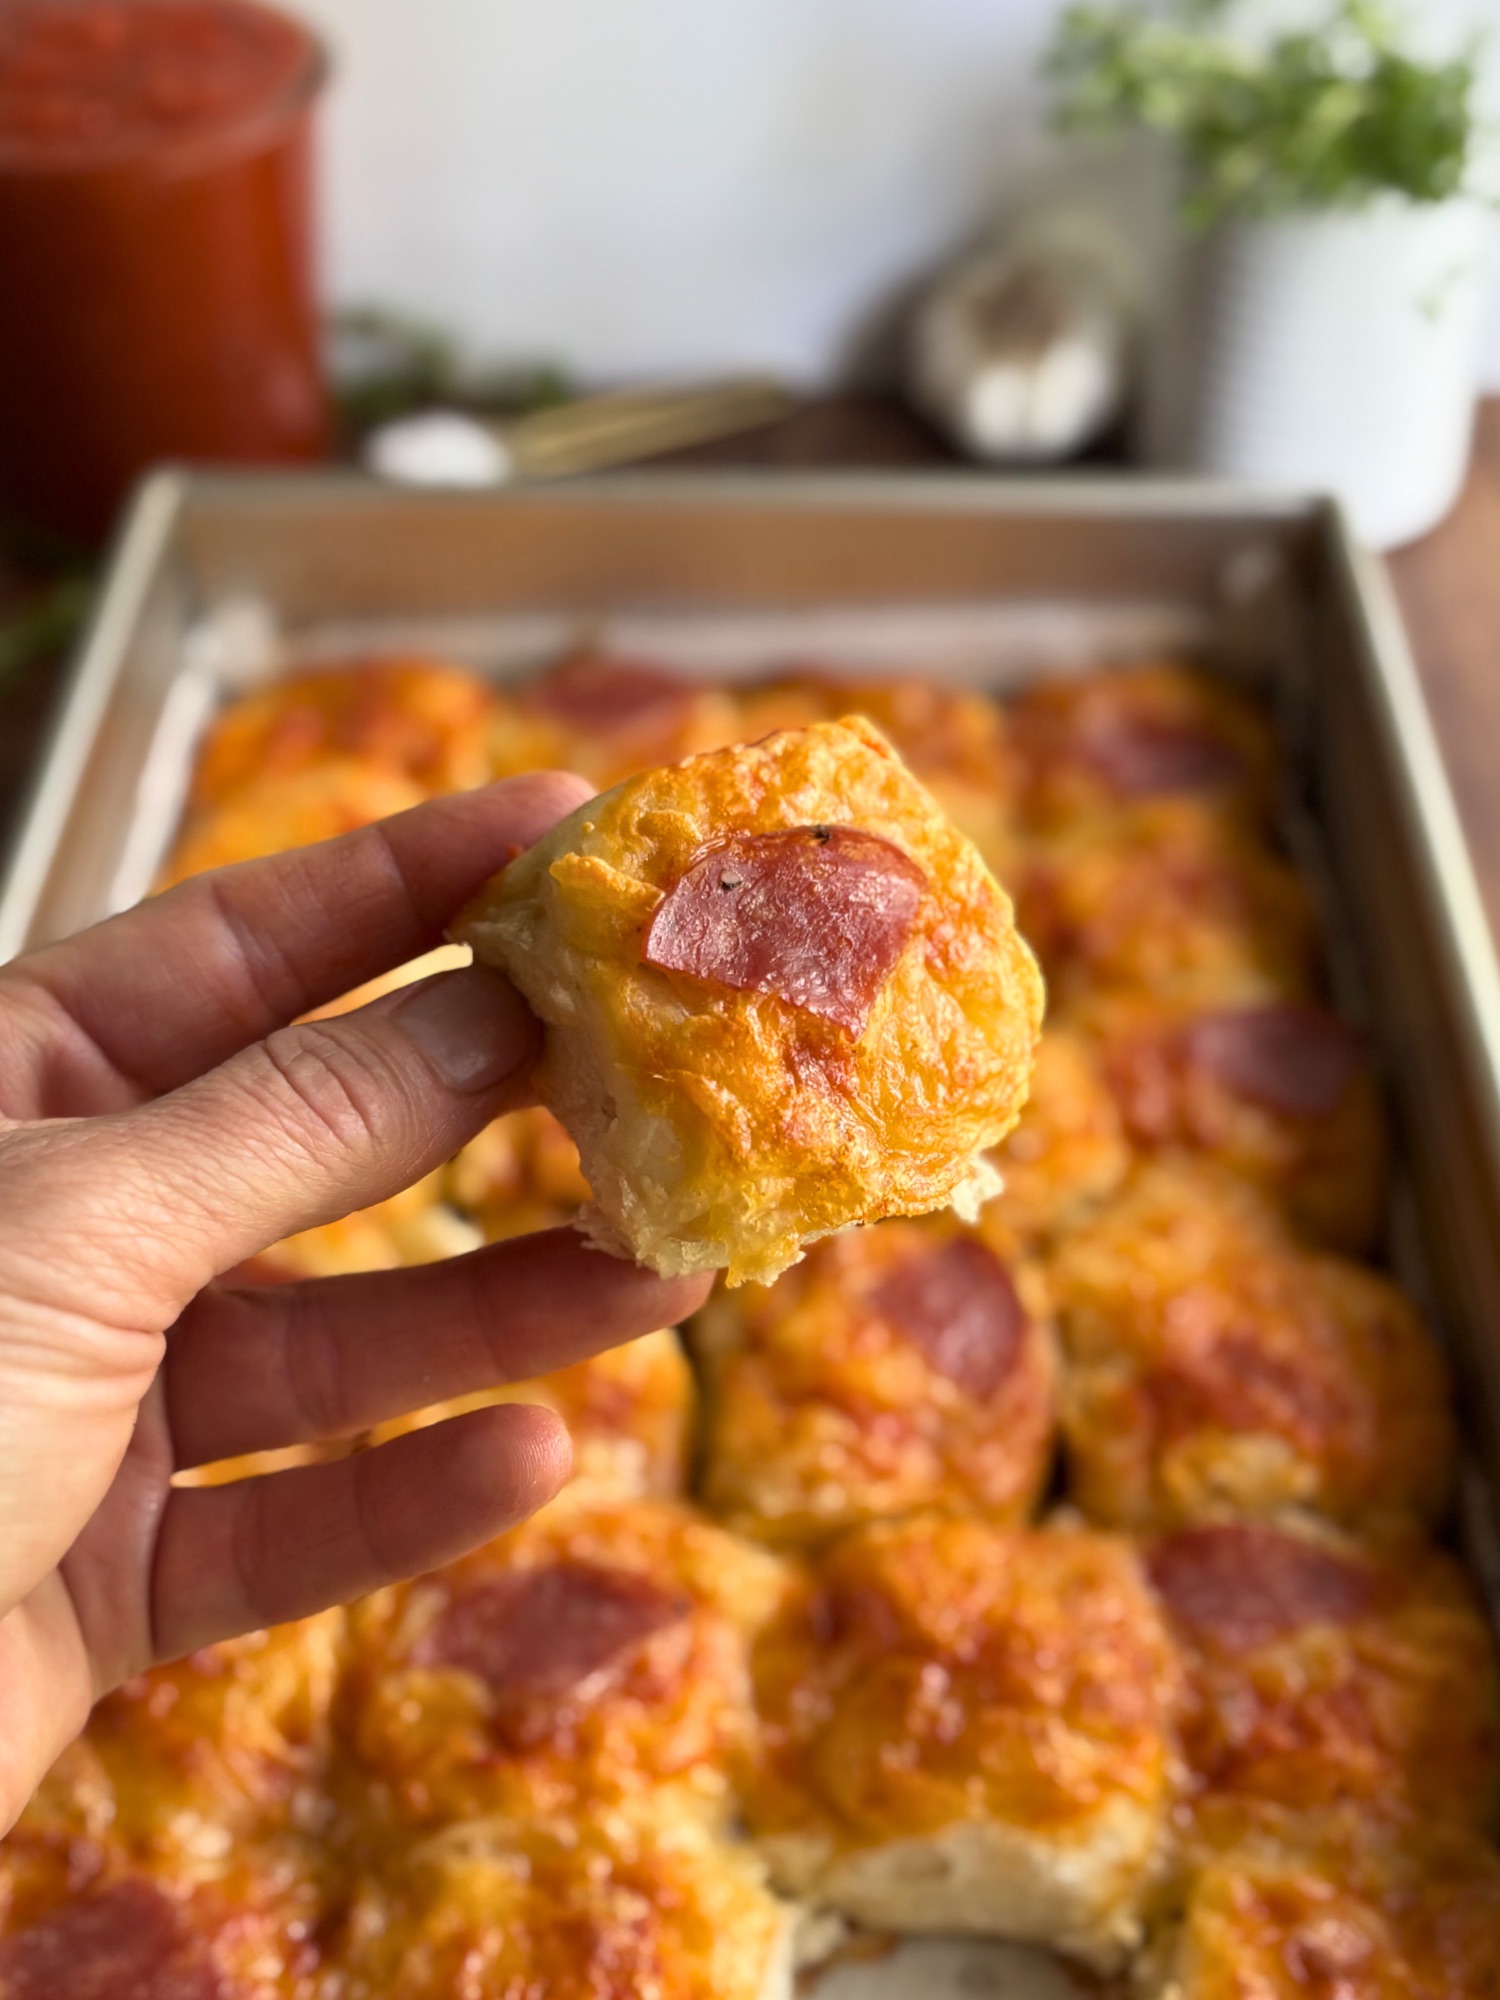
Sheet pan pizza. Press the dough into a well oiled parchment lined half sheet pan instead of shaping individual crusts. Bake at 430F for 20 to 25 minutes fully topped. This is a great option for feeding a crowd or for the pull apart pizza bites format.
Discard version. You can use sourdough discard in place of active starter but I suggest adding some rapid yeast. If not, expect a much slower, less vigorous bulk ferment. See the Frequently Asked Questions section for more information.

Frequently Asked Questions
Why is my dough so sticky?
This is a higher hydration enriched dough and stickiness is normal, especially right after mixing. Use wet hands rather than floured hands when handling, and trust the overnight cold ferment to firm the dough up significantly. It will be much easier to work with after a night in the refrigerator.
Can I use sourdough discard instead of active starter?
Yes, but for the most reliable results add 4g of instant yeast directly to your dry ingredients alongside the discard. The yeast handles the leavening while the discard still contributes flavor depth to the dough. Without the added yeast, discard alone will ferment more slowly and unpredictably since it lacks the active yeast population of a peaked starter. If you go the yeast route, watch your bulk ferment closely as it will move significantly faster than the active starter version.
Can I make this without a stand mixer?
Yes. Mix and knead by hand for 10 to 12 minutes until the dough is smooth and passes a partial windowpane test. Wet your hands periodically to manage the stickiness rather than adding extra flour.
Do I have to par bake or can I top and bake fresh?
You can absolutely top and bake without par baking. Par baking is specifically for the freezer meal prep method. For a fresh bake, stretch the dough, add your toppings, and bake on a preheated stone at 475F for 12 to 15 minutes total.
How do I know when the crust is done?
For a topped fresh bake, you are looking for deeply golden cheese with dark spots, caramelized edges on any meat toppings, and a crust rim that is golden brown with some color on the bottom. For a par bake, pull it when it looks set and dry but has minimal color.
Can I freeze the raw dough instead of par baking?
Yes. Shape the dough balls after the cold ferment and freeze individually on a parchment lined sheet pan until solid. Transfer to freezer bags. Thaw overnight in the refrigerator and bring fully to room temperature before stretching and baking.
What if I do not have a pizza stone or steel?
No pizza stone or steel? No problem. Flip a heavy rimmed baking sheet or cookie sheet upside down and place it on the top rack of your oven. Preheat it at 450 degrees F for at least 10 minutes before baking. The flat bottom of the upside down pan acts just like a pizza stone and gives you a much crispier bottom than baking on a cold pan. Slide your pizza on parchment paper directly onto the preheated surface and bake as directed.
How much protein is in this crust?
From the dough alone each personal pizza crust contains approximately 40g of protein depending on whether you use Greek yogurt or cottage cheese. A standard sourdough pizza crust without enrichment comes in around 14g per crust, so the enriched version delivers meaningfully more protein from the dairy alone before any toppings are added.

More High Protein Recipes You Will Love
If you loved this high protein sourdough pizza crust, here are a few more recipes from the blog worth trying next.
High Protein Sourdough Pizza Bites (Pull Apart)
High Protein Pizza Crust (Instant Yeast)
High Protein Sourdough Cinnamon Rolls with Greek Yogurt
High Protein Sourdough Sandwich Bread
High Protein Sourdough Dinner Rolls
Sourdough Pizza Scones
High Protein Chocolate Chip Cottage Cheese Scones

If you make this High Protein Sourdough Pizza Crust I want to see it. Tag me on Instagram and leave a comment below letting me know how it went and whether you went with Greek yogurt or cottage cheese. I read every single one.
Never Miss a Recipe
If you want more recipes like this sent straight to your inbox, sign up for the H3art of the Home newsletter so you never miss a new post.


Leave a Reply