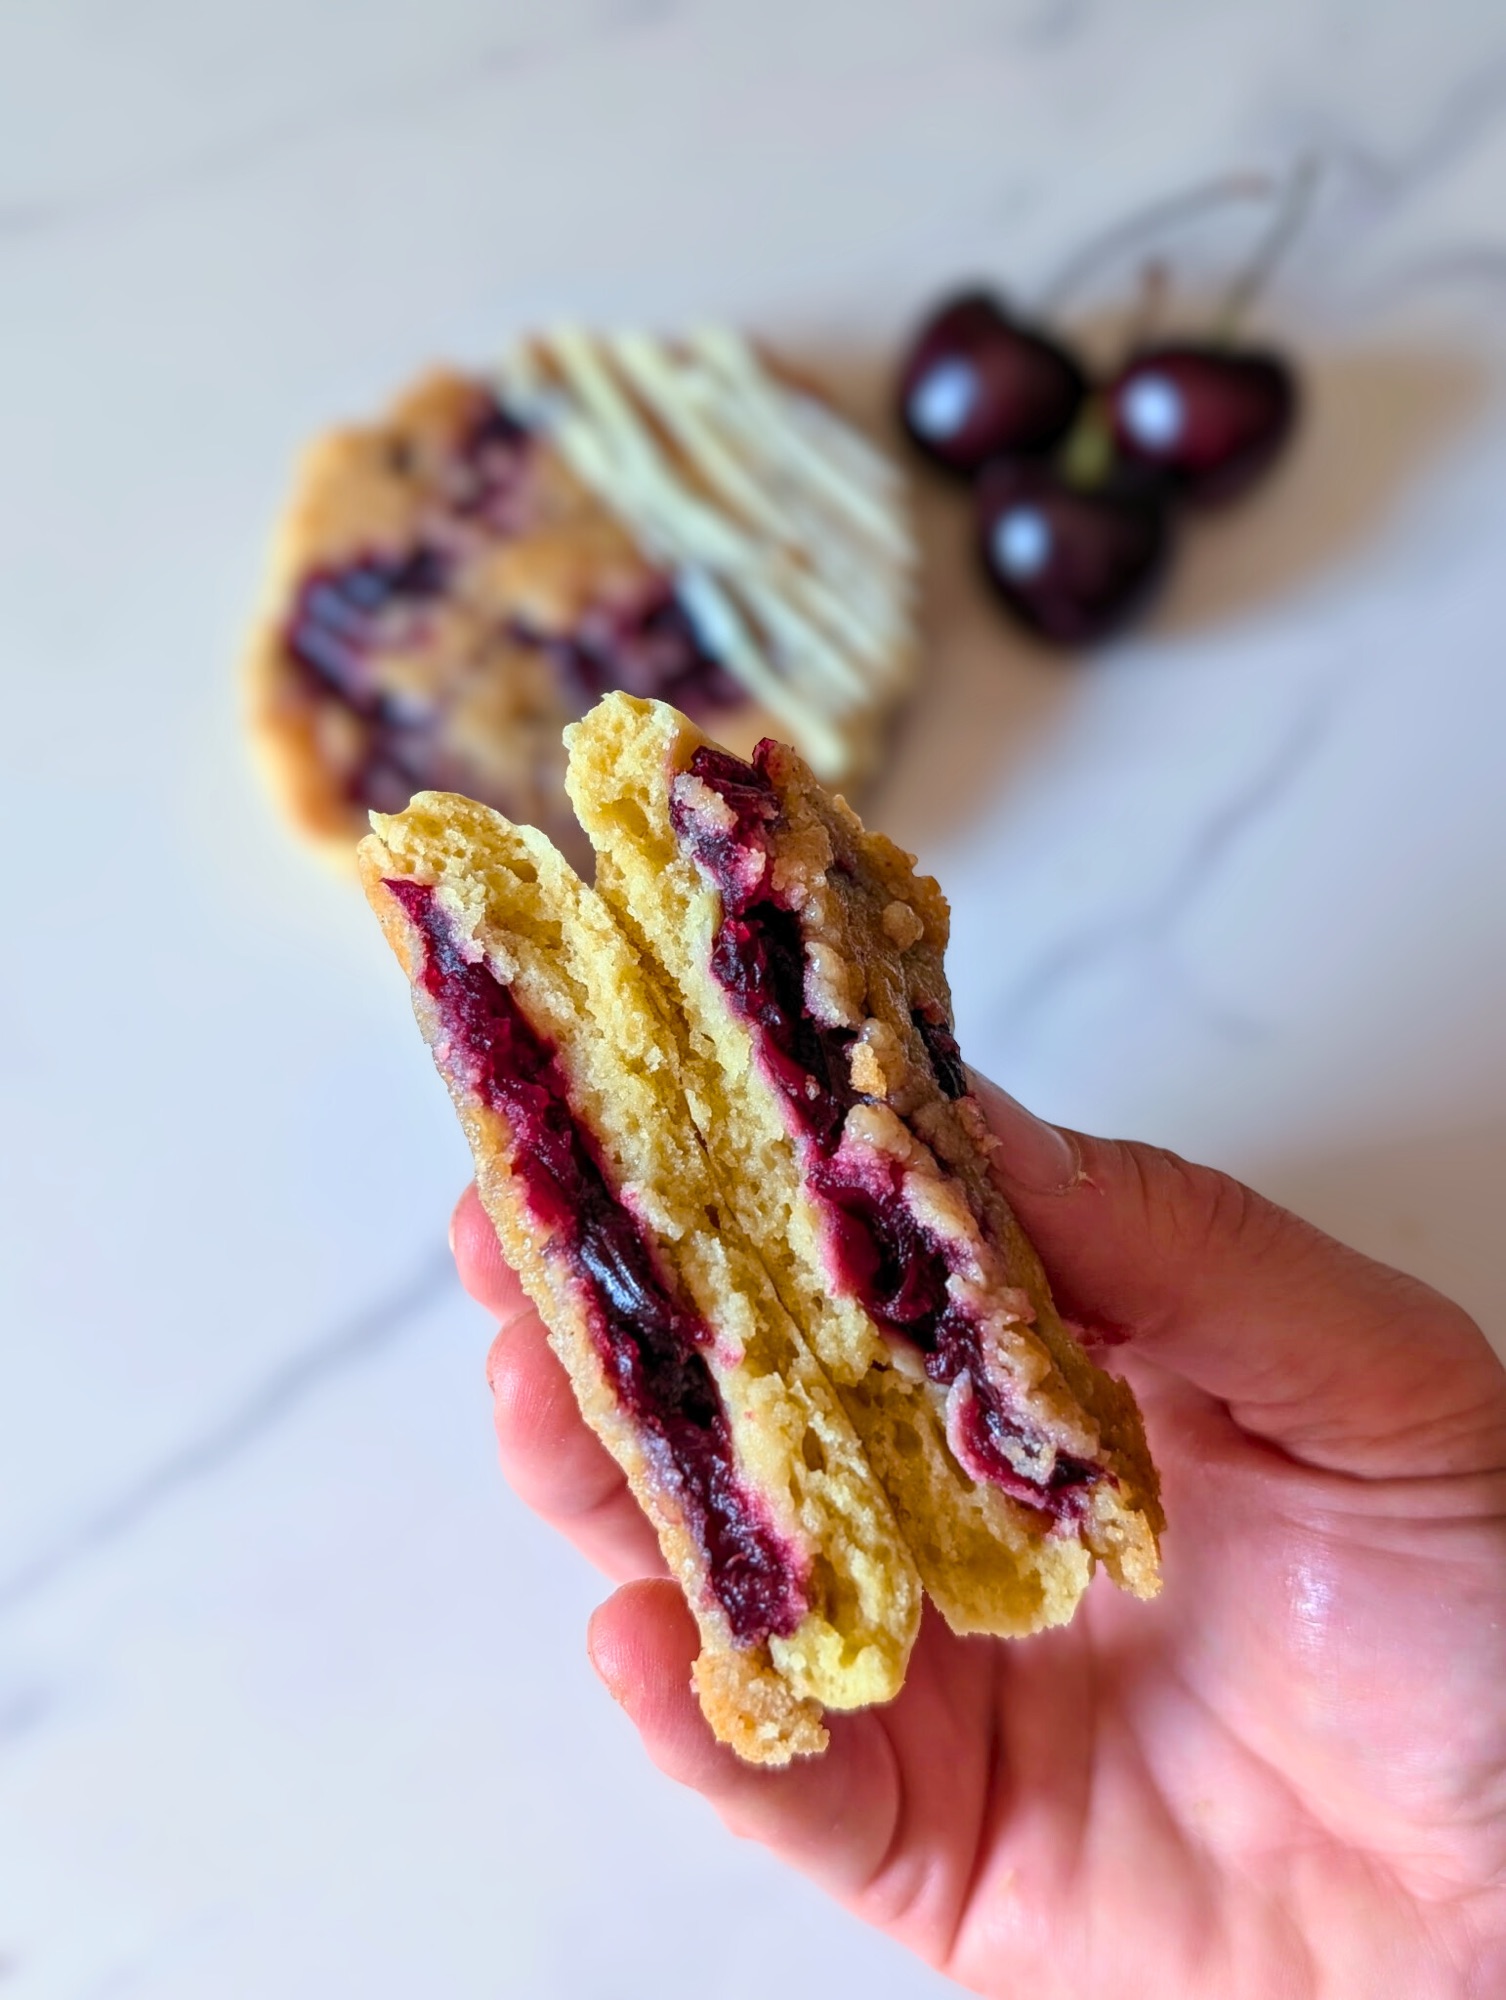

It’s cherry pie in handheld form with no sticky fingers here. These sourdough cookies feature a fermented cookie base that develops complex flavors through 12-24 hour cold fermentation, creating the perfect vessel for homemade cherry pie filling. The upside down assembly method layers fermented crumble on the bottom, cherry compote in the middle, and sourdough cookie dough on top, sealing everything together for a mess-free treat. Once flipped over, you get a beautiful crumble topping that’s finished with a white chocolate drizzle for the perfect bite that tastes like your favorite slice of cherry pie.
What Makes These Cherry Pie Sourdough Cookies Special
These aren’t your average cookies. We’re talking about a three-layer masterpiece that combines the tangy complexity of long-fermented sourdough with the nostalgic comfort of cherry pie. The bottom layer is a buttery, fermented crumble that gets deliciously crispy in the oven. The middle is a luscious homemade cherry pie filling that’s tart, sweet, and perfectly jammy. And the top? A tender sourdough cookie that’s been cold-fermenting overnight, developing those deep, nuanced flavors that make sourdough baking so addictive.
The magic happens during the 8-24 hour fermentation period. Both your cookie dough and crumble topping get time to develop complex flavors while the wild yeast and bacteria in your sourdough starter work their magic. The result is a cookie that’s not only more flavorful but also easier to digest than traditional cookies.
Why You’ll Love This Recipe
The layered texture is incredible. You get crunch from the crumble base, a soft jammy center from the cherry filling, and a tender cookie top that brings it all together. The white chocolate drizzle adds a touch of sweetness and makes them look absolutely bakery-worthy.
These cookies are perfect for using up active sourdough starter. If you’re like most sourdough bakers, you always have starter to use, and this recipe puts it to work in two different components for maximum sourdough flavor.
The make-ahead factor is a game-changer. You prep everything on day one, let it ferment overnight, and assemble and bake on day two. It’s actually easier than it sounds because you’re breaking the work into manageable chunks.
Ingredient Breakdown
For the Sourdough Cookie Base:
Your cookie dough base uses active sourdough starter for that signature tang. The combination of powdered sugar and brown sugar creates the perfect texture, not too cakey, not too crispy. The optional almond extract amplifies the cherry flavor beautifully (cherries and almonds are botanical cousins, so they’re a natural pairing). Cream of tartar helps create a tender crumb and adds a subtle tang that complements the sourdough.
For the Fermented Crumble Topping:
This isn’t just any crumble, it’s fermented overnight with sourdough starter, which adds incredible depth of flavor. The cinnamon gives it that classic cherry pie spice warmth. When baked underneath the cookie, it becomes gloriously crispy and buttery.
For the Cherry Pie Filling:
Fresh or frozen cherries work equally well here, making this a year-round recipe. The cornstarch thickens the filling so it stays put and doesn’t make your cookies soggy. Fresh lemon juice brightens the cherry flavor and balances the sweetness. The optional almond extract is highly recommended, it makes the cherry flavor pop.
For the White Chocolate Drizzle:
This is the finishing touch that makes these cookies look professional. The coconut oil helps thin the white chocolate for easy drizzling and gives it a beautiful sheen.
Tips for Success
Measure your flour correctly. Too much flour will make your cookies dry.
Use active, bubbly sourdough starter. Your starter should have been fed 4-8 hours before you use it and should be at its peak, bubbly, doubled in size, and passing the float test.
Don’t skip the fermentation time. The overnight rest is what makes these cookies special. Plan ahead and you’ll be rewarded with incredible flavor.
Keep your butter cold for the crumble. This is crucial for achieving that perfect crumbly texture. If your butter starts to soften, pop the bowl in the fridge for a few minutes.
Let the cherry filling cool completely before assembling. This prevents it from making your layers soggy and makes it much easier to work with.
Use a circle cutter as your guide. This keeps your cookies uniform in size and helps you portion everything correctly. A wide-mouth mason jar lid works great if you don’t have a cookie cutter.
Want the rustic marble top with the pie filling peaking through? Add in irregular holes and gaps in the crumble when you spread it out.
Don’t overbake. These cookies are done when you see golden browning on the crumble edges peeking out from under the cookie top. The cookie itself will look just set.
Step-by-Step Process
Day 1: Setting Up for Success
Start by making your cookie dough. Cream your butter and sugars until light and fluffy – this incorporates air and creates a tender texture. Add your egg and extracts, then fold in your sourdough starter. The dough will look a bit loose at this stage, which is normal. Mix in your dry ingredients just until combined, then wrap and refrigerate for 8-24 hours.
Next, make your fermented crumble. You can do this by hand with a pastry cutter or use a food processor for speed. The key is to work quickly so your butter stays cold. You want a texture that resembles coarse sand or brown sugar – it should hold together when squeezed but still be crumbly. This also gets wrapped and refrigerated overnight.
Day 2: Assembly and Baking
Your cherry pie filling needs to be made and cooled before you can assemble your cookies. Cook your cherries with sugar, cornstarch, and flavorings until the mixture thickens and becomes glossy. Most of the cherries should break down, creating a thick, jammy consistency. Let this cool completely, you can even make it the night before if you want to get ahead.
Now comes the fun part, assembly. Spread circles of crumble directly on your parchment lined baking sheet using your cookie cutter as a guide. Top each crumble circle with a spoonful of cherry filling. Roll out your fermented cookie dough and cut circles to place on top. Gently press everything together, tucking in any stray crumbs for neat edges.
Bake until you see those telltale golden edges peeking out from under the cookie tops. Let them cool completely on the pan, they’ll firm up as they cool. Finish with a drizzle of melted white chocolate for that professional bakery look.
Variations to Try
Use different toppings. Dark chocolate drizzle, a dusting of powdered sugar, or even a cream cheese glaze would all be amazing.
Add nuts to the crumble. Chopped almonds or pecans would add great texture and flavor.
Storage and Serving
These cookies are best enjoyed within the first two days when the textures are at their peak. Store them covered at room temperature. After two days, transfer them to the refrigerator where they’ll keep for up to 5 days.
You can freeze the assembled, unbaked cookies for up to 3 months. Place them on a baking sheet to freeze solid, then transfer to a freezer bag. Bake from frozen, adding a few extra minutes to the baking time.
The cookie dough and crumble can be made up to 3 days in advance and kept refrigerated. The cherry filling can also be made ahead and stored in the fridge for up to a week.
Frequently Asked Questions
Can I use sourdough discard instead of active starter?
For best results, use active, fed starter. Discard won’t provide the same rise or fermentation benefits, though the recipe will still work in a pinch.
My cookie dough is too soft to roll. What should I do?
Pop it back in the fridge for 15-30 minutes. Cold dough is much easier to work with. You can also roll it between two sheets of parchment paper. Flour your surface well.
Can I make these cookies smaller or larger?
Absolutely! Just adjust your baking time accordingly. Smaller cookies will bake faster, larger ones will need more time.
Why is my crumble turning into a dough ball?
You’re overworking it. The food processor method requires a light touch, pulse just until combined. If it starts clumping too much, you’ve gone too far.
Final Thoughts
These Cherry Pie Sourdough Cookies are a labor of love, but they’re absolutely worth the effort. The combination of textures and flavors is unlike anything you’ll find at a bakery, and the long fermentation makes them special in ways that go beyond just taste. They’re a conversation starter, a show-stopper, and honestly, they’re just really fun to make.
Whether you’re looking for a special treat for a gathering, a unique way to use your sourdough starter, or just want to challenge yourself with something new, these cookies deliver. Plus, there’s something deeply satisfying about serving a cookie that makes people ask, “Wait, how did you make this?”
More Sourdough Cookie Recipes You’ll Love
Did you make these Cherry Pie Sourdough Cookies? I’d love to see them! Tag me on Instagram @h3artofthehome and let me know how they turned out. Don’t forget to leave a comment and rating below, it helps other bakers find this recipe and it makes my day to hear from you!
Jump to RecipeSourdough Cookie Base
- 120g active sourdough starter
- 113g unsalted butter, softened
- 80g powdered sugar
- 67g brown sugar
- 50g egg (1 large)
- 5g vanilla extract
- 2.5g almond extract (1/2 teaspoon) optional
- 270g all-purpose flour
- 2g baking powder (1/2 teaspoon)
- 1.5g salt (1/4 teaspoon)
- 1/8 teaspoon cream of tartar
Fermented Crumble Topping
- 120g all-purpose flour
- 80g brown sugar
- 30g active sourdough starter
- 60g cold butter, cubed
- 1/2 teaspoon salt
- 5g vanilla extract
- 30g powdered sugar
- 1/2 teaspoon cinnamon (for that classic cherry pie spice)
Cherry Pie Filling
- 450g fresh or frozen cherries, pitted
- 75g granulated sugar
- 30g cornstarch
- 15g fresh lemon juice
- 1/4 teaspoon almond extract(optional)
- 1/4 teaspoon vanilla extract
- Pinch of salt
White Chocolate Drizzle
- 100g white chocolate, chopped
- 1-2 teaspoons coconut oil
Instructions
Day 1: Prepare Dough and Crumble for Fermentation
Make the cookie dough:
- In a large bowl, cream together softened butter, powdered sugar, and brown sugar until light and fluffy
- Add egg, vanilla extract, and almond extract (if using), mix well
- Add sourdough starter and mix until combined
- In a separate bowl, whisk together flour, baking powder, salt, and cream of tartar
- Gradually add dry ingredients to wet ingredients, mixing until just combined
- Dump out onto plastic wrap, wrap well and refrigerate for 8-24t hours
Make the fermented crumble:
Hand Method:
- In a medium bowl, mix flour, brown sugar, salt, powdered sugar, cinnamon, and sourdough starter
- Add cold cubed butter and cut in using a pastry cutter or your fingers until mixture resembles coarse crumbs
- Add vanilla and mix gently
Food Processor Method:
- Add flour, brown sugar, salt, powdered sugar, cinnamon, and sourdough starter to food processor
- Pulse 3 to 4 times to combine dry ingredients
- Add cold cubed butter and pulse 10-15 times in short bursts until mixture resembles coarse crumbs
- Add vanilla and pulse 1-2 times just to incorporate
- Pulse until all ingredients combine until you have a brown sugar type texture to your crumble. You can squeeze it together and it will stay formed. Go slowly, you don’t want it to turn into a dough ball.
- Cover and refrigerate alongside the cookie dough for 8-24 hours
Day 2: Assembly and Baking
Prepare the cherry pie filling:
- In a medium saucepan, combine cherries, granulated sugar, lemon juice, almond extract, vanilla extract, and salt
- Cook over medium heat, stirring gently, for 8-12 minutes until cherries begin to release their juices and mixture thickens
- Continue cooking for 2-3 more minutes until mixture becomes glossy and coats the back of a spoon
- Most cherries should soften and you can crush them into smaller pieces
- Mix the cornstarch with about 2 tablespoons of water and slowly drizzle in while whisking.
- Gently stir until it becomes a dark red color.
- Remove from heat and let cool completely (at least 45 minutes) cover with plastic wrap and refrigerate until cold for faster cooling

Prepare for assembly:
- Preheat oven to 350°F (175°C)
- Line a large baking sheet with parchment paper My favorite pans
- Get your 2.5-3 inch circle cutter or wide mouth canning jar Biscuit cutter set

Assemble the cookies:
- Using your circle cutter as a guide, spread about 2 rounded tablespoons of fermented crumble mixture on the parchment in circles. You don’t need to press them together or down. Just loosely in a circle the size of the cutter. Want the rustic marble top with the pie filling peaking through? Add in irregular holes and gaps in the crumble when you spread it out.
- Top each crumble circle with 1 rounded tablespoon of cooled cherry pie filling, gently spread around the middle. Try to keep it from going over the edges of the crumble
- Roll out the fermented cookie dough on a floured surface to a rough rectangle, 12″x 10″, approximately 3/8″ inch thick Handmade rolling pins
- Using your circle cutter, cut out circles from the dough.
- Gently gather scraps, press together to form a ball and roll out another rectangle, and continue cutting until all dough is used. If you’re met with resistance wrap and place in the fridge for 15-30 minutes.
- Place each cookie circle on top of the crumble and cherry layers
- Gently press down to adhere making sure the crumble and cherry filling are under the cookie
- Push any crumbs, sticking out under the cookie top, under to keep the edges tidy

Bake:
- Bake for 18-22 minutes, until you can see dark golden browning on the crumble edges around the bottom.
- Remove from oven and let cool completely on the baking sheet
Letting the Filling Set:
After baking, the cherry pie filling will continue to thicken and set as it cools. The natural pectin in cherries combined with the cornstarch will create a beautiful gel-like consistency that won’t be sticky to the touch. This cooling period is crucial, the filling transforms from a hot, liquid state to a stable, sliceable layer that holds its shape beautifully, just like a real cherry pie slice.
Add white chocolate drizzle:
- Melt white chocolate with 1 teaspoon of coconut oil in a microwave (mixing every 20 seconds) or double boiler, until smooth
- Using a spoon or piping bag, drizzle melted white chocolate over the cooled cookies
Serve:
Serve immediately or store covered for up to 2 days. Place in the refrigerator after that.

Cherry Pie Sourdough Cookies (Long Fermented)
Ingredients
Sourdough Cookie Base
- 120 g active sourdough starter
- 113 g unsalted butter softened
- 80 g powdered sugar
- 67 g brown sugar
- 50 g egg 1 large
- 5 g vanilla extract
- 2.5 g almond extract 1/2 teaspoon optional
- 270 g all-purpose flour
- 2 g baking powder 1/2 teaspoon
- 1.5 g salt 1/4 teaspoon
- 1/8 teaspoon cream of tartar
Fermented Crumble Topping
- 120 g all-purpose flour
- 80 g brown sugar
- 30 g active sourdough starter
- 60 g cold butter cubed
- 1/2 teaspoon salt
- 5 g vanilla extract
- 30 g powdered sugar
- 1/2 teaspoon cinnamon for that classic cherry pie spice
Cherry Pie Filling
- 450 g fresh or frozen cherries pitted
- 75 g granulated sugar
- 30 g cornstarch
- 15 g fresh lemon juice
- 1/4 teaspoon almond extract optional
- 1/4 teaspoon vanilla extract
- Pinch of salt
White Chocolate Drizzle
- 100 g white chocolate chopped
- 1-2 teaspoons coconut oil
Instructions
Day 1: Prepare Dough and Crumble for Fermentation
- Make the cookie dough:
- In a large bowl, cream together softened butter, powdered sugar, and brown sugar until light and fluffy
- Add egg, vanilla extract, and almond extract (if using), mix well
- Add sourdough starter and mix until combined
- In a separate bowl, whisk together flour, baking powder, salt, and cream of tartar
- Gradually add dry ingredients to wet ingredients, mixing until just combined
- Dump out onto plastic wrap, wrap well and refrigerate for 8-24 hours
- Make the fermented crumble:
- Hand Method:
- In a medium bowl, mix flour, brown sugar, salt, powdered sugar, cinnamon, and sourdough starter
- Add cold cubed butter and cut in using a pastry cutter or your fingers until mixture resembles coarse crumbs
- Add vanilla and mix gently
- Food Processor Method:
- Add flour, brown sugar, salt, powdered sugar, cinnamon, and sourdough starter to food processor
- Pulse 3 to 4 times to combine dry ingredients
- Add cold cubed butter and pulse 10-15 times in short bursts until mixture resembles coarse crumbs
- Add vanilla and pulse 1-2 times just to incorporate
- Pulse until all ingredients combine until you have a brown sugar type texture to your crumble. You can squeeze it together and it will stay formed. Go slowly, you don’t want it to turn into a dough ball.
- Cover and refrigerate alongside the cookie dough for 8-24 hours
Day 2: Assembly and Baking
- Prepare the cherry pie filling:
- In a medium saucepan, combine cherries, granulated sugar, lemon juice, almond extract, vanilla extract, and salt
- Cook over medium heat, stirring gently, for 8-12 minutes until cherries begin to release their juices and mixture thickens
- Continue cooking for 2-3 more minutes until mixture becomes glossy and coats the back of a spoon
- Most cherries should soften and you can crush them into smaller pieces
- Mix cornstarch with 2 tablespoons of water and slowly drizzle in while whisking until thickened and a dark red color.
- Remove from heat and let cool completely (at least 45 minutes) cover with plastic wrap and refrigerate until cold for faster cooling
- Prepare for assembly:
- Preheat oven to 350°F (175°C)
- Line a large baking sheet with parchment paper
- Get your 2.5-3 inch circle cutter or wide mouth canning jar
- Assemble the cookies:

- Using your circle cutter as a guide, spread about 2 rounded tablespoons of fermented crumble mixture on the parchment in circles. You don’t need to press them together or down. Just loosely in a circle the size of the cutter. Want the rustic marble top with the pie filling peaking through? Add in irregular holes and gaps in the crumble when you spread it out.
- Top each crumble circle with 1 rounded tablespoon of cooled cherry pie filling, gently spread around the middle. Try to keep it from going over the edges of the crumble
- Roll out the fermented cookie dough on a floured surface to a rough rectangle, 12″x 10″, approximately 3/8″ inch thick
- Using your circle cutter, cut out circles from the dough.
- Gently gather scraps, press together to form a ball and roll out another rectangle, and continue cutting until all dough is used. If you’re met with resistance wrap and place in the fridge for 15-30 minutes.
- Place each cookie circle on top of the crumble and cherry layers
- Gently press down to adhere making sure the crumble and cherry filling are under the cookie
- Push any crumb sticking out under the cookie top, to keep the edges tidy
- Bake:
- Bake for 18-22 minutes, until you can see dark golden browning on the crumble edges around the bottom.
- Remove from oven and let cool completely on the baking sheet
- Add white chocolate drizzle:
- Melt white chocolate with 1 teaspoon of coconut oil in a microwave (mixing every 20 seconds) or double boiler, until smooth
- Using a spoon or piping bag, drizzle melted white chocolate over the cooled cookies
Serve:
- Serve or store covered for up to 2 days. Place in the refrigerator after that.
Notes
Tips for Success
- Cherry prep: If using fresh cherries, pit them carefully. Frozen cherries work wonderfully and don’t need thawing first
- Gentle handling: Use a thin, flexible spatula to remove cookies from parchment to prevent breaking
- Complete cooling is crucial: Removing too early will cause the cherry filling to move around and the cookies to fall apart
- Dough thickness matters: 3/8 inch thick ensures the cookie bakes through without being too thick or thin
- Fermentation time: 12-24 hours develops the best flavor in both the dough and crumble
- Assembly spacing: Leave about 2 inches between cookies on the baking sheet to allow for slight spreading
Yield
Makes approximately 12-15 individual cookies (depending on cutter size)

Total Time
- Prep: 45 minutes
- Fermentation: 8-24 hours
- Baking: 18-22 minutes
- Cooling: 1 hour+
- Chocolate Set: 1 hour+
Fresh vs. Frozen cherries:
- Fresh: Brighter flavor, firmer texture, requires pitting
- Frozen: More convenient, use straight from freezer, slightly more jammy texture
- Both work perfectly – the cornstarch and cooking method handle any differences
Disclosure: As an affiliate partner, I earn from qualifying purchases and may receive compensation for purchases made through my links. Your support helps me keep creating great content at no additional cost to you!


Leave a Reply