If you have ever picked up a low carb wrap and watched it crack down the middle before you even got it to your mouth, this one is going to feel like a small miracle.
This is the same whipped egg white batter from my High Protein Egg White Pizza Crust, just baked differently. Instead of spreading it across a half sheet pan and building a pizza on top, you spread it into a quarter sheet pan, bake it a little shorter, and let it cool completely. What you end up with is a flexible, foldable, genuinely rollable wrap that holds together under a real amount of filling.
I tested it two ways because I did not believe it myself. First as a straight wrap, rolled and cut in half. Then as pinwheels, sliced into rounds, which is the harder test by a mile. Both held. No cracking, no unraveling, no sad pile of filling on the cutting board.
Table of Contents
Why This Works as a Wrap
The pizza version of this crust gets baked, topped, baked again, and broiled. All of that additional oven time drives off moisture and firms the structure, which is exactly what you want under sauce and melted cheese. It is also exactly what you do not want in a wrap.
Here the crust goes into the oven once, comes out a few minutes earlier, and cools completely before anything touches it. That shorter bake leaves enough flexibility in the set egg white foam to bend without fracturing. The cooling step is not optional either. A warm crust is still releasing steam, and steam is what makes it tear when you try to roll it.
The result is a wrap that is nearly carb free without the discard, holds up to sauce and wet fillings, and comes in at a protein number no store bought tortilla is going to touch.

Ingredients
This is the same batter as the pizza crust, so if you have made that one you already know it.
Egg whites: Room temperature, whipped to stiff peaks. The entire structure comes from here.
Cornstarch: Stabilizes the foam and keeps the finished wrap from going rubbery. Do not skip it.
Dried oregano, garlic powder, onion powder: These season the wrap itself so it does not taste like a plain baked egg. Worth every quarter teaspoon.
Sourdough discard (optional): Room temperature and past peak, folded in after whipping. I actually like it even more in the wrap than in the pizza. It adds a little body and pliability that makes rolling easier.
Avocado oil spray: For the pan or the parchment. Non negotiable for a clean release.
For the full ingredient breakdown, the scaling chart, and the science of getting to stiff peaks without deflating the foam, head over to the egg white pizza crust post. Everything there applies here.
The Only Three Things That Change
If you already make the pizza version, here is the entire difference:
The pan. A quarter sheet pan instead of a half sheet. Same amount of batter, smaller footprint, which gives you a thicker, more flexible sheet instead of a thin crisp one.
The bake time. About 12 minutes instead of 15, and no second bake, no broiler.
The cool down. Five minutes resting in the pan, then flipped onto a wire rack and cooled completely before you fill it. This is the step people will skip and then wonder why their wrap split.
That is it. Same batter, same oven temperature, same whipping method.
How to Bake the Wrap
Prep the pan two ways. If you have a genuinely good nonstick quarter sheet pan, a light spray of avocado oil is enough. If you are not sure about your pan, line it with parchment and spray the parchment. Either works. The second option is the safer bet.

Spread it evenly, corner to corner. Push the batter all the way into the corners with an offset spatula or a bench scraper. Even thickness matters more here than it does on the pizza, because a thin spot becomes a tear line the moment you roll it.
Bake at 375 degrees F (190 degrees C) for about 12 minutes, or until it is cooked all the way through. You are looking for a completely matte, dry surface with no shiny or wet spots and the barest hint of gold at the edges. Underbaked in the center is the one failure mode here.

Rest 5 minutes in the pan. This lets the structure firm up enough to move in one piece.
Flip it out onto a wire cooling rack. Not a plate, not a cutting board. Air has to get underneath or the bottom goes soggy and you lose the whole thing.
Cool completely. Warm crust plus cold filling equals a wrap that tears. Give it the time.

How to Fill and Roll It
Once it is fully cool, layering is the same logic as any wrap. Build in order and leave yourself a border.

Cheese goes down first. Lay your slices directly on the crust with about an inch of bare crust along the edge closest to you and along the far edge. That bare border is what seals the roll shut and keeps filling from squeezing out the ends.
Protein next. Deli slices laid flat, overlapping slightly, on top of the cheese.
Then everything else. Veggies, slaw, whatever you are using. Keep this layer even rather than piled in the middle. A mound in the center makes the roll bulge and split.
Sauce last, and go lighter than you think. Drizzle it over the top rather than spreading it on the crust. Sauce directly against the crust will soften it.

Roll from the long edge closest to you, snug but not crushed, keeping steady pressure with both hands as you go. Finish seam side down and let it sit for a minute before cutting.
Cut in half on a slight angle. One sheet makes one wrap, cut into two halves. That is a full lunch.
Recipe

High Protein Egg White Wrap
Equipment
- Quarter sheet pan
- Parchment paper
- Hand mixer or stand mixer with whisk attachment
- Large mixing bowl
- Silicone spatula
- Offset spatula
- kitchen scale
- Wire cooling rack
Ingredients
- 5 egg whites room temperature
- 15 grams cornstarch 1 tablespoon plus 2 teaspoons
- 1 gram dried oregano 1 teaspoon
- 1.5 grams garlic powder 1/2 teaspoon
- 1.5 grams onion powder 1/2 teaspoon, optional
- 75 grams sourdough discard 1/3 cup, room temperature and past peak, optional
- avocado oil spray for the pan
Instructions
- Preheat your oven to 375 degrees F (190 degrees C). If you have a good nonstick quarter sheet pan, spray it lightly with avocado oil. If not, line the pan with parchment paper and spray the parchment.
- Add the egg whites, cornstarch, oregano, garlic powder, and onion powder to a large clean mixing bowl. Your bowl and beaters need to be completely free of grease and moisture or the whites will not whip properly.
- Using a hand mixer or a stand mixer fitted with the whisk attachment, whip on medium until foamy, then increase to medium high and whip until stiff peaks form. The mixture should be glossy and smooth, and the peaks should stand straight up on the beater without drooping.
- If using sourdough discard, drizzle the room temperature discard slowly over the whipped egg whites. Fold it in with a silicone spatula using slow deliberate strokes, going down through the center and sweeping up and over the sides of the bowl. Stop as soon as it is fully incorporated. Do not overfold or the foam will deflate.
- Transfer the mixture to the prepared quarter sheet pan. Spread it evenly all the way into the corners, keeping the thickness consistent across the entire pan. Thin spots become tear lines when you roll.
- Bake for about 10-12 minutes, until the surface is completely matte and dry with no shiny spots and the wrap is cooked all the way through. The edges should just begin to pull away from the pan.
- Let the wrap rest in the pan for 5 minutes, then flip it out onto a wire cooling rack.
- Cool completely before filling.
- Fill and use as needed. Roll it as a wrap, slice it into pinwheels, or load it with whatever you have on hand, turkey and cheese, Caesar salad, buffalo chicken, or breakfast eggs and sausage.
Notes
Using It as a Wrap
This is the everyday version and the one I make most. Cheese, deli turkey, and a handful of coleslaw mix, rolled and cut in half. Two minutes of assembly and it eats like a real sandwich.
A few things that make the wrap version work better than a tortilla ever did for me:
It does not crack at the fold. The set egg white foam bends rather than splitting, which is the whole reason low carb tortillas frustrate people.
It holds sauce. As long as the sauce goes over the filling rather than directly on the wrap, it stays intact through lunch instead of turning to paste.
One sheet is one wrap. Cut in half on an angle and you have a full meal, or two halves to split.
It travels. Wrapped tightly in parchment it holds up in the refrigerator for a few hours, which makes it a genuinely practical packed lunch rather than something you have to eat standing at the counter.
Fill it with whatever you would put in any wrap. Turkey and cheese, chopped Caesar salad, buffalo chicken, a breakfast version with eggs and sausage. The wrap is neutral enough to go savory in any direction.

Turning It Into Pinwheels
This is where I found out how sturdy this thing actually is. Pinwheels are a much harder test than a wrap, because every single slice has to hold its shape without the roll collapsing or the filling sliding out.
The batter, the pan, and the bake are identical. What changes is the filling and how you cut it.
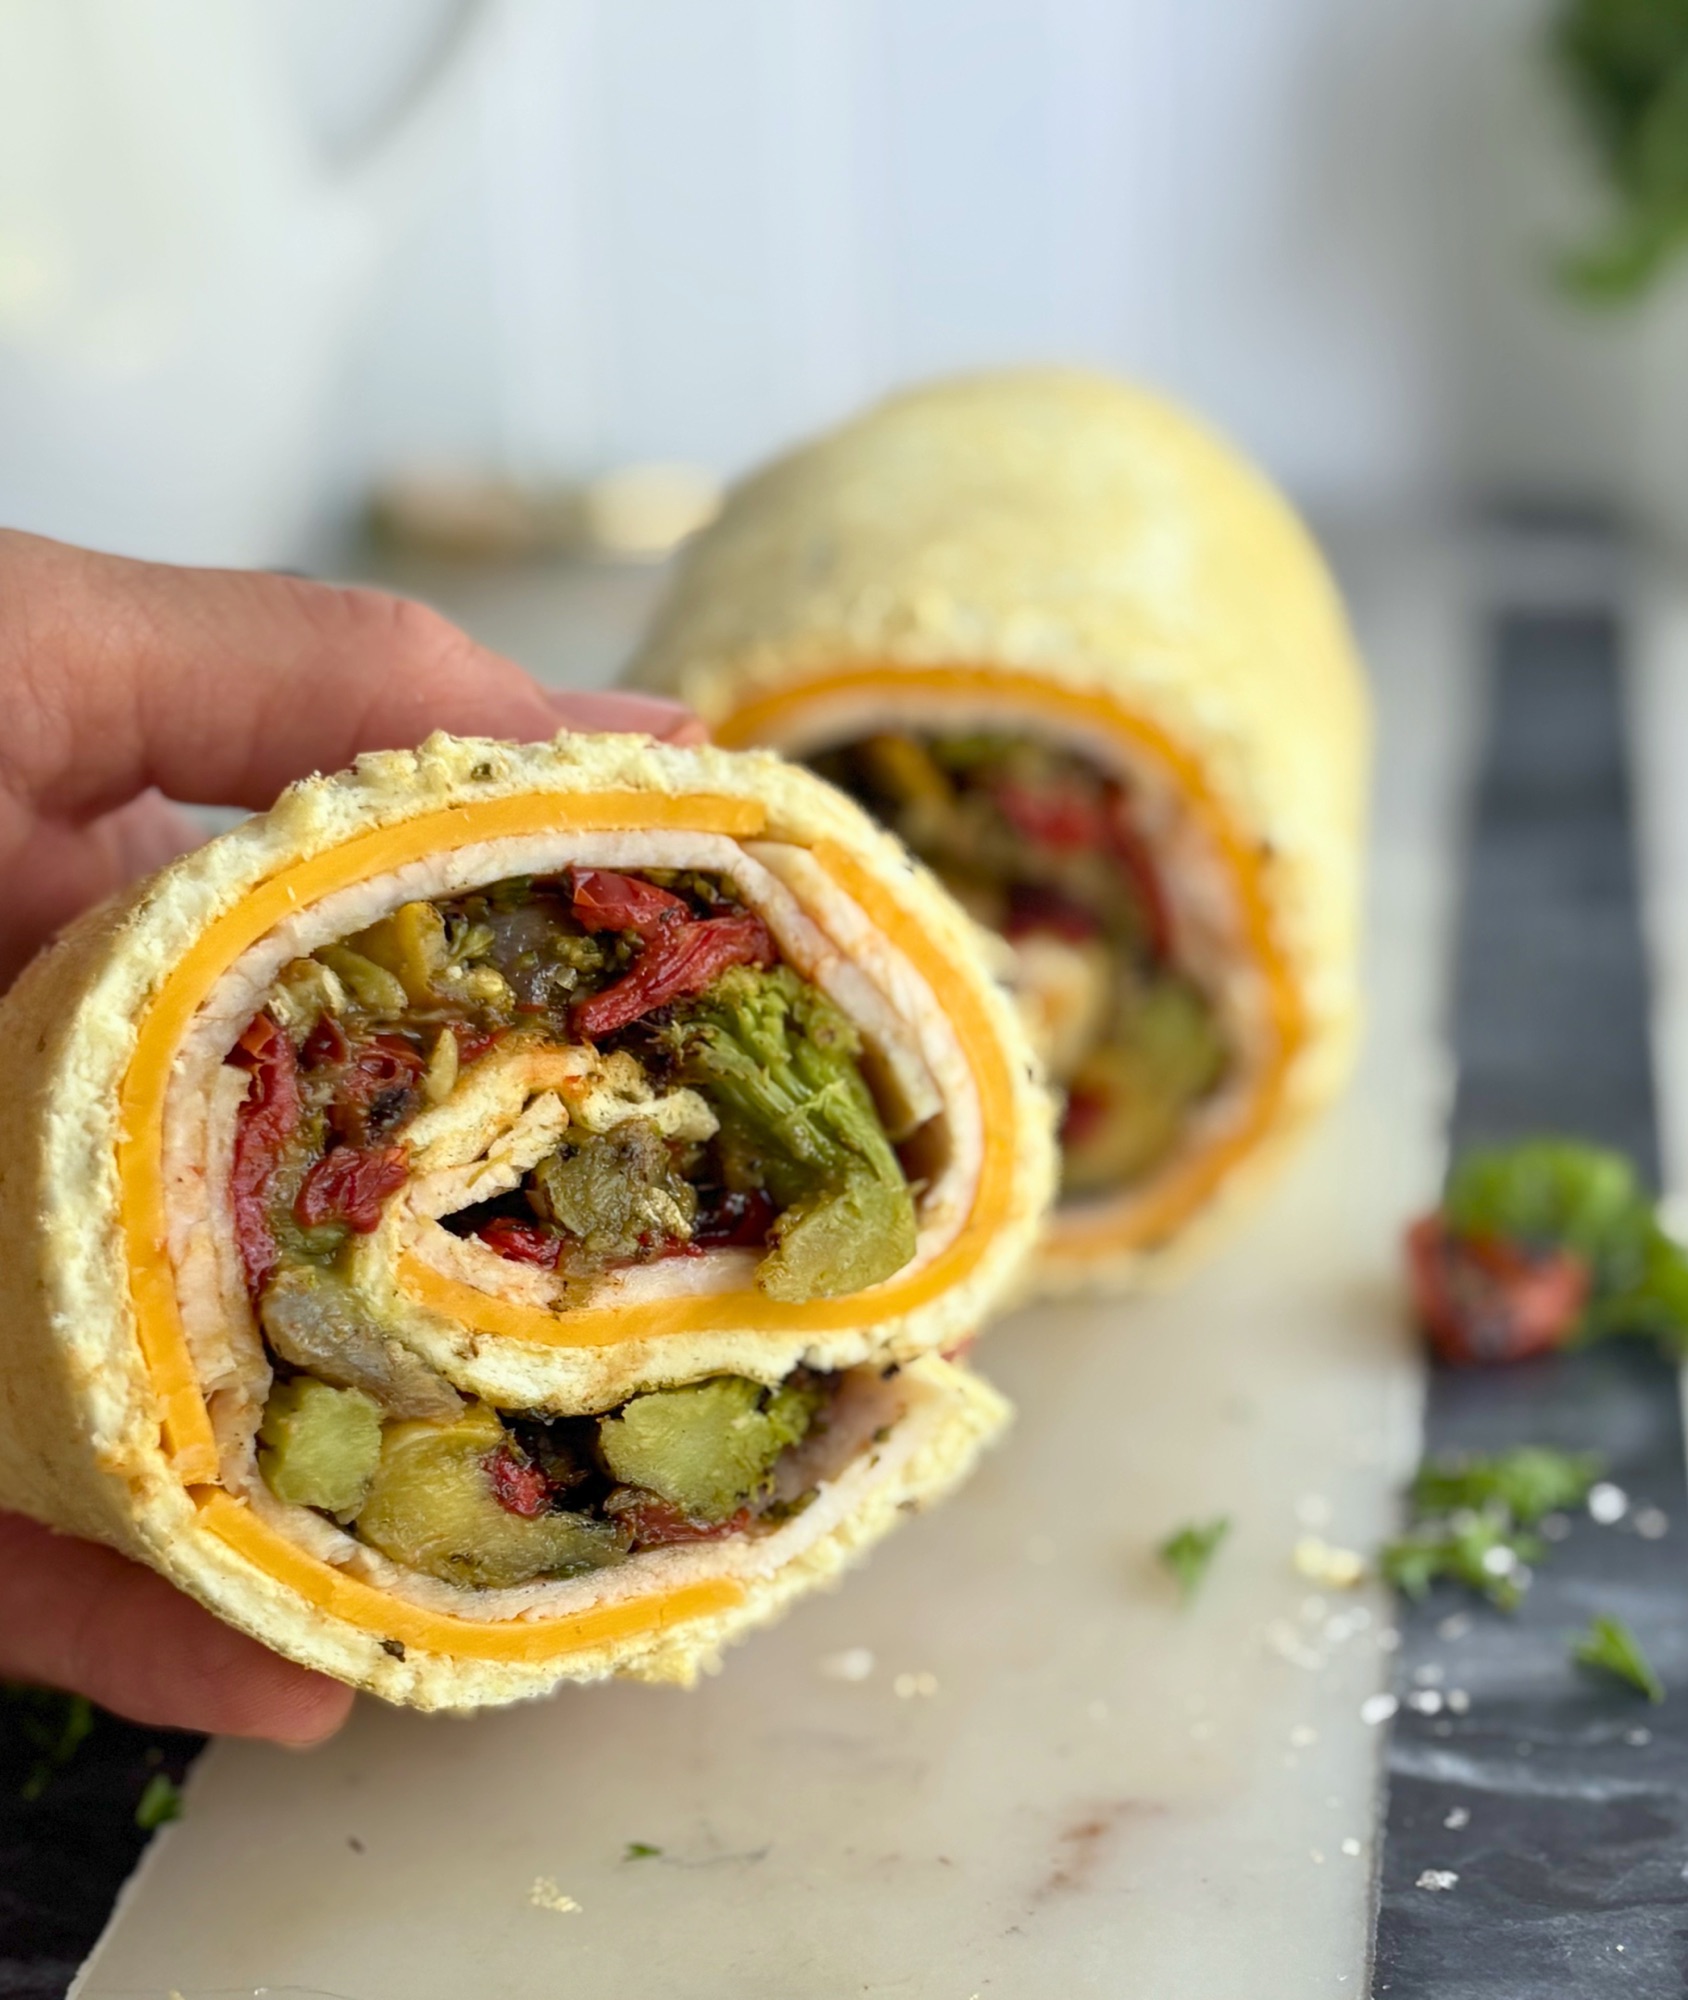
Use firmer fillings. For the pinwheels I did cheddar, roasted turkey, and fire roasted vegetables, the frozen PuraVida blend from Costco. Roasted vegetables work beautifully here because the roasting drives off water. Raw watery vegetables will make the roll soft and the slices will slump.
Drain anything wet. If your vegetables have any liquid clinging to them, pat them dry before they go on. Excess moisture is the enemy of a clean slice.
Roll tighter than you would for a wrap. A loose roll gives you loose spirals. Real pressure as you go is what gives you that tight cross section.
Chill the roll before cutting. Fifteen to twenty minutes in the refrigerator, seam side down and wrapped snugly, makes the slices dramatically cleaner. You can skip it, but you will lose some of the definition.
Cut into roughly 2 inch sections with a sharp serrated knife, using a gentle sawing motion rather than pressing down. Pressing compresses the roll and squeezes the spiral out of shape. One quarter sheet pan gives you 6 pinwheels.

These are the ones to make when you need to bring something. They travel well, they look far more involved than they are, and nobody guesses the wrap is made of egg whites.
Filling Ideas
The one rule that matters across every filling is moisture. Anything raw and watery, fresh tomato slices in particular, will soften the wrap from the inside. Roasted, cooked, or shredded and dry is the way to go.
Beyond that, a few combinations worth stealing:
Buffalo chicken: Shredded chicken tossed in buffalo sauce with a little ranch and shredded lettuce.
Chopped Caesar: Chopped romaine, parmesan, and grilled chicken with just enough dressing to coat.
Turkey club: Turkey, cooked bacon, and a thin layer of mayo. Skip the tomato or the wrap goes soft.
Greek: Chicken, feta, roasted red peppers, and a very light hand with tzatziki.
Breakfast: Scrambled eggs, cheddar, and cooked breakfast sausage crumbles.
Roasted vegetable: Any roasted vegetable blend works, and roasting is what makes it work. The oven drives off the water that would otherwise wreck the wrap.

Macros
These numbers are for the wrap itself, not the filling, since what goes inside is entirely up to you. The discard column assumes a starter fed with King Arthur Organic Bread Flour at 100 percent hydration. With sourdough discard/Without discard: Calories 285/150 Protein 23 g/18 g Carbohydrates 44 g/15 g Fat 1 g/Less than 1 g
A few things worth pointing out.
The protein comes almost entirely from the egg whites. Five whites give you about 18 grams before you add a single thing to it. The discard adds roughly 5 more, which is a little higher than you would get from a starter fed with all purpose, since bread flour runs closer to 13 percent protein against about 11 or 12 for all purpose.
The no discard version is the low carb one. At roughly 15 grams of carbohydrate for the whole wrap, and most of that from the cornstarch, it is a genuinely low carb option in a way that most store bought low carb tortillas are not.
Add your filling on top of these numbers. How high the protein climbs depends entirely on what you put inside, and this is where the wrap earns its keep. See below for what a full build actually looks like.
Building It Into a Full Meal
Here is the version I make, with the discard wrap as the base: Calories/Protein/Carbs/Fat
- Egg white wrap, with discard 285/23 g /44 g/1 g
- Oven roasted turkey breast, 113 g (4 ounces) 100/22 g/2 g/1 g
- Sharp cheddar, 2 slices (21 g each) 160/10 g/2 g/14 g
- Fire roasted vegetables, 255 g (2 cups) 120/3 g/18 g/6 g
- Total: 665/58 g/66 g/22 g
Fifty eight grams of protein in one wrap, and that is with vegetables doing real volume work rather than a pile of meat. Cut in half it is roughly 330 calories and 29 grams of protein per half, which makes it a legitimate two meal build if you are eating lighter.
Swap the discard wrap for the plain version and you land at about 530 calories, 53 grams of protein, and 37 grams of carbohydrate, which is the one to make if you are watching carbs rather than calories.
The turkey is where most of the added protein comes from, and it is worth weighing it rather than eyeballing slices. Four ounces looks like less than you think once it is spread flat.
The vegetables are worth calling out too. The blend I use is red bell pepper, zucchini, yellow squash, red onion, and broccoli tossed in avocado oil with garlic powder, pink salt, onion powder, and black pepper. No added sugar and no seed oils, which is not a given with frozen vegetable blends. Two cups is three servings on the bag and adds real volume for 120 calories.
These are calculated estimates. Your exact numbers will shift with the flour your starter is fed, the hydration you keep it at, and the brands you fill it with.
Make Ahead and Storage
Bake the wrap ahead. Cool it completely on a wire rack, then stack with parchment between layers in an airtight container in the refrigerator for up to 2 days. Let it come closer to room temperature before rolling. Cold straight from the fridge is stiffer and more likely to crack.
Assembled wraps are best eaten the day you make them. Wrapped tightly in parchment they hold up in the refrigerator for a few hours, which makes them a solid packed lunch.
Pinwheels actually improve with a short chill, so assembling in the morning for an afternoon event works in your favor. Keep them covered and refrigerated.
Freezing. Freeze the baked wrap only, never filled. Cool completely, wrap flat in parchment, and freeze for up to 1 month. Thaw at room temperature before filling.
Do not microwave. It turns the texture soft and rubbery and you lose everything that makes this work.
Shop This Recipe
These are the tools I actually use for this recipe. Nothing complicated, but the right pan makes a real difference here.
- Quarter Sheet Pan — This is the pan that makes the wrap the right size and thickness. A half sheet spreads the same batter too thin for rolling.
- Parchment Paper — Your insurance policy for a clean release. Pair it with a light spray of oil.
- Hand Mixer — You need a mixer to reach stiff peaks efficiently, and a hand mixer gives you good control.
- Stand Mixer — Works just as well if you would rather not hold anything. Use the whisk attachment.
- Silicone Spatula — Essential for folding in the discard without deflating the foam, and for spreading the batter evenly.
- Wire Cooling Rack — Air has to circulate underneath while the wrap cools or the bottom softens. Do not skip it.
- Avocado Oil Spray — Neutral flavor, high smoke point, and a light mist is all you need.
- Kitchen Scale — Takes the guesswork out of weighing your discard and cornstarch.
More High Protein Recipes from H3art of the Home
- High Protein Egg White Pizza Crust
- High Protein Sourdough Sandwich Bread
- High Protein Yeasted Sandwich Bread
- High Protein Sourdough Dinner Rolls
- High Protein Sourdough Pretzel Bites
- High Protein Grinder Salad
- Crispy Cottage Cheese Crackers
Frequently Asked Questions
Is this the same recipe as the egg white pizza crust?
Yes, the batter is identical. What changes is the pan size, the bake time, and the cooling. The pizza gets a half sheet pan, 15 minutes, a second bake with toppings, and a broil. The wrap gets a quarter sheet pan, about 12 minutes, and a full cool down with no second bake.
Why did my wrap crack when I rolled it?
Almost always one of three things. It was still warm, it was baked too long, or it was spread unevenly and cracked at a thin spot. Cool it completely on a wire rack and pull it from the oven as soon as the surface is matte and dry.
Can I use carton egg whites?
Fresh whites are strongly preferred. Carton whites are usually pasteurized, which makes them harder to whip to stiff peaks and gives you a less stable foam. If that is all you have, look for cartons that specifically say they are suitable for whipping.
Does it taste eggy?
No. The oregano, garlic powder, and onion powder season the wrap from the inside, so it tastes savory rather than like a plain baked egg. Once there is filling in it, the egg flavor is not something you notice.
Is this gluten free?
Without the sourdough discard, yes. With discard added there is a small amount of flour present from the starter, so it is not technically gluten free, though the fermentation does make it more digestible for many people.
How many pinwheels does one sheet make?
Six, cut into roughly 2 inch sections.
Can I make more than one at a time?
Yes. Scale the batter using the chart in the pizza crust post and bake one quarter sheet pan per wrap. Each sheet makes one wrap.
Do I have to use the sourdough discard?
Not at all. It is an upgrade, not a requirement. Without it the wrap is a little crisper and nearly carb free. With it you get slightly more body and flexibility.
Let’s Connect
If you make this wrap I would love to see it. Leave a comment below and let me know how it turned out, and tag me on Instagram or Facebook so I can share it. And if you want recipes like this one sent straight to your inbox, make sure you are signed up for the H3art of the Home newsletter.
Subscribe to get every new recipe delivered to your inbox.



Leave a Reply