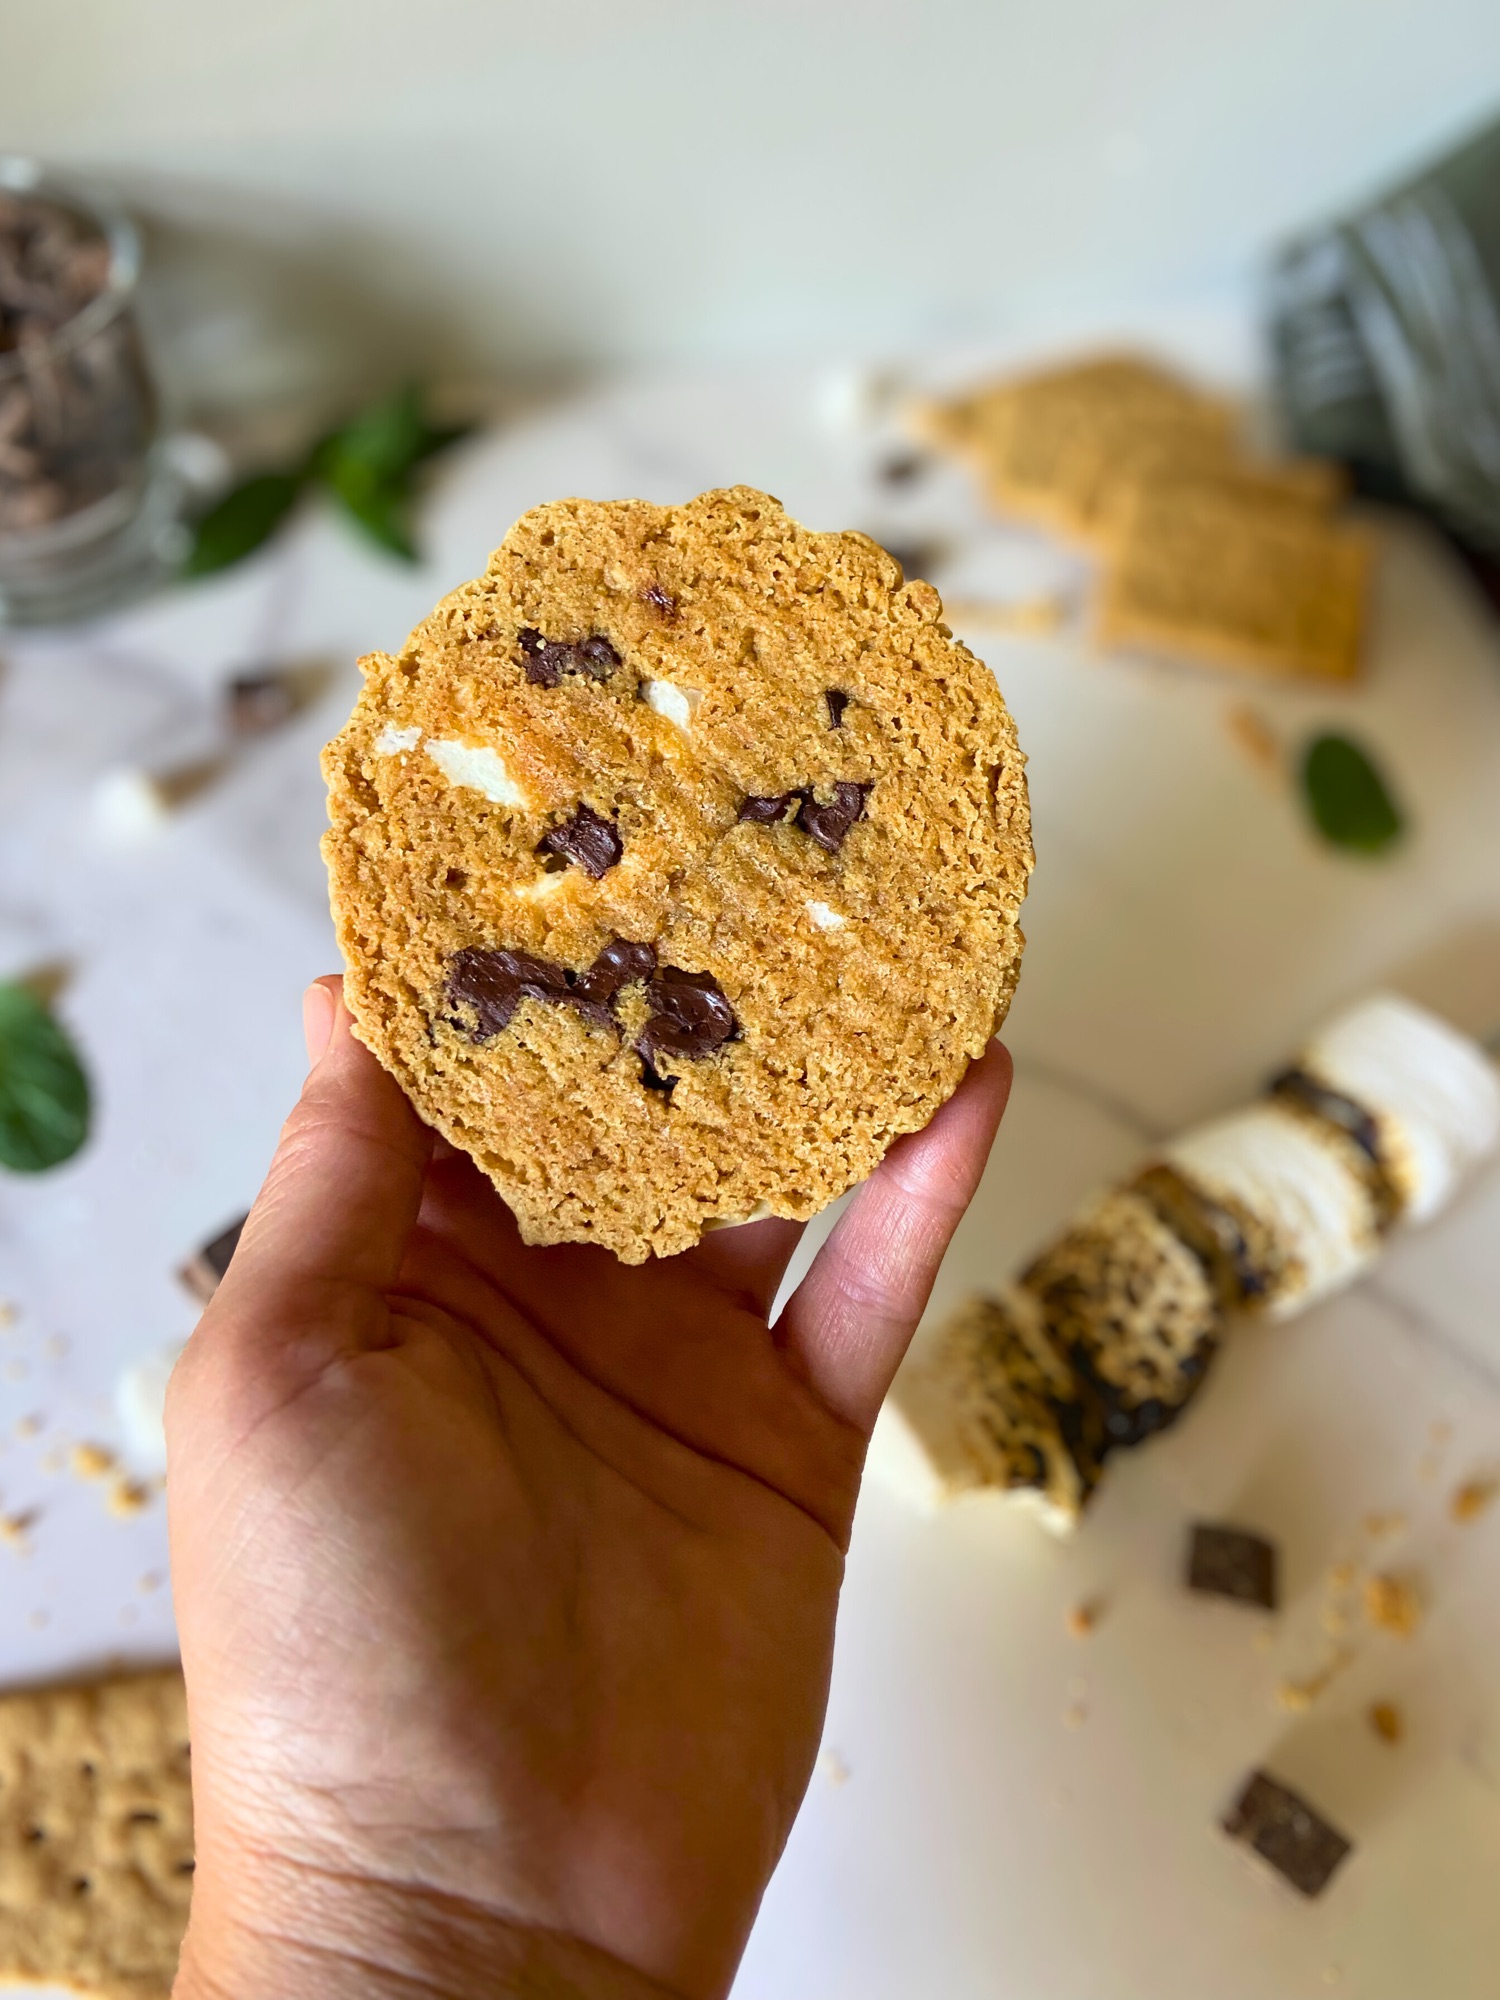
If you have been anywhere near a campfire in your life, you know the s’mores struggle is real. Sticky fingers, burnt marshmallows, chocolate that melts onto everything except where you want it. These s’mores upside down sourdough cookies solve every single one of those problems and deliver all the nostalgic campfire flavor you love in a mess-free, handheld treat that works any time of year.
The secret is a two part fermented base: a cold fermented sourdough cookie dough and a fermented graham cracker crumble that both spend 12 to 24 hours developing flavor in the refrigerator. The upside-down assembly method layers everything in reverse, so when the cookies flip out of the oven, you get that gorgeous marbled crumble top with gooey marshmallow and chocolate peeking through. No campfire required. No sticky fingers in sight.
If you are new to the upside-down cookie method, this post covers everything you need to know. If you are already a fan from the Cherry Pie Sourdough Cookies or Apple Pie Sourdough Cookies, welcome back. You are going to love this one.
Table of Contents
- Why These S’mores Sourdough Cookies Are Different
- Ingredients You Need
- How the Upside-Down Cookie Method Works
- Why Ferment the Cookie Dough?
- Step-by-Step Instructions
- Pro Tips for Success
- Storage and Serving
- No Sourdough Starter? No Problem
- Substitutions and Variations
- Frequently Asked Questions
- Recipe
Why These S’mores Sourdough Cookies Are Different
Most s’mores cookies fall into the same category: a standard drop cookie dough with chocolate chips, crushed graham crackers, and marshmallows thrown on top before baking. They taste fine. They are not these.
What makes this recipe different is the layered construction and the fermentation. You are building two separate components: a sourdough cookie dough that ferments overnight and a graham cracker crumble that also ferments alongside it. Both get cold-fermented for 12 to 24 hours before you even think about assembling. That extra time develops a depth of flavor you simply cannot get from standard cookie dough.
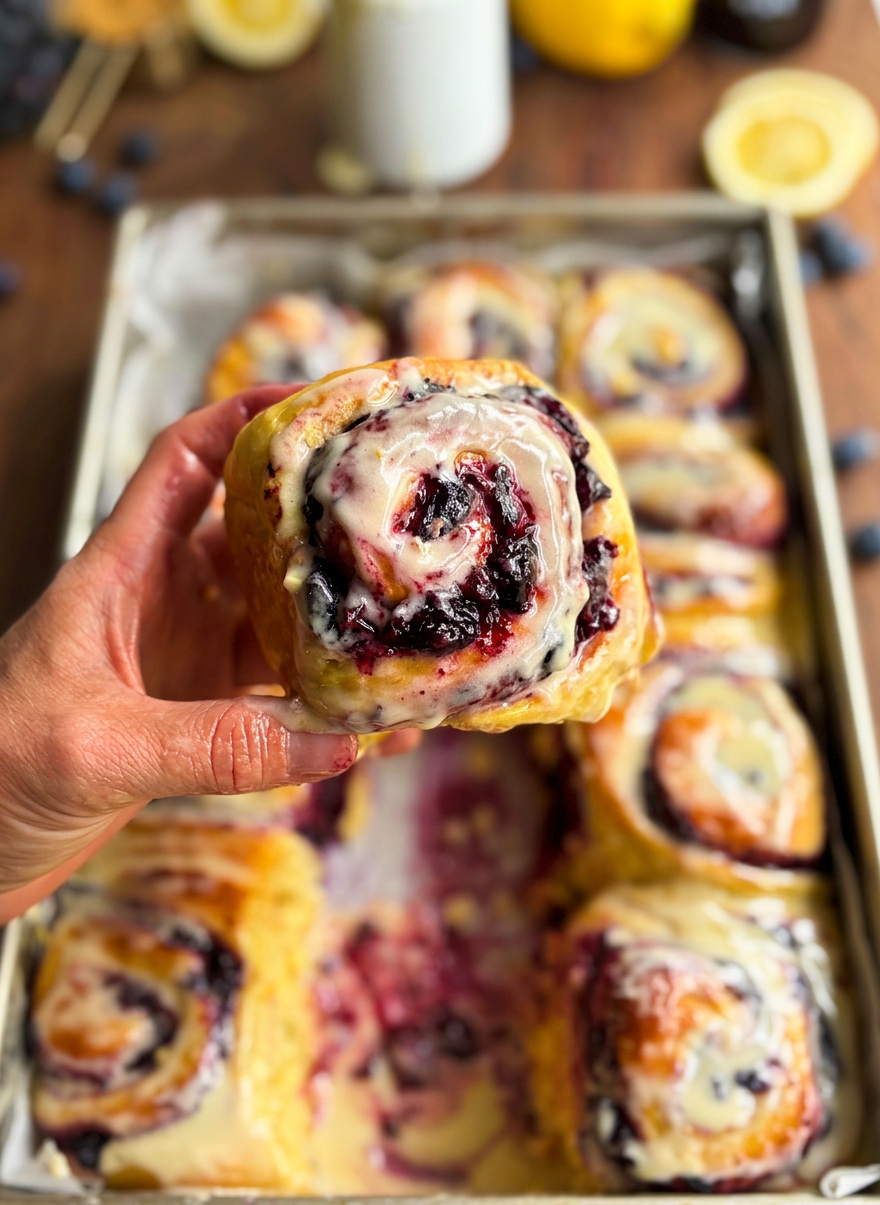
The upside-down assembly is the other game changer. Instead of placing toppings on top of a cookie and hoping they stay put, you build the whole thing in reverse on a parchment-lined sheet pan. The crumble goes down first, then the chocolate chunks and frozen marshmallows, then a circle of fermented cookie dough is pressed on top to seal everything in. When the cookies come out of the oven and you flip them over, the crumble is now the beautiful, marbled top. The chocolate and marshmallow are baked right in, gooey and contained, with no mess.

Ingredients You Need
This recipe has three components. Here is what goes into each one.
For the sourdough cookie base: active sourdough starter, unsalted butter, powdered sugar, brown sugar, one large egg, vanilla extract, almond extract (optional but worth it), all-purpose flour, baking powder, salt, and cream of tartar.
For the fermented graham cracker crumble: graham crackers, all-purpose flour, sourdough starter, brown sugar, powdered sugar, cold cubed butter, salt, and vanilla extract.
For the s’mores layer: mini marshmallows, a chocolate bar chopped into chunks, and cornstarch for dusting the marshmallows before freezing.
A few notes worth mentioning before you start:
The sourdough starter in this recipe goes into both the cookie dough and the crumble. You can use active, peaked starter or straight-from-the-fridge discard. Both work. The fermentation will still happen in the refrigerator either way.
For the chocolate, choose a bar that you would actually eat on its own. Chopped chocolate bars melt into those gorgeous pools that chips never quite achieve. Milk chocolate gives you the most classic s’mores flavor, but dark chocolate works beautifully if you want something a little less sweet. White chocolate is a fun variation too.
Almond extract in the cookie dough is listed as optional, but it is one of those additions that makes people say “what is that flavor?” without being able to identify it. It adds a subtle sweet depth without tasting like marzipan. Highly recommended.
How the Upside-Down Cookie Method Works
If you have not made upside-down cookies before, the process sounds more complicated than it actually is. Here is the basic concept.
Traditional cookies are assembled from the bottom up: dough on the pan, toppings on top. The problem with gooey fillings like marshmallow and chocolate is that they tend to spread, bubble out the sides, or create a sticky mess on the bottom of the pan. The upside-down method flips that logic entirely.
You spread your graham cracker crumble directly onto a parchment-lined sheet pan in rough circles. The crumble becomes the base of what will eventually be the top of the cookie. Chocolate chunks and frozen marshmallows go next, nestled right into the crumble. Then a circle of fermented cookie dough gets pressed on top of everything, sealing all the fillings inside.
When you bake the cookies this way, the dough bakes from the top down, the crumble gets golden and crisp on the pan surface, and the marshmallows and chocolate are completely contained within the cookie. When the cookies cool and you flip them, you get a beautiful crumble-topped cookie with gooey pockets of chocolate and marshmallow running through it.
The technique is the same one used in the Strawberry Shortcake Sourdough Cookies and the Chocolate Covered Strawberry Sourdough Cookies. Once you get comfortable with it, it becomes your go-to for layered cookies.

Why Ferment the Cookie Dough?
Fermenting cookie dough is not traditional, but it creates results that are genuinely difficult to achieve any other way. The wild yeast and bacteria in your sourdough starter spend 12 to 24 hours in the refrigerator slowly breaking down the flour’s starches and proteins. The result is a cookie dough that bakes up with more complex flavor, a more tender crumb, and a texture that holds its shape beautifully when you cut and flip it.
In this recipe, both the cookie dough and the graham cracker crumble ferment together overnight. The crumble fermentation creates tiny air pockets that make it crispier and lighter after baking, which is exactly what you want for that satisfying crunch when you bite through the top layer.
Fermented dough also handles better than standard cookie dough when you are rolling and cutting circles. The gluten has had time to relax, which means the dough is more pliable, less springy, and much easier to work with.
The flavor benefit is real but subtle. You are not adding sourdough bread flavor to a cookie. What you are doing is developing a depth and complexity that makes people keep reaching for another one without
being able to explain exactly why.

Step-by-Step Instructions
Day 1: Make the cookie dough and crumble
Start with the cookie dough. Cream softened butter with powdered sugar and brown sugar until light and fluffy. Add the egg, vanilla, and almond extract if you are using it, then mix in the sourdough starter. In a separate bowl, whisk together the flour, baking powder, salt, and cream of tartar. Add the dry ingredients to the wet ingredients and mix until just combined. Wrap the dough tightly and refrigerate for 12 to 24 hours.
For the crumble, use a food processor. Add the flour, brown sugar, powdered sugar, and salt and pulse a few times to combine. Add the graham crackers and pulse until you have larger chunks, not fine crumbs. You want texture here. Add the cold cubed butter and pulse until incorporated. Then add the vanilla and sourdough starter and pulse until the mixture reaches what I call a “brown sugar texture.” When you squeeze a handful, it holds its shape. When you break it apart, it crumbles easily. That is exactly where you want it. Refrigerate this alongside the cookie dough for the same 12 to 24 hours.
No Food Processor? No Problem
If you do not have a food processor, the hand method works just as well. It just requires a little more speed so your butter stays cold throughout.
Place your graham crackers in a zip-top bag and crush them with a rolling pin until you have a mix of small chunks and fine crumbs. You want real texture here, not a fine powder. Those irregular pieces are what give the crumble its character once it bakes.
Add the crushed graham crackers to a medium bowl along with the flour, brown sugar, powdered sugar, and salt and whisk everything together. Add the cold cubed butter and use a pastry cutter or your fingertips to cut it in until the mixture resembles coarse crumbs with some pea-sized pieces of butter still visible. Add the vanilla extract and sourdough starter and continue working the mixture until it reaches that brown sugar texture where it holds together when squeezed but crumbles apart easily.
The one thing to watch with the hand method is heat. Your hands warm the butter faster than a food processor does, so work quickly and if the mixture starts to feel greasy or soft at any point, put the bowl in the refrigerator for 10 minutes before continuing. Cold butter is what gives you that crispy, distinct crumble layer after baking.
Day 2: Prep, assemble, and bake
Start by coating your mini marshmallows in cornstarch and putting them in the freezer for at least 30 minutes. This is not optional. The cornstarch creates a barrier that slows melting, and the freezing gives the cookie structure time to set before the marshmallows fully soften.
Preheat your oven to 350 degrees F and line a large sheet pan with parchment paper.
Using a 2.5 to 3 inch circle cutter as a guide, spread about 2 rounded tablespoons of graham cracker crumble into circles on the parchment. Here is the part that makes a difference: leave small intentional gaps in the crumble instead of making a solid, perfectly even layer. Those gaps are where the marshmallow and chocolate will peek through, creating the marbled effect after you flip the cookies.
Sprinkle about 1 teaspoon of chocolate chunks over each crumble circle. Add 4 to 5 frozen marshmallows per cookie, pressing them gently into the crumble so they are partially embedded, not just sitting on top.
Roll out the cold fermented cookie dough on a lightly floured surface to about 3/8 inch thickness. Cut circles using your same circle cutter. Place one dough circle on top of each crumble assembly and press down gently around the edges to seal everything in. The dough should cover the crumble circle completely.
Bake for 18 to 22 minutes. You are looking for golden browning on the visible graham cracker edges and a set top on the cookie dough. Let the cookies cool completely on the pan before flipping. Attempting to flip warm cookies will cause them to fall apart.

Pro Tips for Success
Leave gaps in the crumble intentionally. This is the move that separates a beautiful marbled cookie from a solid, uniform top. The marshmallow naturally settles into those gaps as it softens during baking, creating the gooey streaks that make these cookies so visually compelling.
Freeze the marshmallows, no exceptions. Room temperature marshmallows will melt out and pool on your pan before the cookie sets. Frozen marshmallows coated in cornstarch stay mostly intact long enough for the dough to bake around them.
Keep the crumble butter cold. If you are working in a warm kitchen, pop the crumble mixture back in the fridge for 10 minutes before spreading it on the pan. Warm butter in the crumble leads to a denser layer instead of a crispy one.
Do not skip the scraps rest. After your first round of cutting circles, gather the dough scraps, press them together, wrap them, and refrigerate for 15 minutes before rolling again. Overworked dough at room temperature puffs and loses its shape during baking.
Cool completely before flipping. The structure of these cookies needs time to set after coming out of the oven. Give them at least 15 to 20 minutes on the pan before attempting the flip.

Storage and Serving
These cookies are best the day they are baked. The crumble is at its crispest and the marshmallow is at its gooiest within a few hours of coming out of the oven.
For storing, cover at room temperature for up to 2 days. If you need to keep them longer, refrigerate for up to one week. A quick 10-second warm in the microwave before eating brings the marshmallow back to life nicely.
To make these ahead, the cookie dough and crumble both keep in the refrigerator for up to 3 days after making them. You can also freeze the cut dough circles for up to a month and assemble straight from frozen, adding a couple of minutes to the bake time.

No Sourdough Starter? No Problem
You do not need an active sourdough starter to make these cookies. If you do not have one…
Replace the 120g of starter in the cookie dough with
• 60g all-purpose flour
• 60g whole milk.
Replace the 30g of starter in the crumble with
• 15g all-purpose flour
• 15g whole milk.
The structure, texture, and assembly all work exactly the same way. The one thing you will miss is the fermentation flavor, that subtle depth that makes people reach for a second cookie. But the s’mores layers more than carry their weight on their own, so these are still very much worth making.
If you want to build toward having a starter, it takes about 7 days and very little daily effort. Once you have one going, recipes like this one are exactly what it is for.
Substitutions and Variations
No sourdough starter? See the section above for the full swap details.
Chocolate options: Milk chocolate is most traditional for s’mores flavor. Dark chocolate gives you a more sophisticated, less sweet cookie. White chocolate paired with the graham cracker crumble is genuinely excellent if you want something a little different.
Large marshmallows: If you only have regular-sized marshmallows, cut them into quarters before the cornstarch and freezing step.
Make it a discard recipe: This is a great use for sourdough discard that has been in the fridge for a few days. The longer fermentation from the cold discard adds even more complexity to the final cookie.
Frequently Asked Questions
Can I make these without sourdough starter?
Yes. Replace the 120g of starter in the cookie dough with 60g all-purpose flour and 60g whole milk, and replace the 30g starter in the crumble with 15g flour and 15g milk. The texture and structure hold up well. You just skip the fermentation flavor.
How far ahead can I make these?
The dough and crumble both benefit from 12 to 24 hours of fermentation and keep in the refrigerator for up to 3 days. Assemble and bake on the day you plan to serve them.
Do I have to long ferment these cookies?
No! As soon as the dough and crumble are chilled you can begin creating. I would say give the dough about two hours to chill and become more firm.
Why are my marshmallows melting out?
Two things: make sure the marshmallows are frozen for the full 30 minutes before assembly, and make sure they are coated thoroughly in cornstarch. Also, embedding them slightly into the crumble rather than just resting them on top makes a big difference in keeping them contained.
Can I use different chocolate?
Absolutely. Dark chocolate, milk chocolate, and white chocolate all work well. Chopped chocolate bars melt more dramatically than chips and give you those gooey pockets that feel most like an actual s’more.
Do these taste like sourdough bread?
Not at all. The fermentation develops subtle complexity and depth in the flavor without adding any bread-like quality. These taste like a gourmet campfire treat, nothing more.
What size circle cutter should I use?
A 2.5 to 3 inch cutter works well for a standard large cookie. A wide-mouth mason jar lid is a great alternative if you do not have a round cutter.
If you love this series, check out the rest of the upside-down cookie lineup: Cherry Pie Sourdough Cookies, Apple Pie Sourdough Cookies, Strawberry Shortcake Sourdough Cookies, and Chocolate Covered Strawberry Sourdough Cookies.
Recipe

Sourdough S’mores Cookies with Graham Cracker Crumble
Equipment
- mixing bowl
- Stand Mixer hand mixer
- Parchment paper
- thin spatula
- cookie sheet
- Food processor pastry knife or fork
Ingredients
Sourdough Cookie Base:
- 120 g active sourdough starter
- 113 g unsalted butter (softened)
- 80 g powdered sugar
- 67 g brown sugar
- 50 g egg (1 large)
- 1 teaspoon vanilla extract
- 2.5 g almond extract (optional)
- 270 g all-purpose flour
- 2 g baking powder
- 1/4 teaspoon salt
- 1/8 teaspoon cream of tartar
Graham Cracker Crumble:
- 60 g graham crackers
- 70 g all-purpose flour
- 30 g sourdough starter
- 50 g brown sugar
- 25 g powdered sugar
- 65 g cold butter (cubed)
- 5 g salt
- 7 g vanilla extract
S’mores Layer:
- 60 g mini marshmallows
- 80 g chocolate bar (chopped into chunks)
- 1 teaspoon cornstarch (for dusting marshmallows)
Instructions
- Day 1: Prepare Cookie Dough for Fermentation
Cookie Dough
- In a large bowl, cream together softened butter, powdered sugar, and brown sugar until light and fluffy.
- Add egg, vanilla extract, and almond extract (if using), mix well.
- Add sourdough starter and mix until combined.
- In a separate bowl, whisk together flour, baking powder, salt, and cream of tartar.
- Gradually add dry ingredients to wet ingredients, mixing until just combined.
- Wrap in plastic and refrigerate for 12-24 hours.
Crumble
- In a food processor, add flour, brown sugar, powdered sugar, and salt.
- Pulse 3-4 times to combine dry ingredients.
- Add graham crackers and pulse until you have large chunks.
- Add cold cubed butter and pulse until combined.
- Add vanilla and sourdough starter, pulse to incorporate.
- Continue pulsing until you reach a brown sugar texture that you can squeeze together and it holds its shape, but also breaks apart easily.
- Refrigerate for 12-24 hours alongside the cookie dough for fermentation.
No food processor?
- Place graham crackers in a zip-top bag and crush with a rolling pin until you have a mix of small chunks and fine crumbs. Whisk together the crushed graham crackers, flour, brown sugar, powdered sugar, and salt in a medium bowl. Add cold cubed butter and cut in with a pastry cutter or your fingertips until the mixture resembles coarse crumbs with pea-sized pieces remaining. Add vanilla and sourdough starter and continue cutting in until the mixture holds together when squeezed but crumbles apart easily. Work quickly so the butter stays cold. If the mixture feels warm or greasy at any point, refrigerate the bowl for 10 minutes before continuing.
Day 2: Assembly and Baking
- In a small bowl, toss mini marshmallows with cornstarch to lightly coat.
- Place cornstarch-coated marshmallows in the freezer for at least 30 minutes before assembly.
- Have chocolate chunks ready for assembly.
- Preheat oven to 350°F (175°C).
- Line a large baking sheet with parchment paper.
- Using a 2.5-3 inch circle cutter as a guide, spread about 2 rounded tablespoons of graham cracker crumble mixture on the parchment in circles. For a marbled effect, leave small gaps between crumble pieces to allow marshmallow and chocolate to peek through.
- Sprinkle chocolate bar chunks evenly over each crumble circle (about 1 teaspoon per cookie).
- Embed frozen, cornstarch-coated marshmallows into the crumble (about 1 teaspoon per cookie or 4-5 mini marshmallows).
- Roll out the fermented cookie dough on a floured surface to a rough rectangle, 10″x 12″, approximately 3/8″ inch thick.
- Using your circle cutter, cut out circles from the dough.

- Gently gather scraps, press together into a ball and wrap well. Refrigerate for 15 minutes for gluten to relax before rolling again.
- When ready to assemble the next tray create another rough rectangle and continue cutting until all dough is used.
- Place each cookie circle on top of the chilled s’mores layers.
- Gently press down to adhere, making sure the graham crumble, chocolate chunks, and marshmallows are under the cookie.
- Bake for 18-22 minutes, until you can see golden browning on the graham cracker edges and cookie tops are set.
- Remove from oven and let cool completely on the baking sheet before serving.

Leave a Reply