

The ultimate lazy baker hack: One giant 5-pound cinnamon roll instead of making 12 individual rolls
Jump to Section
- Why This Recipe Works
- What Makes This Different
- Ingredients You’ll Need
- Step-by-Step Instructions
- Pro Tips & Tricks
- Troubleshooting
- Glazing Options
- Storage & Reheating
- Yeast Version (No Sourdough Starter)
- FAQs
- More Cinnamon Recipes
- Final Thoughts
Why This Recipe Works
Let me ask you something: Do you love cinnamon rolls but hate the tedious process of rolling, cutting, and arranging 12 individual rolls? What if I told you there’s a way to get all that cinnamon roll magic. The gooey filling, the pull-apart layers, the buttery richness, without any of the fussy work?
Enter the Cinnamon Roll Brioche Swirl.
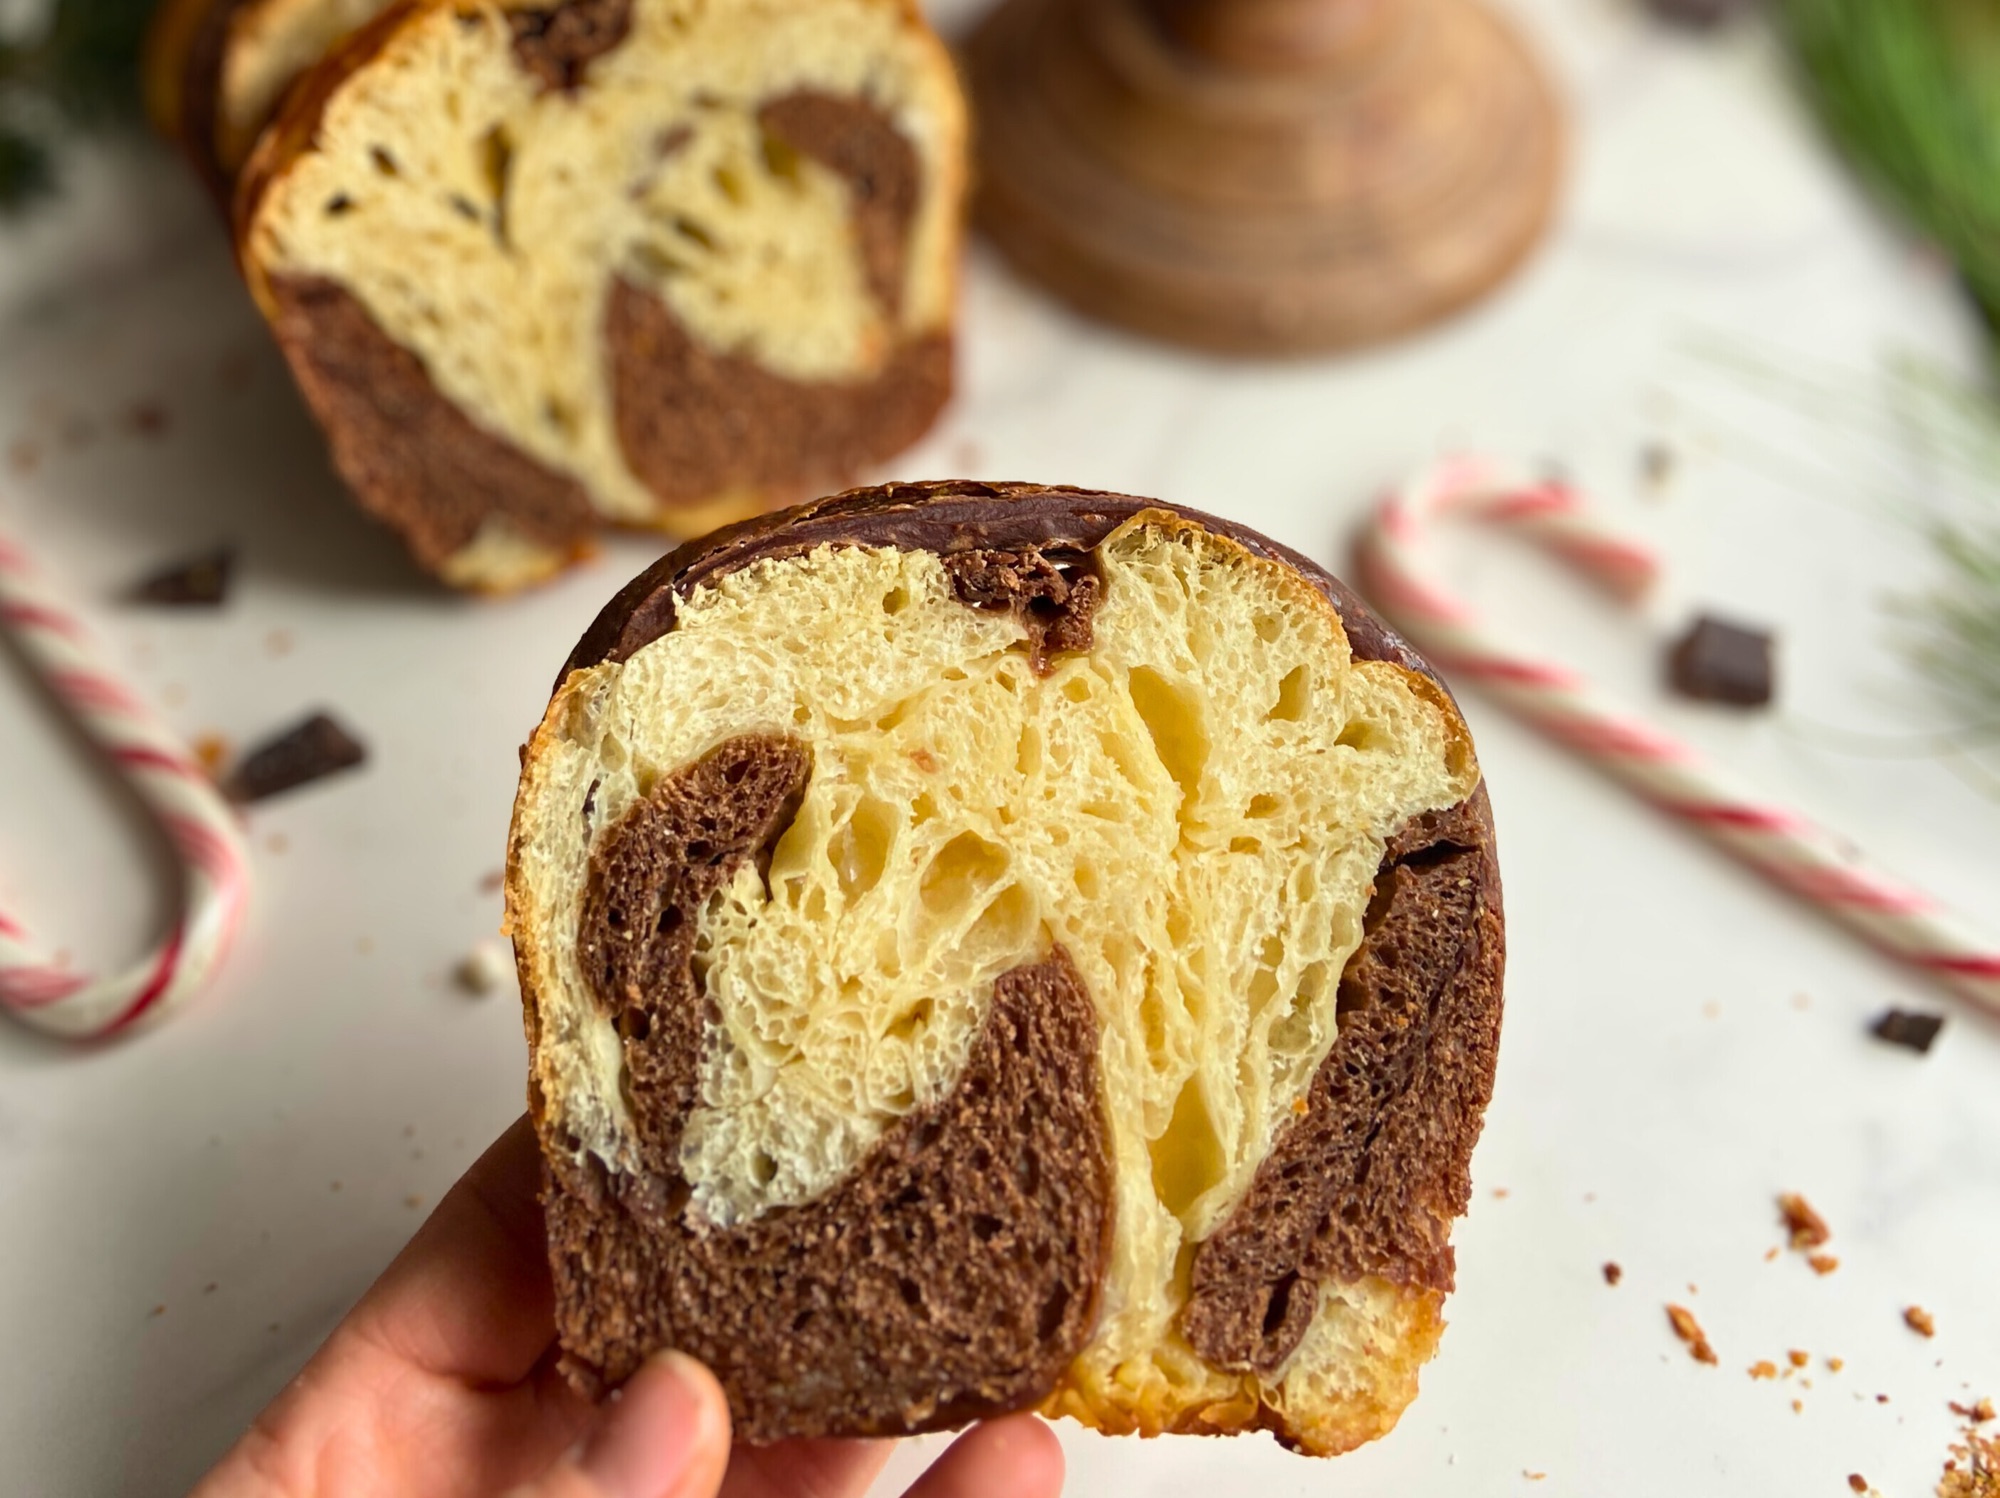
This isn’t just another cinnamon roll recipe. This is a 5-pound showstopper that feeds 10-12 people, looks absolutely stunning on any table, and requires a fraction of the effort of traditional cinnamon rolls. Instead of making individual rolls, you create ONE massive spiral of buttery sourdough brioche filled with whipped cinnamon brown sugar filling, then bake it into golden perfection.
The result? Layers upon layers of tender, pull-apart brioche with pockets of caramelized cinnamon filling running through every gorgeous swirl. It’s cinnamon rolls for a crowd, without standing at your counter for an hour rolling and cutting dough.
Perfect for holiday brunches, Thanksgiving morning, Christmas breakfast, or any time you want to seriously impress people with minimal effort. Because let’s be honest: this looks like it came from a fancy bakery, but it’s surprisingly doable at home.
What Makes This Different

The Taco-Fold Method
Instead of rolling the dough into a traditional log, I use what I call the “taco-fold” method. You roll your dough into one long 28-30 inch strip, spread the cinnamon filling down the side, then fold the dough over itself like a taco. When rolled this creates a filled tube with the seam facing UP, which means:
Gorgeous visual appeal: The cinnamon filling is visible along the entire spiral
Better structure: The fold helps contain the filling (though some delicious caramelization may still escape and create a gorgeous bottom crust!)
Swirl perfection: Each swirl naturally separates into layers, creating a beautiful marbled look.
Sourdough Buttermilk Brioche Dough
This isn’t just any dough; it’s a rich, buttery sourdough brioche made with buttermilk for extra tenderness. The sourdough starter adds:
Better digestibility : The fermentation helps break down sugars and gluten, making it easier for your body to process.
Better texture: More tender, softer crumb than regular yeast brioche
Longer fermentation: Develops incredible flavor during the 8-12 hour bulk rise
The buttermilk keeps everything soft and pillowy, even the next day.
Whipped Cinnamon Filling
The filling isn’t just cinnamon and sugar; it’s a whipped paste made with softened butter whipped until fluffy, brown sugar for molasses depth, cornstarch to create that signature “cinnamon roll goo”, and optional cardamom for warmth and complexity.
This paste consistency means you get even distribution throughout every inch of dough, and the cornstarch helps it stay thick and gooey instead of leaking everywhere.
One Giant Swirl Instead of 12 Rolls
Let’s talk efficiency: Why spend time rolling, cutting, and arranging a dozen individual cinnamon rolls when you can create ONE dramatic centerpiece? This swirl serves 10-12 people easily, looks absolutely stunning, eliminates the “middle rolls are underbaked, end rolls are overbaked” problem, creates a natural presentation (just slice into wedges!), and saves you SO much time.
It’s the ultimate lazy genius move.

Ingredients You’ll Need
For the Sourdough Buttermilk Brioche Dough:
100g active sourdough starter (fed and bubbly). The foundation of flavor and rise.
290g buttermilk (room temperature). Creates tender, soft crumb.
2 whole eggs (room temperature). Richness and structure.
60g granulated sugar. Feeds the starter and adds slight sweetness.
7g vanilla extract. Warm, aromatic backbone.
640g all-purpose flour. Provides structure (bread flour works too for chewier texture).
6g salt. Balances sweetness and enhances flavor.
60g unsalted butter (softened). Makes it brioche-level rich.
For the Whipped Cinnamon Filling:
130g unsalted butter (9 tablespoons, softened). The base that makes it spreadable and rich.
120g brown sugar (½ cup + 2 tablespoons packed). Molasses depth and caramelization.
12g ground cinnamon (2 tablespoons). The star of the show.
18g cornstarch (2 tablespoons + ½ teaspoon). Creates gooey texture and prevents leaking.
2g salt (⅓ teaspoon). Balances sweetness.
5g vanilla extract (1 teaspoon). Extra flavor dimension
Optional: 1g ground cardamom (¼ teaspoon). Adds warmth and complexity (highly recommend!)
For the Vanilla Glaze (Matte/Crackly Finish):
- 150g powdered sugar (1¼ cups)
- 30-40g heavy cream or whole milk (2-3 tablespoons)
- 5g vanilla extract (1 teaspoon)
- 1g salt (pinch)
For Assembly:
- 1 egg beaten with 1 tablespoon water (egg wash)
Step-by-Step Instructions
Make the Sourdough Buttermilk Brioche Dough
- In the bowl of a stand mixer, combine sourdough starter, buttermilk, eggs, sugar, and flour. Mix on low speed with the dough hook until just combined into a shaggy dough (about 2 minutes).
- Cover the bowl with a damp towel or plastic wrap and let rest for 30 minutes. This is called autolyse, it allows the flour to fully hydrate and makes the dough easier to work with.
- After 30 minutes, sprinkle the salt and vanilla over the dough. Mix on medium speed for 3-4 minutes until the dough starts to come together.
- Add the softened butter one chunk at a time (about 1 tablespoon pieces), mixing well between each addition. This takes patience! Let each piece fully incorporate before adding the next.
- Continue mixing on medium speed for 8-10 minutes until the dough is smooth, elastic, and pulls away from the sides of the bowl. It should be slightly tacky but not sticky. The windowpane test works here: stretch a small piece of dough—it should form a thin, translucent membrane without tearing.
- Place dough in a lightly greased bowl, cover tightly, and let rise at room temperature (68-72°F) for 8-12 hours, or until doubled in size. I usually do this overnight.
Alternative Quick-Mix Method (No Autolyse):
If you’re short on time or just want to simplify the process, you can skip the autolyse rest. Simply add all ingredients (starter, buttermilk, eggs, sugar, flour, salt, and vanilla) to the mixer bowl at once. Mix on low speed until all the flour is absorbed and you have a shaggy dough, about 3-4 minutes. Then proceed directly to adding the butter one chunk at a time and continue with step 4 above. The autolyse creates a slightly more extensible dough that’s easier to roll out, but skipping it won’t ruin your brioche. It just might take an extra minute or two of kneading to develop the same smooth, elastic texture.
Prepare the Whipped Cinnamon Filling
While you can make this filling ahead or right before assembly, I recommend making it while the dough is in its final rise stages.
- Let 130g butter soften to room temperature until very soft but not melted. It should easily indent when you press it but still hold its shape.
- Place the softened butter in a medium bowl. Using a fork or hand mixer, whip the butter for 30-60 seconds until it’s fluffy, lighter in color, and increased in volume. If using vanilla extract, add it during this step.
- In a separate small bowl, mix together brown sugar, cinnamon, cornstarch, salt, and cardamom (if using).
- Add the dry mixture to the whipped butter. Mix with a fork or hand mixer for another 30-60 seconds until everything is combined into a thick, spreadable paste. It should look like cookie dough or natural peanut butter.
- Set aside until ready to assemble. If making ahead, store covered at room temperature for up to 24 hours.
Shape the Brioche Swirl
This is where the magic happens!

- Turn the risen dough out onto a lightly floured surface. Don’t punch it down aggressively, just gently deflate it.
- Using a rolling pin, roll the dough into a long rectangle approximately 28-30 inches long and 4 inches wide. The dough should be about ¼-inch thick. Take your time with this, use a tape measure if needed! Consistency in size ensures even baking.
Pro tip: If the dough keeps springing back, let it rest for 5-10 minutes to relax the gluten, then continue rolling.
- Using an offset spatula or butter knife, choose one half of the dough and spread the whipped cinnamon filling evenly down that entire half. You want the filling to go all the way to one long edge (this creates the dramatic visual swirl when you coil it). Leave about 1 inch of clean dough on each short end, but the filling should reach completely to one long edge. The other half of the dough strip (lengthwise) should remain completely bare.

The filling should be generous. Don’t be shy!
- Now for the taco fold: Take the bare half of the dough (the side without filling) and fold it over onto the filled half, matching up the long edges. You’ve now created a filled tube where the filling is visible along one entire long edge. This is your visual swirl side!
Important: If the dough edges seal together and hide your filling, simply peel them apart gently to expose that cinnamon filling. You want that gorgeous swirl visible along the entire length.

- Pinch the short ends closed firmly to prevent filling from escaping during baking.
- Use parchement and grease a 10-inch springform pan lightly with butter or neutral oil.
- Starting from one end of your filled rope, gently coil it into a spiral shape in the center of your prepared pan. I like rolliny it up like a sleeping bag to get the beginning started. Then turning it open edge face up, and wrapping the dough around that center. Continue coiling outward until you’ve used all the dough. The open seam should face UP—this is what creates those gorgeous visible cinnamon swirls!
- Spread the edges apart to showcase that beautiful swirl

Don’t worry if it’s not perfect. Brioche is forgiving, and it’ll puff up beautifully during proofing and baking.
Final Proof

- Cover the pan loosely with plastic wrap or a damp tea towel.
- Let proof at room temperature until puffy and jiggly, about 3-4 hours depending on your kitchen temperature.
How do you know it’s ready?
The dough should look visibly puffy and increased in size. When you gently press the dough with a fingertip, it should slowly spring back but leave a slight indent. When you gently shake the pan, the whole swirl should jiggle slightly (this is the “jiggly test”!)
Don’t rush this step. Under-proofed brioche will be dense; properly proofed brioche will be cloud-like.
Bake
- Preheat your oven to 350°F (175°C).
- Important: Place a parchment-lined baking sheet on the rack directly below where your brioche will bake. This catches any butter or filling that may bubble out during baking and saves your oven from a mess. (Some caramelization on the bottom is normal and delicious!)
- Gently brush the top of the proofed brioche with egg wash (1 egg beaten with 1 tablespoon water). This creates that gorgeous golden-brown shine.
- Bake for 45-55 minutes, until deep golden brown on top. Start checking around the 45-minute mark. If the top is browning too quickly, tent it loosely with aluminum foil after about 30-35 minutes.
- The brioche is done when an instant-read thermometer inserted into the center of the swirl reads 190°F. This ensures the interior is fully baked and not doughy.

- Remove from the oven and let cool in the pan for 10-15 minutes. The brioche needs this time to set, if you remove the springform ring too early, it might collapse slightly.
- Carefully remove the springform ring. You can leave the swirl on the base or use a large spatula to transfer it to a serving plate.
Make the Vanilla Glaze
While the brioche cools slightly, make your glaze.
- In a medium bowl, whisk together powdered sugar and salt.
- Add vanilla extract and 30g heavy cream or milk.
- Whisk vigorously until completely smooth. The glaze should be thick but pourable, it should ribbon off the whisk and slowly settle back into itself. If it’s too thick, add more cream 1 teaspoon at a time.

Glaze and Serve
- While the brioche is still slightly warm (not hot!), drizzle the vanilla glaze generously over the top in a back-and-forth motion. Let it pool into the swirls and drip down the sides.
- Let the glaze sit at room temperature for 15-20 minutes. As it cools, it will set into a beautiful matte, crackly finish.
- Slice into wedges and serve while still warm. Watch people’s faces when they pull apart those layers and see all that cinnamon filling!n

Pro Tips & Tricks
Dough Tips
Temperature matters: Room temperature ingredients (especially eggs and buttermilk) are crucial for proper dough development. Cold ingredients can shock the starter and butter won’t incorporate smoothly.
Don’t skip autolyse: That 30-minute rest makes the dough SO much easier to work with and creates better gluten structure.
Bulk fermentation timing: The 8-12 hour window is flexible. In a warmer kitchen (75°F+), it might be ready in 8 hours. In a cooler kitchen (65-68°F), it could take the full 12 hours. Watch the dough, not the clock; it should be doubled and jiggly.
Use a scale: Baking by weight (grams) is infinitely more accurate than volume measurements. If you’re serious about consistent results, invest in a kitchen scale.
Filling Tips
Whip that butter: This step isn’t optional! Whipped butter spreads 10x easier than regular softened butter and won’t tear your delicate dough.
Even spreading: Take your time spreading the filling. Uneven filling means uneven flavor distribution. An offset spatula is your best friend here.
Don’t overfill the ends: Leave that 1 inch of space on each end clean. This helps you seal the spiral and prevents filling from leaking out the sides.
Shaping Tips
Measure your dough: Seriously, use a tape measure. Getting that 28-30 inch length ensures the spiral fits perfectly in a 10-inch pan.
Seam side UP: I cannot stress this enough. The seam facing up is what creates the visual drama of this recipe.
Gentle hands: Brioche dough is delicate when rolled thin. Handle it gently during the taco fold and spiral shaping.
Baking Tips
Parchment-lined baking sheet underneath: Don’t skip this! Some filling will likely caramelize and bubble out, and you don’t want to scrub your oven for an hour.
Tent with foil if needed: Brioche browns quickly. If your swirl is getting too dark before it’s baked through, loosely tent it with foil.
Internal temperature is king: Don’t guess; use an instant-read thermometer. 190°F is the magic number for perfectly baked, not doughy, brioche.
Glazing Tips
Warm, not hot: If the brioche is too hot, the glaze will melt and soak in rather than set on top. If it’s too cold, the glaze won’t flow into those beautiful swirls. Aim for slightly warm.
Less liquid means crackly: For that matte, crackly finish, keep the glaze on the thicker side. Too much liquid creates a shiny, wet glaze (which is also delicious, just a different look!)
Troubleshooting
My dough isn’t rising during bulk fermentation
Possible causes:
Your starter wasn’t active enough (should be bubbly and doubled within 4-6 hours of feeding). Your kitchen is too cold (below 68°F slows fermentation significantly). You killed the starter with ingredients that were too hot.
Solutions:
Make sure your starter passes the float test (drop a spoonful in water; it should float if active). Place the dough in a warmer spot (near a warm oven, in a proofing box, or inside an oven with just the light on). Always use room temperature or slightly warm ingredients, never hot.
My dough is too sticky to work with
Possible causes:
You didn’t knead long enough (brioche needs that full 8-10 minutes after adding butter). Your flour measurement was off (too little flour). High humidity in your kitchen.
Solutions:
Continue kneading! Brioche dough starts sticky and becomes smooth and elastic with time. Add 1-2 tablespoons more flour, but only if absolutely necessary (too much flour means dense brioche). Lightly flour your work surface and hands when shaping, but don’t overdo it.
The filling is leaking out during baking
Possible causes:
You didn’t seal the ends well. You over-proofed the dough (it expanded too much and burst). Your oven temperature is too high.
Solutions:
Make sure to firmly pinch those ends closed. Watch for proper proofing cues (puffy, jiggly, slow spring-back). Check your oven temperature with an oven thermometer; many ovens run hot. Don’t panic! Even if some filling leaks, it creates delicious caramelization on the bottom.
My brioche is dense, not fluffy
Possible causes:
Under-proofed (didn’t rise long enough during bulk or final proof). Over floured during shaping. Oven temperature too low (dough didn’t get proper oven spring).
Solutions:
Be patient with proofing times; watch the dough, not the clock. Use minimal flour when rolling and shaping. Preheat your oven fully and verify temperature with a thermometer.
The top is browning too fast but the inside isn’t done
Possible causes:
Oven temperature too high. Rack position too close to heating element.
Solutions:
Tent with foil as soon as the top reaches your desired color. Move the pan to a lower rack. Check your oven temperature; it might be running hot.
The glaze is too runny/too thick
Solutions:
Too runny: Add more powdered sugar 1 tablespoon at a time. Too thick: Add more cream or milk 1 teaspoon at a time. For crackly finish, you want it on the thicker side (slow ribbon off the whisk).
Glazing Options
While the vanilla glaze is my go-to for that beautiful matte, crackly finish, you might want something different! Here are your options:
Vanilla Glaze (Matte/Crackly Finish) – RECOMMENDED
Ingredients:
- 150g powdered sugar (1¼ cups)
- 30-40g heavy cream or whole milk (2-3 tablespoons)
- 5g vanilla extract (1 teaspoon)
- 1g salt (pinch)
Instructions:
- Whisk together powdered sugar and salt
- Add vanilla and 30g cream, whisk until smooth
- Add more cream if needed to reach pourable consistency
- Drizzle over warm brioche
- Let set 15-20 minutes for that crackly finish
Why I love it: Simple, lets the cinnamon filling shine, beautiful texture, not overly sweet
Cream Cheese Frosting (Rich & Tangy Alternative)
Ingredients:
- 113g cream cheese (4 oz, softened to room temperature)
- 57g unsalted butter (4 tablespoons, softened)
- 200g powdered sugar (1⅔ cups)
- 5g vanilla extract (1 teaspoon)
- 15-30g heavy cream or milk (1-2 tablespoons)
- 1g salt (pinch)
Instructions:
- Beat softened cream cheese and butter together with a hand mixer for 1-2 minutes until fluffy and well combined
- Add powdered sugar, vanilla, and salt. Beat on low speed until combined, then increase to medium-high and beat for 2-3 minutes until light and fluffy
- Add cream 1 tablespoon at a time until you reach your desired consistency (less cream for spreading, more for drizzling)
- Spread or drizzle over cooled or slightly warm brioche
Why you might want it: Classic cinnamon roll frosting, tangy richness, stays soft and creamy (doesn’t develop a crackly finish like vanilla glaze)
When to use: If you want that Cinnabon-style experience, or if you prefer a richer, more indulgent topping
Other Glazing Ideas
Maple Cream Glaze: Replace the vanilla with maple syrup (use 40g maple syrup + 20g cream)
Brown Butter Glaze: Brown your butter first, let cool slightly, then make the vanilla glaze with brown butter instead of cream
Caramel Glaze: Use the caramel vanilla glaze from my Apple Pie Brioche Swirl recipe for a deeper, more complex sweetness
Storage & Reheating
Storing
Room temperature: Store covered loosely with foil or plastic wrap for up to 2 days. The glaze will soften slightly but it’s still delicious.
Refrigerator: Store wrapped well for up to 5 days. The brioche will firm up when cold but reheats beautifully.
Freezer: Wrap individual slices or the whole swirl (unglazed) tightly in plastic wrap, then aluminum foil. Freeze for up to 3 months. Thaw overnight in the refrigerator, then reheat and glaze before serving.
Reheating
Oven method (best): Preheat oven to 300°F. Tent the brioche with foil and warm for 10-15 minutes until heated through. This keeps it soft and brings back that fresh-baked texture.
Microwave (quick): Microwave individual slices for 15-20 seconds. It won’t be as good as the oven method, but it works in a pinch!
Toaster oven: Individual slices can be warmed in a toaster oven at 300°F for 5-7 minutes.
Make-Ahead Tips
Dough: Make the dough through bulk fermentation, then refrigerate overnight. The next day, let it come to room temperature (about 1 hour) before rolling and shaping.
Shaped swirl: You can shape the swirl, cover it tightly, and refrigerate overnight for the final proof. The next morning, let it come to room temperature and finish proofing (this could take 2-3 hours), then bake.
Fully baked: Bake the swirl completely, let cool, wrap well (don’t glaze yet), and freeze. The day you want to serve it, thaw, warm gently in the oven, then glaze.
Yeast Version (Alternative)
Don’t have a sourdough starter or short on time? You can make this recipe with instant yeast instead! The flavor will be slightly less complex, but it’s still absolutely delicious and dramatically cuts down the fermentation time.
Ingredient Substitutions
Replace the sourdough starter components with:
Remove: 100g active sourdough starter
Add: 50g all-purpose flour + 50g water + 7g instant yeast (2¼ teaspoons)
Keep everything else exactly the same.
Adjusted Instructions
Make the Yeast Brioche Dough:
- In the bowl of a stand mixer, combine 690g all-purpose flour (640g + 50g), 340g water (290g buttermilk + 50g water), eggs, sugar, and instant yeast. Mix on low speed until just combined into a shaggy dough.
- Cover and let rest for 30 minutes (autolyse).
- Add salt and vanilla, mix for 3-4 minutes on medium speed.
- Add butter one chunk at a time, mixing well between additions. Continue mixing for 8-10 minutes until smooth and elastic.
- Place in a greased bowl, cover, and let rise at room temperature for 1-2 hours (instead of 8-12 hours) until doubled in size.
Everything else stays the same:
Shaping process is identical. Final proof is about the same (3-4 hours). Baking time and temperature remain the same. Glazing options are the same.
Notes on Yeast Version
Faster timeline: Total time is about 6-7 hours instead of 17+ hours
Flavor difference: Yeast brioche is sweeter, less tangy, more traditional “cinnamon roll” flavor
Texture: Still rich and buttery, just slightly less complex
When to use it: Last-minute baking, don’t have starter, prefer traditional cinnamon roll taste
Both versions are fantastic; it just depends on what you have on hand and how much time you have!
FAQs
Can I make this without a stand mixer?
Technically yes, but I don’t recommend it. Brioche dough requires significant kneading (10+ minutes) to develop proper gluten structure, and doing this by hand is exhausting. If you absolutely must, knead by hand for 15-20 minutes after adding the butter, your arms will get a serious workout!
Can I use bread flour instead of all-purpose flour?
Yes! Bread flour will give you a slightly chewier, more structured brioche. The hydration will be similar, but you might need to knead an extra minute or two. All-purpose flour creates a more tender, delicate crumb.
What if I don’t have buttermilk?
Make your own! Add 1 tablespoon lemon juice or white vinegar to a measuring cup, then fill to 290g (about 1¼ cups) with whole milk. Let sit for 5 minutes before using. You can also use plain whole-milk yogurt thinned with a bit of milk.
Can I use salted butter?
You can, but reduce the added salt in the recipe. If using salted butter in the dough, reduce salt to 3-4g. If using salted butter in the filling, omit the salt completely from the filling mixture.
Can I make this the night before and bake in the morning?
Yes! After shaping the swirl, cover it tightly and refrigerate overnight. The next morning, take it out and let it come to room temperature and finish proofing (this might take 2-3 hours since it’s cold). Then bake as directed. This is perfect for holiday mornings when you want fresh-baked brioche without waking up at 4am!
My sourdough starter is only fed once a day. Can I still use it?
As long as your starter is active and bubbly when you use it, you’re good! Feed it, wait for it to double (usually 4-6 hours at room temperature), then use it. The feeding schedule doesn’t matter as much as using it at peak activity.
Can I add other fillings?
Absolutely! This method works for:
- Apple pie filling (see my Apple Pie Sourdough Brioche Swirl)
- Nutella or chocolate spread
- Pumpkin spice filling
- Cream cheese + jam
- Basically anything you’d put in a cinnamon roll!
Why is my glaze not getting crackly?
Common reasons:
You applied it while the brioche was too hot (it absorbed instead of setting). Your glaze was too thin (add more powdered sugar). You didn’t give it enough time to set (wait the full 15-20 minutes).
Can I double this recipe?
Yes, but you’ll need two 10-inch springform pans. Don’t try to fit a double batch in one pan—it won’t bake evenly and the center will be doughy.
Help! I don’t have a springform pan. What can I use?
You can use:
A 10-inch cake pan (you’ll have to slide a knife around the edges to release it). A 9×13 inch baking pan (the swirl will be slightly more oblong-shaped). A deep-dish pie plate (10 inches works best).
The springform just makes removal easier, but it’s not absolutely essential.
How do I know when my starter is “active and bubbly”?
A good test: Feed your starter, wait 4-6 hours, then do the float test. Drop a small spoonful of starter into a glass of water. If it floats, it’s ready to use. If it sinks, it needs more time or another feeding.
More Cinnamon Recipes You’ll Love
If you’re obsessed with cinnamon (same!), check out these other recipes:
Sourdough Pull-Apart Cinnamon Roll Focaccia My viral focaccia series with a cinnamon roll twist
Cinnamon Roll Sugar Cookies All the flavor of cinnamon rolls in cookie form
Cinnamon Sugar Sourdough Croissant Dippers Flaky, buttery, cinnamon-sugar heaven
Apple Pie Sourdough Brioche Swirl The apple pie version of this exact recipe!
Nutrition (per serving, 1/12 of recipe)
Calories: 450 | Carbohydrates: 62g | Protein: 8g | Fat: 19g | Saturated Fat: 11g | Cholesterol: 95mg | Sodium: 320mg | Fiber: 2g | Sugar: 28g
Nutrition information is approximate and will vary based on exact ingredients used and portion size.

Cinnamon Roll Brioche Swirl (Sourdough)
Equipment
- kitchen scale for accuracy
- Rolling Pin
- – Stand mixer with dough hook or strong arms
- tape measure or good eye
- – 10-inch springform pan 10 inch deep dish pie plate
- Parchment paper
- Instant read thermometer
- medium mixing bowl for dough
- small mixing bowl for frosting
- Whisk
- plastic wrap or bag for covering during proofing
- butter knife/spatula spread icing around
Ingredients
Sourdough Buttermilk Brioche Dough:
- 100 g active sourdough starter fed and bubbly
- 290 g buttermilk room temperature
- 2 whole eggs room temperature
- 60 g granulated sugar
- 7 g vanilla extract
- 640 g all-purpose flour
- 6 g salt
- 60 g unsalted butter softened
Whipped Cinnamon Filling:
- 130 g unsalted butter 9 tablespoons, softened
- 120 g brown sugar ½ cup + 2 tablespoons packed
- 12 g ground cinnamon 2 tablespoons
- 18 g cornstarch 2 tablespoons + ½ teaspoon
- 2 g salt ⅓ teaspoon
- 1 g ground cardamom ¼ teaspoon, optional but recommended
- 5 g vanilla extract 1 teaspoon,
Vanilla Glaze:
- 150 g powdered sugar 1¼ cups
- 30-40 g heavy cream or whole milk 2-3 tablespoons
- 5 g vanilla extract 1 teaspoon
- 1 g salt pinch
Assembly:
- 1 egg beaten with 1 tablespoon water egg wash
Instructions
Make the Sourdough Buttermilk Brioche Dough:
- In the bowl of a stand mixer, combine sourdough starter, buttermilk, eggs, sugar, and flour. Mix on low speed with the dough hook until just combined into a shaggy dough (about 2 minutes).
- Cover the bowl with a damp towel or plastic wrap and let rest for 30 minutes (autolyse). This allows the flour to fully hydrate and makes the dough easier to work with.
- After 30 minutes, sprinkle the salt and vanilla over the dough. Mix on medium speed for 3-4 minutes until the dough starts to come together.
- Add the softened butter one chunk at a time (about 1 tablespoon pieces), mixing well between each addition. This takes patience! Let each piece fully incorporate before adding the next.
- Continue mixing on medium speed for 8-10 minutes until the dough is smooth, elastic, and pulls away from the sides of the bowl. It should be slightly tacky but not sticky. The windowpane test works here: stretch a small piece of dough—it should form a thin, translucent membrane without tearing.
- Place dough in a lightly greased bowl, cover tightly, and let rise at room temperature (68-72°F) for 8-12 hours, or until doubled in size. I usually do this overnight.
Alternative Quick-Mix Method (No Autolyse):
- If you’re short on time or just want to simplify the process, you can skip the autolyse rest. Simply add all ingredients (starter, buttermilk, eggs, sugar, flour, salt, and vanilla) to the mixer bowl at once. Mix on low speed until all the flour is absorbed and you have a shaggy dough, about 3-4 minutes. Then proceed directly to adding the butter one chunk at a time and continue with step 4 above. The autolyse creates a slightly more extensible dough that’s easier to roll out, but skipping it won’t ruin your brioche. It just might take an extra minute or two of kneading to develop the same smooth, elastic texture.
Prepare the Whipped Cinnamon Filling:
- Let butter soften to room temperature until very soft but not melted. It should easily indent when you press it but still hold its shape.
- Place the softened butter in a medium bowl. Using a fork or hand mixer, whip the butter (and vanilla if using) for 30-60 seconds until it’s fluffy, lighter in color, and increased in volume.
- In a separate small bowl, mix together brown sugar, cinnamon, cornstarch, salt, and cardamom (if using).
- Add the dry mixture to the whipped butter. Mix with a fork or hand mixer for another 30-60 seconds until combined into a thick, spreadable paste. It should look like cookie dough or natural peanut butter.
- Set aside until ready to assemble. If making ahead, store covered at room temperature for up to 24 hours.
Shape the Brioche Swirl:
- Turn the risen dough out onto a lightly floured surface. Don’t punch it down aggressively, just gently deflate it.
- Using a rolling pin, roll the dough into a long rectangle approximately 28-30 inches long and 4 inches wide. The dough should be about ¼-inch thick. Take your time with this, use a tape measure if needed! Consistency in size ensures even baking. If the dough keeps springing back, let it rest for 5-10 minutes to relax the gluten, then continue rolling.
- Using an offset spatula or butter knife, choose one half of the dough and spread the whipped cinnamon filling evenly down that entire half. You want the filling to go all the way to one long edge (this creates the dramatic visual swirl when you coil it). Leave about 1 inch of clean dough on each short end, but the filling should reach completely to one long edge. The other half of the dough strip (lengthwise) should remain completely bare.

- Now for the taco fold: Take the bare half of the dough (the side without filling) and fold it over onto the filled half, matching up the long edges. You’ve now created a filled tube where the filling is visible along one entire long edge. This is your visual swirl side! If the dough edges seal together and hide your filling, simply peel them apart gently to expose that cinnamon filling. You want that gorgeous swirl visible along the entire length.

- Pinch the short ends closed firmly to prevent filling from escaping during baking.
- Grease a 10-inch springform pan lightly with butter or neutral oil.
- Starting from one end of your filled rope, gently coil it into a spiral shape in the center of your prepared pan. Continue coiling outward until you’ve used all the dough. The open seam with visible filling should face UP, this is what creates those gorgeous visible cinnamon swirls! Don’t worry if it’s not perfect. Brioche is forgiving, and it’ll puff up beautifully during proofing and baking.

- If any of the edges seal together, now is the time to gently pull them apart and separate to show that gorgeous swirl.
Final Proof:
- Cover the pan loosely with plastic wrap or plastic bag.
- Let proof at room temperature until puffy and jiggly, about 3-4 hours depending on your kitchen temperature. How do you know it’s ready? The dough should look visibly puffy and increased in size. When you gently press the dough with a fingertip, it should slowly spring back but leave a slight indent. When you gently shake the pan, the whole swirl should jiggle slightly (this is the “jiggly test”!). Don’t rush this step. Under-proofed brioche will be dense; properly proofed brioche will be cloud-like.
Bake:
- Preheat your oven to 375°F (175°C).
- Place a parchment-lined baking sheet on the rack directly below where your brioche will bake to catch any butter or filling that may bubble out during baking and save your oven from a mess. Some caramelization on the bottom is normal and delicious!
- Gently brush the top of the proofed brioche with egg wash (1 egg beaten with 1 tablespoon water). This creates that gorgeous golden-brown shine.
- Bake for 45-55 minutes, until deep golden brown on top. Start checking around the 45-minute mark. If the top is browning too quickly, tent it loosely with aluminum foil after about 30-35 minutes.
- The brioche is done when an instant-read thermometer inserted into the center of the swirl reads 190°F. This ensures the interior is fully baked and not doughy.
- Remove from the oven and let cool in the pan for 10-15 minutes. The brioche needs this time to set, if you remove the springform ring too early, it might collapse slightly.
- Carefully remove the springform ring. You can leave the swirl on the base or use a large spatula to transfer it to a serving plate.
Make the Vanilla Glaze:
- In a medium bowl, whisk together powdered sugar and salt.
- Add vanilla extract and 30g heavy cream or milk.
- Whisk vigorously until completely smooth. The glaze should be thick but pourable—it should ribbon off the whisk and slowly settle back into itself. If it’s too thick, add more cream 1 teaspoon at a time.
Glaze and Serve:
- While the brioche is still slightly warm (not hot!), drizzle the vanilla glaze generously over the top in a back-and-forth motion. Let it pool into the swirls and drip down the sides.
- Let the glaze sit at room temperature for 15-20 minutes. As it cools, it will set into a beautiful matte, crackly finish.
- Slice into wedges and serve while still warm. Watch people’s faces when they pull apart those layers and see all that cinnamon filling!
Notes
Final Thoughts
This Cinnamon Roll Brioche Swirl is proof that sometimes the “lazy” method is actually the brilliant method. Why spend an hour rolling and cutting individual cinnamon rolls when you can create one stunning centerpiece that serves a crowd?
The sourdough adds complexity, the buttermilk keeps it tender, and that whipped cinnamon filling creates the perfect gooey, pull-apart texture we all crave in cinnamon rolls. Whether you make it for a holiday brunch, special occasion, or just because you want your house to smell incredible, this recipe delivers.
And here’s the best part: once you master this technique, you can fill it with ANYTHING. Apple pie filling, Nutella, cream cheese and jam, pumpkin spice; the possibilities are endless.
So grab your sourdough starter, whip up that cinnamon filling, and get ready to create something truly show-stopping. Your kitchen is about to smell like a bakery, and your people are about to think you’re a baking wizard.
Big enough to share… but will you want to? 😏
Did you make this recipe? I’d love to see it! Tag me on Instagram @h3artofthehome or leave a comment below. And if you loved it, please leave a 5-star rating; it helps other bakers find this recipe!
Pin this recipe for later and share it with someone who needs cinnamon rolls in their life!
Last updated: 12/01/2025
Recipe by Noelle | H3art of the Home


Leave a Reply