Jump to Section
- About This Recipe
- Why This Recipe Works
- Key Tips for Success
- Timeline & Method
- Tips & Troubleshooting
- Serving Suggestions
- FAQ
- YEAST SUBSTITUTION FOR PIZZA PULL-APART SOURDOUGH FOCACCIA
- More pull-apart focaccia recipes
Introduction
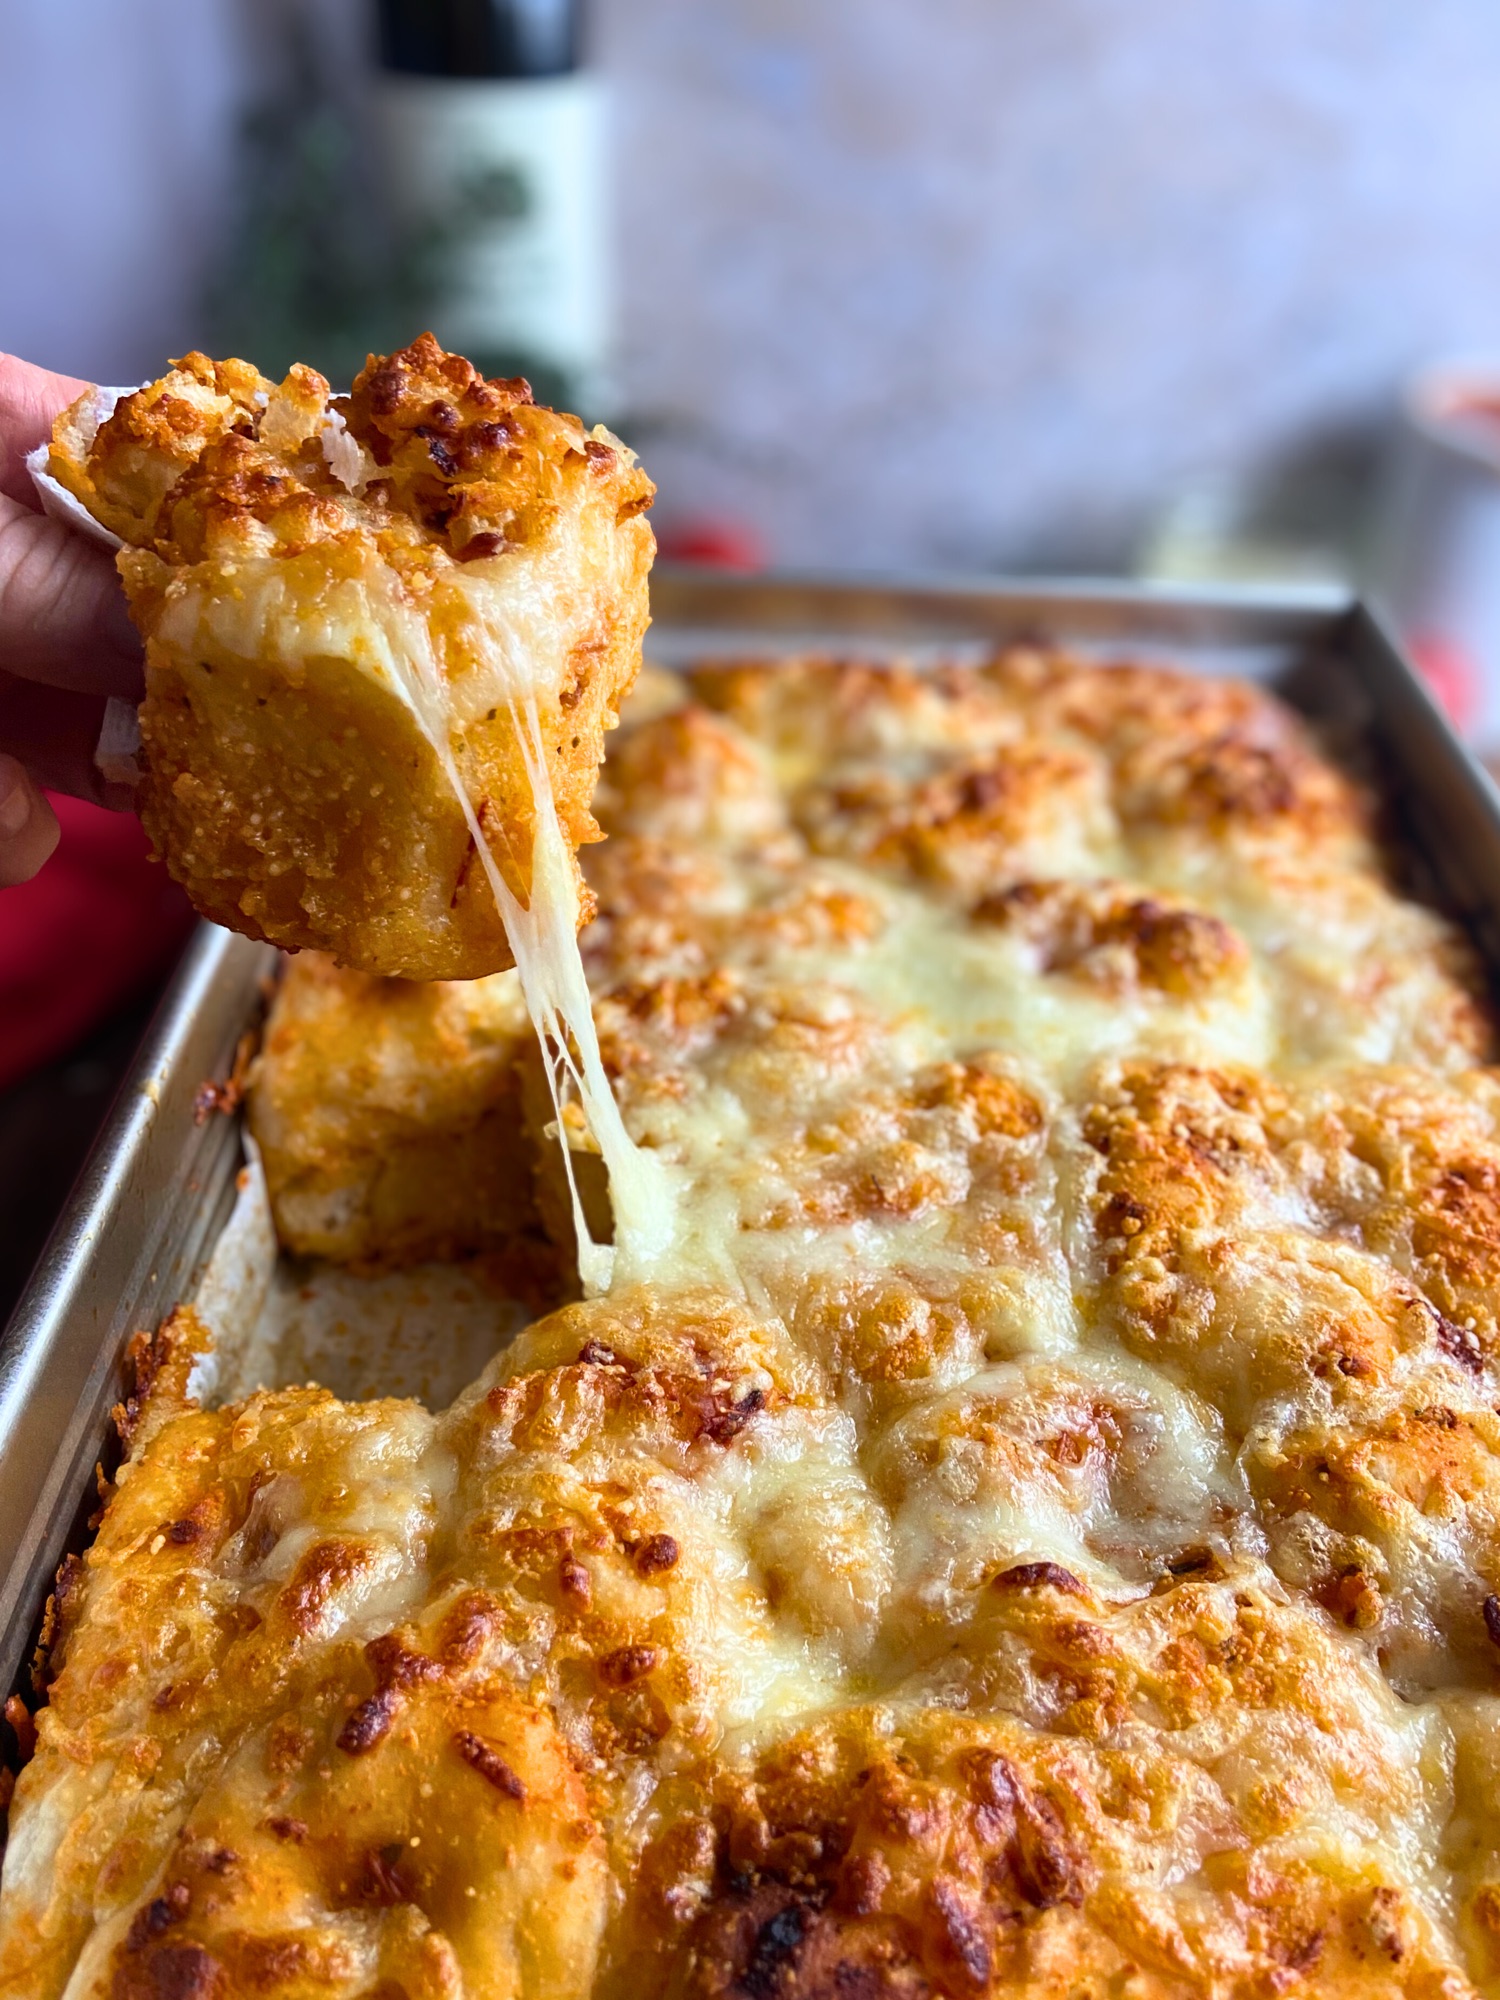
Pizza and focaccia are basically cousins, same dough DNA, different personalities. So why not let them hang out together? This Pizza Pull-Apart Focaccia is what happens when you take the best parts of both and engineer them into something you can literally tear apart with your hands while cheese stretches dramatically across your kitchen counter.
This is the fifth recipe in my pull-apart focaccia series, and here’s the thing: every single one involves getting your hands absolutely covered in butter, sauce, sugar, or in this case, pizza sauce and Parmesan. And you know what? Who cares about messy hands when you get to have this delicious thing waiting at the end?
If you’ve been following along with the cinnamon roll version, the jelly donut situation, or especially the apple pie focaccia that went absolutely viral, you know the drill. We’re taking sourdough focaccia dough, tearing it into chunks, dunking it in something amazing, coating it in something that prevents the pieces from sealing back together, and baking it into pull-apart perfection. The savory turn we took with the garlic Parmesan version proved this technique isn’t just for sweet applications and this pizza version might be the most craveable yet.

About This Recipe
This pizza focaccia continues the formula that’s made this series so successful: a simple, reliable sourdough base gets transformed into something interactive, shareable, and frankly irresistible. But instead of vanilla butter and cinnamon sugar, we’re dunking chunks of dough into actual pizza sauce, rolling them in finely processed Parmesan mixed with cornstarch, and finishing with a blanket of freshly shredded mozzarella that creates those cheese pulls you see in your dreams.
The beauty of this approach is how it takes the concept of pizza, something most people feel pretty comfortable making or at least ordering and elevates it just enough to feel special without feeling complicated. You’re not stretching dough into a perfect circle or worrying about wet toppings making your crust soggy. You’re just tearing, dunking, coating, and arranging. The oven does the dramatic work.
Previous recipes in this series:
- Cinnamon Roll Pull-Apart Focaccia: Vanilla butter dunk + cinnamon-sugar coating + vanilla icing
- Jelly Donut Pull-Apart Focaccia: Vanilla butter dunk + sugar coating + jelly filling + donut icing
- Caramel Apple Pull-Apart Focaccia: Apple pie filling dunk + sugar coating + caramel drizzle (the most viral version)
- Garlic Parmesan Pull-Apart Focaccia: Herb butter dunk + Parmesan coating + mozzarella topping
Each one follows the same structural logic but delivers completely different flavors. This pizza version slots right into that savory category alongside the garlic Parmesan, but with a profile that feels more like Friday night takeout met Sunday morning baking project.
Why This Recipe Works

Let’s talk about the engineering here, because there’s actual method to what might look like madness.
The Coating Creates the Structure
The Parmesan-cornstarch mixture isn’t just for flavor (though it absolutely delivers on that front). When you process Parmesan in a food processor until it’s powdery and then mix in cornstarch, you create a coating that acts as a barrier between each dough chunk. Without this barrier, the pieces would proof back together into a solid mass—which would still taste good, but you’d lose the entire pull-apart experience.
The cornstarch helps the Parmesan stay dry and powdery rather than clumping, and it also contributes to creating those slightly crispy edges where pieces touch. You want each chunk coated completely, like you’re breading chicken but with fancy cheese.
Freshly Shredded Mozzarella Makes the Difference
Pre-shredded mozzarella is coated in anti-caking agents (usually potato starch or cellulose) that prevent it from clumping in the bag. Those same agents also prevent it from melting as smoothly and stretching as dramatically as freshly shredded cheese. If you want those Instagram-worthy cheese pulls, buy a block of low-moisture mozzarella and shred it yourself. It takes three minutes and the difference is genuinely noticeable.
That said, if you only have pre-shredded on hand, use it. This will still be delicious. You’ll just get slightly less dramatic stretch. I’m not about to tell you to run to the store for cheese when you’re already elbow-deep in pizza sauce and Parmesan powder.
The Sourdough Base is Deliberately Simple
This focaccia dough is about as straightforward as sourdough gets: 500 grams bread flour, 400 grams water, 75 grams active starter, 10 grams salt. No oil, no sugar, no garlic powder in the dough itself (I tested it—it slows fermentation without adding enough flavor to justify it). Mix it, do a single stretch and fold, let it bulk ferment overnight or for 4-6 hours at room temperature until doubled, and you’re ready to go.
The simplicity is intentional. The dough is a vehicle for the pizza sauce, Parmesan coating, and mozzarella topping. It needs to be tender, airy, and neutral enough to let those flavors shine. Focaccia dough is naturally high-hydration (80% in this formula), which means it bakes up incredibly light and open-crumbed even when you’re pulling it apart into chunks rather than stretching it flat.
Key Tips for Success
- Coat pieces completely in Parmesan: This coating creates the barrier that prevents pieces from sealing back together. No wet dough should show through.
- Use freshly shredded mozzarella for best cheese pull: Pre-shredded has anti-caking agents that reduce stretch. Shred from a block for those gorgeous pulls.
- Don’t skip the 1-hour rest after mixing: This autolyse period helps develop gluten and makes the dough easier to work with.
- Oil on the pan base = crispy Parmesan crust: Don’t use sauce on the bottom, the olive oil creates that golden, crispy bottom layer.
- Watch your proofing: Pieces should look puffy and jiggly, not dense. When in doubt, give it more time.
Timeline & Method
One of the best things about this recipe is how it fits into a realistic schedule. Here’s how it actually works in practice:
Night Before (5 Minutes Active Time, Plus 1 Hour Rest)
Mix your dough. Combine the flour, water, starter, and salt in a bowl. Use your hands or a wooden spoon, this doesn’t require a stand mixer or any special equipment. Knead it just until it comes together and feels smooth, maybe 2-3 minutes. Cover and let rest for 1 hour.
After the hour rest, do one set of stretch and folds (grab one side of the dough, stretch it up, fold it over itself, rotate the bowl, repeat 3-4 times around the bowl), then cover and go to bed.
While you sleep, the sourdough starter ferments the dough. It’s developing flavor, creating air pockets, and building the gluten structure that gives focaccia its characteristic texture. This is the long bulk fermentation doing all the heavy lifting while you do absolutely nothing.
Morning (15 Minutes Active Time)

Your dough should be roughly doubled in size, looking puffy and jiggly with visible bubbles. This is what we’re looking for, obvious signs of fermentation. Don’t overthink it. If it looks bigger and alive, you’re good.
Now for the fun part: line your 9×13-inch pan with parchment paper for easy removal (unless you have an exceptionally good nonstick pan). Pour about 2 TBS of olive oil into the bottom of the pan and spread it around to coat the entire surface, this creates that beautiful crispy Parmesan crust on the bottom.
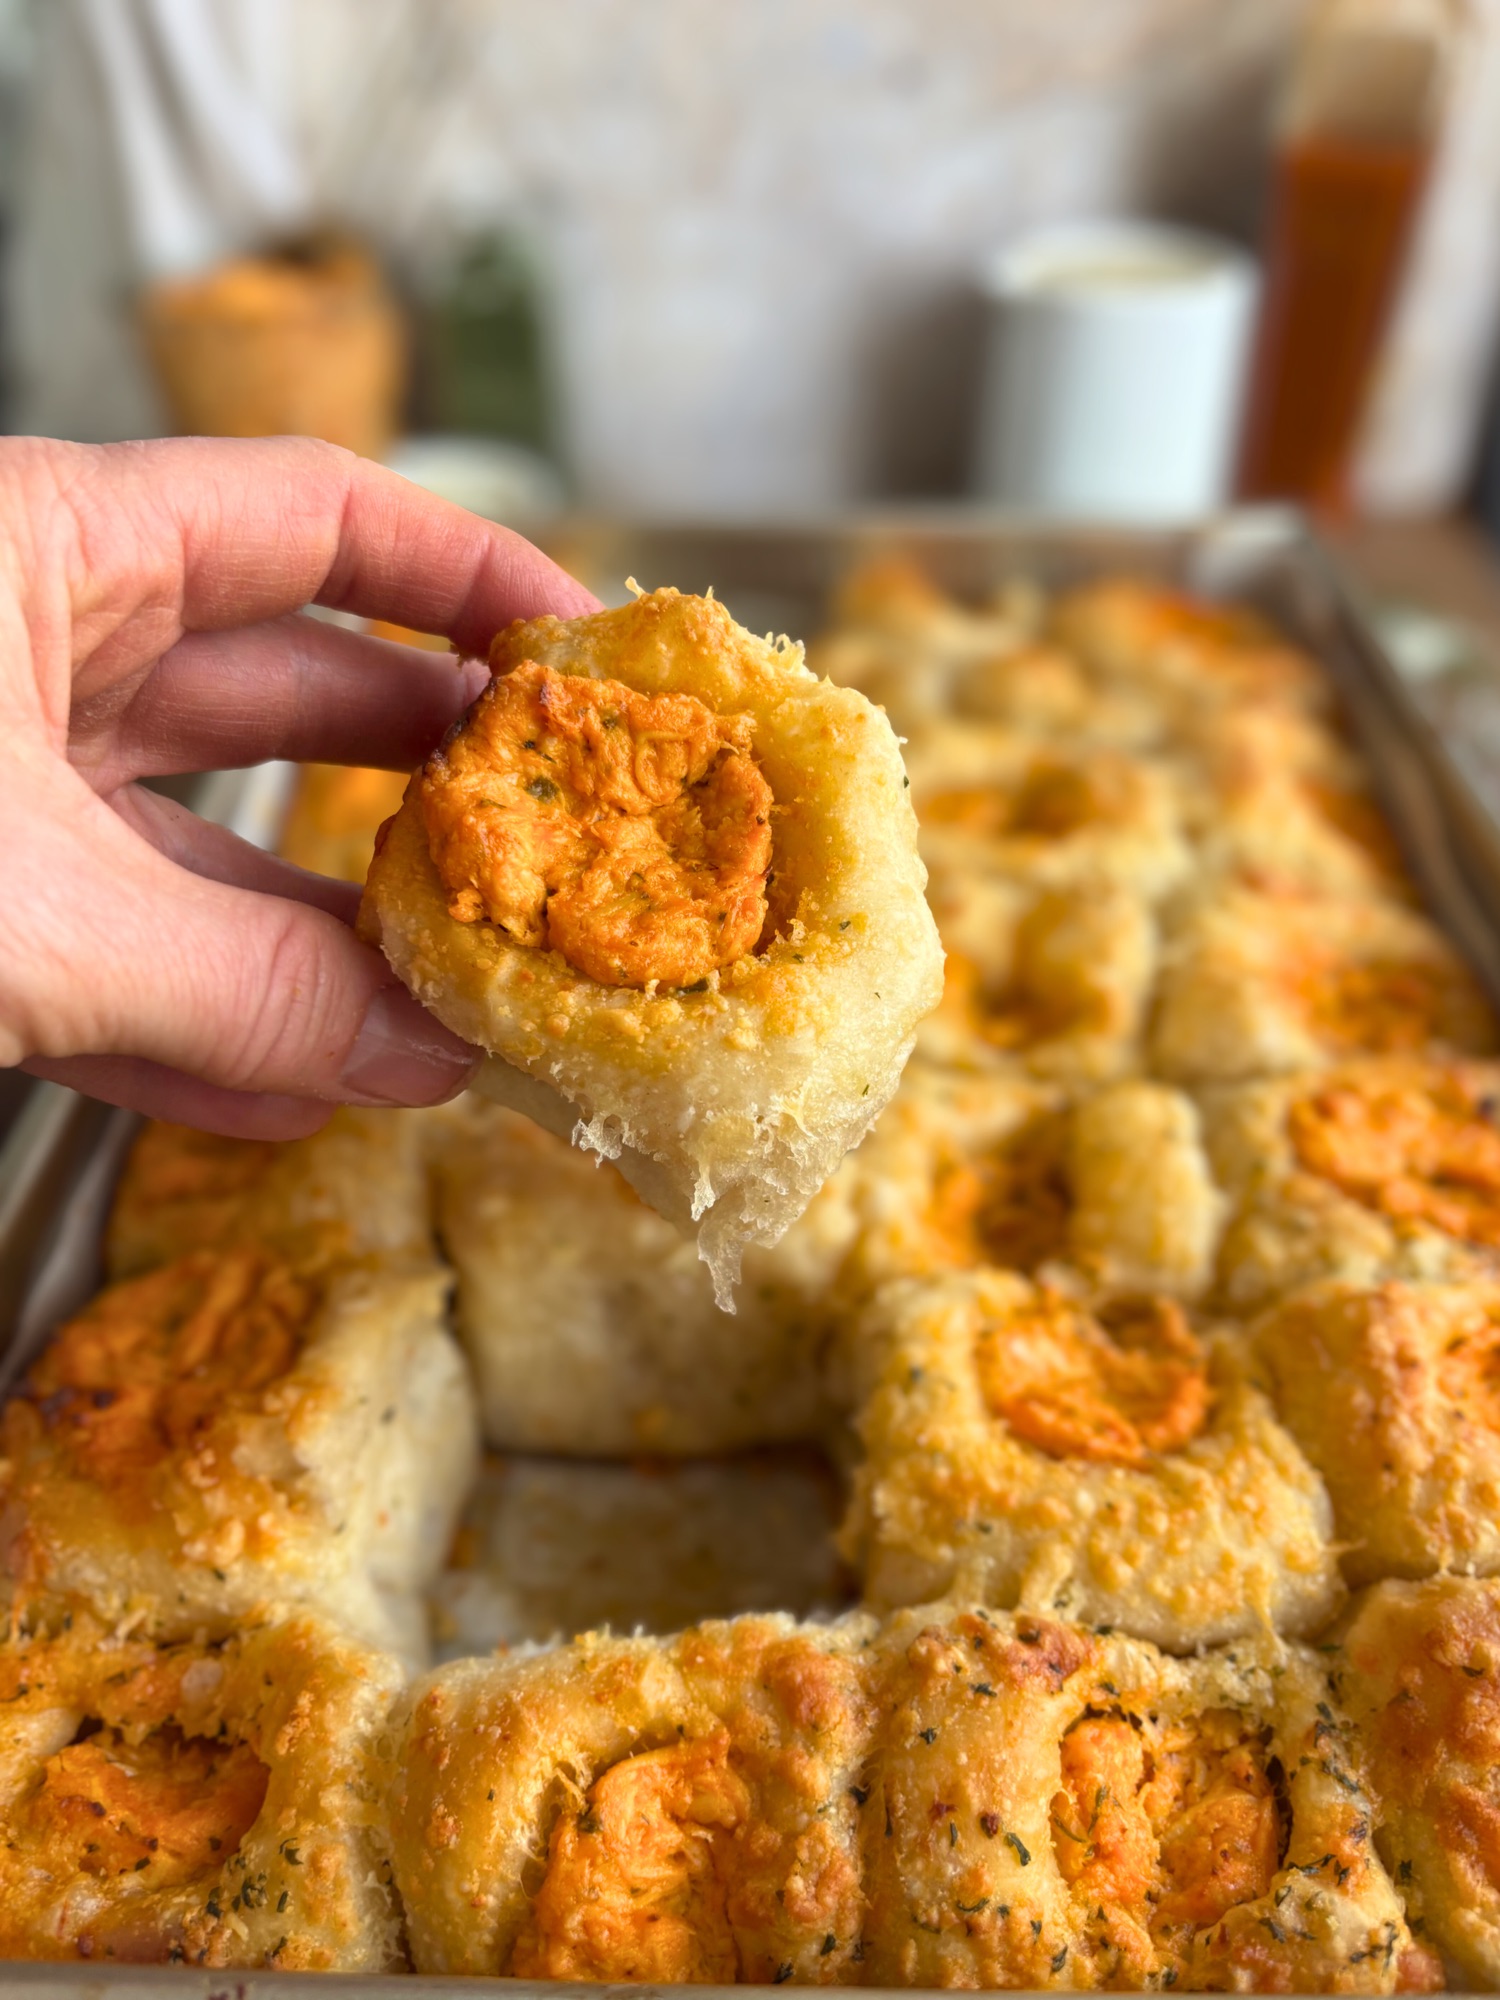
Start pulling off chunks of dough about the size of 2 tablespoons (you don’t need to measure, just eyeball pieces that feel roughly golf-ball-ish). Dunk each piece completely in your bowl of pizza sauce, then drop it into the bowl of Parmesan-cornstarch mixture and roll it around until it’s completely coated. You want full coverage, no wet dough showing through. Place each coated piece in the prepared pan, leaving a little space between pieces. They’ll expand during proofing and fill in gaps slightly, but the coating keeps them from sealing back together completely.
Proofing (1-2 Hours, or Refrigerate and Bake Later)

Once all your dough chunks are arranged in the pan, cover it and let it proof. At room temperature, this usually takes 1-2 hours. You’re looking for the pieces to puff up noticeably. They should look airy and you might see some of the spacing close up slightly as they expand.
Alternative timeline: If morning baking doesn’t work for your schedule, you can cover the pan and refrigerate it after arranging the coated pieces. Pull it out a few hours before you want to bake (morning works great if you’re planning to bake for lunch or dinner). Let it come to room temperature and finish proofing, you’ll see those same signs of puffiness and fermentation when it’s ready.
Baking (30 Minutes Total)

Bake at 425°F for 20 minutes until the dough is golden and cooked through. Pull it out, top with 1-2 cups of freshly shredded mozzarella (don’t go overboard, too much cheese makes it heavy), and return it to the oven for another 10 minutes until the cheese is melted and bubbly.
If you want those gorgeous browned cheese spots like you see on a really good pizza, hit it with the broiler for 1-2 minutes. Watch it closely, broilers go from “perfect” to “carbonized” faster than you can check your phone.
Total time breakdown:
- Active time: ~20 minutes (5 minutes mixing dough + 15 minutes shaping and coating)
- Passive time: ~10-12 hours (overnight bulk fermentation + proofing + baking)
- Actual hands-on work: About as much time as it takes to order pizza delivery
Tips & Troubleshooting
How to Know Your Starter is Ready
Your sourdough starter should be active, bubbly, and roughly doubled in size before you use it. The float test is helpful here: drop a small spoonful into a glass of water. If it floats, your starter has enough gas production to leaven dough effectively. If it sinks immediately, give it another feeding and wait until it’s more active.
That said, focaccia is forgiving. Even if your starter isn’t at peak performance, the long overnight fermentation gives it plenty of time to work. This isn’t a baguette or a sourdough loaf where timing is critical, focaccia dough is high-hydration and naturally extensible, which means it’s more tolerant of fermentation variations.
What Proper Proofing Looks Like

For focaccia specifically, you want the dough to look puffy, jiggly, and full of air. When you arrange the coated pieces in the pan initially, they’ll look relatively compact and defined. After proofing, they should look noticeably larger, and if you gently shake the pan, they should jiggle rather than staying rigid. You might see visible bubbles forming at the surface.
If the dough looks exactly the same as when you put it in the pan, it’s under-proofed. Give it more time. If it’s completely collapsed and looks deflated, it’s over-proofed (though honestly, that’s pretty hard to achieve with this recipe given the coating and pan structure).
Pan Size Matters
A 9×13-inch pan is optimal here. It’s the right size to fit all the dough chunks with appropriate spacing, and it gives you the right ratio of crispy edges to soft interior pieces. If you use a smaller pan, the pieces will be more crowded and you’ll get less of that pull-apart texture. If you use a larger pan, the pieces will spread out more and might not connect enough to create the cohesive structure that makes this work.
Can you use a different size? Sure. An 8×8 or 9×9 square pan would work if you’re halving the recipe. A larger sheet pan would work if you’re spacing pieces out more deliberately. Just know that the 9×13 hits the sweet spot for this full recipe.
Sauce Choice is Flexible
Any pizza sauce or marinara works here. Store-bought, homemade, the jar in your pantry, whatever. Don’t overthink it. The sauce is getting dunked, coated with Parmesan, and baked—it’s not the starring role, it’s supporting cast. I’ve tested this with standard pizza sauce, fancy marinara, and even plain tomato sauce with Italian seasoning stirred in. All delicious.
One note: don’t water down the sauce. You might be tempted to thin it out for easier dunking, but resist. The thicker consistency helps it cling to the dough chunks better, and you want that full pizza-sauce flavor on each piece.
Cheese Amount: The Sweet Spot
1-2 cups of mozzarella is the range, and where you land depends on how cheese-forward you want this. 1 cup gives you good coverage and cheese pulls without overwhelming the other flavors. 2 cups gets you into serious cheese-lover territory, more dramatic pulls, heavier overall. I usually land around 1½ cups because it feels balanced.
Too much cheese (like 3+ cups) makes this heavy and greasy. The focaccia dough is light and airy; burying it under a pound of mozzarella changes the texture in ways that aren’t great. More isn’t always more when it comes to cheese on focaccia.
Common Mistakes and How to Avoid Them
Pieces sealing together: This means you didn’t coat them thoroughly enough in the Parmesan-cornstarch mixture. Every surface of each dough chunk needs to be covered. If you see wet dough showing through after coating, roll it in the Parmesan again.
Under-proofed dough: The pieces look small, dense, and don’t have that puffy, airy quality. They’ll still bake and taste fine, but you won’t get the light, pull-apart texture that makes this special. When in doubt, give it more time.
Over-cheesing: I know I already covered this, but it’s worth repeating because it’s one of the most common issues I see when people make this. More cheese seems like a good idea until you’re eating what’s essentially cheese soup with some bread in it. Trust the 1-2 cup range.
YEAST SUBSTITUTION FOR PIZZA PULL-APART SOURDOUGH FOCACCIA
NO SOURDOUGH STARTER? USE YEAST INSTEAD!
Don’t have sourdough starter? No problem! You can make this Pizza Pull-Apart Sourdough Focaccia recipe using instant yeast or active dry yeast with fantastic results. The bread turns out just as fluffy and delicious with the same epic cheese pulls.
WHAT TO SUBSTITUTE
Replace the 75g active sourdough starter with:
- 37g (about ¼ cup) all purpose flour
- 37g (about 2½ tablespoons) water
- 7g (2¼ teaspoons) instant yeast OR 9g (2¾ teaspoons) active dry yeast
USING INSTANT YEAST (RAPID RISE)
Step 1: Mix everything together at once. Add the 37g flour, 37g water, and 7g instant yeast along with ALL the other recipe ingredients (the 500g bread flour, 400g water, and 10g salt) right from the start. Mix until no dry flour remains. No activation needed with instant yeast.
Step 2: Rest for 30 to 60 minutes (30 minutes is standard; 60 minutes will give you slightly more flavor development but may shorten your bulk fermentation time)
Step 3: Stretch and fold. With wet hands, grab one edge of the dough, stretch it up, and fold it over to the opposite side. Rotate the bowl 90 degrees and repeat. Do this 4 times total (one complete rotation around the bowl). The dough will transform from sticky and shaggy to smoother and more cohesive.
Step 4: Bulk fermentation. Cover and let the complete dough rise for 2 to 3 hours at room temperature until it doubles in size and becomes puffy and jiggly.
Step 5: Continue as normal. Once doubled, proceed with the recipe exactly as written. Same dunking in pizza sauce, same Parmesan coating, same proofing, same baking temperature and time.
USING ACTIVE DRY YEAST
Step 1: Activate the yeast. Mix the 37g warm water (100 to 110°F) with the 9g active dry yeast and ¼ teaspoon sugar in a small bowl. Let it sit for 5 to 10 minutes until foamy and bubbly. If it doesn’t foam, your yeast is dead and you need to start over with fresh yeast.
Step 2: Mix everything together. Once your yeast is foamy, add it along with the 37g flour and ALL the other recipe ingredients (the 500g bread flour, 400g water, and 10g salt). Mix until no dry flour remains.
Step 3: Rest for 30 to 60 minutes (30 minutes is standard; 60 minutes will give you slightly more flavor development but may shorten your bulk fermentation time)
Step 4: Stretch and fold. With wet hands, grab one edge of the dough, stretch it up, and fold it over to the opposite side. Rotate the bowl 90 degrees and repeat. Do this 4 times total (one complete rotation around the bowl).
Step 5: Bulk fermentation. Cover and let the complete dough rise for 2 to 3 hours at room temperature until it doubles in size.
Step 6: Continue as normal. Proceed with the recipe exactly as written.
IMPORTANT YEAST VERSION NOTES
Worried about wet dough? If you’re new to baking and concerned about sticky dough, start by decreasing the water in the main recipe to 360g (1½ cups). Experienced bakers can stick with the full 400g of water.
Water temperature matters:
- Use room temperature water for instant yeast
- Use warm water (100 to 110°F) for active dry yeast
Bulk fermentation is 2 to 3 hours instead of 8 to 12 hours with sourdough starter. This is the main time difference between the two methods.
Everything else stays EXACTLY the same! Same stretch and fold technique, same dunking in pizza sauce, same Parmesan coating, same mozzarella topping, same final proof, same baking time and temperature (425°F for 30 minutes total).
QUICK REFERENCE
Flour: 37g (¼ cup)
Water: 37g (2½ tablespoons)
Instant yeast: 7g (2¼ teaspoons)
Active dry yeast: 9g (2¾ teaspoons)
Pro tip: Instant yeast is more forgiving and faster to use. If you’re new to baking, choose instant yeast over active dry yeast. It eliminates the activation step and produces consistent results.
TIMELINE COMPARISON
Sourdough version: 10 to 14 hours total (mostly hands off fermentation time)
Yeast version: 4 to 6 hours total
Both versions produce incredibly fluffy, flavorful pizza focaccia with insane cheese pulls. The sourdough version has that signature tang and complexity, while the yeast version is faster and perfect for last minute pizza night cravings.
Want to learn how to make a sourdough starter for next time? Check out my instructions here!
Serving Suggestions

This Pizza Pull-Apart Focaccia is wildly versatile in terms of when and how you serve it.
As an appetizer: Put this out at a party and watch people swarm it. It’s interactive, shareable, and gives people something to do with their hands while socializing. Serve with a bowl of extra marinara for dipping (people will dip, even though the focaccia already has sauce, it’s human nature).
As a main dish: Pair this with a simple salad and call it dinner. The bread is substantial enough to be satisfying, and you’re getting some protein from all that cheese and Parmesan coating. This is the kind of meal that feels indulgent without requiring you to cook three different components.
For game day or movie night: Anywhere you’d normally order pizza, you can make this instead. It’s just as easy to eat with your hands, arguably more fun, and you get to feel good about making bread from scratch while everyone else is eating Domino’s.
Dipping sauce options: Beyond marinara, this works great with:
- Ranch dressing (controversial but correct)
- Garlic butter for extra richness
- Hot honey if you like sweet-heat contrast
- Caesar dressing for that creamy, garlicky hit
- Cheese sauce if you want to fully commit to the dairy lifestyle
One thing to know: this is best served hot or warm. The cheese pull effect that makes this so visually satisfying happens when the mozzarella is melted. As it cools, it’s still delicious, but you lose some of that stretch. If you’re making this ahead, you can reheat individual portions in the oven or air fryer to bring back the cheese magic.
Nutrition Information
Serving Size: 1 piece | Servings: 14
Nutritional information is approximate and based on available ingredients. Actual values may vary based on specific brands and amounts used.
Frequently Asked Questions
Can I make this without a stand mixer?
Absolutely! This entire recipe is designed for hand mixing. Just combine the ingredients in a bowl and knead for 2-3 minutes until smooth. No special equipment needed.
Can I freeze this?
This is best enjoyed fresh and warm for optimal cheese pull and texture. If you want to prep ahead, I’d recommend freezing the dough after the bulk fermentation (before shaping), or freezing the assembled pan before the final proof. Thaw overnight in the fridge, then proceed with proofing and baking. Freezing after baking will compromise the texture.
What if I don’t have a food processor for the Parmesan?
No problem! Use 1½ cups finely grated Parmesan from the store (grab a 16-ounce container to be safe). Just whisk the cornstarch into the pre-grated cheese and you’re good to go.
How do I know when my dough is proofed enough?
Look for these signs: the pieces should look noticeably puffier than when you first arranged them, they should jiggle when you gently shake the pan, and you might see some visible bubbles forming at the surface. If they look exactly the same as when you put them in the pan, give them more time.
Can I use a different pan size?
A 9×13-inch pan is optimal for the right ratio of crispy edges to soft interior and proper spacing. You could use an 8×8 or 9×9-inch square pan if you’re halving the recipe, or a larger sheet pan if you’re spacing pieces out more deliberately, but the 9×13 gives you the best results for the full recipe.
Do I have to use sourdough starter?
Nope! Check out the yeasted variation in the recipe notes. You can make this with instant or active dry yeast instead, it just won’t have that signature sourdough glow.
Can I make this dairy-free?
The Parmesan coating and mozzarella topping are pretty central to what makes this recipe work, so dairy-free substitutions would significantly change the final result. You could experiment with dairy-free Parmesan and mozzarella alternatives, but I haven’t tested it that way.
How long will leftovers keep?
Store leftovers in an airtight container in the refrigerator for 3-4 days. Reheat individual portions in a 350°F oven or air fryer until the cheese melts again, this brings back some of that pull-apart magic.

Pizza Pull-Apart Sourdough Focaccia
Equipment
- Large mixing bowl
- 9×13 inch baking pan
- Parchment paper
- Food processor or store bought fine grated parmesan
- Two Medium Bowls (one for pizza sauce dunking, one for Parmesan coating)
- Wooden Spoon
- Whisk (for mixing cornstarch into Parmesan)
- Box Grater (for shredding mozzarella from a block)
- Plastic Wrap/clean bag (for proofing)
Ingredients
For the Dough:
- 500 g bread flour
- 400 g water
- 75 g active sourdough starter or see yeasted variation below
- 10 g salt
For the Pizza Sauce Dunk:
- 1 cup pizza sauce
For the Coating:
- 1½ cups Parmesan cheese in chunks (will be processed) OR 1½ cups finely grated Parmesan from the store (16 oz container to be safe)
- 2 tablespoons cornstarch
For Topping:
- 1-2 cups low-moisture mozzarella freshly shredded from a block or store bought
For the Pan:
- 2 Tablespoons olive/avocado oil
- Parchment paper optional but recommended
Instructions
Night Before:
- Make the dough: In a large bowl, combine 500 g bread flour, 400 g water, 75 g active sourdough starter, and 10 g salt. Mix with your hands or a wooden spoon until no dry flour remains and the dough is cohesive. Knead briefly (2-3 minutes) until smooth. Cover and let rest for 1 hour.
- Stretch and fold: After the 1-hour rest, perform one set of stretch and folds by grabbing one edge of the dough, stretching it upward, and folding it over itself. Rotate the bowl 90 degrees and repeat 3-4 times total until you’ve worked your way around the entire dough mass.
- Bulk ferment: Cover the bowl with a damp towel or plastic wrap and let ferment at room temperature overnight (8-12 hours), until roughly doubled in size with visible bubbles.
Morning/Bake Day:
- Prepare Parmesan coating: Add Parmesan chunks to a food processor and process until fine and powdery, about 30-45 seconds. (Alternatively, use 1½ cups finely grated Parmesan from the store, buy a 16-ounce container to be safe.) Transfer to a medium bowl and whisk in 2 tablespoons cornstarch until evenly distributed. Set aside.
- Prepare the pan: Line a 9×13-inch baking pan with parchment paper (unless you have an exceptionally good nonstick pan). Pour about 2 Tablespoons olive/avocado oil into the bottom of the pan and spread it around to coat the entire surface.
- Pour pizza sauce into a bowl for dunking. You’ll be dunking each dough piece into this before coating.
- Shape and coat: Pull off 2-tablespoon-sized chunks of dough (roughly golf ball size, no need to measure precisely). Dunk each piece completely in the bowl of pizza sauce, coating all sides. Transfer immediately to the bowl of Parmesan-cornstarch mixture and roll until coated.

- Arrange in pan: Place each coated dough chunk in the prepared pan. They’ll expand during proofing and touch, but the coating prevents them from sealing completely together. Continue until all dough is shaped, dunked, coated, and arranged.

- Proof: Cover the pan and let proof at room temperature for 1-2 hours, until pieces look noticeably puffy and airy with visible signs of fermentation. Alternatively, cover and refrigerate overnight, then bring to room temperature and let proof for 1-2 hours before baking.
- Preheat oven: While dough is proofing, preheat oven to 425°F (220°C).
- First bake: Bake uncovered for 20 minutes until the focaccia is golden brown and cooked through.
- Add mozzarella: Remove from oven and immediately top with 1-2 cups freshly shredded mozzarella, distributing evenly across the surface. Return to oven and bake for an additional 10 minutes until cheese is melted and bubbly.
- Optional broil: For browned cheese spots, turn on the broiler and broil for 1-2 minutes, watching very closely to prevent burning.
- Serve: Let cool for 5 minutes, then serve warm for maximum cheese pull. Provide extra marinara sauce on the side for dipping.
Notes
Did You Make This Recipe?
I’d love to see how your Pizza Pull-Apart Focaccia turned out! Leave a comment and rating below to let me know what you thought. Did you get those epic cheese pulls? Did you try any fun dipping sauces?
Share your bake: Tag me on Instagram @h3artofthehome so I can see your creations and share them with the community!
Save this recipe: Pin it to your Pinterest boards so you can find it again when that pizza craving hits.
More pull-apart focaccia recipes:
If you loved this, you’ll definitely want to try the other recipes in the series:
- Cinnamon Roll Pull-Apart Focaccia — Sweet, gooey, and absolutely addictive
- Apple Pie Pull-Apart Focaccia — The viral version with caramel drizzle
- Garlic Parmesan Pull-Apart Focaccia — The savory gateway that started it all
- Jelly Donut Pull-Apart Focaccia — Filled, glazed, and perfect for brunch
Happy baking, and remember: messy hands, zero regrets.
This Pizza Pull-Apart Focaccia is part of the H3art of the Home Pull-Apart Focaccia Series, where getting messy hands is not just acceptable, it’s mandatory.


Leave a Reply to Nicole Richardson Cancel reply