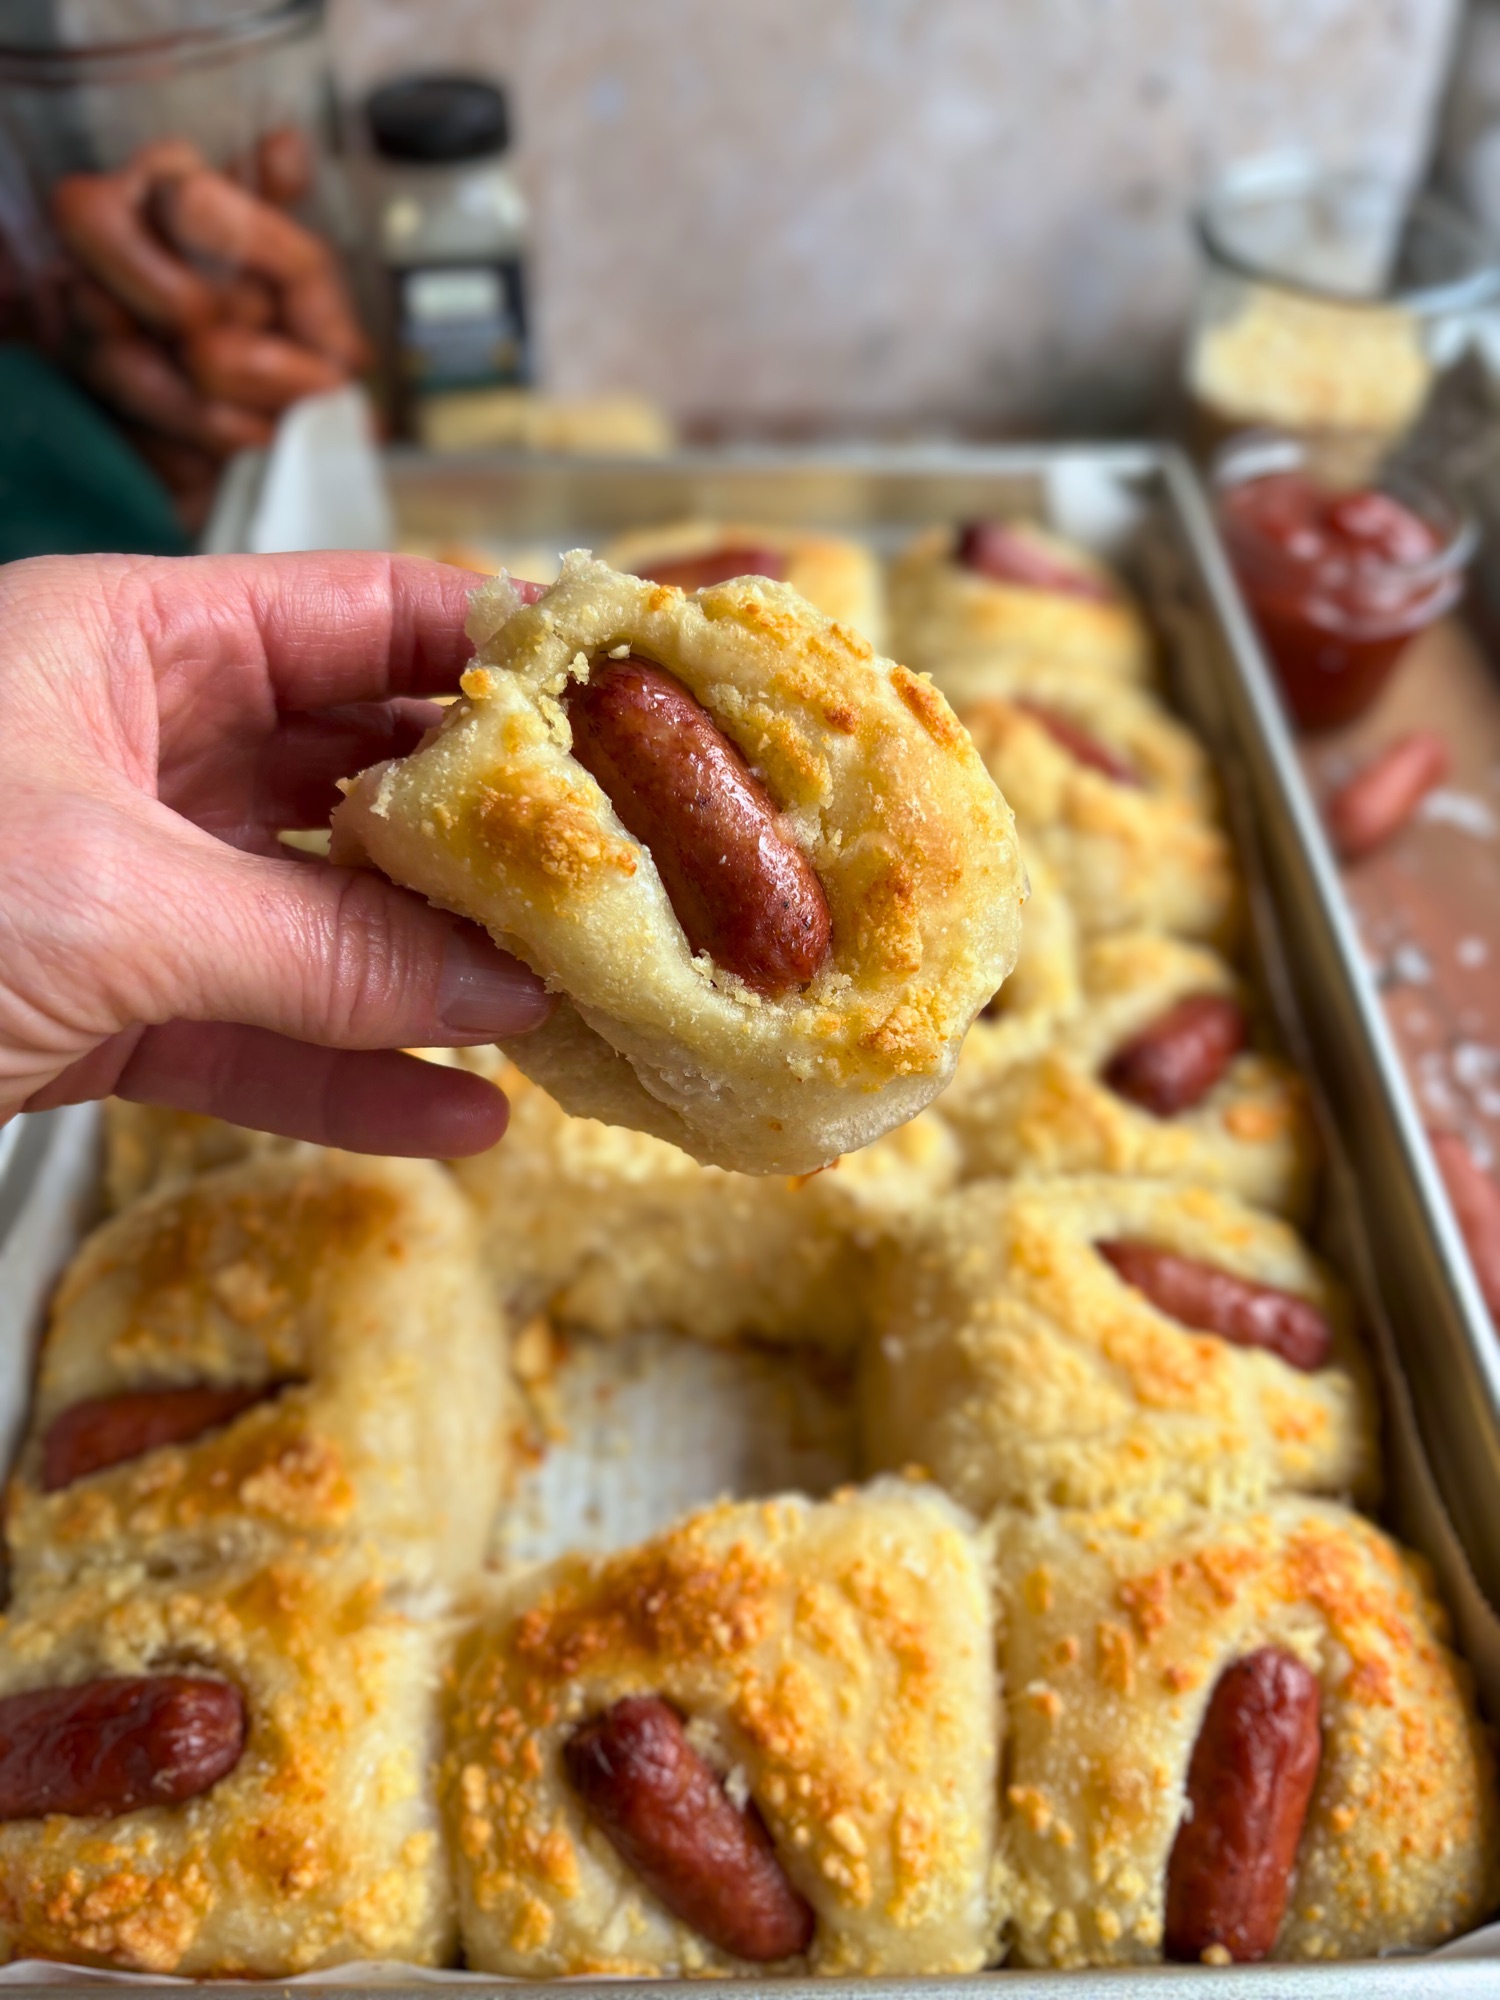
If you’ve been following my pull-apart focaccia series, you know I’m all about taking this fluffy, golden bread and turning it into something completely craveable. We are turning the pull apart focaccia into the easiest pigs in a blanket you’ll ever make. This hot dog focaccia is exactly that: soft sourdough buns with mini hot dogs nestled right in, all coated in a savory parmesan dry mustard crust that gets perfectly crispy in the oven. It’s the ultimate lunch box win, party appetizer, or weeknight dinner that’ll have everyone reaching for seconds. Think pigs in a blanket but make it homemade bread that you can actually pull apart with your hands.
This recipe uses my tried and true sourdough focaccia base with a few changes (the same dough from my viral garlic parmesan pull apart), but if you don’t keep a sourdough starter, I’ve included a yeasted version too. Either way, you’re getting pillowy soft bread bites with that iconic pull-apart satisfaction.
Jump to:
- Why This Recipe Works
- Ingredients You’ll Need
- Ingredient Substitutions
- Process Tips and Techniques
- Yeasted Focaccia Version
- Storage and Reheating
- FAQs
- Serving Ideas

Pigs in a Blanket Pull-Apart Focaccia
Equipment
- Large mixing bowl
- Kitchen scale (optional but recommended)
- 9×13 inch baking pan (USA Pan recommended)
- Plastic wrap or lid for covering
- Two shallow bowls (one for butter mixture, one for coating)
Ingredients
For the Sourdough Focaccia Dough:
- 500 g bread flour
- 400 g water
- 75 g active sourdough starter 100% hydration
- 10 g salt
For the Butter Coating:
- 120 g 1/2 cup melted butter
- 1 teaspoon onion powder
- 1 tablespoon fresh parsley minced (or 1 teaspoon dried),optional
- 1/4 teaspoon salt
For the Parmesan Coating:
- 120 g 1/2 cup grated parmesan cheese (or other finely grated cheese, etc cheddar, you want a drier cheese)
- 2 tablespoons cornstarch
- 1/2 teaspoon mustard powder
For the Topping:
- 20 mini hot dogs or cocktail franks
Instructions
Day One
- Mix the dough by combining bread flour, water, sourdough starter, and salt in a large bowl. Mix until no dry flour remains. The dough will be sticky and wet.
- Cover the bowl and let ferment at room temperature for 8 to 12 hours. I usually mix the dough before bed and then wake up and shape. Alternative timing is in the notes section) About 1 hour after mixing, perform a series of stretch and folds to build strength in the dough. The dough should be puffy and doubled when ready. Watch for signs of proper fermentation. Always watch the dough, not the clock.
Day Two
- Prepare the butter mixture by whisking together melted butter, onion powder, parsley, and salt in a shallow bowl.
- Prepare the coating mixture by combining grated parmesan, cornstarch, and mustard powder in another shallow bowl. Mix well.
- Line a 9×13 inch baking pan with parchment or grease a good non-stick pan with olive/avocado oil.
- Turn out the fermented dough onto a well oiled, clean work surface. Pull off golf ball size chunks. (approximately 20 balls) If your fingers get sticky clean off and rub oil on your hands.
- Shape each piece into a smooth ball with the seam on the bottom.
- Dip each dough ball into the butter mixture, coating all sides.
- Roll the buttered ball in the parmesan coating mixture until fully coated.
- Arrange the coated balls in the 9×13 inch pan in 5 rows of 4. Or feel free to play tetris with it and arrange haphazardly.

- Cover the pan or place in a plastic proofing bag and let proof at room temperature for 1 to 2 hours until the dough balls are puffy and jiggly.
Bake
- Preheat oven to 425°F (220°C).
- Press one mini hot dog into the center of each dough ball, pressing down firmly but gently.

- Bake for 20 to 25 minutes until golden brown and the hot dogs have nice color.
- Let cool for 5 minutes before serving. Pull apart and enjoy with your favorite condiments.
Notes
Why This Recipe Works
Let me tell you why this hot dog pull-apart focaccia is changing the game. First, it’s all about that coating method. Each dough ball gets dipped in seasoned butter, then rolled in a parmesan cornstarch mixture that creates the most incredible crispy barrier between each piece. That cornstarch is the secret weapon here. It keeps the buns separated while they bake so you get that satisfying pull-apart action, plus it crisps up beautifully for texture contrast against the soft interior.
The mini hot dogs go on top right before baking, which means they get perfectly browned and slightly caramelized while the bread puffs up around them. No fussy stuffing or sealing required. You’re literally just pressing them down into proofed dough and letting the oven do its thing.
Using sourdough adds incredible flavor depth and that signature note that balances the richness of the butter and cheese. The long fermentation also develops better texture and makes the bread more digestible. But honestly, the yeasted version works beautifully too if you need this on the table faster or don’t maintain a starter.

Ingredients You’ll Need
This recipe breaks down into three main components: the focaccia dough, the coating mixture, and the hot dogs themselves.
For the Sourdough Focaccia Base:
You’ll need active sourdough starter, bread flour, water, olive oil, and salt. This is the same base I use for all my pull-apart focaccia recipes because it’s reliable, forgiving, and produces consistently fluffy results. The higher hydration keeps everything tender even after the double proof.
For the Coating:
Melted butter mixed with onion powder, fresh parsley, and salt creates your flavor base. Then you’re rolling those buttered balls in grated parmesan, cornstarch, and just a touch of mustard powder. That mustard powder is subtle but it gives you that classic hot dog condiment vibe without being aggressive. I use just half a teaspoon for the whole batch, which adds a background tang that makes people ask “what IS that flavor?”
For the Topping:
Twenty mini hot dogs (or cocktail franks) are perfect for a 9×13 inch pan arranged in five rows of four. You want the smaller size so they’re proportional to your pull-apart pieces. Regular full-size hot dogs would be way too big and throw off the bread to hot dog ratio.

Ingredient Substitutions and Variations
Can I use a different cheese?
Absolutely. I chose parmesan specifically because it’s a drier, harder cheese that gets wonderfully crispy when baked and doesn’t add excess moisture to the coating. That said, finely shredded cheddar works great if you want a more classic “cheese and hot dog” vibe. Just make sure it’s finely shredded, not the thick pre-shredded kind, so it distributes evenly in the cornstarch mixture. The finer the shred, the better the coating adheres and the crispier your exterior will be.
What about the hot dogs?
Use whatever mini hot dogs or cocktail franks you love. Beef, pork, turkey, chicken, or even plant-based versions all work. Just keep them on the smaller side so they’re proportional to the bread pieces. If you can only find regular hot dogs, you could cut them into thirds.
Can I make this without sourdough starter?
Yes! Scroll down to the yeasted focaccia version section where I walk you through the exact conversion using active dry yeast. The texture is nearly identical, it just skips that subtle sourdough tang.
What if I don’t have cornstarch?
You really need the cornstarch for the pull-apart separation effect. It creates that barrier that keeps each piece distinct. Without it, you’ll get more of a traditional focaccia texture where everything bakes together. Arrowroot powder is an excellent 1:1 replacement and works almost identically for creating that separation. Potato starch also works similarly, but I haven’t tested it as extensively for this recipe.

Process Tips and Techniques
The technique here is straightforward but there are a few key moments that’ll make or break your results.
The First Proof
After mixing your dough, let it ferment for 8 to 12 hours at room temperature. I usually mix mine in the evening and let it go overnight. About an hour after mixing, perform a series of stretch and folds to build strength in the dough. This helps create better structure. You want the dough puffy and about doubled in size by the end of fermentation. This long fermentation is what develops flavor and structure.
Shaping the Balls
When you dump out your proofed dough, you’re portioning it into 20 pieces. However you can play around with your prefered size and how you place it in the pan. Carb tetris can be fun! Roll each piece into a smooth ball with the seam on the bottom. Then immediately dip in your melted butter mixture and roll in the parmesan cornstarch coating while the butter is still wet so everything sticks.
The Second Proof
Arrange your coated balls in a greased 9×13 inch pan (I use a USA Pan), cover, and let them proof again for 1 to 2 hours. They should look puffy and be touching each other. This second rise is crucial because it’s what gives you that soft, fluffy interior texture.
Adding the Hot Dogs
Right before the pan goes into the oven, press one mini hot dog into the center of each dough ball. Press down firmly but not aggressively. You want it nestled in there but not squishing the dough flat. The heat of the oven will cause the dough to puff up around the hot dog while everything bakes together.
Baking
Bake at 375°F for 20 to 25 minutes until the tops are golden brown and the hot dogs have some nice color. The parmesan in the coating will get crispy and the butter will make everything glisten. Let it cool for just a few minutes before serving so you don’t burn your mouth on molten hot dog, but these are definitely best warm.

Yeasted Focaccia Version (No Sourdough Starter Needed)
If you don’t maintain a sourdough starter or just want a faster timeline, you can absolutely make this with instant yeast instead. The process is nearly identical, just with a shorter fermentation time.
Note: The full yeasted conversion is also included in the recipe card notes section.
REPLACE THE 75G ACTIVE SOURDOUGH STARTER WITH:
37g (about ¼ cup) all purpose flour
37g (about 2½ tablespoons) water
7g (2¼ teaspoons) instant yeast OR 9g (2¾ teaspoons) active dry yeast
USING INSTANT YEAST (RAPID RISE):
Mix everything together at once. Add the 37g flour, 37g water, and 7g instant yeast along with ALL the other recipe ingredients (the 500g bread flour, 400g water, and 10g salt) right from the start. Mix until no dry flour remains. No activation needed with instant yeast.
Rest for 30 to 60 minutes. Cover the bowl and let the dough rest at room temperature. 30 minutes is standard for yeasted focaccia; 60 minutes will give you slightly more flavor development but may shorten your bulk fermentation time.
Stretch and fold. With wet hands, grab one edge of the dough, stretch it up, and fold it over to the opposite side. Rotate the bowl 90 degrees and repeat. Do this 4 times total (one complete rotation around the bowl). The dough will transform from sticky and shaggy to smoother and more cohesive.
Bulk fermentation. Cover and let the complete dough rise for 2 to 3 hours at room temperature until it doubles in size and becomes puffy and jiggly.
Continue as normal. Once doubled, proceed with the recipe exactly as written. Same shaping into balls, same dip and coating, same proofing, same baking temperature and time.
USING ACTIVE DRY YEAST:
Activate the yeast. Mix the 37g warm water (100 to 110°F) with the 9g active dry yeast and ¼ teaspoon sugar in a small bowl. Let it sit for 5 to 10 minutes until foamy and bubbly. If it doesn’t foam, your yeast is dead and you need to start over with fresh yeast.
Mix everything together. Once your yeast is foamy, add it along with the 37g flour and ALL the other recipe ingredients (the 500g bread flour, 400g water, and 10g salt). Mix until no dry flour remains.
Rest for 30 to 60 minutes. Cover the bowl and let the dough rest at room temperature. 30 minutes is standard; 60 minutes provides more flavor development.
Stretch and fold. With wet hands, grab one edge of the dough, stretch it up, and fold it over to the opposite side. Rotate the bowl 90 degrees and repeat. Do this 4 times total (one complete rotation around the bowl).
Bulk fermentation. Cover and let the complete dough rise for 2 to 3 hours at room temperature until it doubles in size.
Continue as normal. Proceed with the recipe exactly as written.
IMPORTANT YEAST VERSION NOTES:
Worried about wet dough? If you’re new to baking and concerned about sticky dough, start by decreasing the water in the main recipe to 360g (1½ cups). Experienced bakers can stick with the full 400g of water.
Water temperature matters: Use room temperature water for instant yeast. Use warm water (100 to 110°F) for active dry yeast.
Bulk fermentation is 2 to 3 hours instead of 8 to 12 hours with sourdough starter. The rest period is 30 to 60 minutes instead of the sourdough’s 30 to 45 minute autolyse (shorter rest = longer bulk fermentation; longer rest = shorter bulk fermentation). This is the main time difference between the two methods.
Everything else stays EXACTLY the same! Same shaping into 27 dough balls, same dip and coating, same hotdog topping, same final proof, same baking time and temperature (425°F for 30 to 35 minutes).
QUICK REFERENCE:
Flour: 37g (¼ cup)
Water: 37g (2½ tablespoons)
INSTANT YEAST: 7g (2¼ teaspoons)
ACTIVE DRY YEAST: 9g (2¾ teaspoons)
PRO TIP: Instant yeast is more forgiving and faster to use. If you’re new to baking, choose instant yeast over active dry yeast. It eliminates the activation step and produces consistent results.
TIMELINE COMPARISON:
Sourdough version: 10 to 14 hours total (mostly hands off fermentation time)
Yeast version: 4 to 6 hours total
Both versions produce incredibly fluffy, flavorful focaccia with creamy buffalo chicken dip pockets. The sourdough version has that signature tang and complexity, while the yeast version is faster and perfect for last minute game day plans.
Storage and Reheating
Room Temperature Storage
These are best enjoyed the day they’re baked, but you can keep them covered at room temperature for up to 2 days. The bread will firm up slightly but they’re still delicious.
Refrigerator Storage
Store in an airtight container in the fridge for up to 4 days. The cold will make the bread stale faster, so definitely reheat before serving.
Freezing
These freeze beautifully! Let them cool completely, then wrap the entire pan tightly in plastic wrap and aluminum foil, or portion into freezer bags. Freeze for up to 3 months. Thaw overnight in the fridge, then reheat.
Best Reheating Method
Reheat in a 350°F oven for 10 to 12 minutes until warmed through. You can also microwave individual pieces for 20 to 30 seconds, but the oven will help re-crisp that exterior coating. If you’re reheating from frozen, add an extra 5 to 8 minutes in the oven.
Frequently Asked Questions
Can I make these ahead?
Yes! This is actually one of my favorite ways to prep these. Do your bulk fermentation as usual (8 to 12 hours), then portion into balls, dip in the butter mixture, roll in the cheese coating, and arrange in your greased pan. Cover the pan well with plastic wrap or a tight lid and stick it in the refrigerator overnight. The next day when you’re ready to bake, pull the pan out of the fridge, let it come to room temperature and get puffy (this usually takes 1 to 2 hours depending on your kitchen temperature), then press in your mini hot dogs and bake as directed. This method is perfect for when you want fresh baked bread but need to split up the work.
Why is the cornstarch important?
The cornstarch mixed with the cheese creates a barrier between each dough ball that prevents them from fully fusing together as they bake. This is what gives you that signature pull-apart effect where each piece separates cleanly. Without it, you’d have more of a traditional focaccia texture.
Can I use all purpose flour instead of bread flour?
Bread flour is ideal because the higher protein content gives you better structure and chew, but all purpose flour will work in a pinch. Your texture might be slightly less chewy, but it’ll still be delicious. All-purpose flour absorbs less water than bread flour due to its lower protein content. If using all-purpose flour, reduce the water by about 25g (from 350g to 325g for the sourdough version, or from 400g to 375g for the yeasted version). Start with less water and add more if needed the dough should still be sticky but not soupy. Your texture will be slightly softer and less chewy, but still delicious.
What size should my dough balls be?
For 20 pieces in a 9×13 inch pan, each ball should be roughly 60 to 70 grams if you’re weighing. If not, just divide your dough into 20 equal portions by eye. They don’t have to be perfect.
Can I add toppings to the hot dogs?
Absolutely! After pressing the hot dogs in, you could add a tiny sprinkle of shredded cheese, some everything bagel seasoning, or even thin slices of onion on top before baking. Just don’t go too heavy or it’ll weigh down the dough.
My dough didn’t rise much during the first proof. What happened?
If you’re using sourdough starter, make sure it was active and bubbly before adding it to your dough. If it’s too cold in your kitchen, fermentation will be slower. You can let it go longer or find a warmer spot. For the yeasted version, make sure your yeast wasn’t expired and your water wasn’t too hot (which kills yeast).
Can I make a smaller batch?
Sure! Halve the recipe and use an 8×8 inch or 9×9 inch square pan for 10 pieces arranged in a different configuration. All the timing stays roughly the same.

Serving Ideas and What to Serve Alongside
These hot dog pull-apart focaccia bites are incredibly versatile. Here’s how I love to serve them:
Classic Condiment Bar
Set out small bowls of ketchup, yellow mustard, spicy brown mustard, and maybe some ranch or cheese sauce for dipping. Let everyone customize their experience. Kids especially love having options.
Lunch Box Hero
Pack a few pieces in your kid’s lunch with a small container of ketchup or mustard for dipping. They’re the perfect size for little hands and way more exciting than a regular sandwich. These always come home with an empty container.
Game Day Spread
Serve these at your next party or game day gathering alongside other finger foods. They’re easy to grab, not messy, and everyone loves them. Pair with chips, veggies and dip, and you’ve got a full spread.
Easy Weeknight Dinner
Serve with a simple side salad or some roasted vegetables and call it dinner. Sometimes simple comfort food is exactly what you need on a busy Wednesday night.
Breakfast Twist
Swap the hot dogs for breakfast sausage links and serve these for brunch. Same concept, different meal. Serve with scrambled eggs and fruit.
Why You’ll Love This Recipe
This is one of those recipes that looks impressive but is actually really approachable. The pull-apart format is just inherently fun to eat, and there’s something nostalgic about hot dogs baked into bread that hits everyone right in the comfort food feelings.
Whether you’re meal prepping lunches, hosting a party, or just want to make your weeknight dinner a little more special, this hot dog pull-apart focaccia delivers. It’s portable, customizable, and honestly just makes people happy. Plus it uses my proven pull-apart focaccia method that’s been viewed millions of times, so you know the technique works.
If you make this recipe, I’d love to see it! Tag me on Instagram or leave a comment below with how it turned out. And if you’re obsessed with the pull-apart format like I am, make sure to check out my other variations: the caramel apple version, cinnamon roll version, and garlic parmesan version are all waiting for you.


Leave a Reply