
I have been on a quiet mission in my kitchen lately. Not to make bread more beautiful or more complicated, but to make it work harder for my family. Between school lunches, after school snacks, and dinner table negotiations, I am always looking for ways to sneak more protein into the foods we already love. Bread felt like the obvious place to start. And with the same day bake or over night option it worked for my busy schedule.
What I did not want was a dense, dry loaf that tastes like protein powder. I wanted something so soft and pillowy that my kids would reach for it without knowing anything had changed. After testing this recipe multiple times, I can tell you this loaf delivers exactly that. It looks and tastes like the best sandwich bread you have ever made. The protein upgrade is just a bonus.
The secret is nonfat Greek yogurt. Not protein powder, not complicated additions, just Greek yogurt mixed right into the dough alongside your active sourdough starter. The result is a bread that is genuinely higher in protein than a standard loaf, tender enough to pull apart warm, and structured enough to hold up to the heaviest sandwich fillings.
Table of Contents
- Why This Recipe Works
- Key Ingredients and Why They Matter
- Understanding the Fermentation
- How to Shape a Sandwich Loaf
- Proofing Tips and Troubleshooting
- Baking and Finishing
- Storage and Slicing
- Shop This Recipe
- More High Protein Sourdough Recipes
- Frequently Asked Questions
- Recipe
- I Need A Yeast Version of This Recipe
Why This Recipe Works
Most high protein bread recipes fall into one of two camps. Either they use protein powder, which can make a loaf dry and oddly textured, or they add seeds and nuts to an otherwise standard recipe and call it high protein. This recipe does neither of those things.
Instead, nonfat Greek yogurt replaces the water or milk you would typically use in an enriched sandwich loaf. Greek yogurt is naturally high in protein, thick enough to build structure into the dough, and acidic enough to work beautifully alongside a sourdough starter. The combination of active starter and a small amount of baking powder gives you a reliable same day to next day loaf without sacrificing the benefits of slow fermentation.
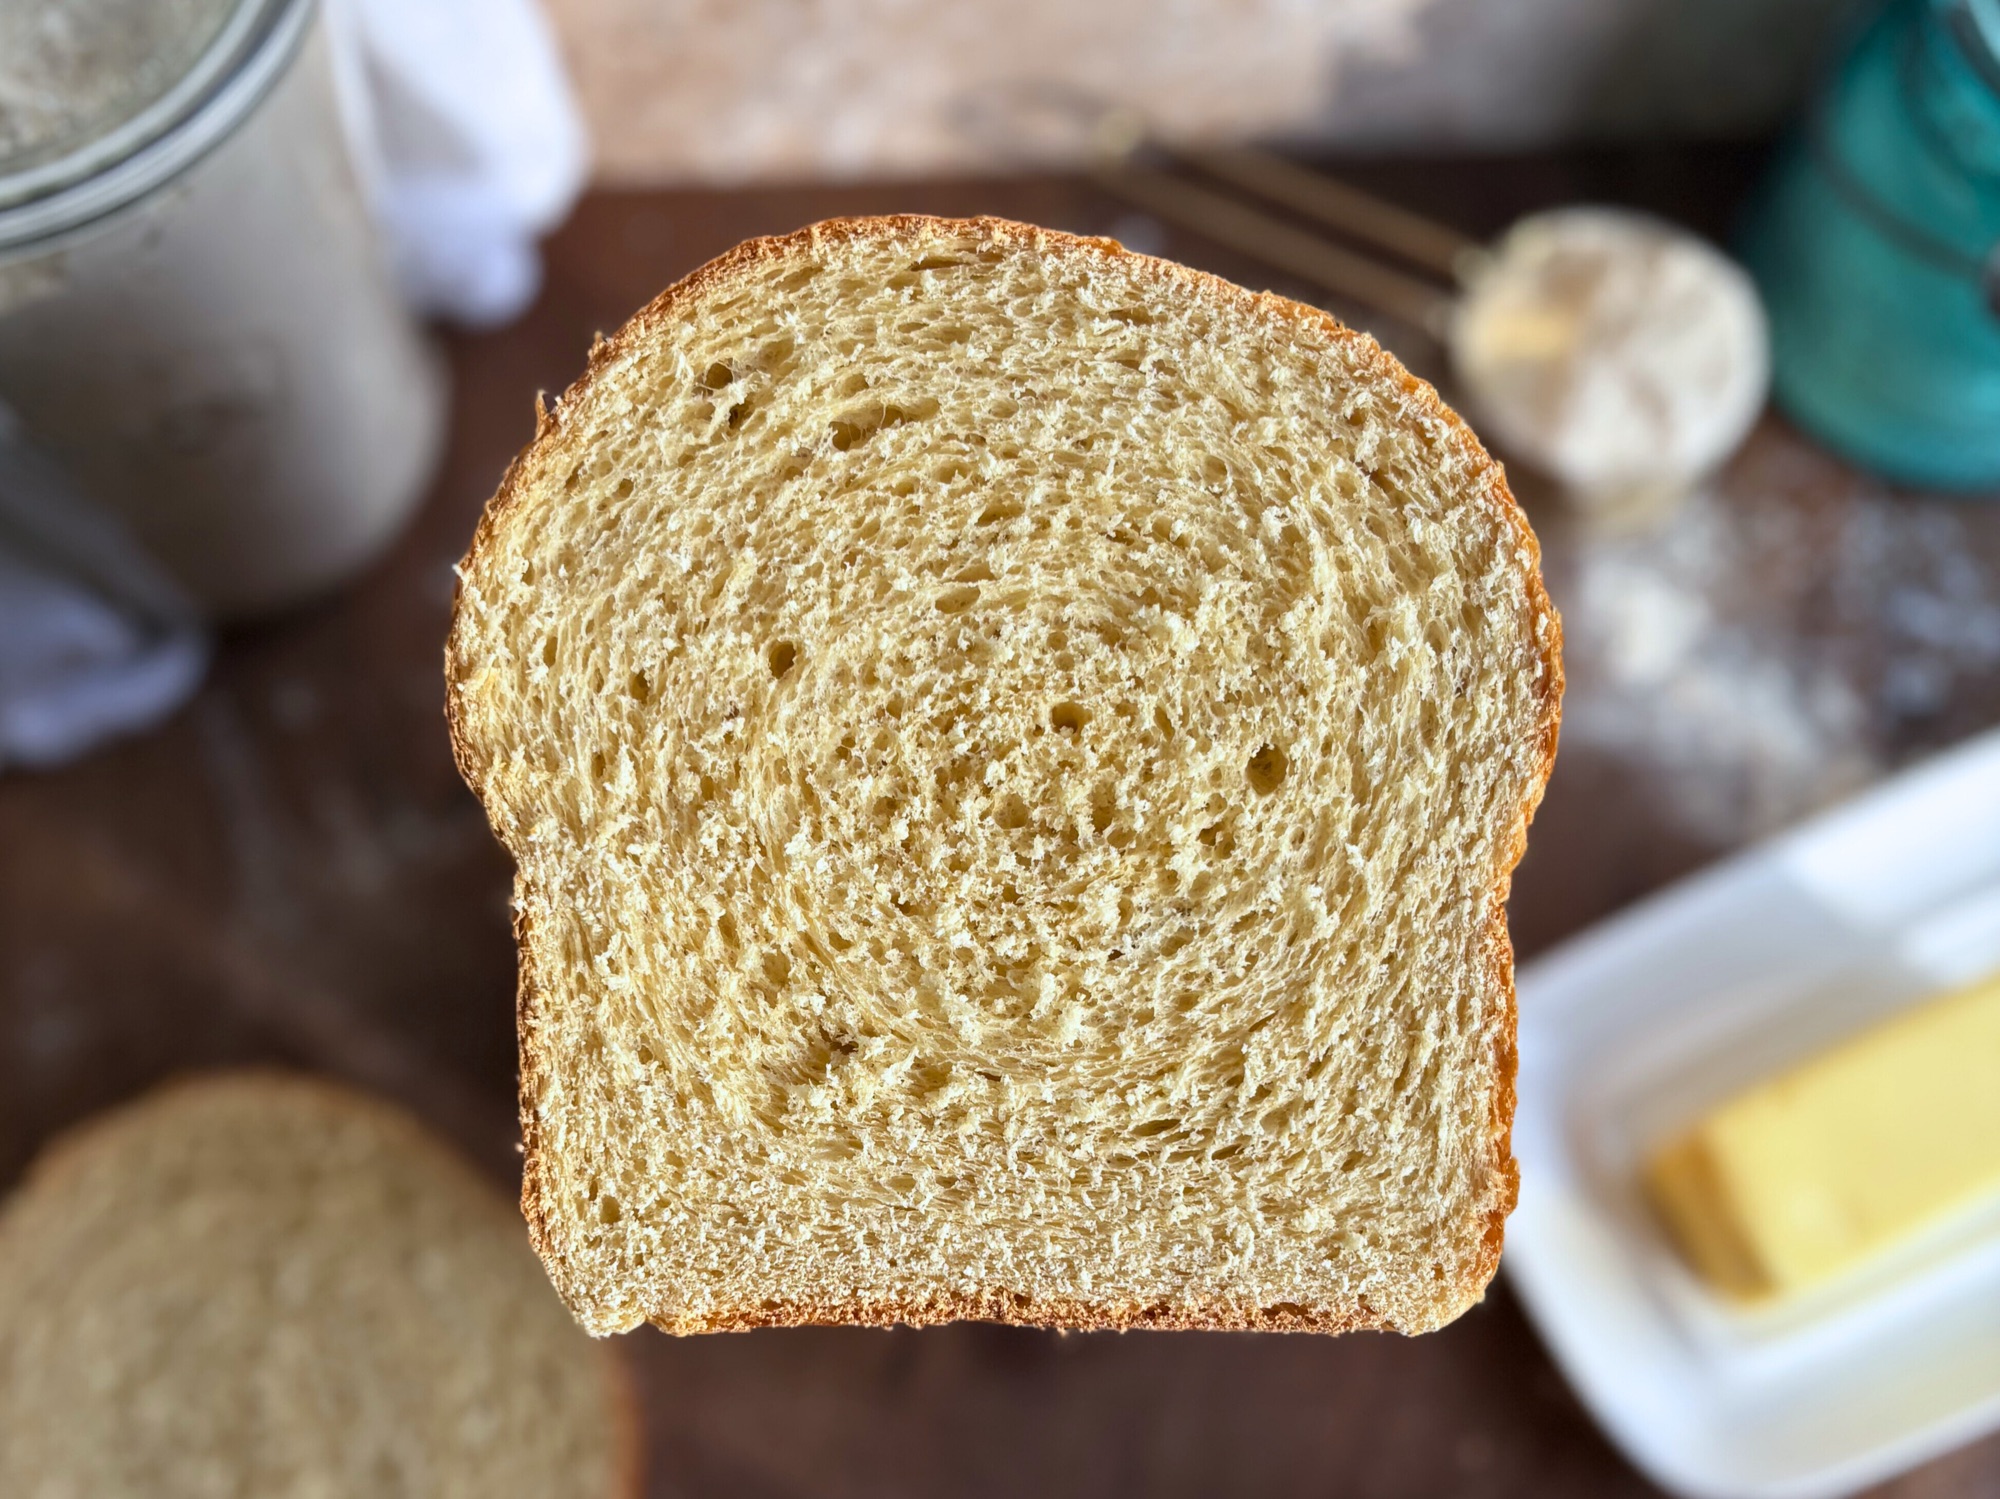
The result is a loaf that is noticeably higher in protein than store bought sandwich bread, genuinely soft enough to compress between your fingers and spring back, and flavorful in a way that plain white sandwich bread simply is not. Bread flour gives the structure the dough needs to rise tall in the pan and hold up to slicing. Everything in this recipe has a reason.

Key Ingredients and Why They Matter
Bread Flour
Bread flour has a higher protein content than all purpose flour, typically 12 to 14 percent compared to 9 to 12 percent. That additional protein builds more gluten, which gives your loaf the structure it needs to rise high in the pan and maintain a crumb that slices cleanly rather than collapsing. For a sandwich bread especially, bread flour is the right choice.
Nonfat Greek Yogurt
This is the star ingredient. Nonfat Greek yogurt adds a significant protein boost to every slice while also contributing to the incredibly soft, tender crumb this loaf is known for. The slight acidity of the yogurt tenderizes the gluten in the bread flour, which is exactly why this loaf does not eat tough or chewy despite using a higher protein flour. Do not substitute regular yogurt without adjusting your liquid ratios, as regular yogurt has a much higher water content and will change the dough entirely. Keep in mind that warming it in the microwave is essential for making sure the recipe can be made same day. (COLD ingredients = slow fermentation. ROOM TEMPERATURE ingredients = normal fermentation)
Active Sourdough Starter
Use your starter at peak activity for this recipe, meaning it should be bubbly, domed, and at its highest point after feeding. The starter is doing the heavy lifting for fermentation here, developing flavor and digestibility over a long slow bulk ferment. A sluggish starter will result in a dense loaf that does not rise properly.
Baking Powder
A small amount of baking powder acts as a reliable backup leavener that activates in the oven. It also contributes to that extra lightness in the crumb that makes this loaf so pillowy even with the substantial amount of greek yogurt. Do not skip it or increase it beyond what the recipe calls for.
Butter and Egg
Both the butter and egg enrich the dough, contributing to a soft, golden crumb and a crust that browns beautifully without going tough. Softened butter, not melted, is important here. Melted butter will not incorporate into the dough the same way and can affect the final texture. Trust me.
Whole Milk
A small amount of whole milk helps the dough come together with the right extensibility for shaping and supports a better oven spring. It also adds a touch of fat that improves shelf life, meaning this loaf stays soft longer than a lean sourdough would.

Understanding the Fermentation
One of the things that makes this recipe genuinely different from most high protein bread recipes online is that it is a real sourdough, meaning it undergoes a proper fermentation. That matters for a few reasons beyond just flavor.
The long slow ferment, typically 8 to 12 hours depending on your kitchen temperature, breaks down some of the phytic acid naturally present in wheat. Phytic acid can interfere with the absorption of certain minerals, so reducing it through fermentation makes the nutrients in this bread more bioavailable. The fermentation process also partially breaks down the gluten structure, which many people find makes sourdough easier to digest than commercially yeasted bread.
Because this is an enriched dough with butter, yogurt, and egg, it will not rise as dramatically during bulk fermentation as regular sourdough would. You are not looking for a full double in size. Instead, look for a 50 to 75 percent increase in volume, a surface that looks domed and jiggly when you shake the bowl gently, and bubbles visible around the edges and on top of the dough. The dough should feel airy and light when you touch it, not dense and heavy like when you first mixed it.
Temperature plays the biggest role in how long your bulk ferment takes. At 65 degrees Fahrenheit, expect 10 to 12 hours, which makes this an ideal overnight recipe. Mix the dough before bed, do one set of stretch and folds after 30 to 45 minutes, then cover it and let it work through the night. By morning it will be ready to shape. At warmer temperatures closer to 75 to 78 degrees, bulk fermentation can happen in as little as 6 to 8 hours.

How to Shape a Sandwich Loaf
Shaping is the step that determines how your loaf rises, how even the crumb is, and whether you get that beautiful domed crown above the rim of the pan. It sounds intimidating but once you do it once it becomes second nature.
Start by turning your fully fermented dough out onto a lightly floured surface. You want just enough flour to prevent sticking but not so much that the dough slides around and loses its grip. Let it rest for five minutes uncovered. This short rest relaxes the gluten just enough to make the dough easier to work with without losing the structure you built during the bulk ferment.
Using a rolling pin, gently roll the dough out into a rectangle roughly 10 inches wide and 8 inches long. This step does more than just shape the dough. It presses out the larger air pockets that developed during fermentation. Those air pockets are not a bad thing, they are proof your dough fermented well, but if you skip this step you may end up with big irregular holes in your crumb. You can still eat that bread and it will taste just as good, but for a clean sandwich slice you want an even, tight crumb and the rolling pin gets you there. Roll with light, even pressure and work from the center outward rather than pressing down hard all at once.
Starting from the short end closest to you, begin rolling the dough up tightly toward the far end. As you roll, periodically fold the sides in and tuck them under toward the center before continuing to roll forward. This side tucking technique keeps the ends of the loaf neat and sealed so you do not end up with open, ragged edges on the finished loaf. Keep the tension firm and consistent all the way through. Watch the video below to see exactly how this looks in action.
When you reach the end, pinch the seam firmly all the way across with your fingers. This seal is important. If the seam is weak it can open up during baking and affect the shape. Give it a few good pinches to make sure it is closed.
Place the shaped loaf seam side down into your parchment lined pan. The seam goes on the bottom so it bakes sealed and the smooth surface faces up for the best crust. Press it gently into the corners of the pan so it fills the width evenly from end to end.
Cover with a plastic bag and move on to the final proof. You will know the shaping worked when the loaf rises evenly across the full length of the pan and crowns in a smooth dome rather than a lumpy or uneven top.
A note on tension: Surface tension is what gives your loaf that tight, uniform crumb. If you find the dough keeps springing back and resisting when you try to roll it, cover it and let it rest for another five minutes. The gluten just needs a little more time to relax before it will cooperate.

Proofing Tips and Troubleshooting
The final proof, after shaping and placing the dough in the pan, is where most home bakers run into trouble with sandwich loaves. Here is everything I learned from testing this recipe multiple times.
How to Know When It Is Ready to Bake
The most reliable method is the poke test. Press a lightly floured finger about half an inch into the side of the shaped loaf. If the indentation springs back immediately and completely, the dough needs more time. If the indentation fills back in slowly and leaves a slight dent, it is ready to bake. If the indentation stays completely and does not spring back at all, it has gone too far.
Visually, look for the dough to crown about 1/2” inch above the rim of the pan. The surface should look smooth and evenly domed, not flat or collapsed.
Temperature Is Everything
This dough is highly sensitive to ambient temperature during the final proof. In a warm kitchen at 75 degrees or above, the final proof can be done in as little as one hour. In a cooler kitchen around 65 degrees, expect two to three hours. Never leave this dough unattended in a warm space. It can go from perfectly proofed to overproofed in under 30 minutes at high temperatures. Ask me how I know.
If your kitchen runs warm and you need to slow things down, place the shaped loaf in the refrigerator while your oven preheats. Even 15 minutes in the fridge firms the dough up and gives you more control over timing.
What Happens If It Overproofs
An overproofed loaf will show surface tearing before it ever hits the oven, and it will have less oven spring once it bakes. The crumb may be slightly more open and irregular than ideal. The loaf will still taste good but it will not have that perfect pillowy crumb. If you catch overproofing early, placing the pan in the refrigerator for 15 to 20 minutes can sometimes stabilize it enough to bake successfully. But always bake your loaf. Always. (See the picture below for an example)
What Happens If It Underproofs
Underproofing is the most common mistake with enriched sandwich loaves and it is easy to do because the dough looks ready before it actually is. If the loaf goes into the oven before the gluten has fully relaxed and the dough has built up enough gas, you are going to get oven spring with nowhere to go. The dough is still tight and the surface has not opened up enough to expand evenly, so all of that pressure finds the weakest point, which is almost always the side of the loaf right where it meets the pan. The result is a split along the side that opens up during baking.
The loaf will still taste good. Do not throw it out. But the crumb may be be denser than it should be, especially toward the bottom, and the shape maybe a little less than perfect. It is one of those things where you know immediately what happened and you file it away for next time.
The fix is simple. Do not go by the clock and do not go by how the dough looks from a distance. Or where it sits in the pan. Always do the poke test before you bake. Press a lightly floured finger about half an inch into the side of the shaped loaf. If it springs back immediately and completely, it is not ready. Walk away for another 20 to 30 minutes and test again. You are waiting for that slow, lazy spring back that leaves a slight indent. That is your green light.
One thing worth knowing about this specific dough: because it is enriched with yogurt, it will act differently than a regular sandwich bread. It can look deceptively similar at 60 percent proofed versus 90 percent proofed from the outside. The poke test is the only reliable way to know what is actually happening inside the dough. Trust it over your eyes every single time.

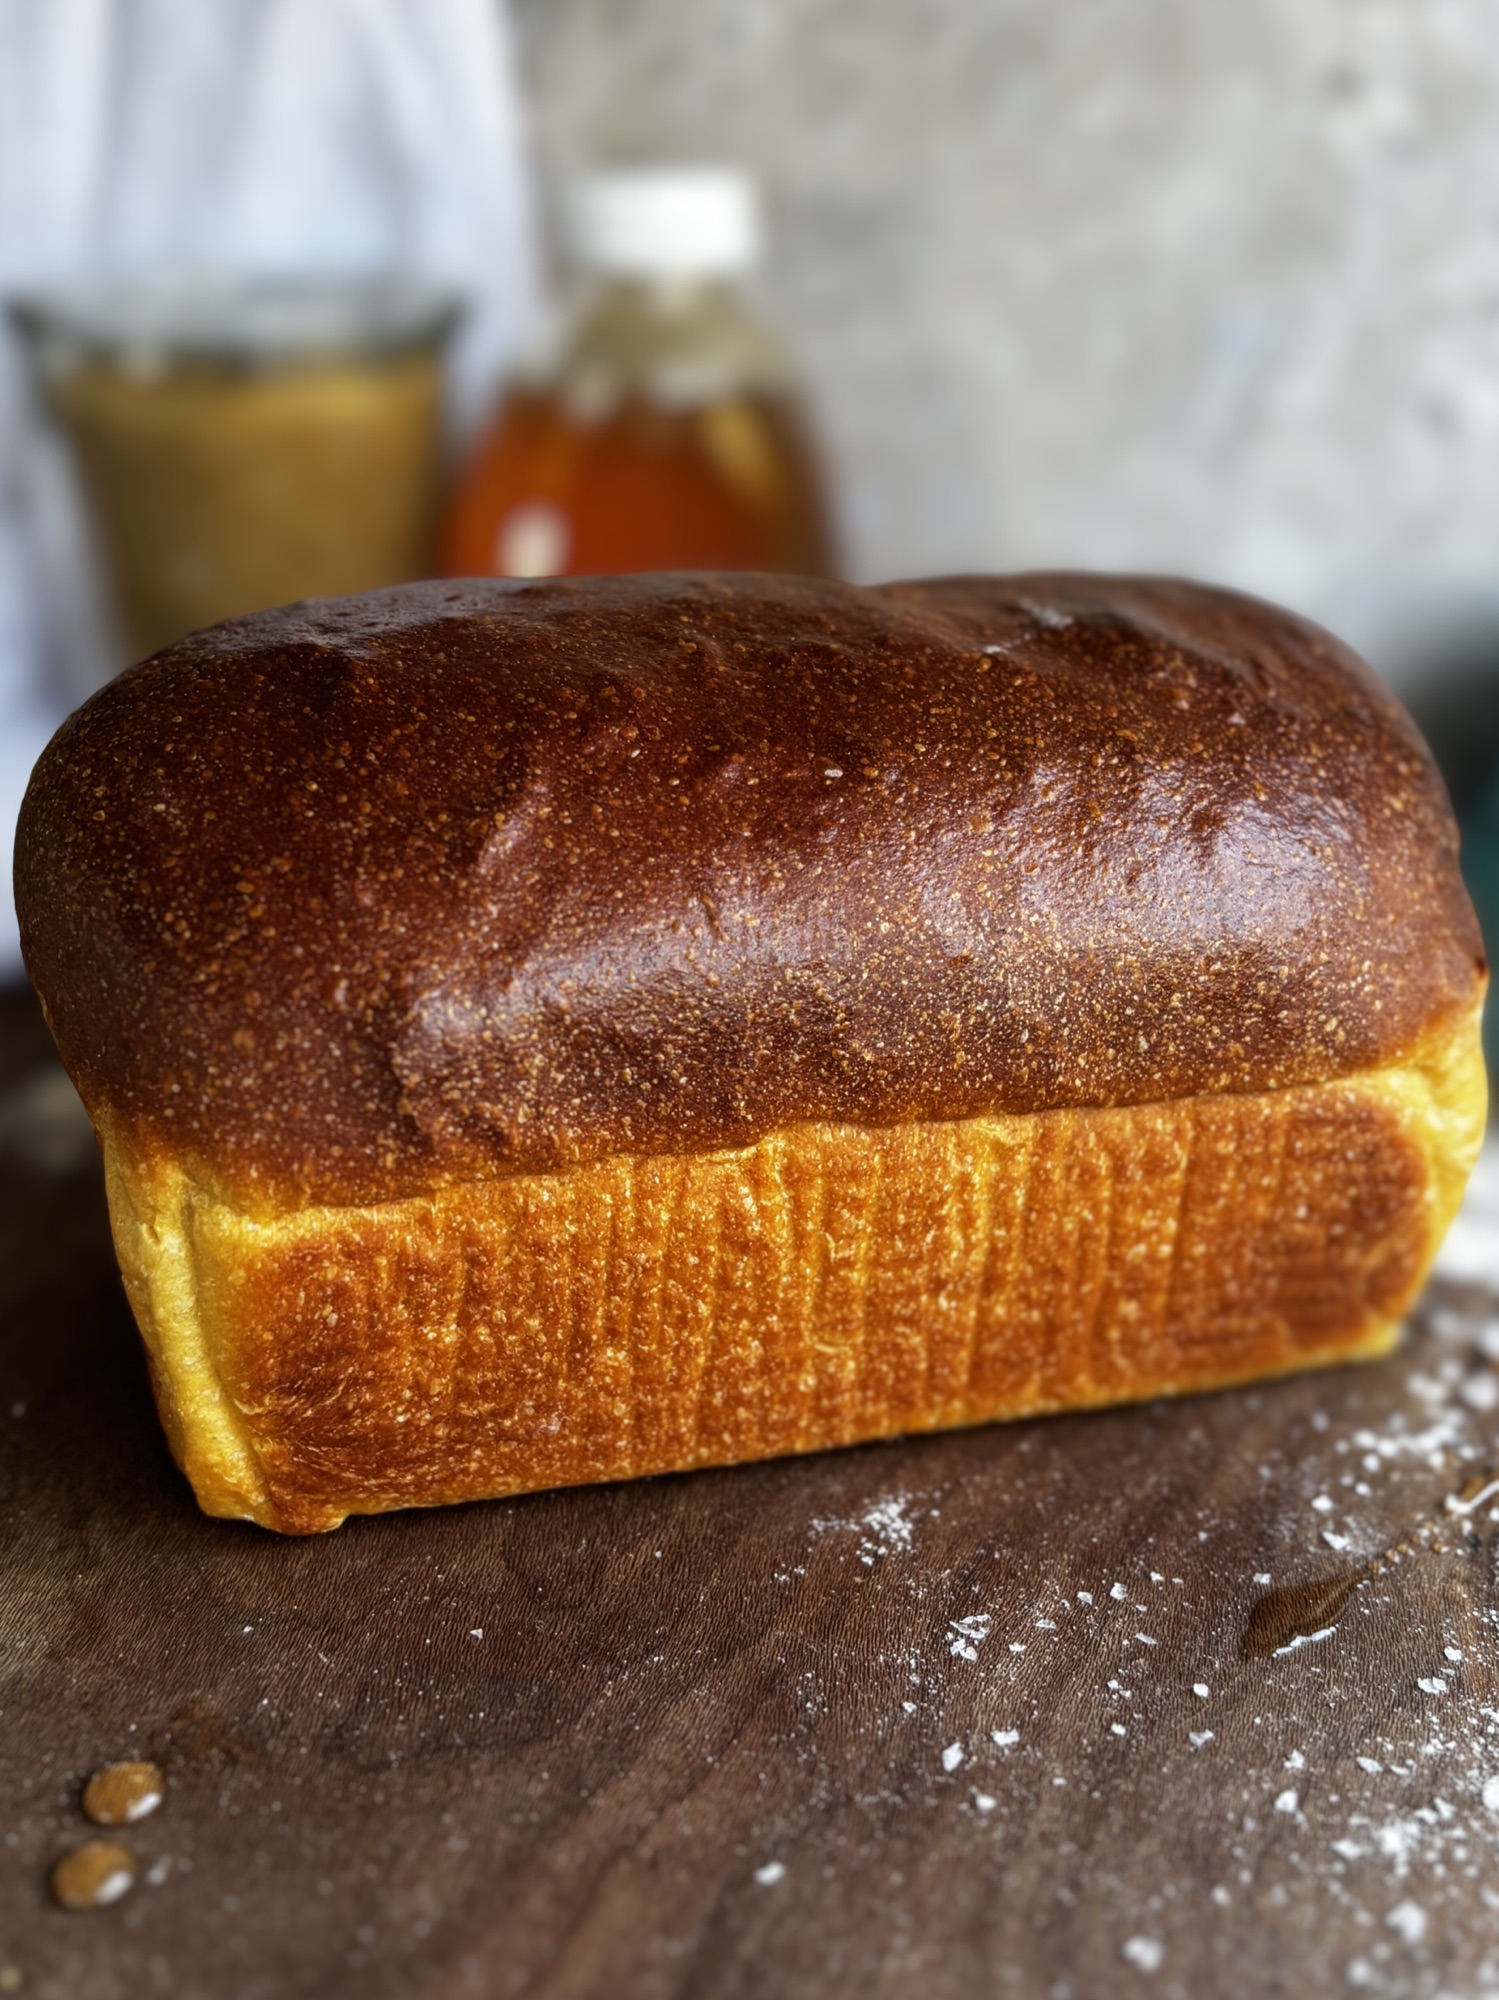
Baking and Finishing
This loaf bakes at 375 degrees Fahrenheit for 38 to 42 minutes. Lower and slower than you might expect, but the enriched dough needs time for the interior to set without the crust burning. The most reliable way to know your loaf is done is an instant read thermometer. You are looking for 190 to 195 degrees Fahrenheit at the very center of the loaf. Pull it when it hits that range regardless of color or time.
If the top is browning faster than you would like, tent the loaf loosely with foil after the first 25 minutes and continue baking. The foil blocks direct heat on the top while allowing the interior to finish cooking through.
Alternatively you can use an inverted pan the same size as the one you’re using, on top of the bread pan for the first 10-12 minutes to slow the browning.
The moment the loaf comes out of the oven, brush the entire top generously with melted butter. This step is HIGHLY recommended. The butter soaks into the hot crust immediately and is what gives this loaf that soft, glossy, irresistible top. It also deepens the color beautifully.

Storage and Slicing
Let the loaf cool in the pan for 10 minutes, then transfer to a wire rack. Do not cut into it for at least 45 minutes to one hour after baking. The interior of an enriched loaf is still setting up as it cools, and cutting too early results in a gummy, doughy crumb even when the loaf is fully baked. It is genuinely worth the wait.
Once fully cooled, store the loaf wrapped tightly in plastic wrap or in an airtight bread bag at room temperature for up to 3 days. Because of the yogurt and butter, this loaf has better staying power than a regular sourdough and will not go stale as quickly. For longer storage, slice the cooled loaf completely, place parchment between slices, and freeze in an airtight bag for up to one month. Pull slices directly from the freezer and toast as needed.

Shop This Recipe
These are the tools I used to develop and bake this loaf. Having the right pan in particular makes a real difference in how this bread rises and what the final shape looks like.
- USA Pan 10×5 Loaf Pan — The pan this recipe was developed and tested in. The aluminized steel gives you even browning and the nonstick coating makes cleanup easy. Using a smaller pan will result in different baking times
- Kitchen Scale — Baking by weight is the only way to get consistent results every time. This is the one I use.
- Instant Read Thermometer — The most reliable way to know your loaf is done. Pull it at 190 to 195 degrees Fahrenheit and you will never overbake or underbake again.
- Parchment Paper Sheets — Pre-cut sheets fit most loaf pans perfectly and make it effortless to lift the baked loaf out without tearing the crust.
- Bread Proofing Bags — Reusable bags that keep the loaf covered during the final proof without sticking to the surface. A great alternative to plastic wrap.
- Bench Scraper — Helpful for shaping the dough, cleaning the counter, and scraping the bowl out.
- Rolling Pin — Useful for rolling the dough out into an even rectangle before shaping into the loaf.
This post contains affiliate links. If you purchase through my links I may earn a small commission at no extra cost to you. I only recommend tools I actually use and trust in my own kitchen. Thank you for supporting H3art of the Home.
More High Protein Sourdough Recipes
If you are working on building more protein into your sourdough baking, these recipes from H3art of the Home are a great place to continue:
- High Protein Sourdough Herb Bread
- High Protein Sourdough Chocolate Chip Scones
- High Protein Sourdough Plain Scones
- High Protein Pumpkin Cheesecake Pudding
- High Protein Pumpkin Spice Pudding
Frequently Asked Questions
Can I use all purpose flour instead of bread flour?
You can, but the results will be different. Bread flour gives this loaf the structure it needs to rise tall and slice cleanly. All purpose flour will produce a softer, slightly more delicate crumb that may not hold up as well to sandwich fillings. If you only have all purpose flour, reduce the milk by about 10 grams as all purpose absorbs less liquid than bread flour.
Can I use full fat Greek yogurt instead of nonfat?
Yes, but the protein content per slice will be lower and the dough may feel slightly richer and softer. Full fat yogurt also has more moisture than nonfat, so you may need to reduce the milk slightly or add a small amount of additional flour to get the right dough consistency. The loaf will still be delicious.
My dough feels sticky when I first mix it. Is that normal?
Yes, completely normal for this recipe. This dough leans sticky rather than stiff, which surprises a lot of people because bread flour is a higher protein flour and you might expect it to feel firm. Here is what is actually happening: nonfat Greek yogurt releases its moisture slowly and differently than water or milk would. The yogurt proteins bind some of that liquid, but as the dough mixes and the flour begins to hydrate fully, the dough will feel wetter than a standard sandwich loaf. This is the same behavior across a lot of Greek yogurt dough recipes. The key is trusting the process. Do not add extra flour right away. Give the dough a full 5 minutes of mixing, then let it rest for 10 minutes. As the bread flour fully absorbs the yogurt, the dough will tighten up and become much more manageable. If it is still very sticky after that rest, you can add flour one tablespoon at a time, but most bakers find it settles into a soft, slightly tacky dough on its own.
Can I make this same day without an overnight bulk ferment?
Yes. Mix the dough in the morning, bulk ferment at room temperature for 6 to 8 hours depending on your kitchen temperature, shape, final proof for 1.5 to 2 hours, and bake in the evening. The baking powder in this recipe means the loaf is reliable even on a shorter timeline. The flavor will be milder with a shorter ferment but the texture will still be excellent.
Why did my loaf split on the side instead of the top?
A side split almost always comes down to underproofing. When the loaf goes into the oven before the gluten structure has fully relaxed and the dough has reached the right level of gas production, the oven spring is too aggressive for the tight surface and it bursts through the weakest point, which is usually the side where the dough meets the pan. The loaf is should fully proof to about 1/2 inch above the rim of the pan before baking, and that the poke test shows a slow, partial spring back rather than snapping back immediately. An oven that is too hot can also contribute, sending a rush of heat before the dough has time to rise evenly. Check your oven temperature with a separate thermometer if side splitting is a recurring issue. See the fermentation section for more.
How much protein is actually in each slice?
How much protein is actually in each slice?
This will vary based on your exact brands and how thick you slice it, but here is a useful real world estimate. A 10 inch loaf cut at half inch to three quarter inch slices yields approximately 12 to 18 slices. At 15 slices, each one has roughly 6 grams of protein. For comparison, a standard store bought white bread like Wonder or Nature’s Own comes in at about 2 grams per slice. That means this loaf delivers about triple the protein of a typical store bought white. It is not going to replace a chicken breast, but six grams per slice adds up fast across a full day of eating, especially when your kids are having two slices at breakfast and two more at lunch. For the most precise number based on your specific brands, plug everything into a nutrition app like Cronometer or MyFitnessPal.
Can I make a dairy free version?
This has not been tested with dairy free substitutions. The nonfat Greek yogurt is a structural ingredient in this recipe, so replacing it would require significant testing. A thick, high protein dairy free yogurt such as a coconut or soy based option with a similar consistency might be worth experimenting with, but results cannot be guaranteed.
Do I need a stand mixer for this recipe?
No. This dough can absolutely be mixed by hand. Combine the wet and place the dry ingredients o top. Then place the chunks of butter on top of the flour. Gently pinch the butter into the flour and then begin to slowly mix together, until a shaggy dough forms, then knead on a clean surface for 6 to 8 minutes until the dough smooths out. The bread flour needs a bit more work than all purpose to develop the gluten properly, but it comes together beautifully with just your hands. Add a small amount of flour to the surface, if it would become sticky.

I Don’t Have Sourdough Starter, What do I do?
I had many many requests to take this recipe and make it non-sourdough! So i whipped out my yeast and got to work. You can get the new recipe for that HERE. The same protein rich, super soft sandwich loaf, now made in a few hours verses a day! But if you don’t have a starter and want to start one to get the benefits of sourdough a try, click HERE for my minimal waste recipe!

Made This Recipe?
I want to hear how it went. Leave a comment below and tell me about your bake. Did you do an overnight proof or a same day loaf? What did you make with it first?
If you share it on Facebook, Instagram or TikTok, tag me so I can see your crumb shots. There is nothing better than watching this recipe work in someone else’s kitchen.
And if you want new recipes sent directly to you before they hit the blog, sign up for the H3art of the Home newsletter below. You will never miss a drop.
Recipe

High Protein Sourdough Sandwich Bread
Equipment
- kitchen scale
- Stand mixer with dough hook or large mixing bowl
- 10×5 loaf pan (USA Pan recommended)
- Parchment paper
- Instant read thermometer
- – Pastry brush
- Wire cooling rack
Ingredients
INGREDIENTS
- 400 grams bread flour 3⅓ cups
- 120 grams active peaked sourdough starter 1/2 cup
- 240 grams nonfat Greek yogurt slightly warmed (1 cup)
- 50 grams unsalted butter softened (3½ tablespoons)
- 40 grams whole milk room temperature (3 tablespoons)
- 20 grams granulated sugar 1½ tablespoons
- 7 grams fine salt 1 ¼ teaspoons
- 4 grams baking powder 1 teaspoon
- 1 large egg room temperature
For finishing:
- 1 large egg
- 1 tablespoon water
- 2 tablespoons melted butter for brushing after baking
Instructions
- Warm the Greek yogurt and milk in the microwave for about 30 seconds, just enough to take the chill off. You want it slightly warm but not hot. If the yogurt is too warm it can weaken your starter when they are mixed together.
- In a large bowl whisk together the bread flour, baking powder, salt, and sugar. In a separate bowl whisk together the sourdough starter, warmed yogurt, milk, and egg until smooth. Pour the dry mixture into the wet ingredients then throw walnut size chunks of the butter on top. Mix until a cohesive dough forms. Let rest 10 minutes.
- Two options: Knead the dough on a clean surface for 6 to 7 minutes, OR mix on medium speed with a stand mixer dough hook, until the dough smooths out and becomes elastic. This dough will feel sticky at first because the Greek yogurt releases moisture slowly and differently than water would. Do not add extra flour yet. Give it the full knead time. The bread flour will absorb the yogurt and the dough will tighten up considerably.
- Scrape the dough into a ball after removing the dough hook.
- Place the dough in a lightly oiled bowl and cover. After the first 30 to 45 minutes, perform a set of stretch and folds until the dough begins to tighten up. Perform one slap and fold to get the seam in the dough to the bottom of the bowl. Creating a smooth rounded top. Then cover and leave it undisturbed. Bulk ferment until the dough is 50 to 75 percent larger in volume, the surface looks domed and jiggly when you gently shake the bowl, and bubbles are visible around the edges. This takes 6 to 10 hours at room temperature depending on your kitchen temperature. For a longer overnight bulk ferment, a room temperature of 66 to 68 degrees Fahrenheit is ideal.
- Turn the dough out onto a lightly floured surface. Roll it gently into a rectangle roughly the width of your loaf pan, about 10 inches wide and 8 inches long. Roll the dough up tightly from the short end, pulling gently and rolling (Like you roll a sleeping bag) creating surface tension as you go. I like to pull the ends in every few rolls to keep them well shaped. Pinch the seam firmly all the way across and place the shaped loaf seam side down in a parchment lined or lightly greased 10×5 loaf pan. (see the blog post for a video guide)
- Cover with a plastic bag (make sure the bag is inflated so the plastic doesn't touch the dough) and let the shaped loaf proof at room temperature for 1.5 to 2.5 hours, until the dough crowns about 1/2 inch above the rim of the pan. However the poke test is the most accurate way to tell if your dough is ready to be baked. If your kitchen runs cool, you can place the pan in the oven with just the oven light on, for a short period to create a gentle proofing environment. You don't want to go above 80 degrees fahrenheit.
- Remove the loaf from the oven if proofing inside and preheat to 375 degrees Fahrenheit. While the oven heats, whisk together the egg and water to make the egg wash and brush it gently over the surface of the loaf.
- Bake for 38 to 42 minutes until deep golden brown. Check the internal temperature with an instant read thermometer. You are looking for 190 to 195 degrees Fahrenheit in the center of the loaf. If the top is browning faster than you would like, tent the loaf loosely with foil after the first 25 minutes and continue baking.
- Remove from the oven and immediately brush the top generously with melted butter. Let the loaf cool in the pan for 10 minutes, then lift it out using the parchment and transfer to a wire rack.
- Cool for at least 45 minutes to one hour before slicing. Cutting into an enriched loaf too soon results in a gummy crumb even when the loaf is fully baked. The interior is still setting up as it cools and the wait is worth it.


Leave a Reply to Sarah Cancel reply