Welcome back to Croissant Class! You have made it to Week Five, which means your laminated dough has been through its double fold in Week Three and its single fold in Week Four, and it has been resting in the refrigerator. All of that work is locked inside that dough right now.
This week is the final rollout, and it is one of the most satisfying steps in the whole process. You are going to roll the dough to its final thickness, cut your triangles, shape each croissant, and get them ready for proofing. We are almost there.
The Master Croissant Recipe and Masterclass Guide has the full recipe with every measurement and detail in one place whenever you are ready for it.
Table of Contents
- The Full Croissant Class Series
- Preparation
- Managing Air Bubbles
- The Tapping Method
- Rolling Technique
- The 45 Degree Rollout Method
- Precise Trimming and Cutting
- Creating Perfect Triangles
- To Notch or Not to Notch
- Shaping Your Croissants
- Common Errors to Avoid
- Watch the Full Video
The Full Croissant Class Series
Week One: How to Make a Butter Block
Week Two: Locking In Your Butter Block
Week Three: Rolling and Lamination
Week Four: The Single Fold Lamination Method
Week Five: Croissant Final Rollout (you are here)
Preparation
Remove your dough from the refrigerator 10 to 20 minutes before rolling, or however long your specific recipe suggests. The dough should be cold but slightly pliable, not rock hard and not soft.
Have these things ready before you start:
Rolling pin
Ruler (follow the measurements on the recipe you are using)
Plastic wrap
Pastry brush or something to dust excess flour off the dough
Water sprayer for a light mist
Sharp knife
Parchment lined sheet pan
Work quickly and with intention. The goal is efficiency without rushing. Every extra minute the dough sits at room temperature is a minute the butter is warming, and warm butter means compromised lamination.
Managing Air Bubbles
Proper air bubble management is essential for even baking and consistent layers throughout the finished croissant.
Before you begin rolling, take a clean toothpick and carefully poke small holes around the edges of the dough at approximately one inch intervals. Do not press too deeply, just enough to create tiny vents about one quarter inch deep. Pay extra attention to corners and thicker sections where air is most likely to get trapped. You can add more vents as needed if bubbles form during rolling.
If you notice a large bubble forming while you are rolling, gently press it toward the pierced edges rather than popping it directly. If you do need to pop one, push the toothpick in at an angle so that when you resume rolling the hole will reseal itself.
The Tapping Method
Just like in Weeks Three and Four, start with the tapping method before you apply any real rolling pressure.
Place your unwrapped dough on the floured work surface. Position your rolling pin at the edge closest to you and using light but firm taps, press gently across the entire surface from one end to the other. You should see the dough expanding slightly with each tap. Then turn the dough so the long side is parallel to you and repeat. Then turn so the short side is parallel and repeat once more.
The dough should begin to yield slightly but remain cold throughout. This tells you the butter is reaching that ideal pliable but not soft state for rolling. If the dough starts to feel sticky or overly soft at any point during tapping, cover it with plastic wrap and return it to the refrigerator immediately.

Rolling Technique
Position your rolling pin in the middle of the dough. Apply gentle, even pressure as you roll from the middle toward the top edge. Return to the middle and roll toward the bottom edge. Continue this middle-out pattern, gradually working across the entire surface toward the exact measurements your recipe calls for.
To even out the outer edges, place your rolling pin vertically and roll from the middle out to each side.
If at any point your dough rectangle starts losing its shape during this final rollout, implement the 45 degree rolling technique below, which will also help even out the sides.
The 45 Degree Rollout Method
Rolling the dough at 45 degrees changes the direction of the gluten strands with each pass. This prevents the dough from becoming too resistant in one direction, which would make it harder to roll out evenly and could result in uneven rising during baking.
After rolling your dough to the size your recipe requires, lift the dough carefully and rotate it 45 degrees clockwise or counterclockwise. If you would rather not move the dough, just move your own position around the work surface. Roll again using your standard middle to top and middle to bottom method. Because the dough is now at an angle, you are rolling diagonally across the previous gluten formation.
Target thickness: Roll to approximately one quarter inch (6 to 7mm), or to the exact dough rectangle dimensions your recipe requires.
Keep the rolling pin moving in the same direction throughout. Do not drag the pin across the dough.
Precise Trimming and Cutting
Make sure your dough is on a lightly floured surface. Position your ruler along one edge and trim a minimal amount, or the amount required by your recipe, to create a perfectly straight edge. Repeat on all four sides to create a clean, precise rectangle. Your recipe should give you the final dimensions.

Measure and mark even intervals along both the top and bottom edges of your rectangle. These marks will determine the base width of each croissant triangle.
Place your ruler to connect a mark on the top edge with its corresponding mark on the bottom edge. Cut along this line to create your initial rectangular divisions.

Cutting tool options:
Sharp knife: Use a long, thin blade. Cut with one smooth, confident up and down motion. Clean the blade between cuts. This is my preferred method for the reasons covered in Week Four.
Pizza wheel: Minimal compression of layers, quick and precise. Keep the wheel clean and sharp.
Freezer assist (optional): Wrap the dough and chill for 5 to 10 minutes before cutting. This firms up the butter layers and creates cleaner, more precise cuts.
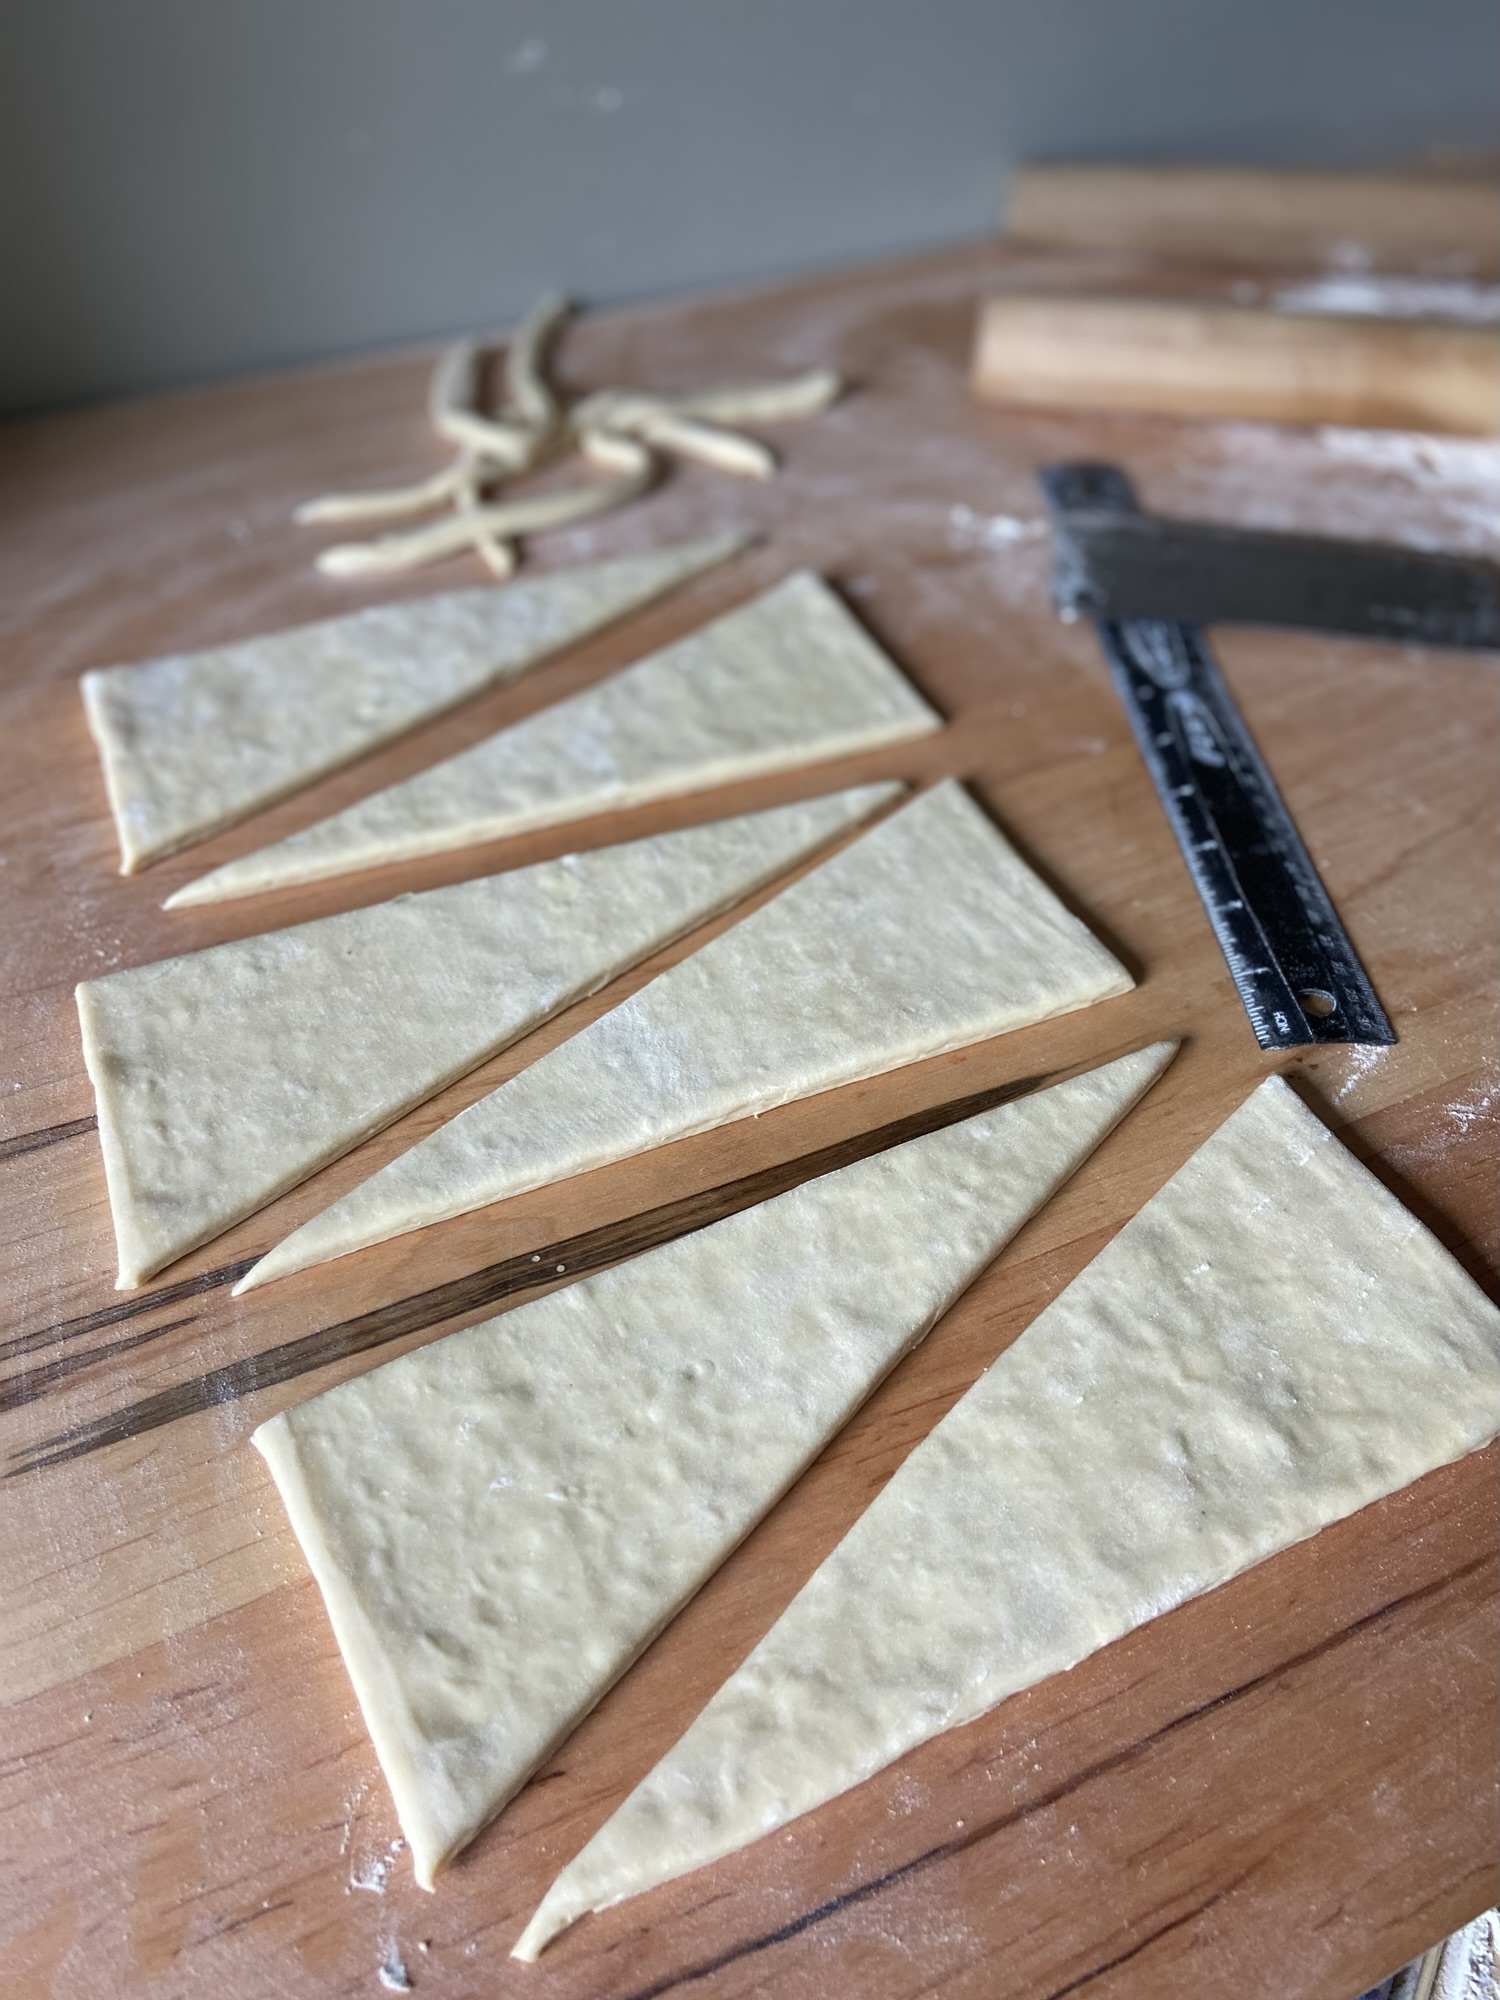
Creating Perfect Triangles
Take one of your rectangular sections. Position your ruler diagonally from one corner to the opposite corner and cut along that line to create two triangles. For perfect isosceles triangles, make sure your ruler connects the corners precisely. The two resulting triangles should have identical angles and proportions. Continue dividing all rectangular sections into triangles using the same technique throughout.

To Notch or Not to Notch
Some bakers make a small cut, about one quarter to one half inch deep, in the center of the triangle’s base before rolling. This is optional and worth understanding before you decide.
Reasons to notch: It helps create a more pronounced crescent shape during rolling. It allows for more even expansion during proofing. It can help prevent the croissant from unrolling during baking and gives a more uniform, professional appearance.
Reasons to skip it: It adds time and requires precision. If cut too deeply it weakens the structure of the croissant. It can create inconsistency across a batch if not done uniformly.
For home bakers working through this class for the first time, skipping the notch is a perfectly valid choice. You can always add it once you are comfortable with the shaping process.
Shaping Your Croissants
Assess your triangle before you begin. Look for uniformity and make sure your work surface is cool, clean, and lightly floured. Position the triangle with the base parallel to your body.
The stretching decision: You can gently stretch the base of the triangle slightly wider before rolling, or you can roll it as is. Stretching creates a wider base with more layers in the final croissant and a more dramatic crescent shape, but it risks compromising the butter layers if done too aggressively. Not stretching preserves the integrity of the lamination exactly as built and produces more consistent results with fewer variables. Neither approach is wrong. Pick one and stay consistent across your whole batch.
Rolling the croissant:
Dust off any excess flour and lightly mist the triangle with water. Position your fingertips at the base of the triangle with light pressure. Roll forward with a gentle motion of your fingertips. As you roll, ever so gently tug the croissant toward yourself at the same time. Keep movements precise and controlled rather than using your palms. Each small roll should slightly overlap the previous one.
As you roll, periodically pause to check that the point of the triangle remains centered. If it starts drifting to one side, adjust before continuing. The goal is perfect symmetry throughout.
Maintain consistent, gentle tension throughout the roll. Too loose and the croissant may unravel during proofing. Too tight and the center may burst during baking.
Before you reach the very end, flatten the last half inch of the tail slightly before rolling the croissant onto it. This creates a base and helps the end adhere securely.
Finish with the point of the triangle placed directly underneath the croissant.

Transferring and covering:
Use a bench scraper or pastry card to gently transfer each shaped croissant to a parchment lined sheet pan. Position with the point securely underneath to prevent unraveling. Leave adequate space between croissants for expansion during proofing.
Lightly mist each croissant with water before covering. Croissants proof best in a humid environment. Cover with a lid or create a tent using a Reynolds oven bag or a clean food safe plastic bag with a thin bottle in the center of the tray to keep it lifted. Clip the edges to seal well.

Common Errors to Avoid
Uneven cutting: Results in inconsistent croissant sizes and uneven baking across the batch.
Dull cutting tools: Compress your layers rather than cleanly separating them. A sharp blade is not optional here.
Excessive handling: Every touch warms the butter layers. Work efficiently and handle the dough as little as possible.
Improper triangle proportions: Creates structural problems during both proofing and baking.
Rushing: Precision takes time. Hasty work at this stage undoes everything you built over the previous four weeks.

The way you cut and shape your croissant dough is just as important as every lamination step that came before it. Getting these techniques right is what takes your croissants from homemade to genuinely impressive. And like everything else in this class, it gets easier and more natural every single time you do it.
Watch the Full Video
The full Week Five video is on Instagram. Watch it alongside this post to see every cut and roll in real time.
Watch: Croissant Final Rollout
Up next is Week Six: Proofing and Baking, the final week. You are almost there.
And when you are ready for the complete recipe with every detail in one place, the Master Croissant Recipe and Masterclass Guide has everything you need.


Leave a Reply