
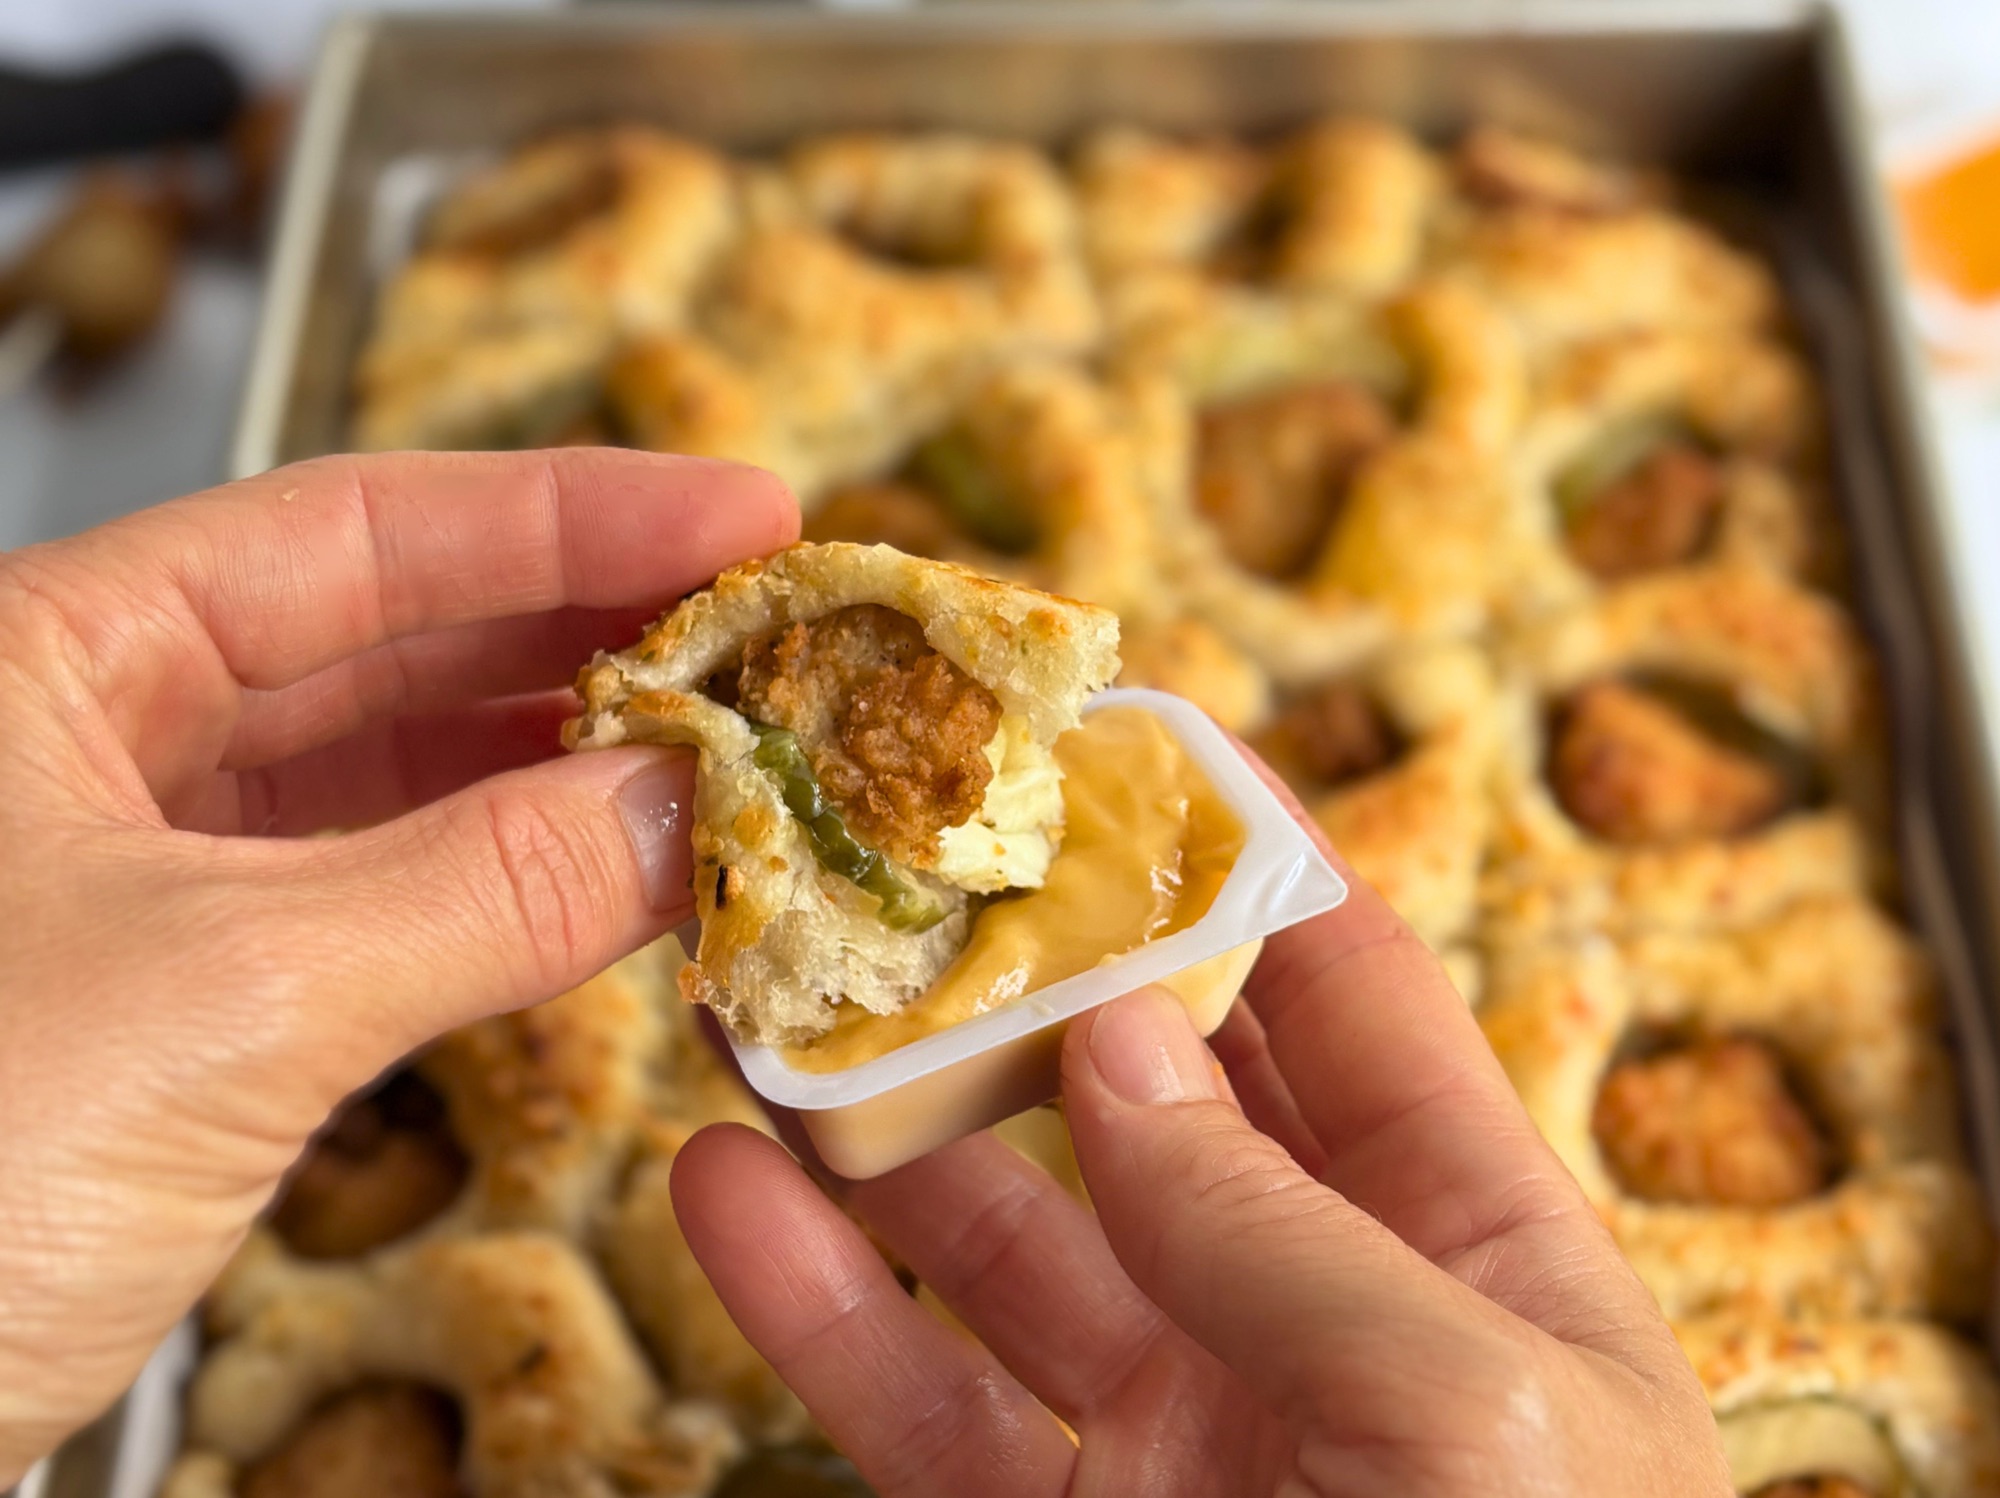
Deep fried OR baked, elevate your favorite appetizer with buttery, flaky sourdough croissant dough. These sourdough croissant mozzarella sticks can be made two ways for crispy, cheesy perfection.
There are two things I will always love unconditionally: my sourdough croissant recipe and a really good mozzarella stick. I spent over a year and thirty plus test batches perfecting my croissant dough, so it lives in my brain rent free at all times. And mozzarella sticks? I grew up on them. The gooey cheese pull, the crispy shell, the marinara dunk. They are pure comfort.
So one day I was standing in my kitchen looking at a batch of freshly laminated croissant dough and thought: what if I wrapped cheese sticks in this instead of shaping it into crescents? The answer, it turns out, is the best version of a mozzarella stick you have ever eaten in your life.
The croissant dough does something breadcrumbs simply cannot. It shatters when you bite into it. It layers. It crisps on the outside while the steam from the fermentation keeps the inside soft, and the cheese in the center goes absolutely molten. The long proof gives the dough a depth of flavor that makes the whole thing taste intentional in a way that frozen appetizers never do.
I tested both frying and baking, and I am giving you both methods today because they each have their place. Frying gives you maximum crunch and that dramatic golden color. Baking gives you something a little lighter with a gorgeous egg washed finish that honestly looks stunning on a serving board. Both start with the same dough. Both are worth making.
If you are ready, here is everything you need to know.
Table of Contents
Get My Sourdough Croissant Recipe
Method 1: Deep Frying to Golden Perfection
Method 2: Baking (Lighter Option!)
Freeze, and Reheat Sourdough Croissant Mozzarella Sticks
Get My Sourdough Croissant Recipe
Before you make these, you’ll need a solid croissant dough recipe and I’m going to tell you why mine is the one you need. My sourdough croissant recipe is a complete 60-page guide with both detailed written instructions AND a full visual guide showing you exactly what your dough should look like at every stage. I designed it specifically for beginners, breaking down intimidating techniques like lamination into simple steps that anyone can follow. For these mozzarella sticks, you need properly laminated dough with strong, well-developed layers, and my recipe delivers that consistency every single time.
Get the Croissant Recipe and Guide HERE
Why You’ll Love This Recipe
If you have ever wished your mozzarella sticks came wrapped in buttery, laminated pastry instead of breadcrumbs, this recipe was made for you. The croissant dough creates a shell that shatters when you bite into it, giving way to a pull of stretchy, molten mozzarella inside. It is the kind of appetizer that makes people stop mid-conversation.
You get two cooking methods in one recipe. Deep frying delivers that classic, golden restaurant crunch with dramatic flaky layers. Baking gives you something a little lighter but still incredibly satisfying, with a gorgeous egg-washed sheen that looks like it came out of a fancy bistro. Both are tested, both are delicious, and both start with the same beautiful dough.
The long proof works in your favor here. Six to eight hours of fermentation develops real depth of flavor in the dough, which makes even a simple mozzarella center taste more interesting than anything you could pull from a freezer bag. And because you can set them up in the morning and walk away, the hands-on time is much shorter than the timeline suggests.
They are also genuinely make ahead friendly. Wrap them, freeze them, and fry or bake them straight from frozen the day of your gathering. No thawing, no stress, just consistently perfect results that look like you spent all day in the kitchen.
Ingredients You’ll Need
For the Croissant Dough:
- 1 batch of my sourdough croissant dough
Get the Croissant Recipe & 60 page Guide HERE
- All-purpose flour for dusting
For Assembly:
- 12 string cheese sticks (regular mozzarella string cheese)
- Water in a spray bottle
- Maldon flaky sea salt (or any flaky finishing salt)
- 1 egg yolk + 2 tablespoons milk (for egg wash if baking)
For Frying:
- Avocado oil for deep frying (or any neutral-flavored oil like vegetable, canola, or peanut oil – enough to fill your fryer 3-4 inches deep)
- Paper towels for draining
Special Equipment:
- Rolling pin
- Sharp knife or pizza cutter
- Parchment paper
- Baking sheet
- Fish spatula (game-changer for frying!)
- Electric deep fryer (or heavy-bottomed pot with candy/deep-fry thermometer)
- Reynolds oven bags or large plastic bag
Step-by-Step Instructions
Prep Your Croissant Dough
Start with your prepared sourdough croissant dough that has already gone through the lamination process. If you’re new to making croissants, don’t worry, the process is easier than you think, and I have a full tutorial and detailed visual guide on my classic sourdough croissant recipe.
Get the Recipe & 60 Page Guide HERE
Roll out your dough on a lightly floured surface to approximately 12 inches by 11 inches. You want it thin enough to wrap around the cheese stick, but thick enough to create those beautiful flaky layers – aim for about 1/4 inch thickness.
Cut Your Strips
Using a sharp knife or pizza cutter, cut 1-inch strips along the 12-inch length of your dough. This should give you approximately 12 strips that are 1 inch wide and 11 inches long. Try to keep them as uniform as possible for even cooking.

Wrap Your Mozzarella Sticks
Here’s where the magic happens! This technique ensures your cheese stays completely sealed inside:
- Take one string cheese stick and place it at one end of your dough strip
- Lightly mist the entire strip with water using a spray bottle – this is crucial for helping the dough adhere to itself and the cheese
- Start wrapping the dough around the cheese stick at a slight angle, creating a spiral effect as you work your way down
- Overlap each wrap slightly to ensure there are no gaps where cheese could escape
- Twist and fold the ends over the top and bottom of the cheese stick to completely seal it in
- Gently press the seams to make sure everything is adhered well

The dough should wrap around the cheese about 5-7 times, creating multiple flaky layers. Don’t worry if it’s not perfect – the dough is forgiving and will puff up beautifully during proofing and frying!
The Proof
The long fermentation develops incredible flavor and creates those signature airy croissant layers.
- Place each wrapped stick on its own small piece of parchment paper on a baking sheet
- Space them at least 2 inches apart: they’ll expand during proofing
- Create a proofing chamber: If you don’t have a lid for your baking sheet, place a tall jar or glass in the center of the tray, then slide the whole tray into a large Reynolds oven bag (or clean plastic bag)
- Seal the bag well to create a humid environment
- Let proof at room temperature for 6-8+ hours they should nearly double in size and feel light and airy when gently touched
Two Cooking Methods: Deep Frying OR Baking

You have two fantastic options for cooking these, both turn out beautifully! I’ve tested both methods and they’re equally delicious, just with slightly different results.
Method 1: Deep Frying to Golden Perfection
This method gives you the crispiest, most restaurant-style result with incredible crunch!
Getting Your Oil Ready:
If you’re using an electric deep fryer (highly recommended!), set it to 350°F and let it preheat. Here’s how to know your oil is ready:
- The thermometer reads 350°F – most electric fryers have built-in thermometers
- The shimmer test: The oil should have a slight shimmer on the surface, not smoking
- The wooden spoon test: Dip the handle of a wooden spoon into the oil – if small bubbles form around it immediately and rise steadily, you’re ready to fry
- The bread cube test: Drop a small cube of bread in – it should turn golden brown in about 60 seconds at 350°F
- Preheating time: Most electric fryers take 10-15 minutes to reach proper temperature
Never start frying until your oil is fully heated! Cold oil leads to greasy, soggy pastries.
Frying Instructions:
- Prepare your draining station with paper towels on a baking sheet
- Use a fish spatula to very gently lift each croissant stick off the parchment paper
- Carefully lower into the hot oil using the fish spatula – the thin, slotted design makes this so much easier and prevents deflating
- Fry for 4-5 minutes per side until deep golden brown
- Watch for these signs they’re done:
- Deep golden brown color (not pale yellow)
- The dough sounds crispy when you tap it with your spatula
- The layers are visibly puffed and separated
- They float and sizzle actively at the surface
- Don’t overcrowd your fryer: fry 2-3 at a time maximum to maintain oil temperature

Temperature tip: The oil will drop when you add the cold pastries. If it drops below 325°F, remove what’s frying and let the oil come back up to 350°F before continuing. Electric fryers usually maintain temperature automatically, but keep an eye on it for the first batch.
Method 2: Baking (Lighter Option!)
This method is perfect if you want something a bit lighter or don’t want to deal with hot oil. They still turn out crispy, flaky, and absolutely delicious!
Baking Instructions:
- Preheat your oven to 400°F
- Prepare the egg wash: In a small bowl, whisk together 1 egg yolk and 2 tablespoons of milk until well combined
- Line a baking sheet with parchment paper (you can use the same parchment they proofed on if it’s clean)
- Carefully transfer each croissant stick to the prepared baking sheet, spacing them about 2 inches apart
- Brush generously with egg wash – get all the surfaces for maximum golden color
- Bake for 20-25 minutes until deep golden brown and the layers are visibly puffed
- Look for doneness: They should be a rich golden color and sound hollow when gently tapped
Baking tips:
- Rotate the pan halfway through for even browning
- If the tops are browning too quickly, loosely tent with foil for the last 5 minutes
- They won’t be quite as crispy as fried, but they’ll still have that amazing flaky texture
Finishing Touches (Both Methods)
- Transfer to paper towels to drain excess oil
- Immediately sprinkle with Maldon flaky sea salt while they’re still hot, the salt will stick and add incredible flavor
- Let cool for 2-3 minutes before eating, that cheese is MOLTEN and will burn your mouth!
How to Store, Freeze, and Reheat Sourdough Croissant Mozzarella Sticks
These sourdough croissant mozzarella sticks are best enjoyed fresh out of the fryer or oven, but the good news is they store and reheat beautifully. Here is everything you need to know to get ahead on prep or save leftovers without sacrificing that flaky, cheesy magic.
Storing Leftovers
Once cooked, let them cool completely before storing. Place them in an airtight container lined with a paper towel to absorb any excess moisture and refrigerate for up to 3 days. Avoid stacking them directly on top of each other, as the layers can compress and become soggy.
Freezing Before Cooking (Recommended)
This is the method I recommend for the best results. After wrapping the cheese sticks in croissant dough and proofing them, place them on a parchment lined baking sheet and freeze uncovered for 1 to 2 hours until firm. Then transfer to a freezer safe bag or airtight container and freeze for up to 2 months. When you are ready to cook, fry or bake directly from frozen, adding 2 to 3 extra minutes to your cook time. No thawing required.
Freezing After Cooking
Already cooked a batch and have extras? Let them cool completely, then freeze in a single layer on a baking sheet before transferring to a freezer bag. They will keep for up to 1 month. The texture will be slightly less flaky after freezing, but they still taste great.
How to Reheat
For the crispiest results, reheat in a 375°F oven or air fryer for 5 to 8 minutes until warmed through and the exterior is crisped back up. Avoid the microwave if you can help it. It will make the dough soft and the cheese rubbery, which is just sad. If you are in a rush, a quick 30 second microwave followed by 3 minutes in the air fryer will get you close.
Make Ahead Tips
These are perfect for entertaining. Wrap and freeze the unbaked sticks up to 2 months in advance, then fry or bake straight from frozen the day of your party. You can also wrap them, proof them, and refrigerate for up to 24 hours before cooking. The cold actually helps the cheese stay contained during cooking, which is a bonus.
Expert Tips for Success
Pro tip: Your kitchen temperature matters! In a warm kitchen (73-+76°F), 6 hours might be enough. In a cooler kitchen (68-72°F), go for the full 8+ hours. Keeping an eye on when the proof is done. Visual cues are much more important for croissants, then watching the clock.
Getting these croissant mozzarella sticks perfect comes down to a few key techniques I learned through plenty of trial and error.
Master the seal. This is the most important step. When wrapping your dough, make sure to overlap each layer and really press those seams together. The water mist is crucial here because it activates the gluten and creates a natural glue. If your seams are weak, the cheese will escape during cooking and you will be sad.
Do not rush the proof. I know 6 to 8 hours feels like forever, but this is where the magic happens. The long fermentation develops that incredible sourdough tang and creates the airy, layered texture that makes these special. Set them up in the morning, go live your life, and come back to perfectly proofed pastries.
Temperature is everything. For frying, keep your oil at a steady 350 degrees. Too hot and the outside burns before the inside cooks. Too cool and they absorb oil and get greasy. For baking, that 400 degree oven gives you the perfect balance of crispy exterior and melted interior.
The fish spatula is non negotiable. I tried lifting these with regular spatulas, tongs, and even my hands. The fish spatula is the only tool thin enough to slide under the delicate proofed dough without deflating all those beautiful layers. Trust me on this one.
Keep them cold until cooking. Once proofed, if you are not cooking immediately, pop them in the fridge. The cold cheese takes longer to melt, giving your dough more time to crisp up. This is especially helpful if you are doing multiple batches.
Delicious Variations to Try
Once you master the basic technique, the flavor possibilities are endless. Here are my favorite ways to switch things up.
Garlic Parmesan. Brush the proofed dough with melted butter mixed with minced garlic before cooking, then immediately toss the finished sticks in grated Parmesan and Italian seasoning. This is the version that gets requested most at parties.
Buffalo Style. Toss the cooked sticks in buffalo sauce and serve with ranch or blue cheese dressing. The buttery croissant layers balance the heat perfectly. For extra kick, add a pinch of cayenne to your dough before wrapping.
Everything Bagel. Brush with egg wash and sprinkle with everything bagel seasoning before baking. The sesame seeds, garlic, and onion create an amazing savory crust. Serve with cream cheese mixed with chives for dipping.
Jalapeño Popper. Add a thin slice of pickled jalapeño next to the cheese before wrapping. The tangy heat cuts through the richness beautifully. You can also mix cream cheese with the mozzarella for that classic popper flavor.
The Baked Option. I cannot stress enough how good these are baked. Yes, frying gives you ultimate crispiness, but baking at 400 degrees still delivers incredibly flaky layers with melted cheese and way less guilt. The egg wash creates a beautiful golden sheen that looks just as impressive. I make the baked version for weeknight snacking and save the fried version for special occasions.
Sweet Variation. Swap the mozzarella for a stick of cream cheese mixed with a little sugar and cinnamon. Bake instead of fry, then dust with powdered sugar. Basically a cream cheese Danish in stick form.
Serving Suggestions
These sourdough croissant mozzarella sticks are amazing on their own, but here are some serving ideas:
- Marinara sauce – the classic pairing never fails
- Garlic aioli – for something more sophisticated
- Hot honey – sweet and spicy is incredible with the buttery croissant
- Pesto – fresh basil pesto is a game-changer
- Balsamic glaze – drizzle over the top for a fancy presentation
Frequently Asked Questions
Can I use store bought croissant dough?
You can, but the results will be very different. Store bought dough does not have the same fermentation time or lamination quality as homemade sourdough croissant dough. If you are going to put in the effort to make these, I strongly recommend using proper croissant dough. My 60 page guide makes it totally doable even for beginners.
Can I make these ahead of time?
Absolutely! You have two options. You can wrap and freeze them before proofing, then thaw in the fridge overnight and proof at room temperature when ready to cook. Or you can proof them, then refrigerate for up to 24 hours before cooking. The cold actually helps prevent cheese leakage.
Why is my cheese leaking out?
This usually happens for one of three reasons. Your seams were not sealed well enough, your oil was not hot enough for frying, or you skipped the water misting step. Make sure to really press those seams and overlap your dough layers. The water creates a seal that keeps everything contained.
Can I use a different cheese?
String cheese works best because of its shape and melting properties, but you can experiment. Low moisture mozzarella is key. Fresh mozzarella has too much water and will make everything soggy. Some people like using mozzarella sticks meant for frying, which also work great.
How do I know when they are done?
For frying, look for a deep golden brown color, not pale yellow. They should sound crispy when you tap them with your spatula and the layers should be visibly puffed and separated. For baking, same visual cues plus they should sound hollow when gently tapped. Total time is 4 to 5 minutes per side for frying, 20 to 25 minutes for baking.
Do I have to proof for the full 8 hours?
The proof time depends on your kitchen temperature. In a warm kitchen at 75 to 78 degrees, 6 hours might be enough. In a cooler kitchen at 68 to 72 degrees, go for the full 8 hours. The dough should nearly double in size and feel light and airy. Do not rush this step because the long proof is what develops the incredible sourdough flavor. Watch the dough and not the clock.
Can I air fry these?
I have not tested air frying extensively, but readers have had success at 375 degrees for about 12 to 15 minutes, flipping halfway through. Brush them with oil or use cooking spray first. The texture will be closer to baked than deep fried, but still delicious.
Troubleshooting
Cheese leaking out? Your seams weren’t sealed well enough, or the oil wasn’t hot enough. Make sure to really press those seams and maintain 350°F.
Dough too pale? Your oil wasn’t hot enough or you took them out too early. They should be a deep golden brown.
Dough burning but still raw inside? Oil too hot! Lower it to 325-340°F and fry a bit longer.
Not puffy enough? Didn’t proof long enough or your dough didn’t have enough lamination. Be patient with the proof time!
Recipe

Sourdough Croissant Mozzarella Sticks
Equipment
- Rolling Pin
- Sharp knife
- Parchment paper
- Baking sheet
- Fish Spatula
- Electric Deep fryer Heavy bottomed pot with a candy/deep fry thermometer
- reynolds oven bags/clean plastic bag for proofing
- Spray Bottle filled with water
- Paper towels for draining
Ingredients
For the Croissant Dough:
- 1 batch sourdough croissant dough your favorite recipe, mine makes enough for 12 sticks
- All-purpose flour for dusting
For Assembly:
- 12 string cheese sticks regular mozzarella string cheese
- Maldon flaky sea salt or any flaky finishing salt
Egg Wash(if baking croissant mozzarella sticks)
- 1 egg yolk
- 2 tablespoons milk
For Frying:
- Avocado oil for deep frying or any neutral-flavored oil like vegetable, canola, or peanut oil – enough to fill your fryer 3-4 inches deep
Instructions
Prep Your Croissant Dough:
- Start with your prepared sourdough croissant dough that has already gone through the lamination process.
- Roll out your dough on a lightly floured surface to approximately 12 inches by 11 inches.
- Aim for about 1/4 inch thickness – thin enough to wrap around the cheese stick, but thick enough to create those beautiful flaky layers.
Cut Your Strips:
- Using a sharp knife or pizza cutter, cut 1-inch strips along the 12-inch length of your dough.

- This should give you approximately 12 strips that are 1 inch wide and 11 inches long.
- Try to keep them as uniform as possible for even cooking.
Wrap Your Mozzarella Sticks:
- Take one string cheese stick and place it at one end of your dough strip.
- Lightly mist the entire strip with water using a spray bottle – this is crucial for helping the dough adhere to itself and the cheese.
- Start wrapping the dough around the cheese stick at a slight angle, creating a spiral effect as you work your way down.
- Overlap each wrap slightly to ensure there are no gaps where cheese could escape.
- Twist and fold the ends over the top and bottom of the cheese stick to completely seal it in.
- Gently press the seams to make sure everything is adhered well.
- The dough should wrap around the cheese about 3-4 times, creating multiple flaky layers.
The Proof:
- Place each wrapped stick on its own small piece of parchment paper on a baking sheet.
- Space them at least 2 inches apart, they'll expand during proofing.
- Create a proofing chamber: If you don't have a lid for your baking sheet, place a tall jar or glass in the center of the tray, then slide the whole tray into a large Reynolds oven bag or clean plastic bag.
- Seal the bag well to create a humid environment.
- Let proof at room temperature for 6-8 hours – they should nearly double in size and feel light and airy when gently touched.
- Pro tip: In a warm kitchen (73-76°F), 6 hours might be enough. In a cooler kitchen (68-72°F), go for the full 8 hours.
Method 1 – Deep Frying:
- Set your electric deep fryer to 350°F and let it preheat for 10-15 minutes.
- Test readiness: The oil should have a slight shimmer on the surface. Dip a wooden spoon handle into the oil – small bubbles should form around it immediately and rise steadily.
- Prepare your draining station with paper towels on a baking sheet.
- Use a fish spatula to very gently lift each croissant stick off the parchment paper.
- Carefully lower into the hot oil using the fish spatula.

- Fry for 4-5 minutes per side until deep golden brown.
- Watch for these signs they're done: deep golden brown color, the dough sounds crispy when you tap it with your spatula, the layers are visibly puffed and separated, and they float and sizzle actively at the surface.
- Don't overcrowd your fryer, fry 2-3 at a time maximum to maintain oil temperature.
- Temperature tip: The oil will drop when you add the cold pastries. If it drops below 325°F, remove what's frying and let the oil come back up to 350°F before continuing.
Method 2 – Baking:
- Preheat your oven to 400°F.
- In a small bowl, whisk together 1 egg yolk and 2 tablespoons of milk until well combined.
- Line a baking sheet with parchment paper.
- Carefully transfer each croissant stick to the prepared baking sheet, spacing them about 2 inches apart.
- Brush generously with egg wash, get all the surfaces for maximum golden color.
- Bake for 20-25 minutes until deep golden brown and the layers are visibly puffed.
- They should be a rich golden color and sound hollow when gently tapped.
- Rotate the pan halfway through for even browning.
- If the tops are browning too quickly, loosely tent with foil for the last 5 minutes.
Finishing Touches:
- Transfer to paper towels to drain excess oil (if fried) or remove from oven (if baked).
- Immediately sprinkle with Maldon flaky sea salt while they're still hot, the salt will stick and add incredible flavor.
- Let cool for 2-3 minutes before eating
Notes
Ready to Make Sourdough Croissant Mozzarella Sticks?
Whether you fry them to a shattering golden crisp or bake them to a rich, flaky finish, these sourdough croissant mozzarella sticks deliver something genuinely different from any mozzarella stick you have had before. The laminated dough does all the heavy lifting: it crisps on the outside, steams from within, and creates those dramatic pull-apart layers around a core of melted cheese that stretches with every bite.
The keys to success are simple. Seal your seams, respect the proof, and keep your oil at 350°F. Do those three things and you will have a plate of croissant mozzarella sticks that disappear in minutes.
If you make them, I want to see your results! Tag me on Instagram so I can share your creations. And if you are ready to build the croissant dough skills that make this recipe possible, my 60-page Sourdough Croissant Masterclass walks you through every step of lamination with a full visual guide designed for home bakers.
Get the Sourdough Croissant Masterclass here.
Tried this recipe? Leave a star rating and a comment below. It helps other bakers find this recipe and it makes my day every single time.

Never Miss a Recipe
If you made these sourdough croissant mozzarella sticks and loved them, there is plenty more where that came from. I am always testing new sourdough recipes, developing new techniques, and finding ways to make laminated dough do things it was never supposed to do.
Subscribe to the H3art of the Home email list and be the first to know when new recipes go live, get behind the scenes peeks at what I am currently testing in my kitchen, and never miss a viral moment.
And if you are not already following along on Instagram or Facebook or Pinterest, come find me there. I post new recipes, process videos, and the occasional baking disaster that did not make it to the blog. It is a good time.


Leave a Reply