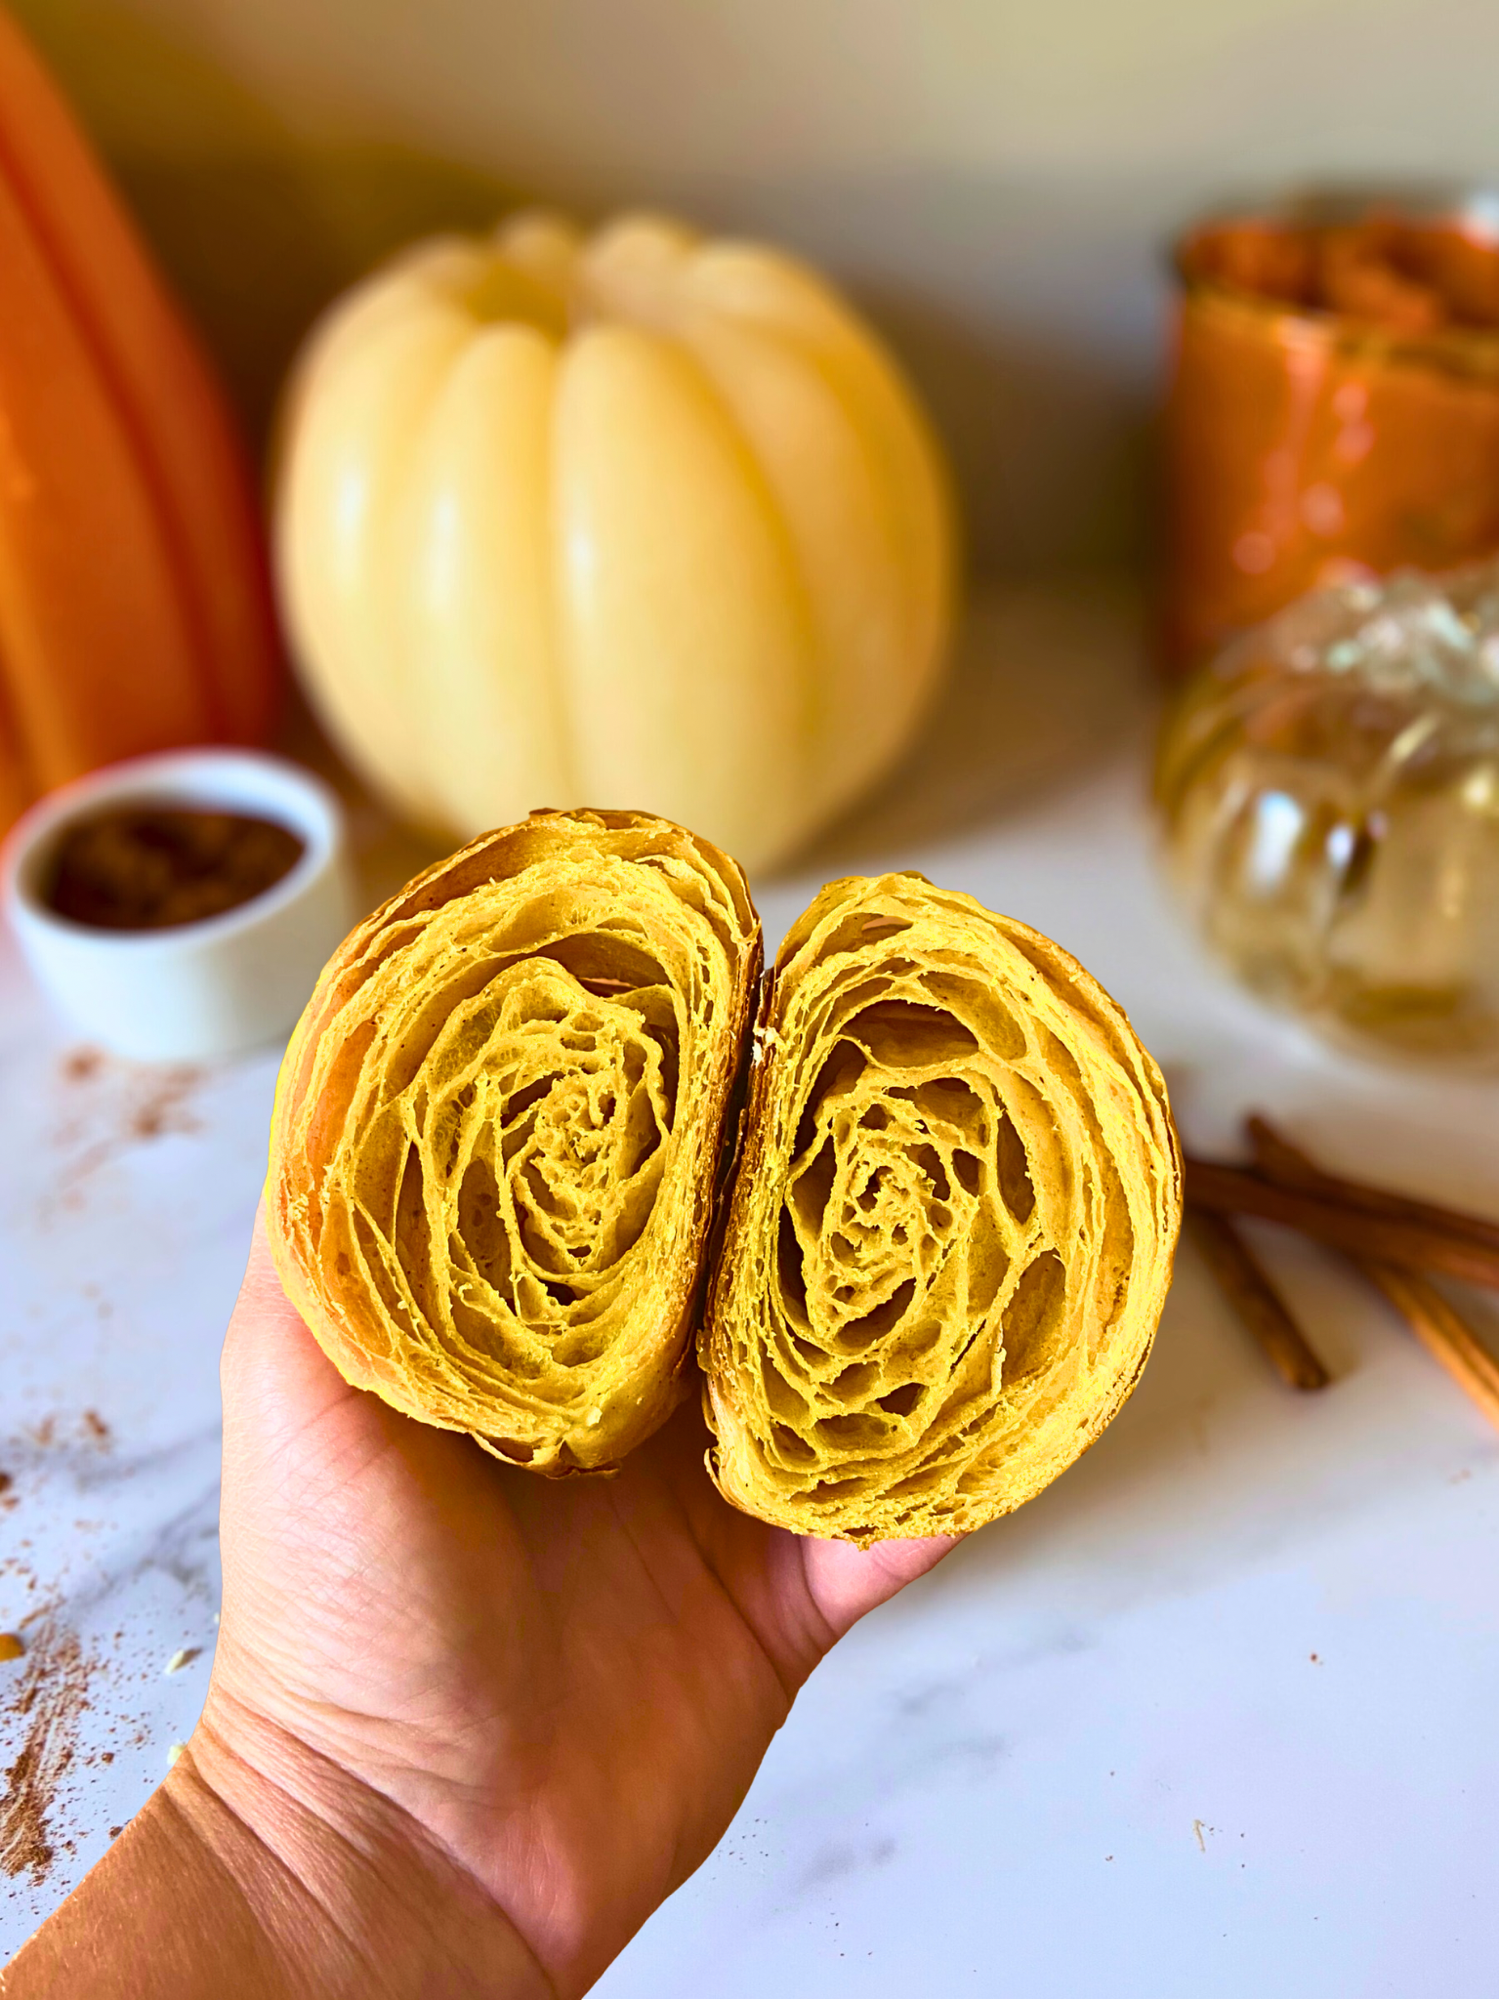

There’s something magical about the first crisp day of autumn that makes you crave all things pumpkin spice. While pumpkin spice lattes get all the attention, I’m here to introduce you to something even more special: homemade pumpkin spice sourdough croissants. These buttery, flaky pastries combine the traditional French lamination technique with the warm, comforting flavors of fall spices.
This step-by-step pumpkin spice croissant recipe builds on the classic French croissant method but incorporates real pumpkin puree into the dough and a custom spiced butter block that creates those beautiful, aromatic layers. The result? Bakery quality croissants with a subtle pumpkin flavor and the perfect blend of cinnamon, ginger, nutmeg, and cloves in every bite.

Why Make Homemade Pumpkin Spice Croissants?
What makes these fall croissants special is the thoughtful integration of pumpkin and spices without overwhelming the delicate pastry structure. The pumpkin puree adds natural moisture and gentle sweetness to the sourdough croissant dough, while the spiced butter block creates aromatic layers throughout. The reduced liquid content in the dough compensates for the moisture from the pumpkin, ensuring the perfect flaky texture that croissant lovers crave.
Jump to Recipe Print RecipePumpkin Spice Croissant Recipe Ingredients
SOURDOUGH CROISSANT DOUGH
- 60g mature 100% hydration starter
- 50g whole milk (reduced from classic recipe)
- 60g water (reduced from classic recipe)
- 60g pumpkin puree (the star addition)
- 35g sugar (slightly increased for balance)
- 2g vanilla extract
- 5g salt
- 30-35g egg white
- 300g bread flour
- 25g unsalted butter (softened)
PUMPKIN SPICE BUTTER BLOCK
- 180g unsalted butter (for lamination)
- 3/4 tsp ground cinnamon
- 1/2 tsp ground ginger
- 1/4 tsp ground nutmeg
- 1/4 tsp ground cloves
- 1/8 tsp ground cardamom (optional)
Or substitute with 1.5 tsp pumpkin pie spice
Day One: Pumpkin Croissant Dough Preparation
Step 1: Make the Pumpkin Spice Croissant Dough (Evening)
The key to exceptional croissants lies in proper gluten development. Unlike regular bread, croissant dough needs to be smooth and slightly tacky, not fully developed into a windowpane.
- In a large bowl, whisk together milk, water, pumpkin puree, egg white, sugar, and vanilla extract until well combined
- Add the mature starter and whisk until incorporated
- Add flour and salt, but don’t mix yet
- Take your 25g of softened butter and distribute it in small pieces on top
- Pinch the butter into the flour mixture
- Using your hands, slowly begin mixing the ingredients until a rough dough forms with no dry flour remaining
- Cover and let rest for 30 minutes
- Do a series of stretch and folds. And then a series of slap and folds to get the dough together. Begin to knead the dough on a lightly floured surface until the dough is smooth and slightly tacky (6-7 minutes by hand, 4-5 minutes by mixer with a dough hook on a low setting)
The goal is a smooth, slightly tacky dough that passes the partial windowpane test—it should stretch to semi-translucent before tearing, but doesn’t need to be paper-thin.
Key Indicator: The dough should feel smooth and cooperative, not sticky to the touch. You want 70-80% gluten development, not the full windowpane that would make lamination difficult.
Step 2: First Fermentation
- Place the dough in a lightly oiled bowl and cover tightly
- Let rise at room temperature for 2-3 hours until increased by about 50%
- Refrigerate overnight (8-18 hours)
This cold fermentation develops flavor and makes the dough easier to handle during lamination.
Day Two: Lamination
Step 3: Prepare the Pumpkin Spice Butter Block (Morning)

The spiced butter block is what gives these croissants their distinctive fall flavor. Getting the butter to the right consistency is crucial for successful lamination.
Check this Croissant Class for more detail
Croissant Class: Week One- The Butter Block
Create the parchment envelope:
Start with a 21-inch sheet of parchment paper. Mark and fold it to create a 7” x 7” square envelope using the ruler method shown in your photos

- Prepare the spiced butter: Remove 180g butter from the refrigerator and cut into similar-sized pieces
- Mix the spices: Combine all spices with the butter pieces
- Shape the butter block: Place the spiced butter mixture in the center of your parchment envelope and roll it out to fill the 7” x 7” square completely
Temperature Check: The butter should be pliable but not soft. If it becomes too soft, chill for 15 minutes. If too hard, let it sit at room temperature for 10 more minutes.
Step 4: First Lamination – Envelope Fold

This is where the magic begins. The envelope fold creates the initial layers that will multiply through subsequent folds.
Check out this Croissant Class for more detail
Croissant Class: Week Two- Locking in the Butter Block
- Remove dough from refrigerator and roll into a 10” x 10” square on a lightly floured surface
- Place the spiced butter block diagonally (diamond position) over the dough square
- Fold each corner of the dough over the butter, with corner tips meeting in the middle, pinching seams to seal completely

Critical step: Poke holes with a toothpick in the top and bottom edges to prevent air bubbles

Rolling technique:
Use the tapping method, gently push the rolling pin up and down on the dough, starting at the bottom and working up. This helps distribute the butter evenly
- Roll gently from center outward to create a 16.5” x 8-8.25” rectangle
- Maintain even edges: Use the 45° angle rolling method to keep corners square
- Trim short edges (about ¼ inch from each end)
- Prepare for folding: Dust off excess flour and mist lightly with water
Book fold:
Check out this Croissant Class for more detail
Croissant Class: Week Three- Rolling & Lamination
- Fold the bottom up 3” and the top down to meet the bottom exposed edge, then fold in half like closing a book
- The resulting dough should be approximately 3” x 8-8.25”
- Wrap tightly and refrigerate for 1 hour

Step 5: Second Lamination – Single Fold
Check out this Croissant Class for more detail
Croissant Class: Week Four – The Single Fold
The second fold multiplies your layers and brings you closer to that perfect flaky texture.
- Remove dough from refrigerator and let rest at room temperature for 5 minutes
- Lightly dust your surface with flour and roll out to approximately 20” x 4.5” rectangle using the tapping method, then working gently from center outward
- Keep edges square: Apply the 45° method to maintain parallel sides
- Trim to 19” in length for clean edges
- Prepare for folding: Dust excess flour off and gently mist with water
- Single fold: Visually divide your rectangle into thirds. Fold the bottom edge up 1/3 of the way (1), then fold the top edge over (like folding a letter)(2), so the top edge is now at the bottom (3)
- Wrap tightly and refrigerate for at least 4 hours (or overnight for better flavor development)
The resulting dough should be approximately 4.5” x 6.5” rectangle.

Day 2 Evening/Day 3: Shaping & Baking Pumpkin Spice Croissants
Step 6: Final Roll and Shape

Check out this Croissant Class for more detail
Croissant Class: Week Five- Shaping
The final shaping is where your croissants come to life. Proper technique here ensures even baking and beautiful layers.
- Prepare the dough: Remove from refrigerator and let rest for 5 minutes. If rolling after an overnight rest, allow 15 minutes at room temperature to check for readiness
- Roll to size: On a lightly floured surface, roll to approximately 10.5” x 12.5-13” rectangle
- Clean edges: Trim to exact 10” x 12” rectangle for clean, even croissants
- Mark for cutting: Make 4-inch sections along top and bottom edges
- Create triangles: Connect the marks to form rectangles, then line up opposite corners to create triangular cutting guides
- Cut triangles: You should yield 6 croissant triangles
Shape the croissants:

- Gently mist each triangle before rolling
- Starting from the wide end, roll snugly but not tightly
- Push down the last ½” of dough tail and roll the croissant onto it
- Place seam-side down on parchment-lined baking sheets
Step 7: Final Proof

Proper proofing is crucial for achieving those coveted flaky layers and proper rise.
Critical temperature: Proof at 70-76°F maximum. Higher temperatures will melt the butter layers.
- Prepare for proofing: Mist croissants gently with water, it should be a fine spray, not droplets
- Cover properly: Use a lid or clean plastic bag, creating a tent-like structure to prevent the plastic from touching the croissants
- Proof time: 6-18 hours depending on your environment
Visual cues for perfectly proofed croissants:
- Size increase: About 50% larger than when first shaped
- Surface appearance: Smooth, slightly taut skin with gentle sheen
- Edge clarity: Pointed ends remain somewhat defined but edges have softened
- Layer visibility: You can still see where the dough was rolled and sealed
- Jiggle test: Gently shake the baking sheet, properly proofed croissants will jiggle slightly like set gelatin
- Poke test: Light finger poke should leave a small indent that slowly springs back halfway
Step 8: Baking

Check out this Croissant Class for more detail
Croissant Class: Week Six – Proofing & Baking
The final step to golden, flaky perfection.
- Preheat: Oven to 400°F (ensure it’s fully preheated)
- Egg wash: Brush with egg wash (1 egg yolk beaten with 2 tbsp milk), avoiding the cut edges to allow proper rise
- Initial bake: 400°F for 7 minutes to set the layers quickly
- Finish baking: Reduce to 375°F and bake 12-18 minutes more until golden brown
- Check doneness: Internal temperature should reach 195-200°F
- Cool properly: Rest on baking sheet for 5 minutes, then transfer to cooling rack
Pumpkin Spice Croissant Baking Tips for Success
Butter temperature is everything: The butter block should be pliable but not soft. It should bend without breaking or melting.
Keep it cool: If your kitchen is warm, work in shorter sessions and chill the dough more frequently.
Don’t rush the proof: Visual cues are more important than timing. Well-proofed croissants will have better layers and texture.
Embrace the process: Croissant making is a journey that spans 2-3 days. Each step builds on the previous one.
The Reward
When you bite into these pumpkin spice croissants, you’ll taste the perfect balance of buttery pastry and warm autumn spices. The pumpkin adds subtle sweetness and moisture, while the spiced butter creates aromatic layers throughout. Each bite delivers the satisfying crunch of proper lamination with the comforting flavors of fall.
These croissants are perfect for a special autumn breakfast, holiday entertaining, or any time you want to bring a touch of bakery magic to your kitchen. The combination of traditional French technique with seasonal American flavors creates something truly special—a pastry that honors both craftsmanship and comfort.
Optional: Pumpkin Whipped Cream Filling

Take your pumpkin spice croissants to the next level with this silky, spiced whipped cream filling. Perfect for special occasions or when you want to create an extra-indulgent fall treat.
Pumpkin Whipped Cream Ingredients
Makes enough for 6 large (6-inch) croissants
- 360g (1.5 cups) heavy whipping cream (cold)
- 32-40g (4-5 tablespoons) powdered sugar
- 90-105g (6-7 tablespoons) pumpkin puree (not pumpkin pie filling)
- 4g (3/4 teaspoon) vanilla extract
- 0.5g (scant 1/4 teaspoon) ground cinnamon
- 4.5g (1.5 teaspoons) unflavored gelatin powder (for stabilization)
- 22g (1.5 tablespoons) warm water
How to Make Pumpkin Whipped Cream Filling
- Prep your equipment: Chill your bowl and whisk attachment in the freezer for 15 minutes before whipping.
- Make the base: In a separate small bowl, whisk together the pumpkin puree, vanilla extract, cinnamon, and 1 tablespoon of the powdered sugar until smooth.
- Start whipping: Pour the cold heavy cream into your chilled bowl and begin whipping on medium speed until it starts to thicken.
- Add sweetener: Gradually add the remaining powdered sugar and continue whipping.
- Incorporate pumpkin mixture: When the cream reaches soft peaks, slowly fold in the pumpkin mixture.
- Prepare the stabilizer: NOW sprinkle the gelatin over warm water in a small bowl and let it bloom for 5 minutes. Then microwave for 10-15 seconds until dissolved. IMPORTANT: Let it cool for only 30-60 seconds- don’t let it cool too much or it will harden into chunks.
- Add stabilizer: Immediately drizzle in the warm gelatin mixture while continuing to whip on medium-high speed until you reach medium-firm peaks. The gelatin should be liquid and just barely warm when added – if it has cooled too much and started to thicken, quickly microwave for 5 seconds to re-liquefy before adding. Don’t overwhip or it will become grainy.
Pumpkin Whipped Cream Tips
- The gelatin will help your filling hold its shape for several hours
- This filling is best used within 24 hours for optimal texture
- If piping into croissants, let it chill for 30 minutes first for easier handling
- Makes approximately 2.5-3 cups of filling (about 1/3 to 1/2 cup per croissant)
Storage
Store covered in refrigerator for up to 24 hours. Give it a gentle stir before using if it has separated slightly.

Pumpkin Spice Croissants: Ultimate Fall Pastry Recipe
Ingredients
SOURDOUGH CROISSANT DOUGH:
- 60 g mature 100% hydration sourdough starter
- 50 g whole milk
- 60 g water
- 60 g pumpkin puree NOT PUMPKIN PIE FILLING
- 35 g granulated sugar
- 2 g vanilla extract
- 5 g salt
- 30-35 g egg white
- 300 g bread flour
- 25 g unsalted butter softened
PUMPKIN SPICE BUTTER BLOCK:
- 180 g unsalted butter
- 3/4 teaspoon ground cinnamon
- 1/2 teaspoon ground ginger
- 1/4 teaspoon ground nutmeg
- 1/4 teaspoon ground cloves
- 1/8 teaspoon ground cardamom optional
- Alternative: 1.5 teaspoons pumpkin pie spice
FOR FINISHING:
- 1 egg yolk
- 2 tablespoons milk
OPTIONAL PUMPKIN WHIPPED CREAM FILLING:
- 360 g heavy whipping cream, cold 1.5 cups
- 32-40 g powdered sugar 4-5 tablespoons
- 90-105 g pumpkin puree (not pumpkin pie filling) 6-7 tablespoons
- 4 g vanilla extract 3/4 teaspoon
- 0.5 g ground cinnamon scant 1/4 teaspoon
- 4.5 g unflavored gelatin powder 1.5 teaspoons
- 22 g warm water 1.5 tablespoons
Instructions
DAY ONE – DOUGH PREPARATION:
Step 1: Make the Pumpkin Spice Croissant Dough (Evening)
- In a large bowl, whisk together milk, water, pumpkin puree, egg white, sugar, and vanilla extract until well combined.
- Add the mature sourdough starter and whisk until incorporated.
- Add flour and salt, but don’t mix yet.
- Distribute the 25g softened butter in small pieces on top.
- Pinch the butter into the flour mixture.
- Using your hands, slowly mix ingredients until a rough dough forms with no dry flour remaining.
- Cover and let rest for 30 minutes.
- Do a series of stretch and folds, then slap and folds to bring dough together. Knead on lightly floured surface until smooth and slightly tacky (6-7 minutes by hand, 4-5 minutes by mixer with dough hook on low).
- Dough should pass partial windowpane test—stretching to semi-translucent before tearing, but not paper-thin. You want 70-80% gluten development, not full windowpane which makes lamination difficult.
- The dough should feel smooth and cooperative, not sticky to the touch.
Step 2: First Fermentation
- Place dough in lightly oiled bowl, cover tightly.
- Let rise at room temperature 2-3 hours until increased by 50%.
- Refrigerate overnight (8-18 hours). This cold fermentation develops flavor and makes lamination easier.
DAY TWO – LAMINATION PROCESS:
Step 3: Prepare Pumpkin Spice Butter Block (Morning)
- Create 7” x 7” parchment envelope: Pull out 21” sheet of parchment, lay long edge parallel to you. Place ruler in middle, pull left edge to 7” mark and crease. Flip ruler upside down, line up 7” mark on creased edge. Fold right edge over and crease. Rotate horizontal, repeat process to create square envelope.

- Remove 180g butter from refrigerator, cut into similar pieces.
- Mix all spices thoroughly with butter pieces.
- Place spiced butter in parchment envelope center, roll to fill 7” x 7” square completely, filling all corners.
- CRITICAL: Butter should be pliable but not soft – should bend without breaking or melting. If too soft, chill 15 minutes. If too hard, let sit 10 minutes at room temperature.
Step 4: First Lamination – Envelope Fold
- Roll dough into 10” x 10” square on lightly floured surface.
- Place spiced butter block diagonally (diamond position) over dough square.
- Fold each dough corner over butter, tips meeting in middle, pinch seams to seal completely.

- IMPORTANT: Poke holes with toothpick in top and bottom edges to prevent air bubbles during rolling.

- Use tapping method: gently push rolling pin up and down on dough, starting at bottom, working up. This distributes butter evenly without breaking through dough.
- Roll gently from center outward to create 16.5” x 8-8.25” rectangle.
- Use 45° angle rolling method to keep edges square and corners even.
- Trim short edges (about ¼ inch from each end) for clean fold.
- Dust off excess flour, mist lightly with water before folding.
- Book fold: fold bottom up 3”, top down to meet bottom exposed edge, then fold in half like closing a book.

- Resulting dough should be approximately 3” x 8-8.25”.
- Wrap tightly, refrigerate 1 hour.
Step 5: Second Lamination – Single Fold
- Remove dough from refrigerator, rest 5 minutes at room temperature to prevent cracking.
- Roll out to approximately 20” x 4.5” rectangle using tapping method first, then working gently from center outward.
- Apply 45° angle method to keep sides parallel and edges square.
- Trim to 19” in length for clean, even edges.
- Dust excess flour off dough surface, gently mist with water before folding.
- Single fold (letter fold): visually divide rectangle into thirds. Fold bottom edge up 1/3 of the way, then fold top edge over so it meets the bottom (like folding a letter). Top edge should now be at bottom.

- Wrap tightly, refrigerate at least 4 hours (or overnight for better flavor development).
- Resulting dough should be approximately 4.5” x 6.5” rectangle.
- DAY 2 EVENING/DAY 3 – SHAPING & BAKING:
Step 6: Final Roll and Shape
- Remove dough from refrigerator, rest 5 minutes (15 minutes if overnight rest). Check dough readiness – should feel slightly pliable, not rock hard.
- Roll to approximately 10.5” x 12.5-13” rectangle on lightly floured surface using gentle, even pressure.
- Trim to exact 10” x 12” rectangle for clean, uniform croissants.
- Mark 4-inch sections along top and bottom edges with knife or bench scraper.
- Connect the marks to form rectangles, then line up top corner with opposite bottom corner to create triangular cutting guides.
- Cut 6 croissant triangles with sharp knife. You should have 6 triangles.

- Gently mist each triangle with fine water spray before rolling – this helps them stick together.
- Roll from wide end: start at base, roll snugly but not tightly, maintaining tension without stretching the dough.
- Push down last ½” of dough tail and roll the croissant onto it to secure the tip.
- Place seam-side down on parchment-lined baking sheets, leaving 3 inches between each croissant.

Step 7: Final Proof – CRITICAL STEP
- Mist croissants gently with fine water spray – should be mist, not droplets.
- Cover with lid or create plastic bag tent (plastic must not touch croissants).
- Proof at 70-76°F MAXIMUM – higher temperatures will melt butter layers.
- Proof for 6-18 hours depending on temperature and humidity.
VISUAL CUES FOR DONENESS (more important than timing):
- Size increase: About 50% larger than when first shaped
- Surface: Smooth, slightly taut skin with gentle sheen, no wrinkled or deflated are
- – Edge clarity: Pointed ends remain somewhat defined but edges have softened and rounded
- – Layer visibility: You can still see where dough was rolled and sealed, seam lines visible but softened
- – Jiggle test: Gently shake baking sheet – properly proofed croissants will jiggle slightly like set gelatin
- – Poke test: Light finger poke should leave small indent that slowly springs back halfway
- Under-proofed: barely move, feel firm
- Over-proofed: wobble excessively, feel very soft
Step 8: Baking
- Preheat oven to 400°F – ensure it’s fully preheated for at least 30 minutes.
- Brush with egg wash (1 egg yolk beaten with 2 tbsp milk) using pastry brush or paper towel, carefully avoiding the cut edges to allow proper rise.
- Bake at 400°F for 7 minutes to set layers quickly and create initial rise.
- Reduce to 375°F and bake 12-18 minutes more until deep golden brown all over.
- Internal temperature should reach 195-200°F when measured with instant-read thermometer.
- Rest on baking sheet 5 minutes to finish cooking from residual heat, then transfer to cooling rack.
- Cool completely before cutting or filling – at least 1 hour for best texture.
PUMPKIN WHIPPED CREAM
Instructions:
- Chill bowl and whisk attachment in freezer for 15 minutes.
- In separate bowl, whisk together pumpkin puree, vanilla, cinnamon, and 1 tablespoon powdered sugar until smooth.
- Pour cold cream into chilled bowl, begin whipping on medium speed until thickening.
- Gradually add remaining powdered sugar, continue whipping.
- When cream reaches soft peaks, slowly fold in pumpkin mixture.
- Sprinkle gelatin over warm water, let bloom 5 minutes. Microwave 10-15 seconds until dissolved.
- Let gelatin cool 30-60 seconds until barely warm to touch.
- Immediately drizzle barely warm gelatin while whipping on medium-high speed until medium-firm peaks form.
- Chill 30 minutes before piping into cooled croissants.
- Store covered in refrigerator up to 24 hours.
HOW TO FILL CROISSANTS WITH PUMPKIN WHIPPED CREAM:
- Ensure croissants are completely cooled (at least 1 hour after baking).
- Transfer chilled pumpkin whipped cream to piping bag fitted with round tip (or cut corner of plastic bag).
- Using a sharp knife, cut a small slit in the side of each croissant about 1 inch from one end.
- Gently insert piping tip into the slit, being careful not to break through the other side.
- Slowly pipe filling into the croissant, applying gentle pressure until you feel resistance (croissant is full).
- You should use about 1/3 to 1/2 cup filling per croissant.
- The croissant will feel slightly heavier and you may see the filling just at the opening.
- Serve immediately after filling, or refrigerate filled croissants up to 4 hours.
- For best texture, fill croissants just before serving.
Notes
Pumpkin Spice Croissant Baking Tips for Success
Butter temperature is everything: The butter block should be pliable but not soft. It should bend without breaking or melting.
Keep it cool: If your kitchen is warm, work in shorter sessions and chill the dough more frequently.
Don’t rush the proof: Visual cues are more important than timing. Well-proofed croissants will have better layers and texture.
Embrace the process: Croissant making is a journey that spans 2-3 days. Each step builds on the previous one.
Enjoy your homemade pumpkin spice croissants with a warm cup of coffee and the satisfaction of having mastered one of baking’s most rewarding challenges.
This homemade pumpkin spice croissant recipe brings together the best of French pastry technique with beloved fall flavors. Whether you enjoy them plain or filled with pumpkin whipped cream, these croissants are sure to become your new favorite autumn treat.


Leave a Reply