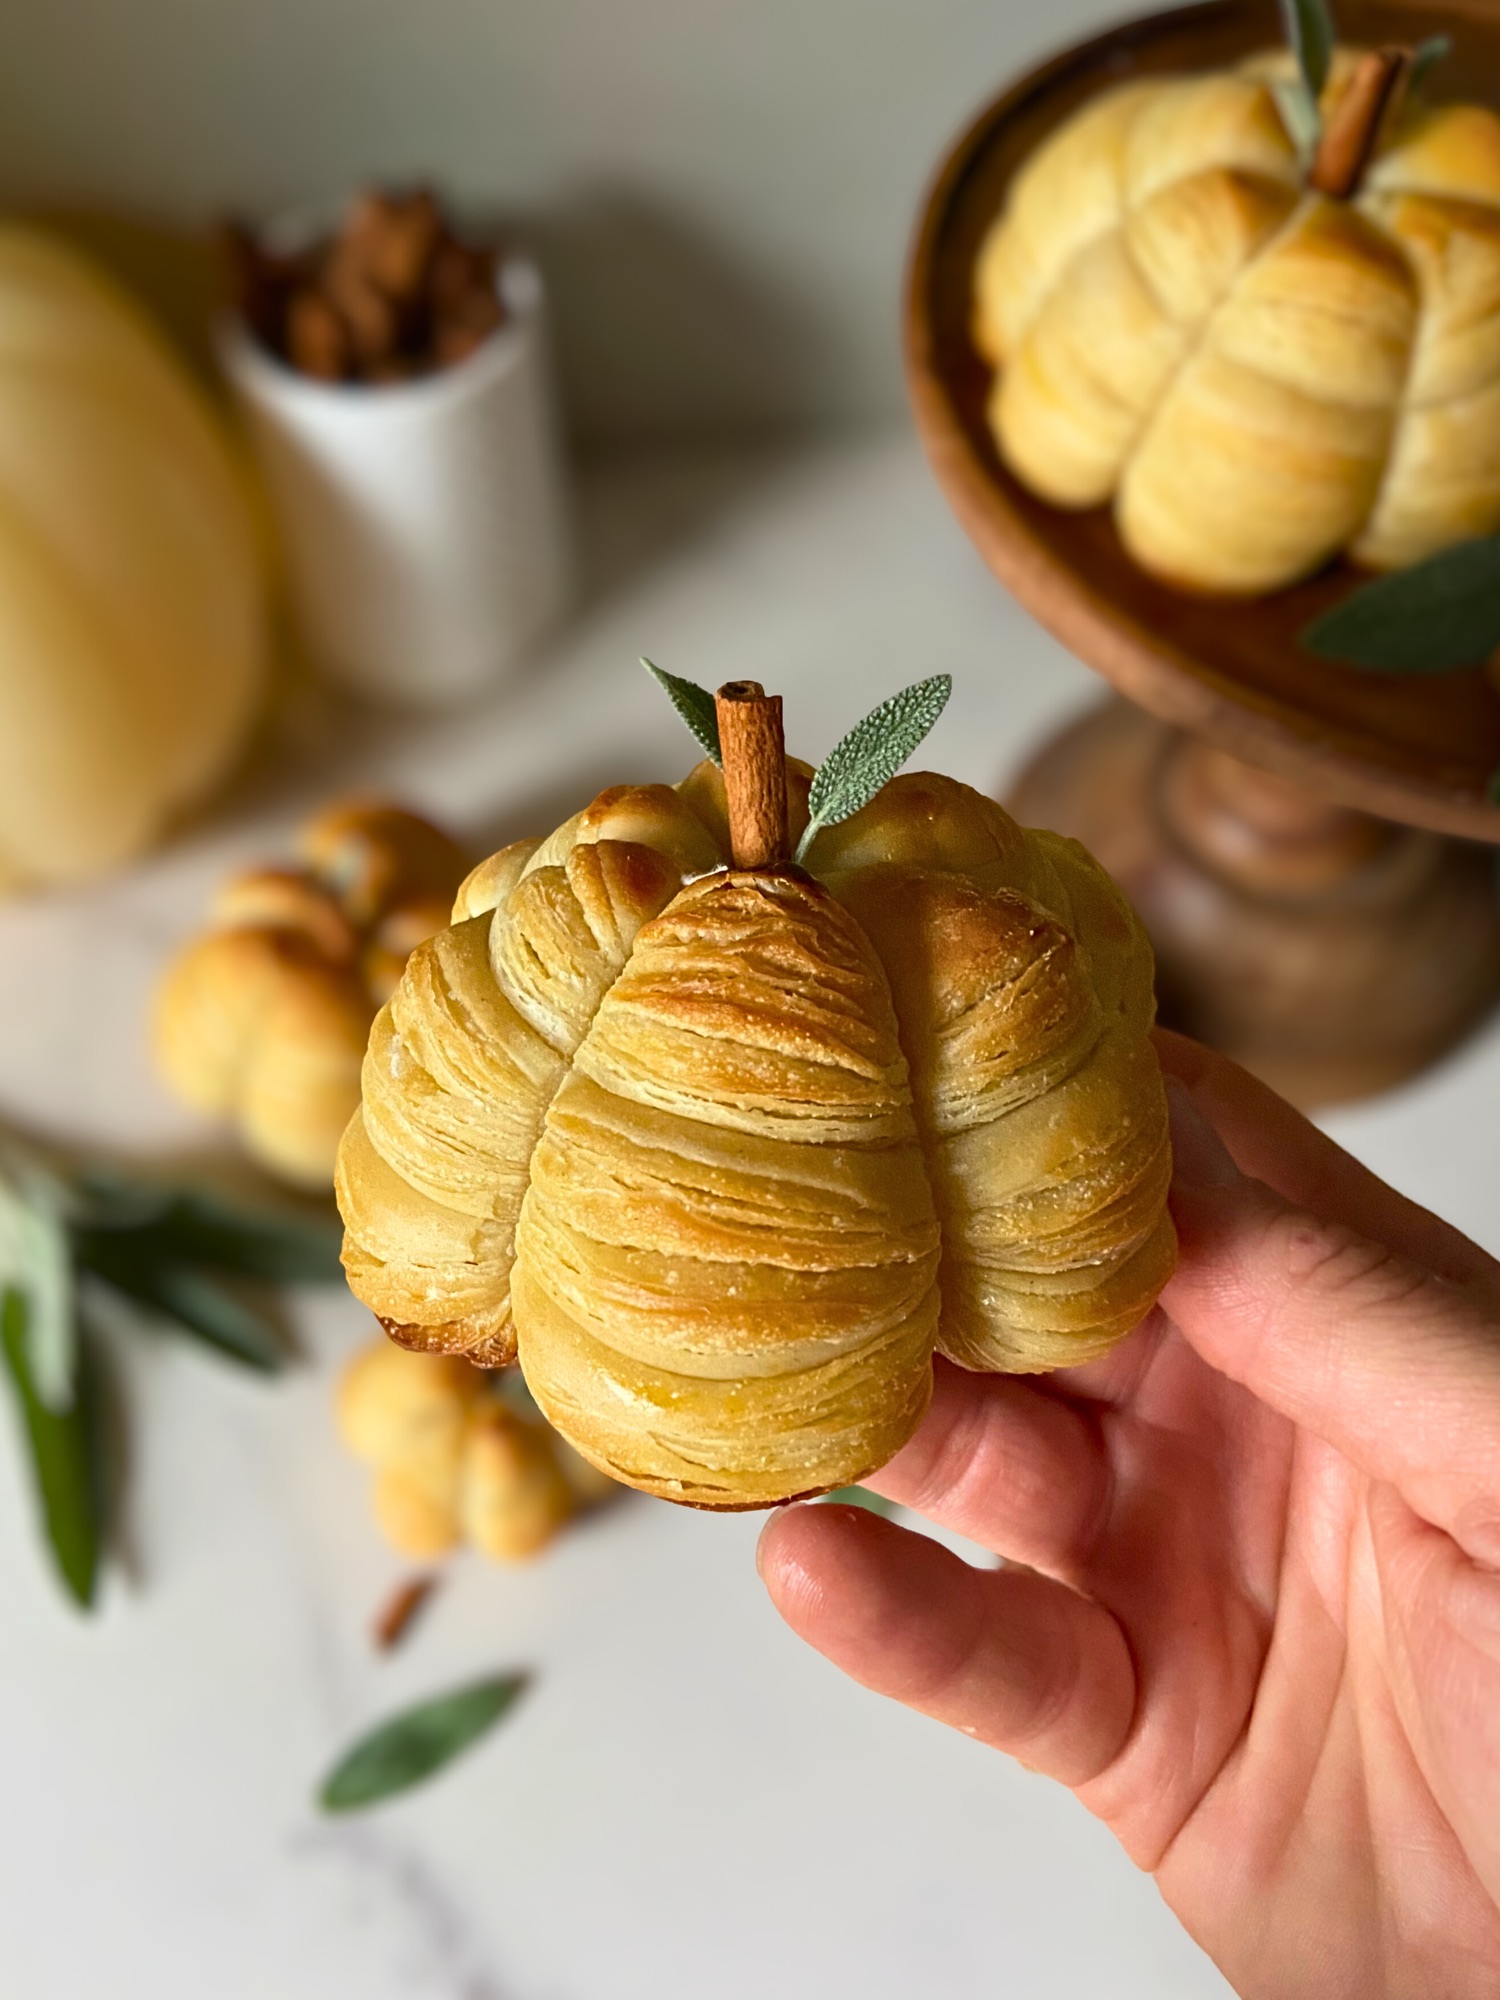

These adorable sourdough croissant pumpkins combine gorgeous buttery layers with a perfect pumpkin shape for an impressive fall pastry. Whether you’re a seasoned baker or trying laminated sourdough dough for the first time, this technique will have you creating bakery-worthy treats that look as amazing as they taste.
What Makes Sourdough Croissant Pumpkins Special?
Unlike traditional pumpkin-shaped breads, sourdough croissant pumpkins showcase those beautiful flaky, buttery layers that make sourdough croissants so irresistible. By stacking circles of laminated sourdough dough and tying them with baker’s twine, you create stunning pumpkin sections that puff up dramatically in the oven. The result? A show-stopping pastry that’s perfect for fall brunches, Thanksgiving tables, or any cozy autumn gathering.
Ingredients You’ll Need
For the Sourdough Croissant Dough:
Follow my complete sourdough croissant recipe and 60-page guide to prepare your dough through all lamination stages.
OR
Check out my new free sourdough croissant fall Recipe Pumpkin Spice Sourdough Croissants made with real pumpkin and a spiced butter block.
For Assembly:
- Croissant dough (prepared through final rollout)
- 1 egg yolk + 2 tablespoons milk or heavy cream (for egg wash)
- Baker’s twine (cut into 16-inch pieces)
- Parchment paper (cut into 4×4-inch squares)
For Decoration:
- Cinnamon sticks (cracked in half)
- Fresh sage sprigs
Equipment Needed
- 2.5-inch round biscuit cutter I love these!
- 2-inch round biscuit cutter
- Pastry brush/ piece of paper towel
- Baker’s twine or kitchen string I use this!
- Spray bottle (for misting) I love this one
- Baking sheet These are my favorite
- Dome lid or tall item + plastic bag (for proofing tent) These are the bags I use These are the lids I use
Step-by-Step Instructions
Step 1: Prepare Your Sourdough Croissant Dough
Follow my complete sourdough croissant recipe and 60-page guide to make your dough, working through all the folding and lamination steps. Continue with the recipe until you reach the final rollout stage.
Step 2: Final Rollout

Roll your sourdough croissant dough into a rough 10” x 11” rectangle. The dough should be evenly rolled.
Step 3: Cut Your Circles

Using your biscuit cutters, cut out circles from the dough:
- Cut 2.5-inch circles (you’ll need 2 per pumpkin)
- Cut 2-inch circles (you’ll need 1 per pumpkin)
Pro tip: Cut circles close together to minimize dough waste. Don’t re-roll the scraps (this will ruin the lamination!). Instead, chop scraps into sections, place in a baking dish, and proof and bake alongside your pumpkins for a delicious pull-apart croissant treat. Optionally mix in a little brown sugar and cinnamon before proofing.
Step 4: Prepare Your Egg Wash
In a small bowl, whisk together:
- 1 egg yolk
- 2 tablespoons milk or heavy cream
This will help your layers adhere and give your pumpkins a beautiful golden color.
Step 5: Prepare Your Baker’s Twine and Parchment

Before stacking your dough, set up your base:
- Cut 3 pieces of baker’s twine, each 16 inches long
- Place a 4×4-inch square of parchment paper on your work surface
- Lay the twine pieces on top of the parchment in a cross/star pattern, overlapping in the center with strings radiating out evenly
The twine and parchment will stay under the pumpkin throughout proofing and baking, this creates 6 pumpkin sections.
Step 6: Stack Your Layers
Now you’ll build your tapered pumpkin stack right on top of the prepared twine:
- Place the first 2.5-inch circle in the center of the twine (on the knot)
- Brush lightly with egg wash
- Add the second 2.5-inch circle on top
- Brush with egg wash
- Top with the 2-inch circle (this creates the tapered pumpkin shape)
The graduated sizes create that authentic pumpkin silhouette, wider at the bottom, narrower at the top.
Step 7: Proof Your Pumpkins
Do NOT tie the strings yet! First, your pumpkins need to proof.
- Place your stacked circles (without string) on a baking sheet
- Cover gently with a dome lid or create a tent using a clean plastic bag propped up with a tall item in the middle of the tray (the bag should not touch the croissants)
- Gently mist the pumpkins with water before closing
- Let proof at room temperature until ready, this typically takes 6-8+ hours depending on your kitchen environment
Signs your pumpkins are fully proofed:
- Puffed up and 50% larger in size (note: this doesn’t mean twice as big)
- Layers are separating slightly
- Dough looks airy and delicate
- Gentle poke leaves a slight indentation that slowly springs back
Step 8: Tie the Pumpkin Shape

Once fully proofed, it’s time to create the pumpkin sections. Your pumpkins should already be on the baking sheet from proofing, no need to move them:
- Gently bring up each piece of twine one at a time
- Tie each string snugly but not too tight around the stack, you want to create indentations without squashing the delicate proofed dough
- Once all sections are tied, gather the loose ends at the top and tie them together to secure
Important: Work gently! The proofed dough is delicate and you want to maintain those beautiful layers.
Step 9: Final Egg Wash

Brush egg wash between the string sections on the top of each pumpkin. This gives them that gorgeous golden-brown color and shine.
Pro tip: Be careful not to let egg wash pool in the indentations, use a light hand with your pastry brush.
Step 10: Bake
- Preheat your oven to 400°F
- Keep pumpkins on their parchment squares and place on a baking sheet
- Bake for 18-22 minutes, or until deep golden brown and flaky
- The pumpkins should be puffed, with defined sections and a beautiful golden color
Baking tip: Every oven is different! Start checking at 18 minutes. You want a deep golden color for the best flavor and texture.
Step 11: Add the Finishing Touches
While your croissant pumpkins are still warm:
- Carefully remove the baker’s twine—it should come off easily
- Create a small indentation in the top center
- Insert half a cinnamon stick as the stem
- Tuck in a fresh sage sprig next to the cinnamon stick for a gorgeous natural look
Tips for Success

Dough Temperature
- Keep your dough cold while working! If it gets too warm, the butter will melt into the dough and you’ll lose those flaky layers
- Pop the dough in the fridge if it starts feeling soft
Egg Wash Between Layers
- Don’t skip the egg wash between circles—it helps them fuse together while baking
- Use a light hand to avoid making the layers soggy
Tying the Twine
- You can oil your twine lightly if you’re worried about it sticking, though the butter in the sourdough croissant dough typically prevents any sticking issues
- Tie snugly but gently, you want definition without deflating the dough
Proofing
- Under-proofed pumpkins will be dense and won’t puff as dramatically
- Over-proofed pumpkins may collapse or lose their shape
- Watch for the visual cues: 50% larger, slight layer separation, jiggly and delicate
Baking
- A hot oven (400°F) is essential for that dramatic puff and flaky texture
- Don’t open the oven door for the first 15 minutes, you’ll let out crucial steam!
Serving Suggestions
These croissant pumpkins are absolutely stunning served:
- Warm from the oven with butter and jam
- As part of a fall brunch spread with coffee or apple cider
- On a rustic wooden board surrounded by real mini pumpkins and fall decor
- With whipped maple cream cheese for an extra special touch
- Alongside soup for a cozy autumn dinner
Storage
Room temperature: Store in an airtight container for up to 2 days. The sourdough croissants are best enjoyed fresh!
Freezing: You can freeze baked sourdough croissant pumpkins for up to 1 month. Thaw at room temperature and refresh in a 350°F oven for 5-7 minutes to restore flakiness.
Why This Recipe Works
The magic of these sourdough croissant pumpkins comes from combining two techniques:
- Stacking graduated sizes creates the classic pumpkin taper
- Baker’s twine creates defined sections that become even more pronounced as the dough puffs in the oven
The result is a pastry that showcases the incredible lamination work you’ve put into your sourdough croissant dough while creating an adorable seasonal shape that’s perfect for fall.
Frequently Asked Questions
Can I use store-bought croissant dough?
While homemade sourdough dough gives you the best results and flavor, store-bought puff pastry or croissant dough can work in a pinch.
What if I don’t have both sizes of cutters?
You can use any round cutters you have, even drinking glasses! Just make sure you have two different sizes about a half inch apart, to create the taper.
Can I make these ahead?
These are best made fresh on the day you plan to serve them. The dough should be worked with while cold and baked after proofing for optimal results.
What other decorations can I use?
Get creative! Try pretzel sticks, rosemary sprigs, twisted dough “stems,” or even a small fondant leaf.
Why didn’t my pumpkins puff up?
This usually means the dough was under-proofed or the oven wasn’t hot enough. Make sure to proof until you see those telltale signs and preheat your oven fully.
The Bottom Line
These sourdough croissant pumpkins are the perfect combination of impressive technique and adorable presentation. Yes, they take some time and patience, but the results are absolutely worth it. Whether you’re making them for Thanksgiving, a fall party, or just because you love beautiful pastries, these little pumpkins are guaranteed to wow everyone who sees (and tastes!) them.
The best part? Once you master this technique, you can apply it to other shapes and seasons—think Christmas ornaments, Easter eggs, or even heart shapes for Valentine’s Day!
Ready to get started? Grab my complete sourdough croissant recipe and 60-page guide and let’s make some magic happen in your kitchen this fall!

Have you made these sourdough croissant pumpkins? I’d love to see your creations! Tag me on Instagram and share your beautiful bakes!


Disclosure: As an Amazon Associate, I earn from qualifying purchases. This means that if you click on an Amazon link on this blog and make a purchase, I may receive a small commission at no additional cost to you. This helps support the blog and allows me to continue creating content.
I only recommend products that I personally use, have researched, or believe will add value to my readers. Your support through these affiliate links is greatly appreciated!


Leave a Reply