Table of Contents
- Why You’ll Love This Recipe
- What is Jelly Pull Apart Focaccia
- Why this recipe works
- Ingredient Substitutions & Variations
- Expert Tips
- Jam Flavor Variations
- Storage & Make-Ahead
- FAQs
- No Sourdough Starter? Use Yeast Instead!
- More Pull-Apart Recipes
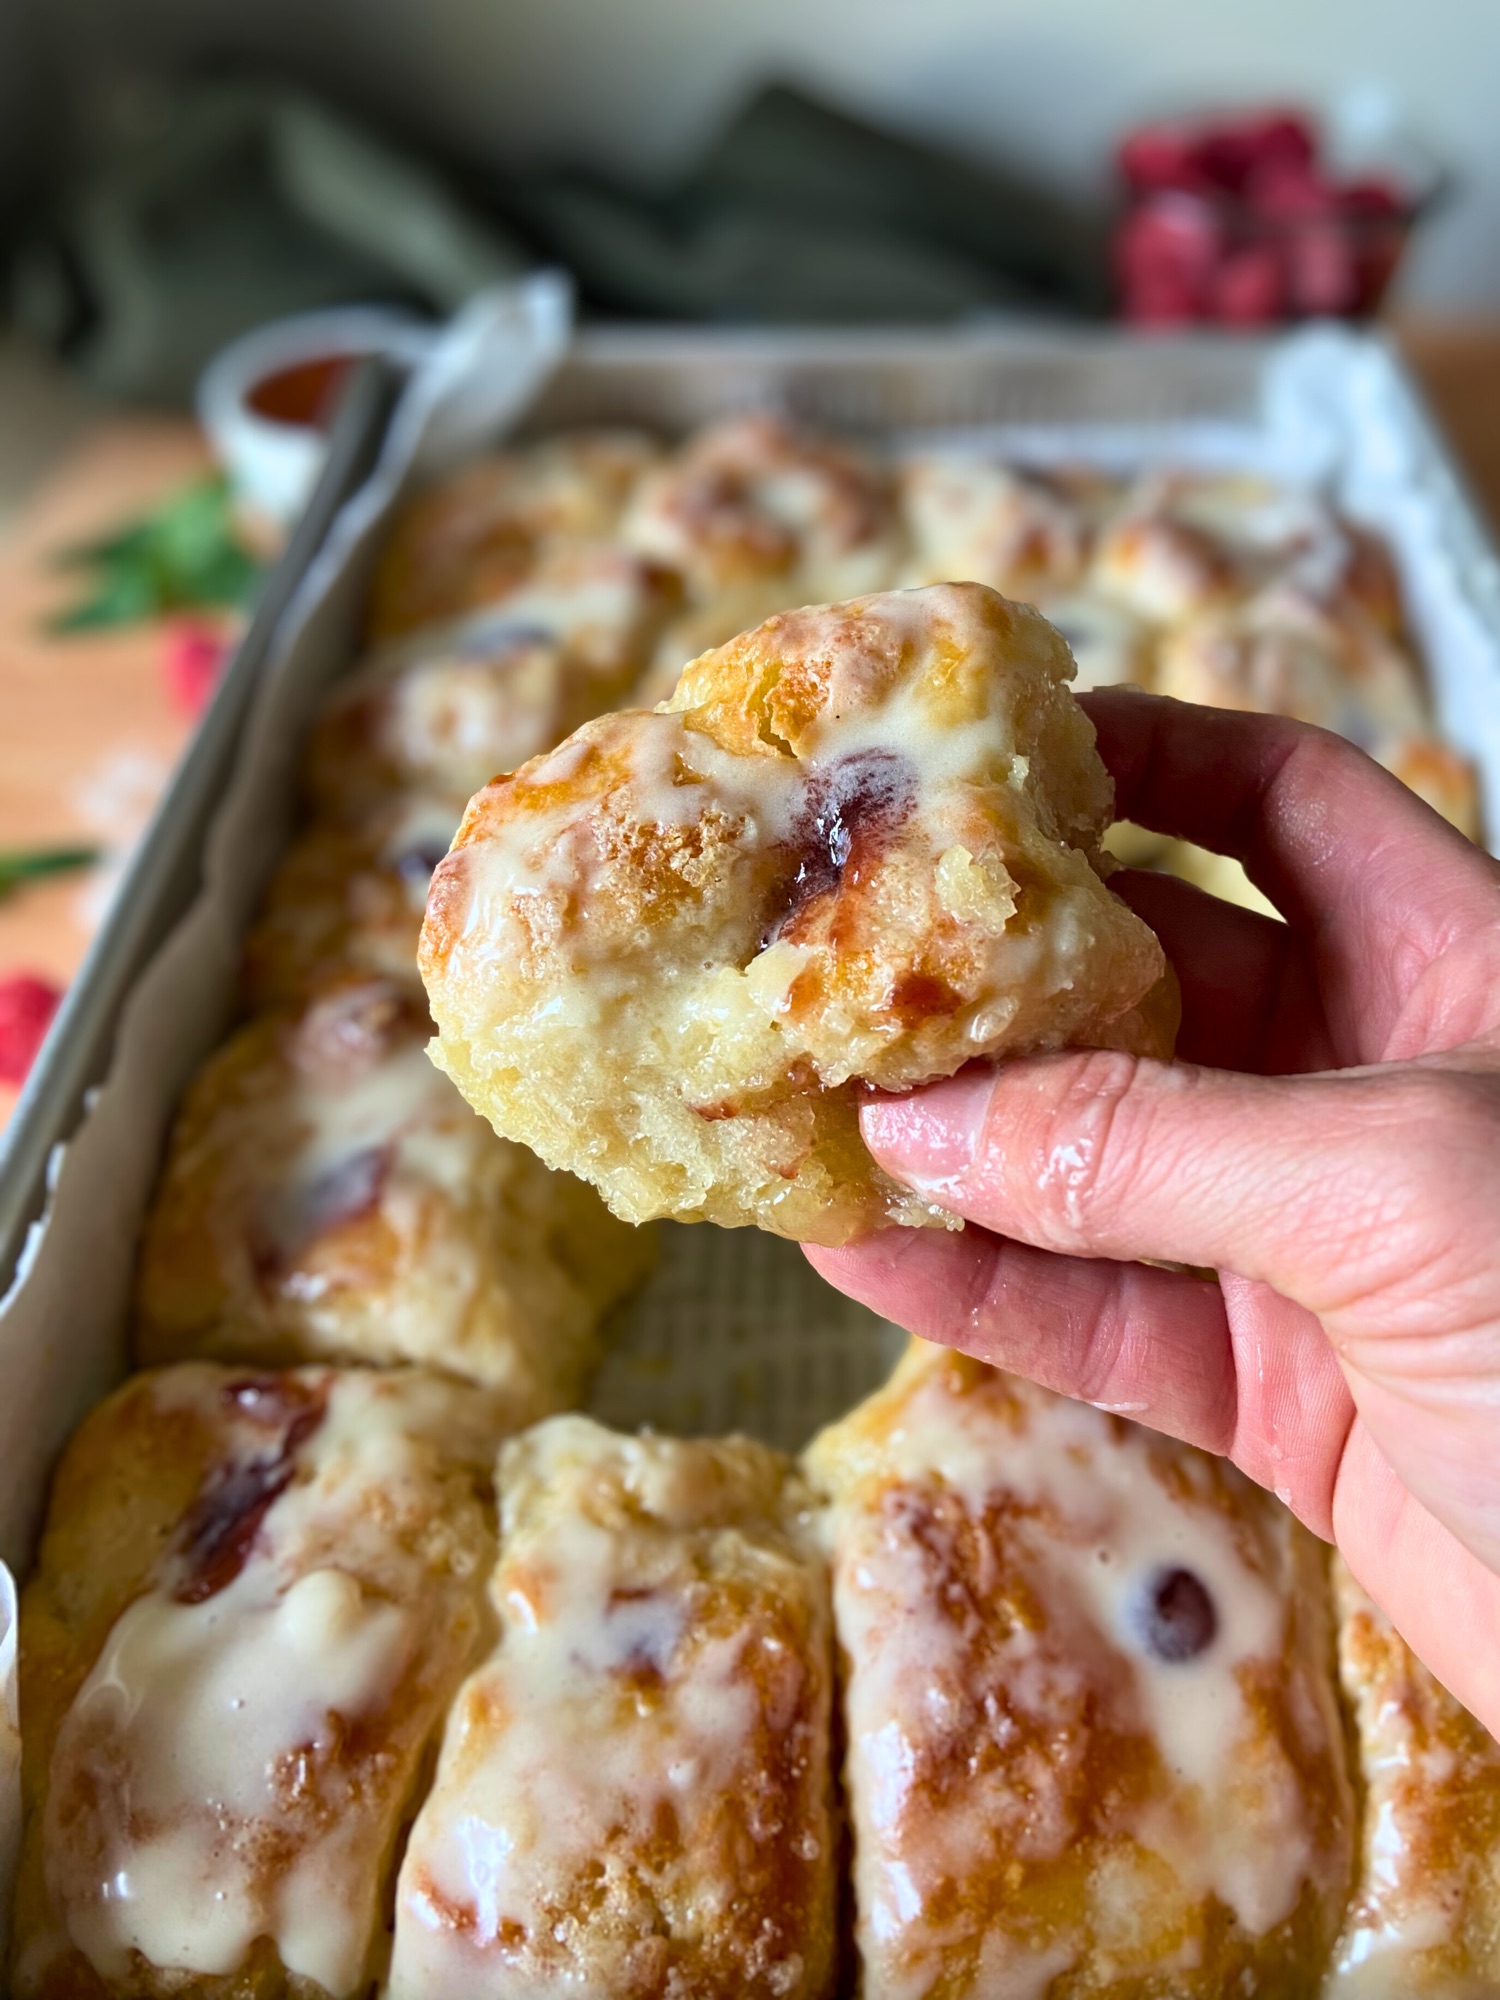
Transform your sourdough into glazed jelly donuts with this viral pull-apart focaccia! Soft, fluffy pieces coated in donut sugar, filled with sweet raspberry jam, and drizzled with a hardening vanilla glaze. Each piece pulls apart like a mini jelly donut BUT no frying required! Perfect for brunch, dessert, or any time you want to impress.
This is the third recipe in my Pull-Apart Focaccia Series, following my Garlic Parmesan Pull-Apart Focaccia and Cinnamon Roll Pull-Apart Focaccia (this series is viral for a reason). If you loved those, you’re going to be obsessed with this jelly donut version!
Why You’ll Love This Jelly Donut Focaccia
This jelly donut pull-apart focaccia is the third installment in my viral focaccia series, and it might be the best one yet!
Imagine this: soft sourdough pieces coated in crunchy sugar, filled with sweet raspberry jam, and glazed like a classic donut. The glaze hardens into that perfect crackly shell just like your favorite bakery donut. Each piece pulls apart easily and reveals jam oozing from the center. Pure heaven!
What makes this recipe truly special is how it captures everything we love about jelly donuts without any frying. The overnight sourdough fermentation creates incredibly soft, fluffy bread. The sugar coating adds texture, the jam brings that nostalgic jelly donut flavor, and the hardening glaze? Chef’s kiss! It’s exactly like biting into a fresh glazed donut from your favorite bakery.
What is Jelly Donut Pull-Apart Focaccia?
Jelly Donut Pull-Apart Focaccia is a viral sourdough recipe that transforms overnight sourdough dough into glazed jelly donuts. Each piece is coated in sugar, filled with raspberry jam, and drizzled with hardening vanilla glaze, no frying required! Perfect for brunch or dessert, this pull-apart bread gives you all the flavor of classic jelly donuts with the magic of sourdough fermentation.
Why This Recipe Works
This jelly donut pull-apart focaccia is the perfect marriage of artisan sourdough bread baking and classic American jelly donuts. Here’s what makes it so special:
The overnight room temperature rise develops incredible flavor complexity and creates that signature sourdough tang that balances all the sweetness perfectly. It also develops the gluten structure for soft, fluffy bread that pulls apart beautifully.
The sugar coating with cornstarch creates that authentic donut exterior, sweet and textured. The cornstarch keeps it from clumping during the second rise, so every piece has that perfect coating and stays perfectly together, but pull-apartable.
Filling with jam while warm is a game-changer, the warmth helps the jelly flow into all the nooks and crannies instead of just sitting in a pocket. This means every bite has that delicious jam flavor.
The hardening glaze is what really makes these feel like authentic glazed donuts. Using the right ratio of powdered sugar to milk creates a glaze that sets into a glossy, crackly shell as it cools, exactly like your favorite bakery donut.

Jelly Donut Pull-Apart Focaccia
Ingredients
Sweet Sourdough Dough:
- 500 g bread flour
- 400 g water room temperature
- 75 g active sourdough starter fed and bubbly
- 8 g salt
- 20 g sugar
- 10 g vanilla extract
- 14 g melted butter
For the Pan:
- 28 g butter melted
Vanilla Butter Dip:
- 85 g butter melted
- 5 g vanilla extract
Sugar Coating:
- 200 g granulated sugar
- 15-20 g cornstarch
Jelly Filling:
- 340 g seedless raspberry jam or strawberry, grape, or mixed berry
Vanilla Glaze:
- 90 g powdered sugar
- 22-30 g milk
- 2.5 g vanilla extract
Instructions
Day 1: Make the Sweet Sourdough Dough
- Mix the dough: In a large bowl, combine water, active sourdough starter, sugar, vanilla extract, and melted butter. Mix until combined. Add the flour and salt, then mix until no dry flour remains. The dough will be sticky and shaggy.
- Rest: Cover the bowl with a damp towel or plastic wrap and let rest for 1 hour at room temperature.
- Stretch and fold: Perform one set of stretch and folds to build strength. Wet your hands, grab one side of the dough, stretch it up, and fold it over itself. Rotate the bowl 90 degrees and repeat 4-6 times total until you’ve worked around the entire dough ball.
- Bulk fermentation: Cover the bowl and let the dough proof at room temperature for 8-12 hours, or until at least doubled in size. Look for a domed top, visible bubbles throughout, and a puffy, jiggly texture. The exact time will depend on your kitchen temperature and starter strength.
Day 2: Shape, Rise, and Bake
- Prepare your pan: Line a 9×13 inch baking pan with parchment paper. Pour 28g (2 tablespoons) of melted butter into the bottom of the pan and spread it around evenly.
- Prepare vanilla butter: Melt 85g butter and stir in 5g vanilla extract. Set aside in a bowl for dipping.
- Prepare sugar coating: In a shallow bowl or plate, whisk together granulated sugar and cornstarch. The cornstarch prevents clumping and keeps the coating dry during the rise.
- Shape into balls: Turn the dough out onto a lightly floured surface. Divide and shape into approximately 20 equal-sized balls. You can pick whatever size you'd like. Use a bench scraper for ease.
- Dip and coat: Dip each ball into the vanilla butter, allowing excess to drip off, then roll in the granulated sugar mixture.

- Arrange in pan: Place the sugar-coated dough balls in the prepared pan, arranging them directly next to each other. They should fill the entire 9×13 inch pan snugly.
- Second rise: Cover and let rise for 2 hours at room temperature, or until puffy and the balls have grown together into one cohesive pull-apart bread.
- Bake: Preheat oven to 425°F (220°C) with the rack positioned in the lower third of the oven. Bake for 25-30 minutes, or until golden brown on top. The internal temperature should reach about 190-200°F. The lower rack helps the bottom get golden while preventing the sugar from over-browning on top.
- Cool slightly: Let cool in the pan for 10-15 minutes. You want it warm but not scorching hot for the next steps.
Fill and Glaze
- Prepare jam: Transfer raspberry jam into a piping bag or zip-top bag with the corner snipped off.
- Poke holes: Using a thick straw, chopstick, or the handle of a wooden spoon, poke holes into each piece of warm focaccia, going about 3/4 of the way down. The warmth of the bread makes this step much easier! Or give your piping tip a good shove in there.
- Fill with jam: Pipe approximately 1 teaspoon of raspberry jam into each hole (about 20 teaspoons total). The warmth of the bread helps the jelly spread into every nook and cranny, creating better distribution throughout each piece.
- Make glaze: Whisk together powdered sugar, milk (starting with 22g), and vanilla extract until smooth. Add more milk if needed to reach a drizzling consistency, you want it thick but pourable.
- Glaze: Generously drizzle the vanilla glaze over the entire focaccia while it’s still warm. Make sure every piece gets covered. The glaze will start to harden as it cools, creating that iconic crackly donut shell.
- Set: Try to let the glaze set for 20 minutes before serving. This allows it to harden into that perfect glossy, crackly donut shell.
Serve:
- Pull apart and enjoy! Each piece is like a mini glazed jelly donut with jam oozing from the center.
Notes
Follow the timing AND signs of complete proofing in the recipe – Use seedless jam for easier piping and a smoother texture – Poke holes while warm – it’s much easier than when cool, and the warmth helps the jam spread throughout – Fill with jam while warm – this helps the jelly get into every nook and cranny for better distribution – The glaze will be messy – embrace it! That’s part of the jelly donut experience – Don’t skip the cornstarch in the sugar coating – it prevents clumping during the rise – Watch your baking time – the sugar can brown quickly, so check at 25 minutes – Use a piping bag for the jam – it makes filling so much easier and neater – Best eaten the day of making while fresh and warm – Leftovers can be stored covered at room temperature for 1 day, but the glaze may soften
No Sourdough Starter? Use Yeast Instead!
Don’t have sourdough starter? You can use instant yeast or active dry yeast instead! Here’s what to do:Replace This:
- 75g active sourdough starter
With This:
- 37g (about ¼ cup) all-purpose flour
- 37g (about 2½ tablespoons) water
- 7g (2¼ teaspoons) instant yeast OR 9g (2¾ teaspoons) active dry yeast
Instructions Based on Yeast Type:
Using INSTANT YEAST (also called Rapid Rise):
This is the easiest option!- Mix everything together at once: Add the flour, water, and instant yeast along with ALL the other recipe ingredients (salt, sugar, vanilla, butter) right from the start. Mix until combined.
- Bulk fermentation: Let the complete dough rise for 2-3 hours at room temperature until it doubles in size and becomes puffy and jiggly. (This replaces the 8-12 hour overnight fermentation you’d do with sourdough starter.)
- Continue as normal: Once your dough has doubled, proceed with the recipe exactly as written – same shaping, same coating in vanilla butter and sugar, same second rise, and same baking!
Using ACTIVE DRY YEAST:
This requires one extra step to activate the yeast first.- Activate the yeast: Mix the 37g warm water (100-110°F/38-43°C) with the 9g active dry yeast in a small bowl and a ¼ teaspoon of sugar. Let it sit for 5-10 minutes until it becomes foamy and bubbly. If it doesn’t foam, your yeast is dead – start over with fresh yeast.
- Mix everything together: Once your yeast is foamy, add it along with the 37g flour and ALL the other recipe ingredients (salt, sugar, vanilla, butter). Mix until combined.
- Bulk fermentation: Let the complete dough rise for 2-3 hours at room temperature until it doubles in size and becomes puffy and jiggly. (This replaces the 8-12 hour overnight fermentation you’d do with sourdough starter.)
- Continue as normal: Once your dough has doubled, proceed with the recipe exactly as written – same shaping, same coating, same second rise, and same baking!
Important Notes:
Water Adjustment:
- Worried about wet dough? Start by decreasing the water in the main recipe to 360g (1.5 cups). Experienced bakers can stick with the full 400g.
- Use room temperature water for instant yeast
- Use warm water (100-110°F) for active dry yeast
Ingredient Substitutions & Variations
Flour:
- All-purpose flour: Can substitute up to 50% of the bread flour with all-purpose for a slightly softer texture
- Whole wheat: Can replace up to 25% bread flour with whole wheat for added nutrition (add 10-20g extra water)
- Stick with bread flour for best results, the higher protein content creates the perfect structure
Sweeteners:
- Sugar in dough: Can use cane sugar, coconut sugar, or brown sugar
- Sugar coating: Granulated white sugar works best, but cane sugar also works, it will just be crunchier
- Don’t use brown sugar for coating, it will burn
Butter:
- Dairy-free: Use vegan butter or coconut oil in equal amounts
- Reduced butter: Can reduce the vanilla butter to 60g (4 tablespoons) if desired
- Quality matters: European-style butter adds extra richness
Jam:
- Raspberry (recommended): Classic jelly donut flavor, tart and sweet
- Strawberry: Sweeter, kid-friendly option
- Grape: Traditional American jelly donut filling
- Mixed berry: Complex flavor with multiple berry notes
- Cherry: Bold and fruity
- Apricot: More sophisticated, less sweet
- Blueberry lemon: Add lemon zest to dough for extra zing
- Must be seedless and smooth for easy piping
Milk (for glaze):
- Dairy-free: Use almond milk, oat milk, or soy milk
- Heavy cream: Makes an extra rich glaze
- Water: Works in a pinch but glaze won’t be as creamy
- Butter: Add half melted butter, half warm water
Vanilla Extract:
- Vanilla bean paste: Use same amount for more vanilla flavor and specks
- Almond extract: Use half the amount (too strong otherwise)
- Skip it: Can omit from butter if needed, but keep in glaze
No sourdough starter?
See the “No Sourdough Starter? Use Yeast Instead!” section below for complete substitution instructions.

Expert Tips for Perfect Jelly Donut Focaccia
- Use seedless jam for easier piping and a smoother texture
- Poke holes while warm – it’s much easier than when cool, and the warmth helps the jam spread throughout
- Fill with jam while warm – this helps the jelly get into every nook and cranny for better distribution
- The glaze will be messy – embrace it! That’s part of the jelly donut experience
- The glaze hardens beautifully into that classic crackly donut shell, just like a bakery!
- Don’t skip the cornstarch in the sugar coating, it prevents clumping during the rise
- Watch your baking time – the sugar can brown quickly, so check at 25 minutes
- Use a piping bag for the jam, it makes filling so much easier and neater

Storage and Make-Ahead Instructions
This jelly donut pull-apart focaccia is best eaten the day of making while fresh and warm. The glaze and jam keep everything moist and delicious for several hours. Leftovers can be stored covered at room temperature for 1 day, but the glaze may soften. For best results, enjoy fresh!
Frequently Asked Questions
Can I use store-bought jam?
Absolutely! Just make sure it’s seedless and smooth enough to pipe. Avoid chunky or preserves-style jams.
Why is my glaze not hardening?
Make sure you’re using powdered sugar (not granulated) and don’t add too much milk. Start with 45g of milk and add more only if needed. The glaze should be thick, it hardens as it cools on the warm bread.
Can I fill these ahead of time?
It’s best to fill with jam right before serving to keep the bread from getting soggy, but you can fill them a few hours ahead if needed. The warmth helps the jam distribute better anyway!
What if I don’t have a piping bag?
Use a zip-top bag with the corner snipped off, or even a spoon to stuff jam into the holes. The piping bag just makes it neater and easier.
Can I freeze these?
Not recommended with the glaze and jam filling. They’re best enjoyed fresh!
My sourdough starter isn’t very active – will this still work?
For best results, use a fed, bubbly, active starter. If your starter is sluggish, the rise times will be longer. Plan for up to 14-16 hours for bulk fermentation if needed.
Can I change the timing of making this recipe?
OPTION 1: Night Before Evening: mix dough → proof overnight at room temp → morning: shape balls, dip & arrange → proof 1-2 hours → bake & ice
OPTION 2: Day Before Morning: mix dough → proof all day → evening: shape balls, dip & arrange → cover well & refrigerate overnight → next morning: bring to room temp 1-2 hours → bake & ice
Both ways = same delicious result! Pick what works for YOUR schedule
Follow the timing AND signs of complete proofing in the recipe
No Sourdough Starter? Use Yeast Instead!
Don’t have sourdough starter? You can use instant yeast or active dry yeast instead! Here’s what to do:
Replace This:
- 75g active sourdough starter
With This:
- 37g (about ¼ cup) all-purpose flour
- 37g (about 2½ tablespoons) water
- 7g (2¼ teaspoons) instant yeast OR 9g (2¾ teaspoons) active dry yeast
Instructions Based on Yeast Type:
Using INSTANT YEAST (also called Rapid Rise):
This is the easiest option!
- Mix everything together at once: Add the flour, water, and instant yeast along with ALL the other recipe ingredients (salt, sugar, vanilla, butter) right from the start. Mix until combined.
- Bulk fermentation: Let the complete dough rise for 2-3 hours at room temperature until it doubles in size and becomes puffy and jiggly. (This replaces the 8-12 hour overnight fermentation you’d do with sourdough starter.)
- Continue as normal: Once your dough has doubled, proceed with the recipe exactly as written – same shaping, same coating in vanilla butter and sugar, same second rise, and same baking!
Using ACTIVE DRY YEAST:
This requires one extra step to activate the yeast first.
- Activate the yeast: Mix the 37g warm water (100-110°F/38-43°C) with the 9g active dry yeast in a small bowl and a ¼ teaspoon of sugar. Let it sit for 5-10 minutes until it becomes foamy and bubbly. If it doesn’t foam, your yeast is dead – start over with fresh yeast.
- Mix everything together: Once your yeast is foamy, add it along with the 37g flour and ALL the other recipe ingredients (salt, sugar, vanilla, butter). Mix until combined.
- Bulk fermentation: Let the complete dough rise for 2-3 hours at room temperature until it doubles in size and becomes puffy and jiggly. (This replaces the 8-12 hour overnight fermentation you’d do with sourdough starter.)
- Continue as normal: Once your dough has doubled, proceed with the recipe exactly as written – same shaping, same coating, same second rise, and same baking!
Important Notes:
Water Adjustment:
- Worried about wet dough? Start by decreasing the water in the main recipe to 360g (1.5 cups). Experienced bakers can stick with the full 400g.
- Use room temperature water for instant yeast
- Use warm water (100-110°F) for active dry yeast
What Actually Changes:
- Much faster bulk fermentation (2-3 hours instead of 8-12 hours)
- Mix yeast right in with the flour and water at the beginning (same as you would with starter)
- Look for the dough to double in size and become puffy and jiggly
- Everything else stays EXACTLY the same, same mixing method, same stretch and fold technique, same shaping, same coating, same second rise time, and same baking temperature and time!
Temperature Tips:
- Ideal bulk fermentation temperature: 75-80°F (24-27°C)
- Warmer kitchen = faster rise (might only take 2 hours)
- Cooler kitchen = slower rise (might take 3+ hours)
- Don’t worry if it takes a bit longer, just watch for the dough to double!
Yeast FAQ:
Q: Can I use regular all-purpose yeast from the grocery store?
A: Yes! Most grocery store yeast is either instant or active dry, check your package. Instant yeast (also called Rapid Rise or Bread Machine yeast) is easier because you don’t need to proof it first.
Q: Why does instant yeast need less than active dry?
A: Instant yeast has smaller granules and is more potent, so you need less of it to achieve the same rise.
Q: Can I let the yeast dough rise overnight in the fridge?
A: Absolutely! After mixing, you can refrigerate the dough for up to 12 hours for even better flavor. The cold temperature slows the rise. When ready to use, let it come to room temperature and finish doubling if needed, then continue with the recipe.
Q: Can I use this yeast method for all your sourdough recipes?
A: This substitution works best for enriched doughs like focaccia, cinnamon roll focaccia, and similar recipes. For lean doughs like basic bread loaves, you may need to adjust the formula differently.
Pro Tip:
Instant yeast is more forgiving and faster to use. If you’re new to baking or want the easiest route, choose instant yeast over active dry!
Why This Recipe Works
This jelly donut pull-apart focaccia is the perfect marriage of artisan sourdough bread baking and classic American jelly donuts. Here’s what makes it so special:
The overnight room temperature rise develops incredible flavor complexity and creates that signature sourdough tang that balances all the sweetness perfectly. It also develops the gluten structure for soft, fluffy bread that pulls apart beautifully.
The sugar coating with cornstarch creates that authentic donut exterior, sweet, and textured. The cornstarch keeps it from clumping during the second rise, so every piece has that perfect coating.
Filling with jam while warm is a game-changer – the warmth helps the jelly flow into all the nooks and crannies instead of just sitting in a pocket. This means every bite has that delicious jam flavor.
The hardening glaze is what really makes these feel like authentic glazed donuts. Using the right ratio of powdered sugar to milk creates a glaze that sets into a glossy, crackly shell as it cools.
Whether you’re serving this for breakfast, brunch, or dessert, it’s guaranteed to disappear fast. Each pull-apart piece is like eating a warm jelly donut from your favorite bakery – but better, because you made it yourself!
The Pull-Apart Focaccia Series
This jelly donut version is the third recipe in my viral pull-apart focaccia series. If you loved this one, you have to try the others:

Garlic Parmesan Pull-Apart Focaccia – Savory, buttery, garlicky perfection.

Cinnamon Roll Pull-Apart Focaccia – All the flavor of cinnamon rolls in focaccia form
More Pull-Apart Focaccia Recipes:
∙ Pigs in a Blanket Pull-Apart Focaccia
∙ Gingerbread Pull-Apart
∙ Pizza Pull-Apart
∙ Buffalo Chicken Dip Pull-Apart Focaccia
∙ Pesto Pull-Apart
Each recipe takes the same basic sourdough focaccia technique and transforms it into something completely different and delicious. The pull-apart format makes them perfect for sharing, brunches, parties, or just treating yourself to something special.
Final Thoughts
Want more sourdough recipes? Join 100K+ followers and get my best recipes delivered straight to your inbox!
Have you tried this recipe? I’d love to hear how it turned out! Leave a comment below and let me know:
- What jam flavor did you use?
- Did you eat it with your HANDS or a FORK?
- Which recipe should I turn into pull-apart focaccia next?
If you loved this recipe, please leave a ⭐⭐⭐⭐⭐ rating! It helps other bakers find this recipe.
Follow me for more viral baking recipes!
- Instagram: @h3artofthehome – Daily baking inspiration & behind-the-scenes
- Pinterest: H3art of the Home – Pin this recipe for later!
- TikTok: @h3artofthehome – Watch the process videos
- Facebook: H3art of the Home – Join the community
Tag me @h3artofthehome when you make this! I love seeing your creations!
Happy baking!


Leave a Reply