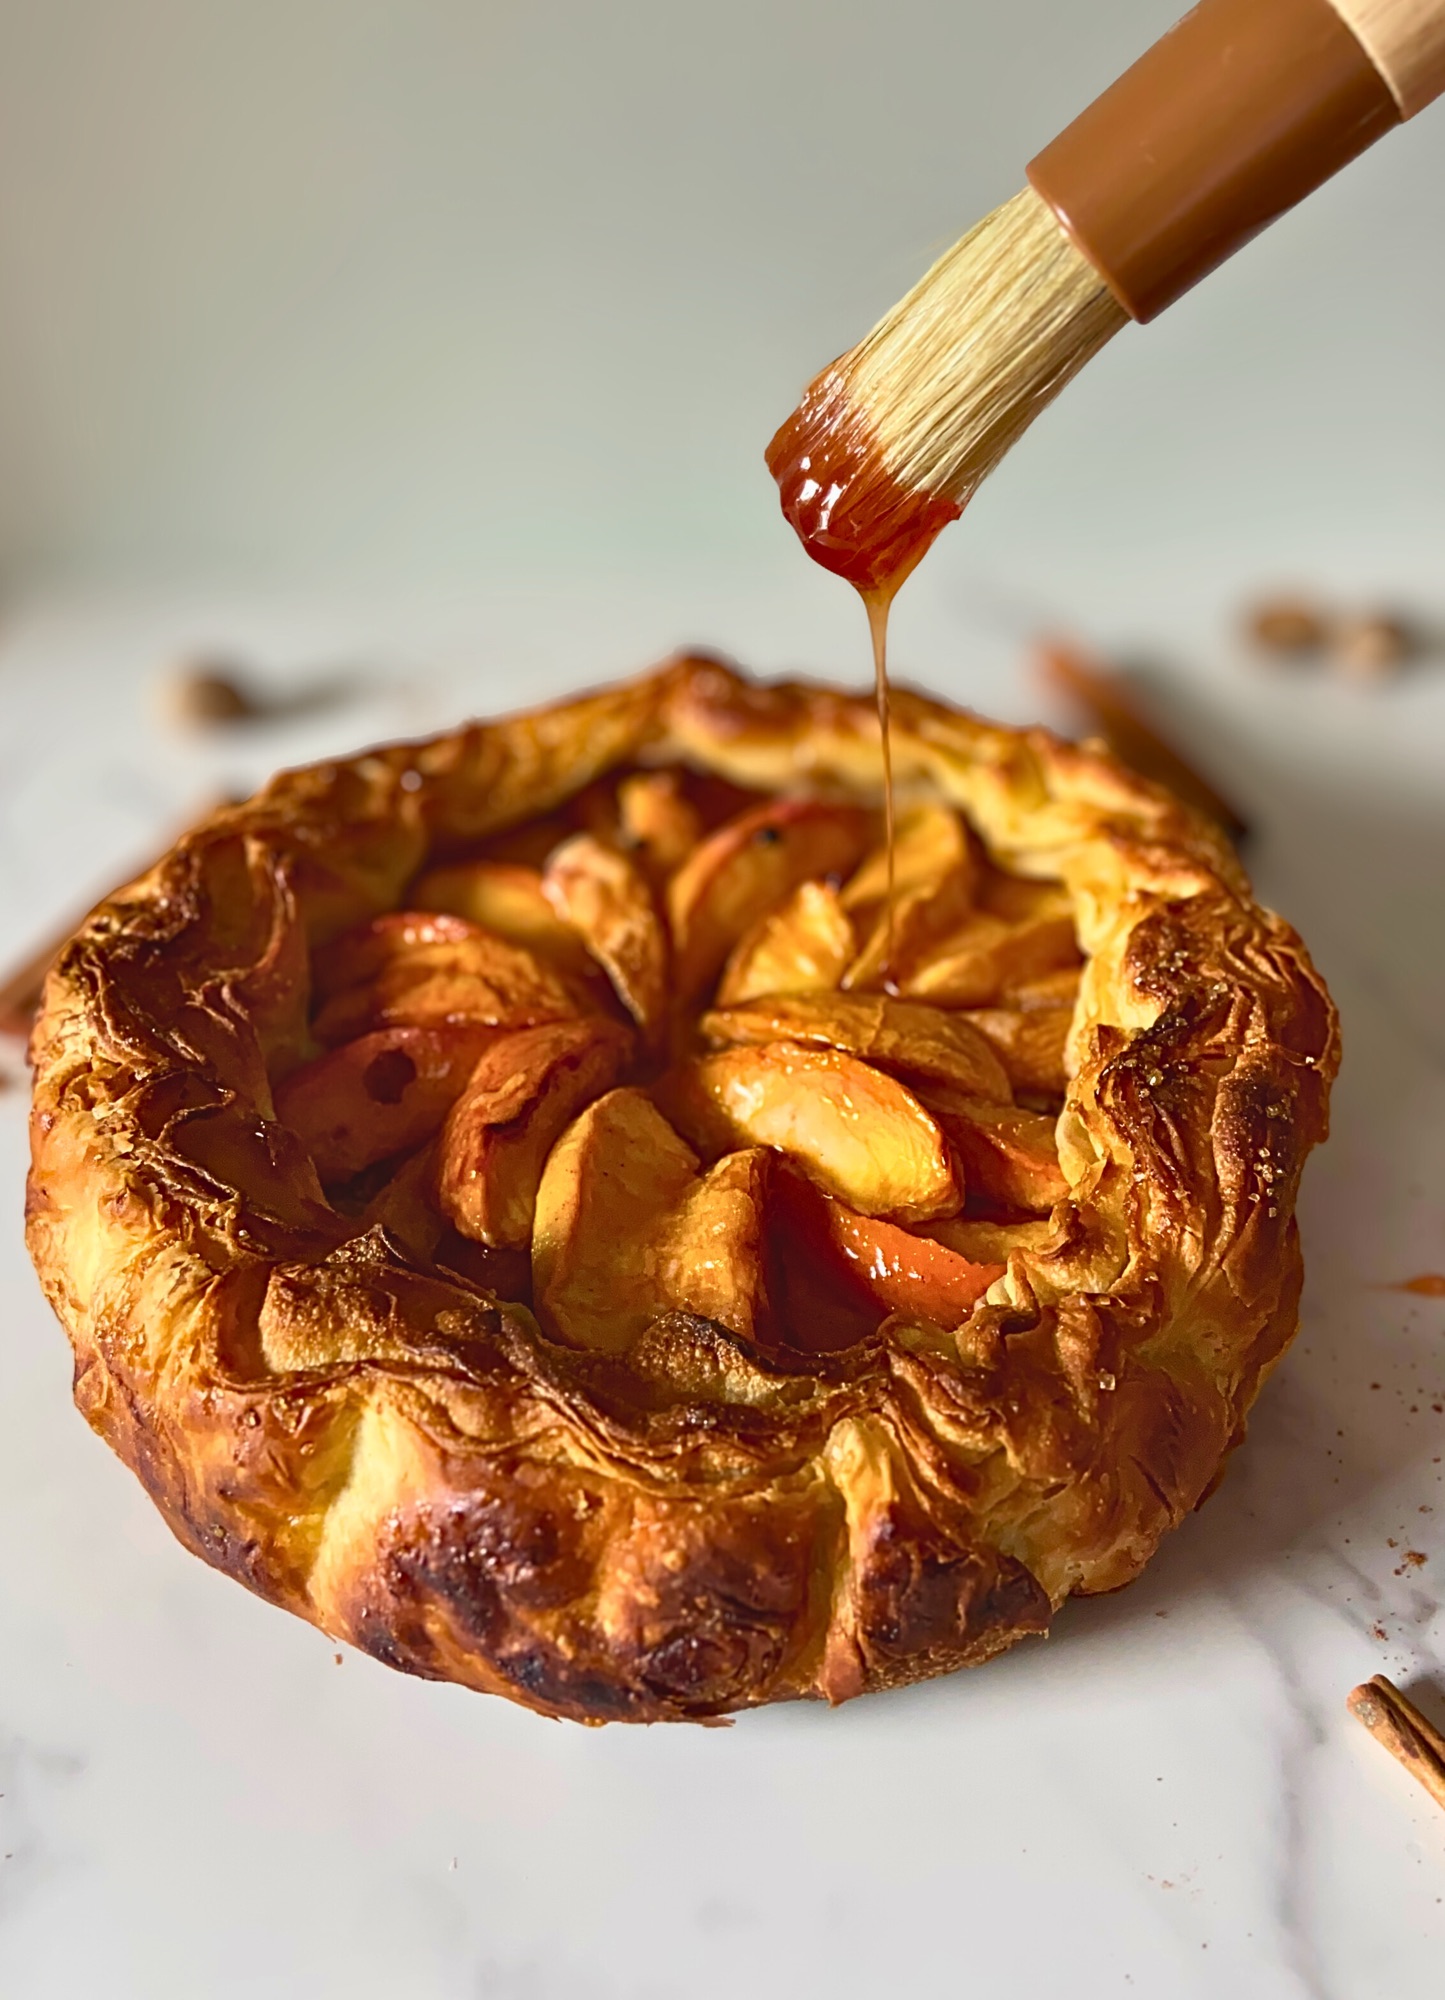
I have been making things out of croissant dough for years now. Savory baskets, croutons, every flavor combination I could talk myself into. But every single time I thought about doing something with fruit, I talked myself right back out of it, because croissant dough and juicy fruit are not natural friends.
Here is the problem. A regular galette uses pie dough, and pie dough is unbothered. You roll it, you fill it, you bake it. Croissant dough needs roughly 8 hours of proofing before it goes anywhere near an oven, and there is no version of that where you leave sliced peaches sitting on raw dough for 8 hours and end up with anything other than a soggy, weeping mess.
So I stopped trying to proof them together. That was the whole fix. You proof the dough on its own, shaped over an inverted bowl so it holds a bowl shape, and you do not introduce the fruit until the very last minute before it bakes. The dough gets the long ferment it needs, the peaches never get the chance to soak in, and you get a deep dish galette with real laminated layers underneath the fruit instead of a wet bottom.
It took me a few rounds to land on the springform pan, and that turned out to matter almost as much as the bowl. More on that below.
Table of Contents
Why Croissant Dough Works for a Galette
A galette is really just dough gathered up around fruit. Nothing about that requires pie dough. What it requires is a dough that can hold an edge and take a long bake without falling apart, and laminated dough does both beautifully once you stop asking it to behave like pie crust.
What you get instead of a short, sandy pie crust is a shell with hundreds of butter layers in it. The bottom stays sturdy because the pan supports it, the sides puff and separate the way croissant dough always wants to, and the top edges bloom open into those ruffled layers you cannot get any other way.
There is a real flavor argument here too. Croissant dough goes through a long fermentation before it is ever laminated, and that time builds a depth and complexity in the pastry that a quick pie dough simply does not have. Underneath sweet, jammy peaches, that deeper background flavor is what keeps the whole thing from tasting flat.
The tradeoff is time. This is not a same day dessert unless you already have dough going. You need one full batch of croissant dough taken through the process right up to the point where you would normally do your final roll out and cut triangles. That is where this recipe picks up.
If you have never made croissant dough, my Sourdough Croissant Masterclass walks you through the whole thing with a visual guide for every step. It is the foundation this entire recipe sits on.

The Inverted Bowl Proofing Method
This is the part that makes the whole thing work, and it is much simpler than it sounds.
Instead of proofing the dough flat on a sheet pan, you drape it over the outside of an upside down stainless steel mixing bowl. As it proofs it takes on the shape of the bowl, so by the time those 8 hours are up you already have a shell instead of a sheet. There is no forming it into a shape after the fact, which would knock all the air right back out of it.
The trick that makes this doable is the parchment. Cut a large square, run it under water, wring it out, crumple it into a ball, then open it back up. Damp crumpled parchment is soft and pliable and will hug the curve of the bowl without tearing or fighting you. Dry parchment will not do this. It creases into stiff points, and your dough will settle into every one of those creases.
Leave plenty of overhang around the edges of the bowl, because that overhang is what you grab later.
Cover the whole thing loosely, and I mean loosely. Build a little tent using a bag and something tall standing next to the bowl so the plastic never touches the dough. Mist lightly with water, seal it up, and leave it at room temperature for roughly 8 hours. You are watching for the same fermentation signs you would look for on any croissant proof, so let those guide you more than the clock does. A warm kitchen gets you there faster and a cool one takes longer.
Then it goes into the refrigerator for 20 to 30 minutes. Do not skip this. Warm proofed laminated dough is soft and sticky and will smear the moment you handle it, which means the butter layers you spent all that time building get destroyed at the very last second. Twenty minutes of cold firms that butter back up so you can move the dough cleanly.

Keeping the Bottom Crisp
Peaches are wet. Very wet. Three things keep that moisture from ruining your bottom crust, and you need all three.
Pre drain the fruit. Tossing the sliced peaches with sugar, lemon juice, and salt and then letting them sit in a colander pulls a surprising amount of liquid out through simple osmosis. You will look at what collects underneath and understand immediately why the untreated version fails.
Pat dry, then add the cornstarch. Once the peaches have drained, patting the slices dry before the cornstarch goes on matters just as much as the drain itself. The cornstarch is there to catch whatever moisture still releases during the bake and thicken it into a set filling, rather than letting it run down into the pastry. If the slices are still wet going in, the cornstarch gets used up before the oven even starts.
Bake in a springform pan. This one is structural as much as it is about moisture. The pan holds the gathered sides upright so the galette bakes tall instead of slumping outward, and it keeps the base in even contact with the heat so the bottom actually cooks through. A free standing galette made from laminated dough will spread and go flat under the weight of the fruit. The pan is what makes this deep dish rather than a puddle.
And do not throw away that drained peach liquid. It becomes the glaze, which I cover further down.

How to Peel Peaches Fast
Peeling is optional here. The skins soften during the bake and plenty of people leave them on for the color. But if you want them off and you do not want to stand over a pot of boiling water, there is a much faster way.
Cut the peaches in half and remove the pits. Lay them cut side down on a parchment lined baking sheet. Broil them 6 to 8 inches from the heat for 1 to 2 minutes, just until the skins tighten and begin to loosen at the edges. Let them cool enough to handle and the skins will slip right off with your fingers.
It takes a fraction of the time that blanching does, and you never have to shock them in ice water afterward.

Ingredient Notes
All of the amounts and conversions live in the recipe card below. Here is what is worth understanding before you shop.
Croissant dough. One full batch. Take it through the process up until the final roll out and stop before you cut triangles. That is your starting line for this recipe.
Peaches. Ripe but still firm is the target. Very soft peaches collapse into mush during the bake and release far more liquid than the cornstarch can manage. Slice them into even wedges so they cook at the same rate. Freestone peaches are much easier to work with than clingstone, since the pit releases cleanly.
Cornstarch. This is what sets the filling. Do not leave it out, and do not swap flour in at a one to one ratio, since flour thickens differently and leaves the filling cloudy rather than glossy.
Lemon juice. Fresh, not bottled. It brightens the peaches, keeps them from tasting flatly sweet, and helps draw the liquid out during the drain.
Cold butter. Dotted over the fruit right before it goes into the oven. It melts down into the peaches and gives the filling richness that sugar alone will not.
Egg wash and coarse sugar. The egg wash on the gathered edges seals the bundle shut so it does not spring open in the oven. The coarse sugar on top gives you crunch and sparkle and holds up to the bake without dissolving.
How to Assemble the Galette
The full instructions are in the recipe card below, but there are two moments in the assembly worth understanding before you start, because they both happen fast and you do not want to be reading about them for the first time with cold dough in your hands.
Getting the dough off the bowl. You are not lifting it off. You are flipping it. Lay a sheet of parchment over the top of the proofed dough, put your hand flat on it, and turn the whole bowl over so the dough lands on your parchment lined baking sheet. Then lift the bowl away and peel off the parchment that was underneath it. What you have now is a shallow round of dough sitting cup side up, ready to fill.


Getting the filled galette into the pan. Once the peaches are in and the edges are gathered and pinched shut, that thing is heavy and fragile. Do not try to pick it up with your hands. Use the parchment underneath as a sling, lift from the corners, and lower the whole package down into the springform pan.


One choice you get to make at the end. If you brush the exposed dough with egg wash you get a deep, even, glossy golden finish. If you leave it unbrushed, the layers spread and open more dramatically as they bake, so you see far more of the lamination but the color is less uniform. I go back and forth on this one. Egg wash when I am serving people, no egg wash when I want to show off the layers.
Recipe

Deep Dish Peach Croissant Galette
Equipment
- Stainless steel mixing bowl, top measuring about 9.5 inches across
- 8 by 2.6 inch springform pan
- Rimmed baking sheet
- Parchment paper
- Colander
- – Pastry brush
- Small saucepan
- Wire cooling rack
- Digital Kitchen Scale
- Plastic wrap or a large bag
Ingredients
For the Croissant Dough
- 1 full batch croissant dough taken through the process up to the final roll out and stopped before cutting triangles
For the Peach Filling
- 700 grams ripe but firm peaches sliced into 1/4 inch wedges (about 4 to 5 medium)
- 38 grams granulated sugar 3 tablespoons
- 10 grams fresh lemon juice 2 teaspoons
- 1 gram fine sea salt 1/8 teaspoon
- 16 grams cornstarch 2 tablespoons
- 4 grams vanilla extract 1 teaspoon
- 1 gram ground cinnamon 1/2 teaspoon
- 28 grams cold unsalted butter cut into small pieces (2 tablespoons)
For Assembly and Baking
- 50 grams large egg 1 egg
- 15 grams water 1 tablespoon
- 12 grams coarse sugar 1 tablespoon
For the Peach Syrup Glaze
- 25 grams granulated sugar 2 tablespoons
- Reserved drained peach liquid
Instructions
- Turn the stainless steel bowl upside down on your work surface.
- Cut a large square of parchment, run it under water, then wring out the excess. Crumple it into a ball and open it back out flat. This makes it pliable enough to hug the curve of the bowl without tearing.
- Drape the damp parchment over the inverted bowl, leaving generous overhang all the way around.
- On a lightly floured surface, roll the croissant dough into a rectangle roughly 10 by 13 inches.
- Drape the dough over the parchment lined bowl. Ease it into the curve and let gravity do the work. Do not pull or stretch it.
- Build a tent over the dough using a large bag and something tall set next to the bowl, so nothing touches the surface. Mist lightly with water and seal.
- Proof at room temperature for about 8 hours, watching for the same fermentation signs you would look for on any croissant proof.
- About 30 minutes before you plan to assemble, toss the sliced peaches with the granulated sugar, lemon juice, and salt. Transfer to a colander set over a bowl and let drain for 30 minutes. Reserve the liquid that collects.
- Transfer the bowl with the proofed dough to the refrigerator and chill for 20 to 30 minutes to firm the butter layers.
- Pat the drained peaches completely dry with paper towels, then toss with the cornstarch, vanilla, and cinnamon.
- Preheat the oven to 400 degrees Fahrenheit. Line a rimmed baking sheet with parchment.
- Beat the egg with the water to make the egg wash.
- Remove the chilled dough from the refrigerator. Lay a sheet of parchment over the top of the dough, place your hand flat on it, and flip the whole bowl over so the dough lands on the lined baking sheet. Lift the bowl away and peel off the parchment underneath.
- Arrange the peaches in the center of the dough round, leaving a border for gathering. Dot the fruit with the cold butter.
- Brush the border of the dough with egg wash, then gather the edges up and pinch them together to enclose the filling in a rustic bundle.
- Using the parchment as a sling, lift from the corners and lower the galette into the springform pan.
- Brush the exposed dough with the remaining egg wash for a glossy golden finish, or leave it unbrushed to let the layers spread and open during the bake. Sprinkle with the coarse sugar.
- Bake at 400 degrees Fahrenheit on the center rack for 15 minutes.
- Reduce the oven to 375 degrees Fahrenheit and bake for another 20 to 25 minutes, until the crust is deep golden brown and visibly flaky and the fruit is bubbling. Tent loosely with foil if the edges brown too fast. Total bake time is 35 to 40 minutes.
- While the galette bakes, simmer the reserved peach liquid with the granulated sugar over medium heat for 5 to 7 minutes, until reduced and syrupy enough to coat the back of a spoon.
- Cool in the pan for 10 to 15 minutes, then release the springform sides.
- Brush the entire galette, edges included, with the warm peach syrup while it is still warm. Serve warm or at room temperature.
Notes
This recipe starts with one full batch of croissant dough already made and taken through to the point just before the final roll out and cut. The full dough method, with a visual walk through of every step, is in my Sourdough Croissant Masterclass. Do Not Skip the Chill
Twenty to thirty minutes in the refrigerator after proofing is what lets you handle the dough without smearing the butter layers. Warm proofed laminated dough will smudge the moment you touch it. Damp Parchment Only
Dry parchment creases into stiff points and the dough sets into those creases. Wetting it, crumpling it, and opening it back out is what makes it mold smoothly to the bowl. Drain the Peaches
The 30 minute drain plus patting the slices dry is the difference between a crisp bottom and a soggy one. Use ripe but firm peaches. Overripe fruit releases more liquid than the cornstarch can handle. Peeling Is Optional
To peel quickly, halve and pit the peaches, lay them cut side down on a lined sheet, and broil 6 to 8 inches from the heat for 1 to 2 minutes. Let cool slightly and the skins slip right off. Fruit Substitutions
Nectarines swap in directly. Plums, apricots, and cherries all work with the same drain and cornstarch approach. Berries need a longer drain and a little extra cornstarch. Apples and pears are drier and need less drain time. Storage
Store covered at room temperature for up to 2 days. Refrigeration softens the layers. To bring the crisp back, warm slices in a 350 degree oven for 8 to 10 minutes. Do not use the microwave. Make Ahead
Proof the dough overnight and assemble the next day. The assembled galette is best within a few hours of baking.
Tips for Flaky Layers
Chill the dough after proofing. Twenty to thirty minutes in the refrigerator is the difference between clean layers and a smeared mess. It is the most skippable looking step in the whole recipe and the one you should never skip.
Use damp parchment on the bowl. Dry parchment creases, and your dough sets into those creases. Wet it, crumple it, open it back up.
Do not force the dough to fit. Drape it over the bowl and let gravity ease it into the curve. If you pull and stretch it you tear the lamination, and torn layers will not separate in the oven.
Watch fermentation, not the clock. Eight hours is a guide, not a rule. Judge by how the dough looks and feels, the same way you would with any croissant proof.
Preheat the oven fully. That initial blast of high heat is what makes laminated dough spring. Going into an oven that is not quite there yet means the butter melts and leaks out before the layers get a chance to lift.
Keep the plastic off the dough. Tent it. Anything resting on the surface will stick and tear it when you go to take it off.
Do not overfill. It is tempting to pile the fruit in, but too much filling weighs the base down and makes the edges hard to gather and seal.
The Peach Syrup Glaze
This is the step that takes it from homemade to looking like it came out of a pastry case, and it costs you nothing, because you already have the ingredient sitting in a bowl.
That liquid you drained off the peaches goes into a small saucepan with a little sugar. Simmer it until it reduces and turns syrupy enough to coat the back of a spoon. It will smell incredible while it happens.
Brush it over the entire galette, edges included, while it is still warm from the oven. Warm pastry takes the glaze evenly and it sets to a shine as everything cools. If you wait until the galette is cold, the syrup sits on top in streaks instead of settling in.

How to Serve and Store
Let it cool in the pan before you release the springform sides, so the filling has a chance to set and the structure firms up. Release too early and the sides can slump outward on you.
Serve it warm or at room temperature. Warm with vanilla ice cream is the obvious move, and it is obvious for a reason. It also holds beautifully at room temperature for a few hours, which makes it a genuinely good thing to bring somewhere.
Store leftovers covered at room temperature for up to 2 days. The refrigerator softens the layers, so only go there if your kitchen runs very warm, and let it come back to room temperature before serving. To bring the crisp back, warm slices in a 350 degree oven for 8 to 10 minutes. Never the microwave, which turns all that lamination into a damp sponge in about 20 seconds.
You can also proof the dough overnight and assemble the next day, which makes this far more manageable when you are feeding people.

Frequently Asked Questions
Can I use store bought puff pastry or crescent dough instead?
You can, and it will be good, but it will not be this. Puff pastry has no fermentation and no proof, so you would skip the inverted bowl entirely and simply shape it cold straight from the package. You lose the flavor the long ferment gives you, and the layers behave differently in the oven. If you go this route, thaw the pastry, drape it over the bowl, chill it, and move straight to assembly.
Do I have to use a springform pan?
It is what gives you the height and the clean sides, and I recommend it. Without one, the galette spreads outward and bakes much flatter. It still tastes good, but you lose the deep dish look entirely. A cake pan with a parchment sling can work in a pinch, though getting the galette back out afterward is considerably harder.
Why did my bottom come out soggy?
Almost always the drain step. Time in a colander with sugar, salt, and lemon pulls out a real amount of liquid, and patting the slices dry afterward matters just as much. Overripe peaches are the other common culprit, since they release far more juice than firm ones do.
Can I make this with other fruit?
Yes. Nectarines are a direct swap with no changes. Plums, apricots, and cherries all work well with the same drain and cornstarch approach. Berries release more liquid, so drain them longer and consider a little extra cornstarch. Apples and pears are much drier and need less drain time.
Can I proof the dough overnight instead of during the day?
Yes, and it is honestly easier that way. Set it up in the evening, let it proof overnight, chill it in the morning, then assemble and bake when you are ready.
How do I know when the galette is done?
Deep golden brown with visibly separated, flaky edges, and the fruit bubbling around them. If the edges are browning faster than the center, tent the top loosely with foil and keep going. Underbaking is the more common mistake here, because laminated dough needs the full time to cook through all those layers.
Can I make the whole thing ahead?
The dough, yes. The assembled galette, no. It is at its absolute best within a few hours of coming out of the oven, while the layers are still crisp.
Do I need to peel the peaches?
No. The skins soften during the bake and add color. If you would rather peel them, use the broiler method above, which is far faster than blanching.
Did You Make This Recipe?
If you make this deep dish peach croissant galette, I would love to hear how it turned out. Leave a comment and a star rating below, and tag me on social media if you share a photo so I can see those layers. For more croissant recipes sent straight to your inbox, sign up for the H3art of the Home newsletter below.
For more ways to put croissant dough to work, take a look at my Mini Sourdough Croissant Croutons, or browse all of my croissant recipes.


Shop This Recipe
Some of the links below are affiliate links, which means I may earn a small commission if you purchase through them. It does not cost you anything extra, and it helps keep the blog running so I can keep sharing free recipes with you. Thank you for the support.
These are the tools I reach for when I make this galette:
8 Inch Springform Pan is what gives this galette its height and its clean sides. Mine measures 8 by 2.6 inches.
Stainless Steel Mixing Bowl is the proofing mold. You want the top of the bowl to measure roughly 9.5 inches across, but work with what you have and size your dough round to match it.
Unbleached Parchment Paper does double duty here, molding to the bowl during the proof and then acting as a sling to move the filled galette into the pan.
Pastry Brush for the egg wash and for the peach syrup glaze at the end.
Digital Kitchen Scale takes the guesswork out of the dough and the filling both. I’ve had mine for 6 years and zero issues.
Wire Cooling Rack so the bottom does not sit and steam while the galette cools.
Rimmed Baking Sheet for the assembly and for catching anything that bubbles over.
Sourdough Croissant Masterclass is the dough recipe this entire method is built on, with a full visual walk through of every step.
Subscribe
Never want to miss a recipe? Sign up for the H3art of the Home newsletter and I will send new recipes straight to your inbox, from sourdough staples to the fun seasonal bakes. It is the easiest way to keep fresh ideas coming to your kitchen, and it is always free.
Sign up for the newsletter here



Leave a Reply