

These incredible high protein cottage cheese scones prove you can have your baked goods and eat them too! Packed with 9 to 11 grams of protein per scone thanks to the cottage cheese and active sourdough starter, they deliver all the buttery, flaky texture you crave with significantly less fat than traditional scones. The overnight fermentation develops complex, nuanced flavors while the cottage cheese melts seamlessly into the dough, creating tender layers without any hint of its presence.
The 30 minute freeze before baking creates those gorgeous flaky layers and impressive rise that makes these scones look and taste completely professional. Perfect for breakfast, brunch, or an afternoon treat with tea, these scones prove that healthy baking doesn’t mean sacrificing flavor or texture.
Makes 8 scones | Prep: 20 minutes + overnight fermentation | Bake: 20-25 minutes |
Jump to RecipeWhy You’ll Love These Sourdough Cottage Cheese Scones
If you’ve been scrolling past yet another “high-protein breakfast” that tastes like cardboard, let me stop you right here. These sourdough cottage cheese scones are about to change everything you thought you knew about healthy baking.
Here’s what makes them different: cottage cheese adds 12+ grams of protein per scone without any weird texture or funky flavor. The overnight sourdough fermentation creates layers of complex, tangy flavor that makes these scones taste gourmet. And the best part? They’re actually flaky and tender, not dense protein bricks.
Whether you make them savory with fresh herbs and sharp cheddar or keep them simple and lightly sweet, these scones will become your new weekend breakfast staple.
What Makes These Scones Different from Traditional Scones?
The Cottage Cheese Secret
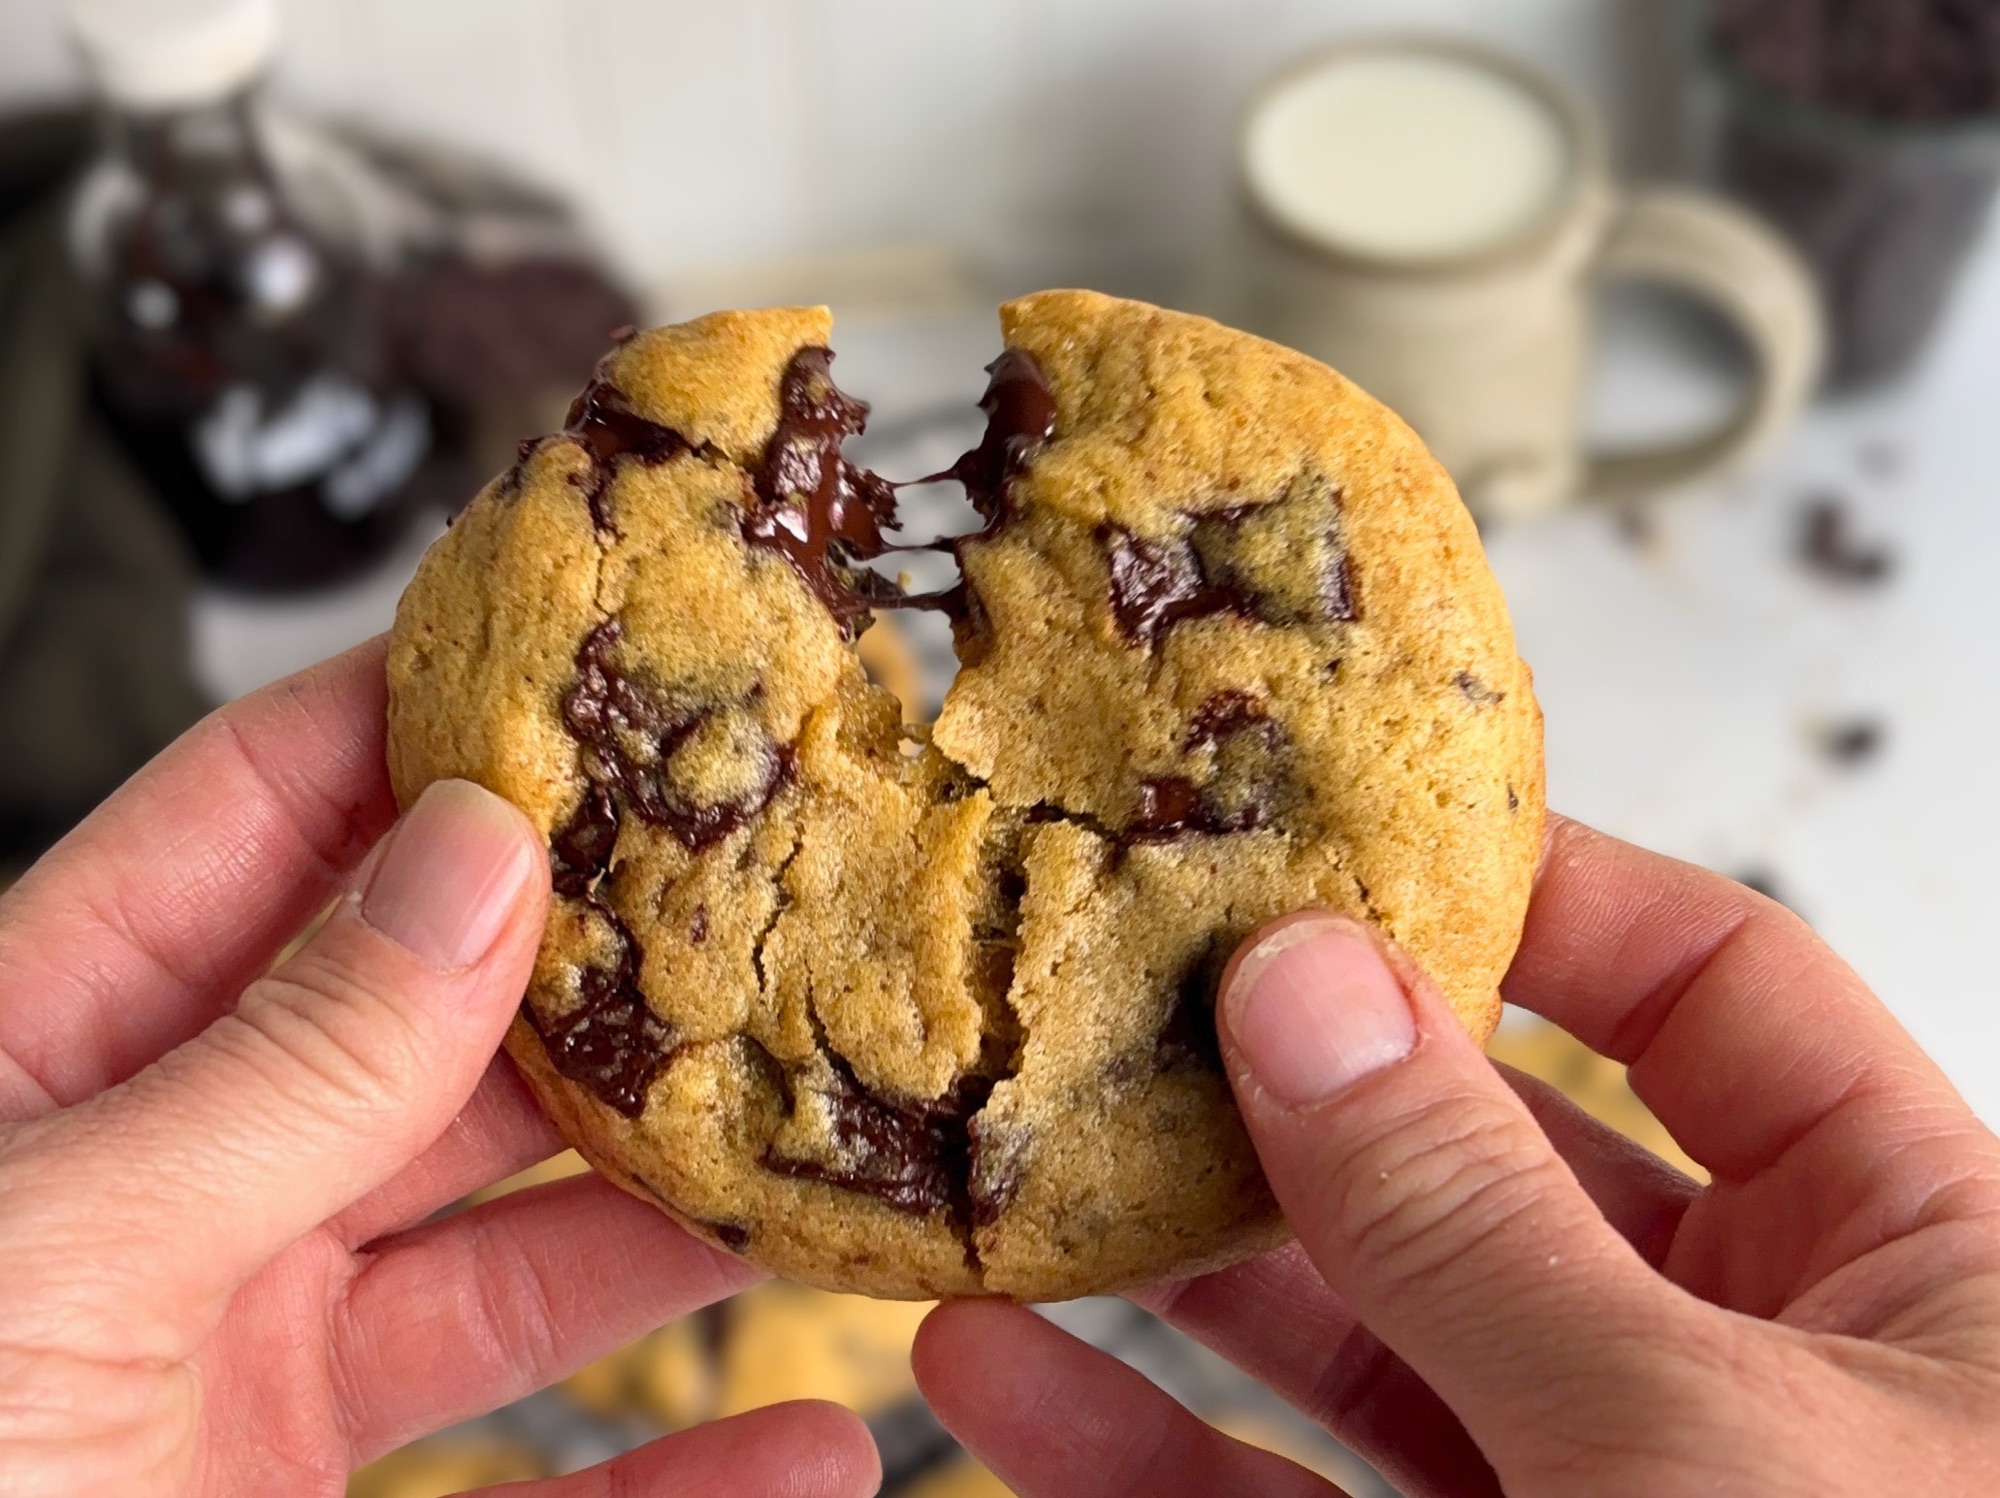
Traditional scones use cream or butter for moisture, but cottage cheese brings something extra to the party: protein and tang without heaviness. When you drain the cottage cheese properly (more on that below), it becomes thick and creamy, blending seamlessly into the dough. You won’t taste “cottage cheese” in the final scone, you’ll just notice how incredibly moist and tender they are.
Each scone packs 12-13g of protein from the cottage cheese, egg, and flour alone. Add cheese to your savory version, and you’re looking at 16-18g of protein per scone. That’s more protein than most protein bars, and these actually taste like real food.
Why Overnight Fermentation Changes Everything
Unlike traditional scones that are mixed and baked immediately, these benefit from 12-24 hours of cold fermentation in the refrigerator. This extended rest period does three incredible things:
- Develops complex sourdough flavor – The active starter has time to work its magic, creating that subtle tang that makes sourdough so addictive
- Creates better texture – The gluten relaxes, resulting in more tender scones with better rise
- Makes them easier to work with – Cold dough is easier to cut cleanly and holds its shape better during baking
This is the same technique professional bakers use for croissants and other laminated pastries. The overnight rest isn’t just convenient, it’s essential for the best flavor and texture.
The Freezing Trick That Changes Everything
Here’s a professional baker’s secret that most home recipes skip: freezing the cut scones for 30 minutes before baking. This step is absolute gold.
When you bake the scones straight from the freezer, the butter stays cold longer in the oven. As it finally melts, it creates intense steam pockets that push the layers apart, giving you those coveted flaky layers. Without this step, the butter melts too quickly, the scones spread instead of rise, and you end up with flat hockey pucks instead of tall, impressive scones.
Trust me on this one, don’t skip the freezer step.
Ingredient Breakdown: Why Each Component Matters
Active Sourdough Starter vs. Discard
This recipe uses active sourdough starter (recently fed and at peak) rather than discard. Here’s why that matters:
Active starter provides:
- Better, more predictable rise
- Cleaner, more complex flavor
- More consistent fermentation over the long rest period
Your starter should be bubbly, doubled in size, and at its peak when you use it (typically 4-8 hours after feeding). If you only have discard, you can use it, but reduce the fermentation time to 8-12 hours and expect slightly less rise.
The Importance of Draining Cottage Cheese
Don’t skip draining the cottage cheese! Cottage cheese has a lot of whey (that liquid you see in the container), and if you add it all to your dough, you’ll end up with a sticky, wet mess that won’t hold its shape.
After 15 minutes in a fine mesh strainer, you should have removed about 2-3 tablespoons of liquid. The cottage cheese should look thicker and more paste-like, almost like ricotta. This ensures your dough has the right consistency and your scones bake up perfectly.
Why Cold, Grated Butter Creates Flakiness
The key to flaky scones is keeping the butter as cold as possible for as long as possible. Grating frozen butter creates tiny shreds that distribute evenly throughout the dough. When these cold butter pieces hit the hot oven, they create steam pockets and steam pockets create layers.
This is the same principle behind croissants and puff pastry, just in a simpler, more approachable format. Room temperature or melted butter will give you tender scones, but not flaky ones.
Savory vs. Sweet: How to Choose Your Flavor
The Best Savory Combinations
I’ve tested five different savory combinations, and here are my favorites:
Chives, Dill & Sharp Cheddar – This is my go-to version. The fresh herbs are vibrant and colorful (perfect for photos!), and sharp cheddar adds a punch of flavor that stands up to the sourdough tang. This version is sophisticated enough for brunch entertaining but easy enough for weekday meal prep.
Basil, Sun-Dried Tomato & Feta – Summer in a scone. The sweetness of sun-dried tomatoes balances the salty feta, and fresh basil ties it all together. This Mediterranean version is what I make when I want to impress guests.
Fresh Thyme & Gruyere – Classic, elegant, and foolproof. Gruyere melts beautifully and has a nutty flavor that complements the sourdough perfectly. This is the simplest savory version and it’s absolutely delicious.
For savory scones, reduce the sugar to 12g and increase the salt to 8g. You still need a bit of sugar, it balances the salt and helps with browning, but you don’t want them sweet.
Keeping It Simple and Sweet
If you prefer a lightly sweet base scone that you can serve with jam, butter, or honey, keep the full 24g of sugar and skip the herbs and cheese. These are perfect for afternoon tea or as a base for strawberry shortcake.
Step-by-Step: Getting Perfect Results Every Time
Day 1: Mixing and Fermentation
Timing your starter: Use your sourdough starter when it passes the float test (a small spoonful floats in water) or has doubled in size and is bubbly and active. This usually happens 4-8 hours after feeding, depending on your starter’s strength and your kitchen temperature.
The mixing technique: When you combine the wet and dry ingredients, you’re looking for a “shaggy” dough, it should look rough and barely hold together. This is normal! Resist the urge to add more liquid right away. Once you turn it out onto your counter and pat it together, it will come together beautifully.
Shaping for overnight fermentation: Pat your dough into a 7-8 inch circle that’s about 1 inch thick. This specific thickness is important. Too thin and your scones will be flat, too thick and they won’t bake through properly. Wrap it tightly in plastic wrap (or use a reusable silicone bag) and pop it in the fridge for at least 12 hours.
Day 2: Cutting, Freezing, and Baking
The cutting technique: Use a sharp chef’s knife (not serrated) and cut straight down through the dough like you’re cutting a pizza into 8 wedges. Wipe the knife clean between cuts for the neatest edges. Don’t twist or saw, just press straight down.
Why spacing matters: Leave 2 inches between scones on your baking sheet. They will puff up and spread slightly as they bake, and you don’t want them to merge together. If they’re touching, you won’t get that crispy exterior on all sides.
The freeze and bake method: After you brush the tops with cream and add your toppings, into the freezer they go for 30 minutes. Then bake them directly from frozen, do not thaw. The contrast between the frozen dough and the hot oven (425°F) is what creates maximum rise and flakiness.
Troubleshooting Common Issues
“My dough is too sticky!”
You added too much cream or didn’t drain the cottage cheese enough. Add flour 1 tablespoon at a time until the dough is manageable but still slightly tacky. Next time, drain the cottage cheese for the full 15 minutes and start with just 45g of cream.
“My dough is too dry and crumbly!”
You didn’t add enough liquid. Add cream 1 tablespoon at a time until the dough holds together when pressed. The dough should be slightly shaggy but come together when you press it with your hands.
“My scones didn’t rise!”
Three possible culprits:
- Your sourdough starter wasn’t active enough—make sure it’s bubbly and doubled before using
- You skipped the freezing step—cold butter is essential for rise
- Your oven temperature was too low—use an oven thermometer to verify it’s actually 425°F
“My scones spread instead of rising up!”
The butter melted too fast. Make sure you’re freezing the cut scones for the full 30 minutes and baking them directly from frozen. Also check that your butter was properly cold when you grated it.
“They taste great but aren’t flaky!”
Your butter wasn’t cold enough, or you overworked the dough. Next time, grate the butter straight from the freezer and mix the dough as gently as possible. You want visible butter pieces in the dough, that’s what creates flakiness.
How to Store and Reheat Sourdough Scones
Short-Term Storage (2-5 Days)
Room temperature works for up to 2 days if your house isn’t too warm. Store in an airtight container or wrapped in foil. For longer storage (up to 5 days), refrigerate them in an airtight container.
To reheat: Place scones on a baking sheet and warm in a 350°F oven for 5-7 minutes. This refreshes the exterior and makes them taste freshly baked. Don’t microwave—it makes them gummy.
Long-Term Storage (Up to 3 Months)
Freeze baked scones individually on a baking sheet until solid, then transfer to a freezer bag. To reheat from frozen, bake at 350°F for 10-12 minutes.
Even better: freeze the unbaked, cut scones after Step 9 on Day 2 (after you’ve brushed them with cream and added toppings). Store in a freezer bag and bake directly from frozen whenever you want fresh scones, adding 3-5 minutes to the baking time.
Make-Ahead Options for Busy Mornings
The beauty of this recipe is its flexibility. Here are three make-ahead strategies:
Strategy 1: Classic Overnight (Best Flavor)
Make the dough on Saturday afternoon, refrigerate overnight, bake Sunday morning. You get maximum sourdough flavor and fresh scones with minimal morning effort.
Strategy 2: Extended Fermentation (Maximum Tang)
Make the dough Friday night, let it ferment for 48 hours in the fridge, bake Sunday morning. The extra fermentation time develops even more complex sourdough flavor.
Strategy 3: Freezer Stash (Ultimate Convenience)
Make a double batch, freeze the cut, unbaked scones, and bake them individually whenever you want a fresh scone. They go from freezer to oven to table in under 30 minutes.
I usually keep a stash of frozen, unbaked scones so I can bake 2-3 at a time for breakfast during the week. It’s like having a bakery in your freezer.
Perfect Pairings: What to Serve with Sourdough Scones
For Savory Versions
- Soup and salad: These scones are substantial enough to anchor a light lunch. Pair with tomato soup or a crisp green salad.
- Eggs any style: Serve alongside scrambled eggs, a frittata, or soft-boiled eggs for a complete brunch spread.
- Smoked salmon spread: Top a split scone with cream cheese, smoked salmon, capers, and red onion for an elevated brunch option.
For Sweet Versions
- Classic jam and butter: Warm scone, salted butter, your favorite jam. Perfection.
- Honey butter: Whip softened butter with honey and a pinch of sea salt. Game changer.
- Clotted cream and preserves: Go full British afternoon tea with clotted cream and strawberry preserves.
- Strawberry shortcake: Split a scone, fill with whipped cream and fresh strawberries.
Nutritional Benefits: More Than Just Delicious
Let’s talk about why these scones are actually a smart breakfast choice:
High in protein (12-18g per scone depending on additions) keeps you full for hours and helps stabilize blood sugar. No 10am crash when you start your day with these.
Fermented foods like sourdough are easier to digest and may help with gut health. The fermentation process breaks down some of the gluten and phytic acid, making nutrients more bioavailable.
Whole food ingredients mean you know exactly what you’re eating. No weird additives, artificial flavors, or ingredients you can’t pronounce.
Balanced macros with a good mix of carbs, protein, and fat make these scones satisfying without being heavy.
Compare that to a typical coffee shop scone (400+ calories, 20g+ fat, minimal protein) and you can feel good about this breakfast choice.
Final Tips for Scone Success
After making these scones dozens of times, here are my top tips:
- Don’t skip the cottage cheese draining – It’s tempting, but those 15 minutes make all the difference
- Trust the freezer step – Even if you’re impatient, those 30 minutes create magic
- Use a scale – Baking is chemistry, and weight measurements are more accurate than volume
- Keep everything cold – Cold butter + cold dough + hot oven = flaky perfection
- Don’t overwork the dough – Gentle hands make tender scones
- Bake until deeply golden – Pale scones are underbaked scones
- Let them cool slightly – Five minutes on the rack lets the structure set
These scones have become my weekend ritual, and I hope they become yours too. There’s something so satisfying about pulling a tray of golden, flaky scones out of the oven, especially when you know they’re packed with protein and made with real, whole-food ingredients.
Whether you’re meal prepping for the week, hosting brunch, or just want to elevate your weekend breakfast game, these sourdough cottage cheese scones deliver every single time.
Frequently Asked Questions
Can I use sourdough discard instead of active starter?
Yes, but active starter provides better results.
Can I make these without overnight fermentation?
You can reduce the fermentation to 4-6 hours minimum.
What if I don’t have a scale?
While I highly recommend weighing ingredients for baking, you can use approximately 2 1/4 cups flour, 2 tablespoons sugar, and 1/2 cup cottage cheese.
Can I make these dairy-free?
The cottage cheese and butter are pretty essential to the texture and flavor of these scones, so I haven’t successfully tested a dairy-free version.
How do I know when they’re done?
They should be deeply golden brown on top and bottom, feel firm to the touch, and register 200°F on an instant-read thermometer inserted into the center.
Can I make them bigger or smaller?
Yes! Cut into 6 wedges for larger scones (add 3-5 minutes to baking time) or 12 for smaller ones (reduce baking time by 3-5 minutes).
Why are my scones tough?
You likely overworked the dough. Mix just until combined and handle the dough as little as possible.
Can I add other mix-ins?
Absolutely! Just keep the total add-ins (herbs, cheese, etc.) to about 90-100g so you don’t throw off the dough ratio.
Ingredients
Dry Ingredients
- 270g all-purpose flour, plus extra for dusting
- 24g granulated sugar (reduce to 12g for savory versions)
- 8g baking powder
- 6g salt (increase to 8g for savory versions)
Wet Ingredients
- 120g active sourdough starter (at peak, recently fed and doubled)
- 113g cottage cheese (2% or whole milk, well-drained)
- 45-60g heavy cream or buttermilk (start with 45g)
- 50g large egg (1 egg)
Fat (the FLAVOR)
- 56g unsalted butter, grated, then frozen
- Flavor Options (choose one):
- Plain Sweet: Keep 24g sugar for a lightly sweet base
- Plain Savory: Use 12g sugar + 8g salt total
For Topping
- 30g heavy cream or milk for brushing
- Turbinado sugar (for sweet)
- Sea salt flakes (for savory, such as Maldon or flaky sea salt)
Instructions
Day 1: Make the Dough
- Timing: Use your sourdough starter when it’s at peak activity, bubbly, and ready (typically 4-8 hours after feeding).
- Drain cottage cheese: Place cottage cheese in fine mesh strainer for 15 minutes to remove excess whey. This is crucial for proper texture.
- Grate butter: grate butter and wrap and place in freezer
- Combine dry ingredients: In a large bowl, whisk together flour, sugar, baking powder, and salt.
- Prepare wet mixture: In another bowl, gently stir together active sourdough starter (at room temperature), drained cottage cheese, and egg. Start with 45g cream, add more only if needed.
- Add cold butter: add the frozen butter directly over the dry ingredients. Toss to coat the butter pieces then cut in with a pastry cutter, knife or fork
- Form dough: Combine the wet mixture over the flour/butter mixture. Using a fork, spatula or hands, gently mix until a shaggy dough forms. The dough should hold together but not be wet or sticky. Add remaining cream only if dough seems too dry.
- Shape for fermentation: Turn dough onto a lightly floured surface. Gently pat into a 7-8 inch (18-20cm) circle about 1 inch (2.5cm) thick. Wrap tightly in plastic wrap.
- Extended cold fermentation: Refrigerate for 12-24 hours minimum

Day 2: Bake the Scones
- Cut scones: Using a sharp knife, cut the chilled dough circle into 8 triangular wedges. Separate and place in the freezer for 30 minutes while preheating the oven
- Prep for baking: Preheat oven to 425°F (220°C). Line a baking sheet with parchment paper
- Final touches: Brush tops with cream or dip tops in a shallow bowl filled with cream and sprinkle with sugar or sea salt flakes as desired.
- Arrange: Place on prepared baking sheet, spacing 2 inches (5cm) apart.
- Bake directly from frozen: Do NOT thaw the scones. Bake directly from freezer for 20-25 minutes until golden brown and risen. Internal temperature should reach 200°F (93°C).
- Cool & serve: Let cool on a wire rack for 5 minutes before serving warm.

High-Protein Sourdough Cottage Cheese Scones
Ingredients
DRY INGREDIENTS:
- 270 g all-purpose flour plus extra for dusting
- 24 g granulated sugar reduce to 12g for savory versions
- 8 g baking powder
- 6 g salt increase to 8g for savory versions
WET INGREDIENTS:
- 120 g active sourdough starter at peak recently fed and doubled
- 113 g cottage cheese 2% or whole milk well-drained
- 45-60 g heavy cream or buttermilk start with 45g
- 50 g large egg 1 egg
FAT & FLAVOR:
- 56 g unsalted butter very cold and grated
FLAVOR OPTIONS (choose one):
- Savory Herb: 30g fresh chives + 15g fresh dill + 60g sharp cheddar use 12g sugar
- Mediterranean: 30g fresh basil + 30g sun-dried tomatoes chopped + 60g feta (use 12g sugar)
- Classic: 15g fresh thyme + 60g gruyere cheese use 12g sugar
- Plain Sweet: Keep 24g sugar for a lightly sweet base
- Plain Savory: Use 12g sugar + 8g salt total
FOR TOPPING:
- 30 g heavy cream or milk for brushing
- Extra grated cheese or herbs for sprinkling
- Sea salt flakes such as Maldon or flaky sea salt
Instructions
DAY 1: MAKE THE DOUGH
- Use your sourdough starter when it’s at peak activity. Doubled in size, bubbly, and ready (typically 4-8 hours after feeding). This is crucial for proper fermentation.
- Place cottage cheese in a fine mesh strainer for 15 minutes to remove excess whey. This step is essential for achieving the right dough texture – skip it and your scones will be too wet.
- In a large bowl, whisk together flour, sugar, baking powder, and salt until well combined.
- In another bowl, gently stir together the active sourdough starter (at room temperature), drained cottage cheese, and egg. Start with 45g cream – you can add more later if needed, but it’s easier to add than remove liquid.
- Grate the frozen butter directly over the dry ingredients using a box grater. Toss gently to coat all the butter pieces with flour – this prevents the butter from clumping and ensures even distribution.
- Pour the wet mixture over the flour-butter mixture. Add your chosen flavor additions (herbs, cheese, etc.). Using a fork or spatula, gently mix until a shaggy dough forms. The dough should hold together when pressed but should not be wet or sticky. If it seems too dry and won’t come together, add the remaining cream 1 tablespoon at a time.
- Turn dough onto a lightly floured surface. Gently pat (don’t knead!) into a 7-8 inch (18-20cm) circle about 1 inch (2.5cm) thick. The thickness is important for achieving tall, impressive scones.
- Wrap the dough disc tightly in plastic wrap and refrigerate for 12-24 hours minimum (up to 48 hours for maximum sourdough flavor). Because we’re using active starter rather than discard, the longer fermentation develops more complex flavor without over-fermenting.
DAY 2: BAKE THE SCONES
- Remove dough from refrigerator. Preheat oven to 425°F (220°C). Line a baking sheet with parchment paper.
- Using a sharp knife (not a serrated one), cut the chilled dough circle into 8 triangular wedges, like cutting a pizza. Wipe the knife clean between cuts for neat edges. Place wedges on prepared baking sheet, spacing them 2 inches (5cm) apart.
- Brush the tops generously with cream or milk – this creates that beautiful golden color. Sprinkle with extra cheese, herbs, and/or sea salt flakes as desired.
- Place the entire baking sheet in the freezer for 30 minutes. This professional baker’s trick firms up the butter and relaxes the gluten, resulting in superior rise and flakiness. Don’t skip this step!
- Bake the scones directly from frozen – do NOT thaw them first. Bake for 20-25 minutes until deeply golden brown and risen beautifully. The internal temperature should reach 200°F (93°C) for fully baked scones.
- Transfer to a wire rack and let cool for 5 minutes before serving. They’re best enjoyed warm, when the cheese is still melty and the exterior is at its crispiest.
Notes
This recipe uses ACTIVE starter (recently fed and at peak) rather than discard. Active starter provides better rise and more predictable fermentation. If you only have discard, you can use it, but reduce the fermentation time to 8-12 hours and expect slightly less rise. DRAINING THE COTTAGE CHEESE:
Don’t skip this step! Excess whey will make your dough too wet and sticky. After draining for 15 minutes, you should have removed about 2-3 tablespoons of liquid. The cottage cheese should look thicker and more paste-like. WHY THE FREEZING STEP MATTERS:
Freezing the cut scones before baking is the secret to tall, flaky scones. The cold butter creates steam pockets as it melts in the hot oven, resulting in those desirable layers. It also prevents spreading, keeping your scones tall rather than flat. STORAGE:
Store baked scones in an airtight container at room temperature for 2 days, or refrigerate for up to 5 days. Reheat in a 350°F oven for 5-7 minutes to refresh. You can also freeze baked scones for up to 3 months – thaw overnight and reheat as directed. MAKE-AHEAD OPTION:
After cutting the scones on Day 2, you can freeze them individually on the baking sheet, then transfer to a freezer bag once solid. Bake from frozen, adding 3-5 minutes to the baking time. This means you can have fresh scones anytime! PROTEIN CONTENT:
Each plain scone contains approximately 12-13g of protein from the cottage cheese, egg, and flour. Add cheese for even more protein (16-18g per scone with cheddar or gruyere). FLAVOR VARIATIONS:
The savory herb version with chives, dill, and cheddar is my personal favorite and performs beautifully for content – it’s colorful, sophisticated, and photograph-worthy. The Mediterranean version with basil, sun-dried tomatoes, and feta is perfect for summer. For a simple, crowd-pleasing option, go with the classic thyme and gruyere. TROUBLESHOOTING:
If your dough is too sticky after mixing, you added too much cream. Add flour 1 tablespoon at a time until it’s manageable. If it’s too dry and crumbly, add cream 1 tablespoon at a time. The dough should be slightly shaggy but hold together when pressed.
Why the 30-Minute Freeze Works
Professional bakers swear by this technique because it:
- Firms the butter structure to create steam pockets when it hits oven heat
- Relaxes gluten networks for better rise and tenderness
- Creates thermal shock when frozen dough meets high heat, producing superior oven spring
- Prevents spreading and ensures scones rise UP rather than OUT
- Works with cottage cheese despite higher moisture content when properly drained
Why Sugar Matters in Savory Scones
- Flavor Balance: A small amount of sugar balances strong savory flavors and prevents flat taste
- Structural Function: Sugar provides structure when baking and is often the secret to success in savory baked goods
- Cottage Cheese Factor: The natural sugars in cottage cheese also contribute sweetness, so less added sugar is needed
Benefits of Using Active Starter vs. Discard
- Lighter texture: Active starter creates scones that are “lighter in texture” compared to discard versions
- Enhanced flavor: Active starter provides more complex fermentation flavors when given proper cold fermentation time
- Better rise: Peak activity starter contributes to better overall structure
- More pronounced sourdough character: Active fermentation develops deeper, more nuanced sourdough notes


Leave a Reply to High Protein Sourdough Dinner Rolls (Greek Yogurt) Cancel reply