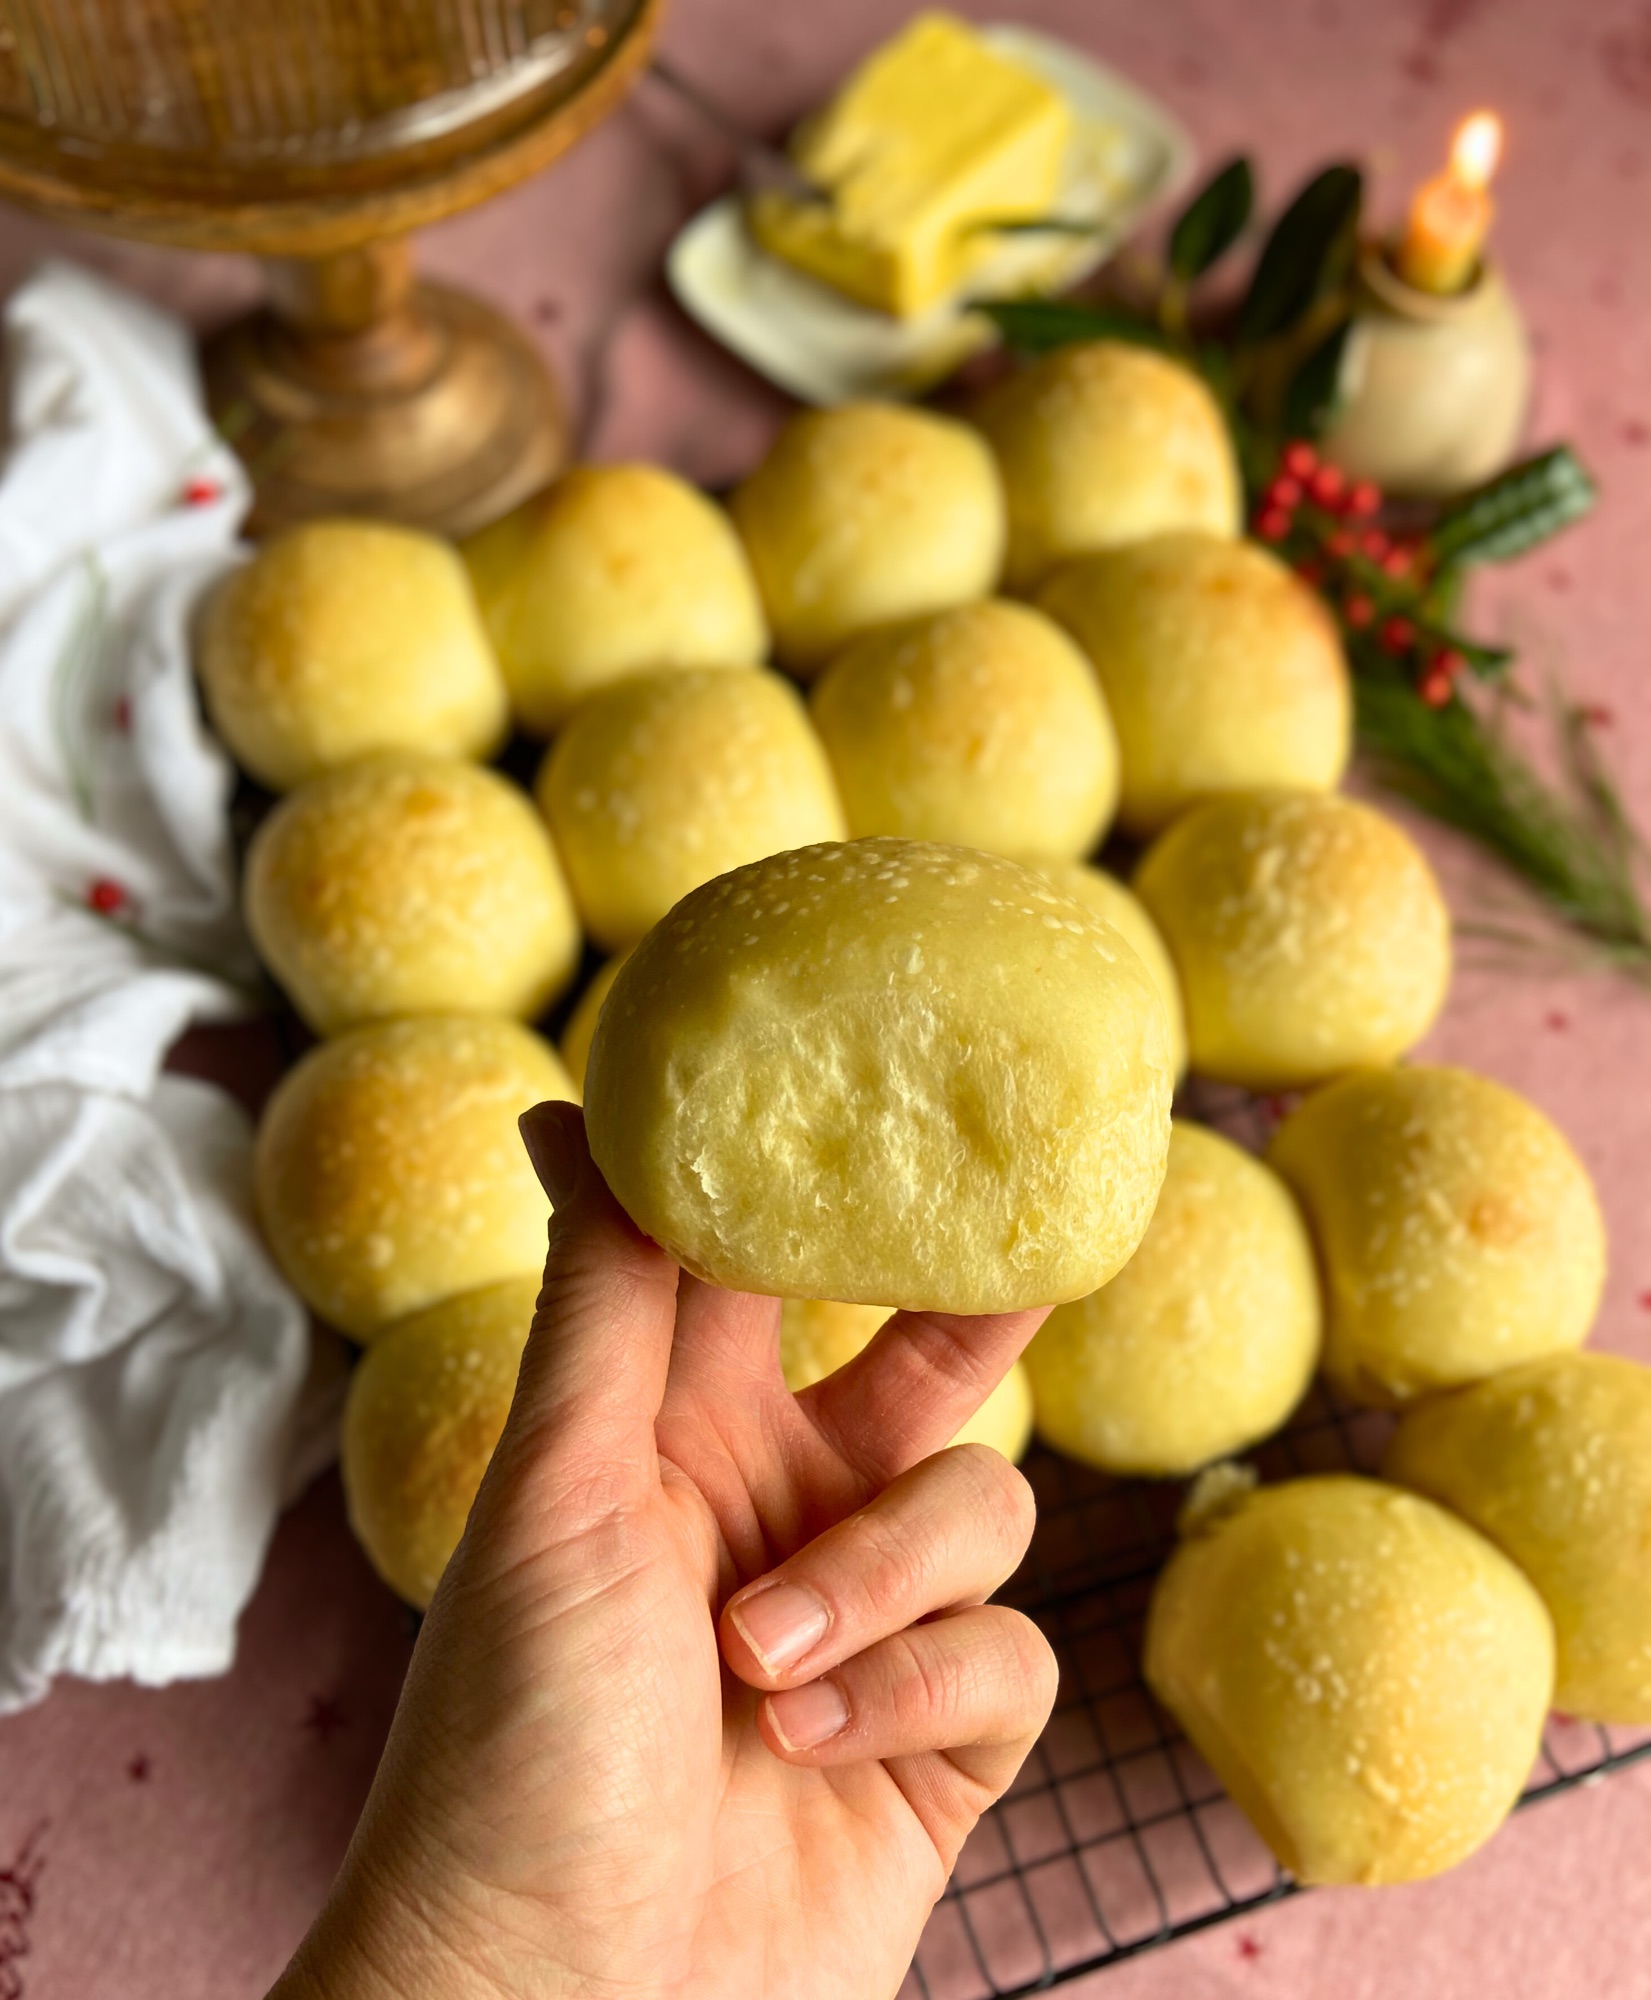

If you’ve been looking for the perfect sourdough roll recipe.one that’s soft, buttery, with just the right hint of tang, this buttermilk sourdough rolls recipe is about to become your new go-to. These rolls are everything you want: pillowy soft on the inside, golden on the outside, and versatile enough to serve as dinner rolls or burger buns. Whether you’re hosting Thanksgiving dinner or just want to elevate taco Tuesday, these rolls deliver every single time.
The secret? The buttermilk adds incredible tenderness and a subtle tanginess that plays beautifully with the sourdough starter. And unlike some sourdough recipes that require days of planning, this one is surprisingly approachable, even if you’re newer to sourdough baking.
Jump to RecipeWhy You’ll Love These Buttermilk Sourdough Rolls
Let me be real with you: I’ve tested a lot of sourdough roll recipes, and this one hits different. Here’s why:
They’re genuinely soft and tender. The combination of buttermilk, eggs, and butter creates an enriched dough that stays soft for days. No dry, crumbly rolls here.
The tang is subtle but present. If you’re worried about overwhelming sourdough flavor, don’t be. The buttermilk and enrichments mellow out the tang, giving you complexity without overpowering your meal.
They’re incredibly versatile. Make them as 60-70g dinner rolls for the holidays, or scale up to 100-120g burger buns for your next cookout. Same dough, endless possibilities.
You have flexibility with timing. Choose between a same-day bake or an overnight cold proof in the fridge.whatever works for your schedule.
Ingredient Notes & Substitutions
Let’s talk about what goes into these rolls and why each ingredient matters.
Active sourdough starter (125g): Your starter should be bubbly and at peak activity when you mix the dough. This is crucial for good fermentation. If your starter is sluggish, give it an extra feeding before you start.
Can I Make These Rolls Without Sourdough Starter?
Yes! You can easily convert this recipe to use instant yeast instead of sourdough starter.
Ingredient Changes:
- Remove: 125g sourdough starter
- Add: 7g (2¼ teaspoons) instant yeast
- Increase: Buttermilk from 215g to 278g
- Increase: All-purpose flour from 520g to 582g
- Keep everything else the same: sugar, eggs, salt, butter
Method Adjustments:
- Mix the instant yeast directly with the other ingredients (either Method 1 or Method 2)
- Bulk fermentation: 1.5-2 hours instead of 6-8 hours (until doubled in size)
- Final proofing: 45-60 minutes instead of 2-3 hours (until puffy and doubled)
- Baking instructions remain the same
Note: The rolls won’t have that subtle sourdough tang, but they’ll still be incredibly soft, buttery, and delicious!
Buttermilk (215g, room temperature): The acidity in buttermilk tenderizes the dough and adds a subtle tang that complements the sourdough beautifully. Make sure it’s truly at room temperature.cold buttermilk will slow down your fermentation even more. If you don’t have buttermilk, you can substitute with a mix of half regular milk and half plain yogurt, though the texture may be slightly different.
Eggs (2 large, approximately 95g): Eggs add richness, color, and structure. I recommend weighing them for consistency, especially if you’re scaling the recipe.
All-purpose flour (520g): I use all-purpose flour for a softer crumb, but you can substitute bread flour if you prefer a slightly chewier texture. Just know that bread flour may require a bit more liquid.
Butter (49g, room temperature): The butter should be soft enough to easily incorporate but not melted. It adds flavor and keeps the rolls tender.
Sugar (15g) and Salt (10g): The sugar feeds the yeast and aids in browning, while the salt enhances flavor and strengthens the gluten structure.
Step-by-Step Instructions

Method 1: All-In Mixing
This is the simpler, faster method.perfect if you’re short on time or just prefer a more straightforward approach.
Step 1: Mix the dough
In the bowl of a stand mixer (or a large mixing bowl if working by hand), combine the active sourdough starter, room-temperature buttermilk, sugar, eggs, flour, salt, and butter. Mix with the dough hook on low speed until everything comes together into a shaggy dough. Increase to medium speed and knead for about 8-10 minutes, until the dough becomes smooth, elastic, and starts pulling away from the sides of the bowl. If kneading by hand, turn the dough out onto a clean surface and knead for about 12-15 minutes until smooth and elastic.
Step 2: Initial rest
Cover the bowl and let the dough rest at room temperature for 1 hour. This gives the gluten time to relax and the fermentation process to begin.
Step 3: Stretch and fold
After the hour, perform one set of stretch and folds. With wet hands, grab one side of the dough, stretch it up, and fold it over to the opposite side. Rotate the bowl 90 degrees and repeat. Do this four times total (one for each “side” of the dough). This builds strength without overworking the dough.
Step 4: Bulk fermentation
Cover the dough again and let it ferment at room temperature (ideally 68-72°F) for 6-8 hours, or until it has roughly doubled in size. If your kitchen is warmer (75-78°F), this may take closer to 4-6 hours. If it’s cooler, it could take up to 10 hours. Look for visual cues: the dough should look puffy, have a slightly domed top, and jiggle when you gently shake the bowl.
Method 2: Butter-Added Method (Traditional Enriched Dough Technique)
This method is more traditional for enriched doughs like brioche and results in an exceptionally smooth, silky dough.
Step 1: Initial mix without butter
In the bowl of a stand mixer, combine the sourdough starter, buttermilk, sugar, eggs, flour, and salt. Mix on low speed until the ingredients come together into a rough, shaggy dough.
Step 2: Autolyse
Cover the bowl and let the dough rest for 45 minutes. This autolyse period allows the flour to fully hydrate and begins gluten development, making it easier to incorporate the butter later.
Step 3: Add butter gradually
Cut your room-temperature butter into walnut-sized pieces. With the mixer running on medium-low speed, add one piece of butter at a time, waiting until each piece is fully incorporated before adding the next. This should take about 5-8 minutes total. The dough may look like it’s breaking apart at first.don’t panic, just keep mixing. It will come together into a smooth, glossy dough.
If kneading by hand, add the butter pieces one at a time, kneading each piece in completely before adding the next. This will take about 10-15 minutes. Take breaks if your arms get tired, the dough will wait for you.
Step 4: Initial rest
Cover the bowl and let the dough rest at room temperature for 1 hour.
Step 5: Stretch and fold
Perform one set of stretch and folds, just as described in Method 1.
Step 6: Bulk fermentation
Cover and let the dough ferment at room temperature for 6-8 hours, or until doubled in size.
Shaping the Rolls

Once your bulk fermentation is complete, it’s time to shape.
For dinner rolls (60-70g each):
Turn the dough out onto a lightly floured surface. Using a bench scraper or knife, divide the dough into 60-70g portions (you should get about 13-14 rolls from this recipe). To shape each roll, gently flatten the portion into a small disc, then fold the edges toward the center, pinching to seal. Flip the dough seam-side down and cup your hand over it. Using a circular motion, roll the dough against the surface to create tension and form a smooth ball.
For burger buns (100-120g each):
Divide the dough into 100-120g portions (you should get about 9-10 buns). Shape the same way as dinner rolls, but expect slightly larger, more substantial buns. These are perfect for burgers, pulled pork, or any sandwich application.
Place your shaped rolls on a parchment-lined baking sheet, leaving about 2 inches of space between each one (they will expand during proofing). Cover loosely with plastic wrap or a clean kitchen towel.

Proofing the Rolls

You have two options here, depending on your timeline.
Same-day bake:
Let the rolls proof at room temperature for 2-3 hours, or until they look puffy, have roughly doubled in size, and feel soft and pillowy when gently pressed. They should look like they’re ready to burst with life.
Overnight cold proof (recommended for deeper flavor):
Cover the shaped rolls tightly with plastic wrap and place them in the refrigerator overnight (or up to 16 hours). The next morning, remove them from the fridge and let them come to room temperature and puff up slightly for about 45 minutes to 1 hour while you preheat the oven. This method develops more complex flavor and makes for an easier morning bake.
Baking
Preheat your oven to 375°F (190°C).
Once your rolls are fully proofed, they’re ready to bake. Bake for 15-20 minutes, or until the rolls are deeply golden brown on top. For dinner rolls (60-70g), start checking at 15 minutes. For larger burger buns (100-120g), they may need the full 20 minutes or slightly longer.
Finishing Touches

This is where you can customize the final texture and appearance of your rolls.
For a soft, buttery finish:
As soon as the rolls come out of the oven, brush them generously with melted butter using a pastry brush. Alternatively, you can take a cold stick of butter and rub it directly over the tops of the hot rolls, then use the pastry brush to spread it evenly. The butter will soak into the crust, making it incredibly soft and adding rich flavor.
For a soft, shiny finish:
Immediately after brushing with butter, lightly spritz the rolls with water using a spray bottle. This creates a soft, glossy crust that’s absolutely beautiful. The water helps the crust stay tender as the rolls cool.
For a rustic matte finish:
If you prefer a more rustic look with a matte crust, simply brush with butter and skip the water. The butter alone will give you a gorgeous golden color without the shine.
After finishing, let the rolls cool for about 10 minutes before serving (if you can wait that long.I usually can’t). Serve them warm with more butter, or use them for sandwiches, sliders, or alongside your favorite soup or stew.

Buttermilk Sourdough Rolls
Ingredients
Ingredients:
- 120 g active sourdough starter bubbly and at peak
- 220 g buttermilk room temperature
- 15 g granulated sugar
- 2 large eggs approximately 95g
- 520 g all-purpose flour
- 10 g salt
- 49 g unsalted butter room temperature
For Finishing (Optional):
- 2-3 tablespoons melted butter
- Water in spray bottle
Instructions
Method 1: All-In Mixing
- In a stand mixer bowl, combine all ingredients. Mix on low speed until combined, then knead on medium speed for 8-10 minutes until smooth and elastic. For hand kneading, knead for 12-15 minutes.
- Cover and rest for 1 hour at room temperature.
- Perform one set of stretch and folds: with wet hands, stretch and fold the dough four times, rotating the bowl 90° between each fold.
- Cover and let ferment at room temperature (68-72°F) for 6-8 hours, or until doubled in size.
Method 2: Butter-Added Method
- Combine starter, buttermilk, sugar, eggs, flour, and salt in stand mixer bowl. Mix until combined into a shaggy dough.
- Cover and rest for 45 minutes (autolyse).
- Cut butter into walnut-sized pieces. With mixer on medium-low, add butter pieces one at a time, waiting for each to incorporate before adding the next (5-8 minutes total).
- Cover and rest for 1 hour.
- Perform one set of stretch and folds.
- Cover and ferment for 6-8 hours at room temperature, or until doubled.
Shaping & Baking (Both Methods):
- Divide dough into 60-70g portions for dinner rolls (makes 13-14 rolls) or 100-120g portions for burger buns (makes 9-10 buns).
- Shape each portion into a tight ball by folding edges to center, flipping seam-side down, and rolling in a circular motion to create tension.
- Place on parchment-lined baking sheet, 2 inches apart. Cover loosely.
For same-day bake:
- Proof at room temperature for 2-3 hours until doubled and puffy.
For overnight method:
- Cover tightly and refrigerate overnight. Next morning, let come to room temperature for 45-60 minutes before baking.
- Preheat oven to 375°F (190°C).
Bake:
- Bake for 15-20 minutes until deep golden brown. Smaller dinner rolls will be ready closer to 15 minutes; larger burger buns may need the full 20 minutes.
- Immediately brush hot rolls with melted butter. For a shiny finish, lightly spritz with water after buttering. Let cool for 10 minutes before serving.
Notes
Can I Make These Rolls Without Sourdough Starter?
Yes! You can easily convert this recipe to use instant yeast instead of sourdough starter.Ingredient Changes:
- Remove: 125g sourdough starter
- Add: 7g (2¼ teaspoons) instant yeast
- Increase: Buttermilk from 215g to 278g
- Increase: All-purpose flour from 520g to 582g
- Keep everything else the same: sugar, eggs, salt, butter
Method Adjustments:
- Mix the instant yeast directly with the other ingredients (either Method 1 or Method 2)
- Bulk fermentation: 1.5-2 hours instead of 6-8 hours (until doubled in size)
- Final proofing: 45-60 minutes instead of 2-3 hours (until puffy and doubled)
- Baking instructions remain the same
Tips for Success
Use an active, bubbly starter. This is non-negotiable. If your starter isn’t at peak when you mix your dough, your fermentation will take forever and your rolls might not rise properly.
Keep your dough warm during bulk fermentation. If your kitchen runs cool (below 70°F), find a warmer spot for your dough. The oven with just the light on is perfect.it usually sits around 75-78°F. Alternatively, place the bowl near a warm appliance or on top of your refrigerator.
Don’t skip the stretch and fold. That one set of stretch and folds builds crucial structure in the dough without overworking it. Your rolls will have better texture and rise more reliably.
Trust the visual cues over the clock. Fermentation times are guidelines, not absolutes. Your dough is ready when it looks puffy and has roughly doubled.not when a timer goes off.
Weigh your portions for even baking. If you want all your rolls to bake evenly and look professional, use a kitchen scale to portion them. It makes a huge difference.
Troubleshooting Common Issues
My bulk fermentation is taking forever.
This usually means one of three things: your starter wasn’t active enough, your kitchen is too cold, or you didn’t use enough starter. Make sure your starter is bubbly and at peak when you start, and try to keep your dough between 72-78°F during fermentation.
The dough feels too sticky.
Enriched doughs like this one are naturally softer and slightly tackier than lean sourdoughs. That’s normal. Resist the urge to add too much extra flour.you’ll end up with dense rolls. If you’re hand kneading and it feels unmanageable, wet your hands instead of flouring the surface.
My rolls didn’t rise much in the oven.
This is usually a sign of overproofing or underproofing. If the rolls are overproofed, they’ll look flat and deflate when you try to move them. If they’re underproofed, they’ll feel dense and won’t have expanded much during the final proof. Use the poke test: gently press a finger into the dough. It should slowly spring back but leave a slight indentation. If it springs back immediately, it needs more time. If the indentation stays, it’s overproofed.
The rolls are dense instead of fluffy.
Check your starter activity first.weak starter = dense rolls. Also make sure you’re not skipping the stretch and fold, and that your bulk fermentation went long enough for the dough to double.
Storage & Reheating
Room temperature: Store rolls in an airtight container or zip-top bag at room temperature for up to 3 days. They stay incredibly soft thanks to the buttermilk and butter.
Freezing: These rolls freeze beautifully. Let them cool completely, then freeze in a zip-top freezer bag for up to 3 months. To reheat, thaw at room temperature or microwave for 20-30 seconds until warmed through. You can also wrap frozen rolls in foil and reheat in a 350°F oven for about 10-15 minutes.
Refreshing day-old rolls: Wrap rolls in a damp paper towel and microwave for 10-15 seconds, or wrap in foil and warm in a 300°F oven for 5-7 minutes. They’ll taste freshly baked.
Fun Variations to Try
Once you’ve mastered the base recipe, here are some ways to mix things up:
Herb and garlic rolls: Add 2 tablespoons of chopped fresh herbs (rosemary, thyme, or parsley) and 2 cloves of minced garlic to the dough during mixing. Brush with garlic butter after baking for extra flavor.
Everything bagel rolls: After shaping, brush the tops with an egg wash (1 egg whisked with 1 tablespoon water), then sprinkle generously with everything bagel seasoning before the final proof.
Cheese rolls: Fold in 1 cup of shredded sharp cheddar or parmesan during the final stretch and fold. You can also sprinkle extra cheese on top before baking.
Jalapeño cheddar buns: Add 1 cup shredded cheddar and 1/4 cup diced pickled jalapeños to the dough. Perfect for burger buns with a kick.
For a unique twist on dinner rolls, check out my Herb Swirl Focaccia Pull-Apart Rolls.they’re a showstopper and use a similar technique with a fun, Instagram-worthy presentation.
Why This Recipe Works
The magic of these rolls comes down to balance. The buttermilk provides acidity and tenderness. The eggs and butter create richness and structure. The sourdough starter adds complexity and a subtle tang without being overpowering. And the increased amount of starter (125g instead of the typical 80-90g you see in some recipes) ensures that even with the enrichment slowing down fermentation, you still get a reasonable timeline and reliable rise.
I tested this recipe dozens of times, and every single batch has been consistent. The dough is forgiving, the flavor is incredible, and the texture is exactly what you want in a soft roll.pillowy, tender, and just slightly chewy.
Final Thoughts
These buttermilk sourdough rolls have become an absolute staple in my kitchen, and I have a feeling they’ll become one in yours too. They’re soft, flavorful, versatile, and just plain delicious. Whether you’re serving them at a holiday dinner, using them for burger buns, or just eating them warm with butter (my personal favorite), they never disappoint.
If you make these rolls, I’d love to hear how they turn out! Drop a comment below and let me know what you think, and if you try any of the variations, tell me which one was your favorite.
Happy baking!
Related Recipes You’ll Love:
- Sourdough Pizza Scones
- Sourdough Herb Swirl Dinner Rolls
- Pull-Apart Cinnamon Roll Sourdough Focaccia


Leave a Reply