These sourdough sticky buns (with a yeasted version available) transform overnight fermentation into pure indulgence. Tender buttermilk brioche dough, cinnamon swirls, and a caramel nut base that’ll make you forget every other recipe exists.
Jump to Section:
- Why These Sourdough Sticky Buns Are Different
- The Magic of Buttermilk in Enriched Dough
- Ingredients & Equipment
- Step-by-Step Method
- Troubleshooting & Tips
- FAQ
- Yeasted Adapted Recipe

Sourdough Sticky Buns
Equipment
- mixer or hands
- bowl for proofing
- 13 x 9 metal baking pan or other similar sized vessel
- digital food scale
- plastic wrap or damp towel
- ruler
- knife for cutting rolls
Ingredients
For the Dough:
- 100 grams active sourdough starter fed and bubbly
- 290 grams buttermilk full-fat, room temperature
- 70 grams granulated sugar
- 7 grams vanilla extract
- 2 large eggs room temperature
- 640 grams all-purpose or bread flour
- 6 grams salt
- 60 grams unsalted butter softened to room temperature
For the Cinnamon Filling:
- 6 tablespoons unsalted butter very soft, almost melting
- 1/2 cup brown sugar light or dark
- 2 teaspoons ground cinnamon
- 1-2 tablespoons cornstarch
For the Caramel Pecan Base:
- 1/2 cup 115 grams unsalted butter
- 1 cup packed brown sugar
- 1/4 cup heavy cream
- 2 tablespoons maple syrup optional
- 1/4 teaspoon salt
- 1.5-2 cups pecans or walnuts
Instructions
Day 1: Mixing and Bulk Fermentation
- In the bowl of your stand mixer (or a large bowl if working by hand), combine the active sourdough starter, buttermilk, sugar, vanilla, and eggs. Whisk until relatively smooth.
- Add the flour and salt. Using the dough hook on low speed, mix until everything comes together into a shaggy mass, about 2-3 minutes. Cover the bowl and rest for 30 minutes.
- After the 30-minute rest, add the softened butter. Mix on low speed (speed 2 on a KitchenAid) for 5-7 minutes. The dough should be soft and slightly tacky.
- Cover the dough and let it rest at room temperature for 1 hour.
- After 1 hour, perform one series of stretch and folds: With wet hands, grab one side of the dough, stretch it up, and fold it over to the opposite side. Rotate the bowl 90 degrees and repeat. Do this four times total. Cover again.
- Bulk ferment the dough at room temperature (68-72°F) for 6-8 hours, or until the dough has nearly doubled in size, is noticeably puffy and jiggly, and shows visible air bubbles.
- Once bulk fermentation is complete, cover tightly and refrigerate overnight (up to 24 hours).
- See Blog post for hand mixing instructions
Day 2: Shaping, Proofing, and Baking
- Make the caramel base:
- In a medium saucepan over medium heat, combine the butter, brown sugar, heavy cream, maple syrup, and salt. Stir constantly until the butter melts and the sugar dissolves, about 3-4 minutes. Let it bubble for another minute, then remove from heat. Pour the caramel into a 9×13-inch baking pan and scatter the pecans or walnuts evenly over the top. Set aside.
- Make the filling:
- In a small bowl, mix together the very soft butter, brown sugar, cinnamon, and cornstarch with a fork until it forms a spreadable paste.
- Roll out the dough:
- Lightly flour your work surface. Turn out the cold dough and press it gently into a rectangle. Using a rolling pin, roll the dough into a large rectangle, approximately 16 inches wide by 12 inches tall, about 1/4 inch thick.
- Spread the cinnamon filling evenly over the entire surface of the dough, leaving a 1-inch strip bare along the top long edge.
- Starting from the long edge closest to you, roll the dough into a tight log. When you reach the bare edge, pinch it gently to seal the seam.
- Position the log seam-side down. Using a sharp knife or bench scraper, cut the log into 12 equal pieces.
- Place the 12 rolls cut-side up in the prepared pan with the caramel and nuts. They should be relatively close together but not completely squished.
- Cover the pan with a damp tea towel or plastic wrap and let proof at room temperature for 1-2 hours, until the buns are puffy and nearly touching each other. When you press a finger gently into the side of one, the indentation should fill back slowly but not completely.
- Meanwhile, preheat your oven to 350°F (175°C).
- Once proofed, bake the sticky buns for 28-35 minutes, until they are deep golden brown on top. The internal temperature should be around 190°F if using an instant-read thermometer.
- As soon as the buns come out of the oven, let them sit for exactly 5 minutes. Set a timer.
- After 5 minutes, place your serving platter or sheet pan over the top of the baking pan. Using oven mitts, hold both pans together and flip the whole thing over confidently and quickly. The sticky buns should release onto the platter with all the caramel and nuts on top.
- Let the buns cool for about 10 minutes before serving. They are best when still slightly warm, with the caramel gooey and the interior soft and steamy.
Notes
Let’s be honest: most sticky buns are either too sweet, too dry, or require so much active time that you question your life choices halfway through. These sourdough sticky buns? They’re none of those things.
What they ARE is achingly tender, with layers that pull apart like the world’s most indulgent garment, all while you sleep. The buttermilk brioche base gives you that elusive combination of rich flavor and feathery texture, while the overnight bulk fermentation does the heavy lifting. You just show up to shape, proof briefly, and bake.
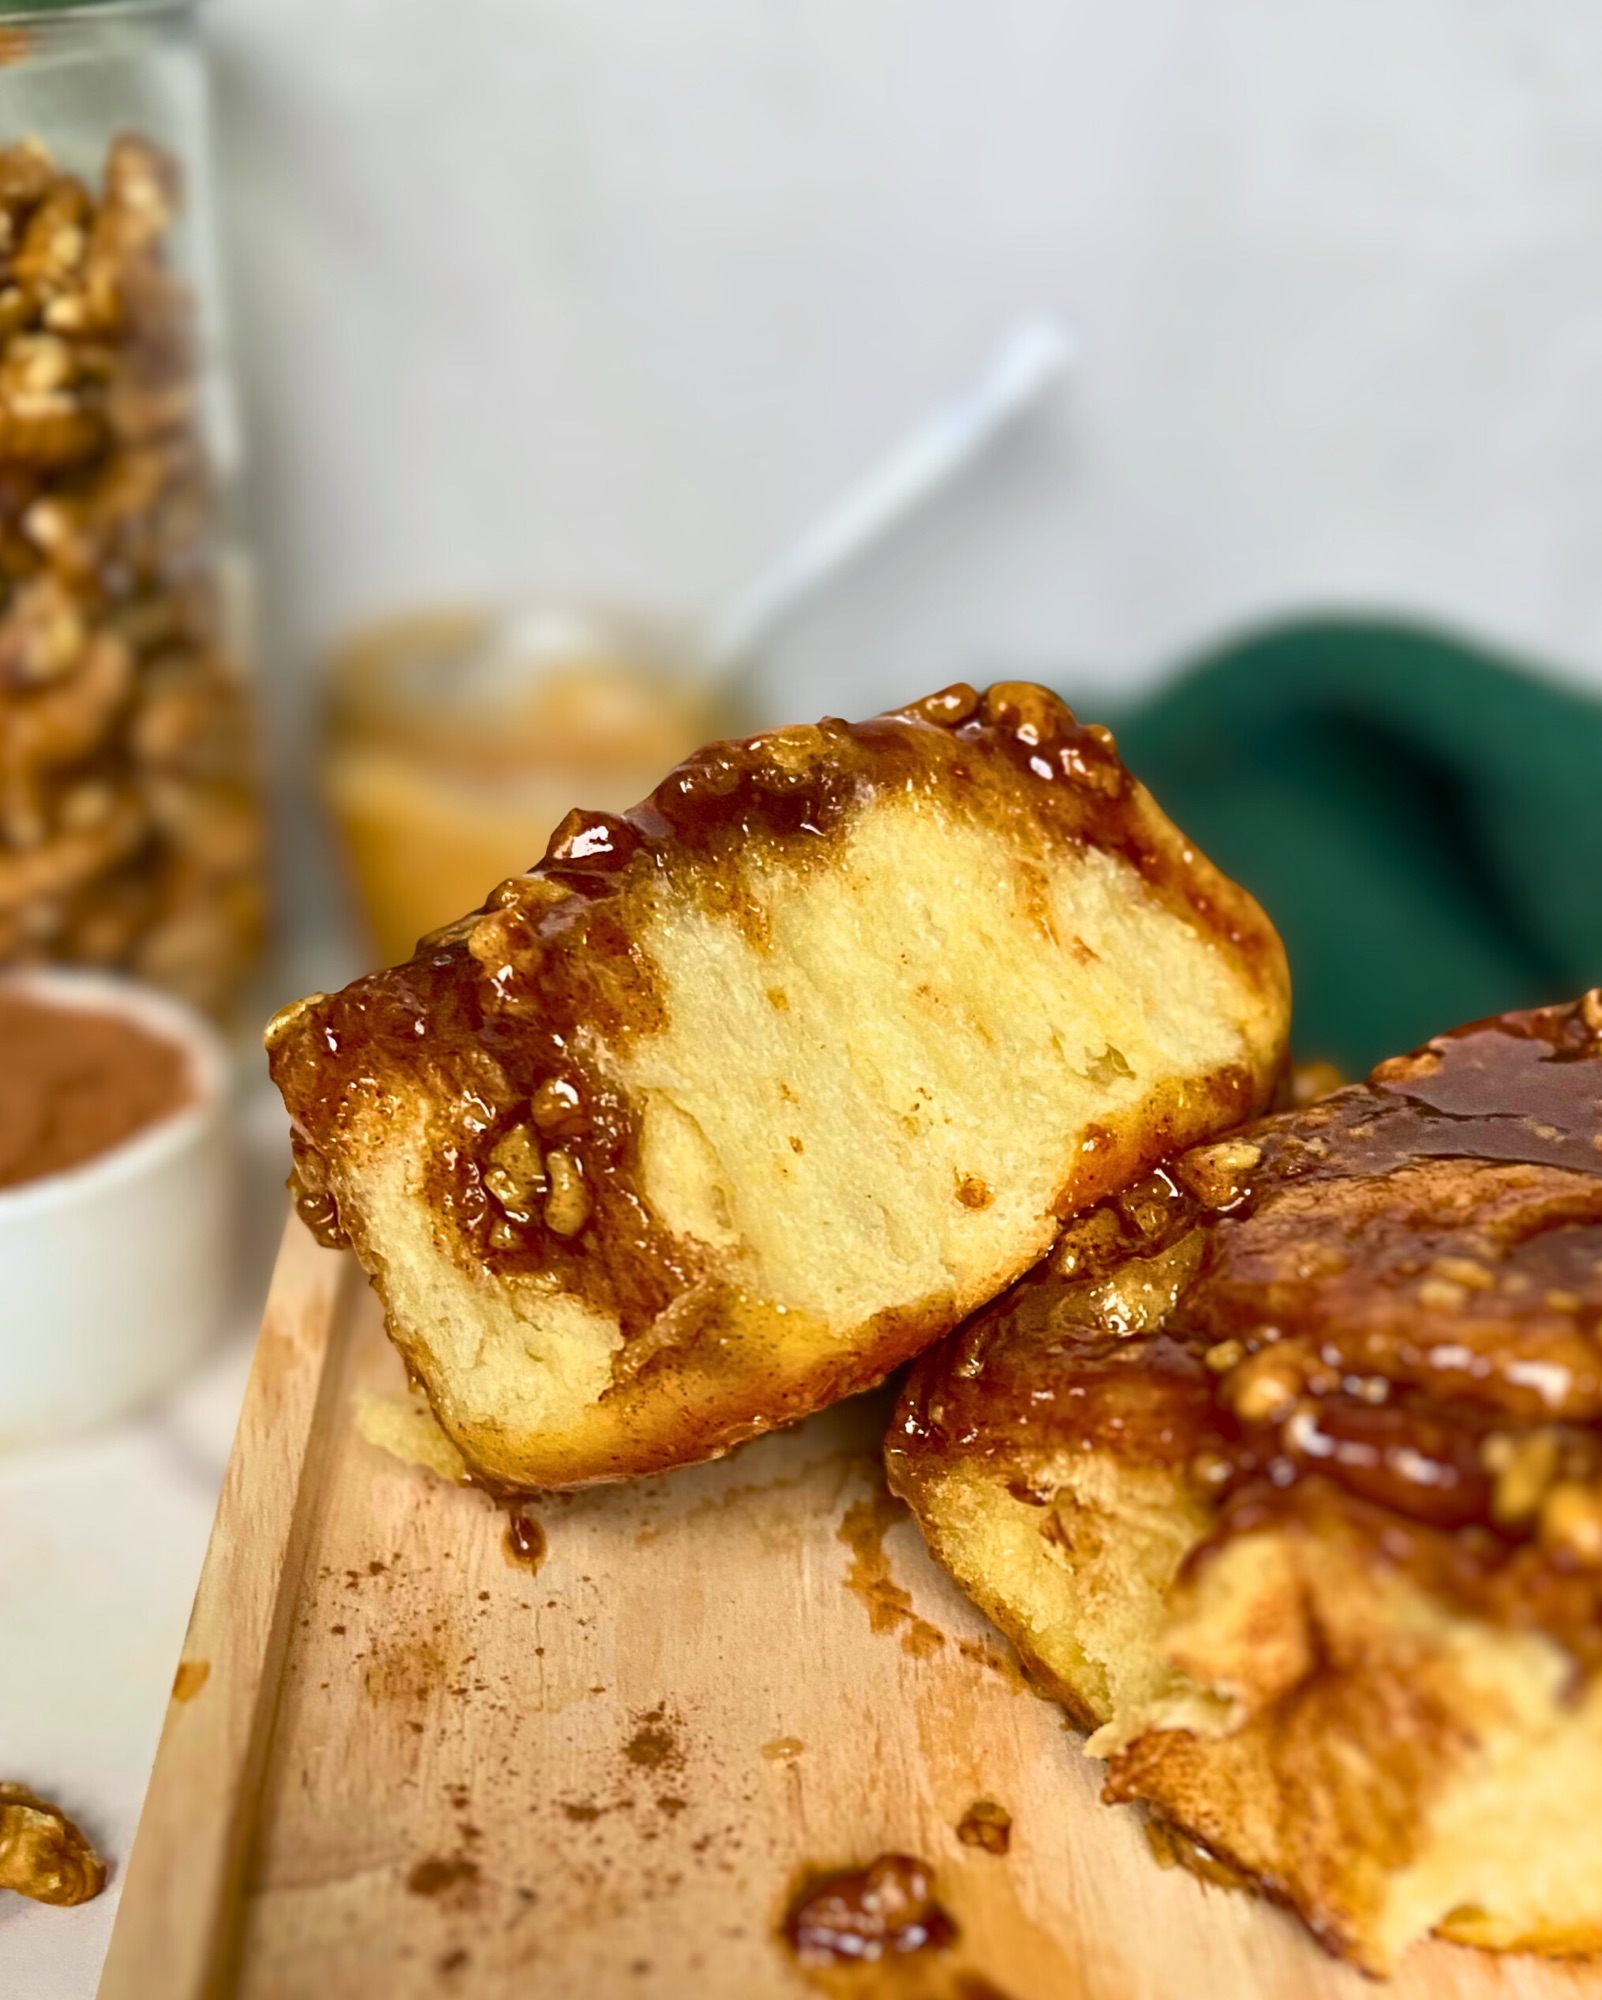
And that caramel nut base? It’s not an afterthought. It’s engineered to stay gloriously gooey, seeping into every crevice of the dough while those nuts toast to the edge of burnt (in the best way). When you invert these onto a platter, you’ll understand why people lose their minds over homemade sticky buns.

Why These Sourdough Sticky Buns Stand Apart
Most sticky bun recipes fall into two camps: the yeasted versions that rise fast but lack depth, or the sourdough attempts that somehow end up dense and sour when they should be tender and subtly tangy. These split the difference in the smartest way possible.
The base is a buttermilk brioche dough that just happens to be leavened with sourdough starter instead of commercial yeast. This means you get:
Actual flavor development. That overnight bulk fermentation isn’t just about convenience (though it absolutely is). It’s giving the lactobacilli in your starter time to create complex flavors and break down proteins in ways that make the final texture superior. You’re building flavor while you sleep.
Tender, not tough. The buttermilk does double duty here. It adds tanginess that plays beautifully with brown sugar and cinnamon, and its acidity helps keep the crumb tender even with the structure you need for proper lamination. More on that in a minute.
A hands-off timeline that actually works. One set of stretch and folds. One long bulk fermentation. A brief final proof. That’s it. No babysitting, no multiple builds, no wondering if you should have fed your starter differently.
The result? Sticky buns that taste like you labored over them for days but really only required about 20 minutes of active work spread across two days.
The Buttermilk Question: Why It Matters in Enriched Sourdough
Here’s where we need to talk about buttermilk, because it’s not just a throwaway ingredient in this recipe. It’s structural.
Traditional brioche uses milk, sometimes cream, occasionally water. But buttermilk brings something else to the table: acidity. In an enriched dough loaded with eggs, sugar, and butter, that acidity serves multiple functions.
First, it helps control gluten development. Too much gluten in an enriched dough and you end up with something that’s strong but tight. The acid in buttermilk helps keep things tender by interfering with some of the gluten cross-linking, which in a lean dough would be a problem but in a rich dough is exactly what you want.
Second, buttermilk reacts with baking soda if you’re using it (we’re not in this recipe, but good to know), but more importantly, its proteins contribute to browning. That golden exterior you want on sticky buns? Buttermilk is working overtime to deliver it through Maillard reactions.
Third, and this is the part people underestimate: buttermilk adds a subtle tang that keeps enriched dough from being cloying. When you’re dealing with brown sugar caramel and cinnamon filling, you need that counterpoint. It’s the difference between “these are delicious” and “I could eat the entire pan and still want more.”
The lactose in buttermilk also feeds your sourdough starter beautifully, giving you a more vigorous fermentation than you’d get with water alone. It’s a symbiotic relationship that results in better rise, better texture, and better flavor.
So no, you can’t just swap regular milk here and expect the same results. The buttermilk is load-bearing.

Ingredients & Equipment You’ll Need
For the Dough:
- 100g active sourdough starter (fed and bubbly, not straight from the fridge)
- 290g buttermilk (full-fat, room temperature)
- 70g granulated sugar
- 7g vanilla extract (the real stuff)
- 2 large eggs (room temperature)
- 640g all-purpose or bread flour (bread flour gives slightly better structure)
- 6g salt
- 60g unsalted butter (softened to room temperature)
For the Cinnamon Filling:
- 6 tablespoons unsalted butter (very soft, almost melting)
- 1/2 cup brown sugar (light or dark, your call)
- 2 teaspoons ground cinnamon
- 1-2 tablespoons cornstarch (this is your insurance against filling leakage)
For the Caramel Nut Base:
- 1/2 cup (115g) unsalted butter
- 1 cup packed brown sugar
- 1/4 cup heavy cream
- 2 tablespoons maple syrup (for that extra layer of complexity)
- 1/4 teaspoon salt
- 1.5-2 cups pecans or walnuts (toasted if you’re feeling ambitious)
Equipment:
- Stand mixer with dough hook (or very strong arms)
- 9×13 baking pan (metal preferred for better heat conduction)
- Rolling pin
- Bench scraper
- Large serving platter or sheet pan (for inverting)
The Method: Stand Mixer & Hand Options
Day 1: Mixing & Bulk Fermentation
Step 1: Initial Mix
In the bowl of your stand mixer (or a large bowl if working by hand), combine your active sourdough starter, buttermilk, sugar, vanilla, and eggs. Whisk until relatively smooth. It won’t be completely homogeneous and that’s fine.
Add the flour and salt. Using the dough hook on low speed, mix until everything comes together into a shaggy mass, about 2-3 minutes. It will look rough. That’s correct.
If working by hand: Use a sturdy wooden spoon or Danish dough whisk to combine until no dry flour remains. Then switch to using your hands to squeeze and fold the dough until it forms a cohesive mass.
Cover the bowl and rest for 30 minutes. This autolyse period (even though we’ve got starter in there) lets the flour fully hydrate and gives the gluten a head start.
Step 2: Add the Butter
After the 30-minute rest, add your softened butter. With the mixer on low speed (speed 2 on a KitchenAid), let it work for 5-7 minutes. The dough will look like a mess at first, with butter sliding around everywhere. Keep going. It will come together.
You’re looking for a smooth, elastic dough that clears the sides of the bowl. It should be soft and slightly tacky but not sticky. If you poke it, it should bounce back slowly.
If working by hand: This is where things get real. Spread the butter on top of your dough and start folding and kneading, using a technique called “slap and fold” if you know it. Alternatively, keep the dough in the bowl and use a pincer method: squeeze the butter into the dough with your fingers, then fold the dough over itself repeatedly. It takes 10-15 minutes of work, but it’s doable. Put on a good playlist.
Step 3: First Rest & Folds
Cover your dough and let it rest at room temperature for 1 hour. After that hour, perform one series of stretch and folds. Here’s how:
With wet hands (to prevent sticking), grab one side of the dough, stretch it up, and fold it over to the opposite side. Rotate the bowl 90 degrees and repeat. Do this four times total, making one complete rotation.
The dough should feel stronger and smoother after this. Cover again.
Step 4: Bulk Fermentation
Now comes the easy part: bulk fermentation. Cover your bowl and leave it at room temperature (68-72°F is ideal) for 6-8 hours, or until the dough has nearly doubled in size.
What you’re looking for: The dough should be noticeably puffy and jiggly. When you look at it from the side, you should see air bubbles through the container if you’re using something transparent. It should have a slightly domed top and jiggle when you shake the bowl gently.
If your kitchen is warm (above 75°F), check at 5-6 hours. If it’s cool (below 68°F), it might take the full 8 hours or even longer. Temperature matters more than the clock.
Once bulk fermentation is complete, cover tightly and refrigerate overnight. This cold retard makes the dough much easier to roll out and gives you flexibility on timing the next day.
Day 2: Shaping, Proofing & Baking
Step 5: Make the Caramel Base
Take your dough out of the fridge and let it sit while you prep everything else. It doesn’t need to come to room temperature before shaping.
In a medium saucepan over medium heat, combine the butter, brown sugar, heavy cream, maple syrup, and salt. Stir constantly until the butter melts and the sugar dissolves, about 3-4 minutes. Let it bubble for another minute, then remove from heat.
Pour this caramel into your 9×13 pan, spreading it evenly. Scatter your pecans or walnuts over the caramel, distributing them well. Set aside.
Step 6: Make the Filling
In a small bowl, mix together your very soft butter, brown sugar, cinnamon, and cornstarch. Mash it with a fork until it forms a spreadable paste. The cornstarch here is crucial: it absorbs moisture from the butter as the buns bake, preventing that annoying filling leakage that makes some buns soggy.
Step 7: Roll & Fill
Lightly flour your work surface. Turn out your cold dough and press it gently into a rectangle. Using a rolling pin, roll the dough into a large rectangle, approximately 16-18 inches wide by 12 inches tall. The dough should be about 1/4 inch thick.
Don’t stress about perfect measurements. You want a rectangle that’s wider than it is tall because you’ll be rolling from the long side.
Spread your cinnamon filling evenly over the entire surface of the dough, leaving a 1-inch strip bare along the top long edge. This bare strip is where you’ll seal the roll.

Step 8: Roll & Cut
Starting from the long edge closest to you (the one that’s fully covered with filling), begin rolling the dough into a tight log. Try to keep even tension as you roll. When you reach the bare edge, push it down and then roll the log on top of it. Then roll seam side up and pinch it gently to seal the seam.
Position the log seam-side down. Using a sharp knife or bench scraper, mark the log into 9-12 equal pieces. Then cut. If the dough squishes rather than cuts cleanly, don’t panic. Just use a gentle sawing motion rather than pressing straight down.

Step 9: Arrange & Proof
Place your rolls cut-side up in the prepared pan with the caramel and nuts. They should be relatively close together but not completely squished. They’ll expand during proofing and baking to fill the gaps.
Cover the pan with a damp tea towel or plastic wrap and let proof at room temperature for 1-2 hours. You’re looking for the buns to be puffy and nearly touching each other. When you press a finger gently into the side of one, the indentation should fill back slowly but not completely.
Meanwhile, preheat your oven to 350°F (175°C).
Step 10: Bake
Once proofed, bake the sticky buns for 28-35 minutes. You’re looking for a deep golden brown on top. If you have an instant-read thermometer, the internal temperature should be around 190°F.
The caramel will be bubbling around the edges and the whole kitchen will smell like heaven.

Step 11: The Critical Invert
This step is non-negotiable and time-sensitive. As soon as the buns come out of the oven, let them sit for exactly 5 minutes. No longer. Set a timer.
After 5 minutes, place your serving platter or sheet pan over the top of the baking pan. Using oven mitts, hold both pans together and flip the whole thing over confidently and quickly. The sticky buns should release onto the platter with all that gooey caramel and nuts now on top where they belong.
If you wait too long to invert, the caramel will set and you’ll have a mess. If you do it too soon, the buns might be too delicate and fall apart. Five minutes is the sweet spot.
Let the buns cool for about 10 minutes before serving (if you can wait that long). They’re best when still slightly warm, with the caramel still gooey and the interior soft and steamy.
Troubleshooting & Pro Tips
My dough isn’t rising during bulk fermentation.
First, check your starter. Was it actually active and bubbly when you used it? A sluggish starter means a sluggish dough. Second, check your temperature. Below 68°F, fermentation slows dramatically. If needed, find a warmer spot or extend the bulk time. The dough will tell you when it’s ready through visual cues: doubled size, jiggly texture, visible bubbles.
The filling leaked out during baking.
This is why we use cornstarch. If you skipped it or used too little, that’s your culprit. The cornstarch absorbs the butter as it melts, creating a paste that mostly stays in place. Also, make sure you’re rolling tightly enough. Loose rolls = more gaps = more leakage.
My buns are dry.
Either overbaked or over-proofed. Enriched doughs are more forgiving than lean doughs, but they still have limits. Check them at 28 minutes and pull them when they’re golden, not dark brown. Also, make sure you’re not over-working the dough during mixing. Once it clears the bowl and looks smooth, stop mixing.
The caramel hardened before I could invert.
You waited too long. Next time, set that timer for 5 minutes and commit. If it’s already happened, you can gently warm the bottom of the pan with a kitchen torch or place it on a warm burner for 30 seconds to re-melt the caramel enough to release.
Can I make these in one day?
Technically yes, but you’ll sacrifice some flavor and the timeline is less forgiving. After bulk fermentation, you’d need to shape, proof, and bake immediately, which gives you a pretty narrow window. The overnight cold retard is really recommended for both flavor and scheduling flexibility.
What if I don’t have buttermilk?
You can make a substitute by adding 1 tablespoon of lemon juice or white vinegar to regular milk and letting it sit for 10 minutes. It’s not quite the same as real buttermilk (different protein structure), but it’s workable in a pinch.
Can I freeze these?
Absolutely. You can freeze them before or after baking. To freeze unbaked: assemble in the pan, cover tightly, and freeze for up to a month. Thaw overnight in the fridge, then proof and bake as directed. To freeze baked: cool completely, wrap tightly, freeze for up to 3 months. Reheat at 300°F for 15-20 minutes.

Frequently Asked Questions
How do I know when my sourdough starter is ready to use?
Your starter should be fed 4-8 hours before you plan to mix your dough. It should have doubled in size, smell pleasantly tangy (not harsh or acetone-like), and have a domed top with lots of bubbles. If you drop a spoonful in water, it should float. That’s your green light.
Can I use whole wheat flour for these sticky buns?
You can replace up to 25% of the all-purpose flour with whole wheat for a slightly nuttier flavor and a bit more nutrition. Beyond that, you’ll start to impact the texture, making it denser and less tender. For sticky buns specifically, I’d keep it mostly white flour.
What’s the difference between using pecans and walnuts?
Pecans are sweeter and butterier, with a softer texture that works beautifully with the caramel. Walnuts are slightly more bitter and have a firmer snap, which some people prefer for contrast. Both are delicious. Use what you like or what you have.
Can I add raisins or other mix-ins?
Sure, though I’d argue these don’t need it. If you want to add raisins, scatter them over the filling before rolling. Dried cranberries also work. Just don’t go overboard; about 1/2 cup is plenty.
How long do these keep?
In an airtight container at room temperature, they’re best within 2 days. After that, they dry out. You can refresh them slightly by warming in a low oven. In the fridge, they’ll last 4-5 days but the texture suffers. Freezing is your best bet for longer storage.
My schedule is weird. Can I manipulate the timing?
Yes. Sourdough is flexible. After mixing, you can do a shorter room temperature bulk (3-4 hours) and then a longer cold bulk in the fridge (up to 48 hours). Or you can do the full room temperature bulk and keep the dough in the fridge for up to 24 hours before shaping. Just watch the dough, not the clock.
Do I have to use a stand mixer?
No, but it makes your life easier, especially when incorporating the butter. The hand method works fine; it just requires more muscle and patience. If you bake a lot of enriched doughs, a mixer is a worthwhile investment.
What if I don’t have a 9×13 pan?
You can use a similar-sized pan or even make these in a round cake pan or cast iron skillet. Just adjust your spacing and expect slightly different baking times depending on pan material and depth.
Can I heat the buttermilk to speed things up, or does it need to be room temperature?
You can warm the buttermilk gently if you want to speed up fermentation slightly, but keep it lukewarm at most (around 100°F/38°C). Any hotter and you risk killing your sourdough starter.
Here’s the thing about heating buttermilk: it can curdle or separate when it gets warm, which looks weird but is completely fine to use. The texture might look grainy or separated, but once it’s mixed into your dough, you won’t notice any difference. The proteins are just reacting to the heat and acid, which is normal.
That said, I actually prefer using room temperature buttermilk straight from the fridge after sitting out for 30-60 minutes. It gives you more control over fermentation timing and you don’t have to deal with the visual of curdled buttermilk, even though it’s harmless.
If you’re making a yeasted version of this recipe (using commercial yeast instead of sourdough starter), you might see recipes call for regular milk instead of buttermilk specifically because it needs to be heated to activate the yeast, and warm buttermilk just looks unappetizing even though it works fine. It’s purely aesthetic.
Bottom line: room temperature buttermilk is your best bet for this sourdough version. No heating necessary, and your bulk fermentation timeline stays predictable.
Yeasted Caramel Nut Sticky Buns
Dough
- 473g (3 3/4 cups + 2 tablespoons) all-purpose flour
- 200g (3/4 cup + 2 tablespoons) whole milk, warmed to 100-110°F (or buttermilk, however heated buttermilk tends to curdle. It is still fine to use but just be aware.)
- 50g (1/4 cup) granulated sugar
- 50g (3 1/2 tablespoons) unsalted butter, softened
- 7g (2 teaspoons) instant yeast
- 8g (1 1/4 teaspoons) salt
- 1 large egg
Instructions
Make the Dough
- Warm the milk to 100-110°F. Stir in the yeast and 1 tablespoon of the sugar. Let sit 5-10 minutes until foamy and bubbly.
- In the bowl of a stand mixer fitted with the dough hook, combine the flour, remaining sugar, salt, and egg.
- Pour in the yeast mixture. Mix on low speed until a shaggy dough forms, about 2-3 minutes.
- With the mixer still running on low speed, add the softened butter one tablespoon at a time, waiting for each piece to incorporate before adding the next. This should take 3-4 minutes.
- Once all butter is added, increase speed to medium and knead for 7-10 minutes until the dough is smooth, elastic, and slightly tacky. The dough should pull away from the sides of the bowl but remain soft.
- Shape the dough into a ball, place in a lightly greased bowl, cover with a towel, and let rise at room temperature for 1-2 hours until doubled in size.
Assemble the Sticky Buns
- Once the dough has doubled, proceed with your caramel nut topping and filling exactly as written in the original recipe.
- Roll the dough into a 16×12” rectangle on a lightly floured surface.
- Spread your filling over the dough, leaving a 1” strip uncovered along one long edge.
- Roll the dough into a log starting from the filled edge. Slice into 12 equal pieces.
- Arrange the buns in your prepared pan with the caramel and nuts in the bottom.
- Cover and let rise 1-1.5 hours until the buns are puffy and touching each other.
Bake
- Preheat oven to 350°F.
- Bake for 25-30 minutes until golden brown. Tent with foil during the last 10 minutes if browning too quickly.
- Let cool 5 minutes, then carefully invert onto a serving platter.
Make-Ahead Option
Shape the buns, place in the pan with caramel, cover tightly, and refrigerate overnight (up to 16 hours). Remove from refrigerator and let sit at room temperature for 1+ hour before baking. Bake at 350°F for 30-35 minutes.
Notes
- Use the same caramel topping, nut mixture, and filling from the sourdough version
- The dough should be soft and slightly tacky but manageable
- If the dough feels too warm to roll out after rising, refrigerate for 15-20 minutes to make it easier to work with
The Bottom Line on Sourdough Sticky Buns
These are sticky buns that actually taste like the effort you put in, even though the effort is minimal. They’re rich without being heavy, sweet without being cloying, and that overnight fermentation gives them a depth that regular yeasted versions just can’t touch.
The buttermilk brioche base is tender and flavorful, the cinnamon filling stays where it belongs, and that caramel pecan topping is the kind of thing you’ll want to eat with a spoon. They’re special enough for a holiday brunch but straightforward enough to make on a random weekend when you need something impressive.
Make them once and you’ll understand why people lose their minds over homemade sticky buns. Make them twice and you’ll have your own tweaks and preferences dialed in. Make them three times and you’ll be the person everyone asks to bring them to every gathering.
That’s the power of a really good sticky buns recipe. This is that recipe.

More Sourdough Treats to Try:
Once you’ve mastered these sticky buns, you might also love:
- Pull Apart Cinnamon Roll Focaccia – All the cinnamon roll vibes with even less shaping required
- Caramel Apple Pull Apart Focaccia – Fall flavors in the easiest possible format
- Apple Pie Cookies – When you want pie but don’t want to deal with a whole pie
Did you make these sourdough sticky buns? I want to see them. Tag me on Instagram with your gooey, caramel-covered results. And if you have questions, drop them in the comments below.
Nutritional Information (per sticky bun): Approximately 420 calories, 18g fat, 58g carbohydrates, 8g protein. Because you asked. Not because it matters when they taste this good.


Leave a Reply to Noelle Reed Cancel reply