
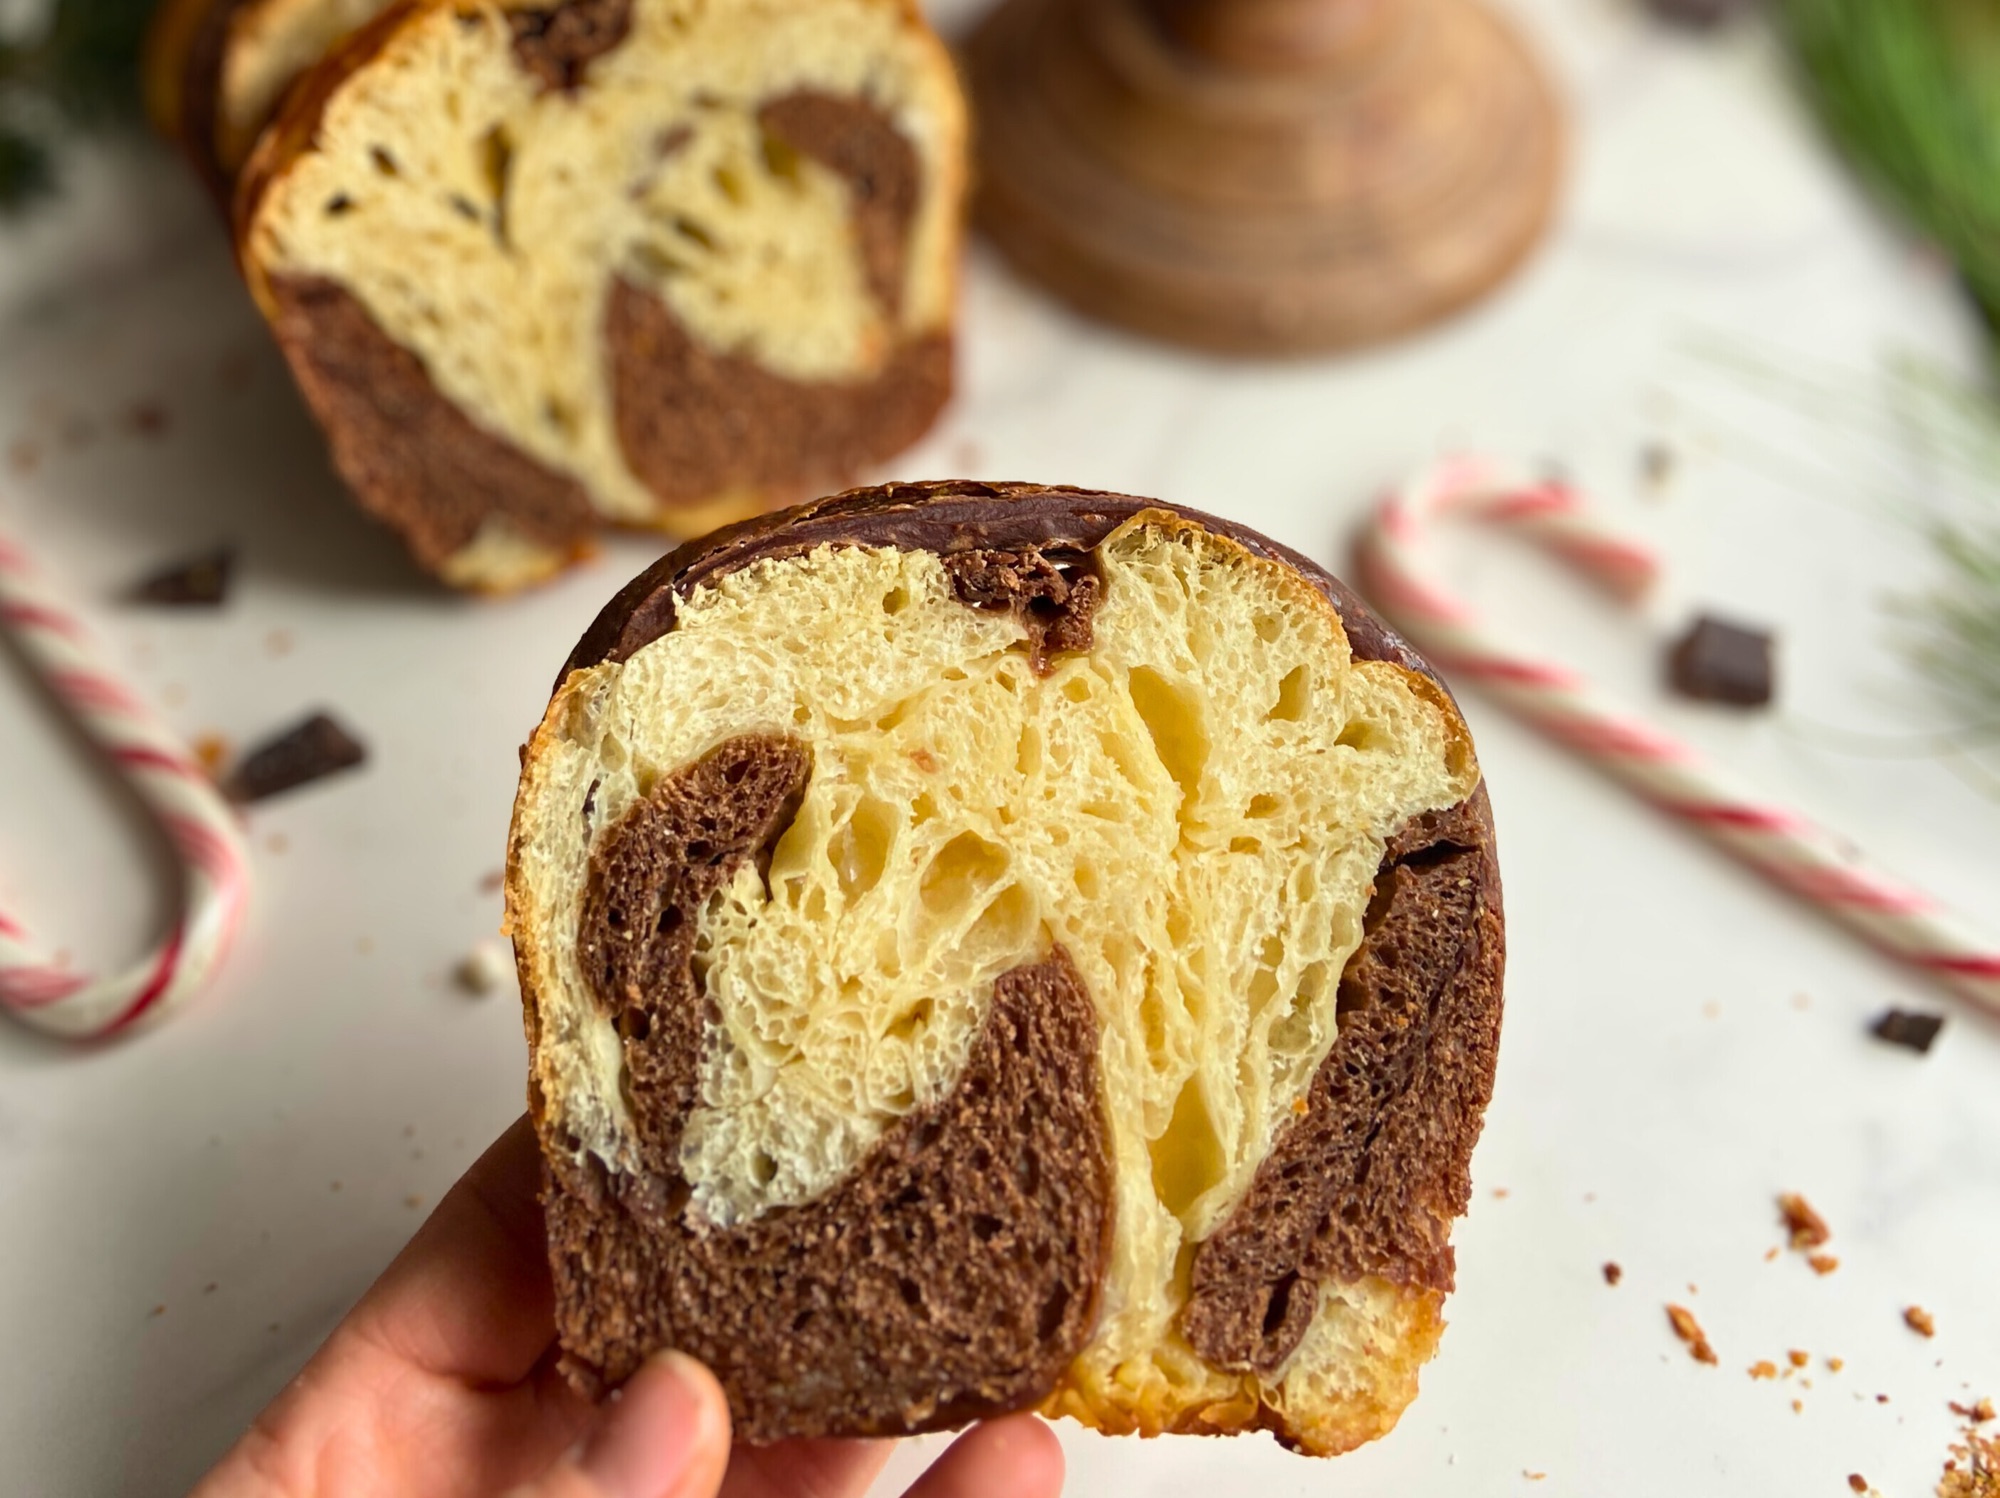
Flaky, buttery chocolate croissants infused with peppermint extract and filled with the perfect peppermint vanilla custards. This tested recipe delivers bakery quality results with detailed lamination instructions perfect for home bakers.
Jump to Section
- Introduction
- Why This Recipe Works
- Ingredients & Why They Matter
- Butter Block Guide
- Locking in Your Butter
- Book Fold Lamination
- Single Fold Lamination
- Final Rollout & Shaping
- Proofing & Baking
- Troubleshooting
- Recipe
- Vanilla Peppermint Custard Filling
- Nutrition Information
The Perfect Marriage of Chocolate and Peppermint

Friends, let me tell you about my love affair with peppermint. There’s something about that fresh, clean taste that just makes everything better, and when you combine it with rich chocolate? Absolute magic. It’s the kind of flavor combination that makes your taste buds do a happy dance.
I originally created a chocolate croissant base recipe over a year ago back in August 2024. That recipe was my triple chocolate croissant, chocolate dough, chocolate butter block, and a chocolate stick swirled inside for maximum chocolate intensity. It was born out of pure frustration after searching everywhere for a solid chocolate croissant recipe and coming up empty-handed. So, like any good sourdoughist (yes, that’s what I call myself), I put on my lab coat and got to work.
After countless trials, adjustments, and more than a few learning moments (some of which involved gummy, sticky crumb that definitely wasn’t Instagram-worthy), I created a chocolate croissant base that actually worked. This chocolate peppermint version uses that same tested foundation, but swaps out the chocolate butter block and filling for bright, festive peppermint flavor.
Now, I know what you’re thinking. Croissants? With lamination and butter blocks and all those folds? That sounds intimidating. And yes, this is technically an intermediate to advanced recipe. But here’s the thing, with my thorough instructions and the detailed Croissant Class posts I’ve created, this is absolutely beginner-friendly. The secret is patience, following the steps, and most importantly, having fun with the process.
Whether you’re searching for chocolate peppermint croissants, sourdough chocolate croissants, or holiday croissants, this recipe has you covered. The peppermint extract in the dough delivers incredible flavor, and you can add crushed candy canes on top or in the custard for that festive holiday look. These are stunning with their deep chocolate dough, beautiful layers, and bright peppermint flavor.
Ready to create some pastry magic? Let’s do this!
Why This Recipe Works

This isn’t just another croissant recipe thrown together. This is the result of extensive testing, failed batches, and the kind of obsessive recipe development that happens when you refuse to settle for anything less than perfect.
The hydration is dialed in. At 58 to 59% hydration, this dough handles beautifully during lamination. It’s not so wet that it’s sticky and impossible to work with, and not so dry that it cracks and fights you at every turn. This is similar hydration as my classic croissant recipe that works flawlessly every single time.
The cocoa is carefully balanced. Cocoa powder is incredibly absorbent and can inhibit gluten development, which is why so many chocolate croissant recipes end up dense and heavy. I’ve adjusted the liquid content specifically to account for the cocoa, so you get that gorgeous chocolate flavor without sacrificing the light, airy texture croissants are known for.
Dutch-processed cocoa is essential. This recipe specifically uses Dutch-processed (alkalized) cocoa powder rather than natural cocoa. Here’s why that matters: natural cocoa has a pH of 5.0 to 5.5, which is quite acidic. That acidity weakens gluten bonds and inhibits yeast activity, both of which are terrible for laminated dough that needs strong structure and good rise. Dutch-processed cocoa has been treated to neutralize that acidity, bringing the pH up to 7.0 to 8.0. This means your gluten can develop properly and your sourdough can ferment without interference. The result? Those beautiful open, airy layers instead of dense, tight croissants.
The peppermint is perfectly layered. Peppermint extract in the dough delivers consistent flavor throughout every bite. It’s a sophisticated approach that ensures the perfect balance of chocolate and peppermint without any overwhelming mintiness.
The technique is proven. Every step in this recipe comes from my Croissant Class series, where I’ve broken down the entire process into digestible, visual guides. You’re not guessing your way through this, you’re following a tested method that actually works.
Thicker layers create better rise. This recipe uses slightly thicker final dough (5 to 6mm or about 1/4 inch) compared to some croissant recipes. Research from professional bakers shows that fewer, thicker layers create more distinct separation and better rise in chocolate dough. Thin layers in chocolate croissants tend to compress together and can’t expand properly during baking. Thicker layers give the butter space to melt and create steam, resulting in that gorgeous honeycomb structure instead of tight, dense layers.
Ingredients & Why They Matter

Note: This recipe was developed using gram measurements for accuracy. While cup and volume measurements are provided for convenience, gram measurements are strongly recommended for best results. Laminated dough requires precision, and even small variations in flour or liquid can significantly impact your results.
Let’s talk about some key ingredient choices that make or break this recipe.
Why Dutch-Processed Cocoa Powder?
You might notice I specifically call for Dutch-processed (alkalized) cocoa powder. This is absolutely critical for this recipe and not interchangeable with natural cocoa.
Dutch-processed cocoa powder (like Hershey’s Special Dark, Droste, or other brands labeled “Dutch-processed” or “alkalized”) has been treated with an alkalizing agent that neutralizes its natural acidity. This creates a darker color, milder chocolate flavor, and most importantly for our purposes, a neutral pH that doesn’t interfere with gluten development or yeast activity.
Natural (non-alkalized) cocoa powder has a lighter brown color, more acidic pH, and a brighter, fruitier chocolate flavor. While this is wonderful in many baking applications, the acidity is problematic in laminated doughs. It weakens the gluten structure you’re working so hard to build through folding and can slow down fermentation. Many bakers have reported dense, flat chocolate croissants when using natural cocoa that transformed into beautiful, airy pastries when they switched to Dutch-processed.
For croissants, where you need strong gluten structure to support all those delicate layers and reliable fermentation for proper rise, Dutch-processed cocoa is the way to go.
About the Candy Cane Topping
I tested adding crushed candy canes to the butter block for those beautiful pink and white striations throughout the layers, but the candy canes melt during baking and create texture issues inside the croissant. Instead, I recommend using them as a topping or thrown in the custard right before piping.
Starter Strength Matters
Your sourdough starter should be mature, active, and at 100% hydration (equal parts flour and water by weight). A strong starter is crucial for proper fermentation, especially since cocoa can slow down yeast activity. If your starter is sluggish, your proofing times will be longer.
Butter Block Guide
Creating a perfectly shaped butter block is the foundation of great lamination. The parchment paper template method ensures your butter is exactly 7 inches (18 cm) square, which is crucial for even layering.
For a detailed visual walkthrough of creating your butter block, check out my Croissant Class Week 1: Butter Block Guide
Creating the Parchment Paper Template (7-Inch/18 cm Square)

Right before beginning your butter block, pull your dough out of the refrigerator.
- Pull out about 21 inches (53 cm) of parchment paper. Lay it horizontally in front of you (long edge parallel to you).
- First side folds:
- Place ruler in the middle of the parchment
- Fold the left edge over to the 7-inch (18 cm) mark on the ruler. Crease well.
- Flip the ruler upside down. Line up the 7-inch (18 cm) mark with your creased edge (ruler start is in the middle)
- Fold the right edge over to create a fold. Crease well.
- Rotate and repeat:
- Rotate the parchment 90 degrees so it’s horizontal again
- Place ruler in the middle
- Fold the left edge to the 7-inch (18 cm) mark. Crease well.
- Flip ruler. Line up the 7-inch (18 cm) mark with your creased edge
- Fold the right edge over. Crease well.
- You now have a 7-inch (18 cm) square template.
Shaping the Butter Block
- Cut 227g (2 sticks / 1 cup) butter into 3 to 4 slices
- Open the parchment template
- Place butter pieces in the center 7-inch (18 cm) square
- Fold parchment back over the butter
- Gently push down on the butter and slowly roll out to fill the entire 7-inch (18 cm) square evenly
- Important: Work gently to avoid ruining the crystal structure of the butter. Do not hit your butter with the rolling pin.
- Leave the butter block at room temperature (still enclosed in parchment) while you prepare the dough
- Do NOT refrigerate at this stage. Move quickly to rolling out your dough square.
Locking in Your Butter (The Envelope Fold)

This is where the magic starts. You’re encasing that beautiful butter block inside your chocolate dough, creating the foundation for all those flaky layers.
For detailed visuals on this crucial step, see my Croissant Class Week 2: Locking in Your Butter Block
Preparing to Enclose the Butter
- Remove dough from refrigerator
- On a lightly floured surface, quickly roll the dough out to a 10-inch (25 cm) square
- Remove butter block from parchment
- Check butter temperature:
- The butter should be perfectly tempered at this point
- If the butter seems glossy or sloppy (too soft), place in the refrigerator for 5 minutes
- The butter should be cold and firm but pliable enough to bend without cracking with a matte sheen
Enclosing the Butter

- Place the 7-inch (18 cm) square butter block in the center of the 10-inch (25 cm) dough square, positioned like a diamond (rotated 45 degrees)
- Take each corner of the dough square and fold to meet in the center, completely encasing the butter (envelope fold)
- Pinch all seams closed to seal butter inside
Degassing (Poke Method)

- Using a toothpick or skewer, poke holes through the top and bottom edges of the dough to release any trapped air
- This prevents air bubbles from forming between your layers during lamination
Book Fold Lamination (First Fold)

The book fold creates your initial layers. This is a gentler fold that sets you up for success with the single fold that follows.
Watch my detailed demonstration in Croissant Class Week 3: Rolling and Lamination
First Roll Out
If you feel resistance at this point after locking in your butter block. Wrap well and place in the refrigerator for 15 minutes. Pull out and let rest a few minutes before beginning again.
- Gently roll the dough out to 17.5 to 18 inches (44 to 46 cm) long by 10 inches (25 cm) wide
- Use the tapping method to gently push down on the dough and slowly move your way upward, essentially warming up the butter.
- Keep even pressure and roll/work from center outward
- Trim the short ends to create clean edges
The Book Fold

- Take the bottom edge and fold it up 2 inches (5 cm)
- Take the top edge and fold it down to meet the bottom folded edge
- Fold the entire piece in half (like closing a book)
- Wrap well and refrigerate for 1 hour
Why the rest is crucial: The gluten needs time to relax, and the butter needs to stay cold. Skipping this rest will make your next roll out nearly impossible and can cause butter to leak out.
Single Fold Lamination (Second Fold)

The single fold (also called a letter fold or tri-fold) is your second and final lamination. This creates those beautiful, distinct layers you’re after.
For a complete visual guide, check out Croissant Class Week 4: Single Fold Lamination Method
Preparing the Dough
- Remove dough from refrigerator and let rest 5 minutes
- Check butter temperature: Gently press the dough with your fingers. The butter should be cold but pliable. You should be able to gently bend it without extreme resistance. If it feels hard and unyielding, let it warm slightly. If it feels sleepy and mushy, return to refrigerator.
Second Roll Out
- Utilize the tapping method again to slowly wake up the dough.
- Roll dough out to approximately 21.5 inches (55 cm) long by 5 to 6 inches (13 to 15 cm) wide
- Trim the short edges to create a rectangle of 21 inches (53 cm) long. The width will naturally be 5 to 6 inches (13 to 15 cm), chocolate dough is less extensible and won’t stretch as wide as regular croissant dough.
The Single Fold

- Fold the dough into thirds like a letter
- Take the bottom edge and fold it up 2/3 of the way up the dough rectangle
- Take the top piece and fold it all the way down to meet the bottom folded edge
- Wrap well and refrigerate for 1 hour to up to 18 hours
Pro tip: The longer rest (up to 18 hours) develops more flavor and makes the final roll out easier. Plan your timeline around what works for your schedule.
Final Rollout & Shaping

This is where your croissants start to look like actual croissants. Take your time here and work with precision.
See every detail in Croissant Class Week 5: The Final Rollout
Preparing for Final Roll
- Remove dough from refrigerator and let warm up slightly (5 to 10 minutes)
- Check butter temperature again: Butter should be easily manipulated but not overly hard. You should be able to gently bend it without it cracking or breaking, but it shouldn’t feel too warm or soft.
Final Roll Out

- Roll the dough out to slightly larger than 12 inches (30 cm) height by 9 inches (23 cm) width
- Trim edges (about 1/4 inch or 0.6 cm on each side) to create a clean rectangle of exactly 12 inches (30 cm) by 9 inches (23 cm). Trimming the edges opens up the layers and creates beautiful definition.
- Optional: After rolling to final dimensions, lift the dough slightly and allow it to naturally shrink back. Cover with plastic wrap and rest in refrigerator for 15 to 20 minutes. This relaxes the gluten for cleaner cuts and prevents shaped croissants from shrinking during proof.
Note on orientation: The 12 inch (30 cm) dimension should be vertical (away from you) and the 9 inch (23 cm) dimension should be horizontal (parallel to you). Final thickness should be approximately 5 to 6mm (about 1/4 inch or 0.6 cm).
Marking and Cutting
- With the dough oriented so the 9 inch (23 cm) side is parallel to you (horizontal) and the 12 inch (30 cm) side is vertical (away from you), make marks at 3 inches (7.5 cm) and 6 inches (15 cm) along the 9 inch (23 cm) width at both the top and bottom edges
- Using a ruler and sharp knife, connect the top and bottom marks to create straight vertical lines
- Cut using a straight up and down motion. No dragging the knife as this will seal the layers
- You now have three rectangles that are 3 inches (7.5 cm) wide by 12 inches (30 cm) tall
Creating Triangles
- Take each rectangle and match up the top corner with the opposite bottom corner to create a triangle shape
- Cut along this diagonal line using the same up and down cutting motion (no dragging)
- You will get 2 triangles per rectangle (6 croissants total)
Optional: You may make a small 1/2-inch (1.3 cm) notch at the base (wide part) of each triangle if desired. This helps create definition during rolling, though I personally skip this step.
Rolling the Croissants

- Optional: Before rolling, gently stretch each triangle 1 to 2 inches (2.5 to 5 cm) longer by holding the base and pulling the tip. This makes the dough easier to roll without tearing.
- Gently mist dough with water. VERY FINELY
- Starting from the wide base, begin rolling the triangle toward the point. The first 2 to 3 rolls should be FIRM to establish the spiral pattern, then continue with snug (but not tight) tension. Chocolate dough is less extensible than regular croissant dough, so don’t roll too tightly or it may tear.
- When you reach the last 1 (2.5 cm) of the tail (point), press the tail firmly down against the work surface
- Roll the croissant body on top of the pressed down tail. This creates a firm base and prevents the tail from popping out during proofing.
- Place shaped croissants on parchment lined baking sheets, with the tail tucked underneath
- Space them at least 3 inches (7.5 cm) apart to allow for expansion
Proofing & Baking

Patience is everything here. Chocolate dough needs significantly more time to proof than regular croissants, and underbaking is the number one mistake people make.
For visual cues on perfect proofing and baking, see Croissant Class Week 6: Proofing and Baking
The Final Proof
- Very finally mist over the croissants.
- Cover croissants loosely with plastic wrap, bag or a lid. Be sure not to let the plastic wrap rest on the croissant you can place a tall item in the middle of your baking tray, essentially creating a little tent.
- Proof at room temperature for 9 to 12 hours
- Time varies based on kitchen temperature, humidity, and starter strength
- Important: Chocolate dough needs significantly longer proofing time than plain croissants
- My favorite temperature is 70 to 72°F
- Spritz croissants LIGHTLY with water every 2 to 3 hours during proofing to prevent the surface from drying and cracking
- Croissants are ready when they have:
- Visible layers seperating at the cut edges
- A gentle wobble when the baking sheet is shaken
- A slightly puffy, airy appearance
Signs of proper proofing:
- When you gently press the side, it should feel light and airy, not dense
- The layers should be clearly visible and separated
- They should jiggle slightly when moved
- Chocolate dough won’t be as dramatically jiggly as plain croissant dough when properly proofed, it will feel slightly firmer but should still wobble
Don’t rush this step. I know 9 to 12 hours sounds like forever, but chocolate croissants genuinely need this time. Underproofed croissants will have dense, gummy interiors no matter how perfect your lamination was. Push the proof longer than feels comfortable, chocolate dough is less likely to overproof than you think.
Egg Wash

- In a small bowl, whisk together 1 egg yolk and 2 tablespoons (30ml) milk or heavy cream
- Apply egg wash only when croissants are fully proofed, right before baking. I like using a ripped piece of paper towel versus a pastry brush.
- Gently apply egg wash over the entire surface of each croissant
- Be careful not to let egg wash drip down the sides (this can glue layers together)
Baking
- Preheat conventional oven to 400°F (200°C)
- Bake for approximately 20-25 minutes (watch closely as baking time may vary)
- Monitor for doneness:
- Internal temperature should reach 200 to 205°F (93 to 96°C)
- Due to dark chocolate color, use this test rather than visual browning
- If croissants are browning too quickly on top, tent with aluminum foil and continue baking
The underbaking trap: Because these are chocolate croissants, they look dark even when they’re not done. Don’t pull them out early just because they look brown. Use your thermometer, use the hollow tap test, and trust the process.
Cooling
- Let croissants sit on the baking sheet for 10 minutes
- Transfer to a wire rack and cool completely before cutting (this allows the interior structure to fully set)
- Wait at least 30 to 45 minutes before cutting to see the best crumb structure
- If you’re using the custard, cool completely before filling.
I know it’s tempting to cut into them immediately, but trust me on this. The interior needs time to finish setting, and cutting too early will give you a gummier texture than if you just wait.
Troubleshooting Common Issues
Even with detailed instructions, laminated doughs can be tricky. Here are solutions to the most common problems.
Problem: Butter Leaking Out During Lamination
Causes:
- Butter was too warm when you started rolling
- Dough was rolled too aggressively
- Not enough rest time between folds
Solutions:
- Always check butter temperature before rolling. It should be cold and firm but pliable.
- If you see butter starting to break through, immediately stop and refrigerate for 15 to 20 minutes
- Use gentle, even pressure when rolling. Let the rolling pin do the work.
- Don’t skip the rest periods between folds
Problem: Dough Tears or Fights Back When Rolling
Causes:
- Gluten is too tight and needs to relax
- Butter is too cold and brittle
- Dough wasn’t rested long enough
Solutions:
- Let dough rest 10 to 15 minutes at room temperature or in the refrigerator if you feel the dough is getting warmer, to relax the gluten
- If butter feels rock hard when you press the dough, let it warm up slightly
- Never force the dough. If it’s resisting, it needs more rest time.
Problem: Dense, Gummy Crumb
Causes:
- Underproofed (most common)
- Underbaked (second most common)
- Too much liquid in the dough
- Cocoa absorbed moisture unevenly
- Using natural cocoa instead of Dutch-processed
Solutions:
- Proof until wobbly, even if it takes 12+ hours
- Bake to full internal temperature (200 to 205°F / 93 to 96°C), not based on color
- Make sure you measured ingredients accurately, especially the bloomed chocolate mixture
- Ensure cocoa is fully bloomed and incorporated before mixing dough
- Verify you’re using Dutch-processed cocoa powder, this is the most common cause of dense chocolate croissants
Problem: Layers Merged or Collapsed
Causes:
- Underproofed
- Oven temperature too low
- Butter was too soft during lamination
- Not enough distinct layers created during folding
- Dough rolled too thin
Solutions:
- Ensure full proof before baking
- Verify oven temperature with an oven thermometer (home ovens are often off by 25°F or more)
- Keep everything cold during lamination process
- Follow the folding sequence exactly as written
- Maintain 5 to 6mm (about 1/4 inch or 0.6 cm) final thickness, thicker layers create better separation in chocolate dough
Problem: Croissants Didn’t Rise Much in the Oven
Causes:
- Severely underproofed
- Oven wasn’t hot enough
- Layers were sealed shut during cutting
- Butter leaked out and layers fused
- Using natural cocoa instead of Dutch-processed
Solutions:
- Give chocolate dough extra proofing time.
- Start with higher oven temperature (400°F / 200°C) for good oven spring
- Always use up and down cutting motion, never drag the knife
- Maintain cold temperatures during lamination to prevent butter leakage
- Switch to Dutch-processed cocoa if you haven’t already
Problem: Tail Popped Out During Proofing
Causes:
- Tail wasn’t pressed down and rolled over properly
- Croissants were shaped too loosely
Solutions:
- When rolling, press the tail firmly against the work surface before rolling the croissant on top of it
- Make sure each roll is snug but not tight
- Place croissants with tail tucked underneath on the baking sheet
Problem: Dough Feels Too Stiff to Roll
Causes:
- Dough is too cold
- Gluten needs more rest time
- Chocolate dough is naturally less extensible than plain dough
Solutions:
- Let dough rest at room temperature for 10 to 15 minutes before rolling
- If dough continues to resist, rest it in the refrigerator for 15 to 20 minutes to relax the gluten
- Work with gentle, patient pressure, chocolate dough won’t stretch as easily as plain croissant dough
- If problems persist, consider adding 10 to 15g more water to your next batch
Recipe

Chocolate Peppermint Sourdough Croissants
Ingredients
Bloomed Chocolate Mixture
- 35 g hot espresso or dark roast coffee 2 tablespoons plus 1 teaspoon
- 35 g water 2 tablespoons plus 1 teaspoon
- 25 to 30 g Dutch processed cocoa powder ¼ cup
Dough
- 60 g mature 100 percent hydration sourdough starter ¼ cup
- 30 g water 2 tablespoons
- 60 g whole milk ¼ cup
- 40 g granulated sugar 3 tablespoons
- 25 g unsalted butter, softened 2 tablespoons
- 5 g salt 1 teaspoon
- 2 g vanilla extract ½ teaspoon
- 2 g peppermint extract ¼ – ½ teaspoon
- 30 to 35 g egg white from about 1 large egg 2 tablespoons
- 300 g bread flour 2 ½ cups
Butter Block
- 227 g unsalted butter cold from refrigerator (Kerrigold prefered) 2 sticks or 1 cup
Egg Wash
- 1 egg yolk
- 30 g milk or heavy cream 2 Tablespoons
Optional Topping
- Finely crushed candy canes
- powdered sugar
Optional Vanilla Peppermint Custard Filling
- 240 g whole milk 1 cup
- 60 g heavy cream ¼ cup
- 50 g granulated sugar, divided ¼ cup
- 3 large egg yolks
- 20 g cornstarch 2.5 tablespoons
- Pinch of salt
- 30 g unsalted butter cold and cubed 2 tablespoons
- 5 g vanilla extract 1 teaspoon
- 1.25 to 2.5 g peppermint extract start with ¼r teaspoon and adjust to taste up to ½ teaspoon
Instructions
Day 1 Bloom Chocolate and Mix Dough
- Mix 35g hot espresso 35g water and 25 to 30g Dutch processed cocoa powder in a bowl. Cover and let bloom for 1 hour.
- In the bowl of a stand mixer combine bloomed chocolate mixture 60g active sourdough starter 30g water 60g milk 40g sugar 25g softened butter 5g salt 2g vanilla extract 2g peppermint extract and 30 to 35g egg white. Mix briefly to combine.
- Add 300g bread flour. Mix with dough hook on low speed until a shaggy dough forms.
- Increase to medium low speed and knead for 3-4 minutes until dough is smooth and elastic.
- Alternatively: Mix together wet ingredients and sugar. Add flour on top (do not mix yet), take your chunks of butter and place on top of the flour. Gently pinch in the butter to the flour, and then start to mix everything together. Knead for 5-6 minutes.
- Cover bowl and let rest at room temperature for 30 minutes.
- Perform a stretch and fold. Grab one side of the dough stretch it up and fold it over to the opposite side. Rotate bowl 90 degrees and repeat. Do this 4 times total going around the bowl. Cover and rest 30 minutes.
- Perform a second stretch and fold using the same technique. Cover and rest 30 minutes.
- Shape dough into a smooth ball and place in a lightly greased container or bowl. Cover tightly and refrigerate overnight or 8 to 12 hours.
Day 2 Create Butter Block and Laminate
- Pull out about 21 inches (53 cm) of parchment paper. Create a 7 inch (18 cm) square template by folding. Place ruler in middle fold left edge to 7 inch (18 cm) mark and crease. Flip ruler line up 7 inch (18 cm) mark with creased edge fold right edge over and crease. Rotate 90 degrees and repeat for other two sides.

- Cut 227g (2 sticks) butter into 3 to 4 slices. Place in center of parchment template. Fold parchment over butter and gently roll to fill entire 7 inch (18 cm) square evenly. Leave at room temperature in parchment while preparing dough.
- Remove dough from refrigerator. On lightly floured surface roll dough to 10 inch (25 cm) square.

- Remove butter block from parchment. Check temperature butter should be cold and firm but pliable. If too soft refrigerate 5 minutes.
- Place 7 inch (18 cm) butter block in center of 10 inch (25 cm) dough square positioned like a diamond rotated 45 degrees.

- Fold each corner of dough to meet in center completely encasing butter. Pinch seams closed.
- Using toothpick or skewer poke holes through top and bottom edges to release trapped air.

Book Fold First Lamination

- Gently roll dough to 17.5 to 18 inches (44 to 46 cm) long by 10 inches (25 cm) wide. Trim short ends.
- Fold bottom edge up 2 inches (5 cm). Fold top edge down to meet bottom folded edge. Fold entire piece in half like closing a book.
- Wrap well and refrigerate 1 hour.
Single Fold Second Lamination

- Remove from refrigerator and rest 5 minutes. Check butter temperature by gently pressing dough. Butter should be cold but pliable.
- Roll dough to 21.5 inches (55 cm) long by 5 to 6 inches (13 to 15 cm) wide. Trim short edges to 21 inches (53 cm) long.
- Fold into thirds like a letter. Fold bottom edge up two thirds of the way. Fold top piece all the way down to meet bottom folded edge.
- Wrap well and refrigerate 1 hour to up to 18 hours.
Day 3 Shape Proof and Bake

- Remove dough from refrigerator and rest 5 to 10 minutes. Check butter temperature should be easily manipulated but not too soft.
- Roll dough to slightly larger than 12 inches (30 cm) by 9 inches (23 cm). Trim edges about one quarter inch (0.6 cm) on each side to create clean rectangle of exactly 12 inches (30 cm) by 9 inches (23 cm).
- Lift dough slightly and allow to naturally shrink back. Cover with plastic wrap and rest in refrigerator 15 to 20 minutes.
- With 9 inch (23 cm) side parallel to you make marks at 3 inches (7.5 cm) and 6 inches (15 cm) along width at top and bottom edges. Connect marks with ruler and sharp knife cutting straight up and down no dragging. You now have three 3 inch (7.5 cm) by 12 inch (30 cm) rectangles.

- Match top corner of each rectangle with opposite bottom corner to create triangle. Cut along diagonal using up and down motion. You will get 2 triangles per rectangle for 6 croissants total.
- Gently stretch each triangle 1 to 2 inches (2.5 to 5 cm) longer. Starting from wide base roll toward point. First 2 to 3 rolls should be firm then continue with snug tension.
- When 1 to 1.5 inches (2.5 to 4 cm) from tip press tail firmly against work surface. Roll croissant body on top of pressed tail.
- Place shaped croissants on parchment lined baking sheets tail tucked underneath. Space at least 3 inches (7.5 cm) apart.
- Cover loosely and proof at room temperature (optimal temprature 70F-72F) 9 to 12 hours until doubled wobbly and visibly puffy. Spritz lightly with water every 2 to 3 hours to prevent surface cracking.
- Preheat oven to 400 degrees F 200 degrees C.
- Whisk together 1 egg yolk and 2 tablespoons milk or cream. Gently brush over entire surface of each croissant.

- Bake 20 to 25 minutes until croissants feel light when lifted bottoms sound hollow when tapped and internal temperature reaches 200 to 205 degrees F 93 to 96 degrees C.
- Let sit on baking sheet 10 minutes then transfer to wire rack. Cool at least 30 to 45 minutes before cutting.
Optional Vanilla Peppermint Custard Filling

- In medium saucepan combine 240g milk 60g heavy cream and 25g sugar half the total sugar. Heat over medium until steaming with small bubbles around edges. Remove from heat.
- Whisk together 3 egg yolks remaining 25g sugar 20g cornstarch and pinch of salt until smooth pale yellow and slightly thickened.
- Slowly pour one third hot milk mixture into egg yolk mixture whisking constantly to temper.
- Pour tempered mixture back into saucepan with remaining hot milk. Whisk thoroughly.
- Return to medium heat. Cook whisking constantly until mixture thickens and comes to full boil about 3 to 5 minutes.
- Continue whisking vigorously for 1 full minute after boil.
- Remove from heat. Add 30g cold butter cubes and whisk until melted and incorporated.
- Stir in 1 teaspoon 5g vanilla extract and one quarter teaspoon 1.25g peppermint extract. Taste and add more peppermint if desired.
- Strain custard through fine mesh sieve into clean bowl.
- Press plastic wrap directly onto surface. Refrigerate at least 2 hours or overnight until completely cold.
- Whisk chilled custard smooth. Transfer to piping bag with medium round tip.
- For bottom injection poke 2 to 3 small holes in bottom of each croissant. Insert tip and squeeze custard throughout about one quarter cup 60ml per croissant.
- For split and fill slice croissants horizontally. Pipe custard on bottom half and replace top.
Notes
Calories: 420
Carbohydrates: 42g
Protein: 8g
Fat: 24g
Saturated Fat: 15g
Sodium: 380mg
Fiber: 2g
Sugar: 8g With custard filling add approximately:
Calories: 120
Fat: 6g
Carbohydrates: 12g
Vanilla Peppermint Custard Filling

These chocolate peppermint croissants are absolutely stunning on their own, but if you want to take them to the next level of indulgence, fill them with this silky vanilla peppermint custard. The cool, creamy filling pairs beautifully with the rich chocolate layers and adds an extra layer of festive flavor. This custard is thick enough to pipe cleanly but still luxuriously smooth and creamy.
Custard Ingredients
Note: For best results, use gram measurements. Volume measurements are provided for convenience.
Custard:
- 240g (1 cup) whole milk
- 60g (1/4 cup) heavy cream
- 50g (1/4 cup) granulated sugar, divided
- 3 large egg yolks
- 20g (2.5 tablespoons) cornstarch
- Pinch of salt
- 30g (2 tablespoons) unsalted butter, cold and cubed
- 1 teaspoon (5g) vanilla extract
- 1/4 to 1/2 teaspoon (1.25 to 2.5g) peppermint extract (start with 1/4 teaspoon and adjust to taste)
Yield: Approximately 1.5 cups (360ml) custard, enough to fill 6 croissants generously
Custard Instructions
Make the Custard Base:
- In a medium saucepan, combine the milk, heavy cream, and half of the sugar (25g). Heat over medium heat, stirring occasionally, until the mixture is steaming and small bubbles begin to form around the edges. Remove from heat.
- While the milk mixture heats, whisk together the egg yolks, remaining sugar (25g), cornstarch, and salt in a medium bowl. Whisk vigorously until the mixture is smooth, pale yellow, and slightly thickened.
Temper and Cook:
- Slowly pour about one third of the hot milk mixture into the egg yolk mixture, whisking constantly as you pour. This tempers the eggs and prevents them from scrambling.
- Pour the tempered egg mixture back into the saucepan with the remaining hot milk. Whisk thoroughly to combine everything.
- Return the saucepan to medium heat. Cook, whisking constantly and making sure to reach all corners of the pan, until the mixture thickens considerably and comes to a full boil. This will take about 3 to 5 minutes.
- Once the custard reaches a boil, continue whisking vigorously for 1 full minute. This step is important as it cooks out the starchy taste from the cornstarch and ensures a smooth, silky texture.
Finish the Custard:
- Remove the pan from heat immediately. Add the cold butter cubes and whisk until they’re completely melted and incorporated into the custard.
- Stir in the vanilla extract and peppermint extract. Start with 1/4 teaspoon (1.25g) of peppermint extract, taste (carefully, it’s hot!), and add more if desired. Peppermint extract is potent, so add gradually.
- Optional: Strain the custard through a fine mesh sieve into a clean bowl. This removes any bits of cooked egg or lumps, ensuring a perfectly smooth custard.
Chill:
- Press a piece of plastic wrap directly onto the surface of the custard to prevent a skin from forming. Refrigerate until completely cold, at least 2 hours or overnight. The custard will continue to thicken as it chills.
Fill the Croissants:
- Once the custard is thoroughly chilled, give it a good whisk to restore its smooth, creamy texture if it has separated slightly during chilling.
- Transfer the custard to a piping bag fitted with a medium round tip, or use a zip top bag with one corner snipped off.
Method 1: Bottom Injection (cleanest presentation)
Use a small paring knife to poke 2 to 3 small holes in the bottom of each croissant, spacing them evenly. Insert the piping tip into each hole and gently squeeze custard into the croissant, moving the tip around slightly to distribute the filling throughout. You’ll feel the croissant become heavier as it fills. Aim for about 1/4 cup (60ml) of custard per croissant.
Method 2: Split and Fill (more dramatic presentation)
Use a serrated knife to carefully slice each croissant in half horizontally. Pipe a generous amount of custard onto the bottom half, then gently replace the top half. This method shows off the beautiful custard filling. If you want to vertically slice it down the middle of the croissant, tear out some of the interior before piping in the custard.
Custard Tips and Notes
- Peppermint intensity: Peppermint extract varies in strength by brand. Start with 1/4 teaspoon (1.25g), taste the cooled custard, and add more in small increments if you want a stronger peppermint flavor. You can always add more, but you can’t take it away.
- Make ahead: The custard can be made up to 3 days in advance and stored in an airtight container in the refrigerator. Whisk smooth before using.
- Filling timing: For best results, fill the croissants within a few hours of serving. Filled croissants should be stored in the refrigerator and are best enjoyed the same day.
- Texture: This custard is designed to be thick enough to hold its shape when piped but still creamy and smooth. If it seems too thick after chilling, whisk in a teaspoon or two of cold milk to loosen it.
- Festive variation: For extra holiday flair, fold 2 to 3 tablespoons (15 to 20g) of finely crushed candy canes into the custard just before filling the croissants. This adds a delightful crunch and amplifies the peppermint flavor.
- Leftover custard: Any extra custard is delicious served as a dessert on its own, layered in parfaits, or used as a filling for other pastries.
Storage for Filled Croissants
Filled croissants should be stored in an airtight container in the refrigerator for up to 2 days. The custard will keep the croissants moist, but they’re definitely best enjoyed fresh. For optimal texture, fill croissants just before serving when possible.
Nutrition Information
Per croissant (without custard filling), approximate:
- Calories: 420
- Carbohydrates: 42g
- Protein: 8g
- Fat: 24g
- Saturated Fat: 15g
- Sodium: 380mg
- Fiber: 2g
- Sugar: 8g
With custard filling (add approximately):
- Calories: +120
- Fat: +6g
- Carbohydrates: +12g
- Protein: +2g
Nutrition information is estimated and will vary based on specific ingredients used and portion sizes.
The Results Are Worth Every Moment

Friends, I’m not going to lie to you. These croissants take time. They take patience. They take attention to detail and a willingness to trust the process even when 10 hours of proofing feels like an eternity.
But when you pull that baking sheet out of the oven and hear the crackle of those layers, when you break one open and see the beautiful spirals of chocolate dough with those perfectly defined layers, when you take that first bite and get hit with the perfect balance of rich chocolate and bright peppermint, that’s when you understand why this recipe exists.
These aren’t just croissants. They’re edible proof that you can create bakery level pastries in your own kitchen. They’re the kind of thing that makes people stop mid conversation and ask, wait, you MADE these?
And the best part? Once you master this technique, you can apply it to endless variations. The croissant world is your oyster.
Let’s Connect!
Did you make these chocolate peppermint croissants? I want to see them! Tag me on Instagram @h3artofthehome so I can celebrate your success with you. And if you have questions along the way, drop them in the comments or send me a DM. I’m here to help you nail this recipe.
Happy Croissanting, friends!
— Noelle


Leave a Reply to Transform Croissant Scraps Into a Gorgeous Loaf Cancel reply