One batter, two flavors. Some of my best recipes have come from mistakes. This one came from a very specific kind of mistake: I cracked two eggs into a cookie batter when I only meant to add one. Instead of making a double batch or starting over, I decided to do something else entirely. I split the batter in half, turned one half into a brownie and the other half into a blondie, and swirled them together in one pan. And I am genuinely so glad I cannot count.
Coming up with a name for these was half the fun. Blondie plus brownie. Blonwnie? Browdie? Blownie? Nothing was quite right until I landed on Brondie. Part blondie, part brownie, and completely its own thing.
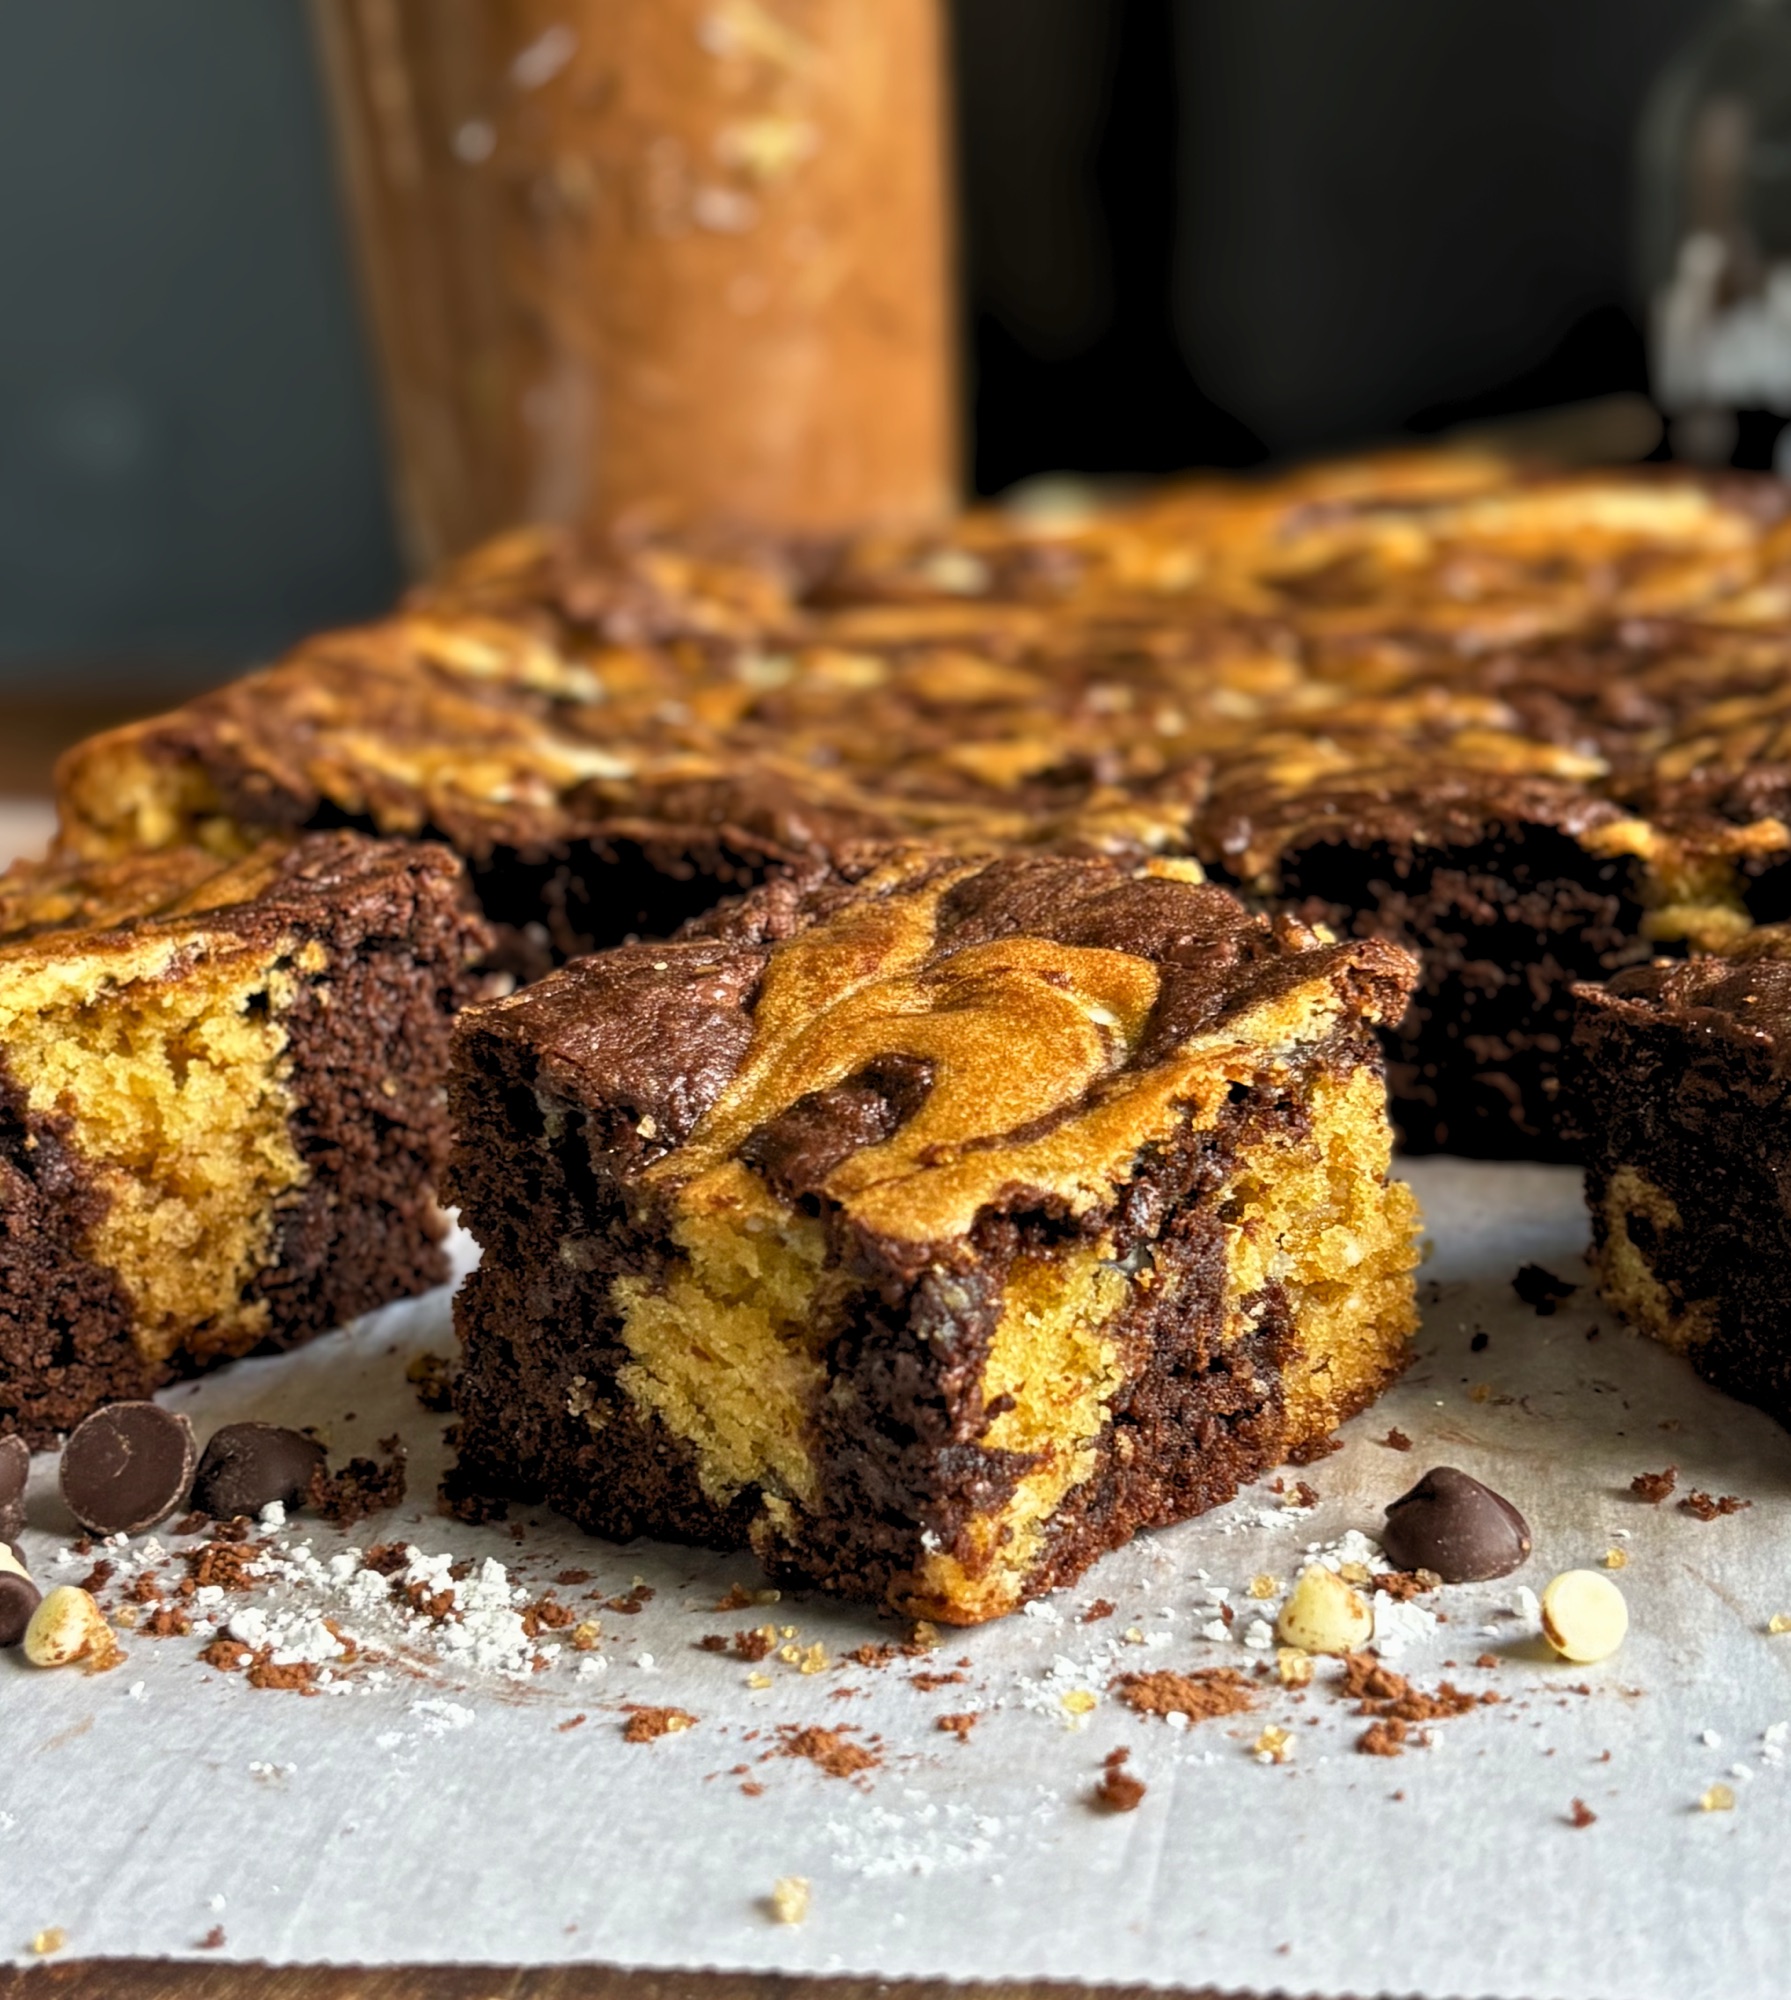
These bars have everything. A fudgy, brownie half loaded with dark chocolate chunks. A chewy, golden blondie half studded with white chocolate chips. A swirled top that looks like it took effort but really just requires a knife and a little restraint. And underneath all of it, sourdough starter doing what it does best: adding depth, improving texture, and making a good bake into a great one.

Table of Contents
- What Are Blondie Brownie Swirl Bars?
- Why Sourdough Makes These Better
- Ingredients and Why They Matter
- No Sourdough Starter? No Problem
- How to Make Sourdough Blondie Brownie Swirl Bars
- The Swirl: Tips for Getting It Right
- Overnight Fridge Ferment Option
- Recipe
- Baking Tips and Doneness Cues
- Storage and Freezing
- Frequently Asked Questions
What Are Blondie Brownie Swirl Bars?

Most brownie blondie recipes require you to make two entirely separate batters from scratch: one for the brownie and one for the blondie. These bars work differently. You make one single wet base and split it in half. One half becomes the brownie. The other half becomes the blondie. Same bowl to start, two completely different results, and far fewer dishes.
The result is a bar that gives you fudgy chocolate brownie and chewy butterscotch blondie in every single bite, all from one pan and one shared base of wet ingredients.
Brownies and blondies share the same DNA. Both rely on melted butter, sugar, eggs, and vanilla. Both are dense, low leavening bars meant to be chewy rather than cakey. The difference is cocoa powder, which is what gives the brownie half its deep color and chocolate flavor. In these bars, you get both in every slice.
Why Sourdough Makes These Better

Sourdough starter, whether active or discard, brings a few things to bar cookies that you simply cannot get any other way.
First, it adds moisture. The natural hydration in the starter contributes to that fudgy, dense texture that makes a great brownie or blondie so satisfying. Second, the fermentation process, even in discard, breaks down some of the starches in the flour and contributes to a more complex, less one dimensional sweetness. You are not getting a bread flavor. You are getting depth.
Third, and this is the practical one: sourdough starter is a great binder. Between the starter, the eggs, and the butter, these bars hold together beautifully when cut, giving you clean slices with visible interior swirl rather than bars that crumble the moment you lift them from the pan.
This recipe works with either active starter or discard. Active starter will give you a very slight additional lift. Discard works perfectly and is a great way to use up what you have on hand. Either way, use a 100% hydration starter, meaning equal parts flour and water by weight.
Ingredients and Why They Matter

Because the wet base is shared between both halves, every ingredient in it pulls double duty. Here is what is going in and why each one matters.
Butter is melted rather than creamed, which is standard for both brownies and blondies. Melted butter produces a denser, fudgier bar. Creamed butter would introduce air and make these cakey, which is the opposite of what we want.
Brown sugar and white sugar are used in combination. Brown sugar contributes moisture and a subtle caramel undertone. White sugar balances the sweetness and helps create that slightly crisp, shiny top characteristic of a well made brownie or blondie.
Honey adds a small amount of additional moisture and a gentle floral sweetness that rounds out the sugar base without making the bars taste like honey.
Eggs provide structure and richness. Two whole eggs give these bars their body and help the batter set properly during baking.
Sourdough starter at 100% hydration contributes moisture, depth of flavor, and binding. It replaces some of the additional fat or liquid you would otherwise need.
Vanilla extract is essential in the blondie half especially, where it is one of the primary flavors. Do not skip it or substitute imitation vanilla here.
For the brownie half, natural cocoa powder is the right choice. Natural cocoa is more acidic than Dutch processed, which means it reacts with the baking soda in the recipe and creates a better rise and a more complex chocolate flavor. Dutch processed will work in a pinch but the results will be slightly different.
Mini white chocolate chips in the blondie half and mini semi sweet chocolate chips in the brownie half are what I use and recommend. Mini chips distribute more evenly throughout the batter than full size chips or chunks, which means you get chocolate in every single bite rather than larger isolated pockets. They also keep the swirl visually clean when the bars are cut.
That said, use whatever you have or prefer. Because chip size affects how densely they pack, the gram amounts shift slightly depending on what you use. For each half of the recipe, the amounts are:
Mini chips: 85g (just over 1/2 cup)
Regular chips: 80g (1/2 cup)
Chunks: 70g (just under 1/2 cup)
This applies to both the white chocolate in the blondie half and the semi sweet or dark chocolate in the brownie half.
No Sourdough Starter? No Problem

If you do not have sourdough starter on hand, you can still make these bars.
Replace the 150g of starter with
- 75g of all purpose flour
- 75g of whole milk
- whisked together until smooth.
- The milk adds fat and richness that water alone cannot replicate, keeping the bars fudgy and rich. The flavor will be slightly simpler without the depth that starter brings, but the texture will hold up well.
How to Make Sourdough Blondie Brownie Swirl Bars

The process here is straightforward and the most important thing to remember is that you are making one wet base and then splitting it. Do not separate anything before the wet ingredients are fully mixed.
Start by combining all of your wet ingredients in one large bowl: melted butter, both sugars, honey, eggs, sourdough starter, and vanilla. Whisk until smooth and well combined with no streaks remaining.
Weigh the bowl and divide the wet mixture as evenly as possible between two bowls. Precision helps here but it does not need to be exact.
To the first bowl, add your blondie dry ingredients: flour, baking soda, baking powder, and salt. Stir until just combined, then fold in the white chocolate chips.
To the second bowl, add your brownie dry ingredients: flour, cocoa powder, baking soda, baking powder, and salt. Stir until just combined, then fold in the dark chocolate chunks.
Line your 9×9 inch pan with parchment paper, leaving an overhang on two sides so you can lift the slab out cleanly after baking. Drop alternating spoonfuls of each batter across the pan until both bowls are empty. See the next section for swirling guidance.
The Swirl: Tips for Getting It Right

There are three ways to approach the top of these bars, and all three produce a beautiful result.
Option one: skip the swirl entirely. Drop your alternating blobs of batter into the pan and put it straight into the oven. The two batters will bake up with distinct pockets of brownie and blondie visible from the top and throughout the interior. This is the easiest approach and looks gorgeous.
Option two: swirl before baking. Using a butter knife or skewer, drag through the batter in a few lazy S curves or figure 8 motions. The key is restraint. Three to four passes is plenty. Overworking the swirl will muddy the two batters together and eliminate the contrast you are going for. Stop earlier than you think you need to.
Option three: the five minute oven swirl. This is the method I actually recommend, and here is why. Because this batter is made with melted butter, the butter can firm back up as it sits at room temperature, making the batter stiffer and harder to swirl cleanly. When you put the pan in the oven for about five minutes first, the butter melts back down and the batter loosens just enough to make swirling significantly easier. You get cleaner, more defined ribbons with less effort and less risk of overworking.
To use this method: place the pan in the preheated oven for five minutes. Pull it out and work quickly with a skewer or butter knife to swirl the top in a few smooth passes. The top should be shiny and soft, not set. Get it back in the oven before the edges start to firm up. Your window is small but the results are worth it.
One more swirl tip: do not drag all the way to the edges of the pan. Pulling batter to the edges creates drag that disrupts the pattern near the sides. Stay toward the center and let the edges do their own thing.
Overnight Fridge Ferment Option

Want to prep these the night before? You can absolutely do a cold ferment with this recipe and it is a great option for getting ahead.
Mix the full batter as directed, split it between two bowls, add your dry ingredients and mix ins to each half, then cover both bowls tightly and refrigerate overnight. In the morning, pull the bowls from the fridge and you have two choices.
You can scoop and drop the cold batter directly into the pan and go straight into the oven. Cold batter will be stiffer, which can actually make the alternating blob method look even better since the mounds hold their shape more distinctly. You may need a few extra minutes of baking time, so start checking at the 30 minute mark and go from there.
Alternatively, let the batter come to room temperature for about an hour before assembling and baking. Room temperature batter will be looser and easier to swirl. If you go this route, the five minute oven swirl method is a great choice since the batter will be soft and workable from the start.
Either way, a cold ferment adds additional complexity to the flavor of both halves, so it is worth trying if you have the time.

Sourdough Blondie Brownie Swirl Bars (Brondies)
Equipment
- 9×9 inch square baking pan
- Parchment paper
- 2 large mixing bowls
- Whisk
- spatula
- kitchen scale
Ingredients
Wet Base
- 169 g melted butter 3/4 cup
- 150 g light brown sugar 3/4 cup packed
- 100 g granulated white sugar 1/2 cup
- 10 g honey 2 teaspoons
- 2 large eggs room temperature
- 150 g sourdough starter active or discard 100% hydration 2/3 cup
- 6 g vanilla extract 1.5 teaspoons
Blondie Half
- 145 g all purpose flour 1 cup + 2 tablespoons
- 2 g baking soda 1/2 teaspoon
- 1 g baking powder 1/4 teaspoon
- 3 g salt 1/2 teaspoon
- 85 g mini white chocolate chips just over 1/2 cup
Brownie Half
- 110 g all purpose flour 3/4 cup + 2 tablespoons
- 30 g natural unsweetened cocoa powder 1/4 cup + 1 tablespoon
- 2 g baking soda 1/2 teaspoon
- 1 g baking powder 1/4 teaspoon
- 3 g salt 1/2 teaspoon
- 85 g mini semi sweet chocolate chips just over 1/2 cup
Instructions
- Preheat oven to 350 degrees F. Line a 9×9 inch pan with parchment paper leaving an overhang on two opposite sides.
- Get two bowls for the separate Blondie and Brownie dry ingredients.
- To the first bowl add 145g flour, 2g baking soda, 1g baking powder, and 3g salt. Stir until just combined then fold in 85g mini white chocolate chips. This is for your blondie batter.
- To the second bowl add 110g flour, 30g cocoa powder, 2g baking soda, 1g baking powder, and 3g salt. Stir until just combined then fold in 85g mini semi sweet chocolate chips. This is for your brownie batter.
- In a large bowl whisk together melted butter, brown sugar, white sugar, honey, eggs, sourdough starter, and vanilla until smooth and fully combined with no streaks.
- Divide the wet mixture evenly between two bowls. Each bowl should have approximately 342g.
- Drop alternating spoonfuls of blondie and brownie batter across the prepared pan until both bowls are empty. See notes for swirl options and long fermentation options.
- Bake at 350 degrees F for 25 to 30 minutes. Edges should be set and pulling slightly from the pan. Center should have a very slight wobble. A toothpick inserted in the center should come out with moist crumbs not wet batter. Do not overbake.
- Cool completely in the pan for at least 2 hours before cutting. For cleanest cuts refrigerate the fully cooled slab for 1 hour then slice into a 4×4 grid for 16 bars.
Notes
Baking Tips and Doneness Cues

Bake at 350 degrees F. The target window is 25 to 30 minutes. Do not push past 30 minutes.
Bar cookies with this much butter and sugar can be tricky to read with a thermometer alone. The sugar content makes internal temperature a less reliable doneness cue here than it would be for something like bread. Instead, rely on these visual and tactile cues:
The edges should be set and pulling away very slightly from the sides of the pan. The center should have a slight wobble when you gently shake the pan. A toothpick inserted in the center should come out with moist crumbs clinging to it, not raw wet batter. If your toothpick comes out completely clean, you have gone a few minutes too long.
These bars will look slightly underdone when you pull them from the oven. That is intentional. They continue to set as they cool, and the result after a full two hour rest at room temperature is a dense, fudgy, properly chewy bar. Do not rush the cooling. If you cut them warm you will lose the clean interior swirl you worked for.
For the cleanest cuts, refrigerate the fully cooled slab for one hour before slicing. Use a sharp knife and wipe the blade between cuts.
Storage and Freezing
Store cut bars in an airtight container at room temperature for up to five days. Refrigerate for up to one week. These freeze beautifully for up to three months. Wrap individual bars in plastic wrap before placing in a freezer safe bag or container. Thaw at room temperature for an hour or pop them in a 300 degree F oven for five minutes straight from frozen.
Frequently Asked Questions
Can I use Dutch processed cocoa powder instead of natural?
You can, but the results will be slightly different. Natural cocoa is more acidic and reacts with the baking soda in the recipe, contributing to lift and a more complex chocolate flavor. Dutch processed cocoa is neutral and will produce a darker, denser brownie half. Both will work but natural is the better choice here.
Can I use active starter instead of discard?
Yes. Both work well in this recipe. Active starter will give a very slight additional lift. Discard is perfectly fine and what I typically use to reduce waste. Use whichever you have on hand.
Why do I mix one wet base instead of making two separate batters?
Because the wet ingredients in brownies and blondies are nearly identical. Melted butter, sugar, eggs, and vanilla are the foundation of both. Mixing one base and splitting it means fewer dishes, less measuring, and a guarantee that both halves are properly balanced from the start.
Can I double this recipe?
Yes. Double all ingredients and bake in a 9×13 inch pan. Add about five to eight minutes to the bake time and start checking at the 30 minute mark.
My batter got stiff and hard to swirl. What happened?
The butter firmed back up as the batter sat. This is normal. Use the five minute oven swirl method described above, which loosens the batter just enough for easy, clean swirling. Alternatively, work quickly and do not let the batter sit too long before assembling.
Can I add other mix ins?
Absolutely. The blondie half works well with butterscotch chips, dried cranberries, or peanut butter chips. The brownie half can take chopped dark chocolate, espresso powder, or a pinch of flaky sea salt on top before baking.
What if I do not have sourdough starter?
See the substitution section above. A simple flour and water mixture or Greek yogurt both work as alternatives.

Let Me Know How Yours Turn Out
If you make these Sourdough Brondie Bars, I want to hear about it. Leave a comment below and let me know how your swirl turned out, whether you went straight in or did the five minute oven trick. If you share on Instagram or Facebook, tag me so I can see your Brondies. And if you want recipes like this sent directly to your inbox before they hit social media, sign up for the H3art of the Home newsletter below.


Leave a Reply