My hot dog bun pan has officially stopped being a hot dog bun pan. First it baked hot dogs directly into the bread, which turned into the biggest reel I have ever posted. Then it turned into breakfast when I poured pancake batter over sausage and cheddar and sliced the whole thing into dippers. So when my kids asked for pizza, I looked at those ten narrow wells and realized they were already the right shape for something I had been wanting to make for a long time.
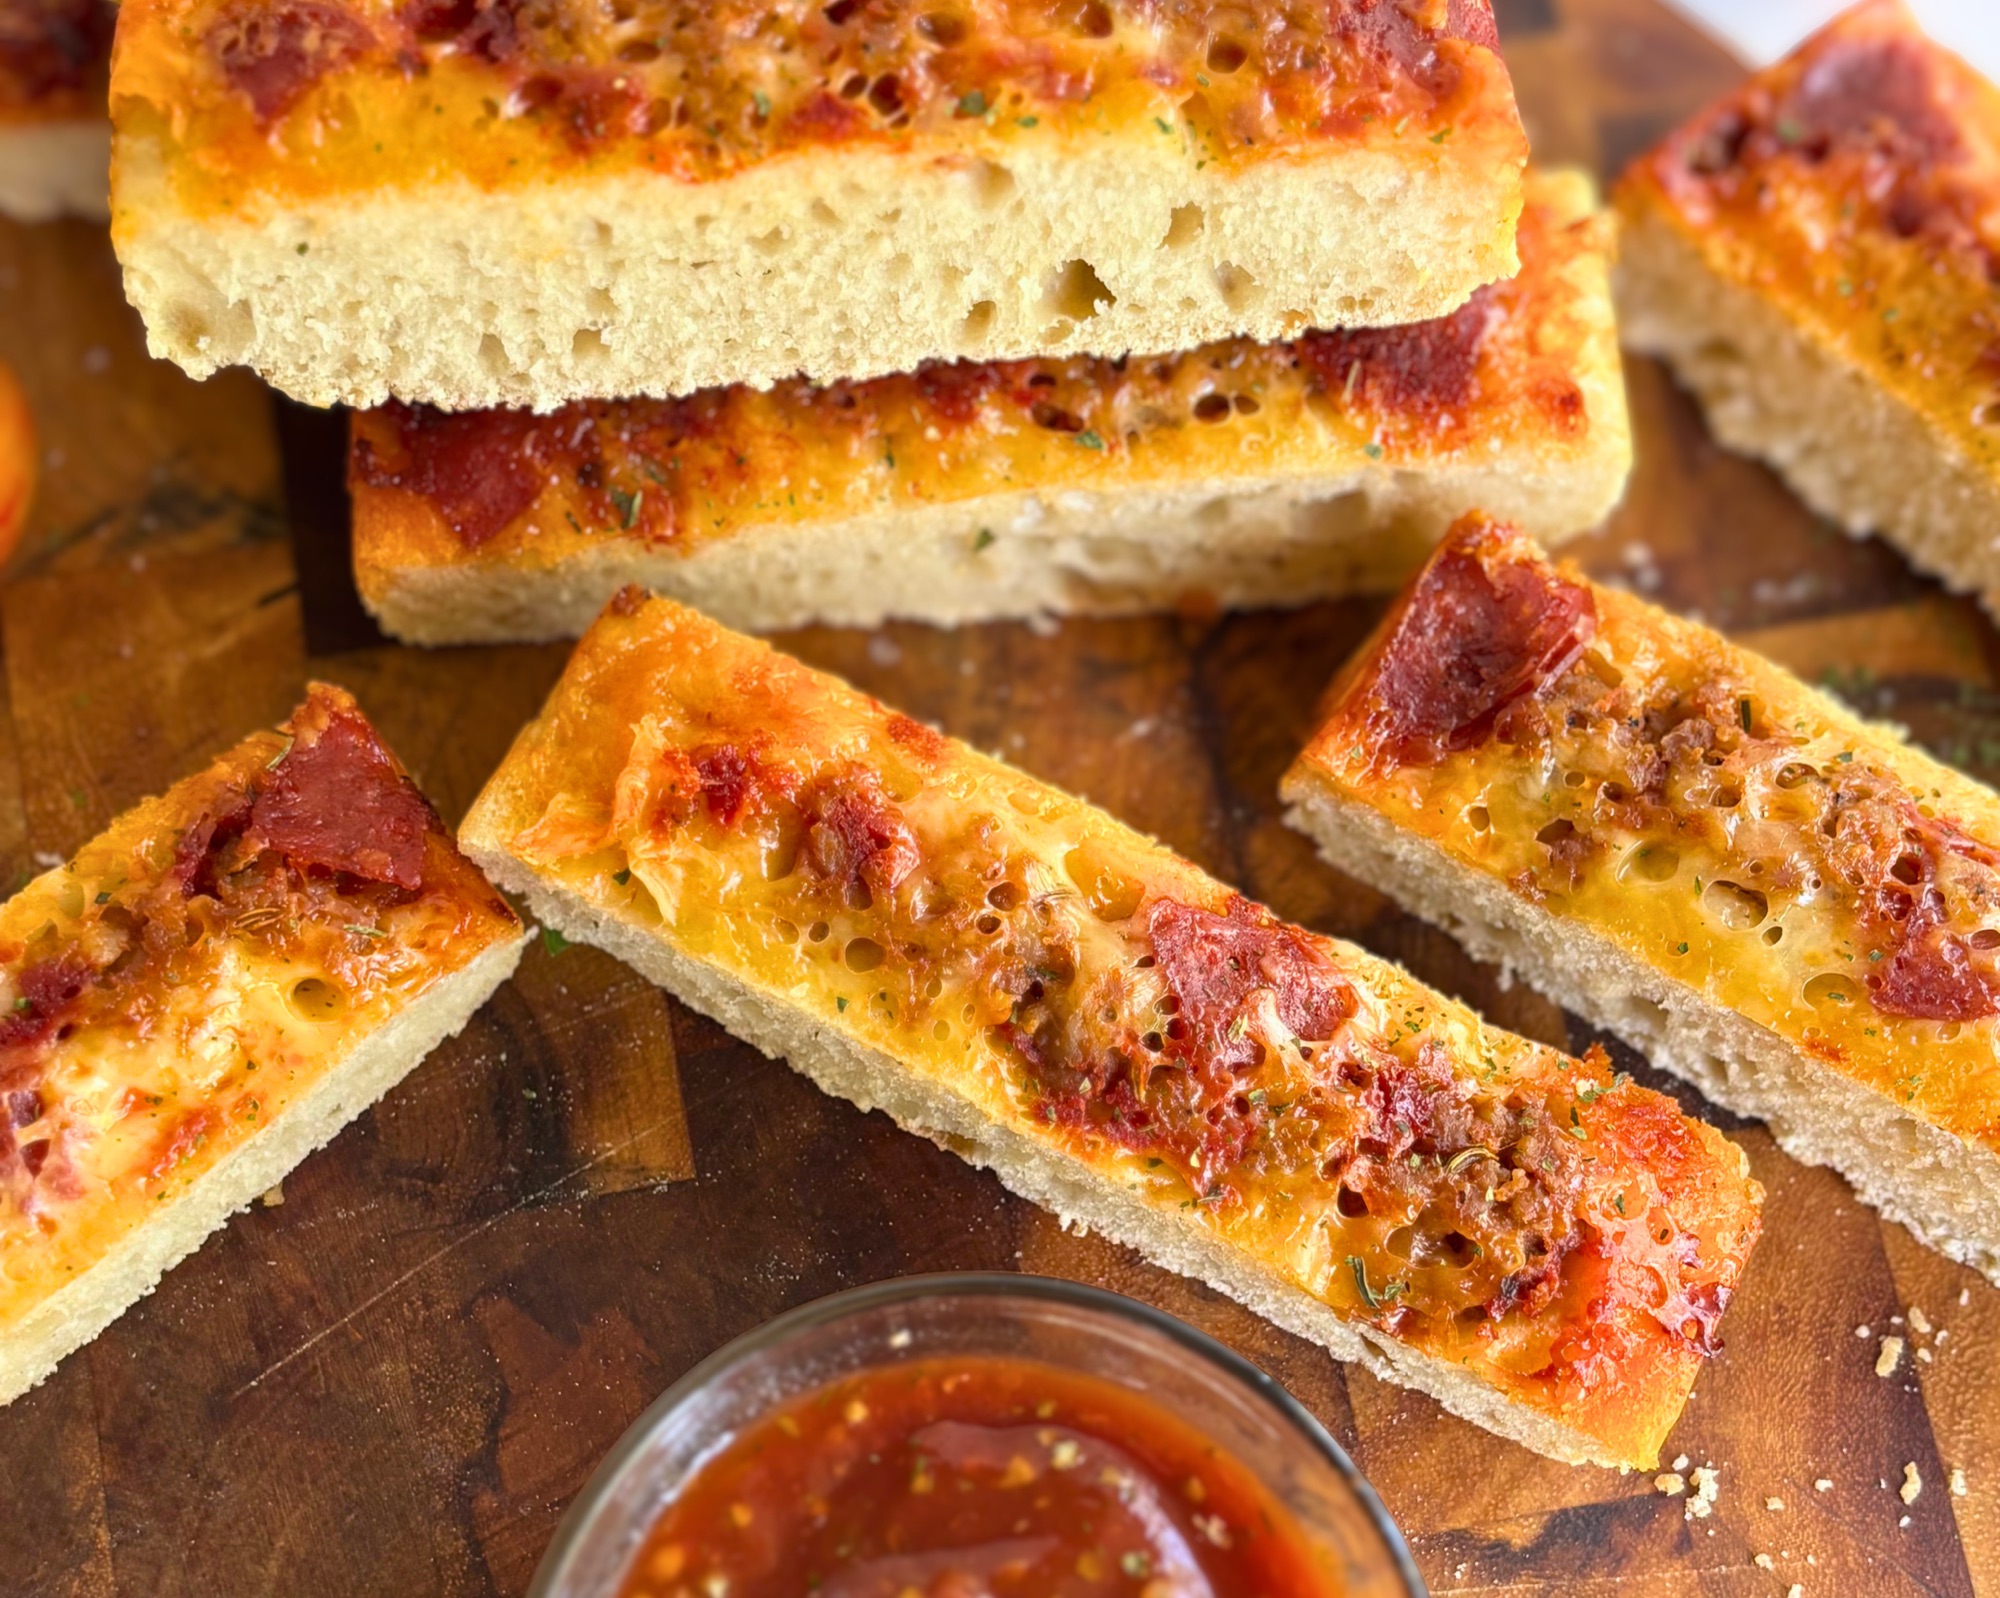
Pizza sticks. Not breadsticks with a little sauce brushed on top. These are built upside down inside the pan, with the sausage, pepperoni, sauce, and cheese going in first and the dough laid over the whole thing like a lid. It bakes into one solid slab, and when you flip it out, everything that was on the bottom of the pan is now a caramelized golden top that has fused right into the bread. Ten sticks, one pan, no shaping, and a bread base sturdy enough to hold up to serious dunking.
The dough is my High Protein Sourdough Pizza Crust scaled down to fit the pan exactly, which means every stick carries about 16 grams of protein before you have added a single thing to your plate.

Table of Contents
- Why You Will Love This Recipe
- Why the Hot Dog Bun Pan Works So Well Here
- Building These Upside Down
- How to Make High Protein Pizza Sticks
- Sourdough Recipe
- Want to Make These with Yeast
- How Much Protein Is in Each Stick
- Baking Tips
- How to Store, Freeze, and Reheat
- Substitutions and Variations
- Frequently Asked Questions
- Shop This Recipe
- More High Protein Recipes You Will Love
- Never Miss A Recipe
Why You Will Love This Recipe

About 16 grams of protein per stick. The Greek yogurt dough does the quiet work underneath, and then the sausage, pepperoni, and mozzarella stack on top of it. There is no protein powder anywhere in this recipe and nothing that tastes like a compromise.
No shaping at all. You roll the dough into one rectangle and lay it over the pan. The wells do every bit of the dividing for you, which is the entire reason this pan has become the most used piece of bakeware in my kitchen.
Built for dipping. The bread base bakes tall and sturdy with a soft, open crumb, so these hold their shape when you drag them through a bowl of warm sauce. They do not flop, they do not fall apart, and the filling does not slide off.
One pan, ten servings, twenty minutes in the oven. After the dough is made, the assembly takes about five minutes and the bake is short because everything inside is already cooked.
Completely customizable. Sausage and pepperoni is where I started, but the filling is the part of this recipe you should make your own. Anything you would put on a pizza works here.
Why the Hot Dog Bun Pan Works So Well Here

The USA Pan New England Hot Dog Bun Pan has a baking surface of 15 by 6 inches divided into ten wells, so each well is 1.5 inches wide and 6 inches long. That is almost exactly the shape of a restaurant pizza stick, which is why this works so well and why you cannot really get the same result from a 13 by 9 pan.
The wells do three things for you at once. They portion the filling so every stick gets the same amount, they hold each stick separate from its neighbors so nothing bleeds together, and they give you a clean edge to slice against once the slab comes out. All you have to do is cut down the ridge lines that the pan already pressed into the bread.
The other advantage is heat. The pan is aluminized steel and it sits the filling directly against the metal, which is what caramelizes the cheese into that lacy golden crust you see in the photos. A glass or ceramic dish will not give you that, and a pan with taller sides will steam the filling instead of browning it.
If you have already made my High Protein Sourdough Hot Dog Buns or my High Protein Pancake Sausage Sticks, you already own everything you need for this one.
Building These Upside Down

This is the part of the recipe that feels wrong while you are doing it and then makes complete sense the moment you turn the pan over.
Everything goes into the pan in reverse. The pepperoni and sausage go down first, then a layer of sauce, then the cheese, then a little more sauce on top of that. The dough is the very last thing to go in, laid over the entire pan as one sheet. While it bakes, the filling is on the bottom taking direct heat from the metal and the dough is on top rising freely with nothing weighing it down. When you flip the slab out onto a rack, the filling is suddenly the top of a pizza and the bread is the base underneath it.
Two things about this order are worth knowing. Piping the sauce rather than spooning it keeps it inside the well instead of smeared up the sides, which matters because sauce on the wall of the well will scorch before the bake is finished. And sandwiching the cheese between two thin layers of sauce is what fuses the filling to the dough, so the whole stick holds together in your hand instead of the topping shearing off in one sheet when you take a bite.
You do not need to be precise about any of it. As long as each well keeps its own filling roughly contained, the slab will slice cleanly.
How to Make High Protein Pizza Sticks
Here is the overview before you get to the recipe card.
Make the dough, let it rest for an hour, give it one round of stretch and folds, and then bulk ferment. From there you can either shape the same day or cover the dough well and let it cold ferment in the refrigerator overnight for deeper flavor. If it has been in the refrigerator, pull it out and let it sit at room temperature for 30 to 45 minutes before you roll it, because cold dough fights you and tears instead of stretching.
While the dough rests, brown your sausage and drain it thoroughly, then build your layers in the pan. Grease the sides of the wells but leave the bottoms alone, since the fat from the sausage takes care of that surface on its own.
Roll the dough into a rectangle roughly 15 by 6 inches, which matches the baking surface of the pan, and lay it over the filling in one motion. Do not slide it around or press it aggressively, because that drags all your careful layering out of position. Just settle it in place and ease it into the corners with your fingertips. Then dock the whole sheet with a fork the way you would dock a pizza crust, which keeps large bubbles from lifting the dough away from the filling underneath.

There is no long second proof here. I go straight into a preheated oven and the bread still comes out tall and soft, which is one of the reasons this recipe moves so quickly on a weeknight. If your kitchen is cold or your starter has been sluggish you can let the assembled pan sit for 30 minutes before baking, but it is genuinely not a required step.
Bake, rest, flip, and slice down the ridge lines. The full recipe with all measurements and detailed instructions is in the recipe card below.
Sourdough Recipe
The full sourdough recipe card with weights, volume conversions, and step by step instructions is below. Looking for the yeasted version? Jump to Want to Make These with Yeast.

High Protein Sourdough Pizza Sticks
Equipment
- USA Pan New England Hot Dog Bun Pan, 15 by 6 inches other pan 9×9 or 10×10
- – Stand mixer with dough hook or your hands
- kitchen scale highly recommened
- Instant read thermometer
- Wire cooling rack
- Rolling Pin
- Instant read thermometer
- Skillet
Ingredients
For the Dough
- 285 grams bread flour 2 and 1/3 cups
- 150 grams nonfat Greek yogurt 2/3 cup, warmed for 30 seconds in the microwave
- 100 grams active peaked sourdough starter scant 1/2 cup
- 75 grams water room temperature (1/3 cup)
- 15 grams olive oil 1 tablespoon
- 6 grams fine sea salt 1 teaspoon
- 4 grams sugar 1 teaspoon
For the Filling
- 340 grams mild Italian sausage pork or chicken (12 ounces)
- 150 grams pizza sauce scant 2/3 cup
- 140 grams shredded low moisture mozzarella 1 and 1/4 cups
- 60 grams mini pepperoni or pepperoni cut up generous 1/2 cup
- Butter softened, for the pan
Instructions
- Warm your yogurt in the microwave for 30 seconds.
- In the bowl of your stand mixer fitted with the dough hook, combine the bread flour, salt, and sugar and mix briefly on low to distribute. In a separate bowl whisk together the Greek yogurt, sourdough starter, water, and olive oil until smooth, then pour the wet ingredients into the flour.
- Mix on low speed until a shaggy dough forms, about 2 minutes, cover and let rest about 30 minutes. This dough hydrates differently than a regular pizza dough.
- Knead on medium speed for 5-6 minutes until the dough is smoother, pulls away cleanly from the sides of the bowl. You are looking for dough that stretches without immediately tearing. It should feel tacky but not sticky.
- Transfer the dough to a lightly oiled bowl, cover, and rest for 1 hour.
- Do one set of stretch and folds, working around the bowl and pulling the dough up and over itself four times. Cover again.
- Bulk ferment at room temperature for 6 to 8 hours, until the dough has risen noticeably and looks puffy and alive. Go by the look of the dough rather than the clock, since kitchen temperature changes everything.
- At this point you can shape immediately, or cover the bowl tightly and cold ferment in the refrigerator overnight for deeper flavor. If the dough has been refrigerated, pull it out and let it rest at room temperature for 30 to 45 minutes before rolling. Cold dough will tear instead of stretching.
- Remove the sausage from its casings if you are using links, then brown it in a skillet over medium heat, breaking it into small crumbles as it cooks. Drain thoroughly on paper towels if you are using pork.
- Butter the wells of the hot dog bun pan, taking the butter all the way up the sides to the rim. If you used a lean chicken sausage, butter the bottoms of the wells as well.
- Divide the mini pepperoni and the cooked sausage evenly among the ten wells, pushing everything all the way into the corners so the end sticks are not left bare.
- Pipe about half the pizza sauce over the meat, scatter the mozzarella evenly over the top, then pipe the remaining sauce over the cheese.
- Preheat your oven to 425 degrees F.
- On a lightly floured surface, roll the dough into a rectangle about 15 by 6 inches, matching the baking surface of the pan. Lay it over the filled pan in one motion and leave it where it lands. Do not slide or press it around, which drags the filling out of position. Ease the edges gently into the corners with your fingertips.
- Dock the dough all over with a fork, the same way you would dock a pizza crust. This keeps large bubbles from lifting the dough away from the filling underneath. Gently push the dough down into the fillings, too hard and it will squish out.
- Bake at 425 degrees F for 18 to 25 minutes, until the top is firm with no give in the center and the internal temperature reads around 190 degrees F. Start checking at 18 minutes if your oven runs hot, since the cheese is against the hot metal on the bottom where you cannot see it. You should be able to watch the edges.
- Let the pan rest on a wire rack for 5 minutes, then invert onto the rack so the filling side faces up. Cool for another 10 minutes before slicing.
- Slice down the ridge lines the pan pressed into the bread to get ten even sticks. Serve warm with extra pizza sauce for dipping.
Notes
Want to Make These with Yeast
No starter on your counter, or no time to wait? This entire recipe works with active dry yeast and the result is nearly identical, just faster and without the long fermentation flavor.
The dough goes together the same way, rises in about an hour and a half instead of most of a day, and gets rolled, filled, and baked exactly like the sourdough version. Everything from the layer order to the pan size to the bake temperature stays the same. The only real difference is the timeline, which makes this the version to reach for when pizza night was not the plan until about two hours ago.
High Protein Pizza Sticks (Yeast Recipe)
Equipment
- – Stand mixer with dough hook your hands
- kitchen scale
- USA Pan New England Hot Dog Bun Pan, 15 by 6 inches
- Skillet
- Instant read thermometer
- Rolling Pin
Ingredients
For the Dough
- 325 grams bread flour 2 and 3/4 cups
- 170 grams nonfat Greek yogurt 3/4 cup
- 100 grams water warm at 100 to 110 degrees F (scant 1/2 cup)
- 17 grams olive oil 1 and 1/4 tablespoons
- 5 grams active dry yeast 1 and 1/2 teaspoons
- 6 grams fine sea salt 1 teaspoon
- 4 grams sugar 1 teaspoon
For the Filling
- 340 grams mild Italian sausage pork or chicken (12 ounces)
- 150 grams pizza sauce scant 2/3 cup
- 140 grams shredded low moisture mozzarella 1 and 1/4 cups
- 60 grams mini pepperoni generous 1/2 cup
- Butter softened, for the pan
Instructions
- Warm the yogurt in the microwave for 30 seconds.
- Combine the warm water, sugar, and active dry yeast in a small bowl and let it sit for 5 to 10 minutes until foamy. If it does not foam, your yeast is no longer active and you should start over with a fresh packet.
- In the bowl of your stand mixer fitted with the dough hook, combine the bread flour and salt and mix briefly on low to distribute. In a separate bowl whisk together the Greek yogurt, the bloomed yeast mixture, and the olive oil until smooth, then pour the wet ingredients into the flour.
- Mix on low speed until a shaggy dough forms, about 2 minutes, then increase to medium speed and knead for 6 to 8 minutes until the dough is smooth, pulls away cleanly from the sides of the bowl, it may stick to the bottom a little. Because this is an enriched dough you are looking for dough that stretches without immediately tearing. It should feel tacky but not sticky. It will not behave the same way as a traditonal pizza dough.
- Transfer the dough to a lightly oiled bowl, cover, and rise at room temperature for 1 to 1.5 hours until visibly puffy and increased in size. You do not need it to fully double.
- Remove the sausage from its casings if you are using links, then brown it in a skillet over medium heat, breaking it into small crumbles as it cooks. Drain thoroughly on paper towels if you are using pork.
- Butter the wells of the hot dog bun pan generously, taking the butter all the way up the sides to the rim. If you used a lean chicken sausage, butter the bottoms of the wells as well.
- Divide the mini pepperoni and the cooked sausage evenly among the ten wells, pushing everything all the way into the corners so the end sticks are not left bare. Pipe about half the pizza sauce over the meat, scatter the mozzarella evenly over the top, then pipe the remaining sauce over the cheese. Keep the filling pulled in slightly from the edges of each well so the cheese does not run up the sides.
- Preheat your oven to 425 degrees F.
- On a lightly floured surface, roll the dough into a rectangle about 15 by 6 inches, matching the baking surface of the pan. Lay it over the filled pan in one motion and leave it where it lands. Do not slide or press it around, which drags the filling out of position. Ease the edges gently into the corners with your fingertips.
- Dock the dough all over with a fork, the same way you would dock a pizza crust. This keeps large bubbles from lifting the dough away from the filling underneath.
- Bake at 425 degrees F for 18 to 22 minutes, until the top is firm with no give in the center and the internal temperature reads around 190 degrees F. Start checking at 18 minutes if your oven runs hot, since the cheese is against the hot metal on the bottom where you cannot see it.
- Let the pan rest on a wire rack for 5 minutes, then invert onto the rack so the filling side faces up. Cool for another 10 minutes before slicing.
- Slice down the ridge lines the pan pressed into the bread to get ten even sticks. Serve warm with extra pizza sauce for dipping.
Notes
How Much Protein Is in Each Stick

Each stick lands at approximately 275 calories with 16 grams of protein, 26 grams of carbohydrates, and 12 grams of fat.
Close to 6 grams of that protein comes from the dough itself, which is the part most people never count. Bread flour and nonfat Greek yogurt together give this crust noticeably more protein than a standard pizza dough made from flour and water, and that number is there before any filling goes in. The other 10 grams comes from the sausage, mozzarella, and pepperoni layered underneath.
Two sticks with a side salad is a genuinely filling dinner at around 32 grams of protein.
Pork and chicken Italian sausage carry almost identical protein, so that 16 grams holds no matter which one you reach for. Chicken runs a little leaner and pork a little richer, and the numbers above sit between the two. Treat them as a starting point rather than a precise count, since sausage and cheese vary quite a bit brand to brand.
Baking Tips

Drain pork sausage well. Rendered fat left in the pan will pool under the filling and fry the bottom of your dough instead of baking it. Chicken sausage barely renders and needs nothing.
Grease the wells all the way up the sides. What sticks is the upper inch of the well wall where the dough climbs during the bake, so take your butter to the rim rather than stopping partway.
Keep the cheese pulled in slightly from the edges. Cheese that creeps up the side of a well will run down and weld itself to the pan above the meat line, and no amount of greasing prevents that. Leave yourself a small margin.
Push the filling into the corners. The end wells are where the filling always runs thin, and an end stick that is mostly bread is a disappointment when everyone else got a loaded one. Take an extra ten seconds on the first and last wells.
Start checking at 18 minutes. The bread is not the limiting factor here. The cheese is sitting directly against the metal taking full heat for the entire bake, and the window between deeply caramelized and burnt down there is only a couple of minutes and completely invisible from above.
Let it rest before you flip. Give the pan five minutes on a rack before you turn it out. The cheese needs to set slightly or it will tear away from the bread and stay in the pan.
How to Store, Freeze, and Reheat

At room temperature. Store cooled sticks in an airtight container for up to 2 days. Because there is cooked meat and cheese in these, anything beyond that should go in the refrigerator.
In the refrigerator. Store in an airtight container for up to 4 days.
To freeze. Cool completely, then freeze the sticks in a single layer on a sheet pan for about an hour until they are solid. Transfer to a freezer safe bag and store for up to 3 months. Freezing them individually first keeps them from fusing into one block.
To reheat. Place on a sheet pan in a 375 degree F oven for 8 to 10 minutes from the refrigerator, or 12 to 15 minutes from frozen. An air fryer at 350 degrees F for about 5 minutes works beautifully and crisps the cheese back up. Skip the microwave, which turns the caramelized top soft and the crumb chewy.
Substitutions and Variations

The filling is yours. This is the part of the recipe I would encourage you to change every single time you make it. Sausage and pepperoni is the classic, but sausage and roasted peppers, buffalo chicken with a drizzle of ranch, pesto with fresh mozzarella and tomato, or plain cheese for the selective eaters at your table all work exactly the same way.
Cottage cheese instead of Greek yogurt. Blend 200 grams of cottage cheese with 15 grams of milk until it is completely smooth and use it in place of the Greek yogurt at the same measured weight. Nothing else in the recipe changes.
Pork or chicken sausage. Mild Italian works in either one, and a mix of the two is great if that is what is in your refrigerator. Chicken keeps things leaner, pork gives you a richer bite, and the protein is nearly the same either way. Hot Italian is an easy swap if your table likes heat.
Ground beef or turkey. Both work in place of the sausage. Season them well, because sausage brings its own seasoning and plain ground meat will taste flat next to the sauce and cheese if you do not.
Homemade sauce. A thick sauce is what you want here, and my Small Batch Roasted Garden Tomato Sauce is perfect for it if you have tomatoes to use up.
No hot dog bun pan. You can build this in a loaf pan or an 8 by 8 pan for a thicker single slab, though you will lose the divided wells and will need to add about 5 to 10 minutes to the bake time. It will not slice as neatly, but it tastes exactly the same.
Frequently Asked Questions
Do I have to flip these out of the pan?
Yes, and it is the whole point. The filling bakes on the bottom against the hot metal, so flipping is what turns it into the top of a pizza. If you left it in the pan the right way up, you would be looking at a plain slab of bread.
Why is my dough tearing when I roll it?
It is too cold. If the dough came out of the refrigerator, give it 30 to 45 minutes at room temperature before you try to roll it. Cold gluten is tight and will fight you the entire time.
Do I need a second proof after I assemble the pan?
No. I go straight from assembly into a preheated oven and the bread rises beautifully. If your kitchen runs cold you can let it sit for 30 minutes, but it is optional.
Why do I have to dock the dough?
Docking keeps large air pockets from forming and lifting the dough away from the filling underneath. Without it you can end up with a hollow gap between the bread and the toppings, which makes the sticks fall apart when you pick them up.
Can I assemble this ahead of time?
You can build the pan and refrigerate it for a few hours before baking, but I would not leave cooked meat sitting in an assembled pan overnight. If you want to work ahead, cold ferment the dough overnight instead and assemble right before you bake.
My sticks are more bread than filling. What happened?
Almost always the end wells, where the filling gets thin as you work outward. Push everything all the way into the corners of each well before the dough goes on, and add a little more filling than you think you need.
What temperature should the bread be when it is done?
Around 190 degrees F internal, though on a slab this thin it will hit that before it looks right. The better test is a firm top with no give in the center, with the thermometer confirming it rather than deciding it.
Shop This Recipe
This section contains affiliate links, which means I may earn a small commission at no additional cost to you.
USA Pan New England Hot Dog Bun Pan is the pan the entire recipe is built around, with a 15 by 6 inch baking surface and ten wells.
Digital Kitchen Scale because the dough sheet needs to match the pan and grams are the only way to get there reliably.
Bench Scraper for dividing dough and lifting the rolled sheet without stretching it.
Rolling Pin for taking the dough to an even thickness across the full 15 inches.
Digital Thermometer so you don’t have to guess if your pizza is done.
More High Protein Recipes You Will Love
If these pizza sticks are your kind of dinner, here is where to go next.
High Protein Sourdough Pizza Crust
High Protein Pizza Crust (Yeast Recipe)
High Protein Pizza Bites (Pull Apart)
High Protein Sourdough Pizza Bites (Pull Apart)

Never Miss A Recipe
If you make these High Protein Pizza Sticks I want to see them. Tag me on Instagram and leave a comment below telling me what you put in your wells, because I am collecting variations and yours might be the one I make next. And if this pan has earned a permanent spot on your counter too, drop ME in the comments and I will send you the link.
Sign up for the H3art of the Home newsletter so you never miss a new recipe sent straight to your inbox.






Leave a Reply