You asked for it and I listened. After the response to my high protein sourdough sandwich bread, my comments and DMs were flooded with one request: a version for people who do not have a sourdough starter. So here it is. Same soft pillowy crumb. Same genuine protein boost from nothing but Greek yogurt. Same clean ingredient list with zero additives and zero protein powder. Just a same day yeasted loaf that comes together in a few hours and tastes like the best sandwich bread you have ever pulled from your own oven.
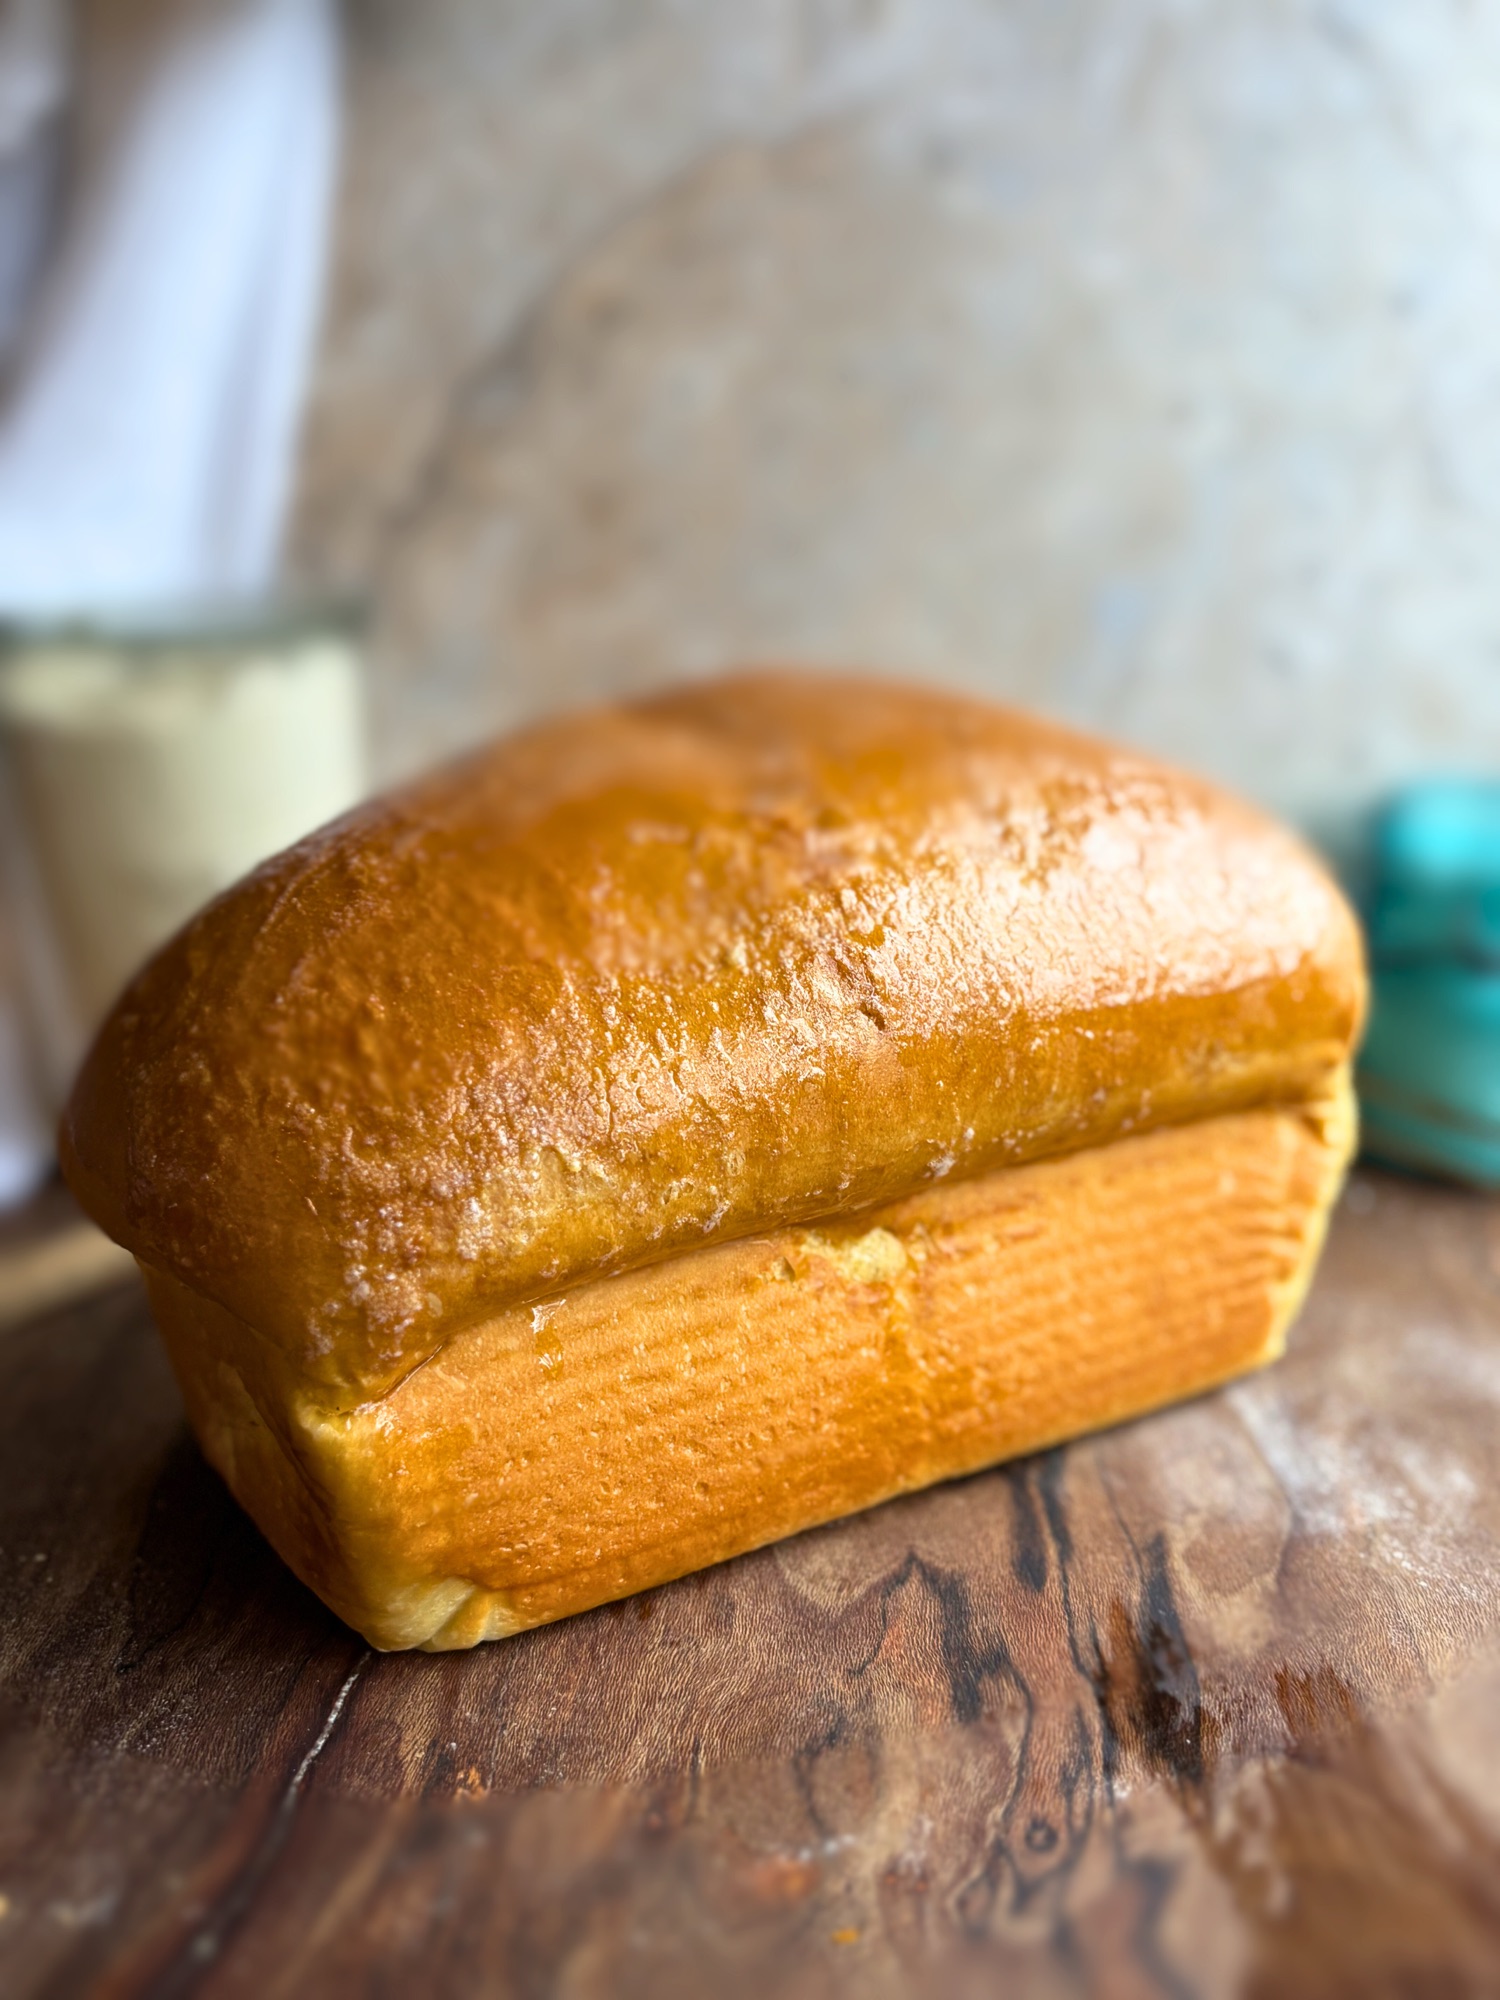
This is not a recipe I threw together to answer the demand. The crumb is exactly right and the crust is golden and the taste is perfect. What came out of that testing is a loaf I am genuinely proud of. Soft enough for the kids, sturdy enough for the biggest sandwich, and packed with 6 grams of protein per slice from an ingredient you already have sitting in your fridge. Ready in a few hours vs a day!
If you have been buying high protein bread at the store, check that ingredient label. What you will find is wheat protein isolate, pea protein concentrate, or faba bean protein carrying those numbers. This loaf gets there with nonfat Greek yogurt. That is it. One real ingredient doing all the work.

Table of Contents
- Why This Recipe Works
- Key Ingredients and Why They Matter
- Working with Active Dry Yeast
- Shaping for the Perfect Rise
- Baking and Finishing
- Storage and Slicing
- Want to Make This with Sourdough?
- More High Protein Recipes
- Frequently Asked Questions
- Recipe
Why This Recipe Works
Most high protein bread recipes online fall into one of two camps. Either they rely on protein powder, which can leave a loaf dry and oddly textured, or they pile in seeds and nuts and call it high protein. This recipe does neither. Instead, nonfat Greek yogurt replaces the water you would typically use in an enriched sandwich loaf. Greek yogurt is naturally protein dense, thick enough to build real structure into the dough, and just acidic enough to tenderize the gluten for that soft, pillowy bite.
The result is a bread that hits 6+ grams of protein per slice using nothing but whole food ingredients. No isolates. No powders. No mystery additives. Just the same ingredients you already keep in your kitchen working together the way they were meant to.
The other thing that makes this recipe stand out is the timeline. This is a same day bread. You bloom the yeast, mix the dough, give it one bulk rise, shape it, proof it in the pan, and bake. From start to finish you are looking at about three to four hours. No starter to maintain, no overnight ferment, no planning ahead. You decide you want homemade high protein sandwich bread in the morning and you have it by lunch.

Key Ingredients and Why They Matter
Bread flour. Bread flour has a higher protein content than all purpose flour, which means more gluten development and a stronger structure. This loaf needs that strength to rise tall in the pan and hold its shape when sliced. Do not swap for all purpose flour or you will get a shorter, denser loaf.
Nonfat Greek yogurt. This is the whole reason the protein numbers work. Nonfat Greek yogurt brings roughly 17 grams of protein per 100 grams and it integrates into the dough in a way that builds both structure and tenderness at the same time. It also slightly acidifies the dough, which helps tenderize the gluten and contributes to that soft bite you want in a sandwich loaf. Do not swap for regular yogurt, it is too thin and will throw off the hydration entirely.
Active dry yeast. This is the leavening that does the heavy lifting. Blooming it properly before it goes into the dough is not optional. A properly bloomed yeast mixture is foamy and fragrant after 10 minutes. If it does not foam, your yeast is dead and the loaf will not rise. Always start fresh.
Butter. Softened butter, not melted. Butter coats the gluten strands in a way that creates tenderness and keeps the crumb soft for days. Melted butter does not behave the same way in the dough and will affect the final texture. Pull it out of the fridge ahead of time.
Egg. The egg enriches the dough, adds color to the crumb, and contributes to both structure and rise. It also helps the loaf stay soft longer than a lean dough would. Room temperature eggs incorporate more smoothly than cold ones.

Working with Active Dry Yeast
The bloom step is the most important part of this recipe and the one people most often skip. Active dry yeast needs to be hydrated and activated before it goes into the dough. Sprinkle it over your warm water and milk mixture along with all of the sugar and let it sit for a full 10 minutes. You are looking for a foamy, fragrant bloom that has visibly risen and bubbled. That foam tells you the yeast is alive and actively producing gas.
Temperature matters more than anything else here. Too cold and the yeast will not activate. Too hot and you will kill it. The sweet spot is 110 to 115 degrees Fahrenheit. Use an instant read thermometer rather than guessing by touch. What feels warm on your wrist may still be too hot for yeast.
The full 20 grams of sugar goes into the bloom rather than the dry ingredients. Sugar is food for yeast and adding it at the bloom stage gives you a more vigorous and reliable activation every time.

Shaping for the Perfect Rise
Shaping is what determines whether your loaf rises tall and even or splits on the sides and domes unevenly. The method here is designed to build surface tension into the dough so it has the structure to rise straight up rather than spreading out or bursting through the weakest point.
Before you shape, do the poke test. This step is not optional and it is the single biggest thing that will prevent your loaf from blowing out on the sides. Press a lightly floured finger about half an inch into the doubled dough. If it springs back immediately and completely, the gluten is still tight and the dough needs more time even if it looks fully doubled. You are looking for a slow partial spring back that leaves a slight indent. That tells you the gluten has relaxed enough to expand gradually in the oven rather than bursting through the weakest point. Give it another 20 to 30 minutes and test again if needed.
After the bulk rise, turn the dough out onto a lightly floured surface and use a rolling pin to roll it out into a rectangle approximately 14 inches wide by 16 inches long. Position it so the 14 inch side is parallel to you. Fold each short side in toward the center, meeting in the middle. Then starting from the edge closest to you, roll the dough up away from you, tugging gently inward and rolling as you go to build surface tension across the outer skin. Once rolled, pinch the seam firmly on the sides and all the way across the bottom and place it seam side down in your parchment lined pan.
A tightly shaped loaf will rise up. A loosely shaped loaf will spread out. Take the extra 60 seconds to do this properly and your loaf will thank you.

Baking and Finishing
This loaf bakes at 350 degrees Fahrenheit for 42 to 48 minutes. The lower temperature compared to some sandwich loaf recipes gives the enriched dough time to bake through evenly without the crust getting ahead of the interior. Because this dough contains butter, egg, and sugar, it will brown more readily than a lean dough. Keep an eye on it after the 25 minute mark and tent loosely with foil if the top is coloring faster than you would like.
The most reliable way to know when this loaf is done is an instant read thermometer. You are looking for 190 to 195 degrees Fahrenheit in the center. Color alone is not enough to judge doneness on an enriched loaf.
The moment it comes out of the oven, brush the top generously with melted butter. This softens the crust and gives the loaf that beautiful sheen that makes it impossible not to cut into immediately. Resist the urge. Let it cool for at least 45 minutes to an hour before slicing. The interior is still setting up as it cools and cutting too soon will give you a gummy crumb no matter how perfectly it baked.

Storage and Slicing
Once fully cooled, wrap the loaf tightly in plastic wrap or store in an airtight bread bag at room temperature for up to 3 days. The butter, yogurt, and egg in this dough give it much better staying power than a standard lean loaf. It stays soft without any added preservatives, which is exactly the point.
For longer storage, slice the cooled loaf completely, place a small piece of parchment between each slice, and freeze in an airtight bag for up to one month. Pull slices directly from the freezer and toast from frozen. This is meal prep done right.

Want to Make This with Sourdough?
If you maintain an active sourdough starter and want all the benefits that come with slow fermentation, the sourdough version of this recipe is for you. Sourdough fermentation breaks down phytic acid in the wheat, making the nutrients in the bread more bioavailable. The long slow ferment also partially breaks down the gluten structure, which many people find makes sourdough easier to digest than commercially yeasted bread. And of course the flavor is different in a way that is hard to replicate with commercial yeast alone.
The sourdough version uses an active peaked starter in place of the yeast and blooming liquid, with a longer bulk fermentation of 6 to 10 hours depending on your kitchen temperature. Everything else about the recipe stays remarkably similar.
Get the High Protein Sourdough Sandwich Bread recipe here.
Looking for a soft sandwich bread without the high protein angle? My friend Samantha over at Healing Slice has a beautiful soft sandwich bread recipe you will love.
More High Protein Recipes
If you love the idea of sneaking more protein into everyday baked goods without protein powder or complicated additions, here are a few more recipes from the archive worth bookmarking.
The High Protein Chocolate Sourdough Sandwich Bread uses the same Greek yogurt base with a rich cocoa dough that is incredible toasted with butter or used for French toast. The High Protein Sourdough Pretzel Bites are a crowd favorite and impossibly easy to make with active starter. And the High Protein Chocolate Chip Sourdough Scones are the recipe my family asks for every single weekend.

Frequently Asked Questions
Can I use full fat Greek yogurt instead of nonfat?
Yes, full fat Greek yogurt will work but the dough will be slightly stickier and wetter than the nonfat version. If you use full fat, add bread flour one tablespoon at a time during kneading until the dough feels soft and tacky but manageable. The crumb will be slightly richer and more tender, which is not a bad thing. The protein content per slice will be marginally lower but not significantly enough to worry about.
Can I use lactose free milk?
Yes, lactose free whole milk like Lactaid is a straight 1 to 1 swap and behaves identically in this recipe. The only difference is that the lactase enzyme has already broken down the lactose into simpler sugars, which means it may brown very slightly faster. At 350 degrees Fahrenheit this is not a concern worth worrying about.
What if I do not have dairy milk at all?
Unsweetened soy milk is the best performing dairy free substitute for this recipe because it most closely matches dairy milk in protein content, which matters for the dough structure. Oat milk or almond milk will work but may produce a slightly softer crumb. Whatever you use, make sure it is plain and unsweetened.
Can I make this without an egg?
I have not personally tested an egg free version of this recipe. Based on research, aquafaba (the liquid drained from a can of unsalted chickpeas) is the most recommended substitute for eggs in enriched yeasted breads. Use 3 tablespoons of aquafaba in place of the one egg. If you try it, let me know in the comments how it goes.
My yeast did not foam. What went wrong?
If nothing happens after 10 minutes your yeast is either dead or the liquid was the wrong temperature. Water that is too hot (above 120 degrees Fahrenheit) will kill yeast. Water that is too cold will not activate it. Use an instant read thermometer and aim for exactly 110 to 115 degrees Fahrenheit. If your liquid was in range and the yeast still did not foam, the yeast itself is old or compromised. Discard and start with a fresh packet.
Why did my loaf split on the sides?
A side split almost always means the loaf went into the oven underproofed. The oven spring was too aggressive for the tight dough structure and it burst through the weakest point on the side of the pan. Make sure the dough has fully doubled during the bulk rise and that it crowns about one inch above the rim of the pan before baking.
An oven running hotter than its dial indicates can also contribute. Check your oven with a separate thermometer if this keeps happening.
The shaping tension is the other big factor. When you roll and fold a rectangle that large, if the seam is not pinched firmly all the way across or if there are any weak points in the outer skin, the oven spring will find that weakness and blow right through it. The side is almost always the weakest point because that is where the seam sits and where the dough transitions from the pan wall to open air. A loose roll with any gaps or air pockets trapped inside gives the expanding gas a predetermined escape route.
Can I use instant yeast instead of active dry?
Yes, instant yeast can be used in the same amount and does not need to be bloomed first. Simply add it directly to the dry ingredients and combine everything as directed. Your rise times may be slightly shorter since instant yeast is more potent, so start checking the dough a little earlier than the recipe suggests.
Can I proof in a warmer environment?
If you proof in a warm environment such as an oven with the light on or a kitchen running above 78 degrees Fahrenheit. Yeast activity doubles in speed with every 18 degree increase in temperature, which means your dough can go from perfectly proofed to overproofed very quickly. A warm proofing environment also causes enzymes to break down gluten faster, weakening the dough structure at the same time the yeast is producing more gas. This combination puts enormous pressure on the loaf in the oven and can lead to tearing on the side. The bread is STILL good!
Can I use honey instead of sugar?
Yes, honey works as a substitute in this recipe. Use about 15 grams of honey in place of the 20 grams of sugar since honey is sweeter. Stir it into the warm water and milk during the yeast bloom step the same way you would the sugar. The dough may feel very slightly softer or stickier than usual because honey adds a touch more moisture, so if it feels too slack during kneading add bread flour one tablespoon at a time. The flavor will be subtly warmer and sweeter which is a lovely variation. If you want to see how honey performs in a similar enriched dough, check out my High Protein Honey Whole Wheat Sandwich Bread where honey is the primary sweetener.

High Protein Yeasted Sandwich Bread
Equipment
- kitchen scale
- Stand mixer with dough hook or large mixing bowl
- 9×5 loaf pan 10×5 pan
- Parchment paper
- Instant read thermometer
- – Pastry brush
- Wire cooling rack
- Rolling Pin
Ingredients
For the yeast bloom:
- 60 grams warm water 110 to 115 degrees Fahrenheit (1/4 cup)
- 40 grams whole milk warmed to 110 to 115 degrees Fahrenheit (3 tablespoons)
- 6 grams active dry yeast 2 teaspoons
- 20 grams granulated sugar 1 1/2 tablespoons
For the dough:
- 460 grams bread flour 3 3/4 cups
- 240 grams nonfat Greek yogurt slightly warmed (1 cup)
- 50 grams unsalted butter softened (3 1/2 tablespoons)
- 7 grams fine sea salt 1 1/4 teaspoons
- 1 large egg room temperature
For finishing:
- 1 large egg
- 1 tablespoon water/milk
- 2 tablespoons melted butter for brushing after baking
Instructions
- Combine the warm water and warm milk in a small bowl and check the temperature. It should register between 110 and 115 degrees Fahrenheit on an instant read thermometer. Sprinkle the yeast and all of the sugar over the liquid and stir gently. Let sit for 10 minutes until the mixture is foamy and fragrant. If nothing happens after 10 minutes, your yeast is dead. Discard and start over with fresh yeast.
- While the yeast blooms, warm the Greek yogurt in the microwave for about 30 seconds, just enough to take the chill off. You want it slightly warm but not hot.
- In a large bowl whisk together the bread flour and salt. In a separate bowl whisk together the warmed yogurt and egg until smooth. Pour the foamy yeast mixture into the yogurt mixture and stir to combine.
- Pour the dry ingredients onto the wet mixture. Do not start mixing. Take teaspoons of the softned butter and place onto of the flour. Then begin to mix at speed 2 until a cohesive shaggy dough forms. Cover and let rest about 15 minutes.
- Knead the dough for 5 to 6 minutes on a countertop, or mix on medium speed with a stand mixer dough hook, until the dough is smooth, elastic, and slightly tacky. This dough will feel sticky at first because the Greek yogurt releases moisture slowly and differently than water would.
- Place the dough in a lightly oiled bowl, cover, and set in a warm spot. Let rise until the dough has fully doubled in size, about 1 to 2 hours depending on your kitchen temperature. Do not rely on size alone. Once doubled, perform the poke test by pressing a floured finger about half an inch into the dough. If it springs back immediately and completely, the gluten is still tight and the dough needs more time regardless of the size. You are looking for a slow partial spring back that leaves a slight indent. If it springs back slowly and only partially fills in, the dough is ready to shape.
- Turn the dough out onto a lightly floured surface. Using a rolling pin, roll the dough out into a rectangle approximately 14 inches wide by 16 inches long. Position the dough so the 14 inch side is parallel to you. Fold each short side in toward the center, overlapping slightly in the middle. Starting from the edge closest to you, roll the dough up away from you, tugging gently inward and rolling as you go to build surface tension. Once rolled, pinch the seam firmly all the way across and place the shaped loaf seam side down in a parchment lined 9×5 loaf pan.

- Cover the pan and let proof in a warm spot for 45 minutes to 1 hour until the dough crowns one inch above the rim of the pan.
- Preheat the oven to 350 degrees Fahrenheit. While the oven heats, whisk together the egg and water or milk to make the egg wash and brush it gently over the surface of the loaf. I find using a torn piece of paper towel works better than a pastry brush.
- Bake for 42 to 48 minutes until deep golden brown. Check the internal temperature with an instant read thermometer. You are looking for about 195 degrees Fahrenheit in the center of the loaf. If the top is browning faster than you would like, tent the loaf loosely with foil after the first 25 minutes and continue baking.
- Remove from the oven and immediately brush the top generously with butter. Let the loaf cool in the pan for 10 minutes, then lift it out using the parchment and transfer to a wire rack.
- Cool for at least 45 minutes to one hour before slicing. Cutting into an enriched loaf too soon results in a gummy crumb even when the loaf is fully baked. The interior is still setting up as it cools and the wait is worth it.
Notes
Made This Recipe?
Leave a comment below and let me know how it turned out. Did your family figure out the secret ingredient? Tag me on Instagram and Facebook so I can see your loaf. And if you want more recipes like this one delivered straight to your inbox, subscribe to the newsletter below.


Leave a Reply to Kaitlyn Hagerman Cancel reply