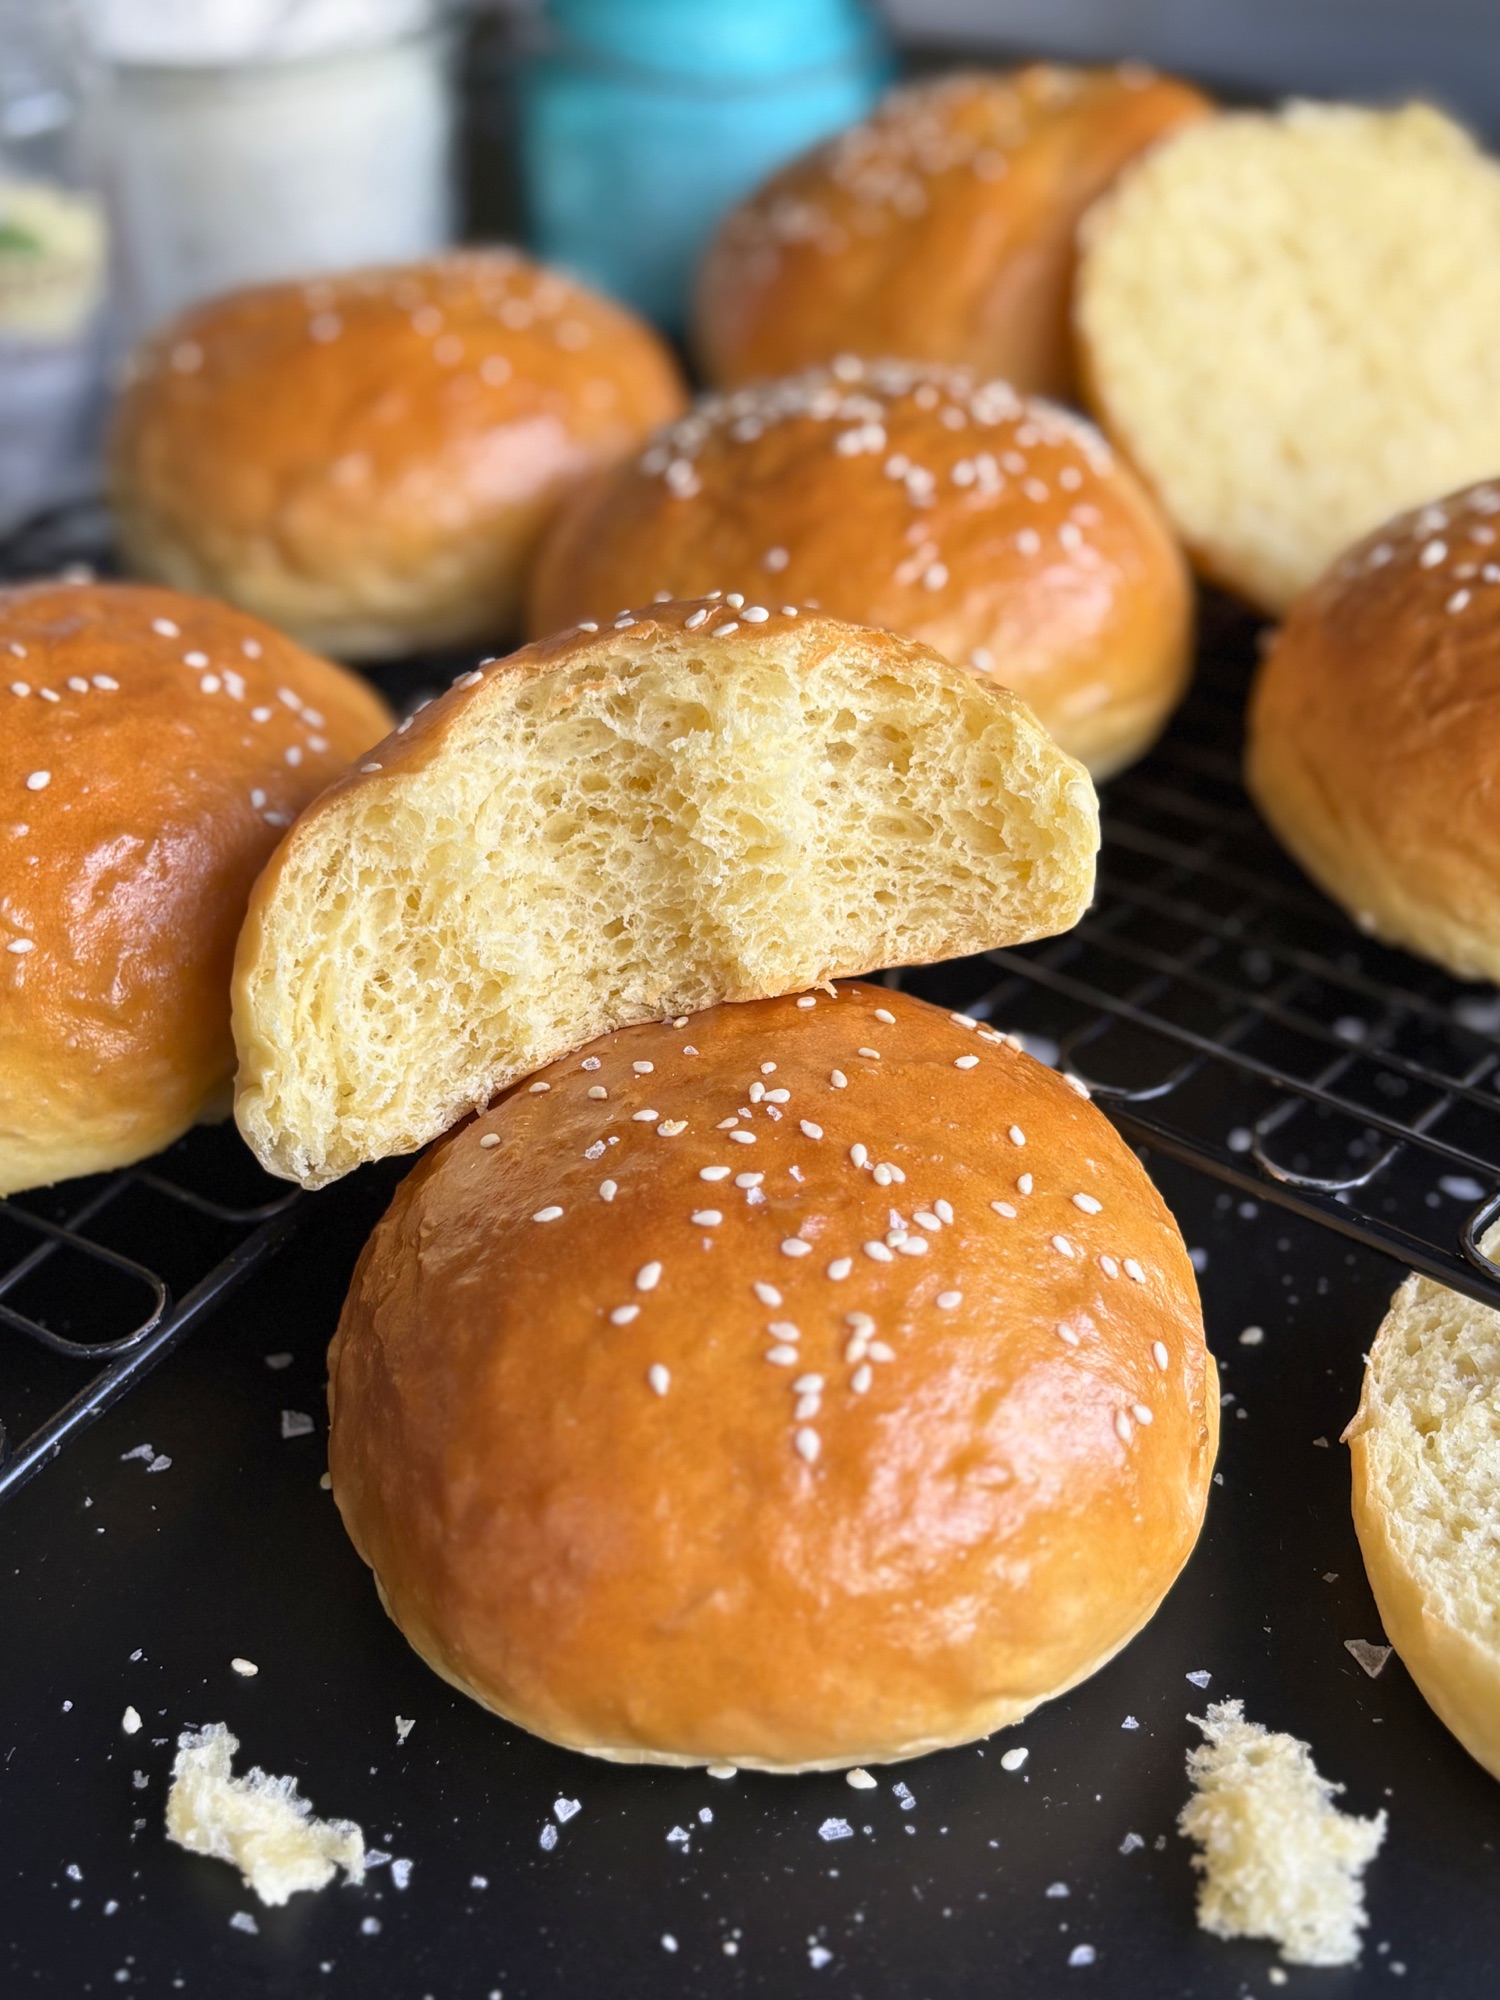
Burger buns are one of those things most people stop thinking about the moment they drop them in the cart at the grocery store. But if you have ever bitten into a homemade burger bun, pillowy soft, golden on top, sturdy enough to hold a thick patty without falling apart, you already know there is no going back.
These high protein yeasted burger buns are built on the same foundation as my High Protein Sourdough Dinner Rolls, adapted into a burger bun format with active dry yeast so you can have them on the table same day without a starter. Every bun delivers around 10 grams of protein from nonfat Greek yogurt worked right into the dough.
No protein powder. No weird fillers. Just real, whole food ingredients, a reliable same day timeline, and a bun that holds up to whatever you stack on top of it.
If you have been following along with the high protein baking series, from the High Protein Sourdough Sandwich Bread to the High Protein Chocolate Chip Cottage Cheese Scones, High Protein Cinnamon Rolls, you already know the approach. Whole food protein. Real ingredients. Soft, pillowy results every time.

Table of Contents
- Why These Burger Buns Work
- The Greek Yogurt Difference
- Yeasted Version vs Sourdough Version
- Tips and Tricks for Soft, Fluffy Buns
- How to Shape your Buns
- How to Get Flat, Wide Burger Buns (Not Dinner Rolls)
- Substitutions and Variations
- Storage and Make Ahead
- Shop This Recipe
- Nutrition and Protein Breakdown
- Frequently Asked Questions
- Recipe
Why These Burger Buns Work
There are two problems with most homemade burger bun recipes. The first is that they skew dry. A lot of buns are built around bread flour, water, and a little oil or butter, which creates structure but not particularly soft or flavorful results. The second is that most recipes are built for bread structure, not for nutrition. A standard burger bun from a traditional recipe delivers around 4 grams of protein.
This recipe solves both at once.
Nonfat Greek yogurt replaces the liquid you would normally use in a burger bun dough. Instead of milk or water, the yogurt does triple duty. It hydrates the flour, adds tenderness and softness through its acidity, and delivers around 10 grams of protein per 100 grams of yogurt. That means every bun in this batch lands at roughly 10 grams of protein without a single scoop of protein powder.
Active dry yeast handles the leavening and gives you a reliable same day timeline. From mixing to baking, you are looking at about 3 hours total. No starter needed, no overnight ferment, no planning ahead. Just a soft, golden, protein packed bun ready for burger night.

The Greek Yogurt Difference
Nonfat Greek yogurt is one of the most effective whole food ways to boost protein in baked goods. It contains around 10 grams of protein per 100 grams, and when worked into an enriched bread dough, it disappears completely into the crumb. You do not taste yogurt in the finished buns. What you get is softness, tenderness, and a subtle richness that store bought buns simply cannot match.
The acidity of the yogurt works beautifully with the enriched dough. It relaxes the gluten slightly and creates a tender crumb. This is the same principle that makes milk bread and brioche so soft. The difference here is that you are getting that texture while also loading each bun with real, whole food protein.
One important step: bring the Greek yogurt to room temperature before mixing. Leave it on the counter for 30 minutes, or microwave it for 20 seconds and stir. Cold yogurt slows down the yeast significantly because it drops the temperature of your dough. Do not add hot yogurt to the yeast though. Hot liquid will kill it. Warm to the touch is the sweet spot.
If you have baked with this method before in my High Protein Sourdough Dinner Rolls, this technique will feel familiar. This burger bun recipe is a direct adaptation of that same base formula, scaled up and adapted for yeast.
Yeasted Version vs Sourdough Version
Not everyone has an active sourdough starter ready to go, and that is exactly why there are two versions of this recipe.
This yeasted version uses active dry yeast and comes together in about 3 hours from mixing to baking. The flavor is clean and slightly sweet from the enriched dough with Greek yogurt, butter, egg, and sugar. If you do not have a sourdough starter, or you need burger buns ready by dinner tonight, this is the version for you.
The sourdough version uses active, peaked sourdough starter and a 6 hour bulk ferment. The result is a bun with deeper flavor, more complex crumb, and the added digestive benefits of a long fermentation. If you have a starter and want the full flavor payoff, head over to the High Protein Sourdough Hamburg Buns Recipe post for that recipe.
Both versions yield 13 buns at roughly 100 grams each. Both deliver the same protein content per bun. The only real difference is the leavening, the timeline, and the flavor profile.

Tips and Tricks for Soft, Fluffy Buns
Bloom your yeast properly. Warm water between 105 and 110 degrees F is the sweet spot. Too cold and the yeast will not activate. Too hot and you will kill it. A kitchen thermometer takes all the guesswork out of this step. If your yeast does not foam within 10 minutes, start over with fresh yeast.
Bring the yogurt to room temperature. This is the single most important step. Thirty seconds in the microwave is all you need. Cold yogurt will slow your yeast down and extend your rise time significantly.
Use bread flour. Bread flour has a higher protein content than all purpose flour, which means more gluten development, better structure, and a small protein boost to each bun. For buns that need to hold up to a juicy patty without falling apart, this matters.
Add the butter slowly. This is an enriched dough, which means the butter goes in after the initial dough has formed. Adding it all at once makes the dough greasy and hard to develop. One tablespoon at a time with the mixer running gives the flour time to absorb each addition before the next one goes in.
Do not skip the full knead. After the butter is incorporated, knead on medium speed for 6 to 8 minutes until the dough is smooth, elastic, and pulls away cleanly from the sides of the bowl. The dough will be soft but should not be sticky at this stage. If it is still sticking to the bowl, add flour 10 grams at a time.
Watch the dough, not the clock. The bulk rise is done when the dough has doubled in size and feels light and airy. In a warm kitchen (75 to 80 degrees F) this takes 1 to 1.5 hours. A cooler kitchen will take longer. Use the visual cue, not the timer.
Use the oven light trick. If your kitchen runs cool, place the shaped and covered buns in the oven with just the light on for the last 15 to 20 minutes of proofing. The gentle warmth from the light gives the dough a push without overheating it.
Brush with butter after baking. The egg wash before baking gives you that beautiful golden shine. The melted butter brushed on hot out of the oven is what keeps the crust soft and adds one more layer of richness that separates a homemade bun from a store bought one. Do it immediately, before the crust has a chance to set.
Check internal temperature. These buns are done when the internal temperature reads 190 to 195 degrees F. Color alone is not always reliable with enriched doughs because the egg wash browns quickly. An instant read thermometer takes all the guesswork out.
Cool before slicing. It is hard to wait, but slicing into a hot bun compresses the crumb. Give them at least 15 minutes on the wire rack before cutting.

How to Shape Burger Bun Dough into a Tight Ball
Getting a tight, smooth dough ball with good surface tension is the step that separates a bun that holds its shape beautifully through the proof and bake from one that spreads out flat or bakes up uneven. Once you feel it click, you will do it on autopilot every time.

Start with your piece of dough on a lightly floured surface. Cup your hand into a C shape around the dough, with the pinky side of your hand lightly touching the counter. Push the dough up and away from you, then drag it back toward you in one smooth motion, keeping that C shape the whole time. As you drag it back, the bottom of the dough catches slightly on the counter and the top pulls tight. That friction is what builds the surface tension.
Repeat this motion while rotating the dough clockwise in a full circle, working your way around until the top of the ball is smooth and taut and the seam has gathered at the bottom. Flip it seam side down and you should see a dough ball that holds its shape cleanly without spreading.
From there, flatten it firmly with your palm to about 3.5 to 4 inches wide before it goes in for the final proof. That flattening step is what gives you the classic wide burger bun shape instead of a tall dinner roll dome.
How to Get Flat, Wide Burger Buns (Not Dinner Rolls)
This is the tip most recipes leave out, and it is the single biggest difference between a bun that works for a burger and a bun that is just a round dinner roll with sesame seeds on top.
After you shape each piece of dough into a tight ball, press it down firmly with your palm to flatten it to about 3.5 to 4 inches wide. This is the shape you want going into the final proof. During the proof they will puff up, and during the bake they will spring up even more, giving you that proper domed burger bun shape that is wide enough to hold a patty.
Do not press them down after the final proof. That deflates them and they will not recover. Shaping them flat before the proof is the move.
If you forget this step and your buns come out tall and round, they are still delicious. They just function more like a slider bun or a small brioche roll. Next time, remember to press them flat before the proof.

RECIPE

High Protein Yeasted Burger Buns with Greek Yogurt
Equipment
- – Stand mixer with dough hook
- kitchen scale
- Large mixing bowl
- Small bowl for blooming yeast
- Two half sheet pans
- Parchment paper
- bench scraper
- – Pastry brush or piece of paper towel
- Wire cooling rack
- Instant read thermometer
Ingredients
Yeast Bloom
- 14 g active dry yeast 4 and 1/2 teaspoons
- 60 g warm water 105 to 110 degrees F (1/4 cup)
- 2 g granulated sugar 1/2 teaspoon
Ingredients
- 650 g bread flour 5 and 1/4 cups
- 25 g granulated sugar 2 Tablespoons
- 424 g nonfat Greek yogurt (1 and 3/4 cups)room temperature or warmed for 40 seconds in the microwave
- 74 g unsalted butter softened (5 tablespoons)
- 10 g fine sea salt 1 and 3/4 teaspoons
- 2 large eggs room temperature
Egg Wash
- 1 large egg
- 15 g water 1 tablespoon
- Sesame seeds, poppy seeds or everything bagel seasoning optional
- 28 g unsalted butter melted, for brushing after baking (2 tablespoons) OPTIONAL
Instructions
- In a small bowl, combine the warm water, active dry yeast, and 2g sugar. Stir gently and let sit for 5 to 10 minutes until foamy. If the mixture does not foam, your yeast is no longer active and you should start with a fresh packet before continuing.
- In a medium bowl, whisk together the bread flour, salt, and 25g sugar until evenly combined.
- If the Greek yogurt is coming straight from the fridge, microwave it for about 40 seconds and stir well before using. You want it semi warm to the touch but not hot. You're just taking the chill off.
- Add the warmed Greek yogurt, eggs, and bloomed yeast mixture to the bowl of a stand mixer fitted with the dough hook. Mix briefly on low speed to combined.
- Add the dry ingredients to the wet ingredients and mix on low speed until a shaggy dough forms, about 2 minutes.
- With the mixer running on low, add the softened butter one tablespoon at a time, waiting for each addition to be fully incorporated before adding the next. This slow addition prevents the dough from becoming greasy and allows the flour to absorb the fat properly.
- Once all the butter is incorporated, increase the mixer to medium speed and knead for 6 to 8 minutes until the dough is smooth, elastic, and pulls away cleanly from the sides of the bowl. The dough should be soft but not sticky. If it is really sticking to the bowl after the full knead, add flour 10 grams at a time until it pulls away.
- Shape the dough into a smooth ball and place it in a lightly oiled bowl. Cover with plastic wrap or a lid and let it rise at room temperature for 1 to 1.5 hours, or until doubled in size.
- Turn the dough out onto a lightly floured surface and weigh the total dough. Divide into 12-13 equal pieces of approximately 100-110 grams each using a bench scraper.
- Roll each piece into a tight, smooth ball by tucking the edges underneath and using your hand cupped around the dough ball in a "C" shape. moving in a counter clockwise circle, creating surface tension on top. Flatten each ball firmly with your palm to about 3 to 3.5 inches wide. Flattening before the proof is what gives you a wide, flat burger bun shape rather than a tall, domed dinner roll.

- Place the shaped buns on two parchment lined baking sheets, spaced at least 2 inches apart. Cover loosely with plastic wrap and let proof for 45 minutes to 1 hour, until noticeably puffy. Preheat the oven to 375 degrees F during the last 20 minutes of proofing.
- Alternatively you can add them in a 4 x 3 grid so they all fit on one tray. You may need to pull them apart after baking.
- Whisk the egg with the water until smooth. Gently brush each bun with the egg wash. Sprinkle with sesame seeds or everything bagel seasoning if desired.
- Bake for 18 to 22 minutes, rotating the pans halfway through, until deep golden brown on top. The buns are done when the internal temperature reads 190 to 195 degrees F.
- Optionally, brush the hot buns immediately with melted butter the moment they come out of the oven. This keeps the crust soft and adds a final layer of richness. Let cool on a wire rack for at least 15 minutes before slicing.
Notes
Substitutions and Variations
Siggi’s nonfat plain skyr. Siggi’s works as a direct swap for the Greek yogurt at the same weight. It is slightly higher in protein per 100g than most Greek yogurts, so your protein per bun will be at least as good if not better. Use it the same way you would the Greek yogurt.
Cottage cheese instead of Greek yogurt. Blend 400 grams of nonfat cottage cheese completely smooth with no lumps before adding it to the dough. Use a thick brand like Nancy’s or Good Culture. Warm the pureed mixture 20 seconds in the microwave before using. The protein content is comparable and the texture is very similar. The flavor will be slightly milder than the Greek yogurt version.
Full fat Greek yogurt. Full fat yogurt will work here. The buns will be slightly richer, but the protein per bun will drop since full fat yogurt has less protein per gram than nonfat. You may also need to add a small amount of additional flour since full fat yogurt runs a little wetter.
All purpose flour. All purpose flour works at a 1:1 swap by weight. The buns will be slightly more delicate and the protein per bun will drop slightly. Because all purpose flour absorbs less liquid than bread flour, your dough may also feel a little stickier. Add flour 10 grams at a time if needed. Do not exceed 30 to 40 grams of extra flour or the buns will be dense.
Instant yeast instead of active dry yeast. Use 11 grams of instant yeast and skip the blooming step. Add it directly to the dry ingredients. The rise time may be slightly shorter so keep an eye on the dough.
Dairy free option. Because this is a yeasted recipe rather than a sourdough recipe, a dairy free swap is more straightforward. The yeast provides consistent, controlled leavening that does not depend on the acidity of the yogurt. Substitute the Greek yogurt with an unsweetened, plain coconut yogurt or thick oat milk yogurt. Avoid thin or watery plant-based yogurts as they will throw off the hydration. Swap the butter for vegan butter at the same weight. Keep in mind protein per bun will be lower with most dairy free yogurts.
Honey instead of sugar. Swap the 32 grams of sugar for 25 grams of honey. The dough may feel slightly wetter. Add flour a few grams at a time if needed. The tops will also brown a little faster, so keep an eye on them in the last few minutes of baking.
Slider buns. Divide the dough into 20 pieces of roughly 60 grams each. Reduce bake time to 14 to 16 minutes. Everything else stays the same.
Topping variations. Sesame seeds, everything bagel seasoning, poppy seeds, or flaky sea salt all work beautifully. For a plain bun, skip the seeds entirely and just egg wash and bake.

Storage and Make Ahead
Room temperature. Store baked buns in an airtight container at room temperature for up to 3 days. For the softest texture, slice just before using.
Freezer. Let the buns cool completely, then place them in a freezer safe bag and freeze for up to one month. To reheat, wrap in foil and warm in a 325 degree oven for 8 to 10 minutes. For a crustier reheat, skip the foil.
Make ahead option. Shape the buns and place them on the parchment lined sheet pans after shaping. Cover tightly with plastic wrap and refrigerate overnight before the final proof. The next morning, pull them out and let them proof at room temperature for 1 to 1.5 hours until noticeably puffy before baking. This is a great strategy for weekend cookouts.

Shop This Recipe
- Digital kitchen scale
- Stand mixer with dough hook
- Parchment paper
- Two half sheet pans
- Pastry brush
- Bench scraper
- Wire cooling rack
- Instant read thermometer
Nutrition and Protein Breakdown
Each bun contains approximately 10 grams of protein when made with bread flour and nonfat Greek yogurt. For comparison, a standard store bought burger bun contains around 4 grams of protein. These buns deliver more than double the protein without any specialty ingredients or protein powders.
Pair one of these buns with a quality burger patty and you are looking at roughly 40 grams of protein from the bun and patty alone, before any cheese or sauce enters the picture. That turns a weeknight burger into a meal that actually holds you over.
Why Pairing Protein with Carbohydrates Matters
The reason a high protein bun is actually worth the effort comes down to how your body handles carbohydrates when protein is along for the ride.
When you eat a carbohydrate heavy meal without much protein, blood sugar rises quickly and drops just as fast. That spike and crash is what leaves you hungry and tired an hour later. Protein slows the process down. When protein is present in a meal, your body digests everything more gradually, which produces a smoother, more sustained rise in blood sugar instead of a sharp peak. That smoother curve keeps you full longer and prevents the afternoon crash that follows a carb only lunch.
When the protein is baked right into the bread instead of only coming from the patty, you are getting that benefit in every single bite, not just the ones where you happen to catch some burger. For anyone cooking for a family and trying to get more mileage out of regular meals, that math adds up quickly. You are not asking anyone to eat differently. You are just making the bread work a little harder.

Frequently Asked Questions
Can I make these with sourdough starter instead of yeast?
Yes. There is a fully tested sourdough version of this recipe available as the High Protein Sourdough Burger Buns. It uses active, peaked sourdough starter and a 6 hour bulk ferment. The flavor is more developed but the same soft, fluffy texture and high protein content are there.
Can I taste the Greek yogurt?
No. Between the yeast, the butter, the egg, and the sugar, the yogurt disappears completely into the dough. What you get is a soft, rich bun. Most people who eat these buns have no idea they were made with yogurt until you tell them.
My yeast did not foam. What went wrong?
Either the water was too hot (above 115 degrees F kills yeast), too cold (below 100 degrees F will not activate it), or the yeast is past its expiration date. Check the date on your yeast package and use a thermometer to confirm your water temperature. If it still does not foam after 10 minutes, start with fresh yeast.
Why are my buns too tall and round?
You likely skipped the flattening step before the final proof. After shaping each piece into a ball, press it firmly with your palm to about 3.5 to 4 inches wide before proofing. This is what gives you the wide, classic burger bun shape. Do not press them down after the proof, that deflates them and they will not recover.
My dough is sticky. What should I do?
After the butter is incorporated, knead for the full 6 to 8 minutes before deciding if flour is needed. The dough transforms significantly during the knead. If after the full knead it is still sticking to the sides of the bowl, add flour 10 grams at a time until it pulls away cleanly. Different yogurt brands vary in thickness and kitchen humidity plays a role too, so a small flour adjustment is sometimes needed.
How much protein is actually in each bun?
Around 10 grams per bun when made with bread flour and nonfat Greek yogurt. The protein comes from the flour, the yogurt, and the eggs working together. No protein powder needed.
Can I freeze the baked buns?
Absolutely. Cool completely, then freeze in an airtight bag for up to one month. Reheat wrapped in foil at 325 degrees for 8 to 10 minutes.
Can I use full fat Greek yogurt?
Yes, but protein per bun will drop and the dough may run slightly wetter. Add flour in small increments if needed.
How many buns does this recipe make?
13 buns at roughly 100 grams each, or 20 slider buns at 60 grams each.
Can I make these dairy free?
Yes. Because this is a yeasted recipe rather than sourdough, the dairy free swap is straightforward. Use an unsweetened, plain coconut or oat milk yogurt of similar thickness, and swap the butter for vegan butter at the same weight. Protein per bun will be lower with most dairy free yogurts.

Make These Buns and Share the Love
If you make these high protein yeasted burger buns, I would love to hear how they turned out. Leave a comment below and let me know what you built on top of them. If you share your bakes on social media, tag me so I can see them and cheer you on.
And if you want more high protein baking recipes delivered straight to your inbox, sign up for the H3art of the Home newsletter. New recipes every week.


Leave a Reply