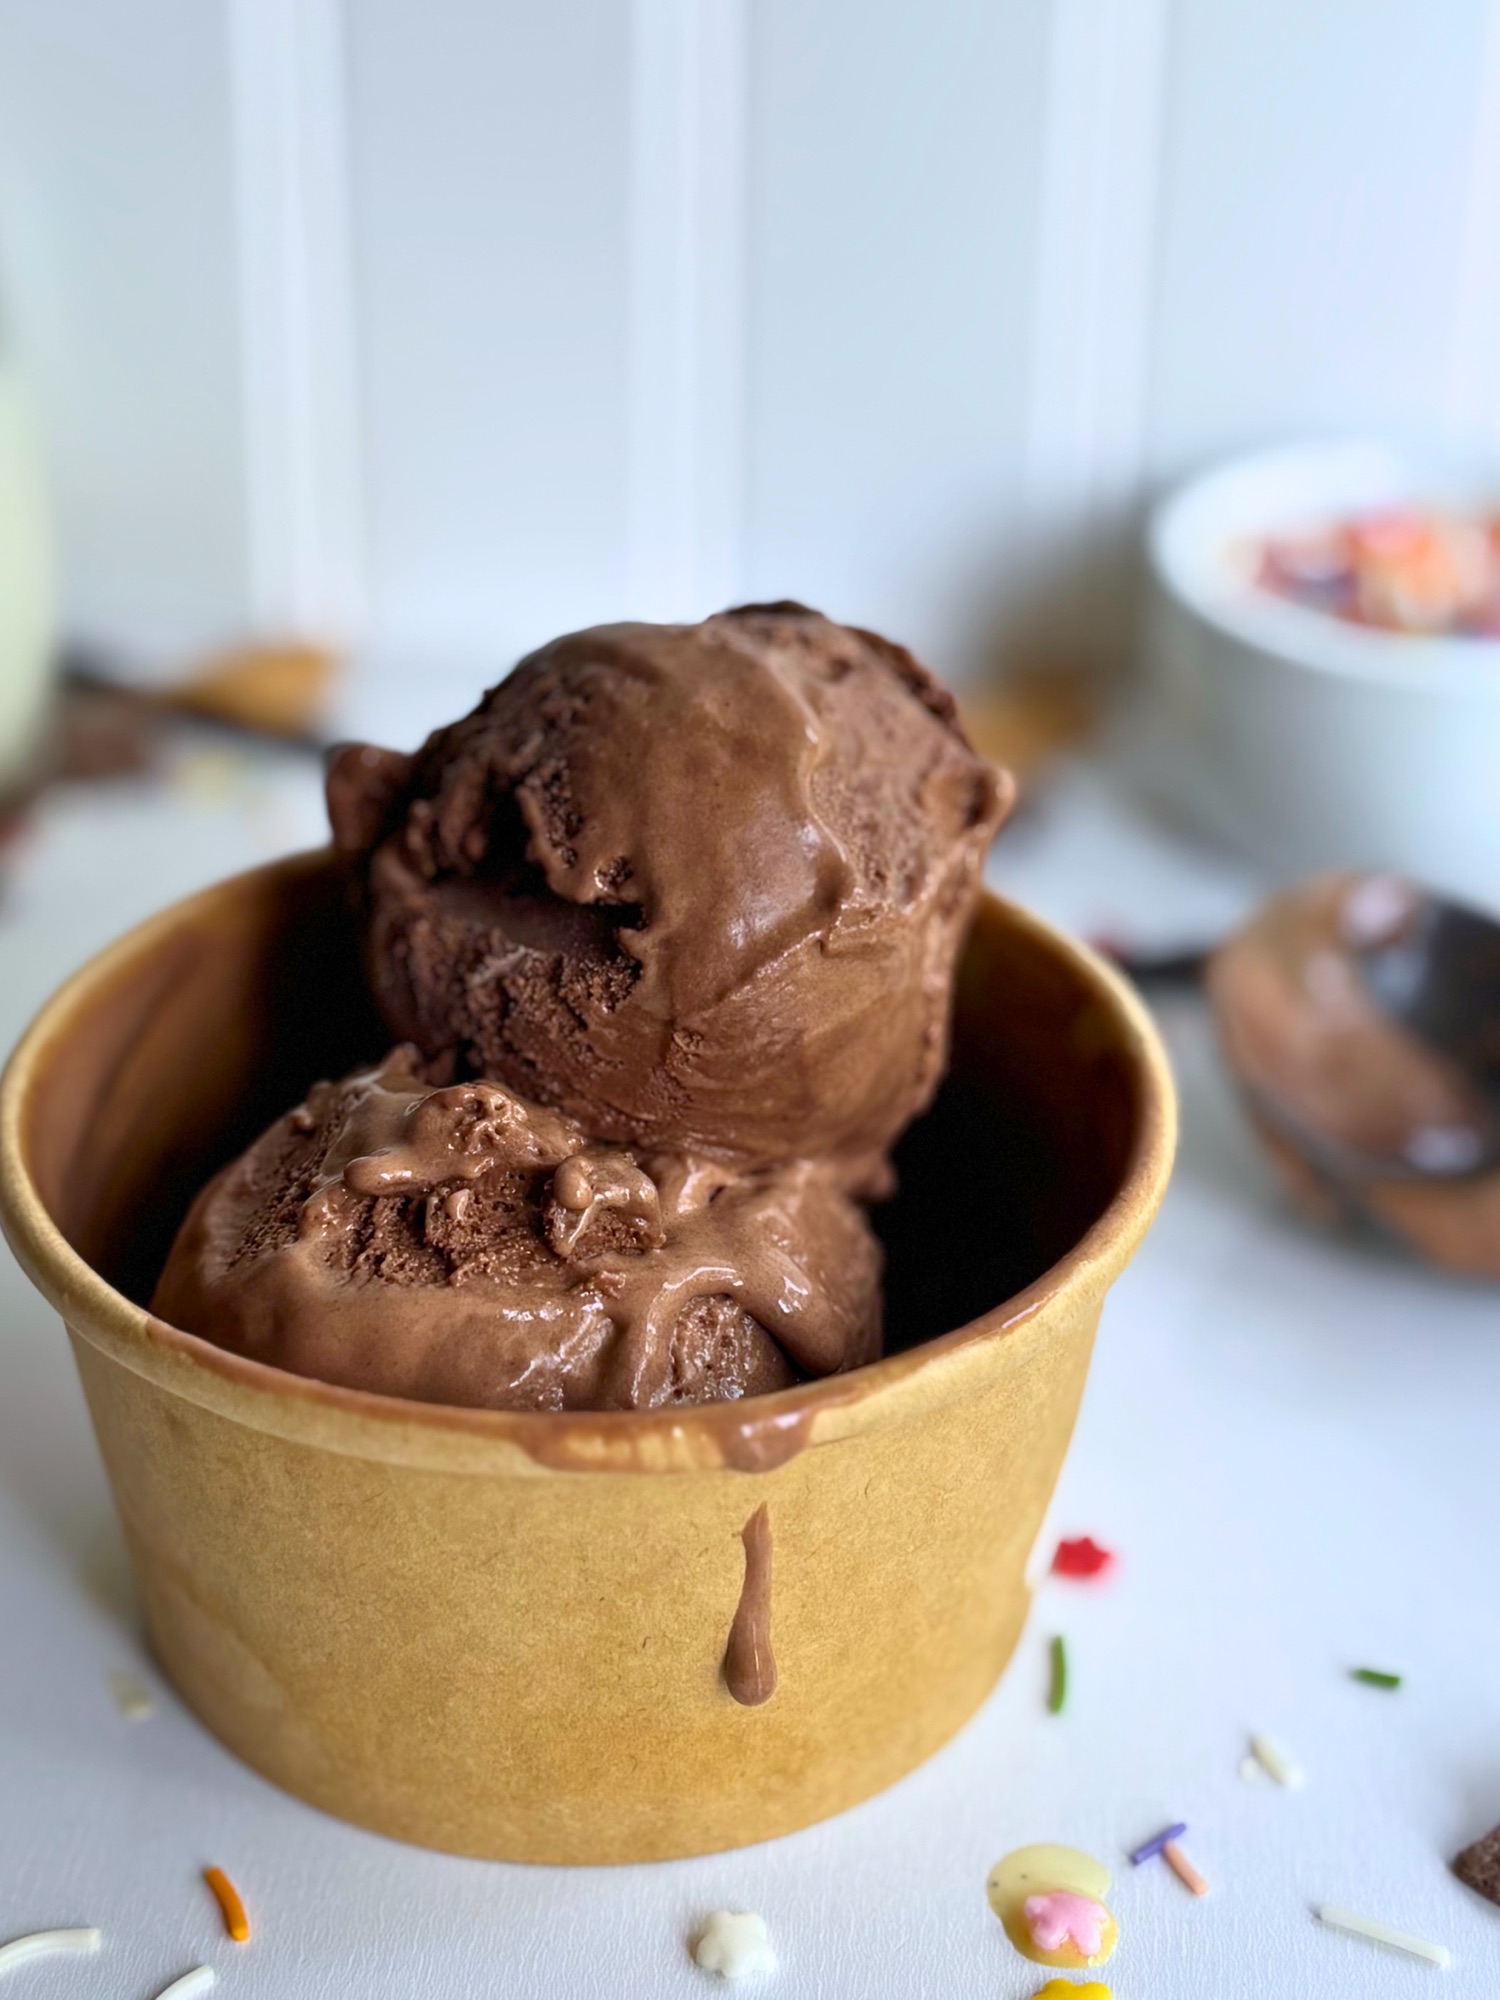
This whole thing started because I had a bowl of egg yolks in my fridge and nothing to do with them.
That is the honest origin story, I had leftover yolks, I had a craving and I had just picked up yet another container of ice cream that cost twelve dollars and still had a list of ingredients on the back I did not want in my ice cream. Twelve dollars. For gums, stabilizers, and something called “natural flavor” doing a lot of nothing.
So I went looking for an ice cream maker, and then I went looking for a chocolate recipe that actually tasted like chocolate instead of tasting like sweetened brown dairy. This is that recipe. It is a proper French style custard base, it uses real cocoa and real chocolate, and it scoops straight out of the freezer without a five minute wait on the counter.
There is also one ingredient in here that is going to surprise you, and I promise it is the reason this stays scoopable.
Table of Contents
Why Homemade Chocolate Ice Cream Is Worth It
Commercial ice cream has a problem, and the problem is that it needs to survive a truck, a warehouse, a grocery store freezer, and your drive home. Every one of those steps is an opportunity for ice crystals to form and re grow. Manufacturers solve that with stabilizers and gums, which work, but they also give you that slightly slick, slightly bouncy texture that never quite melts on your tongue the way real ice cream should.
You do not have any of those problems. Your ice cream goes from the machine to your freezer, and that is the entire supply chain.
What you get instead is a custard base built on egg yolks, which do the stabilizing work naturally. The lecithin in the yolks emulsifies the fat and water so they stay married to each other, and the proteins set into a gentle gel that keeps ice crystals small. That is the actual science behind why a custard base tastes richer than a Philadelphia style base made with no eggs. It is not just more fat. It is better structure.
The chocolate version has an extra advantage. Cocoa solids absorb water in the base, which means less free water available to freeze into crystals. A well built chocolate ice cream is one of the smoothest things you can make at home.

Recipe

Homemade Chocolate Ice Cream
Equipment
- Whynter 2.1 quart automatic ice cream maker
- Instant read thermometer
- Fine-mesh strainer
- Two mixing bowls for the ice bath
- Shallow freezer container with a lid
Ingredients
- 350 g heavy cream 1 cup plus 7 tablespoons
- 390 g whole milk 1 1/2 cups plus 2 tablespoons
- 115 g granulated sugar 1/2 cup plus 1 tablespoon, divided
- 35 g Dutch process cocoa powder 1/3 cup plus 1 tablespoon
- 85 g semi sweet chocolate finely chopped (1/2 cup)
- 4 large egg yolks
- 1/2 teaspoon fine salt
- 2 teaspoon vanilla extract
- 1 tablespoon vodka plain or vanilla (optional)
Instructions
- Whisk the cocoa powder together with about half the sugar in a medium saucepan. Add the milk a little at a time, whisking after each addition, until the mixture is completely smooth with no lumps. Whisk in the cream and the salt.
- Set the pan over medium low heat. Whisk gently and heat until the mixture just begins to steam and the cocoa is fully bloomed. Pull the pan off the heat, add the chopped chocolate, let it sit undisturbed for one full minute, then whisk until glossy and completely smooth.
- In a separate bowl, whisk the egg yolks with the remaining sugar until pale and slightly thickened.
- Temper the yolks. Ladle about one cup of the hot chocolate dairy into the yolks in a slow steady stream while whisking constantly. Once combined, pour the yolk mixture back into the saucepan.
- Return the pan to medium low heat. Stir constantly with a rubber spatula, dragging it across the bottom of the pan, until the custard reaches 170 to 175 degrees Fahrenheit. Do not let it boil. Use the thermometer rather than the spoon test, because the chocolate causes the base to coat a spoon well before the yolks are cooked.
- Set up an ice bath. Fill a large bowl with ice and a splash of cold water, then nest a smaller clean bowl inside it. Pour the custard through a fine mesh strainer directly into the inner bowl. Add vanilla extract.
- Stir every few minutes until the custard stops steaming and cools to about room temperature or chilled.
- Cover the custard and refrigerate at least 4 hours, best 8 hours or overnight, until fully cold.
- Stir the vodka into the cold base if using. Pour into the ice cream maker and churn 40 to 60 minutes, until it thickens to soft serve consistency and mounds on the paddle.
- Transfer to a chilled shallow container. Press a piece of parchment directly against the surface of the ice cream, cover with the lid, and freeze at least 4 hours or until scoopable.
Notes
Shop This Recipe

This section contains affiliate links. If you buy through them I earn a small commission at no extra cost to you.
Whynter 2.1 Quart Automatic Ice Cream Maker
This is the machine I use and the one I specifically hunted for. It has a built in compressor, which means there is no bowl to pre freeze. That was the whole reason I chose it. Every other model I looked at required me to keep a giant frozen bowl living in my freezer at all times, and then wait twenty four hours before I could churn anything. If I wanted ice cream on a Tuesday I had to have decided on Monday.
With a compressor machine you make your base, chill it, and churn whenever you are ready. You can also run two batches back to back, which matters enormously when you are testing a recipe. That flexibility is worth the extra cost if you plan to make ice cream more than a few times a year.
Not optional for a custard base. You are cooking to a specific window, and the difference between a silky custard and sweet scrambled eggs is about ten degrees. The spoon test alone will lie to you when there is chocolate in the pan, because the cocoa thickens the base long before the yolks are actually cooked.
Cheap insurance. Even a perfectly cooked custard can have a few set bits of egg, and thirty seconds of straining is the difference between smooth and slightly grainy.
Two mixing bowls for the ice bath
One large, one that nests inside it. More on why in the next section.
Shallow freezer container with a lid
Shallow beats deep. A wide flat container freezes faster and more evenly, which means smaller ice crystals. A tall narrow container leaves the center soft while the edges harden.
The Secret Ingredient Is Vodka
Here it is. One tablespoon of vodka, stirred into the cold base right before it goes into the machine.
I know how that sounds. Stay with me.
Alcohol does not freeze at normal freezer temperatures. Pure ethanol stays liquid down to around 173 degrees below zero Fahrenheit, which is a temperature your kitchen freezer will never see. When you add a small amount of alcohol to an ice cream base, it lowers the freezing point of the whole mixture. That means at your freezer’s actual temperature, slightly less of your base has frozen solid, and the ice cream stays softer and scoopable straight from the freezer instead of setting into a brick you have to attack with a hot spoon.
This matters more for chocolate than for almost any other flavor. Cocoa solids and chocolate both freeze harder than plain dairy, so a chocolate base that would otherwise be lovely comes out noticeably firmer than the vanilla made from the same method. The vodka closes that gap.
A few things worth knowing:
Use a vodka you would actually drink. I use Tito’s. There is no cooking involved and no heat to burn off harshness, so cheap vodka tastes like cheap vodka.
One tablespoon is the ceiling. More alcohol means a lower freezing point, and past a certain point the base will not set up in the machine at all. It will churn and churn and stay soupy. One tablespoon in this size batch is the sweet spot.
You will not taste it. At this ratio the vodka is doing physics, not flavor.
Flavored vodkas work beautifully. I use vanilla vodka in mine because a little extra vanilla rounds out chocolate. Espresso vodka would be excellent here too. Just pick something that complements the flavor you are making rather than fighting it.
It is optional. Leave it out and you still get very good ice cream. It will just freeze harder and need about ten minutes on the counter before you can scoop it. And to be clear, since the alcohol is stirred into a cold base and never heated, it does not cook off. If you are serving this to kids or to anyone avoiding alcohol, skip it and plan on the counter time instead.

Why the Ice Bath Matters
This is the step people skip, and it is the one I would defend hardest.
Here is the setup. Fill a large bowl with ice and a splash of cold water. Nest a second, smaller bowl inside it so the bottom of the small bowl is sitting in the ice water. Pour your hot strained custard directly into that inner bowl and stir it every few minutes until it stops steaming and comes down to roughly room temperature. Then cover it and move it to the refrigerator for the full overnight chill.
Three reasons this is not optional.
It stops the cooking. A custard pulled off the heat at temperature keeps climbing for a minute or two from residual heat in the pan. Getting it into a cold bowl fast is what keeps it from tipping over into scrambled.
It protects your food safety. A hot custard sitting on the counter cooling slowly, or worse, going straight into the fridge as a hot mass, spends a long time in the temperature range where bacteria are happiest. The ice bath gets you through that range in minutes instead of hours. It also protects everything else in your refrigerator, because a hot bowl going straight in raises the temperature of the whole box.
It sets you up for a better freeze. A base that goes into the machine truly cold, meaning refrigerator cold after a full night, churns faster. Faster churning means less time for water molecules to find each other and build big crystals. The overnight rest also lets the fat molecules crystallize and the proteins fully hydrate, which is why an overnight base churns thicker and holds more air than one you rushed after four hours.
That last point is the one that shows up in the finished texture. Same recipe, same machine, and the difference between a four hour chill and an overnight chill is genuinely noticeable.
Blooming the Cocoa
Cocoa powder has a lot of flavor locked inside it that only heat and liquid will release. Whisking dry cocoa into the warm dairy at the start of the recipe, rather than dumping it into the finished base, is what people mean when they say to bloom cocoa.
Two practical things happen. The starch in the cocoa hydrates and swells, which thickens the base and gives it body. And the flavor compounds dissolve into the fat in the cream, where they can actually reach your tongue instead of sitting locked in dry particles.
I use Dutch process cocoa here rather than natural cocoa. Dutch process has been treated with an alkali, which neutralizes the acidity, darkens the color, and gives you that deep, mellow, almost fudgy chocolate flavor. Natural cocoa is more acidic and fruitier, which is lovely in some applications but reads thin in ice cream. Since there is no chemical leavening in this recipe, you can use either one without anything falling apart. Dutch process just tastes better here.
One warning. Once the chocolate is in the pan, the base will coat the back of a spoon well before the yolks are actually cooked. Ignore the spoon. Go by the thermometer, and keep a spatula moving across the bottom of the pan, because chocolate solids scorch far faster than plain custard.
Tips for the Creamiest Texture

Chill the container you will store it in. Put your freezer container in the freezer while the ice cream churns. Soft ice cream hitting a room temperature container melts at the edges, then refreezes into crystals.
Press parchment to the surface. Directly on the ice cream, not just the lid on top. This is what prevents freezer burn and the gritty layer that forms when moisture evaporates off the surface and refreezes as ice.
Do not overchurn. When it mounds on the paddle and looks like soft serve, it is done. Running the machine longer past that point does not make it firmer, it starts breaking down the air you worked to incorporate.
Let it harden before you serve it. Straight out of the machine it is soft serve consistency. Four hours in the freezer gives you scoopable. Overnight is better.
Salt is not optional. It reads as bland without it. Salt does not make chocolate taste salty, it makes chocolate taste more like chocolate by suppressing bitterness and lifting the sweeter notes.
How to Store Homemade Ice Cream
Homemade ice cream is best within the first two weeks. It is perfectly safe well past that, but with no commercial stabilizers the texture slowly degrades as ice crystals grow.
Keep it in the back of the freezer, never in the door. The door is the warmest part of your freezer and it swings through a temperature change every time someone opens it. Every partial thaw and refreeze grows the crystals a little larger.
If it does firm up more than you like, five minutes on the counter is usually enough. With the vodka in it, you may not need even that.
Frequently Asked Questions
Can I make this without an ice cream maker?
You can, but manage your expectations. Pour the chilled base into a shallow metal pan, freeze it, and stir vigorously with a fork every thirty minutes for the first three hours to break up crystals as they form. The result is closer to a semifreddo than true ice cream, because you are not incorporating the air that churning provides. It will taste right. The texture will be denser.
Why is my ice cream icy?
Usually one of three things. The base was not cold enough going into the machine, the container was not shallow enough to freeze quickly, or it has been living in the freezer door. Occasionally it means the custard was undercooked and the yolks never set into the gel that keeps crystals small.
Can I use natural cocoa instead of Dutch process?
Yes. There is no baking soda in this recipe, so the acidity difference will not cause any structural problem. Expect a lighter color and a slightly sharper, fruitier chocolate flavor.
Do I have to use semi sweet chocolate?
No, bittersweet works. If you switch, you will want slightly more sugar in the base to compensate, since bittersweet carries less of its own.
Can I substitute the whole milk?
Do not go below whole milk. The fat percentage is doing structural work, and lower fat milk will give you an icier result. Half and half or additional cream in place of the milk will work in the other direction, though it gets heavy enough that the chocolate starts getting muffled.
Is it safe to eat given the raw eggs?
The eggs are not raw. The custard is cooked to a temperature that pasteurizes them, which is one of several reasons the thermometer matters.
How long does it take from start to finish?
Plan on two days. About thirty minutes of active work, then the overnight chill, then churning, then a few hours of hardening in the freezer.

If You Loved This One
Chocolate is where I started, but the vanilla bean version from the same custard method is just as good and it is the base every other flavor builds off of. Vanilla Bean Ice Cream recipe coming soon
Let Me Know How It Goes
If you make this, come back and leave a comment with a star rating. It genuinely helps other people find the recipe, and I read every single one.
Tag me on Instagram when you pull that first scoop. I want to see your cone.
And if you want recipes like this sent straight to you, sign up below. No junk, same as the ice cream.




Leave a Reply