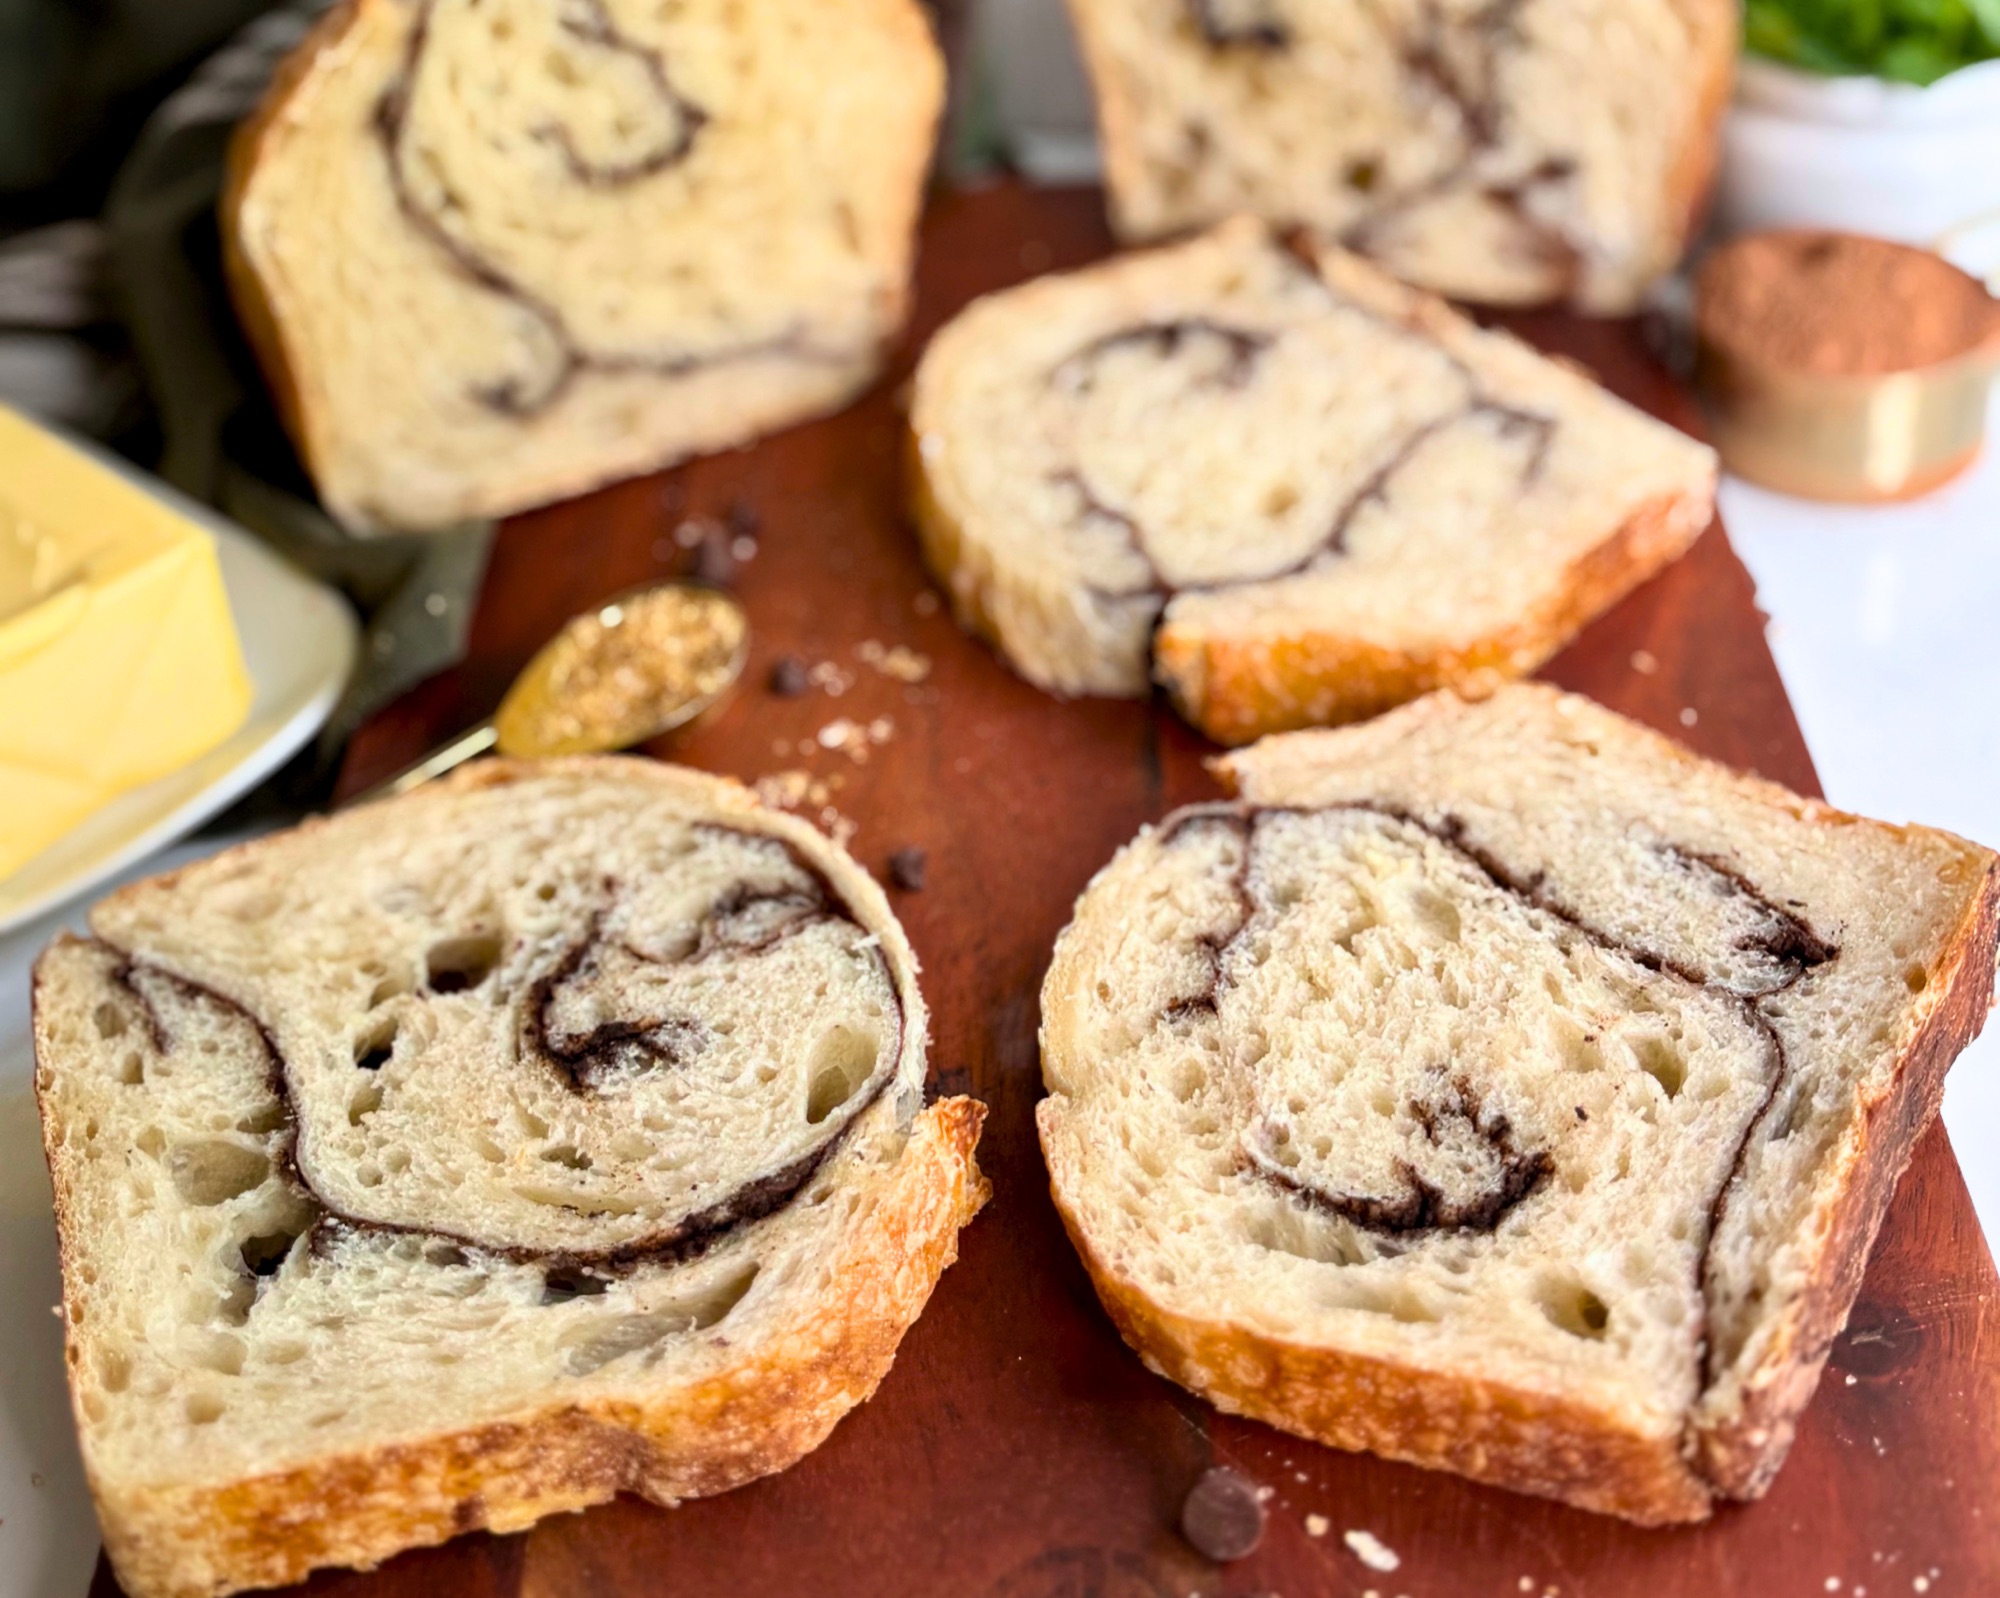
Chocolate swirl bread has a bit of a bad reputation, and honestly it has earned it. If you have baked one before, you probably know the ways it goes wrong, because the loaf comes out of the oven looking gorgeous and then you slice into it and find a gummy line where the filling should be, or a hollow gap where the layers pulled apart, or a swirl that has blurred into one muddy brown smear instead of staying a defined ribbon. Most recipes try to get around this by making two or three separate doughs and laminating them together, or by spreading a butter and cocoa paste across the dough during shaping.

The reason all of that struggles comes down to time. A traditional swirl is built during shaping, which means the filling sits pressed against the dough for the entire cold proof, and a chocolate filling is exactly the wrong thing to leave there for hours. The sugar has all night to pull water out of the crumb, and by the time the loaf hits the oven that seam is already wet and already weakened.
My Cold Swirl Method takes that whole problem off the table by changing when the filling goes in. The loaf bulk ferments and cold proofs plain, and only in the morning, about twenty minutes before it goes into the oven, does it get cut open and filled. The chocolate never gets those hours to sit against the dough and soften it, which is why the seam holds and the ribbon stays sharp.
What I was after with this one was something quieter than most chocolate breads. Not a thick heavy band of chocolate taking over the slice, but a thin ribbon winding all the way through the roll, present in every bite without ever overpowering the bread underneath it. The other thing I love about this method is that the swirl is never just a plain circle. It moves and turns and doubles back on itself, so every single slice comes out with its own bit of character, and no two are quite the same.
This is the fourth flavor in the series, after cinnamon, cheddar everything bagel, and apple.
Table of Contents
- Why You Will Love This Bread
- What Is the Cold Swirl Method
- Ingredient Notes
- How to Make Chocolate Swirl Sourdough Bread
- Expert Tips
- Storage
- Shop This Recipe
- Recipe
- Frequently Asked Questions
- More Sourdough Recipes
- Subscribe (It’s Free!)
Why You Will Love This Bread
- The chocolate complements the bread instead of taking it over, so the loaf still works for breakfast toast with butter
- The filling is three dry ingredients you whisk together in a bowl, and there is no melting, cooking, or cooling involved
- Nothing goes into the dough, so your bulk ferment and cold proof behave exactly the way they always do
- The swirl comes out as a clean continuous ribbon rather than a blurry smear
- It uses the same base dough as every other loaf in this series, so once you know the dough you know all of them

What Is the Cold Swirl Method
A traditional swirl gets built during shaping. You roll the dough into a rectangle, spread something across it, roll it up, and let the whole thing proof that way.

The Cold Swirl Method flips that order. You bulk ferment and shape a plain loaf, cold proof it in the banneton overnight the way you normally would, and only then turn it out and open it up. A knife goes down through the loaf vertically, kitchen scissors cut it into sections, and the filling gets sprinkled down into all of those cuts. Then the whole thing gets rolled back into a log and lowered into the pan.
The part that makes the swirl look the way it does is that the knife slices go deeper than the scissor cuts. That difference in depth is what puts the filling at different levels inside the dough, and layered depth is what gives you a ribbon that winds and turns through the slice instead of one flat plane of chocolate running through the middle.
Ingredient Notes
The dough is my standard four ingredient sourdough, and the filling is three dry ingredients. Full amounts are in the recipe card below.

Bread flour. Bread flour rather than all purpose, because the higher protein gives you the structure to hold an open crumb around a seam that has been cut open and rolled back up.
Active sourdough starter. Use it at peak, when it has risen and is domed rather than starting to fall. If you do not have a starter going yet, my complete guide to building one with minimal waste will get you there.
Dutch process cocoa. This is the ingredient that matters most. Dutch process has been treated to reduce its acidity, which gives you a rounder, less sharp chocolate flavor and a warm brown color rather than a harsh one. I would steer you away from black cocoa here even though the contrast sounds appealing, because it goes grey against a pale sourdough crumb instead of brown and the slices end up reading closer to poppy seed than to chocolate.
Granulated sugar. Plain white sugar, and this is deliberate. It stays granular longer in the oven and sets rather than flowing, where a damp sugar like brown sugar turns to syrup at the seam before the crumb has set.
Cornstarch. A small amount, and it does the same job here that it does in my cinnamon loaf. As the sugar melts it wants to run, and the cornstarch thickens what would otherwise weep out and leave you with a gummy line.
A note on chocolate chips. I know they are the obvious addition, and you absolutely can add them. My chip version held together perfectly well and it tasted lovely, so this is not a warning so much as a heads up about what changes. Chips sitting in the seam melt into liquid fat right where the dough is knitting back together, so you get a little gapping along the ribbon and a slightly wetter swirl, and the melted chocolate widens the line rather than keeping it crisp. I went without them because I wanted the delicate line running through the slice, but if you would rather have a chocolate chip loaf, go for it and just expect a softer looking swirl. You can also fold them into the dough during your stretch and folds instead, which keeps them out of the seam entirely and lets the crumb hold onto them.
How to Make Chocolate Swirl Sourdough Bread
The dough comes together over a day and finishes in the fridge overnight, and the swirl itself takes about ten minutes the next morning. Exact amounts, times, and temperatures are in the recipe card.
You mix, rest, add salt, and do stretch and folds through the afternoon, then bulk ferment until the dough has grown by half again and jiggles when you move the bowl. Pre shape, rest, shape into a batard, and cold proof in the banneton overnight.
The next morning the loaf goes into the freezer for about twenty minutes while you whisk the filling together. This is not optional and it is not about temperature, it is about firmness. A cold proofed loaf straight from the fridge is soft enough that cutting into it and rolling it back up drags and tears, and twenty minutes in the freezer gives you a loaf that holds its shape while you work.
Turn the loaf out onto parchment top side down and slice down through it vertically, keeping those knife cuts deeper than the scissor cuts that come next.

Sprinkle the dry mix down into all of the cuts, working across the whole loaf rather than loading up the first few sections.

Roll it back into a log from one end with the bottom edge tucked under, pressing the seam tight all the way across.

Flip it so the seam faces down and the smooth top faces up, then lower it into the pan.

It bakes covered, gets scored partway through, goes back under the lid, and finishes uncovered.

Expert Tips
- Spread the filling deliberately across every cut instead of loading up the first few. Every void I got came from filling pooling in one spot rather than from the recipe itself
- Whisk the cocoa into the sugar thoroughly before you start filling, so it is evenly distributed rather than sitting loose on top where it can puff out while you roll
- Press the seam tight across the entire length, not just at the ends. A loose seam is what lets a loaf come apart at the bottom once it is sliced and cooled
- These loaves always bake seam side down
- Probe the crumb rather than the dark ribbon when you check the internal temperature. The filling seam holds moisture differently and will read low, which can talk you into overbaking. Coming in from the end of the loaf at an angle keeps you clear of it
- If you have a tablespoon or so of filling left in the bowl at the end, that is expected. The batch is sized with a small cushion on purpose

Storage
Let the loaf cool completely before you cut it, which for this one means genuinely completely rather than mostly. The seam is still setting while the bread is warm, and slicing early is the easiest way to make the swirl come apart on you.

Store it cut side down on a board or in a bread box for two to three days. For longer storage, slice it first and freeze the slices in a bag with the air pressed out, then toast them straight from frozen. This loaf is very good toasted, and the chocolate softens back up in a way that is worth the extra step.
Shop This Recipe
These are the tools I actually use for this loaf. I earn from these affiliate links at no cost to you, and it helps support the blog.
- USA Pan 9×5 loaf pan. This is what I baked these in. I use two of them, one for the loaf and one inverted on top as a lid, and the second pan traps steam the way a Dutch oven does so you get the rise and the crust without moving a heavy pot around. If you would rather have a longer loaf with slightly shorter slices, the 10×5 works too.
- Dutch process cocoa powder. Worth buying specifically rather than using whatever is in the cupboard, since the color and flavor of the ribbon depend on it.
- Banneton basket. For the overnight cold proof.
- Kitchen scissors. These do the cutting that opens up the loaf, and a sharp dedicated pair makes a real difference.
- Instant read thermometer. The only reliable way to know this loaf is done, since the filling makes the usual visual cues less trustworthy.
- Digital kitchen scale. The recipe is based on weight and the cups measurement has been converted to the best of my ability, however there is a decent amount of fluctuation with using the cups measurement that it may affect your end result.
Recipe

The Easiest Chocolate Swirl Sourdough Bread
Equipment
- Large mixing bowl
- Digital Kitchen Scale
- Banneton basket
- Sharp knife
- Kitchen scissors
- 2 9×5 loaf pans or 10×5 for a longer loaf
- Parchment paper
- Instant read thermometer
Ingredients
Dough
- 500 g bread flour 4 cups
- 350 g room temperature filtered water 1 1/2 cups
- 75 g active sourdough starter 1/3 cup
- 10 g salt 1 3/4 teaspoons
Chocolate Swirl Filling
- 32 g granulated sugar for the swirl 2 1/2 tablespoons
- 11 g Dutch process cocoa for the swirl 2 tablespoons
- 3 g cornstarch for the swirl 1 teaspoon
Instructions
- Combine the bread flour, water, and active starter in a large bowl and mix until no dry flour remains and you have a shaggy dough. Cover and rest for 1 hour.
- Add the salt with wet hands, working it through the dough until it is fully incorporated.
- Perform a set of stretch and folds every 45 minutes to one hour for the next 3 hours, covering the bowl between each set.
- Let the dough bulk ferment at room temperature until it has increased in volume by 50 to 70 percent and jiggles when you move the bowl, pulls away from the sides of the bowl cleanly and has a domed non sticky top, about 6 to 12 hours depending on your kitchen temperature.
- Turn the dough out, pre shape it into a round, and rest it seam side down for 15 to 20 minutes.
- Shape the dough into a batard and place it seam side up in a floured banneton. Cover and cold proof in the refrigerator for 8 to 12 hours.
- Place the cold proofed loaf in the freezer for 15-20 minutes to firm it up for cutting.
- Preheat the oven to 450F.
- Whisk the granulated sugar, Dutch process cocoa, and cornstarch together in a small bowl until the cocoa is evenly distributed with no streaks remaining.
- Turn the loaf out onto a sheet of parchment paper, top side down. Slice down through the loaf vertically with a sharp knife, then cut it into sections with kitchen scissors, keeping the knife slices deeper than the scissor cuts.

- Sprinkle the filling down into all of the cuts, working across the entire loaf rather than filling the first few sections heavily. Be sure to spread it evenly and watch there are no deep pockets of powder. You may have a little left over.

- Roll the loaf back into a log from one end, being sure to push down the cut blocks are you roll. Keep the dough on the taunt side, then with the bottom edge pulled tightly. Press the seam closed along its full length, then tuck and seal both ends.
- Flip the log so the seam faces down and the smooth top faces up, then lower it into a parchment lined 9×5 loaf pan.
- Invert a second 9×5 pan over the top of the first to act as a lid.
- Bake covered for 9 minutes. Remove the top pan, score the loaf down the length of the top, and return the top pan.
- Bake covered for another 25 minutes, then remove the top pan and bake uncovered for 10 to 15 minutes, until the crust is deeply golden and the internal temperature reads 205F.
- Turn the loaf out onto a wire rack and cool completely before slicing.
Notes
Frequently Asked Questions

Can I use natural cocoa powder instead of Dutch process?
You can, and it will still work, but you will get a lighter and sharper result. Natural cocoa is more acidic and reads redder and thinner in color, which against a pale sourdough crumb is less striking than the deep brown you get from Dutch process.
Why is my swirl falling apart when I slice it?
It comes down to how the loaf got rolled back up. Either the seam along the bottom was not fully sealed, or the log was not rolled tightly enough as you went, or too much filling made its way in and got caught between the layers while you were rolling. All three leave you with places where the dough never actually made contact with itself, and those are the spots that pull apart once you slice into the cooled loaf. Press that bottom seam closed across its entire length, keep the roll snug from the first turn, and resist the urge to pile filling into the cuts.
Can I make this without a sourdough starter?
Not this version. This one is built entirely around a fully cold proofed sourdough loaf, and the timing of the method depends on that. If you are starting from scratch, my minimal waste starter guide walks you through building one. If you want to use your favorite yeast artisan loaf, be sure to give it an hour in the fridge before cutting and filling it!
Can I double the filling for a stronger chocolate flavor?
You can, but I would not. I tested a heavier filling and went back to this amount on purpose. More filling in the same cuts means more sugar pulling water at the seam and a higher chance of voids, and the thinner ribbon is what keeps this tasting like bread with chocolate in it rather than a dessert.
Do I have to freeze the loaf before cutting it?
Yes, or at least you should. Twenty minutes in the freezer firms a soft cold proofed loaf enough that the knife and scissors cut cleanly and the roll does not drag. Skipping it is the fastest way to tear the dough. However I have done it with out freezing just fine. If your dough is on the over proofed side of the line, i would freeze.
Can I use a Dutch oven instead of two loaf pans?
You can, and it will bake up perfectly well. The only real difference is shape. The double pan setup gives you a tall rectangular loaf with those sandwich style slices, and a Dutch oven will give you a rounder, wider loaf instead, so the swirl will show up differently across the cut. The bread itself and the way the ribbon behaves are the same either way.
More Sourdough Recipes

- The Easiest Cinnamon Swirl Sourdough Bread You Will Ever Make
- The Easiest Cheddar Everything Bagel Swirl Sourdough Bread
- How to Create a Sourdough Starter, a Complete Guide to Minimal Waste and Maximum Flavor
Subscribe
If you made this loaf, I would love to hear how the swirl turned out for you. Leave a rating on the recipe card and tell me in the comments what flavor you want to see next in this series.
Subscribe to get new recipes straight to your inbox, and come find me on Instagram, TikTok, Facebook, and Pinterest where I share every loaf as I am testing it.






Leave a Reply