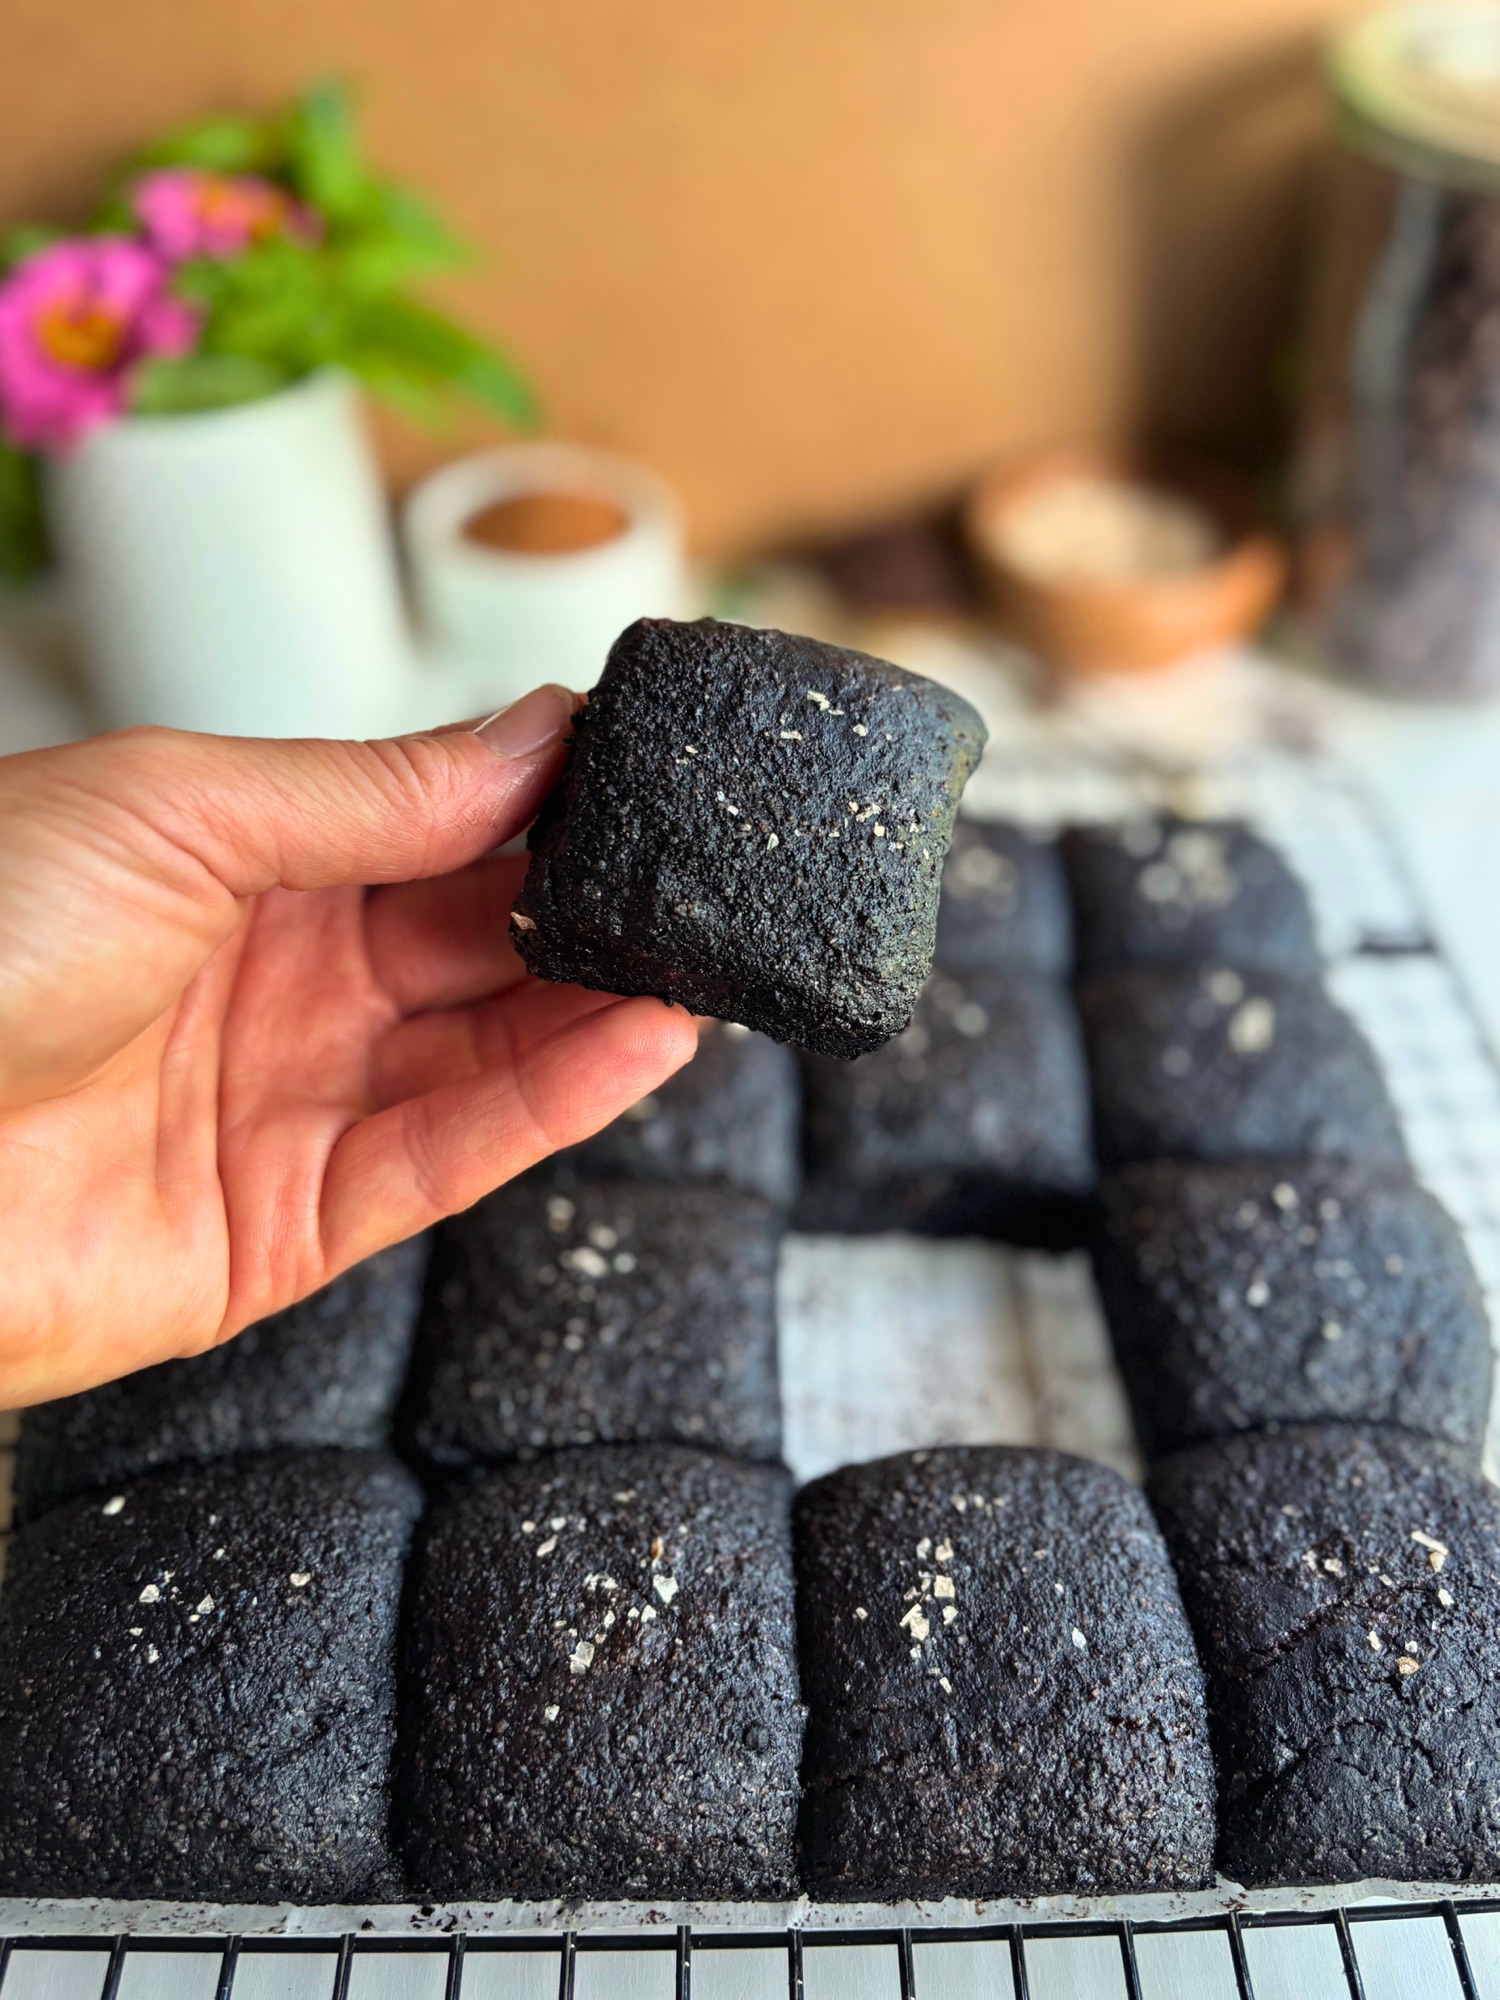
I have always believed the edge piece is the best piece of a brownie pan and they better be the fudgiest brownie you can bake too. So I started wondering what would happen if I took my fudgy sourdough brownies and treated them the way I treat my pull-apart focaccia, portioning the batter into balls, rolling each one in a coating, and letting them bake together in the pan so every single piece comes out with its own crust.
It took a few rounds of testing to get a brownie batter to hold its shape without turning into a blob or cake, but these sourdough pull-apart brownies are the result, and they are everything I was hoping for. Each one has a sparkly black cocoa sugar shell on all four sides, a dense and fudgy center, and a seam that lets it pop right out of the pan with no knife, no fighting over corners, and no special all edges brownie pan, just the regular 9×9 you already own.
The batter rests overnight with sourdough starter or discard, which deepens the chocolate flavor and firms the batter up enough to scoop, so most of the work happens while you sleep. Or there’s a section for how to make them without any sourdough. If you have made any of the recipes in my pull-apart focaccia series, the rolling and arranging will feel familiar, and if you have not, this is a fun place to start.
Table of Contents
- Why You Will Love These
- How Pull-Apart Brownies Work
- Ingredient Notes
- How to Make Sourdough Pull-Apart Brownies
- Expert Tips
- Variations
- No Sourdough Version
- Storing and Freezing
- Shop This Recipe
- Frequently Asked Questions
- Sourdough Pull-Apart Brownies Recipe
- More Recipes You Will Love
- Subscribe for Free
Why You Will Love These
These are the brownies I make when I want something that looks a little special without asking anything complicated of me, because the batter comes together in one bowl and the pan does the rest.

- Every piece is an edge piece. The black cocoa sugar coating bakes into a crisp, sparkly crust on all four sides of every brownie, so nobody gets stuck with a soft middle square, and you get that all edges result without buying a special brownie pan.
- Still truly fudgy. There is no baking powder or baking soda in these, so the center stays dense and rich instead of turning cakey.
- No knife required. The pieces pull apart along the coated seams, which makes them perfect for parties, bake sales, and kids who cannot wait for you to find a knife.
- Overnight convenience. You mix the batter the night before and portion it the next day, so the hands on time is split into two short sessions.
- Deeper chocolate flavor. The overnight rest with sourdough starter or discard rounds out the chocolate in a way a same day brownie cannot quite match.
- Easy to customize. Keep them plain and fudgy or fold in chocolate chips for melty pockets in every bite.
Back to Table of Contents | Jump to Recipe
How Pull-Apart Brownies Work
A regular brownie batter is too loose to roll, and my first test proved it. I baked a small batch of my original batter in a loaf pan walled off with foil, trying granulated sugar and cocoa sugar coatings, with some pieces rolled all over and some coated only on the sides, and every piece melted flat and fused into one slab that would not pull apart even after chilling. Getting pieces that bake together but still separate came down to three small changes that work as a team.
The first is a little extra flour. I raised the flour just enough that the portions hold a soft dome in the oven instead of spreading into a puddle, and because there is still no leavening in the batter, that extra structure does not push the texture toward cake. You can see the difference in my second test, where the same small batch held four separate domed pieces while the center stayed dense and fudgy.


The second is the overnight rest. After a night in the fridge the batter is firm enough to scoop and roll almost like a thick cookie dough, which a freshly mixed brownie batter is not. That same rest gives the sourdough time to deepen the chocolate flavor, which is a nice bonus for something that is mostly hands off.
The third is the coating, and it is what creates the pull-apart seams. In that first test, plain granulated sugar dissolved right into the batter and left no line between the pieces at all, while the one spot that split cleanly was wherever the cocoa coating stayed on. Cocoa does not dissolve the way sugar does, so a cocoa sugar coating stays put as a thin wall between each brownie. In the second test I put regular cocoa sugar and black cocoa sugar side by side, and black cocoa won for its deeper color and bold chocolate flavor.

Put together, those three changes give you a pan of brownies that bakes as one batch and comes apart as sixteen separate pieces, each with its own crust.
Back to Table of Contents | Jump to Recipe
Ingredient Notes
You will find the exact amounts in the recipe card below, but a few ingredients are worth a closer look before you start.

- Semi sweet chocolate. This gets melted with the butter to make the base of the batter. Chopped bars or chips both work.
- Cocoa powder. Natural or Dutch process both work in the batter, since there is no baking soda for the cocoa to react with.
- Black cocoa powder. This is the star of the coating. It gives every piece that nearly black shell, and when I tested it next to regular cocoa, I liked its deep, bold chocolate flavor much better.
- Espresso powder. You will not taste coffee, it just makes the chocolate taste more like itself.
- Sourdough starter. Active starter or discard straight from the fridge both work here, since the starter is there for flavor rather than rise. If you need a starter, my guide to creating a sourdough starter walks you through it.
- All purpose flour. The amount is a little higher than in my original brownie recipe on purpose, since it is what lets each portion hold its shape.
- Flaky sea salt. Optional, but a few flakes on top of the black cocoa look beautiful and balance all that chocolate.
Back to Table of Contents | Jump to Recipe
How to Make Sourdough Pull-Apart Brownies
The full step by step instructions, temperatures, and times are in the recipe card, so this section walks through what is happening at each stage and what to look for along the way.
Mix the batter the night before. Melt the butter and chocolate together, then whisk the cocoa and espresso powder in while the mixture is still hot so they bloom in the warm fat instead of going in with the flour. Let the mixture cool to warm before the eggs go in so they do not start to cook, then fold in the flour and salt and let the bowl rest in the fridge overnight.
Line the pan with a sling. A parchment sling that hangs over two sides of the pan is how you get the whole batch out in one piece, and a couple of binder clips keep the parchment from sliding around while you arrange the brownies.

Scoop the batter cold. After the overnight rest the batter is thick enough to scoop and roll, so take it straight from the fridge and skip any time on the counter. Cold batter is much easier to handle, and it holds its shape better in the oven.

Weigh and divide. Weigh the batter after it rests and divide by 16 rather than trusting a set number, because a little always stays behind in the bowl. Mine came out to about 60 grams per piece, and keeping them even is what makes the batch bake evenly.

Roll each ball in the coating. Roll the portion into a ball between your palms, then roll it through the black cocoa sugar until it is covered on every side. The sides matter just as much as the top here, since the coating on the sides is what forms the seams between the brownies.

Freeze, arrange, and bake. Freeze your balls for 15-20 minutes before baking. Then remove and set the balls in the pan in four rows of four with a little space between them. They look small at first, but they spread and meet in the oven. My first test went into the oven straight from the fridge and melted into one slab, but I had not added the extra flour yet either, so the freeze is not the only thing that changed. I have frozen every batch since, and it is a short, easy step that helps the outsides firm up before the centers soften, so I keep it in.

Cool completely before pulling. The centers finish setting as they cool, so give the pan a couple of hours before you lift the brownies out by the parchment. If you pull them warm the seams will not separate as cleanly, and the middles will still be soft enough to squish.

Expert Tips
Most of what makes these work happens before they ever go in the oven, so these are the little things that make the biggest difference.

- Use a 9×9 metal pan. Every test batch and the final recipe were baked in a 9×9 metal pan, so that is the pan I can promise results in.
- Check a middle piece for doneness. The four center brownies are surrounded on every side and take the longest to bake, so judge doneness by one of those rather than a corner.
- Coat generously and press it in. In my first test a lot of the cocoa coating rolled right off the cold batter, and the only places the pieces split cleanly were where it stayed on. Use more coating than you think you need and cup each ball in your palm so the coating presses into the surface.
- Save your extra coating. The coating recipe makes a little more than you need. As long as it stayed dry, store it in a jar for your next batch, because black cocoa is not cheap.
Back to Table of Contents | Jump to Recipe
Variations
The plain version is my favorite because nothing gets in the way of that fudgy center, but these take well to a few easy changes.

- Chocolate chip pull-apart brownies. Fold dark chocolate chips into the batter at the end of mixing for melty pockets in every bite. The amount is listed as an optional ingredient in the recipe card, and your pieces will weigh a little more, so weigh and divide the same way.
- Regular cocoa coating. If you do not have black cocoa, regular unsweetened cocoa works in the coating at the same ratio. The brownies will bake up dark brown instead of nearly black, with a milder chocolate flavor on the outside.
- Skip the salt. The flaky salt is optional, so leave it off if you are baking for little ones who prefer their brownies straightforward.
Back to Table of Contents | Jump to Recipe
No Sourdough Version
If you do not keep a sourdough starter, you can still make these pull-apart brownies by swapping the starter for flour and milk, since the starter in this recipe is there for flavor rather than rise. This is the same swap from my original fudgy sourdough brownies, though I developed and tested this pull-apart version with sourdough discard.
Replace the 80 g of sourdough starter with
- 40 g all purpose flour (1/3 cup)
- 40 g whole milk (2 tablespoons plus 2 teaspoons),
- and mix everything else exactly as written. That swap keeps the total flour and liquid the same as the sourdough version, so the batter behaves the same way in the pan.
The one step you cannot skip is the chill. The batter still needs to firm up before you can roll it, so cover the bowl and refrigerate it for at least 2 hours, or overnight, until it is thick and scoopable like a cold cookie dough. From there, portion, coat, freeze, and bake exactly as the recipe card describes. The flavor will be a little less deep than the overnight sourdough version, but the fudgy center and the pull-apart crust come through just the same.
Storing and Freezing
These keep well, so a batch will happily carry you through the week, and they freeze beautifully if you want to tuck some away for later.

- Room temperature. Store the brownies in an airtight container for up to 4 days.
- Fridge. Refrigerate them for up to 1 week. They get even fudgier when cold, so let them sit out for a few minutes if you like them softer.
- Freezer. Freeze the baked brownies in a freezer bag for up to 3 months, then thaw them at room temperature.
- Warming. A few seconds in the microwave brings back that fresh from the oven softness, especially on the chocolate chip version.
Back to Table of Contents | Jump to Recipe
Shop This Recipe
These are the tools and ingredients I reach for when I make these brownies. I earn a small commission from these affiliate links at no extra cost to you, which helps support the blog and keeps the recipes coming.
- 9×9 Metal Baking Pan The pan these were developed in, and the right size for thick, domed pieces that pull apart.
- Black Cocoa Powder The secret to that nearly black, sparkly crust and the deep chocolate flavor on the outside of every piece.
- Digital Kitchen Scale I use it to weigh the batter and divide it evenly, so every brownie bakes the same.
- Cookie Scoop Makes quick work of portioning the cold, thick batter.
- Parchment Paper For the sling that lets you lift the whole batch out in one piece.
- Binder Clips They hold the parchment against the sides of the pan while you arrange the brownies.
- Espresso Powder A small amount makes the chocolate taste richer without any coffee flavor. You can also just use instant coffee, if you don’t have it.
- Flaky Sea Salt For finishing the tops.
Back to Table of Contents | Jump to Recipe
Frequently Asked Questions
These are the questions I expect to hear the most about these brownies, so here is everything in one place.

Are pull-apart brownies cakey?
No. There is a little more flour than in my original fudgy brownie so the pieces hold their shape, but there is no baking powder or baking soda, so the centers stay dense and fudgy.
Can I use regular cocoa instead of black cocoa for the coating?
Yes. Use regular unsweetened cocoa in the same amount. The brownies will be dark brown instead of nearly black, and the outside will taste a little milder.
Do I have to use sourdough starter?
No. Swap the starter for 40 g all purpose flour and 40 g whole milk, then chill the batter for at least 2 hours, or overnight, until it is firm enough to roll. The full details are in the No Sourdough Version section.
Can I use active starter instead of discard?
Yes. Either works, since the starter is in this recipe isn’t for a rise.
Why does the batter need to rest overnight?
The melted chocolate and butter firm up as the batter chills, which makes it thick enough to scoop and roll, and the overnight rest also deepens the chocolate flavor.
Do I really need to freeze the brownies before baking?
My first test went into the oven straight from the fridge and melted into one slab, but I had not added the extra flour yet either, so I cannot say the freeze alone made the difference. I have frozen every batch since because it is a short, easy step that helps the outsides firm up before the centers soften, so I recommend keeping it.
Why are my pieces melting together into one slab?
That is exactly what happened in my first test, when the batter had less flour and some pieces were rolled in plain granulated sugar. Make sure you use the full amount of flour, roll the batter cold, and coat each ball in the cocoa sugar on every side, not just the top.
How do I know when they are done?
The edges will look set and the centers will no longer look wet. Check one of the four middle pieces, since those take the longest.
Can I bake these in a different pan?
I developed and tested these only in a 9×9 metal pan, so that is the pan I recommend. Other pan sizes and glass or ceramic dishes will change how the pieces spread and how long they bake, and I have not tested those.
Can I add chocolate chips?
Yes. Fold them in at the end of mixing. The amount is listed as an optional ingredient in the recipe card.
Why did my brownies not pull apart cleanly?
They were most likely still warm. Let them cool completely, about 2 hours, so the centers set before you pull them apart.
Can I freeze pull-apart brownies?
Yes. Freeze the baked brownies in a freezer bag for up to 3 months and thaw them at room temperature. They’re perfect for grabbing a treat on the run.
Back to Table of Contents | Jump to Recipe
Sourdough Pull-Apart Brownies Recipe

Sourdough Pull-Apart Brownies
Equipment
- kitchen scale
- Large microwave safe bowl
- Whisk
- Rubber spatula
- 9×9 inch metal baking pan
- Parchment paper
- Binder clips optional to keep the paper back while filling the pan.
- Cookie scoop or spoon
- Small Bowl
- Cooling rack
Ingredients
Brownie Batter
- 170 g unsalted butter 3/4 cup
- 140 g semi sweet chocolate chopped or chips, for melting into the batter (3/4 cup plus 1 tablespoon)
- 60 g unsweetened cocoa powder for the batter (2/3 cup plus 2 teaspoons)
- 3 g espresso powder 1 teaspoon
- 200 g granulated sugar for the batter (1 cup)
- 60 g brown sugar packed (1/4 cup plus 1 1/2 teaspoons)
- 150 g eggs 3 large eggs
- 20 g egg yolk 1 large egg yolk
- 8 g vanilla extract 2 teaspoons
- 80 g sourdough starter active or discard (1/3 cup plus 1 teaspoon)
- 110 g all purpose flour 3/4 cup plus 2 tablespoons plus 2 teaspoons
- 4 g fine salt 2/3 teaspoon
- 120 g dark chocolate chips optional, folded into the batter (2/3 cup plus 2 teaspoons)
Black Cocoa Coating
- 32 g granulated sugar for the black cocoa coating (2 1/2 tablespoons)
- 8 g black cocoa powder for the black cocoa coating (1 1/2 tablespoons)
Topping
- Flaky sea salt, for sprinkling on top, optional
Instructions
- Melt the butter and semi sweet chocolate together in a large microwave safe bowl in 30 second bursts, stirring between each, until smooth.
- While the mixture is still hot, whisk in the cocoa powder and espresso powder so they bloom in the warm fat.
- Whisk in the granulated sugar and brown sugar, then let the mixture sit until it feels warm rather than hot.
- Whisk in the eggs and egg yolk until the batter turns glossy, then whisk in the vanilla and sourdough starter.
- Fold in the flour and salt until no dry streaks remain. If you are adding chocolate chips, fold them in now.
- Cover the bowl and refrigerate for 12 to 18 hours. However, if you don't want to long ferment them, just let them chill for two hours before using the dough.
- When you are ready to bake, preheat the oven to 350°F (175°C) and line a 9×9 inch metal pan with a parchment sling, using binder clips to hold the parchment against the sides.
- Stir the granulated sugar and black cocoa powder for the coating together in a small bowl.
- Weigh the cold batter straight from the fridge and divide that number by 16 to get the weight of each piece, which should land around 60 to 63 grams without chocolate chips.
- Scoop each portion, roll it into a ball between your palms, then roll it through the coating until it is covered on all sides, pressing gently so the coating sticks.
- Place on a tray or plate and place in the freezer for 15-20 minutes.
- Preheat the oven to 350 degrees F.
- Remove the coated balls from the freezer and place in the pan in 4 rows of 4, evenly spaced. They will spread as they bake and meet in the middle.
- Bake for 28 to 33 minutes, until the edges are set and the centers no longer look wet. The shorter time gives you extra fudgy brownies and the longer time gives you a more set center.
- Sprinkle flaky sea salt over the tops while the brownies are still warm, if using.
- Cool completely in the pan at room temperature, about 2 hours, then lift the brownies out by the parchment and pull them apart.
Notes
More Recipes You Will Love
If you love the pull-apart idea or you are always looking for another way to use chocolate and sourdough, these are a great place to go next.


Subscribe for Free
If you want new recipes like these sent straight to your inbox, subscribe to H3art of the Home. It is completely free, and you will be the first to know when a new pull-apart recipe, sourdough bake, or high protein favorite goes live.

Leave a Reply