Introduction
Some recipes are more than just ingredients and instructions. They’re threads that connect us to the people we’ve loved, the kitchens where we learned to bake, and the moments we hope to hold.
This sourdough chocolate chip cookie recipe started with my great aunt, Jan or as I knew her, Mimi. At one of my visits before she passed away, we were looking through her well worn cookbooks, and tucked between the pages was this handwritten recipe, the paper soft and creased. When I asked her about it, she told me it was one of her absolute favorites, and that she’d been making these cookies for as long as she could remember. My great aunt was an excellent baker and cook, the kind of person who made everything from scratch and never needed to measure twice.
I wrote the recipe down that day and tucked it away, not knowing how precious it would become.
After she passed, I wanted to honor her memory, but I also wanted to make the recipe my own. So I brought it into the sourdough century. I adapted her original cookie to include sourdough starter and instant coffee, transforming a beloved family recipe into something that honors both her legacy and my love of long fermented baking.
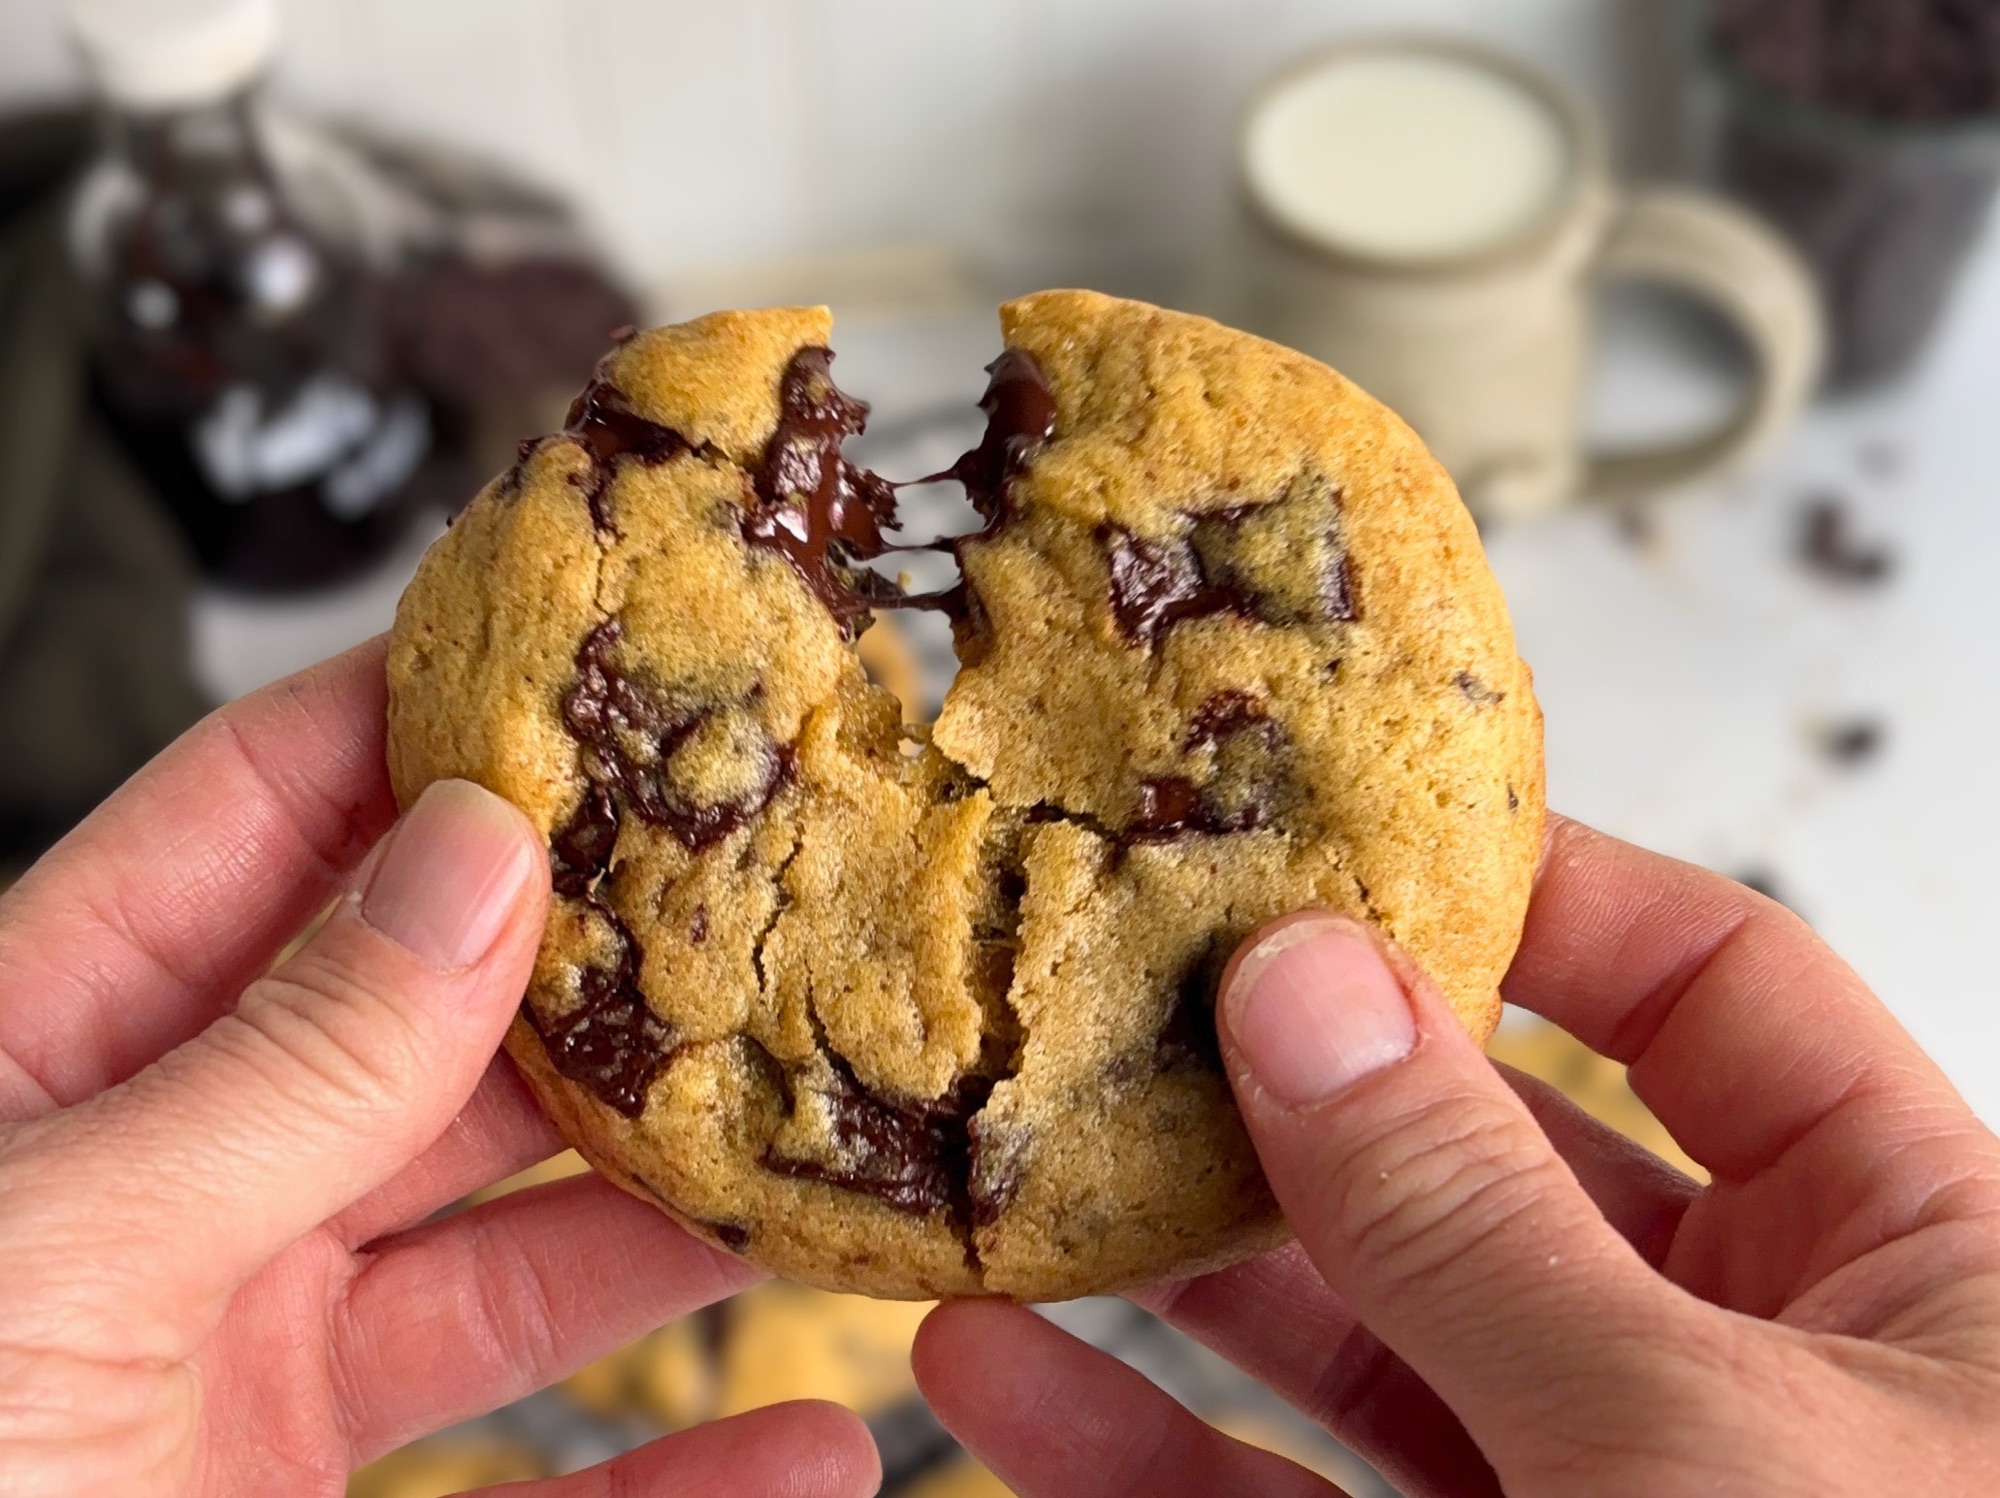
The result is a cookie with incredible depth of flavor from a cold fermentation. The edges shatter when you bite into them, giving way to a soft, chewy center packed with melted chocolate chunks. These aren’t your average chocolate chip cookies.
Table of Contents
- About This Recipe
- Why These Cookies Work
- Ingredient Notes
- Choosing Your Cookie Size
- How to Make Sourdough Chocolate Chip Cookies
- Tips for Success
- Storage
- FAQs
- Why This Recipe Matters to Me
- About Mimi
- Recipe
- Subscribe to the newsletter
About This Recipe

A Family Recipe, Reimagined
My aunt’s original recipe was written in her unique handwriting on a scrap of paper that had been folded and refolded so many times the creases were starting to tear. It was simple, straightforward, and absolutely delicious. When I started working with sourdough, I knew this was the perfect recipe to adapt. The sourdough starter adds complexity and a subtle depth that makes these cookies taste like they’ve been perfected over generations, because in a way, they have.
The fermentation (anywhere from 2 to 24 hours) isn’t just for flavor, ingredients working together to create something truly special.
Why These Sourdough Chocolate Chip Cookies Work

Melted butter creates a denser, chewier texture than creamed butter. You get that bakery style chew without any fuss.
Brown sugar does the heavy lifting for moisture and depth. It creates rich, moist cookies with incredible chew and adds that subtle molasses flavor that makes these cookies complex and satisfying.
Honey keeps these cookies soft for days. The original recipe called for corn syrup, but I prefer using honey for its cleaner ingredient profile and subtle floral sweetness. Both work beautifully for keeping cookies soft and preventing sugar crystallization.
Sourdough starter adds a layer of complexity you can’t get from commercial yeast or baking powder alone. The long fermentation breaks down the flour, develops flavor, and creates a cookie that tastes like it has a story, because it does.
Dark chocolate chunks (chopped from a bar, not chips) melt into pockets of richness. Irregular sizes mean some bites are packed with chocolate, others let the cookie shine through.
Ingredient Notes

Butter
I use regular melted butter for ease and consistency. If you want to experiment with brown butter down the line for a nuttier, more caramelized flavor, that’s an option. But this recipe is designed to be simple and accessible, just like the original.
Sugars
The 2 to 1 ratio of brown sugar to white sugar is intentional. Brown sugar brings moisture and chew. White sugar helps with spread and creates those crispy edges. Together, they balance sweetness without being cloying.
Honey or Corn Syrup
The original recipe called for corn syrup, but I prefer using honey for its cleaner ingredient profile and subtle floral sweetness. Both work beautifully for keeping the cookies soft for up to a week by preventing the sugars from crystallizing. Use whichever you have on hand.
Sourdough Starter
You can use active starter (fed 4 to 6 hours prior) or discard (as long as it’s been fed within a day or two). Active starter gives you slightly more rise and structure. Discard works beautifully and is a great way to use what you’d otherwise toss.
Flour
Bread flour is my preference. The higher protein content gives the cookies more structure and chew, which is exactly what you want when you’re working with the extra hydration from sourdough. You can substitute all-purpose flour if needed (see the FAQ section for details).
Instant Coffee
This is the one ingredient I added beyond the sourdough adaptation. My great aunt’s original recipe didn’t include it, but I wanted something that would make the chocolate taste even more intensely chocolate without being obvious.
I chose instant coffee over espresso powder for a specific reason: instant coffee dissolves more completely and has a cleaner, less bitter flavor. Espresso powder can be grainier and more concentrated, which sometimes creates an identifiable coffee taste in baked goods. With finely ground instant coffee (I use a dark roast), you get all the chocolate amplification benefits without any grittiness or noticeable coffee flavor.
The science behind it is simple. Coffee and chocolate share flavor compounds, so adding a small amount of coffee makes your brain perceive the chocolate as richer and more complex. You’re not tasting coffee. You’re tasting better chocolate.
If you really don’t want to use it, you can leave it out. But I promise, this isn’t a coffee cookie. It’s a chocolate cookie that tastes like the best version of itself.
Chocolate
Chop your chocolate from a bar. The irregular chunks create texture variation: some big, some small, some melted into the dough, others staying solid. It’s what makes every bite different. But chocolate chips work just fine too.
Choosing Your Cookie Size
I tested three different cookie sizes to help you decide what works best for you. Each size has its own personality and baking time, so pick the one that matches what you’re looking for. Highly suggest a kitchen scale – I’ve been using this one for 6 years and its been great!

30g Cookies (Small, Crispy)
Bake time: 10-12 minutes at 350°F
Makes: About 22 cookies
Best for: Crispier cookies with less gooey center, snack size portions, or when you want more cookies from one batch.
These bake faster and have a higher edge to center ratio, so they’re crispier overall. Great for parties where you want smaller, snackable portions.
50g Cookies (Medium, Balanced) ← RECIPE STANDARD
Bake time: 10-14 minutes at 350°F (12 minutes is my sweet spot)
Makes: About 14 cookies
Best for: The perfect balance of crispy edges and soft, chewy center.
This is the size I developed the recipe around. At 12 minutes, you get crispy golden edges with a soft, slightly underbaked center (what I call medium well). If you like crispier cookies (well done), bake for 13-14 minutes. If you want them even gooier, pull them at 10-11 minutes (medium rare).
70g Cookies (Large, Bakery Style)
Bake time: 14-16 minutes at 350°F
Makes: About 10 cookies
Best for: Thick, bakery style cookies with a big gooey center and substantial chew.
These are the showstoppers. They take longer to bake and have a much thicker, chewier center. If you want that thick, decadent cookie experience, this is your size.

No matter which size you choose, remember to flatten your dough to between 1/2 inch and 3/4 inch thick (right between the two lines on a ruler) before baking. This ensures even baking and prevents a domed center.
How to Make Sourdough Chocolate Chip Cookies

Step 1: Melt the Butter
Melt your butter in the microwave or on the stovetop, then let it cool for 5 minutes. You want it warm, not hot. If it’s too hot, it’ll cook the egg when you add it.
Step 2: Mix Wet Ingredients
Whisk the melted butter with both sugars and honey for about 1 minute by hand (or 30 to 45 seconds with an electric mixer on medium speed) until smooth and glossy. The mixture should look uniform with no streaks of butter. Some graininess from the sugar is fine – it will dissolve during the rest period. Add the egg and whisk until glossy. Stir in your sourdough starter and vanilla. Don’t worry if the starter looks ribboned through the mixture. That’s fine.
Step 3: Add Dry Ingredients
Fold in the flour, instant coffee, salt, and baking soda. Mix until the dough is about 80% combined. You should still see some streaks of flour. This prevents overmixing, which makes cookies tough.
Step 4: Fold in Chocolate
Gently fold in your chocolate chunks. Try not to break them up. You want those big, irregular pieces.
Step 5: Ferment the Dough
This is where the magic happens. The dough needs to ferment for 8 to 24 hours for the best flavor. The longer it sits, the more complex the flavor becomes.
Here’s my recommended workflow (it’s much easier):
- Chill the dough for 1 hour in the bowl
- Scoop the dough into your chosen cookie size (30g, 50g, or 70g portions)
- Place the portioned dough back in the fridge to finish fermenting for the remaining 7 to 23 hours
This method is way easier than trying to scoop cold, firm dough later. The dough is still soft after 1 hour, so scooping is effortless. Then it firms up during the rest of the fermentation.
Alternatively, you can refrigerate the dough in the bowl for the full 8 to 24 hours and scoop it later, but it will be much firmer and harder to work with.
Step 6: Shape and Flatten
After the dough has finished its cold fermentation, it’s time to shape and flatten. If you scooped the dough after 1 hour (recommended), your portions are already ready to go. If you chilled the whole batch, scoop it now into your chosen size (30g, 50g, or 70g).
Press each portion down gently with your palm to between 1/2 inch and 3/4 inch thick (right in between the two lines on a ruler). This ensures even baking and prevents a domed center. Smooth the edges with your fingers if needed.
Step 7: Rest at Room Temperature
Let the portioned dough rest at room temperature for 15 minutes before baking. This step is key for getting that perfect spread and even texture.
Step 8: Bake
Preheat your oven to 350°F (or 325°F if you’re using convection). Space the cookies 3 inches apart on a parchment lined baking sheet.
Baking times by size:
- 30g cookies: 10-12 minutes
- 50g cookies: 10-14 minutes (12 minutes for my preferred texture)
- 70g cookies: 14-16 minutes
The edges should be deep golden brown, and the centers should look slightly underbaked and puffy. Don’t overbake. They’ll continue cooking on the pan after you pull them out.
Step 9: Cool
Let the cookies cool on the pan for 5 minutes. This is when they firm up and set. Then transfer them to a wire rack to cool completely.
Tips for Success

Use a Kitchen Scale
Baking by weight is more accurate than measuring by volume. If you don’t have a scale, that’s okay, but I highly recommend investing in one. It makes a huge difference in consistency.
Don’t Skip the Room Temperature Rest
I tested this recipe both ways, and the 15 minute rest makes a massive difference. The cookies spread better, bake more evenly, and have the perfect texture.
Flatten the Dough
If you bake these as balls, you’ll end up with crisper outer circle but undone centers. Flattening them to between 1/2 inch and 3/4 inch (right in between the two ruler lines) ensures even baking. Just put a little water on your palm and smoosh. Damp skin not wet.
Watch the Edges, Not the Clock
Every oven is different. Start checking your cookies a few minutes before the minimum time for your chosen size (30g at 10 min, 50g at 10 min, 70g at 14 min). When the edges are deep golden brown and the centers look slightly underdone, pull them out.
Let Them Cool on the Pan
Those 5 minutes on the pan are crucial. The cookies are still cooking from residual heat, and they’ll firm up during this time. If you move them too soon, they might fall apart.
Storage

Room Temperature
Store baked cookies in an airtight container at room temperature for up to 7 days. The honey keeps them soft and chewy even after a week.
Freezing Unbaked Dough
You can refrigerate portioned dough for up to 3 days or freeze it for up to 3 months. If freezing, thaw the dough in the fridge overnight, then let it rest at room temperature for 15 minutes before baking.
Freezing Baked Cookies
Baked cookies freeze beautifully for up to 2 months. Thaw at room temperature and enjoy.
Mini Chips and M&Ms Variation
If using mini chocolate chips and/or M&Ms instead of chopped chocolate chunks, use 200g (1 and a quarter cups) total. You can split it as 100g mini chips plus 100g M&Ms, or use 200g of just one. Mini chips and M&Ms are smaller and more uniform than chopped chocolate, so you need slightly more by weight to get the same chocolatey experience in every bite.
FAQs
Can I use sourdough discard?
Yes! Discard works perfectly as long as it’s been fed within a day or two. It might give you slightly less rise than active starter, but the flavor and texture will still be excellent.
Can I use all purpose flour instead of bread flour?
Yes! All-purpose flour absorbs liquid differently than bread flour because of the lower protein content. You may need to add 10-15g more all-purpose flour (230-235g total instead of 220g) to get the right dough consistency. Start with 220g and check the dough after chilling. If it’s too sticky to handle easily, add another tablespoon (7-8g) of flour and chill for another 30 minutes. The cookies will be slightly more tender and less chewy than the bread flour version, but they’ll still be delicious.
Do I have to use instant coffee?
No, but I highly recommend it. The coffee doesn’t make the cookies taste like coffee. It makes the chocolate taste more intensely chocolate. If you really don’t want to use it, you can leave it out.
Can I make these without honey?
Yes. Substitute light corn syrup in the same amount (10g or 2 teaspoons). It’s neutral in flavor and does the same job of keeping the cookies soft. Or add 10g more of white sugar.
Why do my cookies spread too much?
If your cookies are spreading excessively, your dough might be too warm. Make sure you’re chilling the dough for at least 2 hours and flattening it to between 1/2 inch and 3/4 inch before baking. Also, double check that your oven temperature is accurate with an oven thermometer.
Why are my cookies too thick?
If your cookies aren’t spreading enough, they might be too cold when you put them in the oven. Let them rest at room temperature for 15 minutes before baking, and make sure you’re flattening them before they go in.
Can I brown the butter?
Yes, but I’d recommend mastering this version first. Browning butter adds a nutty, caramelized flavor, but it’s an extra step. Once you’re happy with the base recipe, you can experiment with brown butter as an upgrade. 113 g of butter usually browns down to about 85 g. So make sure you adjust accordingly.
Why This Recipe Matters to Me

That handwritten recipe sits in my kitchen. But now when I open it on my blog, I’m reminded of my aunt’s kitchen, the way she moved through it with such confidence and ease, and the way she lit up when she talked about all the amazing things she baked and cooked. She didn’t just give me instructions for making cookies. She gave me a piece of her life, her love of baking, and the care she put into feeding the people around her.
Adapting her recipe to include sourdough wasn’t about making it trendy or modern. It was about honoring the way she baked: with patience, intention, and a deep respect for ingredients. These cookies are a bridge between her kitchen and mine, between the past and the present, between what was and what can be.
About Mimi
She was the person I called when I had a question. About gardening. About canning. About cooking or baking. She always had an answer, or at least she knew how to help you find one.
Mimi and I had more in common than you’d think for two people with a 50 year age gap. We share a middle name. Mine came from hers. We both went into cosmetology, though our paths diverged when I left the field and she stayed. She worked and her own salon for 54 years. Our love of baking and gardening was often a topic of conversation on our long phone calls. We were both readers, she was the kind who always had a book next to her. She was patient and reserved, but she knew how to laugh. Really laugh.
Mimi loved creating beautiful things. Whether it was the flowers she tended in her garden, homemade cards, the leaded stained glass pieces she learned to create, or the collectible figurines and paintings she displayed throughout her home, she saw the world as something worth preserving. I always told her, everything she owned had a story behind it, and she held onto those stories the way some people hold onto photographs.
She loved Willie Nelson. I was genuinely surprised when I found that out, but once I knew, it made perfect sense. And his voice was often heard in the backround when I called.
One of my favorite stories about her was the time she and a friend went to New York City’s diamond district. She only had cash, because back then, that’s all she carried because her husband didn’t trust banks. Worried about being mugged in the city, she stuffed her bra, her socks, and her underwear with the money she needed to buy a diamond. That was Mimi. Practical. Determined. And brave enough to do what needed to be done.
She was married to “Boots”, a tall man with a quiet demeanor and a big laugh. He stormed the beaches of Normandy and came back, and together they built a life. Mimi loved putting on a party. Her holiday gatherings and picnics were the kind of events we looked forward to all year. She made everything feel special.
She lived a full, long life. And when I think about her now, I think about the care she put into everything. The way she listened. She made the world a little more beautiful just by being in it.
There are so many more of Mimi’s recipes tucked away in my kitchen. This one felt like the right place to start sharing them. I hope you taste the love she put into her baking. I hope you feel the same warmth I felt sitting in her kitchen, where we’d play rummy and have buttered toast and dip it in hot mint tea. I hope when I’m gone that I’m remembered the way I remember Mimi. Here’s to keeping memories alive!


No Mixer Sourdough Chocolate Chip Cookies
Equipment
- Large mixing bowl
- Whisk
- spatula
- plastic wrap
- Parchment paper
- Baking sheet
- Kitchen scale (recommended)
- Cooling rack
Ingredients
Fats and Sugars
- 113 g unsalted butter melted and cooled slightly (1/2 cup or 1 stick)
- 100 g dark brown sugar 1/2 cup, packed
- 60 g granulated sugar scant 1/3 cup
- 10 g honey 2 teaspoons or light corn syrup
Wet Ingredients
- 1 large egg room temperature (50g)
- 75 g active sourdough starter 100% hydration, fed 4 to 6 hours prior OR 75g sourdough discard (fed within 1 to 2 days)
- 6 g vanilla extract 1 1/2 teaspoons
Dry Ingredients
- 220 g bread flour 1 3/4 cups plus 2 tablespoons
- 1.5 g instant coffee finely ground dark roast, optional (1/2 teaspoon)
- 4 g fine sea salt 3/4 teaspoon
- 2 g baking soda 1/2 teaspoon
Mix Ins
- 170 g dark chocolate chunks chopped from bars (1 cup)
Instructions
Day 1: Mixing and Fermentation
- Melt butter in microwave for 30 to 45 seconds or on stovetop. Let cool for 5 minutes until warm, not hot (around 100 degrees F).
- Whisk together melted butter, both sugars, and honey for about 2 minute by hand (or 30 to 45 seconds with electric mixer on medium speed) until smooth and glossy. The mixture should look uniform with no streaks of butter. Some graininess from the sugar is fine, it will dissolve during the rest period.
- Add egg and whisk until fully incorporated and glossy.
- Add starter and vanilla, whisk until just combined.
- Add dry ingredients (bread flour, instant coffee (if using), salt, and baking soda) and fold with spatula until 80% combined. Streaks of flour are okay.
- Fold in chocolate chunks. Do not overmix.
- Cover bowl tightly with plastic wrap and refrigerate for 1 hour.
- After 1 hour, scoop dough into 50g portions (about 2 1/2 tablespoons each) onto a parchment lined sheet pan or plate.
- Return portioned dough to refrigerator to finish fermenting for the remaining 1 to 23 hours. Total fermentation time: 2 to 24 hours.
Portioning and Baking
- Remove portioned dough from refrigerator.
- Press each portion down gently with your palm to between 1/2 inch and 3/4 inch thick (right between the two lines on a ruler). Smooth edges with your fingers to round them.
- Let rest at room temperature for 15 minutes. This step is key for getting perfect spread and even texture.
Baking
- Preheat oven to 350 degrees F ( 177 C).
- Space dough 3 inches apart on parchment lined baking sheet.
- Bake 10 to 14 minutes. For medium rare cookies with gooey centers, bake 10 to 11 minutes. For balanced texture (recommended), bake 12 minutes. For crispier edges, bake 13 to 14 minutes. Edges should be d golden brown, centers should look slightly matte and puffy.
- Cool on pan 5 minutes, then transfer to wire rack.
Notes
Final Thoughts
This recipe is more than just a cookie. It’s a connection to my great aunt, a tribute to her love of baking, and a reminder that the best recipes are the ones we share with the people we love. I’m so grateful she shared this recipe with me, and I hope this sourdough adaptation honors her memory.
If you make these cookies, I’d love to hear about it! Leave a comment below telling me how they turned out, tag me on Instagram or Facebook so I can see your beautiful bakes, and don’t forget to sign up for my newsletter to get new recipes delivered straight to your inbox.
Happy baking!




Leave a Reply