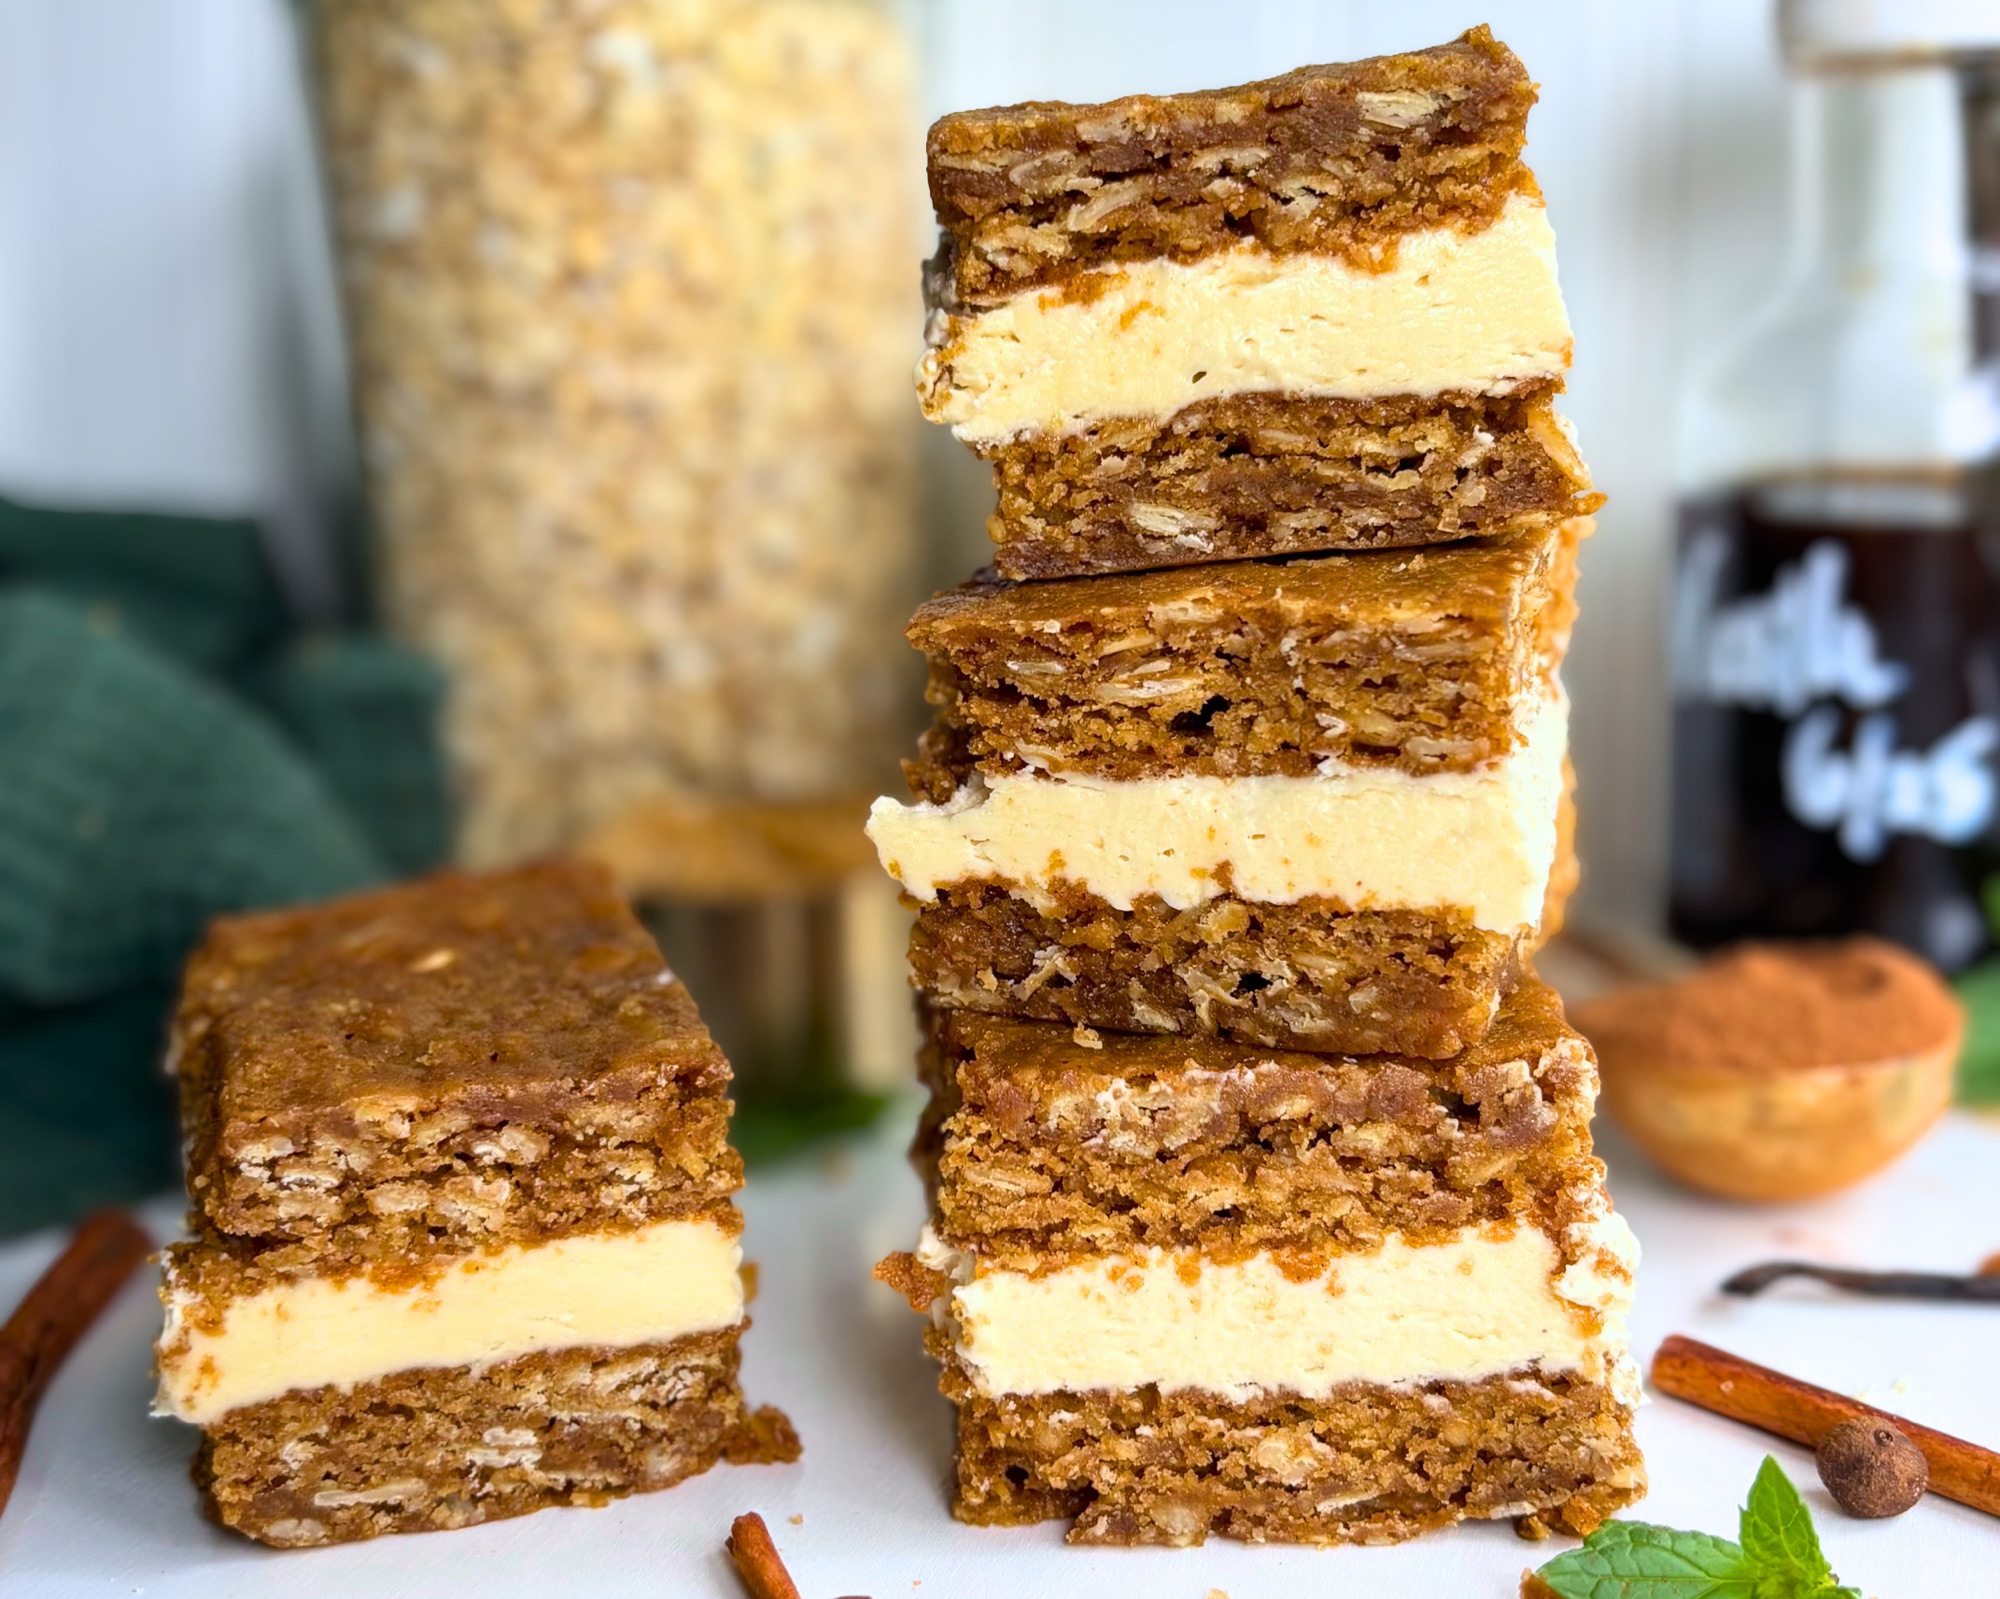
There is a version of this recipe where you scoop twenty eight cookies, bake them in three batches, wait for all of them to cool, pipe filling onto half of them, and then press the other half on top while quietly asking myself if its worth it. I made that version but I needed something that moved faster with a similar result.
This is the other version. Two quarter sheet pans, two slabs, filling spread across one of them in a single pass, and twenty four bars at the end of it. Same soft spiced oatmeal cookie, same marshmallow creme filling, none of the intricacies.

Table of Contents
- Why Sheet Pan Instead of Cookies
- Ingredient Notes
- Shop This Recipe
- Sourdough or Not
- The Dough Is Sticky and Must Be Chilled
- The One Thing That Ruins These
- Which Side Faces Out
- Cut Them Frozen
- Storage
- No Sourdough Version
- Frequently Asked Questions
- Recipe
- More Sourdough Recipes You Will Love
- Subscribe (free!)
Why Sheet Pan Instead of Cookies
Time is the obvious answer, but texture is the better one.
A scooped cookie has a huge amount of surface area for its weight, and all of that surface is drying out the whole time it sits in the oven. That is why oatmeal cookies slide toward crisp so easily and why the window between soft and snappy is about ninety seconds wide. A slab exposes a fraction of that, so it holds onto its moisture and the soft center stops being a matter of luck.
The trade is that a slab does not spread. It bakes exactly where you put it, which means the lift and the body have to come from air you whip into the butter and sugar at the very start. Four full minutes on the paddle. That is the one step I would not shorten.
Ingredient Notes

Oats, two ways. Most stay whole and a smaller portion gets ground into a flour, which takes about fifteen seconds in a food processor. The whole oats give you the speckle and the chew while the ground oats carry oat flavor through the crumb and keep it tender. Store bought oat flour swaps in at the same weight if you would rather skip the grinding.
Shortening in the filling. A portion of the butter is shortening, and it is there for structure rather than economy. Butter starts softening around seventy degrees, so an all butter filling goes loose the moment the kitchen warms up. Shortening has no water in it and holds well past ninety, which is what keeps these bars sitting up in your hand. Any brand works.
Blackstrap molasses is fine here. It is the third boiling of cane juice, so it is darker and less sweet with a bitter edge that a lot of people find sharp straight from the jar. At under two percent of this dough it reads as depth instead, and it gives you a darker crumb. Regular unsulphured molasses lands sweeter and rounder. Both are correct.
Shop This Recipe
Nothing here is exotic, but two of these actually change the outcome rather than just making it faster.
Equipment
- quarter sheet pans You need two, and the parchment sling matters more than the pan brand.
- mini rolling pin This is the tool that makes the whole recipe work. A full size pin will not fit inside the pan walls, and fingers will not give you a level slab.
- kitchen scale The dough gets split by weight between two pans, and eyeballing it gives you two slabs that bake at different rates.
- stand mixer The four minutes of creaming is where all the lift comes from.
- small offset spatula For spreading the filling out to the edges.
- cookie scoop Not required, but portioning the filling in scoops rather than one pile makes it spread evenly in half the time.
- food processor For grinding the oat flour, unless you are buying it.
Pantry
- old fashioned rolled oats
- shortening I use Spectrum Organic.
- marshmallow creme Toonie Moonie organic vanilla is what went into this batch.
- powdered sugar Florida Crystals organic.
- molasses
Sourdough or Not
If you keep a starter, discard works beautifully and so does a longer ferment. I have taken this to a twelve hour overnight in the refrigerator and the flavor was noticeably deeper than the same day version. I have not personally pushed it further, though I see no reason it would not go longer if that is how you like to work.
Active starter at peak works too, and it will give you slightly more rise. Just know it is harder to incorporate, since peak starter is full of gas and stretchy with developed gluten and it would rather stay in ropes than disperse. Add it with the eggs and give it longer on the paddle than feels necessary.
If you do not have a starter at all, the swap is in the recipe notes and it is a simple one. Flour and milk in place of the discard, with nothing else changing. Milk rather than water, because it puts the liquid back and hands you milk fat and milk sugars on top of it, which buys a more tender bar and better browning.

The Dough Is Sticky and Must Be Chilled
I want to be very clear about this before you get your hands in the bowl, because it is not what people picture when they hear cookie dough.
This is not a stiff dough you can pat out with your palms and have it stay clean. It is thick, but it is genuinely tacky and it will stick to your fingers and your spatula and anything else you press it with. That is not a measuring error and it is not a sign anything went wrong. It is what makes the dough spreadable into a thin even layer in the first place, which a drier stiffer dough simply will not do.
So do not fix it with flour. Every gram you add there comes back to you as a drier, tougher bar.
What you do instead is chill it. An hour or two in the refrigerator, minimum, and the dough becomes completely manageable. You can chill it in the bowl, wrapped as two flattened discs, or already weighed into the lined pans and covered. If you are fermenting it overnight anyway then this is already handled.

Then comes the part that makes this whole recipe easy. Weigh the dough into the pan in six or eight blobs spread around rather than one mound in the middle, lay plastic wrap loosely over the top, and roll it level right in the pan with a small rolling pin. The plastic takes all the stick and the pin gives you a flatter surface than fingers ever will.

Do not try to roll this on the counter. You would have to work in extra flour just to keep it from grabbing, and then you would still be moving a floppy rectangle into a pan without tearing it.
The One Thing That Ruins These
Overbaking, and it happens faster than you think.
Pull the slabs when the edges are set and just barely releasing from the parchment, the surface has lost its raw wet sheen, and the center still looks slightly underdone when you tilt the pan into the light. It will not look finished. Take it out anyway.
A half inch slab holds an enormous amount of heat in a hot metal pan, so it keeps cooking on the counter. Two extra minutes in the oven is the whole difference between the soft bar you wanted and a crisp one you did not.


Which Side Faces Out
This is the part people get backwards, so let me be specific.
The craggy baked tops face outward on the finished bar, and the two smooth pan sides meet in the middle against the filling. That texture is the visual signature of an oatmeal cream pie. Build it the other way and you get two flat faces, however do whatever you like! It’s hard to ruin something so delicious.


The moment to be careful is moving the top slab. Do not pick it up with your hands, because it will crack, and I know that because mine did a little. Flip it onto a board with parchment and a flat surface, flip it back so the craggy side is up again, then line up one long edge and slide it onto the filling while pulling the board out from underneath. The full sequence is in the recipe notes.

Cut Them Frozen
Not chilled. Frozen.
I tried the refrigerator first and it was not enough, because a merely cold filling still drags under the blade and pulls the layers apart on you. An hour in the freezer and the whole thing cuts straight through without an argument.
Press the knife straight down rather than sawing, wipe the blade between every cut, and let the bars sit at room temperature for twenty or thirty minutes afterward. They are also excellent eaten straight from frozen, which I did not expect and am now completely on board with.

Storage
Cut bars keep airtight at room temperature for three days. There is no cream cheese and no fresh dairy in the filling, so the refrigerator is not necessary and the shortening is what holds them together in a warm kitchen.
I prefer storing them in the fridge though so everything stays solid. You can also assemble and keep in the refrigerator for a few days or in the freezer.
They freezer really well sliced, and my kids enjoy them straight from the freezer, they say it’s like an ice cream sandwich!


No Sourdough Version
You do not need a sourdough starter. This is the same one, with two ingredients swapped in for one.
Sourdough starter kept at one hundred percent hydration is equal parts flour and water by weight, which means the discard here is functioning as half flour and half liquid. Take it out and put those two things back separately.
Leave out the 160g of sourdough discard. In its place add
- 90g whole milk (6 Tbsp).
- 80g all purpose flour (⅔ cup)
That is the entire change. Both leaveners stay exactly where they are, the spices stay, the sugars stay, and the method does not change at all. Your dough comes to about 1569g total, so weigh 785g into each pan instead of 780g.
- Milk rather than water. Water is the literal swap and it would work, but milk is the better answer. Water only replaces what the discard was giving you in liquid, while milk replaces the liquid and hands you milk fat, milk protein, and milk sugars on top of it. The fat and protein give a more tender crumb and the milk sugars brown in a way plain water never will. The reason it is 90g and not 80g is that milk is only about eighty eight percent water, so 90g puts the actual water back where the discard had it and the dough rolls out exactly the same.
- You still have to chill it. This is the part people skip when there is no ferment to wait on, and it will cost you. The chill is not about flavor, it is about making the dough handleable, and this dough is sticky enough that it will not roll straight from the mixer no matter what is in it. Give it an hour or two in the refrigerator, wrapped as discs or already portioned into the lined pans.
- Two small things to watch. Those milk sugars brown faster than a discard version does, so start checking at eighteen minutes and lean toward the early end of the range. And fresh flour absorbs a little more liquid than the flour in discard, which has already been sitting hydrated, so the dough may feel slightly stiffer as you mix. If it fights the rolling pin, another 10g of milk will bring it right.
Frequently Asked Questions
Can I use one 9×13 pan instead of two quarter sheet pans? A standard 9×13 is close enough in surface area to a quarter sheet that the same 780g of dough works in it. Your layer will run very slightly thinner, so check at 17 minutes instead of 18. It may be a little more difficult to remove.
Why are my bars uneven or thick? It is important that you evenly spread the dough in the pans for the perfect layer. Tap the tray a few times on the counter to help get out any air bubbles. The dough will be where you put it, so if its thicker in spots before baking, it will be thicker after baking.
Can I use quick oats instead of old fashioned rolled oats? For the portion you grind, yes. For the whole oats, I would consider. Quick oats are cut smaller and thinner, so they can disappear into the crumb and you lose the chew and the visible speckle that make these read as an oatmeal cookie. But if you only have quick oats, use them. It’s not worth a trip to the store.
Why did my bars crumble when I cut them? Almost always one of two things. Either the slabs went a few minutes too long in the oven, which makes a drier cookie that fractures instead of slicing, or the slab was not frozen when you cut it. Refrigerator cold is not enough. Give it a full hour in the freezer and cut it while it is still hard.
Can I make these without a sourdough starter? Yes, and nothing about the method changes. The swap is in the recipe notes and its own section and it is flour and milk in place of the discard.
Can I halve the recipe? You can, half everything in the recipe. You would be making one slab, cut it in half after baking and add the adjusted filling and continue as directed.
Do these need to be refrigerated? No. There is no cream cheese and no fresh dairy anywhere in the filling, so they keep at room temperature in an airtight container for three days. However, I prefer them in the fridge. It keeps everything firm.
Can I Freeze These? Yes! They freeze really well, just pull them out about 45 minutes before serving. They also are quite delicious frozen, think of an ice cream sandwich vibe.
Recipe

Sourdough Oatmeal Cream Pie Bars
Equipment
- 2 Quarter sheet pans
- kitchen scale
- Stand mixer with paddle attachment
- Food processor or blender, for grinding the oat flour
- Mini rolling pin
- Small offset spatula
- Cookie scoop, for portioning the filling optional
- Wire cooling racks
- Parchment paper
- plastic wrap
- Long sharp chef knife
- A flat board or upturned sheet pan, for flipping the top slab
Ingredients
Oatmeal Slabs
- 283 g unsalted butter softened (1 1/4 cups)
- 265 g dark brown sugar packed (1 1/4 cups)
- 100 g granulated sugar 1/2 cup
- 30 g molasses unsulphured or blackstrap (1 1/2 Tbsp)
- 2 large eggs plus 1 large egg yolk about 118 g
- 12 g vanilla extract 1 Tbsp
- 160 g sourdough discard 100% hydration (2/3 cup)
- 330 g all purpose flour 2 3/4 cups
- 180 g old fashioned rolled oats left whole (2 cups)
- 60 g old fashioned rolled oats ground to a flour (2/3 cup, measured before grinding)
- 6 g baking soda 1 tsp
- 2 g baking powder 1/2 tsp
- 7 g fine sea salt 1 1/4 tsp
- 5 g ground cinnamon 2 tsp
- 0.5 g ground nutmeg 1/4 tsp
Marshmallow Creme Filling
- 198 g unsalted butter softened (1 3/4 sticks)
- 68 g shortening 1/3 cup
- 198 g marshmallow creme one 7 oz jar
- 170 g powdered sugar 1 1/2 cups
- 8 g vanilla extract 2 tsp
- 3 g fine sea salt 1/2 tsp
Instructions
- Grind the 60 g of oats in a food processor or blender until they look like a coarse flour. Whisk together with the all purpose flour, whole oats, baking soda, baking powder, salt, cinnamon, and nutmeg. Set aside.
- Cream the butter with both sugars and the molasses on medium with the paddle for a full 4 minutes, scraping down twice, until pale and light. Do not shorten this step.
- Add the eggs one at a time, then the yolk, beating well after each. Add the vanilla and the sourdough discard and mix until smooth and glossy.
- Add the dry mixture all at once and mix on low just until no dry flour remains. The dough will be thick and sticky. This is correct. Do not add extra flour.
- Cover the dough and refrigerate at least 2 hours, or up to 48 hours for a longer ferment. This chill is required, not optional. The dough is too sticky to handle straight from the mixer.
- Line two quarter sheet pans with a parchment sling that hangs over the two long sides. Do not grease underneath.
- Weigh 780 g of chilled dough into each pan or weigh your dough ball and divide by 2 for more accurate results, dropping it in six or eight separate blobs spread around rather than one mound in the center.
- Lay a sheet of plastic wrap loosely over the dough and roll it level right in the pan with a small rolling pin, working the corners deliberately. The dough will be where you put it, so if its thicker in spots before baking, it will be thicker there after baking. Peel the plastic away.
- Heat the oven to 350°F (175°C).
- Bake 18 to 22 minutes, checking at 18. Pull when the edges are set and just releasing from the parchment and the center still looks slightly underdone. It will not look finished. Take it out anyway.
- Rap each pan firmly on the counter once or twice the moment it leaves the oven to settle any doming.
- Cool 10 minutes in the pan, then lift both slabs out by the parchment onto racks and cool completely.
- Beat the filling butter and shortening together until smooth and light, about 2 minutes. Add the marshmallow creme and beat 1 minute more. Add the powdered sugar, vanilla, and salt, then whip on medium high 2 minutes until fluffy.
- Chill both cooled slabs in the refrigerator 30 minutes. Invert the first slab onto a board so the craggy baked side faces down and the smooth pan side faces up, then peel off the parchment.
- Scoop the filling across the slab in dollops and spread it into an even layer right out to the edges.
- Lay parchment over the second slab, set a flat board on top, and flip it so the slab is craggy side down. Peel off the parchment underneath, flip once more onto a second board so it is craggy side up, then line up one long edge and slide it onto the filling while drawing the board back out.
- Press gently with a flat sheet pan to seat and level everything.
- Cover with plastic wrap and freeze 1 hour.
- Cut while still frozen. Trim 1/4 inch from all four sides, then cut 4 columns down the length and 6 rows across the width. Press straight down rather than sawing and wipe the blade between cuts.
- Let the bars sit at room temperature 20 to 30 minutes before serving.
Notes
More Sourdough Recipes You Will Love
If sheet pan desserts are your speed, start here. And if you like a fermented cookie dough, these are the ones readers keep coming back to.
- Strawberry Pop Tart Sheet Pan Bars (Sourdough or Classic)
- Chocolate Covered Strawberry Sourdough Cookies
- Apple Pie Sourdough Cookies
- Sourdough S’mores Cookies with Graham Cracker Crumble
- Strawberry Shortcake Sourdough Cookies
- Blueberry Pie Sourdough Cookies
- Heart Shaped Brookies
- Lemon Blueberry Crumble Cookies

Subscribe
If you want more recipes like this one, the kind where the technique is explained rather than just listed, subscribe below and I will send new bakes straight to your inbox.




Leave a Reply