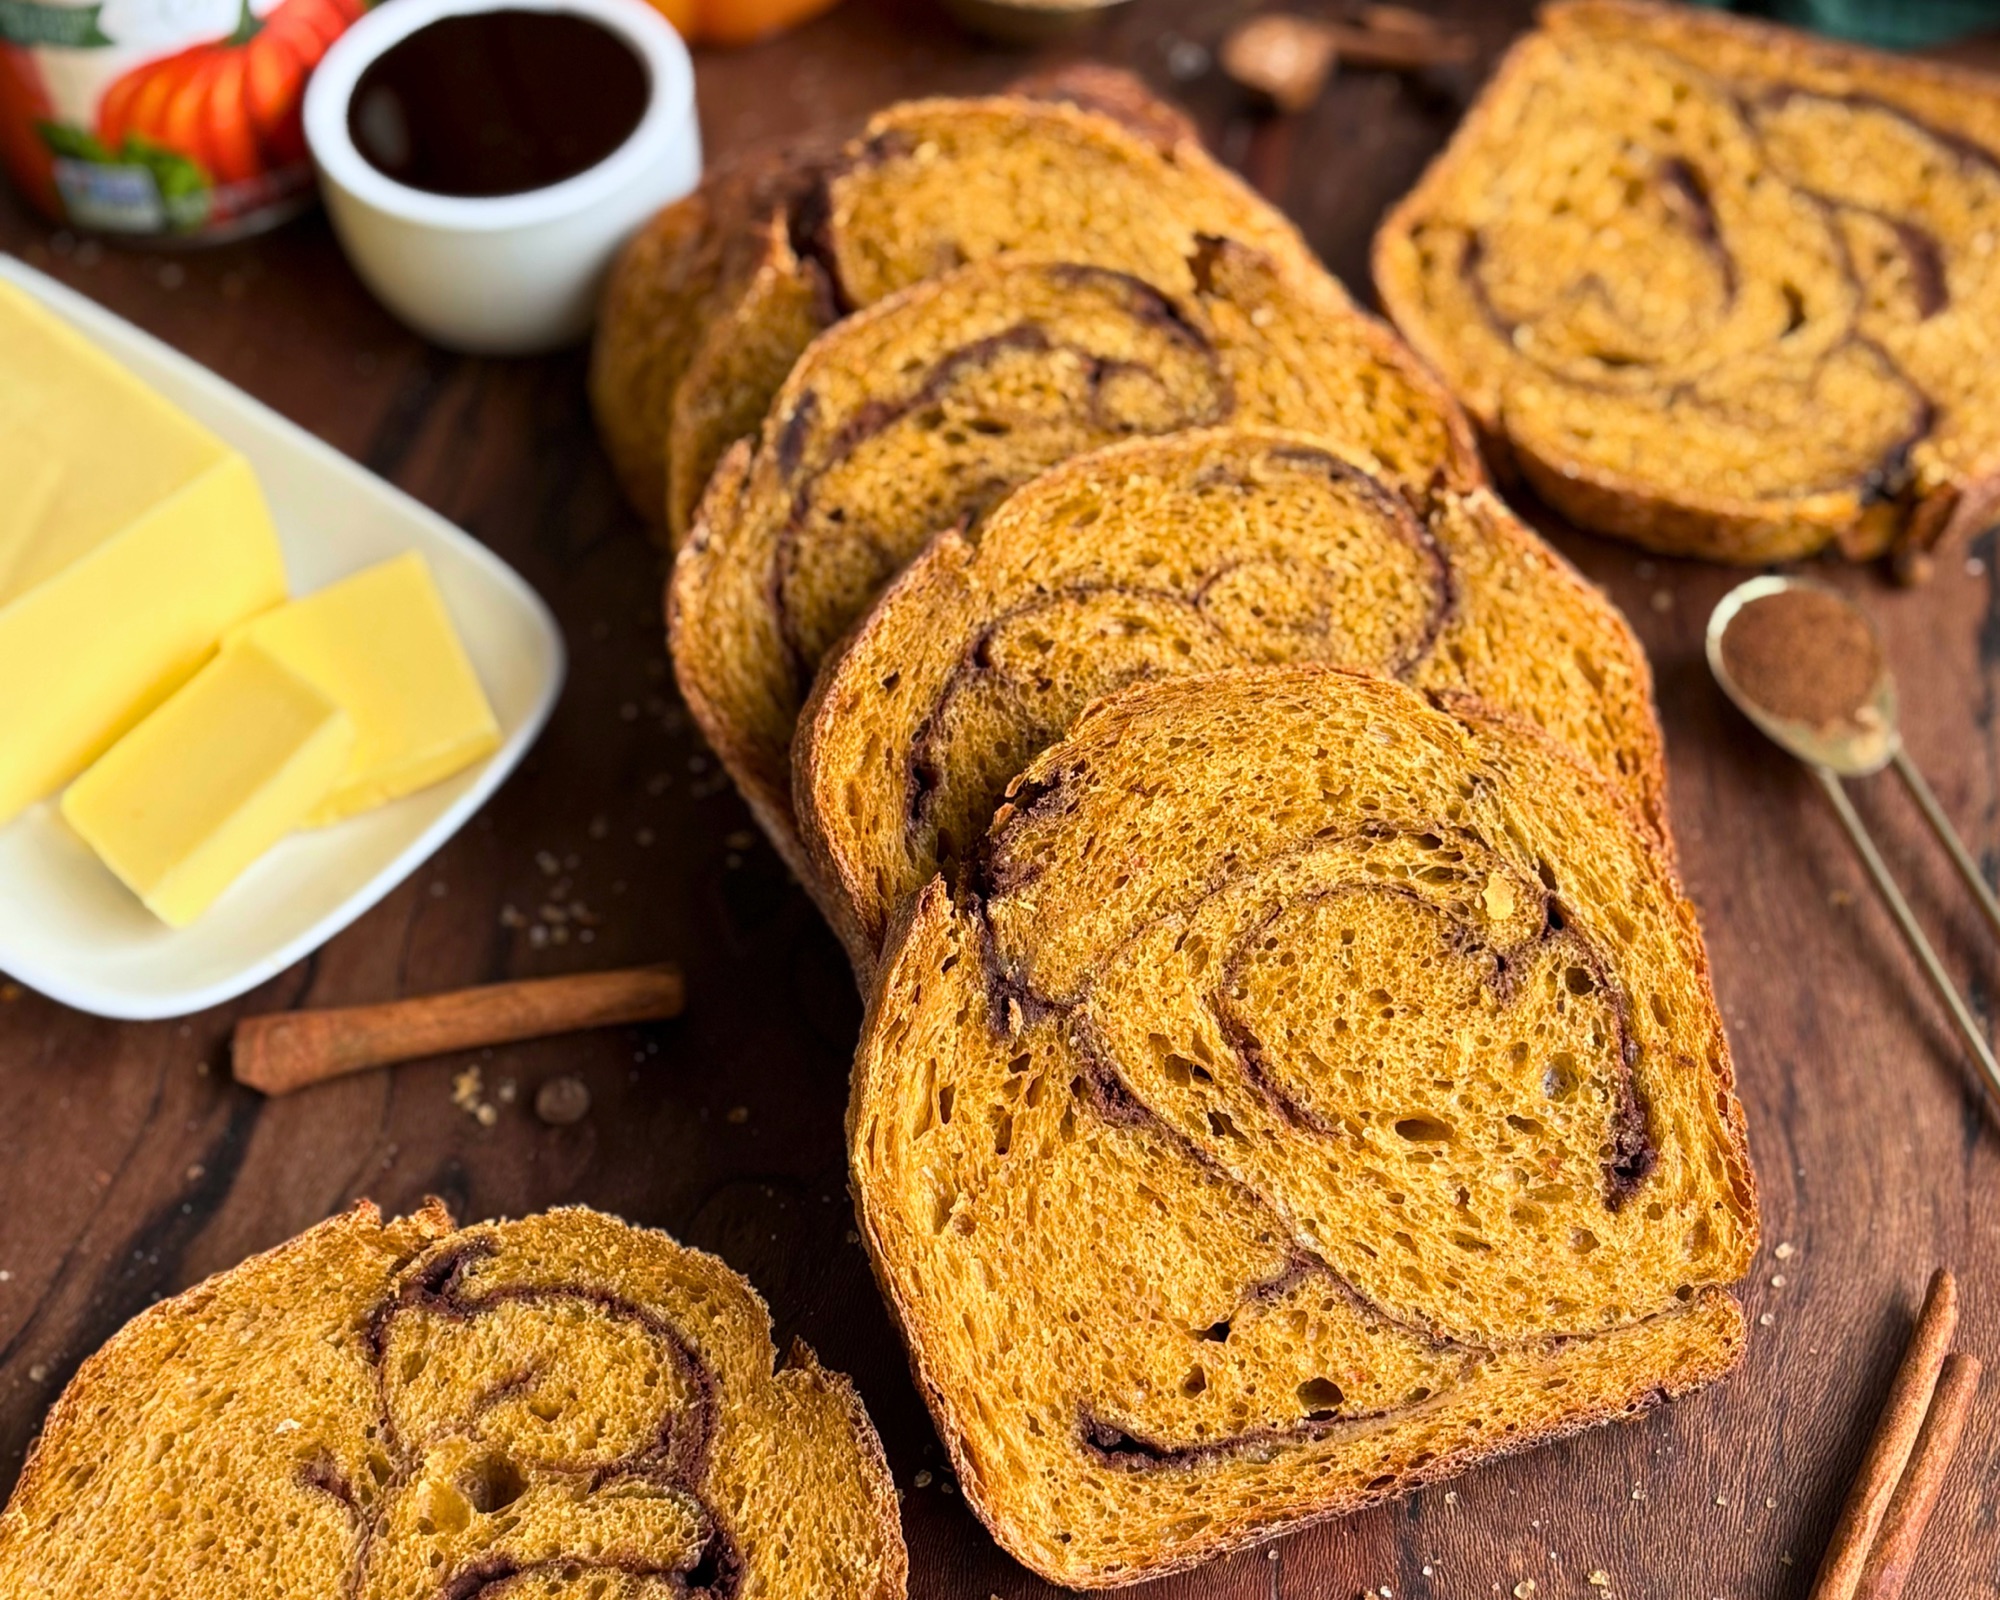
Every slice of this loaf comes out a little different, with the spiced ribbon feathering through the crumb in four or five turns rather than sitting in one neat ring at the center. That is the whole reason I built it. The spice runs through every bite instead of gathering in a single band you end up eating around, so it tastes better distributed that way, and it is genuinely lovely to look at. Artwork in every slice.
There is no shortage of pumpkin bread in the world, with quick breads everywhere you look and plenty of sourdough versions too, but most pumpkin swirl sourdough bread recipes give you that same single ring. A feathered swirl is the more forgiving of the two, which surprises people. One even spiral has to be nearly perfect to look right, and the layers tend to pull away from each other as the loaf rises, which is where those hollow gaps between the bread and the filling come from. Feathering has nothing to be perfect against, so there is no wrong version of it and every slice comes out its own small canvas.
The other thing this method takes off your plate is the guesswork at the end. The loaf is completely proofed before the filling ever goes in, so you are never standing at the oven wondering whether a freshly shaped log has risen enough to bake. That part is already behind you. What is left is cutting, filling, rolling, and baking, with the hydration dialed in over three test bakes so the dough handles beautifully rather than fighting you. There is no rolling out a rectangle, no dutch oven, and no freezer step.
The swirl goes in with my Cold Swirl Method, where the filling never touches the dough until minutes before it goes into the oven. Molasses goes into the dough rather than the maple syrup you will find in most versions, sitting quietly in the background and adding a depth and subtle sweetness that pumpkin and spice cannot manage alone. Leave the filling out entirely and the same dough bakes into an excellent plain pumpkin sourdough, so this one recipe is really two.
Table of Contents
- Why You Will Love This Loaf
- How to Swirl Sourdough Without Rolling It Out
- Ingredient Notes
- How Much Pumpkin Puree Goes in Sourdough Bread
- Why Molasses Instead of Maple Syrup
- Building the Swirl, Step by Step
- Reading the Bulk Ferment
- No Dutch Oven Needed
- What Three Test Bakes Taught Me
- Expert Tips
- Storage and Freezing
- Shop This Recipe
- Recipe
- Frequently Asked Questions
- More Sourdough Recipes
- Subscribe (Free!)
Why You Will Love This Loaf

- It uses my Cold Swirl Method, where the swirl goes in after the dough has already finished proofing, so there is no fighting a slack dough into a tight roll and no filling squeezing out at the seam.
- Real pumpkin puree straight from the can, no roasting and no draining, because a recipe that starts with an extra hour of prep is not a recipe most people will make twice.
- It bakes in a loaf pan with no dutch oven required, which also means it slices into a proper sandwich shape.
- The molasses sits in the background and adds depth and a subtle sweetness without ever tasting like molasses, which is what keeps the loaf from reading as dessert.
- It toasts beautifully, and the spiced ribbon caramelizes at the edges when it does.
- The technique works with any dry filling you can think of, so once you have made it once you have really learned four or five recipes.
How to Swirl Sourdough Without Rolling It Out
Most swirl breads are built at shaping. You roll the dough into a rectangle, spread the filling across it, roll it back up, and then let the whole thing proof with the filling already inside. That works fine for an enriched dough going into the oven in ninety minutes. It works much less well for sourdough, where the filling sits against the dough for eight to twelve hours in the fridge and slowly turns the layer it is touching into paste.

I do it backwards, and this is what I call the Cold Swirl Method. The loaf proofs plain, exactly like a regular sandwich style sourdough, and it goes into the fridge with nothing in it. Then, straight out of the cold, the loaf gets cut open and the dry filling goes down into the cuts. The whole thing gets rolled up, sealed, and put in the pan. Total contact time between the sugar and the dough is a matter of minutes rather than half a day.
It is the same method behind my cinnamon swirl and cheddar everything bagel loaves, and once you have done it once you can put nearly any dry filling through it.
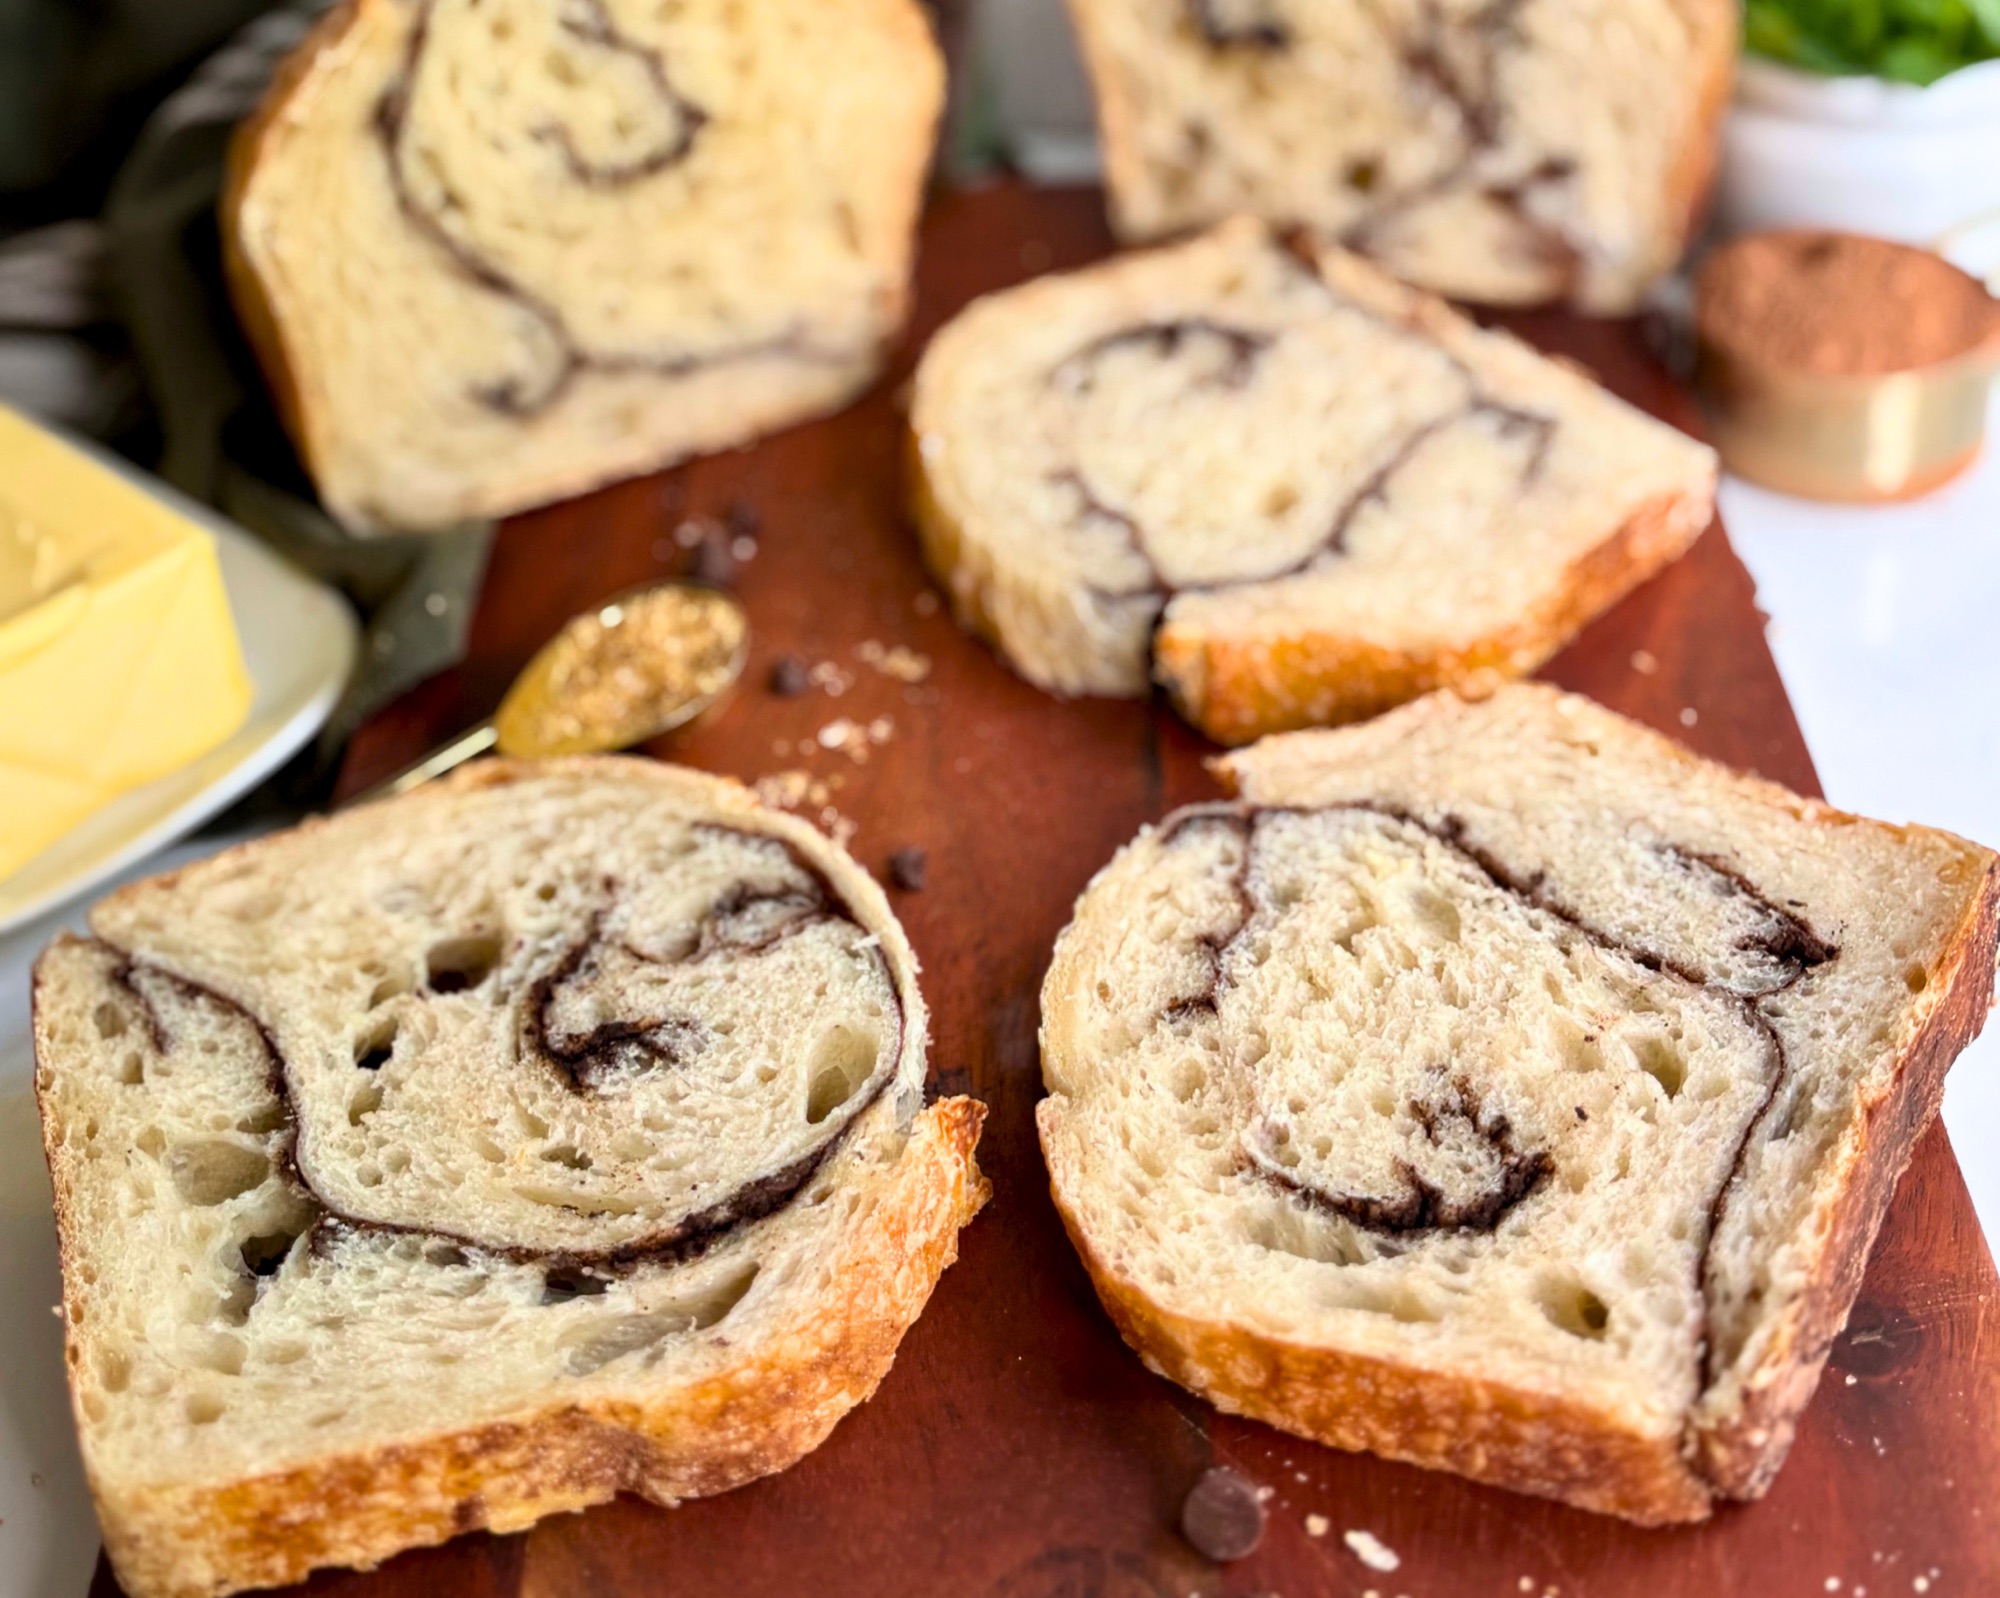
That end piece above is the clearest look at what is actually happening inside. You can see the individual cuts baked right into the structure, which is what turns into a spiral once the loaf is rolled.
There is no rectangle to roll and no slab of dough to fight, which matters a great deal here because a pumpkin dough is softer than a plain one and a rolled rectangle is exactly where a soft dough tears.
That single change is what makes a pumpkin swirl possible at all. It is also why the filling in this loaf stays grainy and set rather than melting into a syrupy line.
Ingredient Notes

Canned pumpkin puree. Plain pumpkin, not pumpkin pie filling, which is already sweetened and spiced. Canned is genuinely better here than homemade roasted puree, which varies wildly in how much water it holds. Canned is consistent, and consistency is what lets the water in this recipe be a fixed number instead of a guess.
Bread flour. All bread flour, no whole wheat. The pumpkin is already diluting the gluten with a meaningful amount of material that contributes no structure, so the flour needs to bring everything it can.
A ripe active starter. No separate levain build. Feed your starter, wait for it to peak, and use it.
The filling. Granulated sugar carries most of the sweetness, with only a small amount of dark brown sugar. Brown sugar is hygroscopic, which is a technical way of saying it goes looking for water, and there is a great deal of water available in a pumpkin dough. Too much of it and the ribbon turns to syrup. The cornstarch does the same job, holding the sugar in place so it sets rather than weeping.
There is also a small amount of cocoa powder in the filling. You cannot taste it. It is there purely so the ribbon reads dark against an orange crumb, and it earns its place.
New to sourdough? Start with my guide to creating a sourdough starter with minimal waste and come back when yours is doubling reliably.
How Much Pumpkin Puree Goes in Sourdough Bread
This is the question that took me the longest to answer, and getting it wrong is why most pumpkin breads taste like spice rather than like pumpkin.
Pumpkin is a genuinely mild ingredient. Nearly everything sold as pumpkin flavored is really tasting like the blend of cinnamon, ginger, and clove that came along with it. If you want the squash itself to come through in a fermented loaf, where it is competing with the flavor of the fermentation, it has to be there in real quantity. My first attempt used a modest amount and the pumpkin sat so far in the background that it may as well not have been there.

The amount in this recipe works out to about forty percent of the flour weight, which will look like a lot when you measure it. That is correct. It is roughly two thirds of a standard can, and it is where that deep orange crumb comes from.
Because of that, the water in this recipe is much lower than you would expect for a sourdough. Canned pumpkin is roughly ninety percent water, so the puree itself is doing most of the work the water normally would. Add a full amount of water on top of it and you end up with a dough far too slack to cut and roll. If the number in the recipe card looks wrong to you, that is why, and please do not adjust it upward.
Why Molasses Instead of Maple Syrup
Most pumpkin sourdough recipes sweeten the dough with maple syrup or honey. I use molasses, and the amount is small on purpose.

Maple and honey both push the loaf toward sweet in an obvious way, which is the direction I did not want to go given that the swirl is already carrying the sweetness. Molasses does something quieter. It adds depth underneath everything else and a subtle sweetness that never announces itself, so the crumb has somewhere to go besides pumpkin and spice without anyone tasting molasses and thinking molasses.
The amount matters more than you would think. I tested this at double what the recipe calls for and it took over completely, flattened the pumpkin I had worked to bring forward, and turned the crumb so dark brown that the spiced swirl stopped showing against it at all. Cut back to where it is now, the crumb stays orange, the swirl reads, and the molasses does its job without announcing itself.
If you can, use regular unsulphured molasses. Blackstrap is a different ingredient although it’s not worth a trip to the store to get unsulphered, if blackstrap is all you have.
Building the Swirl, Step by Step
This is the part worth reading closely, because the Cold Swirl Method is the only step in the recipe that is genuinely unfamiliar.
Skip the freezer on this one. If you have made my cinnamon or apple swirl loaves, you will remember chilling the proofed loaf in the freezer before cutting into it. You do not need that here. The pumpkin gives this dough a denser, tighter crumb than a plain lean dough, so it cuts cleanly straight out of the fridge and the cuts hold their shape on their own. Leaving that step out is intentional rather than an oversight, and it takes half an hour off your morning.

Cut deep with the knife, shallow with the scissors. Make four or five slices down through the loaf vertically with a sharp knife, going well into it without cutting all the way through. Then open each of those further with kitchen scissors, staying shallower than the knife went.

Four or five cuts rather than three. This dough is tighter than my other swirl loaves, so it can carry more of them, and every extra cut becomes another turn in the finished slice.
That difference in depth is the entire trick. Filling that sits at two different levels inside the dough spirals when you roll it. Filling that all sits at one level gives you a flat plane instead of a swirl, which is the single most common way this goes wrong.

Work the filling all the way down. Do not sprinkle it across the top and hope gravity handles the rest. Push it down into each cut with your fingers, then go back through a second time and check the deepest ones. Any cut that only gets filled partway shows up in the finished slice as a spot where the ribbon thins out and disappears.

Roll from one end, longer and thinner. The length of your log determines how many turns you see in a slice. A short fat log gives you two or three. A longer one gives you four or five, and that is what reads as a dramatic swirl.
Press the cut sections down as you roll. This is the part that makes the difference, and it is easy to miss. As the dough comes over the top, gently tug back against the roll and push each cut section down so it lies flat. Sections that flop sideways or fold over on themselves are what leave you with gaps in the spiral. Keep even tension the whole way across so the swirl sits centered rather than riding high on one side.

Seal the seam properly. Roll so the top of the loaf finishes on the bottom, tuck the ends under, and press the seam tight all the way across before flipping it seam side down into the pan. A loose seam lets filling escape while it bakes and makes the bottom of the loaf come apart once it is cut.
Brush loose filling off the parchment before the log goes in the pan. Any sugar that rides along underneath will caramelize hard against the hot pan and darken the bottom crust.
Reading the Bulk Ferment
If you have made my other swirl loaves, this is the one place where your instincts will lead you astray, so it is worth flagging.
A plain sourdough can go quite far in the bulk before it suffers for it. This dough cannot. All that pumpkin puree brings a large amount of material that adds no structure, and pumpkin is mildly acidic, which works against the gluten network across the whole cold proof. The practical result is that this dough holds less gas than a plain one does at the same visible rise. It looks ready before it is ready.

Look for four things together rather than any one of them on its own.
- The dough should be up about fifty percent in volume.
- The top should be domed and visibly bubbly.
- It should pull away from the side of the bowl easily rather than clinging.
- And the surface should not feel sticky when you touch it.
That last one is the tell people miss. A super sticky top means it needs more time even if the volume looks right.
For reference, my kitchen sits at 73F and this dough takes about seven hours to get there, then nine hours in the fridge. A warmer kitchen will move faster and a cooler one slower, sometimes by hours, so treat those numbers as a rough guide and the four signs above as the actual instruction.
One more thing, learned the hard way. Do not proof this on top of a running dishwasher or anywhere else that gets warm in bursts. Ambient temperature and dough temperature drift apart faster than you would think, and a dough that runs twenty degrees warm for an hour will get away from you completely.
No Dutch Oven Needed
Most sourdough recipes send you to a dutch oven, and most pumpkin swirl loaves you will find online are baked as a round boule inside one. This loaf uses two loaf pans instead, one holding the dough and a second one inverted on top of it as a lid.

The lid does the same job the dutch oven does, which is to trap the steam coming off the loaf so the crust stays soft long enough for the bread to rise fully before it sets. You lift it off partway through and the crust colors in the dry heat that follows.
Two reasons I prefer it here. A swirl loaf does not have much structural integrity, since you have deliberately cut the dough apart and rolled it back together, and a pan supports it in a way a bare boule does not. And a loaf pan gives you square slices that fit a toaster and make a sandwich, which is how anyone actually eats this bread.
What Three Test Bakes Taught Me
This recipe took three loaves to get right, and the failures are more instructive than the success, so here they are.

The first loaf was overproofed and underbaked. Look at the cell walls in that photo. They are thin and shredded looking rather than clean and defined, the crumb has collapsed around the filling instead of setting against it, and there are large voids sitting right next to the swirl. I had let the bulk run to the same point I use for my plain sourdough, and this dough cannot go that far. I had also been proofing it on top of the dishwasher without thinking about it, which was quietly running the dough far warmer than my kitchen.
The filling on that loaf came out gummy. My original mix was mostly brown sugar, which works beautifully in a plain dough but goes hunting for moisture, and in a dough carrying this much pumpkin there is plenty of moisture to find. Cutting the brown sugar back and letting granulated carry the sweetness fixed it completely.

The second loaf fixed the crumb but the swirl was timid. Pulling the bulk earlier and baking longer gave me the structure I wanted, and you can see the difference in the cell walls immediately. What it did not have was a dramatic spiral. Two or three turns per slice, and the ribbon thinned out in a few places where filling had not reached the bottom of a cut.

The third loaf is the one in the rest of these photos. More cuts, deeper knife work, a longer thinner roll, and pressing each cut section flat as the dough came over it. Four to five turns per slice and a continuous line the whole way around.
If your first one comes out closer to my first one, none of that is a mystery and all of it is fixable.
Expert Tips

- Have the filling whisked and waiting before you start cutting. The less time the loaf spends sitting open on the counter, the better the filling stays put in the cuts rather than dissolving into the surface.
- Hold back a small amount of the water at mixing and add it during the first set of folds only if the dough feels stiff. Canned pumpkin varies in thickness between brands and this gives you somewhere to adjust.
- Do the extra set of stretch and folds. The pumpkin is costing you structure and the folds are how you buy it back.
- Pull the loaf at a higher internal temperature than you would for a plain sourdough. There is a lot of water in this dough and it all has to leave before the crumb will set.
- Cool it fully before slicing. A wet loaf finishes setting as it cools, and cutting early makes a perfectly baked loaf read as underdone.
Storage and Freezing

Keep it cut side down on a board or in a bread box for two to three days. Skip the plastic bag, which softens the crust and makes the sugar in the swirl sticky.
For longer storage, slice the whole loaf first and freeze it in a bag with the slices separated. Toast straight from frozen. The spiced ribbon caramelizes slightly in the toaster and that is arguably the best way to eat this bread.
Shop This Recipe
I earn from qualifying purchases through the links below at no extra cost to you, which helps support the blog.
- USA Pan loaf pan. Two of them. One holds the loaf and the second goes upside down on top as a lid.
- Kitchen scissors. For opening the cuts. A dedicated pair lives in my baking drawer because this technique uses them constantly. Unless my kids steal them.
- Digital thermometer. The pull temperature matters more than usual on this loaf and there is no way to judge it by eye.
- Banneton. For the cold proof. Or go to the dollar store and get a plastic container and use one of these bowl liners to nest the dough in!
- Digital scale. Every amount in this recipe is in grams first for a reason, and the water especially is too precise to measure by cup.
Recipe

The Easiest Pumpkin Swirl Sourdough Bread
Equipment
- Digital Kitchen Scale
- Large mixing bowl
- Banneton or proofing basket
- Parchment paper
- Sharp knife
- Kitchen scissors
- 2 9×5 Pans Two 10×5 loaf pans
- Instant read thermometer
Ingredients
Dough
- 500 g bread flour 4 cups
- 200 g canned pumpkin puree 3/4 cup plus 1 tablespoon
- 165 g room temperature filtered water 2/3 cup plus 2 teaspoons
- 20 g room temperature filtered water held in reserve 4 teaspoons
- 20 g unsulphured molasses 1 tablespoon
- 75 g active ripe sourdough starter 1/3 cup
- 10 g salt 1 3/4 teaspoons
Swirl Filling
- 25 g granulated sugar for the swirl 2 tablespoons
- 10 g dark brown sugar for the swirl 2 1/4 teaspoons packed
- 6 g pumpkin pie spice for the swirl 2 1/4 teaspoons
- 6 g cornstarch for the swirl 2 1/4 teaspoons
- 2 g cocoa powder for the swirl 1 teaspoon
Instructions
- Stir the starter, water, pumpkin puree, and molasses together in a large bowl until smooth and evenly blended.
- Add the bread flour and salt and mix to a shaggy dough with no dry flour remaining. Cover and rest 1 hour.
- Complete four sets of stretch and folds spaced 45 minutes apart. Be sure to cover after each one.
- Bulk ferment until the dough is up about 50 percent larger, the top is domed and bubbly, the dough pulls away from the side of the bowl easily, and the surface is no longer sticky. At 73F this took me about 7 hours. Watch your dough and not the clock, every starter is different.
- Turn the dough out and pre shape into a round. Rest 15-20 minutes seam side down.
- Shape into a batard and place seam side up in a floured banneton. Cover and cold proof in the refrigerator 8-12 hours. (I did 9 hours)
- Whisk the granulated sugar, dark brown sugar, pumpkin pie spice, cornstarch, and cocoa powder together in a small bowl and set aside.
- Preheat the oven to 450F.
- Turn the cold loaf out onto parchment, sprinkle with sweet rice flour if it seems sticky. Place top side down. Cut four or five slices down through the loaf vertically with a razor blade, going deep without cutting all the way through.

- Open each cut further with kitchen scissors, staying shallower than the knife went.

- Work the filling down into every cut, pressing it in with your fingers rather than just sprinkling it across the surface. Go back through a second time and check the deepest cuts.

- Roll the loaf into a long thin log from one end, gently tugging back against the roll and pressing each cut section flat as the dough comes over it. Tuck the ends under and press the seam tight all the way across.
- Brush any loose filling off the parchment. Flip the log seam side down and lower it into the lined loaf pan.
- Invert the second loaf pan over the top as a lid. Bake 9 minutes.
- Remove the lid, score down the center of the loaf, replace the lid, and bake 35 minutes.
- Remove the lid and bake 10 minutes more, until the internal temperature reaches 205F.
- Cool completely in the pan before slicing.
Notes
Frequently Asked Questions
Can I make pumpkin sourdough without a dutch oven?
Yes, and this recipe is built that way. Two loaf pans, one holding the dough and one inverted on top as a lid, trap steam the same way a dutch oven does. For a swirl loaf it is actually the better choice, since the pan supports a structure you have deliberately cut apart and rolled back together. But feel free to use one!
Why did my swirl come out as one flat line instead of a spiral?
Your knife cuts and your scissor cuts were probably at similar depths. The swirl comes from filling sitting at two different levels inside the dough. Go deeper with the knife next time and keep the scissors shallow.
Why is my sourdough swirl gummy?
Two likely causes. Either the loaf was underbaked, which leaves the sugar layer soft, or the filling was layered too heavy. Make sure you spread it out evenly. And ull to temperature rather than by time.
My ribbon disappears in places. What happened?
Filling did not reach the bottom of every cut, or the cut sections flopped sideways as you rolled instead of lying flat. Both are fixable and both are covered in the swirl section above.
What is the Cold Swirl Method?
It is my new technique this recipe is built on. Instead of spreading filling onto a rolled out rectangle at shaping, the loaf proofs completely plain and goes into the fridge with nothing in it. Straight out of the cold proof it gets cut open, filled, rolled, and baked. The filling and the dough are only in contact for a few minutes rather than the eight to twelve hours a traditional swirl sits together, which is what keeps the ribbon set instead of gummy. I use it across my cinnamon swirl and cheddar everything bagel loaves as well.
Can I make this as a plain pumpkin sourdough bread without the swirl?
Yes, and it is worth doing. Skip the cutting and filling entirely, take the loaf straight from the cold proof into the pan, and bake it exactly as written. The dough on its own is a lovely soft pumpkin sourdough with the molasses running underneath it, and it makes a better sandwich bread than the swirled version does since there is no sugar in the crumb.
Can I use fresh roasted pumpkin instead of canned?
You can, but you will need to cook it down and drain it first, and even then the water content is a guess. Canned pumpkin is thicker and far more consistent, which is what lets the water in this recipe be an exact amount rather than something you adjust by feel every time.
Why is the water so much lower than in other sourdough recipes?
Because the pumpkin is water. Canned puree is roughly ninety percent water by weight, so a large amount of it is doing the work that most of the water would normally do. Add a full amount of water on top and you end up with a dough far too slack to cut and roll.
Can I use maple syrup or honey instead of molasses?
You can, and the loaf will still be good, but it will be a sweeter and shallower one. Molasses is doing something maple and honey do not, which is adding a dark mineral note underneath the pumpkin rather than more sweetness on top of it. The dough might feel a touch wetter since maple syrup has more water in it.
Can I use pumpkin pie spice from the jar?
Yes, that is exactly what this uses. Blends vary in how heavy they are on cinnamon, so if yours tastes mild you can push the amount up slightly without any other change. There is a from scratch blend in the recipe notes if you do not keep it on hand. Or you can check out my Pumpkin Spice Blend Blog Post!
Why is there cocoa in the filling?
Only for color. You will not taste it. The amount is tiny and it does not read as chocolate at all. Against an orange pumpkin crumb, a filling without it looks washed out, and this is the cheapest way to get a ribbon that actually shows.
Do I need to freeze the loaf before cutting it?
Not for this one. My other swirl loaves need a short chill to help hold their cuts, but the pumpkin makes this dough dense enough that it cuts cleanly straight out of the fridge.
Can I make this without a starter?
You can! I haven’t finished creating my version of the yeast artisan loaf yet. But feel free to try this with your favorite yeast recipe. Be sure to do a hour or so in the fridge before cutting into it.
More Sourdough Recipes
- The Easiest Cinnamon Swirl Sourdough Bread You Will Ever Make
- The Easiest Cheddar Everything Bagel Swirl Sourdough Bread
- How to Create a Sourdough Starter, a Complete Guide to Minimal Waste and Maximum Flavor
- Homemade Pumpkin Pie Spice
Subscribe
Subscribing is completely free, and it is the easiest way to get new recipes like this one sent straight to your inbox. No spam, just bread.


Leave a Reply