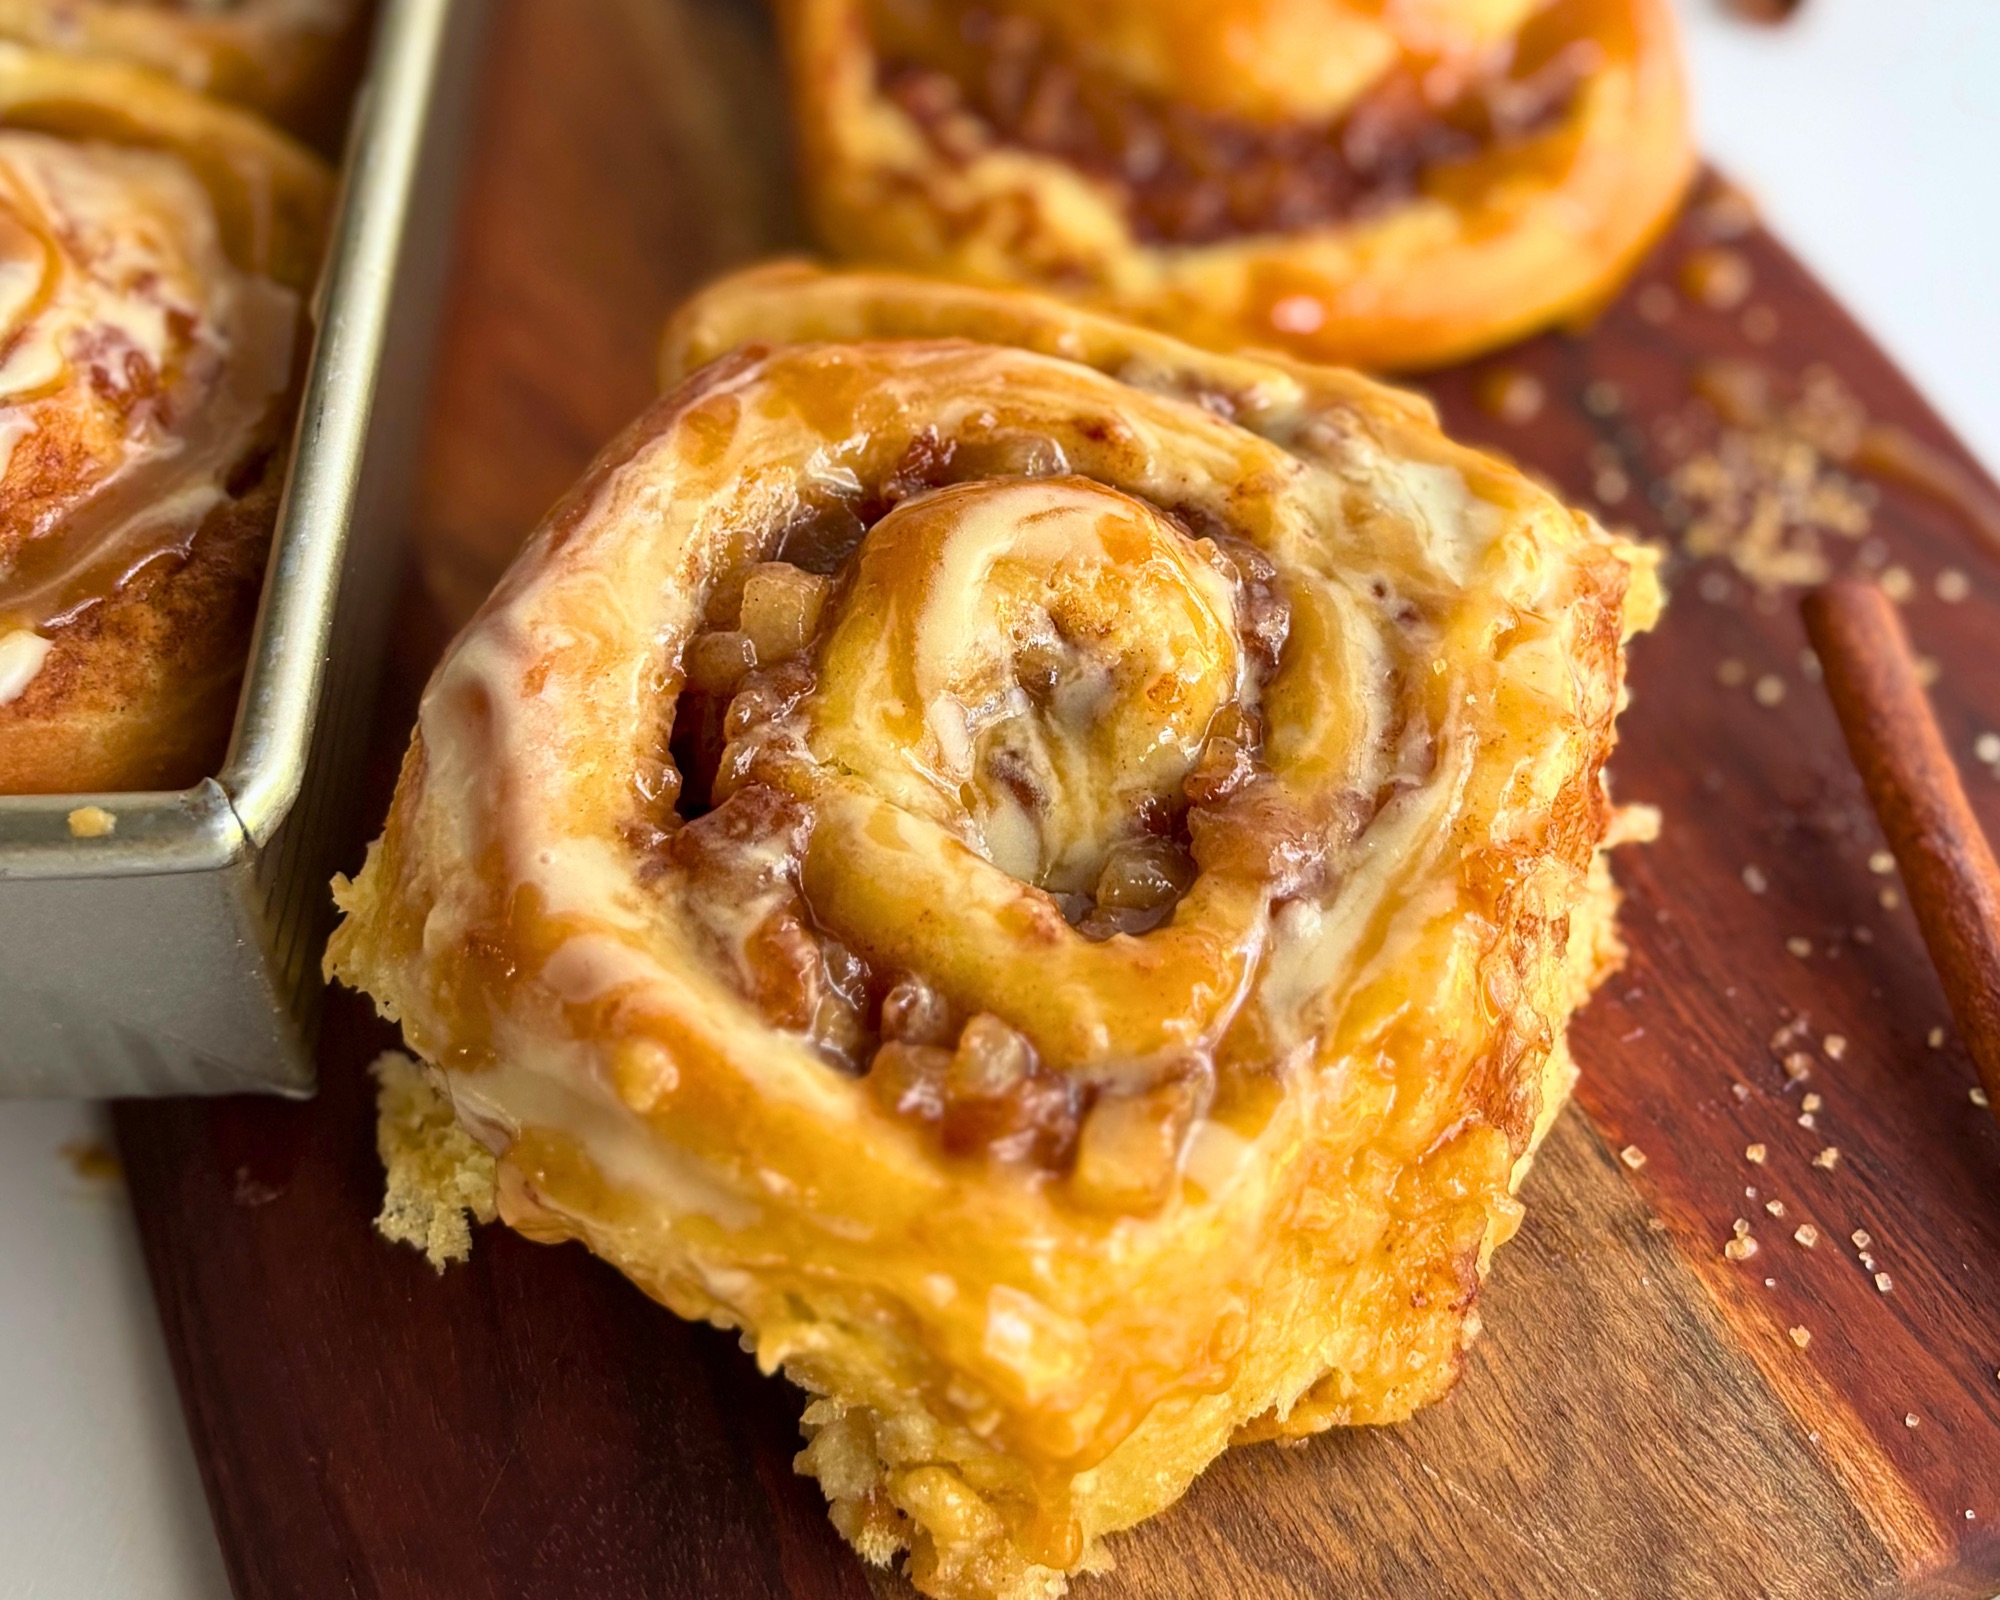
You cannot have fall without making these at least once, and I say that as someone who has tried very hard to be reasonable about seasonal baking. The house smells like a cider mill for the entire afternoon, the rolls taste even better than they smell, which almost never happens, and the whole thing is honestly simple to make once you understand what each part is doing. You can decide you want these in the morning and be eating them the same day.
Each roll carries around 12 grams of protein, and every bit of that comes from real food rather than a scoop of powder. The Greek yogurt or cottage cheese in the dough is doing the heavy lifting, and it is genuinely the ingredient that sets this recipe apart from the caramel apple rolls you can buy in a tube or pick up from a bakery case. This is also a true yeasted dough that rises the way an enriched dough should, not a baking powder shortcut dressed up as a sweet roll, so you get the pull and the softness that only fermentation gives you.
The apples stay where you put them, which is the part most people have given up on. That comes down to the three layer filling method, and I walk through exactly why it works further down.
If you keep a starter going and you would rather ferment this dough overnight, I have the sourdough version of these rolls as its own post. SOURDOUGH CARAMEL APPLE SWEET ROLLS If you do not have a starter yet and you have been thinking about it, my Minimal Waste Sourdough Starter guide will get you there without throwing half a bag of flour in the trash.
And if you want the spring version of this same idea, the Lemon Blueberry Sweet Rolls use the same dough and the same filling method with fruit that behaves completely differently in the oven.

Table of Contents
- Why You Will Love These
- What High Protein Actually Means Here
- Why Fruit Filling Falls Out of Sweet Rolls
- Ingredient Notes
- Choosing Your Apples
- Can I Use Cottage Cheese Instead of Greek Yogurt
- Making the Apple Filling
- Blooming the Yeast and Rising the Dough
- How to Roll a Proper Rectangle
- Building the Three Layers
- Shaping and Cutting
- Baking
- Choosing Your Glaze
- Expert Tips
- Storage and Freezing
- Frequently Asked Questions
- More Recipes You Will Love
- Recipe
Why You Will Love These
They are a same day project. There is no starter to feed the night before and no overnight fermentation to schedule around, so the decision to make these and the eating of these can happen inside the same afternoon.
The filling actually stays in the swirl. No syrupy puddle welded to the bottom of the pan, no hollow gaps where the apples used to be, and no gummy wet inch across the base of every roll.
The dairy makes them softer, not drier. The Greek yogurt or cottage cheese brings moisture, fat, and a little acidity to a dough that wants all three, so the protein comes with a texture upgrade rather than a texture penalty.
You get to choose how sweet they end up. There are three glazes here, and the one you pick changes these from a fairly restrained apple roll into a full caramel apple dessert, which means the same pan can be breakfast one weekend and a holiday centerpiece the next.

What High Protein Actually Means Here
I want to be honest with you about what these are, because the phrase high protein has been stretched into meaninglessness lately and I have no interest in adding to that.
These are not a health food. They are not replacing a protein shake, and they are certainly not replacing six eggs. What I am doing instead is taking something we already love and getting a little more mileage out of it, which is a much smaller and much more useful idea.

The dairy is in this dough because it genuinely improves the dough. Enriched doughs want moisture, they want fat, and they want a little acidity to soften the gluten and keep the crumb tender, and cultured dairy happens to bring all three at once. That is why the rolls come out softer rather than drier, which is the opposite of what usually happens when someone starts chasing a protein number in a baked good. The moment you have to trade texture or flavor for a better line on a nutrition label, you have made a worse recipe, and I am not willing to do that. It is exactly why there is no protein powder anywhere in this.
I have also been pulling sugar down across my recipes over the last year, and this filling is a good example of what that gets you. It tastes like apples and cinnamon rather than like syrup, and the fruit still reads as fruit after it has been through the oven. The glaze is always optional and it is genuinely the dial that turns these into three different things depending on your mood and your occasion.
So no, these are not a protein powder based roll. They are just a version of something wonderful that gives back a little more than the original did, and that is the whole pitch.
Why Fruit Filling Falls Out of Sweet Rolls
You already know this failure even if you have never named it. You pull the pan out, the apples have slid out the sides and are sitting in a dark syrupy puddle that has welded itself to the bottom of the pan, the bottom inch of every roll is wet and gummy, and when you pull one apart there are hollow gaps running through the swirl where the filling used to be and is no longer. The rolls are not ruined exactly, but they are not what you were promised either.

Here is what is actually happening. Fruit is mostly water, and that water is held inside cell walls that heat ruptures. In an open bake, a galette or a crisp or a pie with vents, that released liquid has somewhere to go, because it can evaporate off the surface or it can get caught by a thickener sitting right there in the same bowl of fruit. Inside a rolled dough it has neither option. The liquid cannot escape and it cannot evaporate, so it does the only thing left available to it, which is run downhill along the buttered slick between the dough layers, and gravity takes the fruit along with it. The final proof does a surprising amount of that damage before the oven is ever involved, because the rolls are sitting there warm and relaxed for the better part of an hour while the fruit quietly weeps into the seams.
Most recipes work around this in one of two ways. They tell you to use jam, which is really an admission that the fruit was too wet to use as fruit in the first place, or they tell you to use less filling, which gets you a roll that tastes vaguely of apple and mostly of cinnamon sugar. Neither of those is a fix. They are both ways of avoiding the problem.
The three layer method is the actual fix, and it works because each layer has exactly one job.
The first layer is whipped butter, and butter is the grip. It is what makes the filling hold onto the dough surface instead of sliding across it, and it is also what keeps the swirl from unwinding as the roll expands.
The second layer is dry granulated sugar mixed with cornstarch and cinnamon, and this is the moisture barrier. It sits between the dough and the fruit and it absorbs the liquid the apples release, then gels it in place instead of letting it run. This layer is the entire reason the puddle never forms, and it is also the layer most people skip because it looks like an odd thing to sprinkle over butter and leave alone.
The third layer is the cold thickened apple filling, and both of those words matter. Cold keeps the butter underneath it solid through the rolling, which means the layers stay distinct instead of smearing into one greasy mass. Thickened means most of the water is already locked into a starch gel before the filling ever touches the dough, so there is far less free liquid available to go anywhere in the first place.
Ingredient Notes
Bread flour is doing structural work here and it is not an ideal place to substitute. This dough is carrying yogurt, eggs, and a real amount of butter, all of which interfere with gluten development, and the extra protein in bread flour is what gives you a network strong enough to hold a swirl full of wet fruit without collapsing into a dense band at the base of the roll.
Active dry yeast is what this recipe is written for, and it gets bloomed in warm milk rather than water. Temperature is the only thing you have to be careful about, since milk that is too hot will kill the yeast outright and there is no recovering from that later in the process. A thermometer removes all the guesswork, and it is worth using one rather than testing the milk on your wrist and hoping. If you prefer instant yeast, the swap is in the recipe card notes.
Skyr or thick Greek yogurt is the protein source and the texture source at the same time. Siggi’s is what I reach for first because it is genuinely thick and the flavor is clean, and the Kirkland Signature organic Greek yogurt is the alternative I have tested and can vouch for. Whatever you use needs to be thick and plain, since a thin or sweetened yogurt changes both the hydration and the flavor of the dough.
Eggs and butter should be at room temperature before they go anywhere near this dough. Cold eggs drop the dough temperature and slow the rise, and cold butter will not incorporate into a developed dough the way softened butter does, so you end up either underworking the dough or overworking it trying to force streaks of butter to disappear.
Cornstarch appears twice in this recipe and it is doing two completely different jobs. In the apple filling it thickens the liquid the apples give up on the stove, which is the job everyone expects it to do. In the second layer it is sitting there dry, waiting to absorb and gel the liquid that gets released later during the proof and the bake, which is a job most people have never asked cornstarch to do. Do not skip it in either place and do not move the amounts around between them.
The second layer uses granulated sugar rather than brown sugar, and this is deliberate rather than a preference. Brown sugar carries molasses, molasses brings water along with it, and it also brings hygroscopic invert sugars that pull in more moisture from everything nearby. All of that means brown sugar liquefies earlier and at a lower temperature than granulated does. Put a wet fruit layer directly on top of it and your moisture barrier turns to syrup at exactly the same moment the apples start releasing, which is precisely the failure you built the barrier to prevent.

Choosing Your Apples
Granny Smith is the workhorse of this recipe and the variety I would reach for if you are only using one. It holds its shape through both the stovetop cook and the bake, and the tartness gives the caramel something to push against instead of letting the whole roll go flat and sugary.
Honeycrisp is what I add for flavor, because Granny Smith on its own can taste a little one note once it is buried under caramel and glaze. Two parts Granny Smith to one part Honeycrisp is my preferred mix and the ratio I keep coming back to.
But in the end use the apple you love and usually use! However, I would avoid McIntosh and Red Delicious entirely. McIntosh breaks down into applesauce almost immediately, which gives you flavor but no texture and a great deal more free liquid than you want in a rolled dough. Red Delicious goes mealy and dull when it is cooked and contributes very little worth having.
Dice everything to a quarter inch and treat that as rule, rather than a suggestion. Larger pieces do not soften evenly on the stove, they create bulges that distort the swirl as you roll, and they tear the dough when you go to cut the log. Smaller pieces are the more common mistake and the more damaging one, because a smaller dice means far more cut surface for the same weight of apple, and cut surface is where liquid escapes. Go too fine and the apples give up their water almost immediately, break down before they have finished cooking, and leave you with something closer to a loose sauce than a filling with fruit in it.
Can I Use Cottage Cheese Instead of Greek Yogurt
Yes, and I tested this version rather than assuming it would work, so you can make it with confidence.
The important part is that the cottage cheese has to be pureed completely smooth before it goes into the dough. Not almost smooth and not mostly smooth, because any curd that survives the blender will show up as a small wet pocket in the finished crumb. A high powered blender does this faster than a food processor, and it helps to warm the cottage cheese slightly first, which loosens it up and lets the blades actually catch it rather than spinning against a cold solid mass.
Use a thick brand. Good Culture and Nancy’s are both reliable here, and a watery cottage cheese will throw the hydration off no matter how well you blend it.
The exact swap ratio is in the notes on the recipe card, and it is worth reading before you start rather than after, because the blending liquid comes out of the milk the recipe already calls for rather than being added on top of it.
Making the Apple Filling

The filling starts with maceration, which is the step people are most tempted to skip and the one that sets up everything after it. Tossing the diced apples with the brown sugar and lemon juice and then walking away pulls liquid out of the fruit through osmosis before any heat is involved. That matters because liquid drawn out on the counter is liquid you can thicken and control, whereas liquid that stays locked in the fruit until it hits the oven is liquid that ends up in the bottom of your pan.
The sugar in this filling is not there for sweetness alone and I learned that the hard way. My first version cut the filling sugar way down on the theory that the second layer would carry the sweetness, and what I got back was a dry congealed filling that clung to the apples rather than behaving like a filling at all. Sugar in a fruit filling is doing three separate jobs. It creates the liquid through osmosis, it holds onto that liquid during cooking because sugar is hygroscopic, and it softens the finished gel because it competes with the starch for water and raises the temperature at which that starch sets. Cut it too far and you remove the liquid while simultaneously making the starch behave more aggressively, which is how you end up with something closer to apple cement.
The filling cooks uncovered from start to finish, and this is worth being stubborn about. A lid traps the steam coming off the apples and condenses it straight back into the pan, so nothing ever leaves and you finish the cook with more liquid than you had when you started. That extra water does not simply disappear later. It becomes liquid the cornstarch has to thicken, which either means a filling that never fully sets or a filling that needs so much starch it turns dull and pasty. Leaving the lid off lets the moisture reduce as the apples soften, which is what you actually want, and it also keeps the mixture hot enough for the slurry to gel properly when it goes in, since a slurry stirred into something that is not truly at a simmer will thicken unevenly and then loosen again as it sits.
Two things matter enormously once the pan is on the heat, and neither of them is the clock. The first is that the apples come off while they still hold their shape and still have some bite left. Apples do not stop at soft, they keep going, and every extra minute past that point releases more liquid and breaks down more structure, so what started as a filling with fruit in it turns into a loose sauce with fragments floating in it. The second is that the pan never goes to a hard boil. A rolling boil drives off the juice you spent thirty minutes drawing out of the fruit, which leaves you thickening a smaller and smaller amount of liquid, and it agitates the apples enough to knock the softened edges off them. A steady gentle simmer does everything a boil does without any of that.
Once the slurry is in, give it the full cook time even though it will look thick almost immediately. Cornstarch thickens well before it is finished cooking, and a slurry that has not been held at temperature long enough will break down and turn watery hours later, which in this recipe means during the proof, which is the worst possible moment for your filling to thin out.
Vanilla goes in off the heat, always. It is volatile and most of what makes it taste like vanilla will simply evaporate if you add it to a boiling pot.
Then spread the filling flat on a sheet pan rather than leaving it in the saucepan to cool. A shallow layer cools far faster and far more evenly, and the filling has to be genuinely cold when it goes onto the dough, because room temperature filling will melt the butter layer underneath it and undo the entire structure you are building.
Blooming the Yeast and Rising the Dough

Take the temperature of your milk. I know that sounds fussy for a step this small, but the window that wakes yeast up and the window that kills it are not far apart, and once the yeast is dead nothing that happens afterward will bring the dough back. A thermometer turns this from a guess into a fact, and it costs you about four seconds.
Milk is slower to activate yeast than water is, partly because of the fat and partly because of the proteins and sugars competing for the yeast’s attention, so give the bloom its full time rather than deciding after a few minutes that nothing is happening. What you are looking for is a surface that has gone visibly foamy and domed. If it stays flat and dull, the yeast is dead, and the honest thing to do is start over with a fresh packet rather than proceeding and hoping the rise sorts itself out. It will not.
After the initial mix, the dough gets a rest before the salt and the butter go in, and this rest is doing more here than it would in a lean dough. Skyr and Greek yogurt hydrate flour considerably more slowly than plain water or milk does, so a dough that feels alarmingly sticky right after mixing will feel completely different once the flour has had time to actually drink. Skip the rest and you will fight the dough for the next twenty minutes and probably add flour it did not need. The cottage cheese version wants a few extra minutes on top of that.
Butter goes in gradually, a piece at a time, and each piece needs to disappear before the next one joins it. Butter coats gluten strands and interferes with their ability to link up, so adding it all at once means you are asking the dough to build structure and absorb fat at the same moment, and it will do neither well. Adding it in stages lets the network keep developing between additions.
You will know the knead is finished by feel rather than by the clock. The dough should be smooth and elastic, it should pull away from the sides of the bowl and gather on the hook, and it should still feel slightly tacky when you touch it. Tacky is correct and it is what you want. Sticky, as in leaving dough behind on your fingers, means it needs more time or the flour has not fully hydrated yet.
A finished rise has roughly doubled and feels airy and slack rather than tight. This is a heavily enriched dough carrying yogurt, eggs, and a substantial amount of butter, and all three of those slow yeast down considerably, so it will take noticeably longer than a lean dough would. That is normal and not a sign that anything has gone wrong.
How to Roll a Proper Rectangle

Roll from the center of the dough outward, top to bottom, and then bring the pin back to the center and roll the other direction. Never roll side to side. Rolling across the width stretches the dough unevenly and works against the gluten alignment you want running along the length of the log, and it is the reason most people end up with something shaped vaguely like a kidney.
Once you have the length, go after the corners individually at a forty five degree angle. Corners are always the last part to cooperate and they are also the part that determines whether your end rolls have a proper swirl or a sad flat wrap, so give them attention rather than hoping they will sort themselves out as you go.
Then measure. Actually measure, with a ruler or a tape, rather than eyeballing it and telling yourself it looks close enough. The dimensions on the card are not arbitrary. The length you roll from determines how many times the dough wraps around itself.
Building the Three Layers

Whip the butter rather than simply softening it. Whipped butter spreads in a thin even film without dragging or tearing the dough underneath, while softened butter still wants to be pushed around in clumps and you will end up thinning the dough in the places where you worked hardest. It takes about a minute with a hand mixer and it changes how the whole assembly goes.
Leave a bare strip along the far edge with nothing on it at all. That strip is what seals the log closed, and butter or sugar sitting on it will keep the seam from ever adhering properly, which means the roll unwinds in the oven and the filling has an open door to leave through.
Do not stir the sugar layer into the butter. I know it looks like it wants to be stirred, and I know it feels wrong to sprinkle a dry mixture over butter and then simply leave it there. Stirring it in turns two layers into one, which destroys the moisture barrier and gives you back the exact problem the method exists to solve. It goes on dry and it stays dry.
Spread the apples gently and evenly, without pressing them down into the layers below. Pressure pushes the fruit through the sugar barrier and into contact with the butter, and once that happens the barrier is no longer between the fruit and the dough where it needs to be.
Shaping and Cutting

Build tension as you roll rather than simply rolling the dough up loosely. Use your fingertips to tuck the leading edge under itself and keep gentle pressure going as the log forms, so each wrap sits snugly against the one before it. A loose log leaves air gaps that turn into hollow tunnels in the finished roll, and it also lets the filling migrate into those gaps during the proof.
Pinch the seam closed along its entire length, not just at the ends. A seam that is sealed in the middle and open at the edges will still open in the oven, and the ends are exactly where the filling likes to escape.
Cut with unflavored dental floss rather than a knife. Slide a length under the log, cross the ends over the top, and pull. A knife pushes down and compresses the swirl into an oval no matter how sharp it is, and with a soft enriched dough full of wet fruit that compression is very hard to undo. Floss cuts by pulling the log apart cleanly and the swirl stays round.
The proof is finished when the rolls look puffy, have grown into each other so the gaps between them have mostly closed, and jiggle slightly as a group when you shake the pan gently. That jiggle is the most reliable signal, and it is more useful than watching the clock, since the temperature of your kitchen matters more than any number I could give you.
Baking
These bake uncovered from the start. I do not tent sweet rolls, because a tent traps steam over the tops for the entire bake and you end up with pale slightly damp surfaces instead of the deep golden color that makes a pan of rolls look like a pan of rolls. Foil is a rescue tool here rather than a plan. If the tops are getting darker than you want in the last stretch of the bake, lay a sheet loosely over the top of the pan without sealing it around the edges, so the steam still has somewhere to go.

Take a temperature in the center rolls. This is the single most important thing in this section. An enriched dough with a wet filling looks finished well before it actually is, and the outer rolls always run ahead of the ones in the middle, so the pan can look perfectly golden across the top while the center rolls are still underbaked and gummy in the middle. The thermometer is the only thing that will tell you the truth, and the center of the pan is the only place worth asking.
Expect the bake to run longer than you think it should. Between the moisture in the dough and the moisture in the fruit there is a great deal of water to drive off, and pulling the pan early is the most common reason a batch of these comes out doughy through the base.
Choosing Your Glaze

There are three glazes on the recipe card and the one you choose genuinely changes what these are.
The caramel glaze is the full experience and the one I would make for a holiday morning or for company. It leans into the caramel apple idea completely and it is the sweetest of the three by a comfortable margin.
The simple vanilla glaze is the restrained choice and it is what I make most often. It lets the apples and the cinnamon stay in front, and it keeps the rolls firmly in breakfast territory rather than pushing them toward dessert.
The Greek yogurt caramel glaze is a cream cheese style glaze with the protein bumped up. It is tangier and thicker than the other two, it holds its shape on top of the roll rather than soaking in, and it is the one to pick if you want the glaze to be a real layer rather than a finish.


Whichever you use, the rolls need to have cooled to warm rather than hot before it goes on, and the caramel needs to be at room temperature or barely warm before it goes into any glaze. Hot rolls will simply drink a glaze straight into the crumb and leave nothing visible on top, and hot caramel will thin the glaze into something that runs off the sides and pools in the pan. Glaze first, then drizzle the remaining caramel over the top in ribbons.
Expert Tips
Make the filling the day before. It has to be completely cold anyway, and having it waiting in the fridge turns baking day into a much calmer project.
Weigh your flour. A cup of flour can vary by a startling amount depending on how it is scooped, and in an enriched dough that variation is the difference between tacky and stiff.
Check the yeast bloom before you commit anything else. It takes ten minutes to find out whether your yeast is alive, and it takes considerably longer to find out that it was not by watching a dough refuse to rise.
Let the dough tell you when the knead is done. Times are a guide, but mixer speed, bowl shape, and dough temperature all move the number, and the feel of the dough does not lie.
Line the pan. Even with the three layer method there will be some caramelization at the base, and parchment makes getting the rolls out intact very simple.
Rotate the pan partway through the bake if you know your oven runs hot on one side, which most ovens do whether or not their owners have admitted it yet.
Storage and Freezing
Store the rolls covered at room temperature for up to two days. The dairy in the dough keeps them soft longer than a standard sweet roll, but they are still best on the first day and noticeably better warm.
The refrigerator will keep them for about five days, though cold firms up the crumb and the butter, so let refrigerated rolls come back toward room temperature or warm them briefly before eating.
To freeze baked rolls, let them cool completely and freeze them unglazed, either as a whole pan wrapped well or as individual rolls. Unglazed is important, since glaze does not survive freezing gracefully and turns weepy on the thaw. Thaw at room temperature, warm them through, then glaze fresh.
To freeze the shaped unbaked rolls, place them in the pan, cover tightly, and freeze before the final proof. Move the pan to the refrigerator overnight to thaw, then let it sit out until the rolls are properly puffy before baking. Expect the final proof to take considerably longer than it would from room temperature.
You can also refrigerate the shaped rolls overnight and bake them in the morning, which is the closest thing this recipe has to an overnight option. Cover the pan well, and let it sit out until the rolls are puffy and jiggling before it goes into the oven.

Frequently Asked Questions
Can I use instant yeast instead of active dry?
Yes, and the conversion is in the recipe card notes. Instant yeast mixes straight in with the flour and skips the bloom entirely, though you should still warm the milk before it goes into the dough, since dough temperature affects the rise regardless of which yeast you use.
Can I make these without a stand mixer?
You can, but it is real work. This dough gets a long knead and a substantial amount of butter worked into it in stages, and doing that by hand takes noticeably longer and a fair bit of arm. Use the slap and fold method rather than a traditional push knead if you go this route, since it handles a soft enriched dough much better.
Do I have to peel the apples?
Yes. Skins do not soften on the same timeline as the flesh, so they stay chewy and separate slightly from the fruit inside the swirl, which is unpleasant in a soft roll in a way it never is in a pie.
Why is the bottom of my rolls wet?
Almost always one of three things. The filling was not completely cold when it went on, the sugar and cornstarch layer got stirred into the butter instead of staying separate, or the rolls came out of the oven before the center ones reached temperature.
Can I use a different fruit?
The method works with any fruit, but the filling amounts do not transfer directly, since different fruits release wildly different amounts of liquid at different points in the process. The Lemon Blueberry Sweet Rolls are already built and tested if blueberries are what you want.
My dough did not rise. What happened?
If the bloom never foamed, the yeast was dead before you started and the dough was never going to rise. If the bloom was fine, the most likely cause is a cool kitchen, since this dough is heavily enriched and enriched doughs slow down dramatically as the ambient temperature drops. Give it more time in a warmer spot before concluding anything.
Can I halve the recipe?
Yes, and it scales cleanly to a smaller pan. Keep the rectangle proportional rather than simply rolling a shorter one, so the wrap count and the swirl stay the same.
What are the macros for these rolls?
A roll on its own, before any glaze goes near it, comes in around 425 calories with about 12 grams of protein, 14 grams of fat, and 21 grams of sugar.
Once the caramel glaze is on and the extra caramel is drizzled over the top, a roll lands around 545 calories with roughly 17 grams of fat and 44 grams of sugar. The protein number does not move, since all of it is coming from the dough rather than the topping.
I give you both figures because the glaze is genuinely optional and people finish these three different ways. A single number would be wrong for most readers no matter which one I picked.
Worth saying plainly, this is not a low calorie recipe and I am not going to pretend otherwise. What it is gram for gram against a standard apple cinnamon roll, is roughly a third lower in both sugar and fat, mostly because there is far more real fruit in these and far less of everything else. The protein is doing its own work at around 12 grams a roll and it all comes from the dough verses a protein powder. Zero compromise on flavor or texture, less sugar, and more milage.
More Recipes You Will Love
Recipe

Easy Caramel Apple Cinnamon Rolls (High Protein)
Equipment
- – Stand mixer with dough hook
- Digital Kitchen Scale
- Instant read thermometer
- 9 by 13 inch baking pan or a half sheet pan for larger, individual, more spread out rolls
- Rimmed sheet pan
- Rolling Pin
- Ruler or tape measure
- Unflavored dental floss sharp knife for cutting
- Immersion blender or high powered blender for the cottage cheese option
- Large microwave safe glass bowl for the caramel
Ingredients
For the Yeast Bloom
- 110 grams whole milk for the bloom warmed to 105 to 110 degrees Fahrenheit (scant 1/2 cup)
- 9 grams active dry yeast scant 3 teaspoons
- 5 grams granulated sugar for the bloom taken from the dough sugar (1 1/4 teaspoons)
For the Dough
- 630 grams bread flour 5 1/4 cups
- 265 grams nonfat plain skyr or thick Greek yogurt slightly warmed (1 cup plus 1 1/2 tablespoons)
- 40 grams granulated sugar for the dough what remains after the bloom (3 tablespoons)
- 2 large eggs room temperature
- 5 grams vanilla extract for the dough 1 teaspoon
- 9 grams fine salt for the dough 1 1/2 teaspoons
- 75 grams unsalted butter for the dough softened (5 tablespoons plus 1 teaspoon)
For the Apple Filling
- 540 grams apples peeled and diced into 1/4 inch pieces (about 4 medium apples, 4 1/3 cups diced)
- 55 grams light brown sugar for the filling packed (1/4 cup)
- 12 grams fresh lemon juice 2 1/2 teaspoons
- 60 grams water for the filling 1/4 cup
- 18 grams unsalted butter for the filling 1 1/4 tablespoons
- 2.5 grams ground cinnamon for the filling 1 teaspoon
- 1 gram fine salt for the filling scant 1/4 teaspoon
- 0.6 grams ground nutmeg 1/4 teaspoon
- 0.5 grams ground ginger 1/4 teaspoon
- 17 grams cornstarch for the filling 2 tablespoons
- 30 grams cold water for the cornstarch slurry 2 tablespoons
- 6 grams vanilla extract for the filling 1 1/4 teaspoons
For the Butter Layer, Layer One
- 85 grams unsalted butter for the butter layer softened and whipped (6 tablespoons)
For the Cinnamon Sugar Layer, Layer Two
- 75 grams granulated sugar for the cinnamon sugar layer 6 tablespoons
- 14 grams cornstarch for the cinnamon sugar layer 1 3/4 tablespoons
- 5 grams ground cinnamon for the cinnamon sugar layer 2 teaspoons
- 1 gram fine salt for the cinnamon sugar layer scant 1/4 teaspoon
For the Caramel
- 100 grams granulated sugar for the caramel 1/2 cup
- 30 grams water for the caramel 2 tablespoons
- 45 grams heavy cream for the caramel warmed (3 tablespoons)
- 22 grams unsalted butter for the caramel 1 1/2 tablespoons
- 4 grams vanilla extract for the caramel 1 teaspoon
- 1.5 grams fine salt for the caramel 1/4 teaspoon
For the Caramel Glaze
- 180 grams powdered sugar for the caramel glaze 1 1/2 cups
- 70 grams cooled caramel for the caramel glaze 3 1/2 tablespoons
- 30 grams whole milk or heavy cream for the caramel glaze 2 tablespoons
- 3 grams vanilla extract for the caramel glaze 3/4 teaspoon
- 1 gram fine salt for the caramel glaze scant 1/4 teaspoon
For the Simple Vanilla Glaze Variation
- 180 grams powdered sugar for the vanilla glaze 1 1/2 cups
- 50 grams whole milk or heavy cream for the vanilla glaze 3 1/4 tablespoons
- 5 grams vanilla extract for the vanilla glaze 1 teaspoon
- 1 gram fine salt for the vanilla glaze scant 1/4 teaspoon
For the Greek Yogurt Caramel Glaze Variation
- 113 grams full fat cream cheese for the yogurt glaze room temperature (4 ounces)
- 60 grams nonfat plain skyr or thick Greek yogurt for the yogurt glaze room temperature (1/4 cup)
- 70 grams cooled caramel for the yogurt glaze 3 1/2 tablespoons
- 90 grams powdered sugar for the yogurt glaze sifted (3/4 cup)
- 5 grams vanilla extract for the yogurt glaze 1 teaspoon
- 1 gram fine salt for the yogurt glaze scant 1/4 teaspoon
- 15 to 30 grams heavy cream for the yogurt glaze to consistency (1 to 2 tablespoons)
Instructions
Make the Apple Filling
- Toss the diced apples with the light brown sugar and the lemon juice in a large bowl and let them macerate for 30 minutes, stirring once partway through.
- Scrape the apples and all of the liquid they released into a medium saucepan along with the water, butter, cinnamon, salt, nutmeg, and ginger.
- Cook uncovered over medium low heat for 6 to 8 minutes, stirring occasionally, until the apples have just begun to soften but still hold their shape and still have some bite. Keep it at a gentle simmer rather than a hard boil, and do not put a lid on it at any point. Apples that are cooked past this point keep releasing liquid and start breaking down, and a hard boil drives off the juice you are trying to keep.
- Whisk the cornstarch into the cold water until completely smooth. Bring the apples up to a steady simmer, still short of a rolling boil, then stir in the slurry.
- Cook for 3 to 5 minutes, stirring, until the mixture is thick and glossy and the starch has lost any raw edge. Do not stop as soon as it thickens, and do not let it boil hard while it finishes.
- Remove from the heat and stir in the vanilla extract.
- Spread the filling in a thin even layer on a rimmed sheet pan and refrigerate until completely cold, at least 1 hour. This can be made up to 3 days ahead.
Bloom the Yeast and Mix the Dough
- Warm the milk to 105 to 110 degrees Fahrenheit and check it with a thermometer. Stir in the active dry yeast and the 5 grams of granulated sugar and let it sit for 10 minutes, until the surface is visibly foamy and domed. If it does not foam, the yeast is dead and you need to start over with a fresh packet.
- Add the bloomed milk mixture to the bowl of a stand mixer along with the bread flour, skyr, remaining granulated sugar, eggs, and vanilla extract. Mix on low with the dough hook until no dry flour remains.
- Cover and rest the dough for 15 to 30 minutes. Add 5 to 10 minutes to this rest if you are using the cottage cheese option.
- Add the fine salt and knead on medium low for about 5 minutes.
- Add the softened butter one piece at a time, waiting until each piece has fully disappeared into the dough before adding the next.
- Knead for another 8 to 10 minutes, until the dough is smooth and elastic, pulls away from the sides of the bowl, and feels slightly tacky rather than sticky.
- Cover the bowl and let the dough rise in a warm spot for 1 1/2 to 2 hours, until doubled.
Roll, Fill, and Shape
- Turn the dough onto a lightly floured surface and roll it into a 12 inch by 18 inch rectangle, working from the center outward, top to bottom, and squaring the corners at a 45 degree angle. Measure rather than eyeballing.
- Spread the whipped butter evenly across the dough, leaving a bare 1 inch strip along the far 12 inch edge with nothing on it.
- Whisk together the granulated sugar, cornstarch, cinnamon, and salt for the cinnamon sugar layer and sprinkle it evenly over the butter. Do not stir it in.
- Spread the completely cold apple filling gently over the sugar layer without pressing it down, keeping the bare strip clear.
- Roll the dough up from the 12 inch edge, building tension as you go and tucking the leading edge under itself so each wrap sits snugly against the last.
- Pinch the seam closed along its entire length and roll the log seam side down.
- Cut the log into 12 equal rolls using unflavored dental floss, sliding it under the log, crossing the ends over the top, and pulling.
- Arrange the rolls in a parchment lined 9 by 13 inch pan, three across and four down.
Proof and Bake
- Cover and proof for 45 to 75 minutes, until the rolls are puffy, have grown into each other, and jiggle slightly as a group when the pan is shaken gently.
- Preheat the oven to 375 degrees Fahrenheit while the rolls finish proofing.
- Bake uncovered for about 35 minutes, starting to check at 30, until the tops are deep golden and the center rolls read 190 degrees Fahrenheit internally. The outer rolls will always run ahead of the center ones, so take the temperature in the middle of the pan.
- If the tops darken faster than you want in the last 5 to 10 minutes, lay a sheet of foil loosely over the pan without sealing it around the edges. Do not tent from the start.
- Let the rolls cool in the pan until they are warm rather than hot.
Make the Caramel
- Combine the granulated sugar and water in a large microwave safe glass bowl and microwave for 3 to 3 1/2 minutes, until the syrup is amber. Watch it closely toward the end, since it moves quickly.
- Stir in the warmed heavy cream, standing back as it bubbles hard.
- Once the bubbling settles, stir in the butter, vanilla extract, and salt until smooth. Adding the cream first and the butter second keeps the emulsion from breaking.
- Let the caramel cool to room temperature or barely warm before it goes into any glaze.
Glaze and Finish
- Whisk together the ingredients for whichever glaze you have chosen until smooth, adjusting the liquid a little at a time to reach a thick pourable consistency.
- Spread or pour the glaze over the warm rolls, then drizzle the remaining caramel over the top in ribbons.
- Serve warm.
Notes
Never Miss a Recipe
If you make these, come back and tell me how they went, and if you want more recipes like this one landing in your inbox, subscribe below. You will get new posts as they go up along with the occasional thing I only share by email.



Leave a Reply