I wanted pop tarts. Not the kind from a foil packet that is filled with everything but real strawberries and butter, but real ones, made from scratch, with a flaky crust and filling that actually tastes like strawberries. I just did not want to spend an afternoon cutting and crimping individual rectangles.
So I made them into bars.
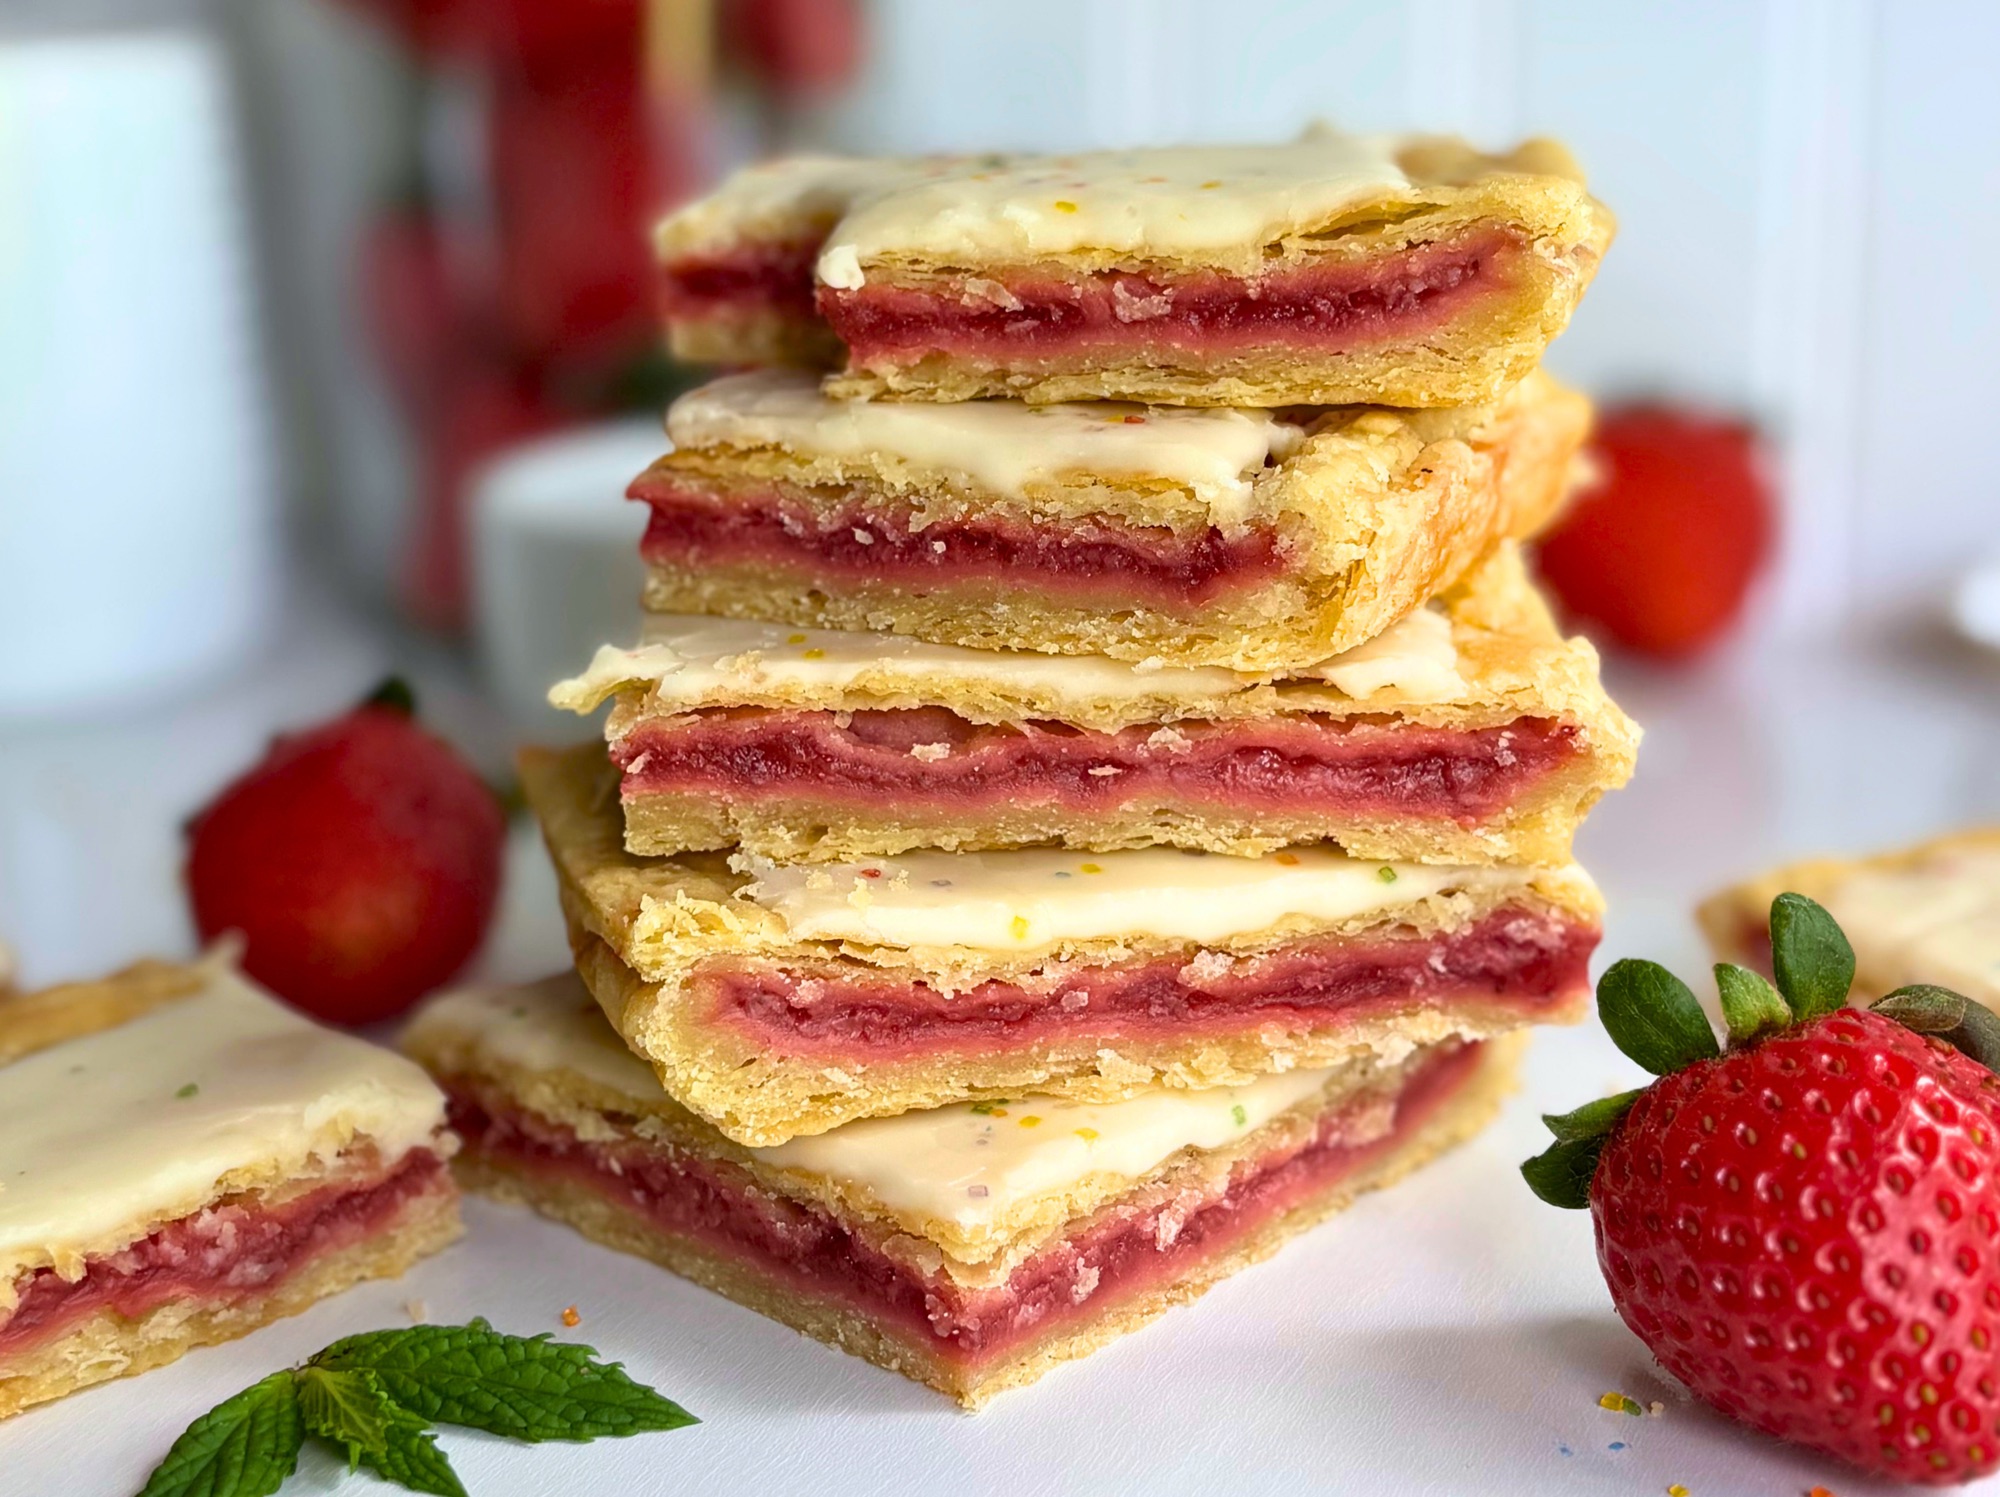
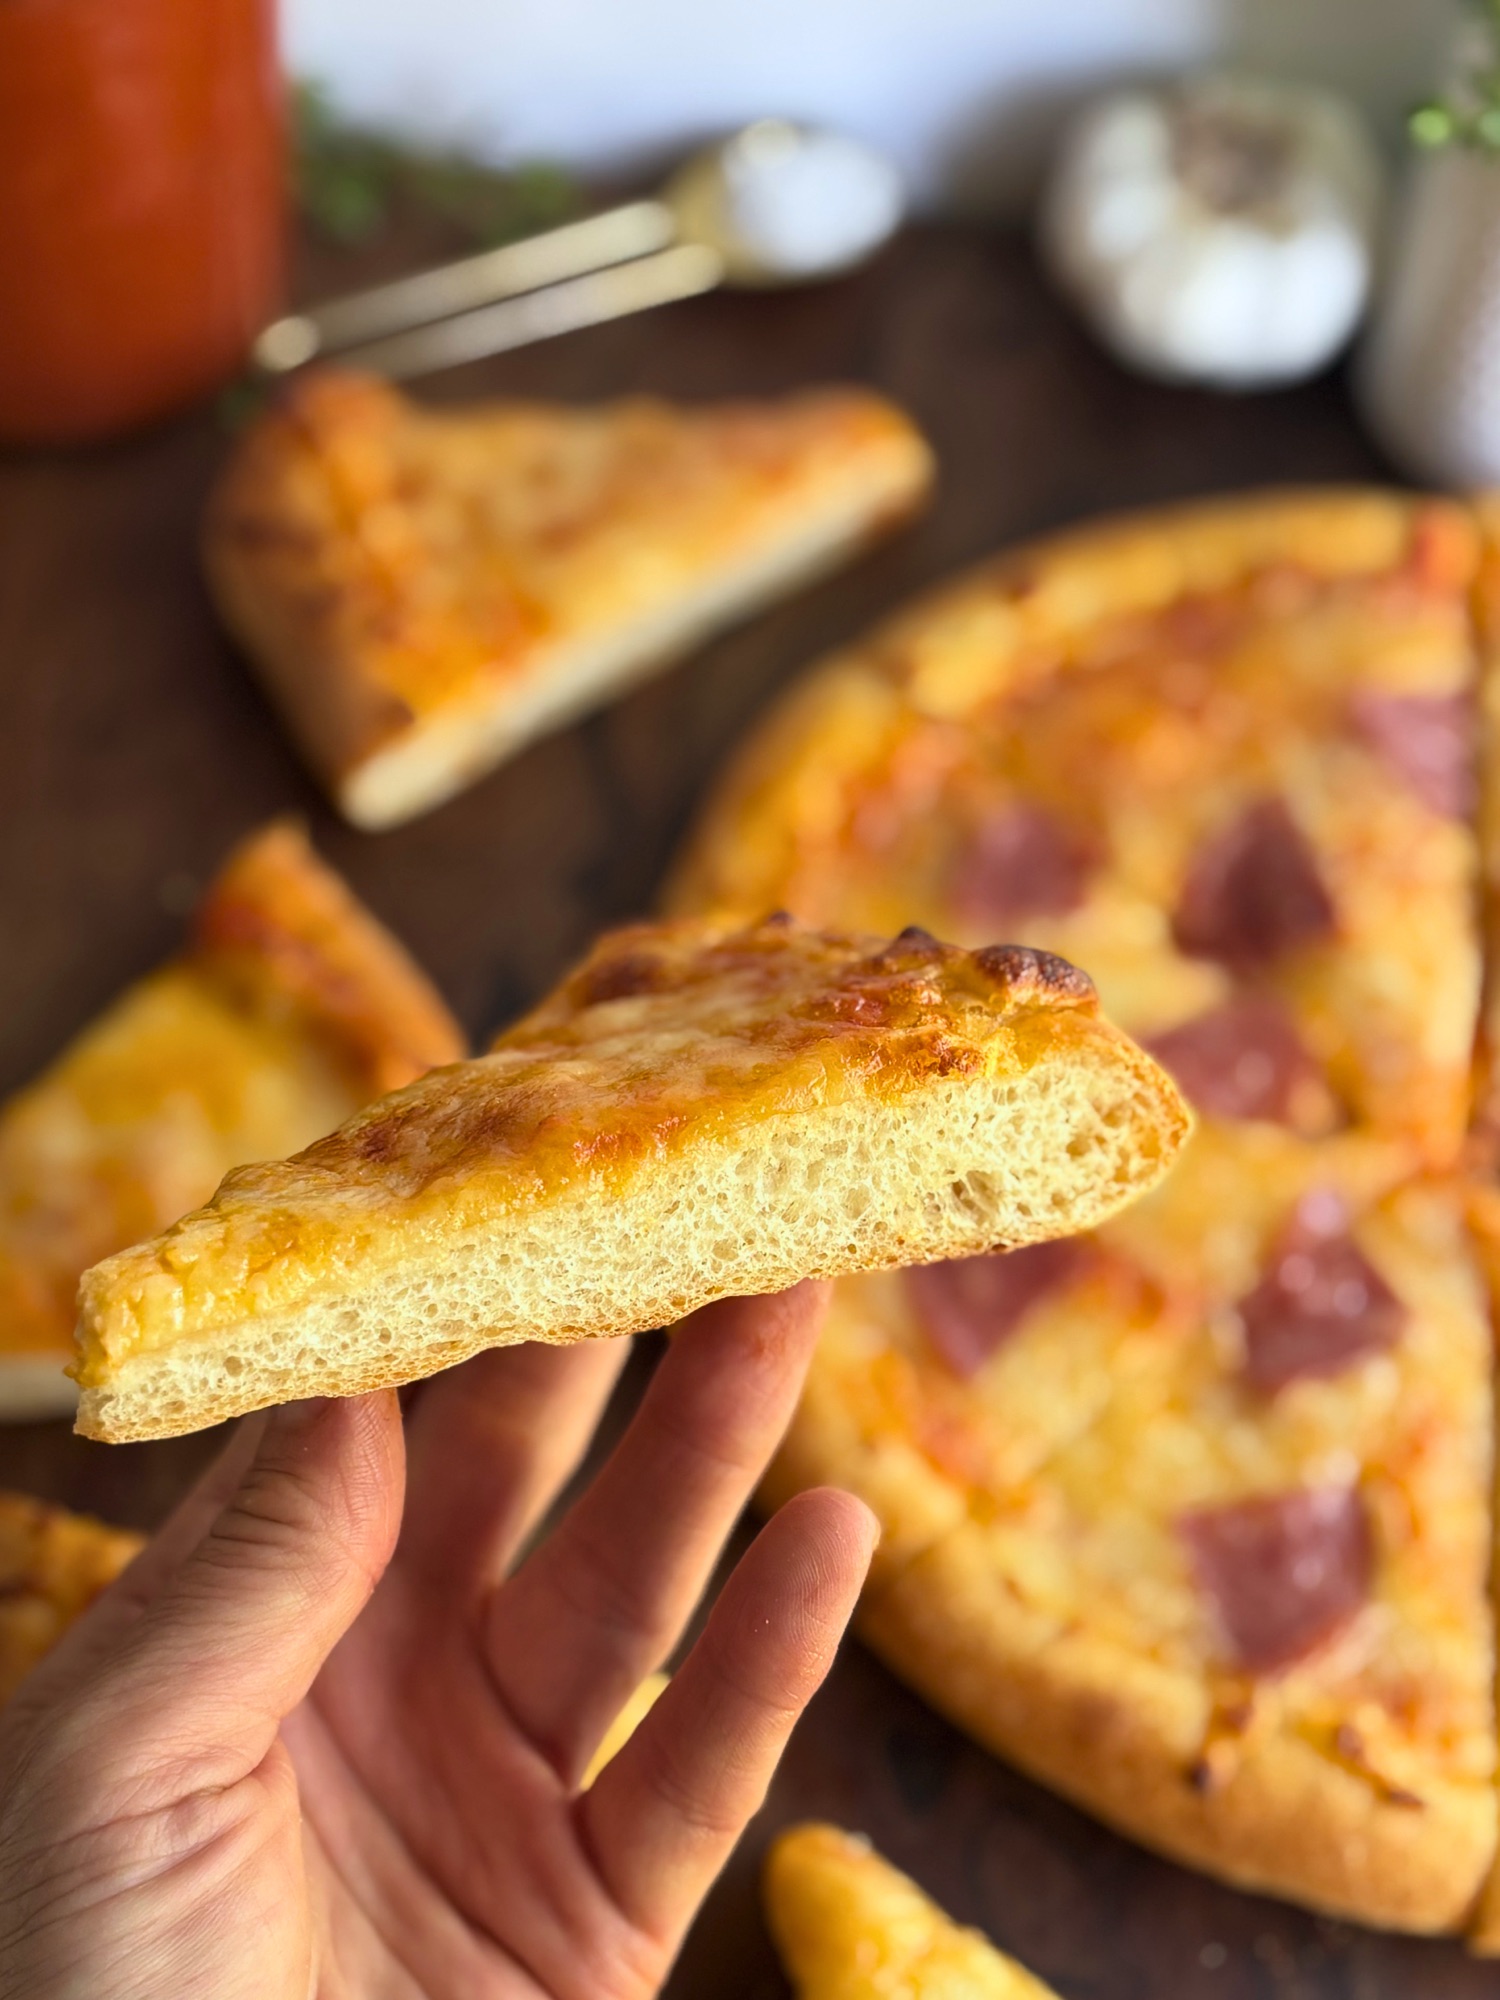
These Sheet Pan Strawberry Pop Tart Bars bake in one quarter sheet pan, glaze all at once, and cut into twelve generous bars. Choose the classic all butter pastry dough or the sourdough version for the fermentation benefits. Either way you get flaky layers, a thick cooked strawberry filling that holds a clean edge, and that iconic sprinkle icing on top.
Table of Contents
- Why You Will Love This Recipe
- The Recipe
- What Are Sheet Pan Strawberry Pop Tart Bars
- Ingredients You Will Need
- Understanding the Sourdough Pastry Dough
- How to Make the Strawberry Filling
- Can I Use Store Bought Jam Instead
- Fat Substitutions for the Crust
- Gluten Free Option
- How to Assemble and Bake
- The Icing
- No Sourdough Version
- Shop This Recipe
- More Sourdough Recipes
- Frequently Asked Questions
- Leave a Comment
Why You Will Love This Recipe

These sheet pan strawberry pop tart bars were developed to solve every frustration that comes with making homemade pop tarts. No individual cutting and crimping. No running filling. No pale, underbaked bottom crust. Here is what makes them work so well.
The sheet pan format means one assembly, one bake, one glaze. You get twelve bars from a single 13×9 quarter sheet pan and the whole process is far more manageable than individual pastries.
The sourdough discard in the pastry dough is not there to make things complicated. It is there purely for flavor. A small amount of discard adds a subtle savory depth that balances the sweet filling beautifully without overpowering it. If you have a sourdough starter, this is one of the best ways to use your discard.
The homemade strawberry filling cooks down into a thick, jammy layer that holds its shape when the bars are cut. No running, no soggy layers, and clean edges every time.
Recipe

Sheet Pan Strawberry Pop Tart Bars (Sourdough)
Equipment
- 13×9 quarter sheet pan
- Parchment paper
- Large mixing bowl
- Medium saucepan
- Pastry cutter
- Rolling Pin
- kitchen scale
- plastic wrap
- – Pastry brush
- Offset spatula
- Wire cooling rack
- Sharp knife
Ingredients
PASTRY DOUGH
- 300 grams all purpose flour 2 1/2 cups
- 226 grams unsalted butter cold and cubed (1 cup / 2 sticks)
- 75 grams sourdough discard or active starter cold (1/3 cup)
- 75 grams ice water 5 tablespoons
- 12 grams granulated sugar 1 tablespoon
- 6 grams fine sea salt 1 teaspoon
STRAWBERRY FILLING
- 500 grams fresh or frozen strawberries thawed and drained if frozen, roughly chopped (about 3 cups)
- 65 grams granulated sugar 1/3 cup
- 24 grams cornstarch 3 tablespoons
- 10 grams lemon juice 2 teaspoons
- 5 grams vanilla extract 1 teaspoon
EGG WASH
- 1 large egg
- 15 grams whole milk 1 tablespoon
ICING
- 180 grams powdered sugar sifted (1 1/2 cups)
- 30 grams heavy cream 2 tablespoons, plus more by the teaspoon if needed
- 5 grams vanilla extract 1 teaspoon
- 1 small pinch fine sea salt
- rainbow sprinkles for top, optional
Instructions
MAKE THE FILLING
- Whisk the cornstarch and sugar together dry in a medium saucepan before adding anything else. Mixing them dry first prevents the cornstarch from clumping when it hits liquid.
- Add the strawberries, lemon juice, and vanilla to the saucepan and stir to combine.
- Cook over medium heat, stirring frequently but gently, until the mixture comes to a full boil and thickens noticeably, about 8 to 10 minutes. The filling must reach a full boil to activate the cornstarch properly.
- Transfer the filling to a bowl and press plastic wrap directly onto the surface to prevent a skin from forming. Refrigerate until completely cold, at least 1 hour. The filling will firm up significantly as it cools, which is exactly what you want for clean cuts.
MAKE THE DOUGH
- Whisk the flour, sugar, and salt together in a large mixing bowl.
- Add the cold cubed butter and use a pastry cutter to work it into the flour until the mixture looks like rough, uneven crumbles with butter pieces ranging from pea sized to almond sized. Do not overwork. Visible butter pieces are what create the flaky layers during baking.
- Place the entire bowl in the freezer for 10 minutes. This step firms the butter back up after working it in, without the frustration of starting with frozen butter.
- Whisk the cold sourdough discard/starter and cold water together in a small bowl until combined. Pour the liquid over the chilled flour and butter mixture and use a fork to toss until the dough comes together in shaggy clumps. If the dough is still too dry to hold together when pressed, add ice water one teaspoon at a time to the crumbs that are dry
- Divide the dough in half and press each half into a flat rectangle. Wrap tightly in plastic wrap and refrigerate for at least 2 hours or up to 3 days.
ROLL AND ASSEMBLE
- Preheat the oven to 375 degrees F. Line the quarter sheet pan with parchment paper leaving overhang on all sides. The overhang makes it easy to lift the finished slab out of the pan.
- Remove one dough rectangle from the refrigerator and let it sit at room temperature for 10 minutes before rolling. Do not skip this rest or the dough will crack, and do not let it sit longer than 10 minutes or the butter will soften too much.
- Place the dough between two sheets of parchment paper and roll it out to a rectangle slightly larger than the pan, about 14 by 10 inches. (Or use a lightly flour dusted surface) Transfer to the prepared pan and press it into the corners and up the sides slightly. This creates a natural border that helps contain the filling.
- Spread the cold strawberry filling evenly over the bottom layer, leaving a 1/4-1/2 inch border on all sides.
- Roll the second dough rectangle to the same size between parchment paper. Lay it over the filling and press the edges down firmly with your fingers to create a seal all the way around.
- Whisk the egg and milk together and brush generously over the entire top surface. Poking vent holes with a fork or skewer across the top is essential. Without them, steam forces its way out through the sealed edges and causes the filling to leak.
BAKE
- Bake for 30 to 35 minutes, checking at the 25 minute mark since all ovens vary. The top should be deep golden brown, much darker than you might expect. A pale top means an underbaked bottom layer.
- Let the bars cool for about an hour in the pan on a wire rack before glazing. Then carefully transfer to the wire rack without the pan. i place a cutting board on top and gently flip, so the poptart is upside down. Then place the cooling rack on top and fip again. Making the top free and the bottom resting on the wire cooling rack. Cool completely. Do not rush this step. Glazing warm bars will cause the icing to run and will not set properly.
GLAZE AND CUT
- Sift the powdered sugar into a bowl. Add the vanilla and salt, then add the heavy cream starting with 2 tablespoons, whisking after each addition. The icing should move slowly off a spoon like honey. If it is too thick, add more cream one teaspoon at a time.
- Pour the icing over the completely cooled bars and spread quickly to the edges with an offset spatula. Add the sprinkles immediately before the icing begins to set.
- Let the icing set for at least 1 hour at room temperature. It should be dry and firm to the touch before cutting.
- Cut 3 columns by 4 rows for 12 bars using a sharp knife or pizza cutter. Wipe the blade clean between each cut for the cleanest edges. Bars cut best cold, straight from the refrigerator.
Notes
What Are Sheet Pan Strawberry Pop Tart Bars

A sheet pan pop tart bar is exactly what it sounds like. Instead of individual hand held pastry pockets, the entire recipe is built in a quarter sheet pan, baked as one slab, and cut into bars after glazing. Think of it as a giant pop tart that you slice like a pan of brownies.
This recipe comes in two versions. The classic version is a straightforward all butter pastry dough that anyone can make regardless of whether they have a sourdough starter. The sourdough version uses a small amount of discard or active starter in the dough, adding a subtle depth of flavor that complements the sweet strawberry filling beautifully. Both versions use the same homemade strawberry filling, the same icing, and the same assembly process.
What makes this different from every other homemade pop tart recipe out there is the sheet pan format combined with a from scratch strawberry filling that is cooked to a firm set rather than spooned straight from a jar. Clean edges, flaky layers, and real strawberry flavor in every single bar.
Ingredients You Will Need

For the pastry dough:
All purpose flour is the base of the crust. No bread flour or cake flour needed here.
Cold unsalted butter is what creates the flaky layers. The key word is cold. The butter needs to stay in distinct pieces throughout the mixing process so that it can create steam during baking, and that steam is what pushes the layers apart.
Sourdough discard or active starter is the ingredient that sets this recipe apart. A small amount goes a long way, adding depth without sourness. Use it straight from the refrigerator to keep it cold.
Granulated sugar adds just a touch of sweetness to the pastry without making it taste like a cookie.
Fine sea salt balances the richness of the butter.
Ice water brings the dough together. Mixed together with the discard before adding to the flour, it distributes moisture evenly throughout the dough.
For the strawberry filling:
Fresh or frozen strawberries are the star. Both work beautifully. See the FAQ section below for how to handle frozen strawberries properly.
Granulated sugar sweetens the filling. The amount is intentionally measured to let the strawberry flavor come through rather than getting lost under sweetness.
Cornstarch is what makes this filling set firm enough to cut clean bars. The ratio is higher than a standard pie filling because these bars need to hold their shape at room temperature after cutting.
Lemon juice brightens the filling and balances the sweetness.
Vanilla extract rounds out the flavor.
For the icing:
Powdered sugar forms the base of the icing.
Heavy cream creates a slightly richer, more stable icing than milk alone.
Vanilla extract adds flavor.
Fine sea salt is the small detail that keeps the icing from tasting like pure sugar.
Rainbow sprinkles are optional but highly encouraged.
Understanding the Sourdough Pastry Dough

This pastry dough is built on the same principles as any great all butter pie crust, with one small but meaningful addition. The sourdough discard replaces a portion of the liquid in the recipe, contributing both moisture and a gentle fermented flavor that complements the sweet filling.
The key to a flaky crust is keeping everything cold and keeping the butter in pieces. You are not trying to fully incorporate the butter into the flour. You want a shaggy, uneven mixture with visible butter chunks throughout. Those chunks are what create the layers.
Here is the process broken down:
Start by whisking the dry ingredients together. Then cut in the cold butter with a pastry cutter until the mixture looks like rough, uneven crumbles with pieces ranging from the size of a pea to the size of a small almond. Both sizes are fine. Variety is actually what you want.

Place the entire bowl in the freezer for 10 minutes. This step replaces the older advice to use frozen butter. Working with frozen butter is frustrating and hard on your hands. This method lets you do all the work while the butter is still manageable, then everything chills again before the liquid goes in.
Whisk the cold discard and ice water together in a small bowl until combined, then pour over the flour mixture. Use a fork to toss until the dough comes together in shaggy clumps. If it is still too dry to hold together when pressed, add ice water one teaspoon at a time.
Divide the dough in half, press each half into a flat rectangle, wrap tightly in plastic wrap, and refrigerate for at least 2 hours.
Long ferment option: After dividing and wrapping, refrigerate the dough overnight or up to 2 days. The extended rest develops deeper flavor complexity and makes the dough significantly more relaxed and cooperative when you go to roll it. This is the recommended approach if your schedule allows for it.
When you are ready to roll, remove the dough from the refrigerator and let it sit at room temperature for 10 minutes before rolling. Do not try to roll it straight from the refrigerator and do not let it warm beyond 10 minutes. That 10 minute window is the sweet spot.
How to Make the Strawberry Filling

The homemade strawberry filling is what separates this recipe from every other sheet pan pop tart recipe online. Store bought jam is convenient, but it does not cook down the same way, and it does not set firm enough to guarantee clean cuts.
This filling is simple. Five ingredients, one saucepan, about 10 minutes of active cooking.
The most important technique in this filling is how you handle the cornstarch. Whisk the cornstarch and sugar together dry before anything else goes into the pan. This prevents clumping. When starch granules hit liquid before they have been dispersed in a dry medium, they clump together instantly and no amount of stirring will break them apart.
Once the dry ingredients are combined, add the strawberries, lemon juice, and vanilla. Cook over medium heat, stirring frequently but gently. The goal is to bring the mixture to a full boil. This is not optional. Cornstarch must reach boiling temperature to fully activate. A filling that looks thick at 180 degrees will thin back out when it cools because the starch has not properly gelatinized.
Once it reaches a full boil and thickens noticeably, transfer to a bowl, press plastic wrap directly onto the surface, and refrigerate until completely cold. The filling will firm up significantly as it cools.
The cold filling going onto cold dough is one of the most important steps in the entire recipe. Warm filling on cold butter pastry dough melts the fat before the oven ever gets a chance to do its job, and that destroys the layers.
Can I Use Store Bought Jam Instead
Yes, store bought strawberry jam works as a shortcut. A few guidelines to get the best result:
Choose a jam where strawberries are the first ingredient. The simpler the ingredient list, the better. You want a jam that is primarily fruit and sugar, not one with a long list of thickeners, artificial flavors, or high fructose corn syrup.
You still need to cook the jam with cornstarch before using it. Spoon the jam into a small saucepan and stir in 1 tablespoon of cornstarch mixed with 1 tablespoon of cold water until smooth. Bring to a boil over medium heat and simmer for 2 minutes, stirring constantly. Remove from heat and cool completely before spreading.
This step is not optional even with store bought jam. Jam straight from the jar has a soft, spreadable consistency that will liquefy in the oven and run through the crimped edges. The brief cooking and cornstarch step firms it up enough to hold between the layers during baking.
You will need approximately 1 cup of jam for the full recipe.
Fat Substitutions for the Crust
This recipe is developed with all butter pastry dough for the best flavor and flakiness. However, there are two alternative fats worth knowing about.
Palm oil shortening: Vegetable shortening can be substituted for the butter at a 1 to 1 ratio by weight. The crust will be slightly less flavorful and will not brown as deeply since shortening does not contain the milk solids that contribute to browning in butter. The texture will be a bit more tender and less distinctly layered. If you are looking for a dairy free option, palm oil shortening is your best choice here. Use it cold, the same way you would use cold butter.
Lard: Leaf lard makes an exceptional pie crust and can be substituted for the butter at a 1 to 1 ratio by weight. The flavor is subtler than butter but still far superior to shortening, and lard produces a notably tender, flaky result. If you have access to good quality leaf lard, it is absolutely worth trying. Note that store bought hydrogenated lard is not the same product as fresh rendered leaf lard and will behave more like shortening.
A note on liquid adjustments: Both shortening and lard are 100 percent fat with no water content, whereas butter contains approximately 18 to 20 percent water. That water is part of what creates flaky layers through steam. If you substitute shortening or lard for the butter, you may need to add a teaspoon or two of additional ice water to compensate.
Gluten Free Option

This recipe can be made gluten free using a measure for measure gluten free all purpose flour blend. Substitute the same weight of gluten free flour for the all purpose flour in the dough. Because gluten free flour blends absorb liquid differently, you may need a bit more ice water than the standard recipe calls for. Add it one teaspoon at a time until the dough holds together when pressed. The dough may feel slightly more fragile than a traditional pastry dough, so handle it gently and use the parchment paper rolling method to transfer it without tearing.
How to Assemble and Bake

Line your 13×9 quarter sheet pan with parchment paper, leaving overhang on all sides. This overhang is important. It is how you will lift the finished slab out of the pan for glazing and cutting.
Roll the first dough rectangle slightly larger than the pan, about 14 by 10 inches, between two sheets of parchment paper. Transfer to the prepared pan and press it into the corners, letting it come up the sides slightly. This creates a natural border that helps contain the filling and makes sealing easier.
Spread the cold strawberry filling evenly over the bottom layer, leaving a half inch border on all sides.
Roll the second dough rectangle to the same size. Lay it over the filling and press the edges down firmly with your fingers to create a seal all the way around. You do not need to crimp with a fork if you have pressed firmly enough with your fingers, though a fork crimp along the edges adds an extra layer of security and gives the bars that classic pop tart look.
Whisk the egg and milk together and brush generously over the entire top surface.
Bake at 375 degrees in the middle rack for 30 to 35 minutes until deep golden brown. Start checking at 25 minutes due to all ovens being different.
Let the bars cool completely in the pan on a wire rack before glazing.
The Icing

The icing for these bars is a straightforward powdered sugar glaze made with heavy cream for a slightly richer set than milk alone. The pinch of salt is not optional. It is the detail that keeps the icing tasting balanced rather than cloying.
Sift the powdered sugar into a bowl before adding any liquid. Unsifted powdered sugar almost always has lumps, and those lumps may not dissolve once liquid is added.
Start with 2 tablespoons of heavy cream and whisk. The icing should be thick but pourable, moving slowly off a spoon like honey. If it is too thick to spread, add more cream one teaspoon at a time. If it is too thin it will not set properly.
Pour the icing over the completely cooled bars and spread it quickly to the edges with an offset spatula or the back of a spoon. Add the sprinkles immediately, before the icing starts to set.
Let the icing set for at least 1 hour before cutting. It should be dry to the touch and hold a clean edge when pressed lightly.
Cut the bars cold for the cleanest edges. Three columns by four rows gives you 12 generous bars. But bar size is customizable Wipe the knife blade clean between each cut.

No Sourdough Version
If you do not have sourdough starter or discard, this recipe is just as delicious made with a standard all butter pastry dough. Simply replace the discard with an equal combination of flour and water to maintain the same hydration in the dough.
For the no sourdough version, use 337g all purpose flour (2 3/4 cups) and 113g ice water (7 1/2 tablespoons) in place of the 300g flour, 75g discard, and 75g ice water in the original recipe. All other ingredients and instructions remain exactly the same.
The full no sourdough recipe card is below.
Sheet Pan Strawberry Pop Tart Bars (Classic)
Equipment
- 13×9 quarter sheet pan
- Parchment paper
- Large mixing bowl
- Medium saucepan
- Pastry cutter fork
- Rolling Pin
- kitchen scale
- plastic wrap
- fork
- – Pastry brush
- Offset spatula
- Wire cooling rack
- Sharp knife
Ingredients
PASTRY DOUGH
- 337 grams all purpose flour 2 3/4 cups
- 226 grams unsalted butter cold and cubed (1 cup / 2 sticks)
- 113 grams ice water 7 1/2 tablespoons, plus more by the teaspoon if needed
- 12 grams granulated sugar 1 tablespoon
- 6 grams fine sea salt 1 teaspoon
STRAWBERRY FILLING
- 500 grams fresh or frozen strawberries thawed and drained if frozen, roughly chopped (about 3 cups)
- 65 grams granulated sugar 1/3 cup
- 24 grams cornstarch 3 tablespoons
- 10 grams lemon juice 2 teaspoons
- 5 grams vanilla extract 1 teaspoon
EGG WASH
- 1 large egg
- 15 grams whole milk 1 tablespoon
ICING
- 180 grams powdered sugar sifted (1 1/2 cups)
- 30 grams heavy cream 2 tablespoons, plus more by the teaspoon if needed
- 5 grams vanilla extract 1 teaspoon
- 1 small pinch fine sea salt
- rainbow sprinkles optional
Instructions
MAKE THE FILLING
- Whisk the cornstarch and sugar together dry in a medium saucepan before adding anything else. Mixing them dry first prevents the cornstarch from clumping when it hits liquid.
- Add the strawberries, lemon juice, and vanilla to the saucepan and stir to combine.
- Cook over medium heat, stirring frequently but gently, until the mixture comes to a full boil and thickens noticeably, about 8 to 10 minutes. The filling must reach a full boil to activate the cornstarch properly.
- Transfer the filling to a bowl and press plastic wrap directly onto the surface to prevent a skin from forming. Refrigerate until completely cold, at least 1 hour. The filling will firm up significantly as it cools, which is exactly what you want for clean cuts.
MAKE THE DOUGH
- Whisk the flour, sugar, and salt together in a large mixing bowl.
- Add the cold cubed butter and use a pastry cutter to work it into the flour until the mixture looks like rough, uneven crumbles with butter pieces ranging from pea sized to almond sized. Do not overwork. Visible butter pieces are what create the flaky layers during baking.
- Place the entire bowl in the freezer for 10 minutes. This step firms the butter back up after working it in, without the frustration of starting with frozen butter.
- Pour the ice water over the chilled flour and butter mixture and use a fork to toss until the dough comes together in shaggy clumps. Add ice water one teaspoon at a time only if the dough is still too dry to hold together when pressed.
- Divide the dough in half and press each half into a flat rectangle. Wrap tightly in plastic wrap and refrigerate for at least 2 hours or up to 3 days.
ROLL AND ASSEMBLE
- Preheat the oven to 375 degrees F. Line the quarter sheet pan with parchment paper leaving overhang on all sides. The overhang makes it easy to lift the finished slab out of the pan.
- Remove one dough rectangle from the refrigerator and let it sit at room temperature for 10 minutes before rolling. Do not skip this rest or the dough will crack, and do not let it sit longer than 10 minutes or the butter will soften too much.
- Place the dough between two sheets of parchment paper and roll it out to a rectangle slightly larger than the pan, about 14 by 10 inches. Transfer to the prepared pan and press it into the corners and up the sides slightly. This creates a natural border that helps contain the filling.
- Spread the cold strawberry filling evenly over the bottom layer, leaving a half inch border on all sides.
- Roll the second dough rectangle to the same size between parchment paper. Lay it over the filling and press the edges down firmly with your fingers to create a seal all the way around.
- Whisk the egg and milk together and brush generously over the entire top surface. Poke vent holes with a fork or skewer evenly across the top. Without vent holes, steam forces its way out through the sealed edges and causes the filling to leak.
BAKE
- Bake for 30 to 35 minutes, checking at the 25 minute mark since all ovens vary. The top should be deep golden brown, much darker than you might expect. A pale top means an underbaked bottom layer.
- Let the bars cool for about an hour in the pan on a wire rack before glazing. Then carefully transfer to the wire rack without the pan. i place a cutting board on top and gently flip, so the poptart is upside down. Then place the cooling rack on top and fip again. Making the top free and the bottom resting on the wire cooling rack. Cool completely. Do not rush this step. Glazing warm bars will cause the icing to run and will not set properly.
GLAZE AND CUT
- Sift the powdered sugar into a bowl. Add the vanilla and salt, then add the heavy cream starting with 2 tablespoons, whisking after each addition. The icing should move slowly off a spoon like honey. If it is too thick, add more cream one teaspoon at a time.
- Pour the icing over the completely cooled bars and spread quickly to the edges with an offset spatula. Add the sprinkles immediately before the icing begins to set.
- Let the icing set for at least 1 hour at room temperature. It should be dry and firm to the touch before cutting.
- Cut 3 columns by 4 rows for 12 bars using a sharp knife or pizza cutter. Wipe the blade clean between each cut for the cleanest edges. Bars cut best cold, straight from the refrigerator.
Notes
Shop This Recipe
These are the tools that make this recipe significantly easier to pull off. You do not need all of them, but each one earns its place in this particular recipe.
The pan this recipe was developed and tested in. The straight sides and tight corners are essential for getting the dough to fit properly and for even baking.
The right tool for cutting cold butter into flour without warming it with your hands. A good pastry cutter makes the dough come together faster and with less overworking.
The best tool for spreading the icing evenly all the way to the edges in one smooth pass. A regular spatula works but an offset gives you much better control.
A straight French rolling pin gives you the most control when rolling pastry dough to a specific rectangle shape.
Invaluable for lifting the rolled dough off the surface without tearing it, and for keeping your work surface clean between steps.
Used both to line the pan and to roll the dough between sheets. Rolling between parchment eliminates the need for extra flour on the surface and makes transferring the dough to the pan significantly easier. HOWEVER if you are using the USA pan that is linked above you will not need it.
Highly recommend the finish touch of rainbow sprinkles on the top of the pop tart for that classic finish. This dye free sanding sugar will last you through many poptart creations.

More Sourdough Recipes


Frequently Asked Questions
Can I use frozen strawberries for the filling?
Yes, frozen strawberries work beautifully in this recipe and are arguably the better choice because they break down more evenly during cooking, producing a smoother, more uniform filling. The critical step is thawing them completely and draining off all the excess liquid before you start cooking. Frozen strawberries release a significant amount of water as they thaw, and that extra liquid throws off the cornstarch ratio and prevents the filling from setting properly. Drain in a colander and press gently before chopping and cooking. However fresh work just fine!
How do I thaw frozen strawberries quickly?
Place the frozen strawberries in a microwave safe bowl and microwave in 30 second intervals, stirring between each, until fully thawed. Usually 2 to 3 rounds depending on quantity. Do not let them get hot or start cooking in the microwave. You want them thawed, not cooked. Then drain in a colander and press gently to remove the pooled liquid before chopping.
Can I use a food processor to make the dough?
Yes. Add the flour, sugar, and salt to the food processor and pulse twice to combine. Add the cold cubed butter and pulse 8 to 10 times until the butter is broken down into pea and almond sized pieces. Turn the dough out into a bowl and place in the freezer for 10 minutes. Then whisk the cold discard and ice water together and drizzle over the chilled mixture, using a fork to bring it together. Add additional water one teaspoon at a time only if needed. The key warning with a food processor: it is very easy to overwork this dough. Stop the moment the mixture starts clumping. If it forms a smooth ball in the processor, you have gone too far and the crust will be tough instead of flaky.
How do I store the bars?
Store the bars uncovered in the refrigerator. Do not wrap them in plastic wrap as trapped moisture will soften the icing and the top crust. They keep well for up to 3 days. Pull them from the refrigerator about 20 minutes before serving if you prefer them at room temperature.
Can these be made ahead?
Yes, this recipe is well suited to making ahead. The dough can be made up to 3 days in advance and refrigerated. The strawberry filling can be made up to 3 days in advance and refrigerated. The assembled, unbaked slab can be refrigerated overnight before baking. And the fully baked and glazed bars store well in the refrigerator for up to 3 days.
Why are my bars leaking filling at the edges?
There are three common causes. The first is filling that was spread too close to the edges without leaving a border. The second is a seal that was not pressed firmly enough. The third is not poking a few vent holes in the top crust before baking. Steam needs somewhere to escape. If the edges are sealed but there are no vents, the pressure from the steam will find the weakest point in the seal and push through. The other option is to leave a few spots on the side where the top and sides meet unsealed. Gap randomly around the edges.
My dough cracked when I tried to roll it. What happened?
The dough is likely too cold. Let it sit at room temperature for the full 10 minutes before rolling. If it continues to crack at the edges, press the cracks back together with your fingers and continue rolling. A few edge cracks are normal and will seal when the top layer is pressed down over the filling.
Can I make these without the sourdough?
Yes. See the No Sourdough Version section above and the separate recipe card for the full instructions without sourdough.

Leave a Comment
If you make these Sourdough Sheet Pan Pop Tart Bars, I would love to hear how they turned out. Leave a star rating and a comment below so other readers can learn from your experience.
Did you try a different filling? Did you go with the long ferment option? Share it below.
And if you share on Instagram or Facebook, tag me so I can see your bars. There is nothing better than seeing your kitchens bring these recipes to life.
Want recipes like this sent directly to your inbox? Sign up for the H3art of the Home newsletter below and you will never miss a new post.


Leave a Reply