Most high protein English muffins you find are shortcuts. Self rising flour and Greek yogurt stirred together, leavened with baking powder, cooked in a few minutes. They are quick and they are fine, but they bake up closer to a biscuit than a muffin. What you do not get is the chew, the pull, the real open interior that makes an English muffin worth splitting and toasting in the first place.
I wanted the real thing. A proper yeasted English muffin with genuine nooks and crannies and that signature chewy crumb, that just happens to carry 12 grams of protein per muffin with no protein powder anywhere in sight. This is that muffin. It uses instant yeast for real structure and Greek yogurt for whole food protein, and it still comes together in a small time.

Table of Contents
- Why You Will Love These
- The Macros
- Ingredients
- Why These English Muffins Work
- Two Ways to Shape
- Shop This Recipe
- Tips for the Best Crumb
- Want the Sourdough Version
- Make Ahead and Overnight Option
- How to Store
- FAQ
- Recipe
- Subscribe
Why You Will Love These

- 12 grams of protein per muffin, no protein powder involved
- A true yeasted muffin with real chew and real nooks and crannies, not a baking powder shortcut
- Ready start to finish in a few hours, no sourdough starter and no overnight rise
- Made with whole food protein from Greek yogurt
- Freezer friendly, so one batch covers weeks of breakfasts
- Sturdy enough to fork split, toast, and load up without falling apart
The Macros
Per muffin (makes 8):
- 260 calories
- 12 g protein
- 44 g carbs
- 2.7 g fat
- 1.4 g fiber
These macros are calculated using Kirkland organic nonfat Greek yogurt and King Arthur organic bread flour. Numbers will shift slightly depending on the brands you use, since yogurt protein content varies more than people expect.
Here is the comparison that actually matters. Gram for gram, this muffin runs close to 13% protein by weight. A standard store bought English muffin sits around 7% protein by weight. Bite for bite, mine carries almost double the protein, regardless of muffin size. That is the whole point of building it this way instead of reaching for protein powder.
Ingredients

Bread flour. The higher protein content compared to all purpose flour gives this dough the structure it needs to hold a real crumb instead of collapsing into something gummy. It is also where a lot of the chew comes from.
Nonfat Greek yogurt. This is doing double duty, adding protein and adding moisture. Brand matters more than you would think. Thick, dry yogurts like Kirkland make a stiffer dough than looser brands, so do not panic if yours feels tighter than you expected. Add water a tablespoon at a time if it feels like bagel dough.
Water. Just enough to round out the hydration once the yogurt is accounted for.
Instant yeast. This is the entire reason this version comes together in an afternoon instead of overnight, and it is what gives you a true chewy English muffin crumb that baking powder simply cannot. No proofing it separately needed, it goes straight in with the dry ingredients.
Egg. Adds structure and a little richness without adding much fat.
Honey. A small amount to feed the yeast and round out the flavor, not enough to make these taste sweet.
Butter. Softened and kneaded in at the end for a tender bite without weighing the dough down.
Salt. Controls the yeast and makes everything taste like something instead of plain bread.
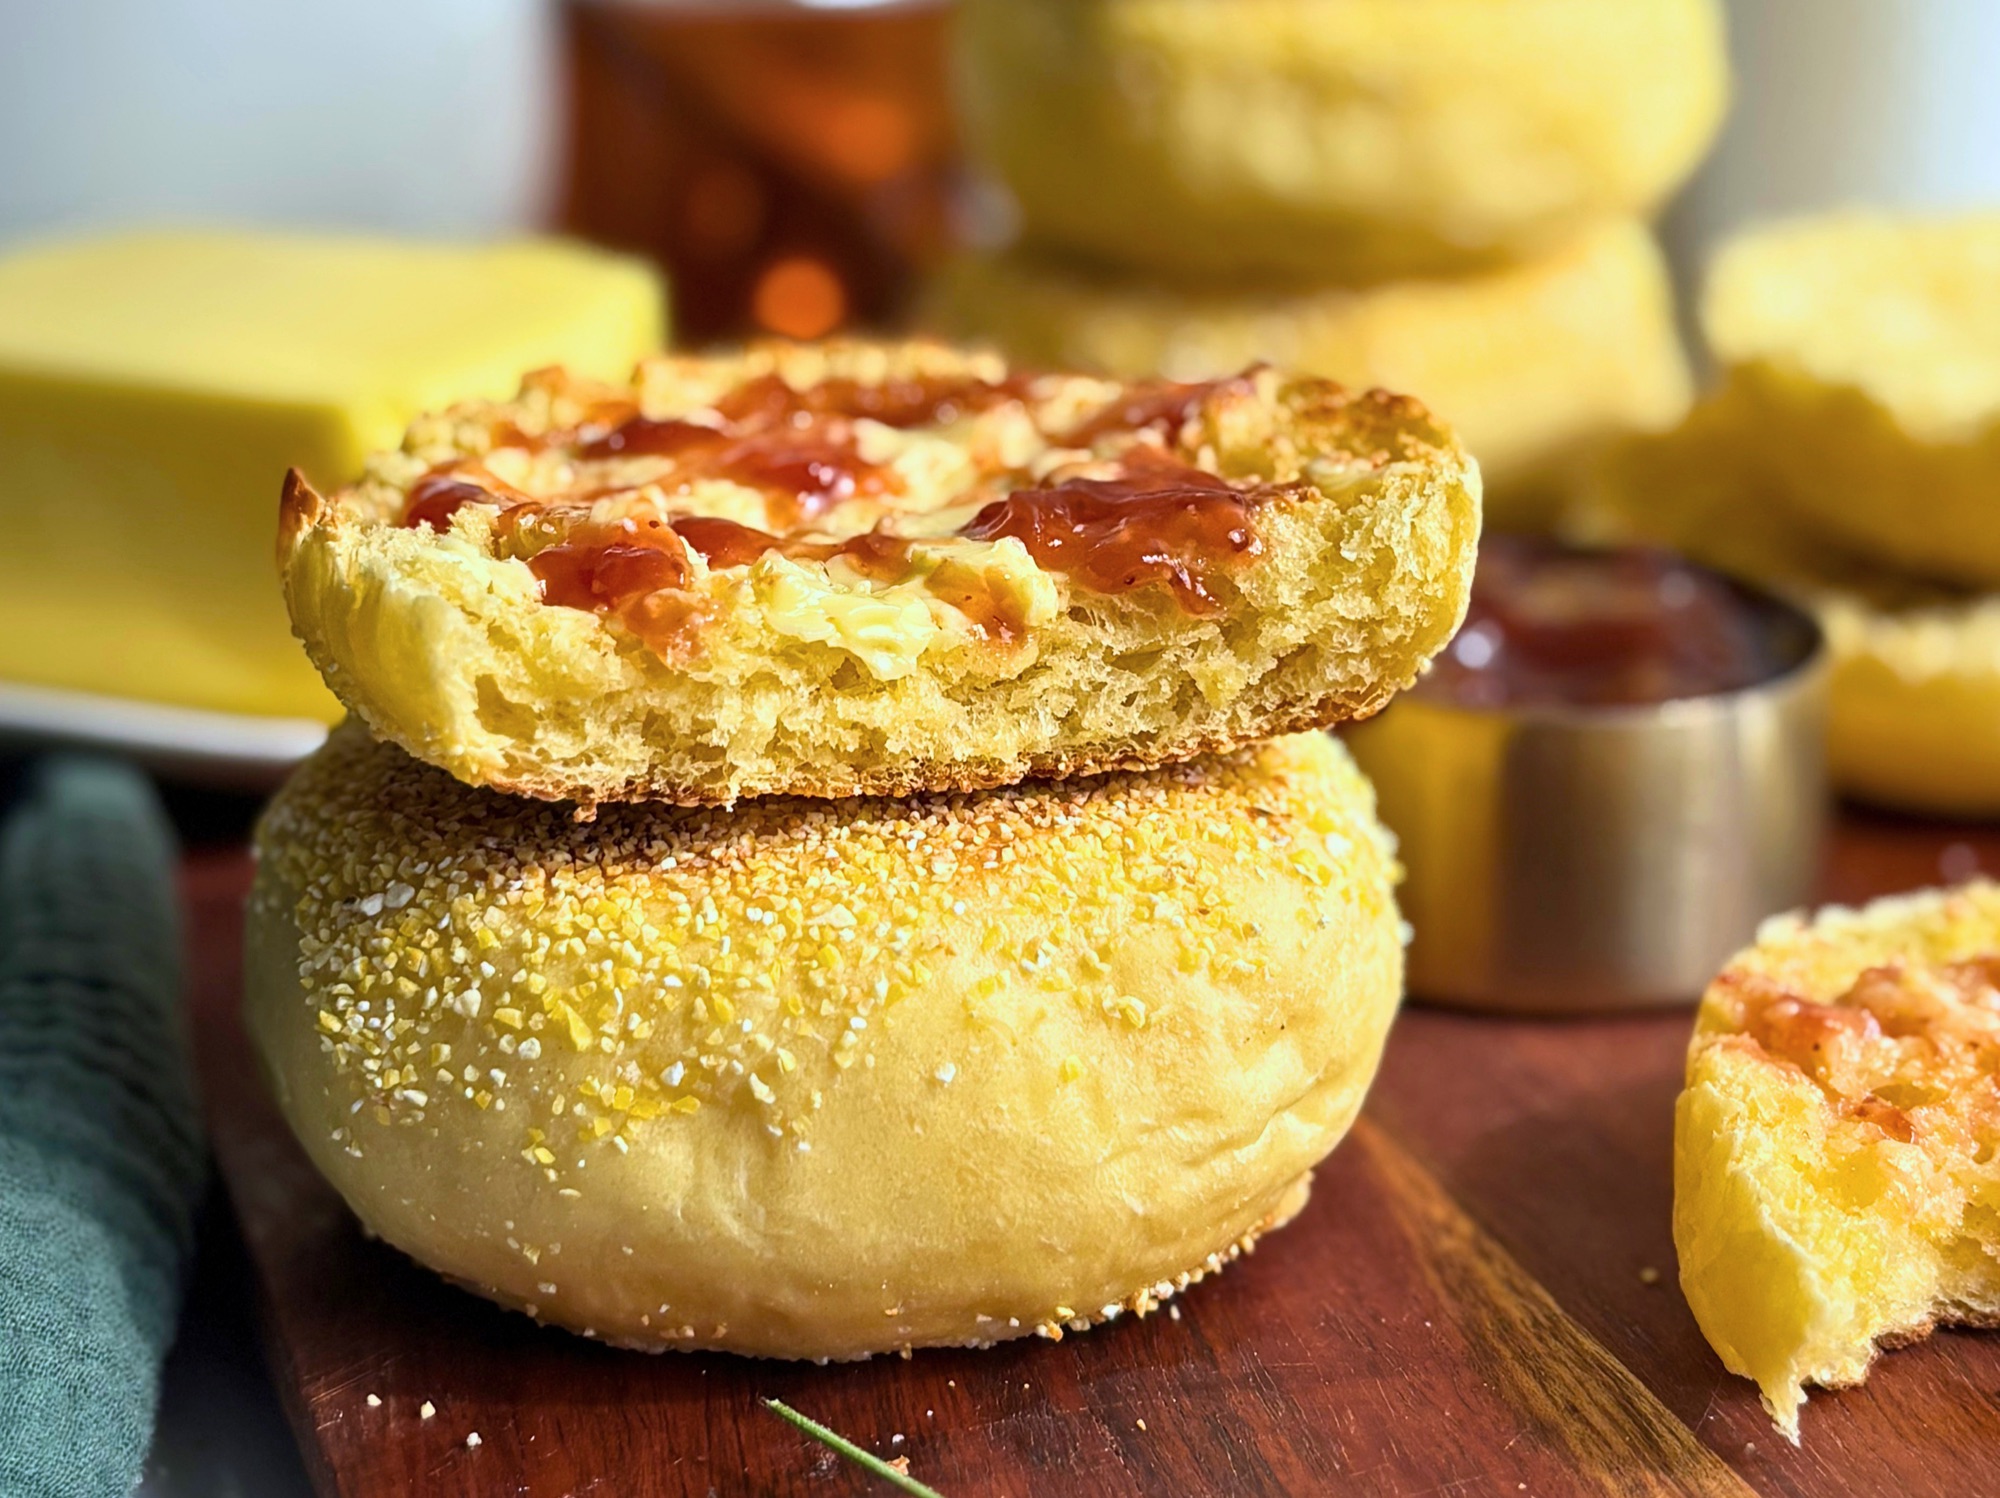
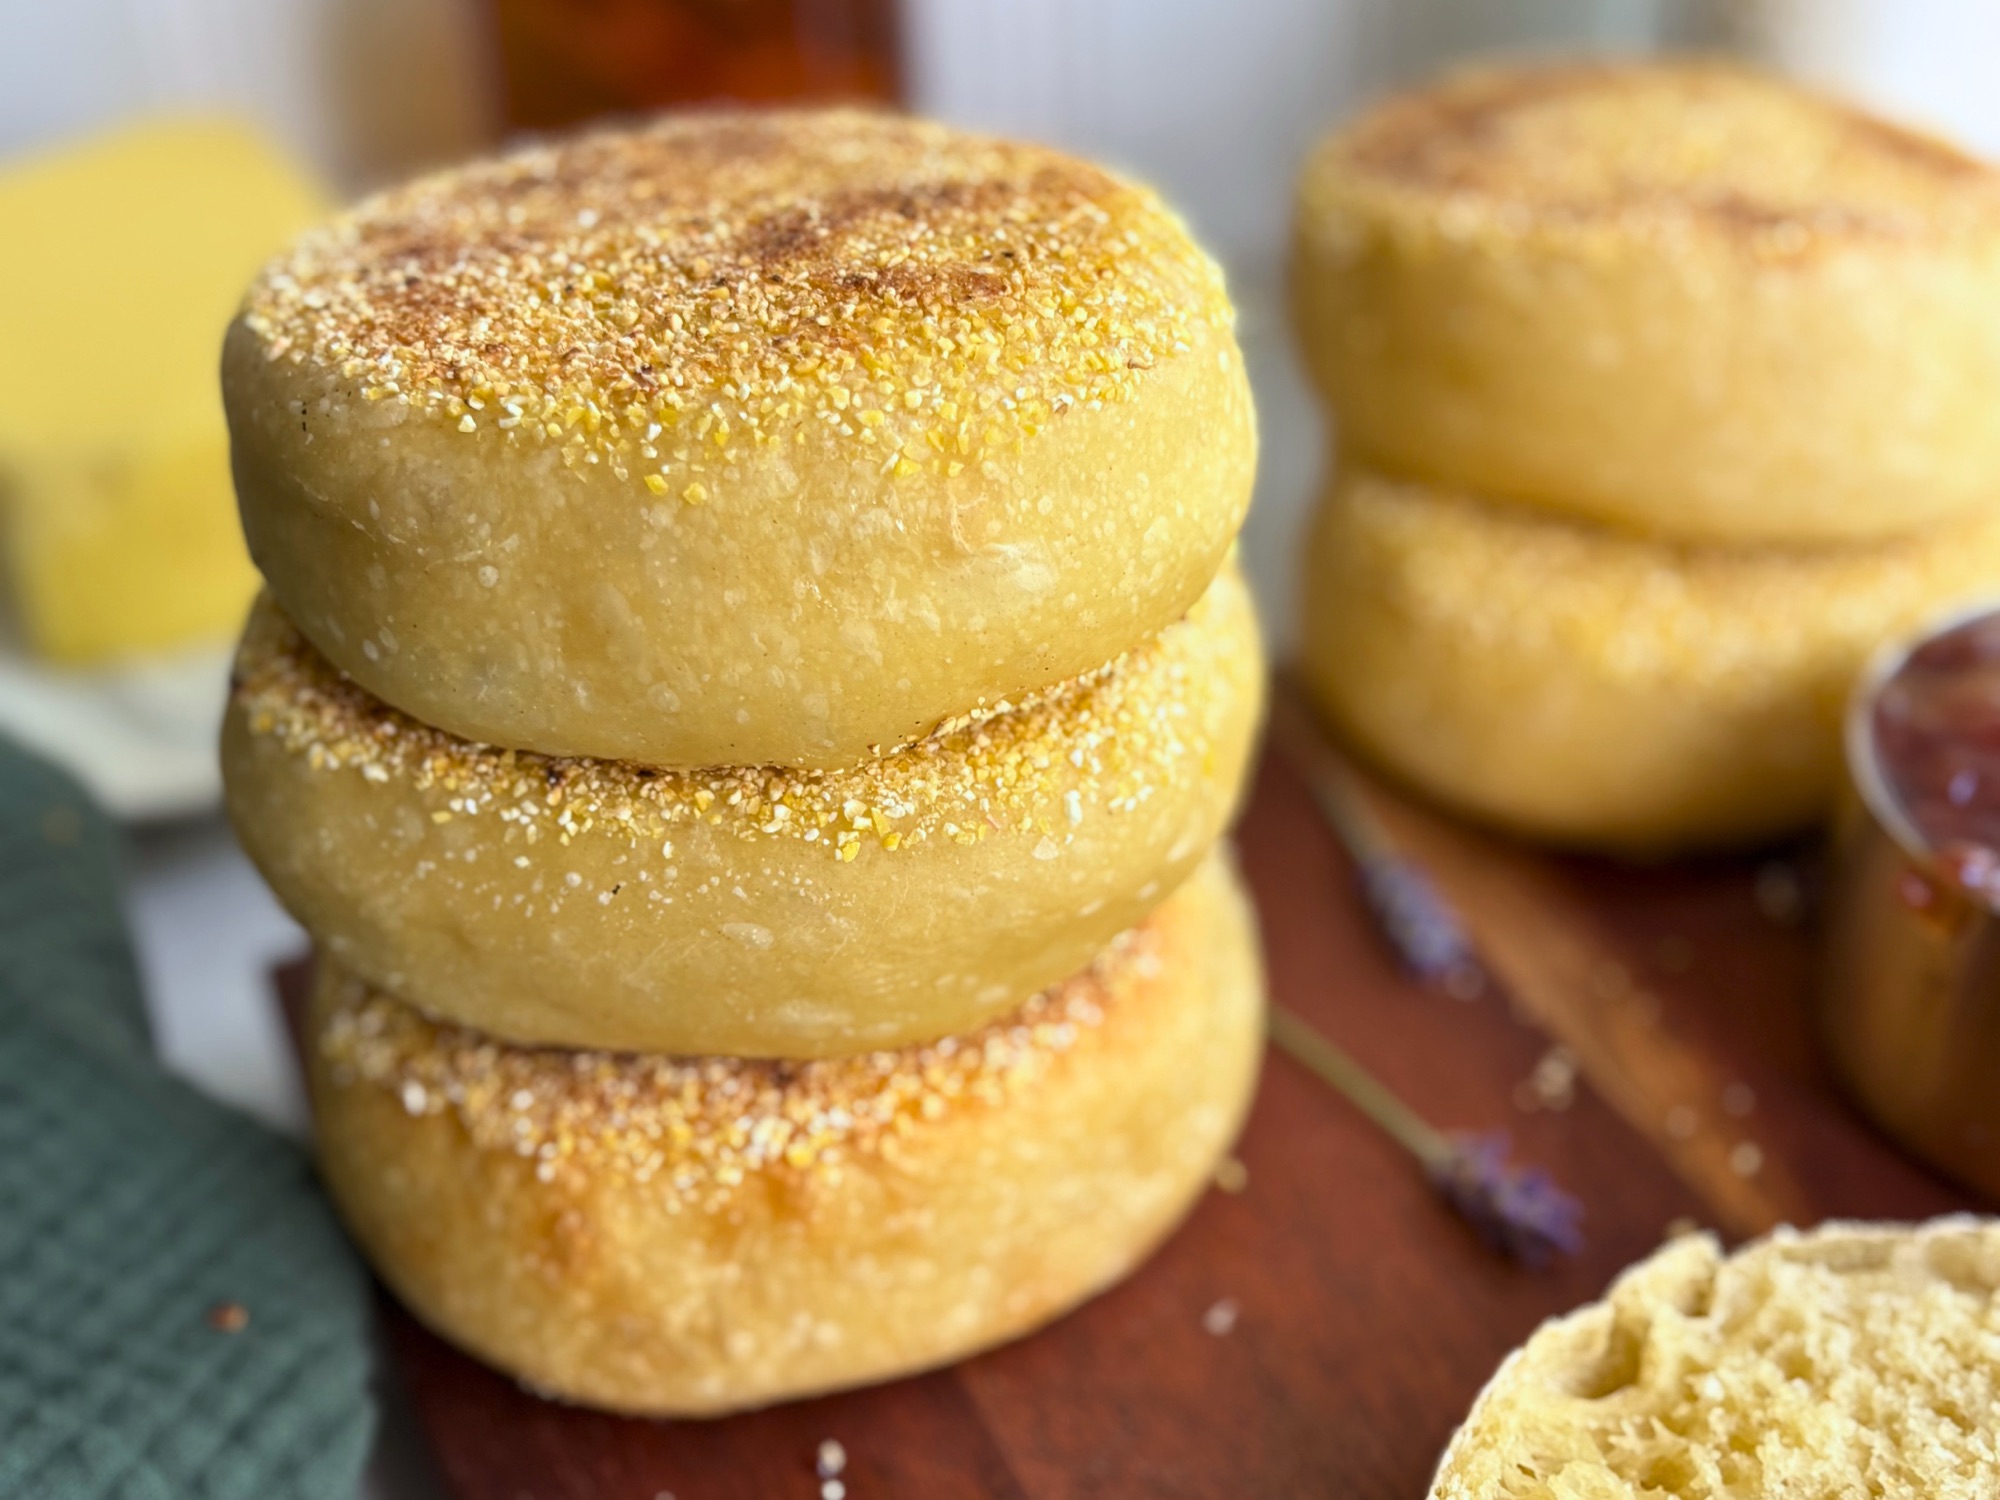
Cornmeal. For dusting the pan so the bottoms get that classic English muffin texture and do not stick.
Why These English Muffins Work
The full measured method lives in the recipe card below, so instead of walking you through every step here, I want to explain the why behind the choices, because that is what makes the difference between a flat, dense muffin and one with real nooks and crannies. These are the things I learned testing this recipe over and over.
Liquid temperature is the part most people get wrong. Because this recipe uses instant yeast added straight to the dry ingredients rather than bloomed first, the water needs to be hotter than you might expect. My Red Star packet calls for water around 120°F when the yeast is mixed in dry like this, and that is the number I use. This is the opposite of what a lot of people assume. Instant yeast going in dry wants warm water to wake it up on contact, while active dry yeast that gets bloomed first wants a gentler temperature. Always check the back of your specific yeast packet, since brands vary, but for instant yeast mixed in dry, do not be shy with the warmth. A thermometer takes the guessing out of it.
The yogurt only needs the chill taken off, not heated through. I give it about 30 seconds in the microwave and a good stir, just enough to bring it to room temperature or slightly warmer. It does not need to be hot, because the hot water is doing the real work of activating the yeast. The point is simply that you do not want cold yogurt straight from the fridge dragging the temperature of the whole dough down and slowing your rise. Take the chill off and move on.
The order you add things matters. I mix the warmed yogurt, egg, and honey together first into a wet base. Then the flour and salt go on top, the instant yeast goes on top of the flour, and the hot water gets poured right over the yeast before mixing it all together. Layering it this way means the warm water meets the yeast directly to wake it up, while the flour keeps the yeast from sitting in direct contact with the salt, which can slow it down if they are concentrated together too long.

This dough wants a thorough knead. Because it is built on yeast rather than a long sourdough ferment, it does not get to develop strength slowly over many hours. You build that structure at the bench instead. Knead until the dough is smooth, supple, and slightly tacky, never dry and never so wet it sticks to your hands in sheets. The softened butter goes in at the end, once the dough is already cohesive, worked in a little at a time. Do not cut the kneading short. This is where the chew comes from.
Yogurt brand changes the feel of the dough. Thick, dry yogurts like Kirkland make a stiffer dough than looser brands. If yours feels like stiff bagel dough, add water a tablespoon at a time until it relaxes into something soft and pliable. If it feels too slack, a little extra flour brings it back.
Do not rush either rise. The first rise goes until the dough has doubled, usually an hour to an hour and a half depending on how warm your kitchen runs. After shaping and a short rest, the second proof goes around 45 minutes, faster than a sourdough timeline because the yeast is working at full speed the whole time. Underproofing is the most common reason a muffin bakes up dense, so let it get puffy and airy before it hits the skillet.
Two cook stages, not one. The muffins brown in a dry cast iron skillet over medium low heat to build that deep golden crust, then finish in a 350°F oven until they reach 205°F internal. The stovetop gives you color, the oven guarantees the inside is fully cooked without burning the outside. Skipping the oven is how you end up with a gummy center.
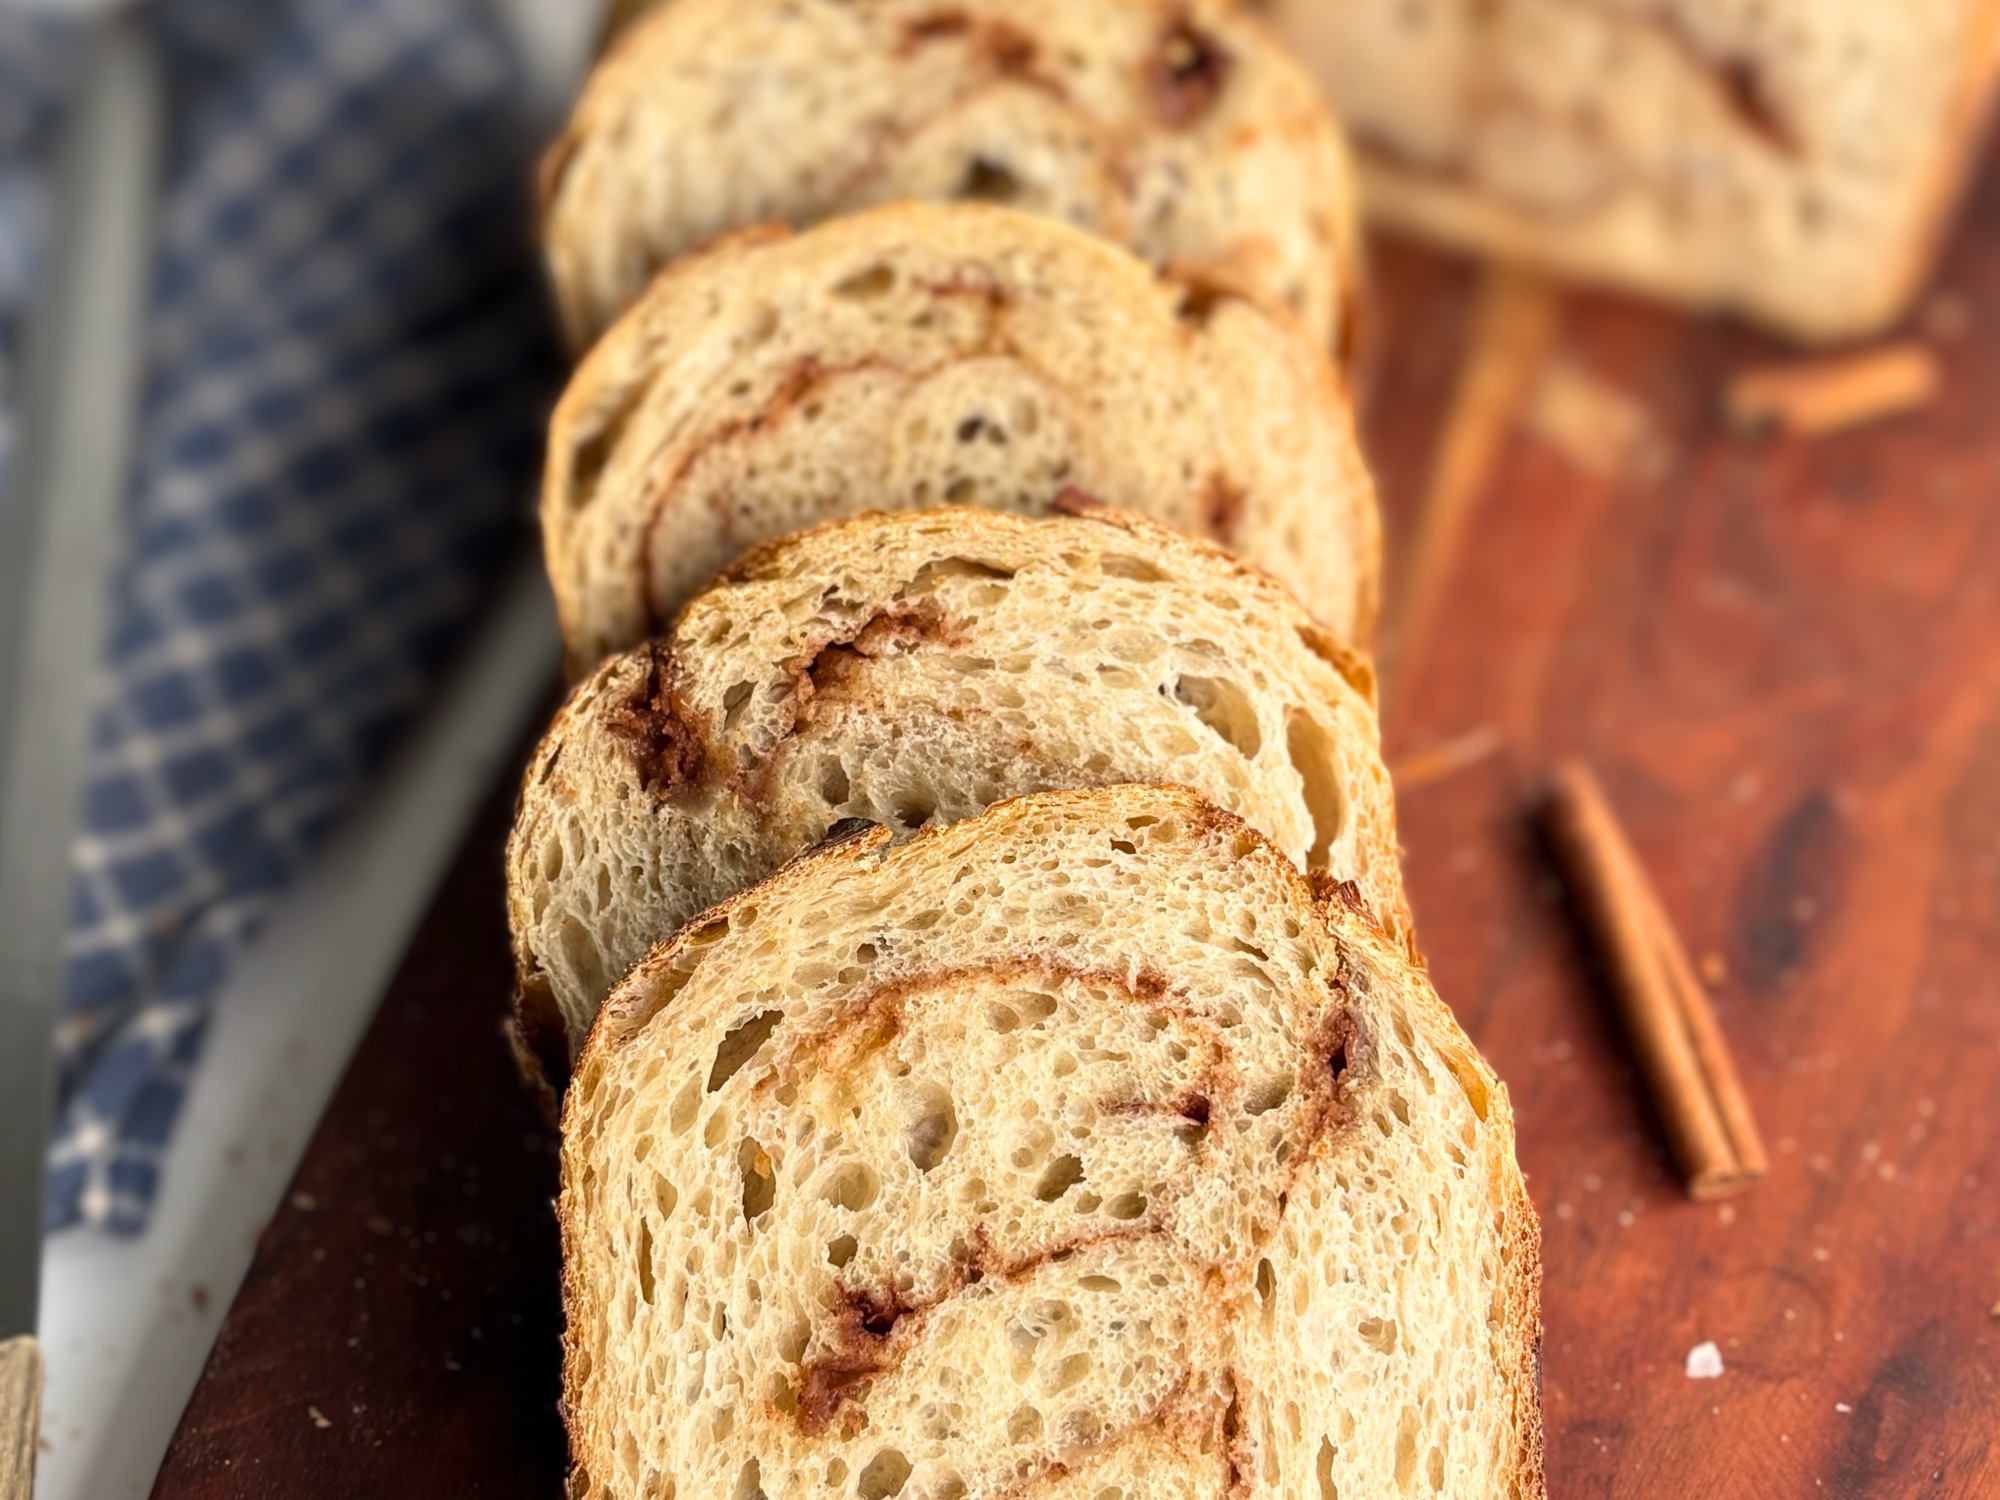
Always fork split, never knife cut. Fork splitting follows the natural air pockets and preserves the nooks and crannies. A knife slices straight through them and leaves you a flat, smooth surface that does not catch butter the same way.
Two Ways to Shape

My favorite method is the weigh and ball technique. Portion the dough into even pieces, then shape each one like a hamburger bun. Cup your hand over the dough like a small cage against the counter and move it in a gentle circular motion. This builds tension on the surface and gives you a smooth, even round top, which matters once it puffs up in the second proof. With this method, let the shaped balls rest about 15 minutes, then gently press down to take the dome off. You are not flattening to a specific thickness here, just knocking the dome down so the muffins proof evenly instead of doming unevenly in the skillet.
The alternative is the classic roll and cut method, rolling the whole batch out to an even thickness, around 3/4 inch to an inch, and cutting rounds. Because you are setting the thickness as you roll, there is no doming to press out, so these go straight to the second proof after cutting. It works well, you just lose a little of the surface tension that the ball method builds in naturally.
A thin plastic bowl scraper makes transferring these without deflating them so much easier, especially once they have puffed up in the second proof. A bench scraper works as a backup if that is what you have on hand.

Shop This Recipe
These are affiliate links, which means I may earn a small commission at no extra cost to you.
- Cornmeal
- Thin Plastic Bowl Scraper
- Bench Scraper
- USA Pan Sheet Pan
- Cast Iron Skillet
- Digital Thermometer
- Kitchen Scale
- Rapid Rise Yeast
Tips for the Best Crumb

- Pay attention to your yogurt brand. Thicker brands need more water, thinner brands need less.
- Do not rush the kneading. A smooth, supple dough is what gives you the open crumb later, and this yeasted dough needs that structure built at the bench.
- Let the second proof go all the way. Underproofed muffins bake up dense no matter how good your dough was.
- Cook low and slow on the stovetop. Medium low heat builds color without burning the outside before the inside catches up.
- Use a thermometer. 205°F internal is the number that tells you it is actually done, not just brown on the outside.
Want the Sourdough Version Instead
If you already keep a starter alive and want the deeper flavor of a long ferment, High Protein Sourdough English Muffins is the version for you. Same protein payoff, same chewy crumb, just built around an overnight rise instead of same day yeast. And if you are working your way through my high protein series, the High Protein Sandwich Bread and High Protein Hamburger Rolls are natural next bakes, both built on the same whole food ingredients, no protein powder approach.
Make Ahead and Overnight Option

One of the nice things about a yeasted dough is that you can slow it down in the fridge and bake fresh muffins in the morning without doing all the work at sunrise. Mix the dough in the evening, shape and dedome the muffins as usual, then instead of the room temperature second proof, cover the pan well and refrigerate them overnight, anywhere from about 8 to 12 hours. The cold slows the yeast to a crawl, so the muffins proof slowly and develop a little more flavor while you sleep.
In the morning, pull the pan out and let the muffins finish proofing at room temperature until they are puffed and airy, the same way you would judge the same day version. Cold dough straight from the fridge will not be ready to cook yet, so give them time to lose the chill and come back to life. This usually takes a little while depending on how warm your kitchen is. Once they pass the poke test, gently springing back and leaving a faint mark, cook them exactly as you would the same day batch, skillet first and then the oven finish.
This is also a great way to stagger a batch. Cook some fresh the day you mix and hold the rest in the fridge to bake the next morning.
How to Store
Keep these at room temperature in an airtight container for up to 3 days. For longer storage, freeze for up to 2 months. Toast straight from frozen, no thawing required, and you get a fresh muffin texture in the time it takes your toaster to run a cycle.

FAQ
How much protein is in these English muffins?
Each muffin has 12 grams of protein, calculated with Kirkland organic nonfat Greek yogurt and King Arthur organic bread flour. All of it comes from whole food sources, no protein powder. Gram for gram that is close to double the protein of a standard store bought English muffin.
Can I use active dry yeast instead of instant yeast?
Yes, with two small changes. Use about 25% more active dry yeast than instant, so roughly 7.5 grams (about 2 teaspoons) in place of the 6 grams of instant. And unlike instant yeast, active dry should be bloomed first. Stir it into the warm liquid with a pinch of the honey and let it sit until foamy, about 5 to 10 minutes, before adding it to the rest. Active dry also wants a gentler liquid temperature for blooming, around 100 to 110°F, rather than the hotter 120°F instant yeast can take when added dry. Always check the back of your specific yeast packet, since the recommended temperature varies by brand.
Can I make these without a stand mixer?
Yes. This dough comes together completely by hand. Mix it to a shaggy dough in the bowl, then turn it out and knead on the counter until it is smooth and supple. The one thing to know is that this yeasted dough wants a thorough knead to build its structure, so by hand you will put in a few honest minutes of work. A stand mixer with a dough hook just saves you the arm effort. Neither one changes the result, only the labor.
Can I use full fat Greek yogurt instead of nonfat?
You can. Full fat yogurt has a higher moisture and fat content, so the dough will run a touch wetter and softer. If it feels too slack to shape, add bread flour a tablespoon at a time until it firms up to a smooth, supple dough. The texture will be slightly more tender and the macros will shift, with more fat and a little less protein per muffin, since nonfat yogurt is the more protein dense option.
Can I make them bigger or smaller?
Absolutely. I like to portion this dough into 8 muffins at roughly 119 grams each, which is what gives you a substantial muffin and backs the 12 gram protein number. If you want a larger muffin, go for 6 at about 159 grams each. For smaller muffins, make 10 at about 95 grams each. Just remember that the smaller you portion, the lower the protein per muffin, so if the macro number matters to you, stay closer to the 8 muffin size.
Why is my dough so stiff?
Almost always the yogurt brand. Thick brands like Kirkland behave more like bagel dough. Add water a tablespoon at a time until it softens to smooth and pliable.
Do I need English muffin rings?
No. The weigh and ball method builds enough structure on its own to hold a good shape without rings.
Can I skip the oven finish?
I do not recommend it. The stovetop builds color, but the oven finish is what guarantees the inside is fully cooked through without burning the crust.
Why fork split instead of cutting with a knife?
Fork splitting follows the natural air pockets instead of slicing through them, which is what gives you those classic nooks and crannies instead of a flat cut surface.

Recipe

High Protein English Muffins (Yeast)
Equipment
- Large mixing bowl
- kitchen scale
- Digital thermometer
- Sheet pan
- Thin plastic bowl scraper
- Cast iron skillet
Ingredients
- 475 g bread flour 3 3/4 cups plus 2 tsp
- 285 g nonfat plain Greek yogurt 1 cup plus 2 tbsp
- 90 g water about 6 tbsp
- 6 g instant yeast 1 3/4 tsp
- 1 large egg
- 15 g honey 1 tbsp
- 20 g unsalted butter softened (1 1/2 tbsp)
- 8 g salt 1 1/3 tsp
- Cornmeal for dusting the pan
Instructions
The Dough
- Warm the Greek yogurt in the microwave for about 30 seconds, just enough to take the chill off. Stir well so it is room temperature or slightly warmer, not hot.
- In a large mixing bowl, combine the warmed yogurt, egg, and honey. Stir into a wet base.
- Add the bread flour and salt on top of the wet ingredients, then add the instant yeast on top of the flour. Pour the warm water, around 120 degrees F, over the yeast. Check the back of your yeast packet, since the recommended temperature varies by brand.
- Mix until a shaggy dough forms. Once it is roughly cohesive, knead in the softened butter a little at a time. Knead thoroughly until the dough is smooth, supple, and slightly tacky. If the dough feels stiff like bagel dough, add water 1 tablespoon at a time until it softens.
- Cover the dough and let it rise at room temperature until doubled, about 1 to 1.5 hours depending on the warmth of your kitchen.
- Divide the dough into 8 equal pieces, about 119 g each. If you want more muffins, make them smaller.
To Shape
My Preferred Method
- Using the weigh and ball method, shape each piece into a smooth round by cupping your hand over the dough against the counter and moving in a small circular motion to build a smooth top. Place each on a cornmeal dusted sheet pan.
Roll and Cut
- Dump the dough onto a flour work surface and roll out to approximately 3/4-1 inch thickness. Using a 3-3.5 round cutter, cut your muffins. Do not twist the cutter when cutting. Smoosh the dough back together and repeat until dough is used. If you have resistance. cover and et rest for 15-20 minutes to allow the gluten to relax. Place on a cornmeal covered baking sheet and cover.
- Let the shaped rounds rest 15 minutes, then gently press down on each to take the dome off.
Second Proof
Same Day
- Cover and let proof at room temperature until puffed and airy, about 45 minutes. Use the poke test. Press the side gently with a floured finger. The muffins are ready when the indent springs back slowly and leaves a faint mark. Use a thin plastic bowl scraper to transfer them without deflating to the hot pan.
Overnight
- Cover and place in the fridge overnight. Pull out and let come to room temperature until they’re showing proper signs of fermentation.
- Preheat the oven to 350 degrees F.
- Heat a dry cast iron skillet over medium low heat. Use a thin plastic bowl scraper to transfer them to the hot pan without deflating. Cook the muffins 5 to 7 minutes per side, until deep golden brown.
- Transfer the muffins to a sheet pan and finish baking 8 to 10 minutes, until they reach 200-205 degrees F internal temperature.
- Cool completely before fork splitting. Do not cut with a knife. Fork split only to preserve the open crumb.
Notes
Subscribe
Want more high protein recipes made with whole food ingredients and no protein powder delivered straight to your inbox? Subscribe below and never miss a new post. If you make these, leave a comment and a star rating, and tag me on social media so I can see your muffins.


Leave a Reply