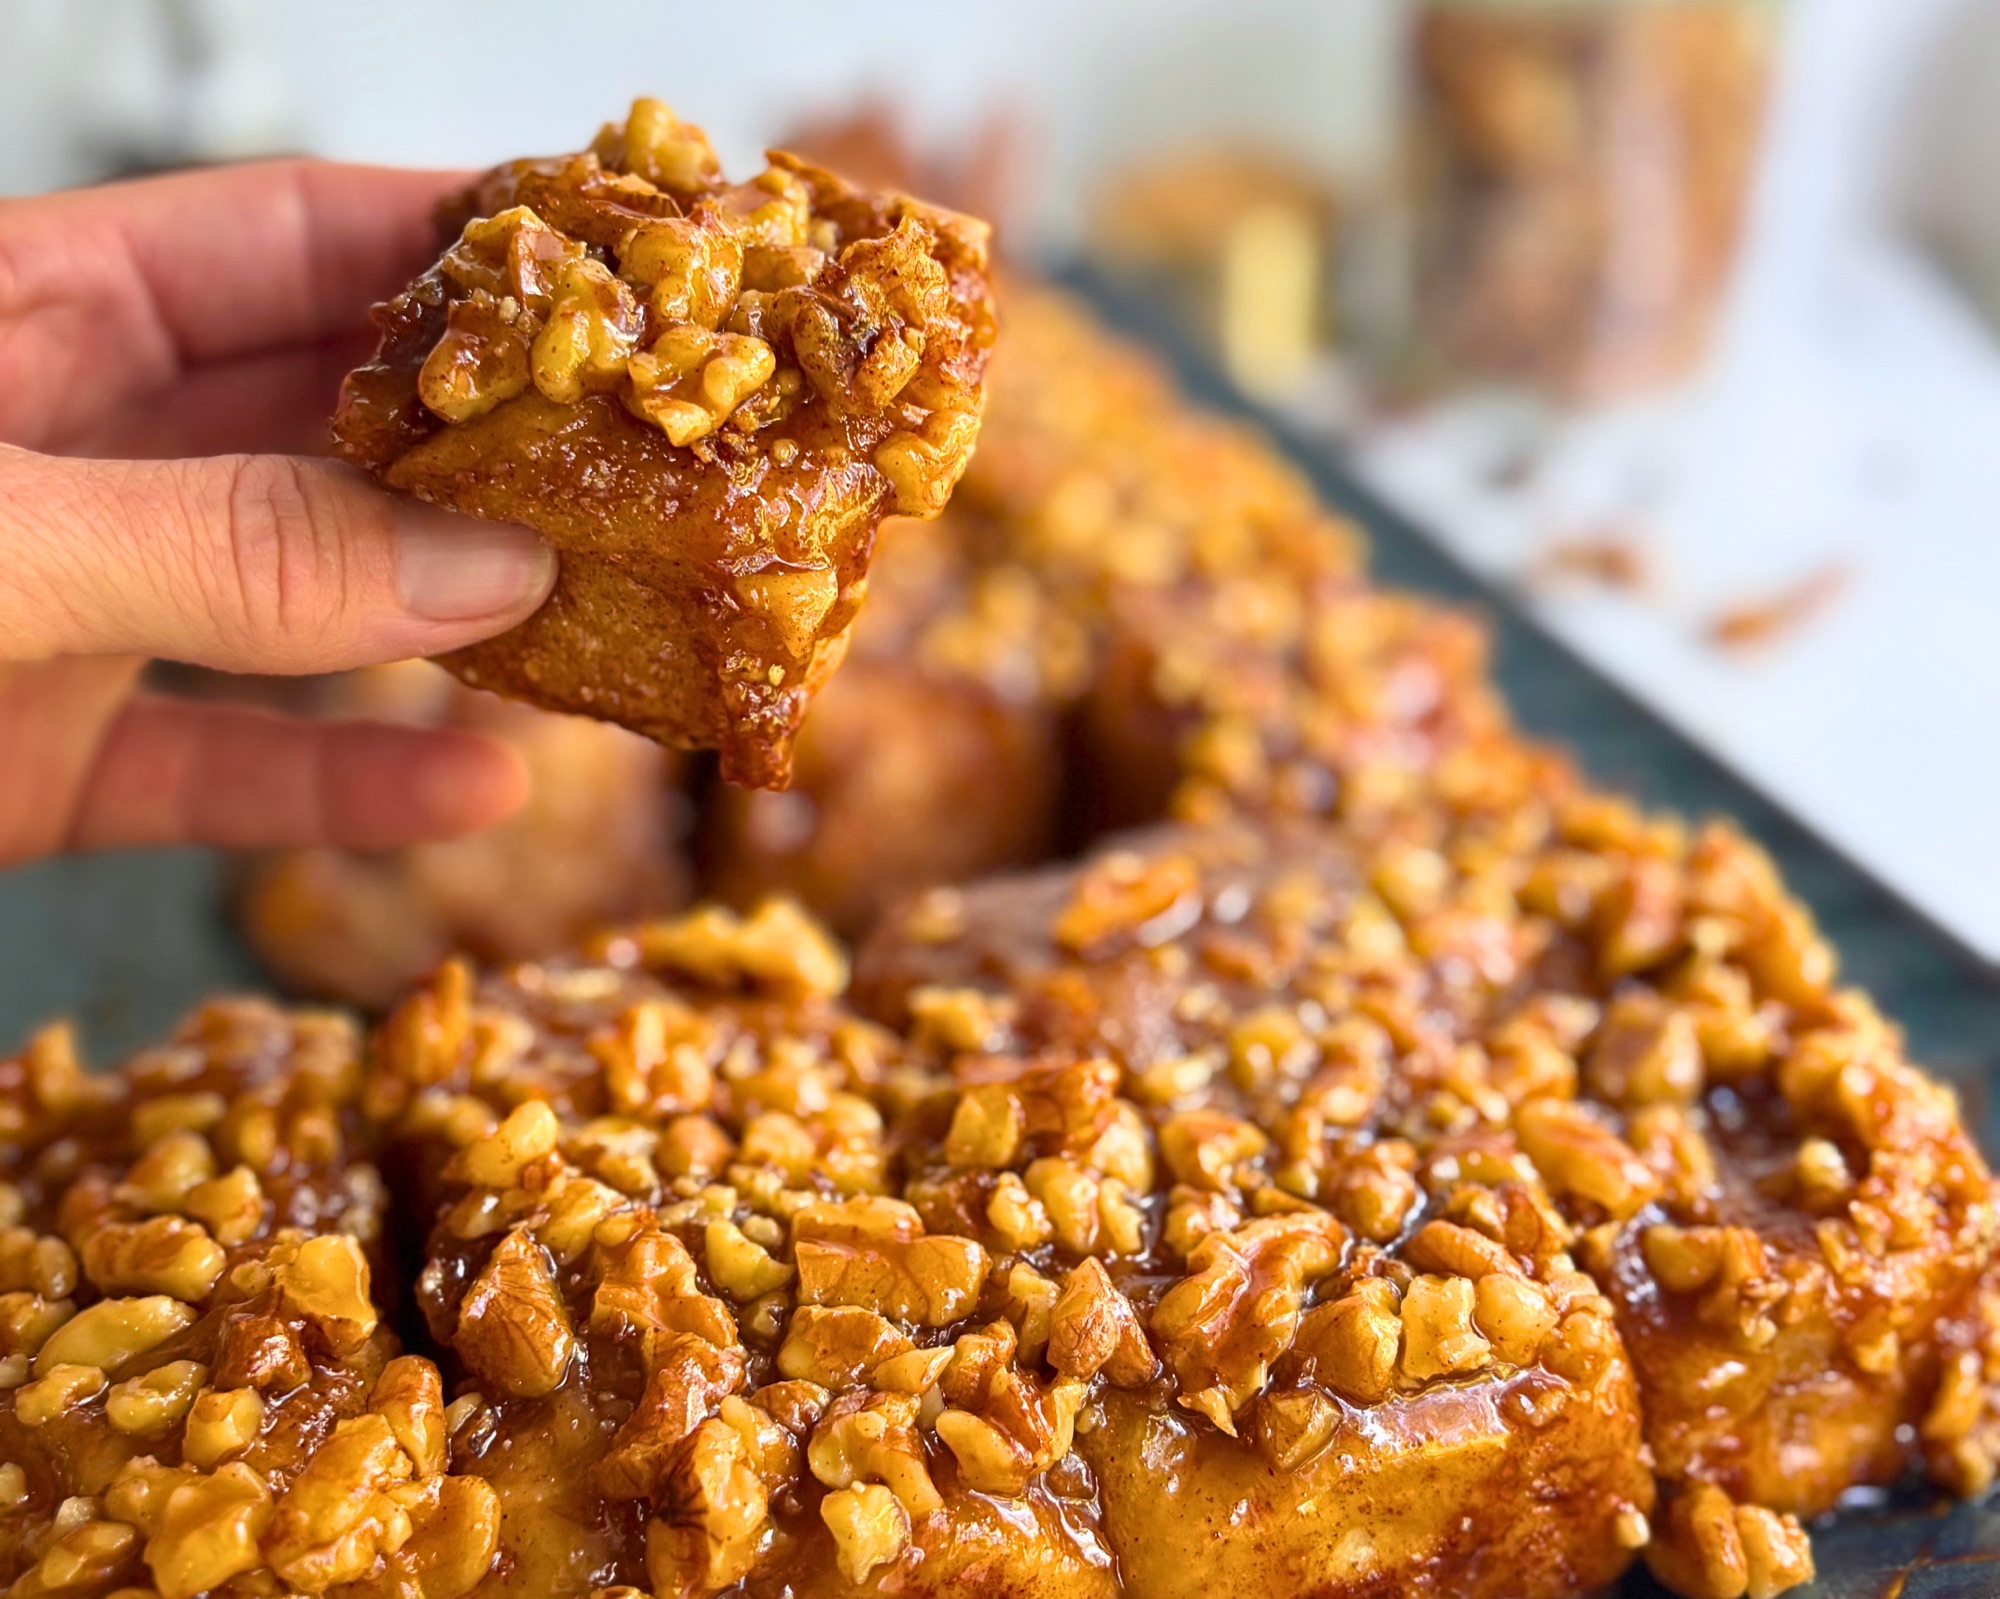
This sticky bun pull-apart focaccia is what happens when my Cinnamon Roll Pull-Apart Focaccia meets my caramel nut sticky buns, and it might be the most satisfying pan in the whole series. Soft vanilla focaccia balls get dunked in vanilla butter, rolled in a walnut cinnamon sugar, and nestled into a bed of brown sugar caramel and chopped walnuts, then the whole pan is baked and flipped so every single piece comes out glossy, gooey, and crowned with caramel coated walnuts.
I wanted a sticky bun I could set in the middle of the table and let everyone pull from without ever rolling out a sheet of dough, cutting spirals, or worrying about uneven rolls, and this is exactly that. You can make it with an active sourdough starter and let the overnight rise do the work, or use the same day yeast version and have it on the table that afternoon, and both recipes are written out in full with their own printable cards below.
Table of Contents
- Why You Will Love This Recipe
- About the Pull-Apart Focaccia Series
- A Sticky Bun, Pull-Apart Style
- Ingredient Breakdown
- Choosing Your Nuts
- Why Is My Dough So Sticky?
- How to Make Sticky Bun Pull-Apart Focaccia
- Watch the Dough, Not the Clock
- The Sourdough Recipe
- The Yeast Recipe
- Tips for Success
- Troubleshooting
- Storage and Make Ahead
- Shop This Recipe
- Frequently Asked Questions
- More Pull-Apart Focaccia Recipes
- More Recipes You Will Love
- Made This Recipe?
- Subscribe
Why You Will Love This Recipe
- Every piece gets the sticky bun treatment. Because each ball bakes sitting in the caramel, every piece comes out of the pan with its own walnut caramel crown instead of one gooey top layer that only a few lucky slices get.
- Walnut flavor all the way through. The walnuts show up twice, chopped in the caramel base and ground right into the cinnamon sugar, so even the parts of each piece that never touch the caramel taste like a real nut sticky bun.
- No rolling, no spirals, no slicing. The dough is portioned into balls, dipped, rolled, and set in the pan, which is the same easy method as the rest of the series and a lot more forgiving than traditional sticky buns.
- A dough that lets the caramel shine. The focaccia itself is lightly flavored with vanilla and no added sugar, so the soft bread balances all that caramel instead of piling sweet on sweet.
- Sourdough or yeast. Make it overnight with a starter, or make it the same day with instant or active dry yeast.
- Made for sharing. The flip is a showstopper at brunch, and the pull-apart format means nobody needs a knife or a plate to dig in.

About the Pull-Apart Focaccia Series
This recipe is part of my pull-apart focaccia series, which started with my Garlic Parmesan Pull-Apart Focaccia and took off with the Cinnamon Roll Pull-Apart Focaccia, whose reels have passed 50 million views across social media. Every recipe in the series is built on the same idea: take a simple, high hydration focaccia dough, divide it into balls, dip each one in something flavorful, roll it in a coating, and let the balls rise together in the pan so they bake into one loaf that pulls apart into individual pieces.
Once you learn the method, you can take it in almost any direction, sweet or savory, and turning it into a sticky bun by baking the balls on top of a caramel walnut base and flipping the pan felt like the most natural next step for fall and holiday baking.
A Sticky Bun, Pull-Apart Style
Sticky buns have deep roots here in Pennsylvania, where German bakers brought over their sweet rolls baked in a pan of butter and brown sugar, and they have been a bakery case staple ever since. What sets a sticky bun apart from a cinnamon roll is where the sweetness lives, because instead of a glaze poured over the top after baking, the dough bakes directly on top of a buttery caramel and nuts, and then the pan is turned upside down so that caramel becomes the topping.

This pull-apart version keeps that tradition and simply swaps the rolled spirals for my focaccia balls. The caramel base comes straight from my caramel nut sticky buns, which is a quick stovetop caramel of butter, brown sugar, heavy cream, and a pinch of salt that bakes into a soft, glossy goo rather than setting hard, so it clings to every walnut and every piece after the flip.
Ingredient Breakdown
Full measurements are in the recipe cards below, so here is what each ingredient brings to the pan.

Bread flour gives the dough the structure it needs to hold the air bubbles from the rise and still bake up soft, chewy, and pillowy.
Active sourdough starter or yeast is the only real difference between the two versions. Use a fed, bubbly starter at its peak for the overnight sourdough version, or instant or active dry yeast for the same day version.
Vanilla extract is the only flavoring in the dough. I leave the sugar out of the focaccia on purpose here, since the caramel and cinnamon sugar bring plenty of sweetness, and the vanilla gives the bread a warm, bakery flavor without tipping the whole pan into too sweet territory.
Butter, brown sugar, heavy cream, and salt make the caramel base. The cream is what keeps the caramel soft and gooey after baking instead of letting it harden, and the salt keeps it from tasting flat.
Walnuts show up twice, chopped or crushed for the caramel base and finely ground into the cinnamon sugar coating, and I break down other nuts that work below.
Vanilla butter is the dip that helps the coating stick to every ball, and whatever is left gets drizzled over the tops before the second rise.
Brown sugar, cornstarch, and cinnamon make up the coating. The cornstarch soaks up moisture and helps form a thin crust that caramelizes in the oven, which keeps the outside of each piece from going soggy while the inside stays soft.
Choosing Your Nuts
Walnuts are my first choice for this recipe, and their slight bitterness is exactly what balances all of that brown sugar caramel. That said, this is a very forgiving recipe when it comes to nuts, and you can use the same amount of any of these in both the caramel base and the coating.

- Walnuts are classic and easy to find, with a mild bitterness that keeps the caramel from tasting one note.
- Pecans are sweeter and more buttery and give you a more traditional southern style sticky bun.
- Hickory nuts are a favorite in my area, and if you can find them or have a tree nearby, they are a real treat here, with a sweet, buttery flavor a lot like pecans since the two are close relatives.
- Black walnuts have a much bolder, earthier flavor than regular walnuts, so if you are new to them, try mixing them half and half with regular walnuts the first time.
If you are grinding nuts for the coating, pulse them together with the brown sugar rather than on their own, since the sugar keeps oily nuts like walnuts and pecans loose and sandy instead of turning them into nut butter.
Why Is My Dough So Sticky?
This is a high hydration dough, which means there is a lot of water compared with the flour, and that extra water is exactly what gives focaccia its soft, open, airy crumb. It will feel sticky and loose, and if you are not used to working with wet dough it can seem strange at first, but sticky means you are on the right track.

The key is a light touch. Work with damp or lightly oiled hands, use quick and gentle movements, and when you do your stretch and folds, keep your hand on the top surface of the dough as you lift and fold instead of pushing all the way in. A light spray of oil on your counter and a bench scraper make portioning the balls much easier, and it is best to resist adding extra flour, which will firm up the crumb you are working so hard to keep soft.
How to Make Sticky Bun Pull-Apart Focaccia
This is the process at a glance, and the complete step by step instructions for both versions are in the recipe cards below.
Mix and Rise the Dough
For the sourdough version, the dough gets a short rest, a single set of stretch and folds, and an overnight rise at room temperature until it has doubled. For the yeast version, the dough gets three sets of stretch and folds spaced out over an hour and a half, followed by a much shorter rise, since those folds build the strength that the long sourdough rise develops on its own.
Make the Caramel Walnut Base
The caramel comes together in a saucepan in just a few minutes, and it goes straight into a parchment lined metal pan with the chopped walnuts scattered over the top. A metal pan matters here, because glass and ceramic heat too slowly for the caramel to bubble and set up the way it should.

Dip, Roll, and Arrange
Each ball of dough gets dipped in vanilla butter and rolled in the walnut cinnamon sugar, then nestled on top of the caramel with just enough space that the balls barely touch. As they rise, they grow together into one loaf, which is what lets the whole pan flip out in one piece.


Rise, Bake, and Flip
After the second rise, the pan bakes until the tops are deep golden and the caramel is bubbling at the edges. The flip is the one step that needs a little explanation, because timing really matters: the pan rests for exactly 5 minutes, which is long enough for the pieces to firm up so they hold together, but short enough that the caramel is still loose and runs down over every piece. Wait much longer and the caramel starts to set in the pan, and if that happens, a quick 30 seconds on a warm burner loosens it right back up. Set a platter or sheet pan over the top, flip it in one confident motion, lift the pan away, and spoon any caramel or walnuts left on the parchment back over the top.

Watch the Dough, Not the Clock
Every kitchen, every starter, and every packet of yeast behaves a little differently, so the times in the recipe cards are a guide rather than a schedule to follow to the minute. A warm kitchen can finish a rise in half the time listed, and a cool one can take much longer, which is why I always want you watching the dough instead of the clock.

After the bulk rise, the dough should have at least doubled, with a domed top, bubbles all through it, and a jiggly, airy feel when you shake the bowl. After the second rise, the balls should look puffy, have grown together into one loaf, and jiggle when you gently shake the pan, and a light press with a floured finger should spring back slowly rather than snapping back right away. An underproofed pan bakes up dense and tight, while an overproofed pan can collapse and bake up flat, so trusting these signs is the single best thing you can do for a soft, fluffy result.
The Sourdough Recipe
This is the original version, and the overnight room temperature rise gives the bread a deeper, more developed flavor and a beautifully soft structure while most of the work happens while you sleep. Use a fed, bubbly starter at its peak for the best rise, and if you need a starter, my guide to creating a sourdough starter walks you through it from start to finish.

Sticky Bun Pull-Apart Sourdough Focaccia
Equipment
- Large mixing bowl
- Digital Kitchen Scale
- Danish dough whisk or large spoon or hands
- Medium saucepan
- 9×13 inch metal baking pan
- Parchment paper
- Food processor or mini chopper
- Two shallow bowls (for dipping and coating)
- bench scraper
- Instant read thermometer
- Large serving platter or sheet pan (for flipping)
- Plastic wrap or a lid
Ingredients
FOR THE VANILLA SOURDOUGH FOCACCIA DOUGH:
- 500 g bread flour 4 cups plus 2 tablespoons, spooned and leveled
- 400 g water room temperature (1¾ cups)
- 75 g active sourdough starter fed and bubbly (⅓ cup)
- 8 g fine sea salt 1½ teaspoons
- 10 g vanilla extract for the dough (2 teaspoons)
FOR THE CARAMEL WALNUT BASE:
- 115 g unsalted butter for the caramel (½ cup)
- 213 g brown sugar packed, for the caramel (1 cup)
- 57 g heavy cream for the caramel (¼ cup)
- 1.5 g salt for the caramel (¼ teaspoon)
- 170 to 227 g walnuts chopped or crushed, for the pan (1½ to 2 cups)
FOR THE VANILLA BUTTER DIP:
- 85 g butter melted, for dipping (6 tablespoons)
- 5 g vanilla extract for the dipping butter (1 teaspoon)
FOR THE WALNUT CINNAMON SUGAR COATING:
- 107 g brown sugar packed, for the coating (½ cup)
- 38 g walnuts for the coating (⅓ cup chopped, measured before grinding)
- 5 g cornstarch for the coating (2 teaspoons)
- 9 to 10 g ground cinnamon for the coating (1 tablespoon plus ½ teaspoon to 1 tablespoon plus ¾ teaspoon)
Instructions
DAY 1: MAKE THE DOUGH
Mix the dough.
- In a large bowl, combine the 400 g water, 75 g active sourdough starter, and 10 g vanilla extract, and stir until combined. Add the 500 g bread flour and 8 g salt and mix until no dry flour remains. The dough will be sticky and shaggy, which is exactly right.
Rest the dough.
- Cover the bowl with a damp towel or plastic wrap and let it rest at room temperature for 1 hour.
Stretch and fold.
- With a wet hand, grab one side of the dough, stretch it up, and fold it over itself. Rotate the bowl a quarter turn and repeat, working all the way around the dough 4 to 6 times total. One set is all this dough needs.
Bulk ferment.
- Cover the bowl and let the dough rise at room temperature for 8 to 12 hours, until it has at least doubled and has a domed top, visible bubbles throughout, and a puffy, jiggly texture. Timing depends on your kitchen temperature and the strength of your starter, so watch the dough rather than the clock.
DAY 2: CARAMEL, SHAPE, RISE, AND BAKE
Make the caramel walnut base.
- Line a 9×13 inch metal pan with parchment paper. In a medium saucepan over medium heat, combine the 115 g butter, 213 g brown sugar, 57 g heavy cream, and 1.5 g salt. Stir constantly until the butter melts and the sugar dissolves, about 3 to 4 minutes. Let it bubble for 1 more minute, then remove from the heat. Pour the caramel into the lined pan, spread it evenly into the corners, and scatter the chopped or crushed walnuts over the top. Set aside.
Prepare the vanilla butter.
- Melt the 85 g butter and stir in the 5 g vanilla extract. Pour into a shallow bowl for dipping.
Prepare the walnut cinnamon sugar.
- Add the 38 g walnuts and the 107 g brown sugar to a food processor and pulse in short bursts until the walnuts look like coarse sand. Pulsing the walnuts together with the sugar keeps them loose instead of turning them into a paste. Stir in the cornstarch and cinnamon, then pour the mixture into a second shallow bowl. You can also use a rolling pin and gently roll, being sure to target larger chunks. It may not be as fine, but it will do in a pinch!
Portion, dip, and coat.
- Turn the dough out onto a surface lightly sprayed with oil. With oiled hands, pinch off a golf ball size piece of dough, dip it into the vanilla butter so all sides are coated, let the excess drip off, then roll it in the walnut cinnamon sugar until it is completely covered and set it into the pan on top of the caramel and walnuts. Work one ball at a time all the way through, dipping, rolling, and placing each one before you pinch off the next.
Arrange as you go.
- Nestle the balls right up against each other in rows as you fill the pan, about five or six rows of four across a 9×13 pan. They should be touching with very little space between them, and you will end up with roughly 24 to 30 balls depending on how large you make them.
Finish the top.
- Sprinkle any leftover walnut cinnamon sugar over the tops. Skip any leftover vanilla butter here, since the caramel base underneath is already rich and buttery enough.
Second rise.
- Cover and let rise at room temperature. Mine took 1 hour 45 minutes, until the balls are puffy, jiggly, and have grown together into one pull-apart loaf. Watch the dough rather than the clock, since a warm kitchen moves faster and a cool one slower.
Bake.
- Preheat the oven to 375°F (190°C) with a rack in the center position, and set a sheet pan on the rack below to catch any caramel that bubbles over. Gently dimple the tops with your fingers. Bake for 30 to 35 minutes, until deep golden brown and the caramel is bubbling at the edges. The internal temperature should read 190 to 200°F. Tent loosely with foil after 20 minutes if the tops are browning too quickly.
Rest and flip.
- Let the pan sit for 5 minutes. Place a serving platter or sheet pan over the top, and using oven mitts, hold both together and flip quickly and confidently. Lift off the pan, peel away the parchment, and spoon any caramel or walnuts left behind back over the top.
- Serve warm and pull apart.
Notes
The Yeast Recipe
No sourdough starter? You can make this exact sticky bun pull-apart focaccia with instant or active dry yeast and have it ready the same day. The caramel walnut base, the vanilla butter, the walnut cinnamon sugar, the bake, and the flip all stay exactly the same, and the only things that change are the dough and the timeline.
The yeast version is built on my Same Day Focaccia dough, so instead of one set of stretch and folds and an overnight rise, the dough gets three sets of stretch and folds spaced 30 minutes apart, followed by a much shorter rise. The full ingredient list, timing, and step by step method for both instant and active dry yeast are in the printable card below.
Sticky Bun Pull-Apart Focaccia (Yeast Version)
Equipment
- Large mixing bowl
- Digital Kitchen Scale
- Danish dough whisk or large spoon
- Medium saucepan
- 9×13 inch metal baking pan
- Parchment paper
- Food processor or mini chopper rolling pin for crushing walnuts
- Two shallow bowls (for dipping and coating)
- bench scraper
- Instant read thermometer
- Large serving platter or sheet pan (for flipping)
- Plastic wrap or a lid
Ingredients
FOR THE SAME DAY FOCACCIA DOUGH:
- 500 g bread flour 4 cups plus 2 tablespoons, spooned and leveled
- 375 g warm water 1½ cups plus 1 tablespoon plus 1 teaspoon, see notes for temperature
- 5 g instant yeast 1½ teaspoons OR 5 g active dry yeast (1½ teaspoons)
- 9 g fine sea salt 1½ teaspoons
- 10 g vanilla extract for the dough (2 teaspoons)
FOR THE CARAMEL WALNUT BASE:
- 115 g unsalted butter for the caramel (½ cup)
- 213 g brown sugar packed, for the caramel (1 cup)
- 57 g heavy cream for the caramel (¼ cup)
- 1.5 g salt for the caramel (¼ teaspoon)
- 170 to 227 g walnuts chopped or crushed, for the pan (1½ to 2 cups)
FOR THE VANILLA BUTTER DIP:
- 85 g butter melted, for dipping (6 tablespoons)
- 5 g vanilla extract for the dipping butter (1 teaspoon)
FOR THE WALNUT CINNAMON SUGAR COATING:
- 107 g brown sugar packed, for the coating (½ cup)
- 38 g walnuts for the coating (⅓ cup chopped, measured before grinding)
- 5 g cornstarch for the coating (2 teaspoons)
- 9 to 10 g ground cinnamon for the coating (1 tablespoon plus ½ teaspoon to 1 tablespoon plus ¾ teaspoon)
Instructions
Mix the dough.
- There are two ways to do this depending on your yeast. Follow only the method that matches your yeast, then continue with the rest of the recipe.
METHOD A: INSTANT YEAST (no blooming needed)
- Add the 500 g bread flour to a large bowl. Place the 9 g salt on one side of the bowl and the 5 g instant yeast on the other side so they do not sit on top of each other. Pour in the 375 g warm water and 10 g vanilla extract and mix until no dry flour remains. The dough will be very wet and sticky, which is exactly what you want, so do not add more flour. Check the back of your yeast packet for the recommended water temperature, since it varies by brand.
METHOD B: ACTIVE DRY YEAST (bloom the yeast first)
- Warm the 375 g water to 100 to 110°F, stir in the 5 g active dry yeast, and let it sit for about 10 minutes until foamy. If it does not foam, the yeast is dead and you need to start over with fresh yeast. Add the 500 g bread flour and 9 g salt to a large bowl, pour in the yeast mixture and 10 g vanilla extract, and mix until no dry flour remains.
Rest the dough.
- Cover the bowl and let the dough rest at room temperature for 30 minutes so the flour can fully hydrate before you start building structure.
Stretch and fold, first set.
- With a wet hand, grab one side of the dough, stretch it up as far as it will go without tearing, and fold it over the center. Rotate the bowl a quarter turn and repeat for four folds total, keeping your hand on the top surface of the dough rather than digging in. Cover the bowl and rest 30 minutes.
Stretch and fold, second set.
- Repeat the same four folds around the bowl. The dough will already feel smoother and more cohesive than it did the first time. Cover and rest 30 minutes.
Stretch and fold, third set.
- Repeat the four folds one final time. If the dough still feels slack and spreads out quickly, give it a fourth set after another 30 minutes.
Bulk rise.
- Cover and let the dough rise at room temperature until it has doubled in size and looks bubbly and jiggly, about 1 to 1½ hours after the final set. Watch the dough rather than the clock, because a warm kitchen moves much faster.
Make the caramel walnut base.
- While the dough rises, line a 9×13 inch metal pan with parchment paper. In a medium saucepan over medium heat, combine the 115 g butter, 213 g brown sugar, 57 g heavy cream, and 1.5 g salt. Stir constantly until the butter melts and the sugar dissolves, about 3 to 4 minutes. Let it bubble for 1 more minute, then remove from the heat. Pour the caramel into the lined pan, spread it evenly into the corners, and scatter the chopped or crushed walnuts over the top. Set aside.
Prepare the vanilla butter.
- Melt the 85 g butter and stir in the 5 g vanilla extract. Pour into a shallow bowl for dipping.
Prepare the walnut cinnamon sugar.
- Add the 38 g walnuts and the 107 g brown sugar to a food processor and pulse in short bursts until the walnuts look like coarse sand. Pulsing the walnuts together with the sugar keeps them loose instead of turning them into a paste. Stir in the cornstarch and cinnamon, then pour the mixture into a second shallow bowl.
Portion, dip, and coat.
- Turn the dough out onto a surface lightly sprayed with oil. With oiled hands, pinch off a golf ball size piece of dough, dip it into the vanilla butter so all sides are coated, let the excess drip off, then roll it in the walnut cinnamon sugar until it is completely covered and set it into the pan on top of the caramel and walnuts. Work one ball at a time all the way through, dipping, rolling, and placing each one before you pinch off the next.
Arrange as you go.
- Nestle the balls right up against each other in rows as you fill the pan, about five or six rows of four across a 9×13 pan. They should be touching with very little space between them, and you will end up with roughly 24 to 30 balls depending on how large you make them.
Finish the top. (Optional)
- Sprinkle any leftover walnut cinnamon sugar over the tops. Skip any leftover vanilla butter here, since the caramel base underneath is already rich and buttery enough.
Second rise.
- Cover and let rise at room temperature for 1 to 2 hours, until the balls are puffy, jiggly, and have grown together into one pull-apart loaf. Watch the dough rather than the clock, since a warm kitchen moves faster and a cool one slower.
Bake.
- Preheat the oven to 375°F (190°C) with a rack in the center position, and set a sheet pan on the rack below to catch any caramel that bubbles over. Gently dimple the tops with your fingers. Bake for 30 to 35 minutes, until deep golden brown and the caramel is bubbling at the edges. The internal temperature should read 190 to 200°F. Tent loosely with foil after 20 minutes if the tops are browning too quickly.
Rest and flip.
- Let the pan sit for exactly 5 minutes. Place a serving platter or sheet pan over the top, and using oven mitts, hold both together and flip quickly and confidently. Lift off the pan, peel away the parchment, and spoon any caramel or walnuts left behind back over the top.
- Serve warm and pull apart.
Notes
Tips for Success
- Use your starter at its peak. For the sourdough version, your starter should have roughly doubled since its last feeding and be full of bubbles when you mix the dough.
- Check your yeast packet. For the yeast version, the right water temperature depends on your brand, so read the packet and use a thermometer rather than guessing.
- Use a metal pan and parchment. Metal lets the caramel bubble and set up properly, and parchment makes the flip release cleanly.
- Pulse the coating nuts with the sugar. Grinding walnuts on their own can turn them into a paste, while pulsing them with the brown sugar keeps the coating loose and sandy.
- Space the balls so they barely touch. They need a little room to rise into one loaf, which is what keeps the pan together through the flip.
- Set a sheet pan underneath. The caramel can bubble up around the edges, and a sheet pan on the rack below saves you from cleaning the oven.
- Trust the thermometer over the color. The bottoms of the balls sit in caramel, so check that the center reaches the internal temperature in the card before you pull the pan.
- Flip after exactly 5 minutes. This is the sweet spot where the pieces hold together and the caramel is still loose enough to run over the top.
- Serve it warm. This is at its best the day it is made, while the caramel is soft and the pieces pull apart easily.

Troubleshooting
My focaccia is dense and heavy. This almost always comes down to underproofing during the bulk rise or the second rise, so give the dough the time it needs and look for the puffy, jiggly signs described above. An inactive starter, old yeast, or skipped stretch and folds can also leave the dough without enough strength to rise well.

The bottoms of the pieces are gummy. The center needs a few more minutes in the oven, since the dough sitting in the caramel bakes more slowly than the tops. Tent the pan with foil if the tops are browning and keep baking until the center reaches the temperature in the recipe card.
The caramel stuck in the pan. The pan sat too long before flipping and the caramel started to set. Warm the bottom of the pan on a burner for about 30 seconds to loosen it, then flip, and next time flip right at the 5 minute mark.
The caramel bubbled over. A little overflow is normal with a full pan of caramel and rising dough, which is why a sheet pan on the rack below is worth using every time.
The pieces fell apart when I flipped. Either the pan was flipped before the 5 minute rest, or the balls were spaced too far apart to grow together during the second rise.
The tops are browning too fast. Loosely tent the pan with foil and keep baking until the center is done.
Storage and Make Ahead
This sticky bun focaccia is at its best the day it is made, while the caramel is still soft and glossy.

Room temperature: Store leftovers covered for up to 2 days, and they are best within the first 24 hours.
Reheating: Warm individual pieces in the microwave for 15 to 20 seconds, or warm the whole pan in a low oven for 10 to 15 minutes until the caramel softens again.
Make ahead, sourdough version: Mix the dough in the morning and let it rise all day, then make the caramel base, shape, dip, and arrange the balls in the evening. Cover the pan well and refrigerate it overnight, then let it sit at room temperature until puffy and jiggly before baking and flipping in the morning.
Make ahead, yeast version: Make the caramel base, then shape, dip, coat, and arrange the balls, cover the pan well, and refrigerate it overnight. In the morning, let the pan sit at room temperature until puffy and jiggly, then bake and flip.
Shop This Recipe
These are the tools I reach for every time I make this recipe. Some of the links below are affiliate links, which means I earn a small commission at no extra cost to you, and it helps support the blog so I can keep sharing free recipes.
- 9×13 inch metal baking pan, which lets the caramel bubble and set up properly for a clean flip.
- Digital kitchen scale, which I use to weigh the flour, water, and caramel ingredients for consistent results every time.
- Danish dough whisk, which mixes this sticky, high hydration dough without it clinging to a spoon.
- Instant read thermometer, which I use to check that the center is fully baked before I flip the pan.
- Bench scraper, which makes portioning the sticky dough into even balls quick and clean.
- Parchment paper, which lines the pan so the caramel releases cleanly after the flip.

Frequently Asked Questions
Can I make this without nuts?
This recipe is written and tested with walnuts in both the caramel base and the coating, so I cannot promise the same results without them. If you want to try it, leave the nuts out of both and keep the rest of the recipe the same.
Can I use pecans instead of walnuts?
Yes. Pecans work the same way in both the caramel base and the coating, and hickory nuts and black walnuts are great options too, which I cover in the nut section above.
Why is there no sugar in the dough?
The caramel base and the cinnamon sugar coating already bring plenty of sweetness, so the dough is flavored only with vanilla. The lightly sweet bread balances the caramel and keeps the whole pan from tasting too sweet.
Does the yeast version taste different from the sourdough version?
It is slightly different. The sourdough version has a deeper, more developed flavor from its long overnight rise, while the yeast version is milder and softer in flavor. Both bake up fluffy and flip and pull apart the same way.
Why do I have to wait 5 minutes before flipping?
The pieces need a few minutes to firm up so they hold together when the pan is turned over, but if you wait too long the caramel starts to set in the pan. Five minutes is the sweet spot for a clean flip with the caramel still running over the top.
Can I assemble this the night before?
Yes. Make the caramel base, shape, dip, coat, and arrange the balls, cover the pan well, and refrigerate it overnight. In the morning, let the pan sit at room temperature until puffy and jiggly, then bake and flip.
How do I know when it is done baking?
The tops should be deep golden brown with the caramel bubbling at the edges, and an instant read thermometer in the center should read within the range listed in the recipe card.
Can I use a glass baking dish?
A metal pan works best, since glass and ceramic heat more slowly and the caramel will not bubble and set up the same way. If glass is all you have, expect a longer bake and watch the center temperature closely.
Can I use all purpose flour?
Yes. All purpose flour absorbs less water than bread flour, so reduce the water as noted in the recipe card and expect a slightly softer crumb.
My sourdough starter is not very active. Will this still work?
It will, but the bulk rise will take longer. For the best results, feed your starter and use it once it has doubled and is at its peak, and watch the dough rather than the clock.
More Pull-Apart Focaccia Recipes
If you love this one, there is a whole series waiting for you. On the sweet side, start with the Cinnamon Roll Pull-Apart Focaccia that started it all, then try the Caramel Apple Pie Pull-Apart Focaccia, the Jelly Donut Pull-Apart Focaccia, the bright Lemon Blueberry Pull-Apart Focaccia, the Carrot Cake Pull-Apart Focaccia with its cream cheese drizzle, the Strawberry Shortcake Pull-Apart Focaccia, the campfire inspired S’mores Pull-Apart Focaccia, and my Banana Bread Sourdough Focaccia.
On the savory side, the Garlic Parmesan Pull-Apart Focaccia is where the series began, and from there you can move on to the Pizza Pull-Apart Focaccia, Pigs in a Blanket Pull-Apart Focaccia, Buffalo Chicken Dip Pull-Apart Focaccia, Pulled Pork Pull-Apart Focaccia, Meatball Stuffed Pull-Apart Focaccia, and Chick-fil-A Pull-Apart Focaccia.
If you want to master the base dough on its own, my Sourdough Focaccia and Same Day Focaccia are both simple, no knead recipes that bake up golden with a light, open crumb.
More Recipes You Will Love
If you are craving more sticky, caramel filled bakes, my caramel nut sticky buns are the classic rolled version of this recipe, and the Caramel Apple Cinnamon Rolls bring caramel and apples together in a soft sourdough roll. My Easy Microwave Caramel Sauce is a quick way to add even more caramel to anything, and for fall toast all season, try The Easiest Apple Cinnamon Swirl Sourdough Bread or The Easiest Pumpkin Swirl Sourdough Bread.

Made This Recipe?
I would love to hear how your sticky bun pull-apart focaccia turned out! Leave a star rating and a comment below letting me know whether you made the sourdough or yeast version and which nuts you used, and tag me @h3artofthehome on Instagram so I can see your flip.
Subscribe
Never miss a recipe. Subscribe to the H3art of the Home newsletter for free and get new sourdough bakes, pull-apart focaccia flavors, and high protein recipes delivered straight to your inbox.





Leave a Reply