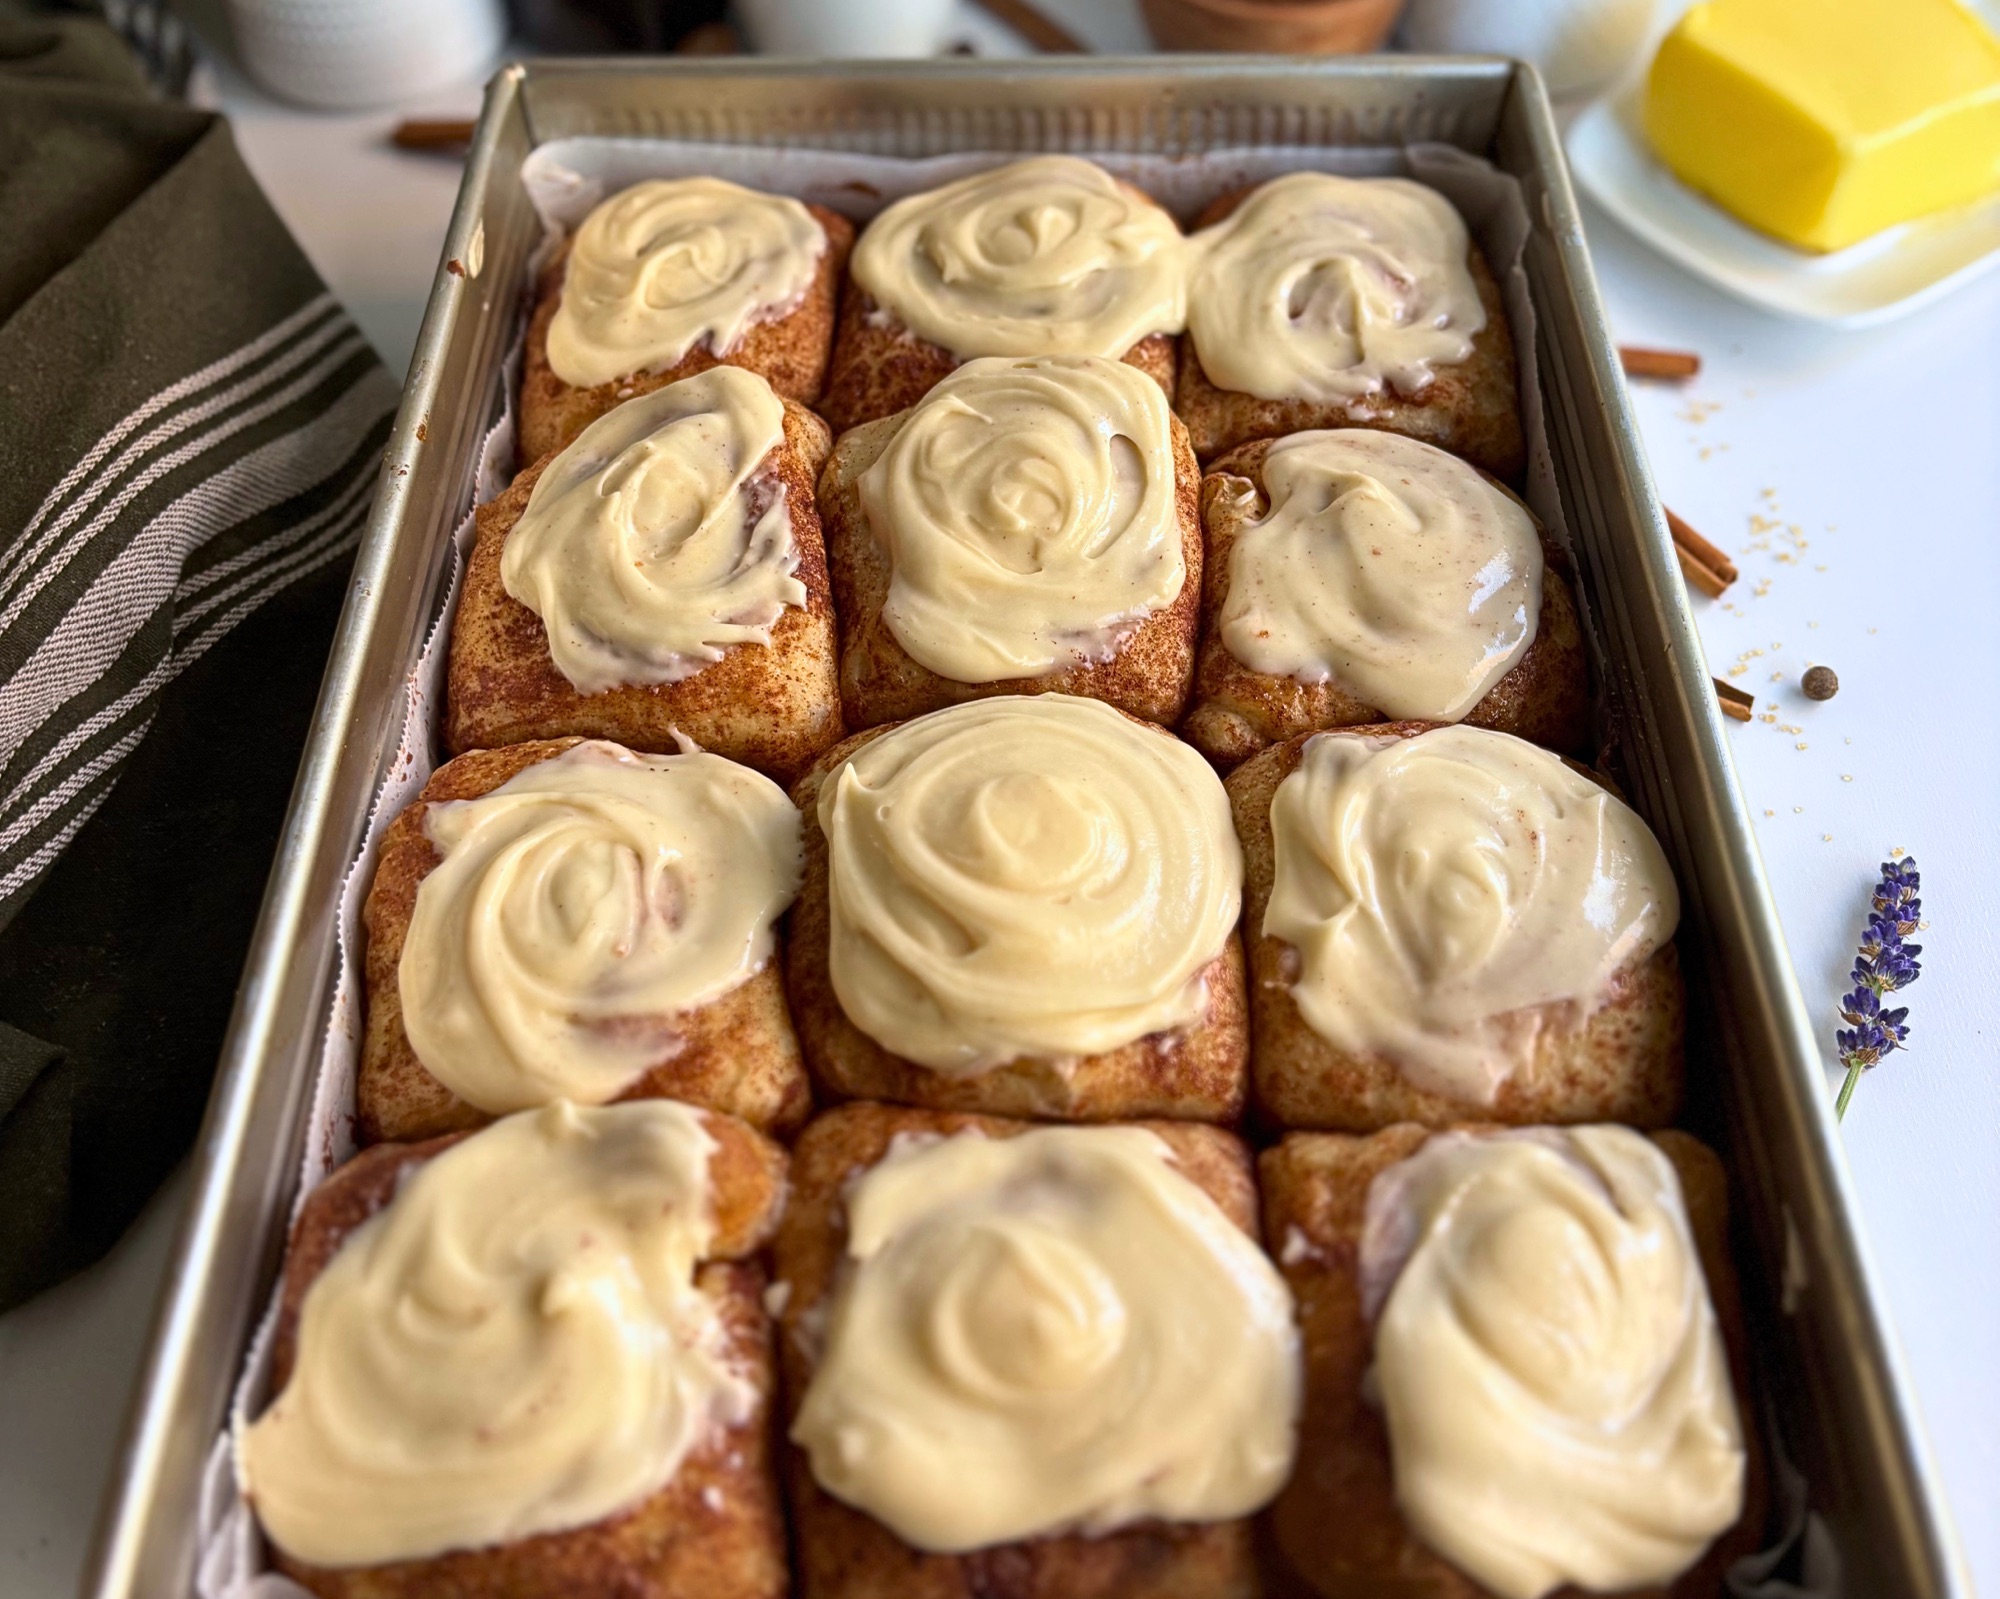
Last fall my Cinnamon Roll Pull-Apart Focaccia became the most visited recipe on this blog, with little golf ball size pieces of focaccia dough dipped in vanilla butter, rolled through cinnamon sugar, and baked shoulder to shoulder in one pan. This year I wanted to take that same dough somewhere new instead of simply making it again, so I divided it into twelve big pieces and worked out a shaping method that folds the cinnamon sugar inside each one. I call it the Cinnamon Tuck, and it gives you streaks of cinnamon sugar running through the middle of every roll without a rolling pin, without rolling up a log, and without slicing a single thing.
What comes out of the oven looks like a pan of bakery cinnamon rolls, soft and squared off where they baked into each other, with a caramelized bottom from the brown sugar and butter and a crumb that still has the airy, fermented texture of a good focaccia. You can make them with sourdough as an overnight bake or with commercial yeast as a same day bake, and both recipe cards are below, along with three icing options so you can decide exactly how sweet you want them.
Table of Contents
- What Are No Roll Focaccia Cinnamon Rolls?
- Why You Will Love Them
- How These Came Together
- The Ingredients and Why They Matter
- The Cinnamon Tuck: How to Shape Them
- How to Make Them
- Icing Options
- Sourdough Recipe
- Yeast Version
- Tips for the Best Rolls
- Make Ahead and Freezing
- FAQ
- Shop This Recipe
- More Pull-Apart Recipes
- Subscribe
What Are No Roll Focaccia Cinnamon Rolls?
These are cinnamon rolls made from focaccia dough instead of a traditional enriched cinnamon roll dough, shaped into twelve large pieces and baked together in a 9×13 pan so they pull apart into individual rolls. Each piece gets dipped in vanilla butter, rolled through a brown sugar cinnamon coating, and then folded around that coating with the Cinnamon Tuck, so the cinnamon sugar ends up both on the outside and swirled through the inside.

The dough is my focaccia dough with a little sugar, butter, vanilla, and cinnamon worked in, so it bakes up lighter and more open than a classic cinnamon roll while still being soft enough to tear apart with your hands. The sourdough version ferments overnight and bakes the next morning, and the yeast version goes from mixing bowl to oven in one day.
Back to Table of Contents | Jump to Recipe
Why You Will Love Them
If you love the cinnamon roll idea but not the rolling, chilling, and slicing that usually comes with it, these were made for you.

- No rolling pin, no log, no slicing. Every roll is shaped by hand right over the pan, one at a time.
- A real swirl inside. The Cinnamon Tuck folds the coating into the center, so the middle of each roll is not plain bread.
- Big, bakery size rolls. Twelve generous pieces instead of a pan of bite size ones, which makes them perfect for a holiday breakfast table.
- A gooey, caramelized bottom. The vanilla butter and brown sugar settle into the pan and bake into a sticky layer underneath.
- Sourdough or yeast. Both versions use the same shaping, coating, and bake, so you can pick whichever fits your schedule.
- Make ahead friendly. You can hold the shaped rolls in the refrigerator overnight, and the baked rolls freeze beautifully.
Back to Table of Contents | Jump to Recipe
How These Came Together
I started with the exact dough and coating from my original Cinnamon Roll Pull-Apart Focaccia, because the flavor was already right and I did not want to change what so many of you have made and loved. The only real question was size, since that recipe makes 24 to 30 smaller pieces and I wanted twelve big rolls that would look like a pan of cinnamon rolls when they came out of the oven.

My first concern with bigger pieces was the center, because when you only coat the outside of a larger ball of dough, you end up with a lot of plain bread in the middle. So instead of simply rolling each piece in the cinnamon sugar and setting it in the pan, I pushed the coating up into the dough with my thumbs, brought the sides up around it, and pinched everything together underneath into a taut ball. When I cut into the baked rolls, there were streaks of cinnamon sugar running right through the middle, which is exactly what I was hoping for.
A few other things I learned along the way:
- Water. I used 380 grams of water in this batch instead of the 400 grams in my original card, and the dough was easier to shape into bigger pieces. The card below uses 375 grams, which is what I recommend if you are newer to high hydration dough, and you can go up to 400 grams if you are comfortable handling a wetter dough.
- Coating. I kept the same amount of vanilla butter and cinnamon sugar as the original recipe, worried it might come up short, and because so much of it gets folded inside with the Cinnamon Tuck, it turned out to be exactly enough for all twelve.
- Proofing. My house was cold the day I made these, and the second proof took two and a half hours, so go by how the rolls look instead of the clock.
- Baking. I baked them at 400°F for 25 minutes, and they came out deep golden on top with a caramelized bottom.
- Icing. I topped the first pan with a thick vanilla icing scooped into a round on each roll, and while it looked beautiful, it was very sweet on top of the brown sugar coating, which is why I added the cream cheese frosting and Greek yogurt glaze options below.
Back to Table of Contents | Jump to Recipe
The Ingredients and Why They Matter
Everything here is simple pantry baking, but each part has a job, so here is what each one does. You will find exact amounts in the recipe cards.

- Bread flour. I use King Arthur Organic Bread Flour, and its higher protein gives this wet dough the strength to hold its shape as big rolls.
- Active sourdough starter or yeast. Starter gives you the overnight, long fermented version, and instant or active dry yeast gives you the same day version.
- Sugar, butter, vanilla, and cinnamon in the dough. Just enough to make the dough taste like a cinnamon roll without turning it into a heavy enriched dough, so it keeps its light focaccia texture.
- Vanilla butter. Melted butter with a little vanilla is what every piece gets dipped in, and it is what helps the coating stick and then bake into that gooey bottom.
- Brown sugar, cornstarch, and cinnamon coating. The brown sugar and cinnamon are the classic cinnamon roll flavor, and the cornstarch helps the butter and sugar thicken into a sticky layer instead of running thin.
- Icing. A simple vanilla icing is on the recipe cards, and two other options are in the Icing Options section.
If you do not have a sourdough starter yet, my Minimal Waste Sourdough Starter guide walks you through making one from scratch, or you can jump straight to the yeast version.
Back to Table of Contents | Jump to Recipe
The Cinnamon Tuck: How to Shape Them
The Cinnamon Tuck is what makes these no roll cinnamon rolls instead of big pieces of cinnamon sugar focaccia, and it takes a lot less effort than it sounds. You are simply folding the coating into the dough as you shape each piece, so the cinnamon sugar ends up on the inside as well as the outside.

4 or five quick folds and its ready for the pan
Work one piece at a time, right next to the pan, so you are never holding a pile of shaped balls waiting to go in:
- Pinch off a piece of dough. Each one should be about 84 grams for the sourdough version or about 79 grams for the yeast version, roughly one and a half times the size of the golf ball pieces in my original recipe. With only twelve rolls in the pan, a kitchen scale helps them bake evenly, but eyeballing works too.
- Dip it in the vanilla butter. Let the extra drip off for a second.
- Roll it in the cinnamon sugar. Coat it generously on all sides.
- Tuck. Hold the piece in both hands, then bring the sides up and pinch them together, then bring up the opposite edges and pinch. Squeeze the bottom together so it’s a sealed, flat bottom until you have a taut ball.
- Set it seam side down in the pan. Arrange the rolls in three rows of four, close together, since they will grow into each other as they proof and bake.

This is a high hydration focaccia dough, so it is soft, airy, and a little sticky, and it is not going to behave like a smooth, tight cinnamon roll dough. Pinch the seam closed as well as you can, but do not overthink it, because a seam that opens up a little in the oven will not ruin anything. One of my rolls baked with a small knob of dough poking up where the seam opened, and it tasted exactly like the rest.
When you pull a baked roll apart, you should see streaks of cinnamon sugar running down through the center like the ones in my rolls above, which is the Cinnamon Tuck doing its job.

How to Make Them
Here is how the bake comes together from start to finish, with the exact amounts, temperatures, and timing in the recipe cards below.

Mix and bulk ferment. The dough gets mixed, rested, given its stretch and folds, and then left to rise. The sourdough version bulk ferments overnight until it has at least doubled, and the yeast version rises in about an hour or so after its folds. A straight sided container with measurements on the side makes it easy to see when the dough has doubled.
Turn it out and shape. Turn the dough out onto a lightly floured counter, set out your vanilla butter and cinnamon sugar beside the lined pan, and shape each piece with the Cinnamon Tuck.

Second proof. Cover the pan and let the rolls rise until they are puffy and pressed up against each other with almost no space between them. This took me two and a half hours in a cold house, and it can take anywhere from one to three hours depending on how warm your kitchen and your dough are.

Dimple and bake. Gently press your fingertips into the tops of the proofed rolls, the same way you would dimple a focaccia, then bake until they are deep golden and the center roll reads 190°F to 200°F on an instant read thermometer, and if your oven runs hot, start checking at 20 minutes.

Cool and ice. Let the rolls cool for 20 to 30 minutes before icing, since a thick icing will melt and slide right off rolls that are still hot.

Icing Options
The recipe cards use a thick vanilla icing scooped into a round on each roll, which gives you that classic bakery cinnamon roll look. It is very sweet with the brown sugar coating, though, so if you like your cinnamon rolls a little less sugary, either of the two options below will balance them out.

Thick Vanilla Icing (on the recipe cards)
Powdered sugar, a small splash of milk, vanilla, and a pinch of salt, stirred until it holds a soft peak but still spreads slowly. I used a cookie scoop to drop one round onto the center of each roll and let it settle into its own swirl.

Buttercream Cheese Frosting (half batch)
This is a half batch of the buttercream cheese frosting from my original pull-apart recipe, sized for twelve rolls.
57 grams unsalted butter, softened (¼ cup)
57 grams cold full fat cream cheese (2 ounces)
212 grams powdered sugar, sifted (1¾ cups)
7 grams buttermilk powder, optional (1½ teaspoons)
1 gram ground cinnamon, sifted (scant ½ teaspoon)
2.5 grams vanilla extract or paste (½ teaspoon)
1.5 grams fine sea salt (¼ teaspoon)
Cream the softened butter on medium high speed for about 2 minutes, until pale and fluffy. Add the cold cream cheese and beat just until combined, since overmixing will make the frosting too soft, then mix in the vanilla and salt. Sift the powdered sugar, cinnamon, and buttermilk powder (if you are using it) together, and add them gradually on low speed until the frosting is fully combined and smooth. Taste it and add a little more cinnamon or salt if you like, then spread or scoop it over the rolls once they have cooled for 20 to 30 minutes.
Greek Yogurt Cream Cheese Glaze
This is the glaze from my High Protein Sourdough Cinnamon Rolls, where nonfat Greek yogurt takes the place of the butter, so it tastes a little lighter and less sweet while still being rich and creamy.
113 grams full fat cream cheese, room temperature (4 ounces)
60 grams nonfat plain Greek yogurt or skyr, room temperature (¼ cup)
120 grams powdered sugar, sifted (1 cup)
5 grams vanilla extract (1 teaspoon)
1 gram fine sea salt (small pinch)
15 to 30 grams heavy cream, to consistency (1 to 2 tablespoons)
Beat the cream cheese and Greek yogurt together until completely smooth, about 2 minutes. Add the powdered sugar, vanilla, and salt and beat until glossy. For scooped rounds on each roll, add only enough cream to make it spreadable, and for a drizzle, add the full amount until it runs slowly off a spoon.

Back to Table of Contents | Jump to Recipe
Sourdough Recipe

No Roll Focaccia Cinnamon Rolls (Sourdough)
Equipment
- 9×13 inch metal baking pan
- Parchment paper
- Large bowl or dough container
- 2 small bowls for dipping
- kitchen scale
- Instant read thermometer
- Cookie scoop
Ingredients
Dough
- 500 g bread flour 4 cups plus 2 tablespoons, spooned and leveled
- 375 g room temperature water 1½ cups plus 1 tablespoon plus 1 teaspoon
- 75 g active fed sourdough starter (⅓ cup)
- 8 g fine sea salt 1⅓ teaspoons
- 30 g granulated sugar for the dough 2 tablespoons plus 1 teaspoon
- 10 g vanilla extract for the dough 2 teaspoons
- 14 g unsalted butter melted, for the dough (1 tablespoon)
- 1 g ground cinnamon for the dough ½ teaspoon
Vanilla Butter Dip
- 85 g unsalted butter melted, for dipping (6 tablespoons)
- 5 g vanilla extract for the dip 1 teaspoon
Cinnamon Sugar Coating
- 150 g packed brown sugar for the coating ¾ cup
- 7 g cornstarch for the coating 1 tablespoon
- 12 to 15 g ground cinnamon for the coating 1½ to 2 tablespoons
Thick Vanilla Icing
- 120 g powdered sugar for the icing 1 cup
- 15 to 20 g milk for the icing 1 tablespoon to 1 tablespoon plus 1 teaspoon
- 2.5 g vanilla extract for the icing ½ teaspoon
- Pinch of fine sea salt for the icing
Instructions
Day 1
- Mix the dough: In a large bowl or dough container, combine the bread flour, water, sourdough starter, salt, sugar, vanilla, melted butter, and cinnamon. Mix until no dry flour remains, then cover and rest for 1 hour at room temperature.
- Stretch and fold: With wet hands, pull an edge of the dough up and fold it into the middle, working around the bowl until the dough comes together and feels taut. Flip it seam side down, cover, and do just this one round.
- Bulk ferment: Leave the covered dough at room temperature for 8 to 12 hours, until it has at least doubled and looks puffy with bubbles on the sides.
Day 2
- Prepare the pan: Line a 9×13 inch metal pan with parchment.
- Set up the dip and coating: Stir the melted dipping butter and vanilla together in one small bowl. Mix the brown sugar, cornstarch, and cinnamon together in a second small bowl.
- Turn out the dough: Turn the dough out onto a lightly floured counter.
- Shape with the Cinnamon Tuck: Pinch off a piece of dough about 84 g. Dip it in the vanilla butter, then roll it generously in the cinnamon sugar. Push your thumbs into the bottom of the piece so the cinnamon sugar is pressed up inside, bring the sides up, and pinch them together underneath into a taut ball. Then do the same with the opposite edges, and close the bottom seam. Redip the top of the roll into the cinnamon sugar. Set it seam side down in the pan, then shape the next piece. Arrange the 12 rolls in three rows of four, close together.
- Use the leftover coating: Drizzle any remaining butter between the gaps of the rolls. Sprinkle any cinnamon sugar left in the bowl over the tops and into the gaps between the rolls.
- Second proof: Cover the pan and let the rolls rise at room temperature for 1 to 3 hours, until they are puffy, soft, and pressed up against each other.
- Preheat: About 20 minutes before the rolls are ready, preheat the oven to 400°F (200°C) with a rack in the center.
- Dimple: Gently press your fingertips into the top of each roll.
- Bake: Bake for 25 to 30 minutes, until deep golden and the center roll reads 190°F to 200°F on an instant read thermometer. If your oven runs hot, start checking at 20 minutes, and tent loosely with foil if the tops brown too quickly.
- Cool: Let the rolls cool in the pan for 20 to 30 minutes.
- Make the icing: Stir the powdered sugar, vanilla, salt, and 15 g of milk together, adding the rest of the milk only if needed, until the icing holds a soft peak but still spreads slowly.
- Ice: Scoop a round of icing onto the center of each roll and let it settle. Pull apart and serve warm.
Notes
Yeast Version
If you do not bake with sourdough or you want these on the table the same day, the yeast version uses my Same Day Focaccia dough with the same sugar, butter, vanilla, and cinnamon added, along with the exact same Cinnamon Tuck shaping, coating, bake, and icing.

The difference is all in the timing. The yeast dough gets a short rest, three sets of stretch and folds thirty minutes apart, and about an hour to an hour and a half of bulk rise, so you can mix it in the morning and have warm rolls by the afternoon. Because there is no starter in the dough, the batch is a little lighter and each piece comes out to about 79 grams instead of 84.

No Roll Focaccia Cinnamon Rolls (Yeast)
Equipment
- 9×13 inch metal baking pan
- Parchment paper
- Large bowl or dough container
- 2 small bowls for dipping
- kitchen scale
- Instant read thermometer
- Cookie scoop
Ingredients
Dough
- 500 g bread flour 4 cups plus 2 tablespoons, spooned and leveled
- 375 g warm water 1½ cups plus 1 tablespoon plus 1 teaspoon
- 5 g instant yeast or active dry yeast 1½ teaspoons
- 9 g fine sea salt 1½ teaspoons
- 30 g granulated sugar for the dough 2 tablespoons plus 1 teaspoon
- 10 g vanilla extract for the dough 2 teaspoons
- 14 g unsalted butter melted, for the dough (1 tablespoon)
- 1 to 2 g ground cinnamon for the dough ½ to ¾ teaspoon
Vanilla Butter Dip
- 85 g unsalted butter melted, for dipping (6 tablespoons)
- 5 g vanilla extract for the dip 1 teaspoon
Cinnamon Sugar Coating
- 150 g packed brown sugar for the coating ¾ cup
- 7 g cornstarch for the coating 1 tablespoon
- 12 to 15 g ground cinnamon for the coating 1½ to 2 tablespoons
Thick Vanilla Icing
- 120 g powdered sugar for the icing 1 cup
- 15 to 20 g milk for the icing 1 tablespoon to 1 tablespoon plus 1 teaspoon
- 2.5 g vanilla extract for the icing ½ teaspoon
- Pinch of fine sea salt for the icing
Instructions
- Warm the water: Warm the 375 g of water before you start. For instant yeast, use the temperature on your yeast packet, since brands vary from about 100°F to 120°F. For active dry yeast, warm it to 100°F to 110°F, which should feel warm but not hot on the inside of your wrist
- If using instant yeast: In a large bowl or dough container, whisk together the bread flour, instant yeast, salt, and sugar. Instant yeast does not need to be bloomed, so it goes straight into the dry ingredients. Add the warm water, vanilla, melted butter, and cinnamon and mix until no dry flour remains.
- If using active dry yeast: Pour the warm water into a large bowl or dough container, stir in the active dry yeast and a pinch of the sugar, and let it sit for about 10 minutes, until the top is foamy. If it does not foam at all, your yeast may be expired, so start again with fresh yeast. Once it is foamy, add the bread flour, salt, remaining sugar, vanilla, melted butter, and cinnamon and mix until no dry flour remains.
- Rest: Cover and rest for 30 minutes.
- Stretch and fold: With wet hands, pull an edge of the dough up and fold it into the middle four times, working around the bowl. Cover and rest 30 minutes. Repeat for three sets total, resting 30 minutes after each. If the dough still feels slack after the third set, give it a fourth.
- Bulk rise: Leave the covered dough at room temperature for 1 to 1½ hours after the final set, until doubled.
- Prepare the pan: Line a 9×13 inch metal pan with parchment.
- Set up the dip and coating: Stir the melted dipping butter and vanilla together in one small bowl. Mix the brown sugar, cornstarch, and cinnamon together in a second small bowl.
- Turn out the dough: Turn the dough out onto a lightly floured counter.
- Shape with the Cinnamon Tuck: Pinch off a piece of dough about 79 g. Dip it in the vanilla butter, then roll it generously in the cinnamon sugar. Push your thumbs into the bottom of the piece so the cinnamon sugar is pressed up inside, bring the sides up and seal, then do the same for the opposite edges. Pinch them together underneath into a taut ball. Set it seam side down in the pan, then shape the next piece. Arrange the 12 rolls in three rows of four, close together.
- Use the leftover coating: Drizzle any butter between the gaps by the cinnamon rolls. Sprinkle any cinnamon sugar left in the bowl over the tops and into the gaps between the rolls.
- Second proof: Cover the pan and let the rolls rise at room temperature for 1 to 2 hours, until they are puffy, soft, and pressed up against each other. Allow longer in a cool kitchen.
- Preheat: About 20 minutes before the rolls are ready, preheat the oven to 400°F (200°C) with a rack in the center.
- Dimple: Gently press your fingertips into the top of each roll.
- Bake: Bake for 25 to 30 minutes, until deep golden and the center roll reads 190°F to 200°F on an instant read thermometer. If your oven runs hot, start checking at 20 minutes, and tent loosely with foil if the tops brown too quickly.
- Cool: Let the rolls cool in the pan for 20 to 30 minutes.
- Make the icing: Stir the powdered sugar, vanilla, salt, and 15 g of milk together, adding the rest of the milk only if needed, until the icing holds a soft peak but still spreads slowly.
- Ice: Scoop a round of icing onto the center of each roll and let it settle. Pull apart and serve warm.
Notes
Back to Table of Contents | Jump to Recipe
Tips for the Best Rolls
Most of what makes these work comes down to proofing them fully and being relaxed about the shaping, so here is what I would tell you if you were baking these in my kitchen.

- Start with 375 grams of water. It makes the dough easier to handle in bigger pieces, and you can work up to 400 grams once you are comfortable with a wetter dough.
- Line the pan with parchment. The brown sugar and butter turn into caramel on the bottom of the pan, and parchment makes lifting the rolls out and cleaning up much easier.
- Shape one piece at a time. Pinch, dip, roll, tuck, and place each piece before you start the next one, so none of them sit around getting sticky.
- Do not worry about a perfect seam. Pinch it closed as best you can and set it seam side down, and let the oven take care of the rest.
- Proof by look, not by the clock. The rolls are ready when they are puffy, soft, and pressed up against each other, which can take one to three hours.
- Check the center roll. The middle roll is the last to bake through, so take its temperature to make sure it reads 190°F to 200°F.
- Ice them warm, not hot. Give them 20 to 30 minutes out of the oven so a thick icing holds its shape.
Back to Table of Contents | Jump to Recipe
Make Ahead and Freezing
These are an ideal holiday morning bake, because you can do all of the shaping the day before and bake them fresh in the morning.

Overnight in the refrigerator. Let the dough rise during the day, then shape the rolls with the dip, roll, and Cinnamon Tuck, arrange them in the pan, cover the pan well, and put it in the refrigerator overnight. In the morning, take the pan out and let the rolls keep proofing at room temperature until they are noticeably larger, puffy, and soft, then bake as written.
Freezing baked rolls. These freeze exceptionally well after baking, so freeze them before you ice them. When you are ready to serve, let them come to room temperature and ice them, or let them come to room temperature, warm them in the oven, and then ice them.
Back to Table of Contents | Jump to Recipe
FAQ
Here are the questions I get most about this recipe and my other pull-apart focaccias.
Can I make these the night before?
Yes. Let the dough rise during the day, shape the rolls with the dip, roll, and Cinnamon Tuck, cover the pan well, and refrigerate it overnight. In the morning, let the rolls finish proofing at room temperature until they are definitely larger, fluffy, and soft, then bake as written.
Can I freeze focaccia cinnamon rolls?
Yes, and they freeze exceptionally well after baking. Freeze them before icing, then let them come to room temperature and ice them, or bring them to room temperature, warm them in the oven, and ice them.
Why are they called no roll cinnamon rolls?
Because you never roll out the dough, spread a filling, roll it into a log, or slice it. The Cinnamon Tuck folds the cinnamon sugar into each piece by hand as you shape it, so you still get cinnamon through the middle of every roll.
How are these different from regular cinnamon rolls?
Regular cinnamon rolls use a rich dough with eggs and plenty of butter and milk, and they are rolled around a filling and sliced. These use a lightly sweetened focaccia dough, so they are lighter and more open inside, and the cinnamon sugar is folded in by hand instead of rolled in a spiral.
How are these different from your original Cinnamon Roll Pull-Apart Focaccia?
The dough and coating are the same, but the original uses sixteen to twenty smaller pieces that are simply rolled in the coating, while these use twelve big pieces shaped with the Cinnamon Tuck so the cinnamon sugar ends up inside each roll. They bake up looking like a pan of individual cinnamon rolls instead of monkey bread style pieces.
Why is my dough so sticky?
This is a high hydration focaccia dough, so it is meant to be soft and a little sticky. Starting with 375 grams of water makes it easier to handle, and a light dusting of flour on the counter is all you need when you turn it out.
Can I use 400 grams of water?
Yes, if you are comfortable with a wetter dough. It will be softer and stickier to shape, but the rolls will bake the same way.
Can I use all purpose flour?
Yes. All purpose flour absorbs less water than bread flour, so reduce the water to 350 grams, and the rolls will be a little softer and slightly less tall.
Can I make the icing less sweet?
Yes. The Greek yogurt cream cheese glaze is the least sweet of the three options, and the cream cheese frosting is a good middle ground. You can also use less of the thick vanilla icing and do a thin swipe on each roll instead of a full round.
Do I have to weigh the dough pieces?
You do not have to, but with only twelve big rolls in the pan, pieces that are close to the same size will bake more evenly. Each piece should be about 84 grams for the sourdough version or about 79 grams for the yeast version.
What if one of my seams opens up during baking?
Nothing bad happens. You may get a small knob of dough poking up on top, but the roll will taste exactly the same.
Shop This Recipe
These are the tools I used for this pan of rolls. I earn a small commission from these affiliate links at no extra cost to you, which helps support this blog.
- USA Pan 9×13 baking pan: My favorite pans are made in the USA, release beautifully, and are great quality, and the straight sides give these rolls their squared off edges and a deeply caramelized bottom.
- Parchment paper: I line the pan so the caramel on the bottom lifts out cleanly.
- 6 quart round dough container: The measurements on the side make it easy to see when the dough has doubled.
- Kitchen scale: Helpful for weighing the dough and dividing it into twelve even pieces.
- Bench scraper: For turning the sticky dough out of the container and onto the counter.
- Cookie scoop: I used one to drop an even round of icing onto each roll.
- Instant read thermometer: The easiest way to know the center roll is baked through.
More Pull-Apart Recipes
If you love these, the rest of my pull-apart focaccia series uses the same dough and the same dip and roll method with a different flavor in every pan.
- Cinnamon Roll Pull-Apart Focaccia (Sourdough or Yeast)
- Sticky Bun Pull-Apart Focaccia (Sourdough or Yeast)
- Pumpkin Spice Pull-Apart Focaccia with Brown Butter Maple Glaze
- Caramel Apple Pie Pull-Apart Focaccia (Sourdough or Yeast)
- Chick-fil-A Pull-Apart Focaccia (Sourdough or Yeast)
- Sourdough Focaccia
- Same Day Focaccia
Subscribe
If you want new recipes like this one delivered straight to your inbox, subscribe to H3art of the Home. It is completely free, and you will be the first to know when a new pull-apart, sourdough bake, or high protein recipe goes live.

Leave a Reply