
I started making my own hoagie rolls because I got tired of buying a package of six at the store, reading the label, and finding out that a roll built to hold half a pound of sausage and peppers was only going to give me about nine grams of protein and a crumb that turned to paste the second anything wet touched it. That is a lot of bread for very little return, and it is the part of a sandwich that nobody thinks about until it fails in their hands.
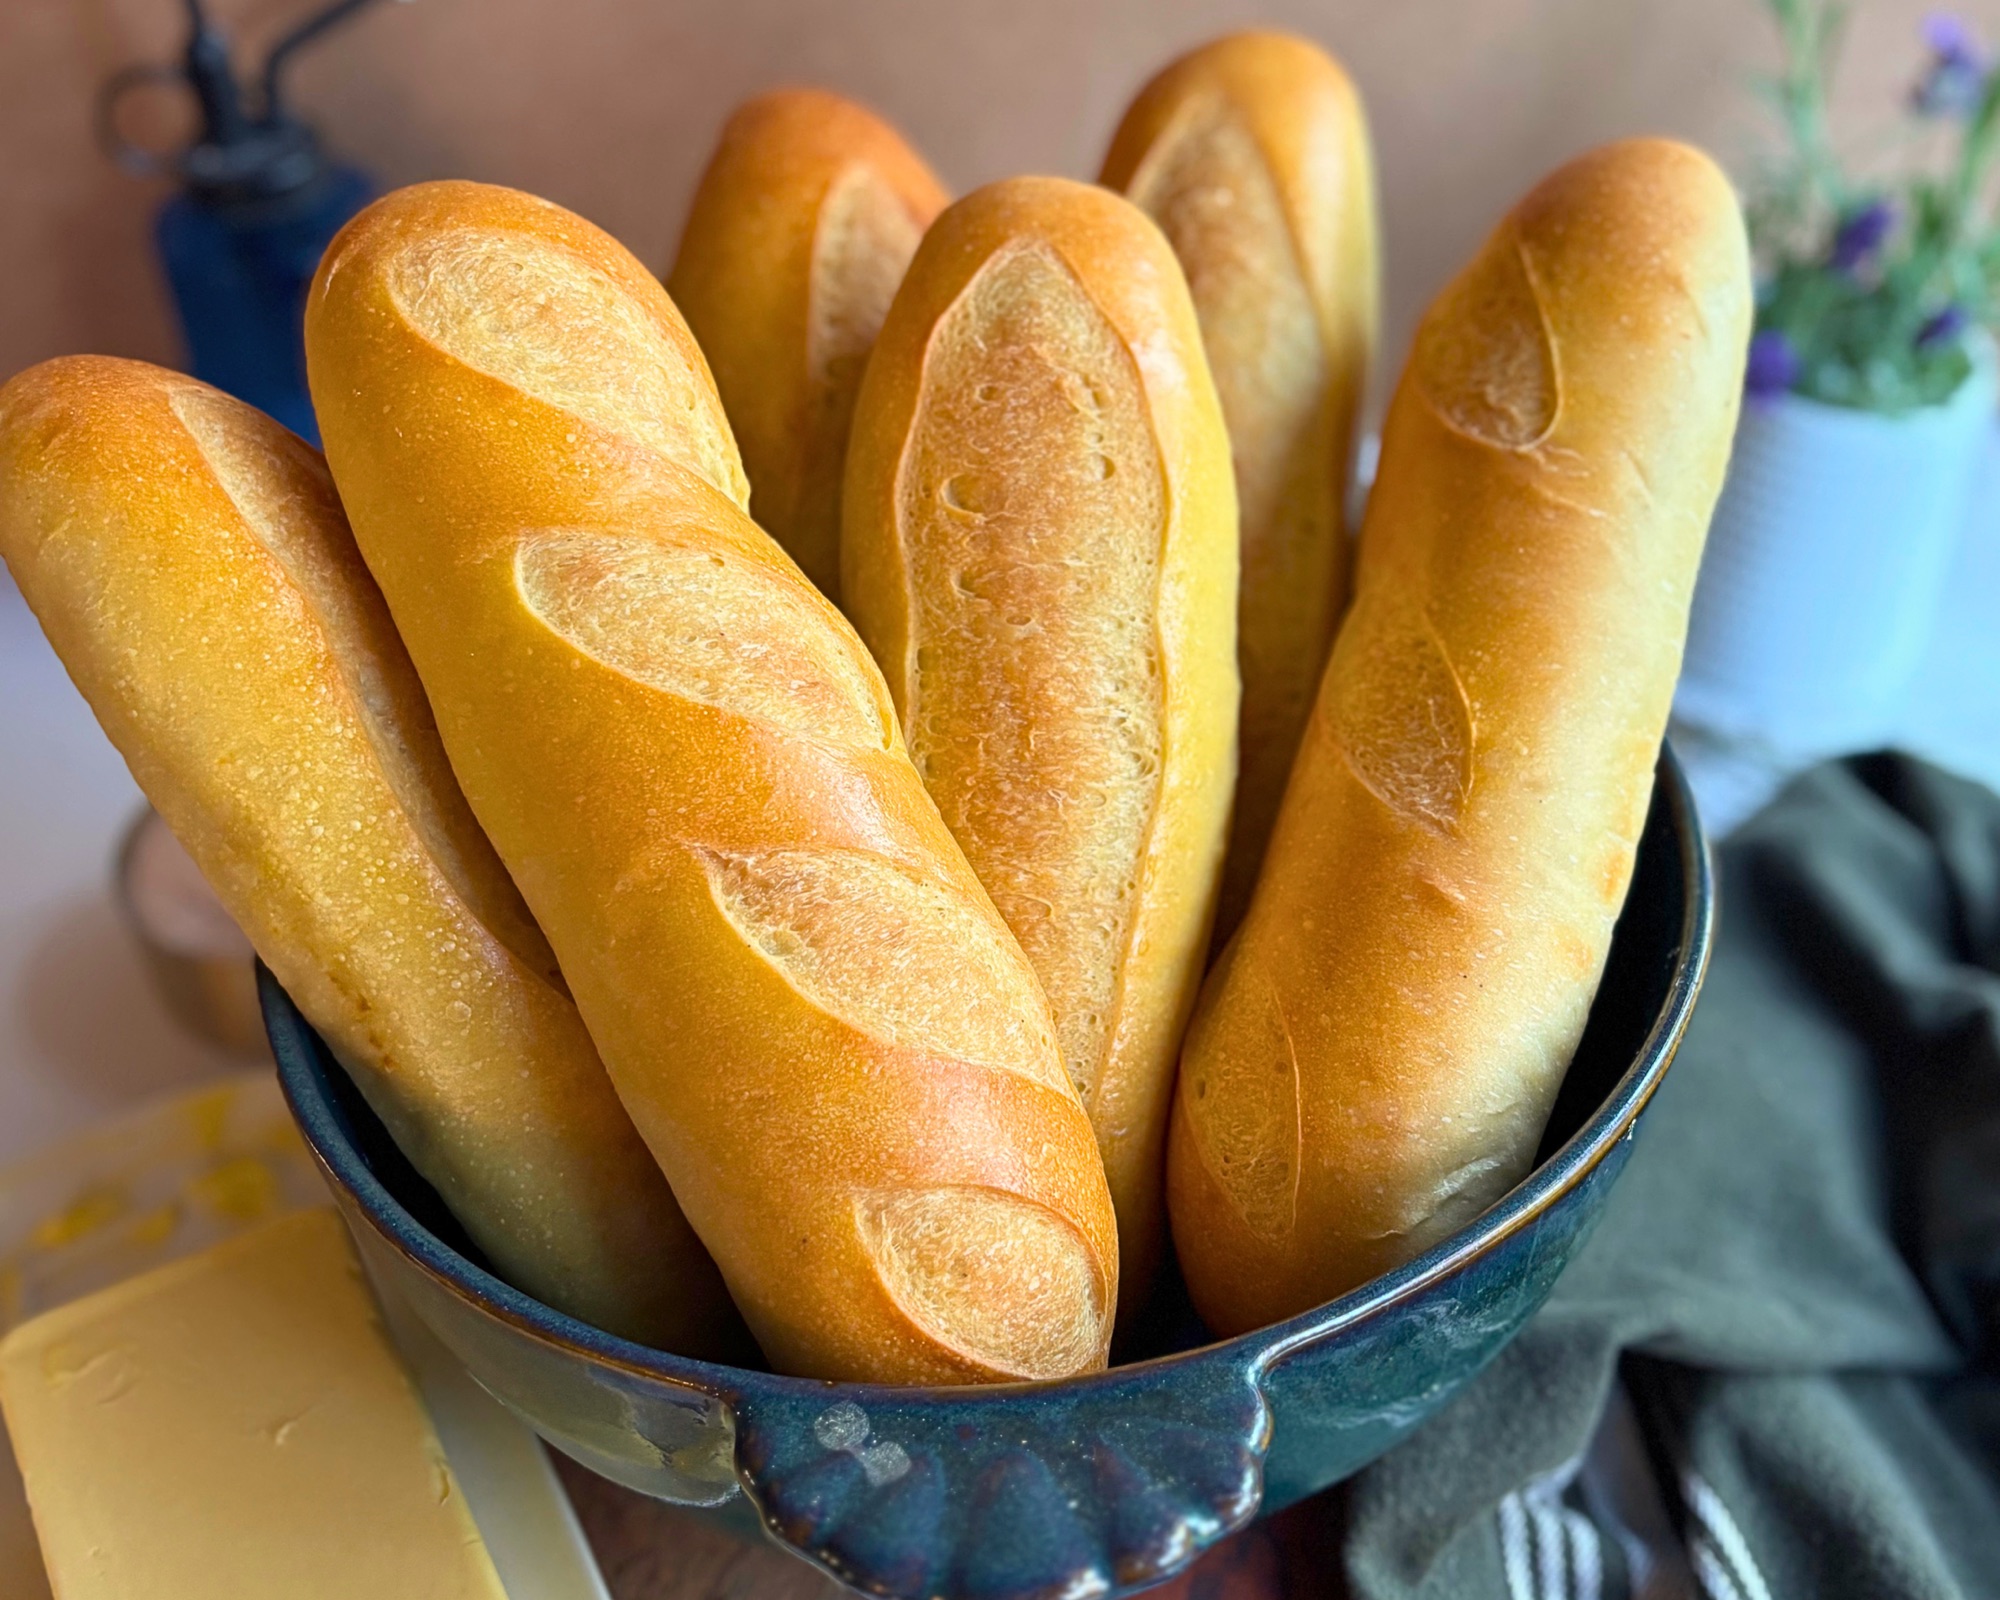
These rolls are my answer to that. They are made with nonfat Greek yogurt and active dry yeast, they come together and bake in the same afternoon, and each one carries about 22 grams of protein without a single scoop of protein powder anywhere in the formula. The yogurt is doing the heavy lifting, and it is also what gives the crumb that soft, pillowy, slightly plush texture that makes a good bakery roll feel different from a supermarket one.
The other thing I wanted was structure. A hoagie roll has a job to do, and the job is holding a loaded sandwich together long enough for you to eat it. I pulled the butter back from what I use in my burger buns so the crumb has more chew and does not compress into a flat layer under a wet filling, and I pulled the sugar back so the roll reads savory instead of sweet. What comes out of the oven is soft enough to bite through cleanly and sturdy enough to stay in one piece all the way to the last bite.

Table of Contents
- Why You Will Love These Rolls
- What Makes These High Protein
- Ingredients You Will Need
- Blooming the Yeast and the Bulk Rise
- Hoagie, Sub, Hero, or Grinder
- Soft Roll or Crusty Roll
- How to Shape a Hoagie Roll
- My Hoagie Pan Hack
- How Big Should You Make Them
- How to Score Hoagie Rolls
- Substitutions
- Tips for the Best Hoagie Rolls
- How to Store and Freeze
- What to Put on Them
- Want a Sourdough Version
- Shop This Recipe
- More High Protein Recipes
- Frequently Asked Questions
- Recipe
- Subscribe
Why You Will Love These Rolls
They are a same day bake, which means you can decide at ten in the morning that you want sausage and peppers for dinner and have warm rolls cooling on the rack by mid afternoon. There is no starter to feed, no overnight ferment to plan around, and nothing that has to be started the day before.
Each roll carries about 22 grams of protein, which is more than double what most store bought hoagie rolls give you, and it comes entirely from nonfat Greek yogurt and eggs rather than from anything added or engineered.
The crumb is soft and pillowy but it has real chew to it, so the roll holds up under a wet, loaded filling instead of compressing into a soggy layer. That was the whole point of the recipe.
The dough is genuinely pleasant to work with. It is smooth and elastic after the knead, it shapes cleanly, and it is forgiving if your timing slips by twenty minutes.
You control the size completely. A batch makes six large rolls, but the same dough divides into smaller sizes for kids or for shorter sandwiches, and I have the numbers for that further down.

What Makes These High Protein
The hero ingredient is nonfat Greek yogurt. It goes in as the main liquid in the dough, taking the place of the milk or water that most enriched roll recipes use, and because nonfat Greek yogurt is strained it brings a substantial amount of protein along with that liquid. Two eggs add more, and the whole thing bakes up as a true yeasted bread rather than something dense and gummy the way protein powder doughs tend to go.
That matters more than it sounds like it should. Protein powder absorbs water differently than flour does, it does not build gluten, and it almost always leaves a chalky aftertaste in bread. There is none of that here, because there is none of it in the recipe. What you are eating is bread, and the protein is simply built into the ingredients that were already going into the dough.
A typical store bought hoagie roll runs somewhere around eight to ten grams of protein. These come in at about 22 grams when the batch is divided into six, which means the bread itself is contributing as much protein as a serving of meat would.

Ingredients You Will Need
Active dry yeast. This is what makes the recipe a same day bake. It gets bloomed in warm water with a pinch of sugar before anything else happens, which both wakes it up and proves that it is still alive.
Warm water. Only enough to bloom the yeast, held between 105 and 110 degrees F. Warm enough to activate, never hot enough to damage.
Bread flour. The higher protein content builds the gluten structure that lets these rolls hold a heavy sandwich. All purpose flour will bake, but the rolls come out softer and less sturdy.
Granulated sugar. A small amount feeds the yeast in the bloom and a little more goes into the dough. I deliberately kept this low so the roll reads savory, the way a sandwich roll should.
Nonfat Greek yogurt. The protein source and the main liquid in the dough. Warm it gently before it goes into the mixer so it does not shock the yeast.
Unsalted butter. Just enough to keep the crumb tender without making it so soft that it compresses under a filling. This is meaningfully less butter than I use in my burger buns, and that is on purpose.
Fine sea salt. For flavor and for controlling the fermentation. A savory roll needs it.
Eggs. Two in the dough for structure, richness, and a little more protein.
Egg yolk and heavy cream. The wash. Yolk and cream together give a deeper, glossier color than a whole egg beaten with water, and that color is most of what makes a homemade roll look like it came from a bakery.

Blooming the Yeast and the Bulk Rise
Blooming is the step people skip, and it is the step that saves you an entire wasted batch. You stir the yeast and a small amount of sugar into warm water and walk away for five to ten minutes. When you come back there should be real foam on the surface, domed up and clearly active. If the water looks exactly the way you left it, the yeast is dead, and no amount of rising time is going to fix that. Open a fresh package and start over before you commit four hundred and twenty four grams of Greek yogurt to the project.
Temperature is the thing to get right. Between 105 and 110 degrees F is the window where yeast wakes up happily. Much cooler and the bloom is sluggish and unconvincing, and somewhere north of 120 degrees F you are killing the yeast rather than activating it. The same logic applies to the yogurt, which gets warmed for about forty seconds until it is just warm to the touch. Warm yogurt keeps the dough temperature up and helps the rise along, but hot yogurt going into the mixer will undo the bloom you just watched happen.
The bulk rise takes one to one and a half hours and you are looking for the dough to double. This is different from the final proof, where you deliberately stop short, and it is worth knowing why. During bulk you want the yeast to build a full head of steam and develop flavor in a relaxed, unshaped mass. Once the rolls are shaped, the goal changes to preserving some of that rising power for the oven, which is where your oven spring and your open score come from.

Hoagie, Sub, Hero, or Grinder
They are all more or less the same sandwich, and which word you use mostly tells people where you grew up. Here in Pennsylvania it is a hoagie, and that word covers everything from an Italian cold cut sandwich to a cheesesteak to sausage and peppers. Head to New York and you are ordering a hero. In New England, particularly around Connecticut, it is a grinder, and the name is usually traced to the chew of the crustier roll it was traditionally served on. Sub is the broad national term, short for submarine, and it is what you will see on most menus outside of the regional strongholds.
The roll differs a little from region to region as well. A classic Philadelphia hoagie roll is soft and a bit yielding, built to squish slightly when you bite it. A grinder roll tends to be crustier and chewier. What I have written here sits on the softer side of that range, because that is how I grew up eating them, but the next section covers how to push these toward a crustier result if that is what you want.

Soft Roll or Crusty Roll
This recipe is built for a soft roll with real structure, which is a specific target and not the same thing as a soft roll that collapses. The egg wash is a large part of that. It gives you a thin, glossy, deeply colored skin rather than the thick, brittle crust you would get from a lean dough baked with steam.
If you want to push these crustier, skip the egg wash entirely and bake the rolls plain. The exterior will come out drier and firmer and the color will be paler and more matte. You can also add steam to the oven for the first ten minutes by setting a metal pan on the lower rack while the oven preheats and pouring a cup of hot water into it as the rolls go in, which delays the crust setting and gives a crisper finish.
What I would not do is brush the baked rolls with butter. It is a common finishing step on dinner rolls and it works beautifully there, but on a hoagie roll it softens the crust you just built and dulls the shine from the wash, and the entire reason this roll exists is that it stays sturdy under a filling.

How to Shape a Hoagie Roll
Shaping is what separates a roll that looks like a roll from one that looks like a loaf somebody stretched out, and it is worth slowing down for.

Start by weighing the entire batch of dough and dividing that number by six, then weighing out each piece to match. Even pieces proof evenly and bake evenly, and guessing at the division is the fastest way to end up with one roll that is underbaked and another that is dry.

Preshape each piece into a short log about six inches long rather than rolling it into a ball. A round preshape means you have to fight the dough back into a long shape later, while a log preshape already points the gluten in the direction you want it to go. Set the logs seam side down, cover them, and let them rest for fifteen to twenty minutes so the gluten relaxes enough to roll out without fighting you.

Take one rested log at a time and roll it out with a rolling pin into a rectangle about eight inches wide and about five inches deep, a third of an inch thick, squaring up the corners as you go. The width of that rectangle becomes the length of your finished roll, which is a useful thing to know when you want a different size.
Roll the rectangle up starting from the long edge farthest from you, going one turn at a time and pressing the seam closed at every single turn. This is the step that matters most. Sealing as you go is what prevents a long hollow air pocket from forming down the middle of the roll, which is the flaw that makes a homemade sub roll tear apart when you slice it.
Pinch the final seam shut and pinch both ends closed, then give the roll one or two passes under flat palms to even it out. Ease off the pressure through the last inch and a half at each end so the ends stay blunt rather than tapering to points. Pointed ends are what make a roll read as a baguette, and blunt ends are what make it read as a hoagie. The finished roll should land at about eight inches.
Shaping is the part that decides whether these read as hoagies or as baguettes, so here is the whole sequence in real time, from the rested log through the rectangle, the roll up with the seam sealed at every turn, and the blunt ends that keep the roll sitting tall.
My Hoagie Pan Hack
Commercial sub roll pans exist, and I do not use one. They are sized for twelve inch rolls, they take up a shelf, and they lock you into exactly one size forever. What I do instead costs nothing and adjusts in about a minute.

My preferred version uses ordinary aluminum foil. Roll sheets of foil into firm ropes about as long as the sheet pan is wide and about an inch to an inch and a half thick, then lay them across the pan about three inches apart. Lay one sheet of parchment flat over the top without pressing it down into the gaps, and set each shaped roll seam side down into a gap, where the weight of the dough settles the parchment into the valley on its own. The ropes act as walls, so as the rolls proof and then hit the oven they climb upward instead of spreading outward, and you get a tall roll with a defined shape instead of a flat oval.
If you happen to own metal cannoli tubes, they work in place of the foil ropes and you use them exactly the same way, laid across the pan with the parchment over the top. One thing I would do is wrap a layer of foil around the tubes first, which keeps them from rolling apart on you while you are settling the rolls into place. Either version gives you the walls you need, so use whichever you already have in the kitchen.
Either way the dough never touches the foil or the metal, because the parchment sits between them, and you can respace the walls for any size roll you feel like making that day.

How Big Should You Make Them
Dividing this batch into six gives you rolls of about 220 grams each that finish at about eight inches long, and those are big rolls. That is the size I developed the recipe around, because a hoagie should hold a real sandwich, and it is the size I recommend if you are building something substantial like sausage and peppers or a cheesesteak.
The two things to keep straight are that weight controls how much bread you get and length controls how thick the roll sits. A 220 gram piece rolled out to twelve inches gives you a long skinny roll that reads as a baguette, while the same piece kept at eight inches gives you a proper hoagie with height to it. If you want a longer roll, use more dough rather than stretching what you have.
Smaller Sizes
The same batch of dough divides comfortably into smaller rolls, and the protein and the bake time scale with the size. These numbers are calculated off the full batch weight of about 1,322 grams.
- Seven rolls at about 189 grams each, about 19.7 grams of protein per roll, baking about 22 to 24 minutes
- Eight rolls at about 165 grams each, about 17.2 grams of protein per roll, baking about 20 to 23 minutes
- Ten rolls at about 132 grams each, about 13.8 grams of protein per roll, baking about 18 to 20 minutes
For the smaller divisions, scale the shaping rectangle down along with the dough so the proportions stay right. A rough guide is to roll the rectangle out to about the length you want the finished roll to be, keeping the thickness at a third of an inch. Whatever size you choose, pull the rolls when the internal temperature reads 190 to 195 degrees F, because that is the number that tells you they are done regardless of how long the clock says.

How to Score Hoagie Rolls
Scoring an egg washed roll is a different job than scoring a lean sourdough loaf, and the order of operations is the part that trips people up.
The wash goes on first, always. Apply the yolk and cream mixture with a folded paper towel rather than a brush, which lays down a thin even coat without dragging on the soft proofed surface, and then let it sit for about two minutes at room temperature so it tacks up slightly. If you score first and wash afterward, the egg runs down into the cut and pools there, and it glues the score shut so it never opens in the oven.
Hold the razor close to vertical rather than at a low angle, and cut about three eighths of an inch deep. A low angle blade skates across a soft egg washed surface and wanders off course instead of biting in, which leaves you going back over the same line a second time and ending up with visible doubled cuts. Straight down and confident is what works here.
For the pattern, my preference is three or four short diagonal cuts, each about two inches long, set about 45 degrees off the long axis of the roll and stopping about an inch from each end. It looks like a bakery roll and it gives the roll several places to expand rather than one. A single lengthwise slash down the center also works and gives a more dramatic split, and some people prefer leaving the rolls unscored entirely for a smooth domed top. All three are fine, and the diagonals are simply what I like best.

Tips for the Best Hoagie Rolls
- Weigh everything. Weigh the ingredients and weigh the divided dough. Bread rewards precision more than almost anything else that comes out of a kitchen.
- Let the bloom prove itself. Five to ten minutes and real foam, or open fresh yeast and start again.
- Warm the yogurt, do not heat it. Just warm to the touch. Hot yogurt kills the yeast you just woke up.
- Give the knead the full six to eight minutes before you decide the dough needs more flour. This dough firms up considerably over the course of the knead, and adding flour early gives you dry rolls.
- Seal the seam at every turn while you roll the rectangle up, not just at the end.
- Keep the ends blunt. Ease off the pressure through the last inch and a half when you even the rolls out.
- Stop the final proof at 50 to 75 percent larger rather than a full double, which is different from the bulk rise. Save some rise for the oven.
- Do not chill the shaped rolls before baking. I tested it both ways and the chilled batch rose noticeably smaller and expanded unevenly. Go straight from the final proof to the wash and the score.
- Bake them uncovered the whole way through. There is no need to tent or cover these at any point.
- Trust the thermometer over the clock. 190 to 195 degrees F internal.
- Cool completely before slicing. Cutting into a warm roll compresses the crumb and gives you a gummy interior.
Substitutions
Cottage cheese instead of Greek yogurt. Replace the 310 grams of Greek yogurt with 275 grams of thick cottage cheese pureed completely smooth with 35 grams of whole milk, warm the mixture before adding, and let the dough rest a few extra minutes after the initial mix so the flour has time to absorb the moisture.
Full fat Greek yogurt. This works but the protein per roll will drop and the dough may run slightly wetter, so add flour in 10 gram increments if needed.
All purpose flour. This works as a swap by weight but the rolls will be more delicate and the protein per roll will drop. Start with 500 grams and add more only if the dough will not come together.
Salted butter. Reduce the salt in the dough by 2 grams to compensate.
Sesame seed rolls. Sprinkle sesame seeds over the wash before scoring for a classic deli look.
A softer crust. Brush the rolls with melted butter straight out of the oven. It softens the crust and dulls the shine from the egg wash, so it is worth doing only if you want a softer roll rather than one that stands up to a wet filling.
How to Store and Freeze
Let the rolls cool all the way down before they go into anything, because trapping residual warmth creates condensation and condensation softens the crust you worked to build. Once they are fully cool, store them in a bread bag or an airtight container at room temperature for up to three days. Skip the refrigerator, which stales bread faster than the counter does.
For longer storage, wrap each cooled roll tightly and freeze it for up to three months. Thaw at room temperature and then warm the roll in a 325 degree F oven for about five minutes, which brings the crust back and makes it taste close to freshly baked. If you already know you are freezing them, it is worth slicing them most of the way through before they go into the freezer so you can pull one out and fill it without waiting for the center to thaw enough to cut.
What to Put on Them
Sausage and peppers is what I built these around and what I photographed them with. Italian sausage browned in a skillet with sliced peppers and onions cooked down soft and sweet, piled into the roll with the juices soaking into the crumb, is exactly the test a hoagie roll needs to pass. This dough passes it, which is the whole reason the butter came down and the crumb has more chew than my burger buns do.
Beyond that, a cheesesteak is the obvious one here in Pennsylvania, and these rolls hold up to the chopped steak and melted cheese without tearing. An Italian cold cut hoagie with provolone, oil and vinegar, and shredded lettuce works beautifully and is where the soft crumb really shines. Meatball subs, chicken parmesan, a pulled pork sandwich, or a shrimp roll all work. For something lighter, split a roll and use it for an egg and cheese breakfast sandwich, which is a very good use of the extra protein.

Want a Sourdough Version
I developed the sourdough version of these first, and it is the one to make if you keep a starter and you want the flavor that a long fermentation brings. It uses active peaked starter in place of the yeast bloom and runs on a longer timeline, and it lands at about 20.8 grams of protein per roll. The shaping, the pan hack, the wash, and the scoring are identical between the two recipes, so anything you learn making one transfers directly to the other.
If you do not have a starter yet and you want one, I have a complete guide to getting one going with minimal waste here: How to Create a Sourdough Starter
Shop This Recipe
- Stand mixer with dough hook. This dough gets a full six to eight minute knead on medium and it is much easier to let the mixer do it.
- Kitchen scale. Used twice in this recipe, once for the ingredients and once for dividing the dough into even pieces.
- Metal cannoli tubes. My preferred walls for the hoagie pan hack, because they stay rigid under the weight of the dough.
- Half sheet pan. My favorite pan!
- Rolling pin. For rolling each rested log out into the rectangle before you roll it up.
- Bench scraper. For dividing the dough cleanly and for moving shaped rolls onto the pan without deflating them.
- Razor blade or lame. Held close to vertical, this is what gives you a clean score that actually opens.
- Instant read thermometer. The only reliable way to know these are done at 190 to 195 degrees F.
Affiliate disclosure: this post contains affiliate links, which means I may earn a small commission at no additional cost to you if you purchase through them. I only recommend products I use in my own kitchen.
More High Protein Recipes
If you liked these rolls, here is more of my yeasted high protein baking to work through:
- High Protein Hamburger Buns with Greek Yogurt
- High Protein Sandwich Bread with Greek Yogurt
- High Protein Bagels
- High Protein Caramel Apple Cinnamon Rolls
- High Protein Pizza Sticks in a Hot Dog Bun Pan
Frequently Asked Questions
My yeast did not foam. What went wrong?
Either the yeast was no longer alive or the water was the wrong temperature. Yeast has a shelf life and an opened package stored in a warm cupboard can quietly die months before the printed date. Water that is too cool gives you a slow, unconvincing bloom, and water above about 120 degrees F kills the yeast outright. Check the temperature with a thermometer, aim for 105 to 110 degrees F, and if a fresh package still does nothing, the problem was the yeast.
Can I use instant yeast instead of active dry?
Yes. Use 11 grams of instant yeast, which is 3 1/2 teaspoons, skip the bloom entirely, whisk the instant yeast in with the dry ingredients, and add the 60 grams of water to the mixer along with the yogurt. The tradeoff is that you lose the bloom as a test, so you find out whether your yeast is alive an hour into the bulk rise instead of five minutes into the recipe.
Can I make these the night before?
You can shape the rolls, pan them, cover them well, and refrigerate them overnight for up to twelve hours. The next day, pull the pan out and let the rolls finish proofing at room temperature until they are 50 to 75 percent larger, which usually takes one to two hours, then wash, score, and bake as written. What I would not do is chill shaped rolls that have already finished proofing, because the cold costs you oven spring and the rolls come out smaller with uneven expansion.
Why did my rolls come out looking like baguettes?
The pieces were too light for the length you rolled them to. This is the most common shaping issue with sub rolls and the fix is straightforward. Weight controls how much bread you get and length controls how thick the roll sits, so a lighter piece stretched long gives you something thin and baguette shaped. Keep the pieces at about 220 grams, keep the finished length at about eight inches, and keep the ends blunt rather than tapered.
Why is my score not opening in the oven?
There are three usual causes. The egg wash went on after the score and sealed the cut shut, so wash first and score second. The blade was held at too low an angle and skated across the surface rather than cutting into it, so hold the razor close to vertical. Or the oven was too hot and the crust set before the rolls finished expanding, so hold a steady 375 degrees F.
Can I make these without a stand mixer?
You can, though you should plan on ten to twelve minutes of hand kneading rather than six to eight, and the butter step takes patience because it wants to slide around before it incorporates. Work it in a little at a time and keep going until the dough turns smooth and elastic again.
Do these taste like Greek yogurt?
No. The yogurt reads as richness and softness in the finished roll rather than as a flavor of its own, and with the sugar kept low the roll comes out savory and straightforwardly bready.
Recipe

High Protein Hoagie Rolls
Equipment
- – Stand mixer with dough hook
- kitchen scale
- bench scraper
- Rolling Pin
- Half sheet pan
- Parchment paper
- Aluminum foil or metal cannoli tubes
- Razor blade or lame
- Instant read thermometer
- Cooling rack
Ingredients
Yeast Bloom
- 14 grams active dry yeast 4 1/2 teaspoons
- 60 grams warm water 105 to 110 degrees F (1/4 cup)
- 2 grams granulated sugar 1/2 teaspoon
Dough
- 650 grams bread flour 5 1/4 cups
- 18 grams granulated sugar 1 1/2 tablespoons
- 10 grams fine sea salt 1 2/3 teaspoons
- 424 grams nonfat Greek yogurt warmed (1 3/4 cups)
- 2 large eggs room temperature
- 40 grams unsalted butter softened (2 3/4 tablespoons)
Egg Wash
- 1 large egg yolk
- 10 grams heavy cream or whole milk 2 teaspoons
Instructions
- Stir the active dry yeast and the 2 grams of granulated sugar into the warm water and let it sit for 5 to 10 minutes until the surface is foamy and domed. If nothing happens in that time the yeast is no longer alive and the batch will not rise, so open fresh yeast and start the bloom again.
- Whisk the bread flour, fine sea salt, and 18 grams of granulated sugar together in a bowl and set it aside.
- Warm the Greek yogurt for about 40 seconds until it is just warm to the touch. It should never feel hot, because hot yogurt will kill the yeast you just woke up.
- Add the warmed yogurt, the eggs, and the bloomed yeast to the bowl of a stand mixer fitted with the dough hook and mix briefly on low to combine.
- Add the whisked dry ingredients and mix on low for about 2 minutes, until the dough comes together in a shaggy mass with no dry flour left in the bottom of the bowl.
- With the mixer running on low, add the softened butter one tablespoon at a time, letting each piece disappear into the dough before the next one goes in.
- Knead on medium for 6 to 8 minutes, until the dough is smooth and elastic and pulling away from the sides of the bowl. It should feel slightly tacky but not sticky. If it is still slack after the full knead, add flour only 10 grams at a time and only then, because this dough needs the whole knead before it firms up.
- Transfer the dough to a lightly oiled bowl, cover it, and let it rise for 1 to 1.5 hours, until it has doubled in size.
- Weigh the whole batch of dough and divide it into 6 equal pieces at about 220 grams each. Preshape each piece into a short log about 6 inches long, place the logs seam side down on the counter, cover them, and let them rest for 15 to 20 minutes. *See the blog post for additional sizing*

- Working with one rested log at a time, roll it out with a rolling pin into a rectangle about 8 inches wide and about 5 inches deep and a third of an inch thick, squaring the corners as you go.

- Starting at the long edge farthest from you, roll the rectangle up one turn at a time, pressing the seam closed at every single turn so no air gets trapped inside. Pinch the final seam shut and pinch both ends closed.
- Give the roll one or two passes under flat palms to even it out, easing off the pressure through the last inch and a half at each end so the ends stay blunt instead of tapering to points. The finished roll should be about 8 inches long.
- Lay firmly rolled ropes of aluminum foil, or metal cannoli tubes wrapped in foil, across a half sheet pan about 3 inches apart, then lay one sheet of parchment flat over the top without pressing it down into the gaps. Set each shaped roll seam side down into a gap, where its own weight will settle the parchment into the valley and the tubes will act as walls that push the rolls up instead of out.

- Cover the rolls and let them proof for 45 minutes to 1 hour and 15 minutes, until they are 50 to 75 percent larger rather than fully doubled. Poke the side of a roll to test it, and look for a dent that springs back slowly and only partway.
- Preheat the oven to 375 degrees F during the last 20 minutes of the proof, and uncover the rolls when you turn the oven on so any condensation dries off the tops. Do not chill these rolls before baking, because the cold slows the oven spring and the rolls come out smaller and expand unevenly.
- Whisk the egg yolk and the heavy cream together, then apply the wash to the tops and sides of the rolls with a folded paper towel, which lays down a thin even coat without dragging on the soft surface. Let the wash sit for about 2 minutes at room temperature so it tacks up.
- Score each roll with a razor held close to vertical rather than angled, cutting about three eighths of an inch deep. Make three or four short diagonal cuts about 2 inches long, set about 45 degrees off the long axis of the roll, and stop about an inch from each end.
- Bake uncovered at a steady 375 degrees F for 24 to 27 minutes, rotating the pan halfway through, until the rolls are deeply golden and the internal temperature reads 190 to 195 degrees F.
- Move the rolls to a cooling rack and let them cool completely before slicing. Do not brush them with butter after baking, because it softens the crust and dulls the shine you just built with the egg wash.
Notes
Subscribe
If you want more recipes like this one, subscribe to the H3art of the Home newsletter. It is completely free, and you will get new recipes, baking tips, and behind the scenes notes from my kitchen delivered straight to your inbox.





Leave a Reply